Testing Ovenware - Ceramic Arts Daily
Testing Ovenware - Ceramic Arts Daily
Testing Ovenware - Ceramic Arts Daily

You also want an ePaper? Increase the reach of your titles
YUMPU automatically turns print PDFs into web optimized ePapers that Google loves.
Right before Christmas a few years ago, several customers<br />
returned baking dishes to my studio due<br />
to unexplainable and unexpected cracking (after<br />
2 to 3 years of use). The customers assured me that all<br />
appropriate care had been afforded these pieces, and I<br />
had no reason to believe that they had not followed all<br />
the normal safeguards and recommendations for using<br />
handmade ovenware pieces. Additionally, some mugs<br />
were returned to me that had multiple cracks going about<br />
one or two inches from the rim down the side. These<br />
cracks reportedly appeared through normal or less than<br />
normal use.<br />
I had a problem. What to do? The failures were so<br />
few, considering the number of pots I sell each year, that<br />
I could have just replaced the pieces and chalked it up to<br />
the cost of doing business. And it could have been just<br />
a coincidence that these pieces had all come back to me<br />
within a few weeks time—perhaps I should just ignore<br />
all this. On the other hand, it may have been that I was<br />
on the front end of an avalanche of all the ovenware<br />
pieces I had made within the last three years. That was<br />
an awful prospect!<br />
Regardless of not knowing whether there would be<br />
more failures in my ovenware, I thought it important to<br />
try to improve the clay body if possible. And I hoped to<br />
do so without changing the recipe to such an extent that<br />
it would alter the colors of all my glazes.<br />
So I set out to attempt to create several new ovenware<br />
bodies. My knowledge and abilities in ceramic<br />
engineering are limited, and my attempts at altering and<br />
improving my own ovenware recipe were more intuitive<br />
than academic, relying more on anecdotal information<br />
and “common knowledge” than on my acquaintance<br />
with good science or accepted research.<br />
Designing a Test<br />
I created and gathered six new ovenware clay bodies,<br />
then developed a series of tests to see if any of the new<br />
formulations were actually an improvement over what<br />
I was already using. I needed a methodology to make<br />
thermal shock tests which were thorough, inclusive,<br />
severe and comparative; and these testing procedures<br />
needed to be accessible, repeatable and, to some extent,<br />
reliable.<br />
I found no published recommendations for uniform<br />
thermal shock testing or integrity testing of ovenware<br />
bodies—at least none geared to the low-tech produc-<br />
Pottery Making ILLUSTRATED<br />
P r o d u c t i o n :<br />
<strong>Testing</strong> <strong>Ovenware</strong><br />
by Dick Lehman<br />
Regardless of how we finally come to our ovenware<br />
recipes—or what those recipes are—we need a methodology<br />
by which to make thermal shock tests that are<br />
thorough, inclusive, severe and comparative.<br />
tion potter. This test was not informed by any of the<br />
existing normative standards that exist within industrial<br />
ceramics related to “mean of first failure”—the average<br />
number of times a piece must be shock tested before it<br />
will fail. What follows are the methods and approaches<br />
I developed after talking with numerous other potters,<br />
and reflecting on the kinds of pot-failures we had all<br />
encountered.<br />
I decided to test both mugs and baking dishes. The<br />
mugs were of a variety of shapes, and utilized all six<br />
of the different clay bodies I was testing. The baking<br />
utensils were of two kinds—flat-bottomed dishes (two<br />
sizes) and bowl-shaped bakers. The tests were made<br />
in conventional ovens, and no microwave tests were<br />
attempted (that is a separate testing procedure). Furthermore,<br />
this test provided no information about the<br />
effects of “glaze fit” on a particular clay body, or the<br />
implications of glaze fit upon thermal shock failure.<br />
Measuring Results<br />
Following each step of the shock test, the pots were<br />
individually tested for integrity. The integrity check,<br />
though somewhat colloquial, tested both the sound of the<br />
piece (the noise it makes when it was struck with a metal<br />
rod) and the look of the piece (could I see any cracks?).<br />
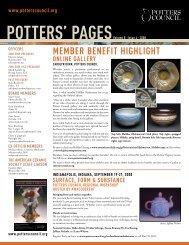
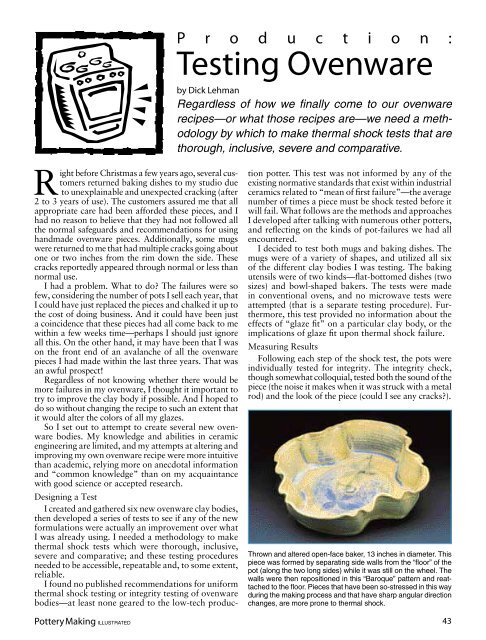
Thrown and altered open-face baker, 13 inches in diameter. This<br />
piece was formed by separating side walls from the “floor” of the<br />
pot (along the two long sides) while it was still on the wheel. The<br />
walls were then repositioned in this “Baroque” pattern and reattached<br />
to the floor. Pieces that have been so-stressed in this way<br />
during the making process and that have sharp angular direction<br />
changes, are more prone to thermal shock.<br />
43
44<br />
Most all of us recognize the difference<br />
between the beautiful “ring”<br />
that a pot of integrity makes when<br />
struck, and the dull “thud/thunk”<br />
that occurs when pots have been<br />
cracked, overly stressed or damaged.<br />
To perform the sound test, I<br />
placed each pot on a metal stand,<br />
then struck it on the rim with a<br />
metal rod. This striking was done<br />
“gently” so as not to break the piece<br />
with the rod. Each piece was struck<br />
with as similar a stroke as possible,<br />
and struck at the same position on<br />
the pot. While each piece did not<br />
sound the same (due in part to small<br />
unavoidable variations in shape<br />
and thickness and also differences<br />
in recipe formulation), I did note<br />
the sound, or “ring,” of each. I<br />
compared these sounds to “control”<br />
pieces—pots of similar shapes made<br />
with the same recipe—which had<br />
not yet been shock tested.<br />
The visual test involved putting<br />
water (heavily stained with food<br />
coloring) into each piece for at<br />
least 10 minutes. I looked for small<br />
cracks, which might not be visible<br />
to the naked eye, and which might<br />
not have revealed themselves in the<br />
sound test. I assumed that any crack<br />
would collect, through capillary action,<br />
some of the food coloring, and<br />
maintain some color in the crack<br />
when the tinted water was poured<br />
out. To eliminate as many variables<br />
as possible, all pots used for this test<br />
were glazed white and I used blue<br />
food coloring to heighten the contrast.<br />
While the food color revealed<br />
that most cracks went all the way<br />
through the bodies, there were rare<br />
cases where really small or beginning<br />
cracks were visible only on the inside.<br />
<strong>Testing</strong> Mugs<br />
The mugs went through two tests,<br />
which were designed to provide progressively<br />
more thermal shock.<br />
Test 1: The first test was simply to<br />
fill each room-temperature mug half<br />
full of boiling water. By filling the<br />
mug only half full, I reasoned that<br />
there would be more dissonance<br />
within the piece itself. Not only did<br />
the piece suddenly go from ambient<br />
temperature to boiling temperature,<br />
but only part of the piece would<br />
make this transition, thereby causing<br />
the piece, within itself, to have<br />
both ambient and hot surfaces,<br />
which would increase the interior<br />
thermal stress.<br />
Test 2: The second test was to freeze<br />
the mugs at –10°F for 45 minutes.<br />
Upon taking the mugs out of the<br />
freezer, they were immediately filled<br />
halfway with boiling water. While<br />
the mugs I tested passed each of these<br />
tests, the tests could be continued for<br />
perhaps hundreds of cycles to determine<br />
where the clay bodies would<br />
eventually fail. This would establish<br />
my own “mean of first failure.”<br />
<strong>Testing</strong> Baking Dishes<br />
For each of the six recipes, I<br />
tested multiple pieces consisting<br />
of two basic shapes—two sizes of<br />
flat-bottomed baking dishes with<br />
right-angled corners where the bottoms<br />
of the pots met the side walls;<br />
and baking dishes with rounded<br />
bowl-like contours. I devised five<br />
tests, which would expose pieces to<br />
progressively more dramatic shock<br />
in each subsequent step. I determined<br />
that I would continue testing until at<br />
least some (if not all) the ovenware<br />
bodies failed.<br />
Test 1: Baking dishes at room<br />
temperature were placed into a<br />
preheated 500°F oven, and allowed<br />
to remain there for 10 minutes. The<br />
pieces were then pulled out, allowed<br />
to cool naturally, then tested<br />
for integrity. (I included this fairly<br />
benign test since I have always cautioned<br />
my customers never to place<br />
the baking dishes into a preheated<br />
oven.) This test was repeated three<br />
times for each piece, for each of the<br />
six clay bodies. No failures were<br />
observed in any of the clay bodies,<br />
or any of the shapes.<br />
Test 2: Reasoning that sometimes<br />
my customers may put food-filled<br />
baking dishes into hot ovens, I tested<br />
each piece several times by placing<br />
an ambient temperature piece,<br />
half-filled (and not fully filled as I<br />
recommend to my customers) with<br />
water, into 500°F oven. Having the<br />
pieces half-filled created the potential<br />
for exacerbating the shock within<br />
each individual piece. Repeated tests<br />
yielded no failures for any of the six<br />
clay bodies.<br />
Test 3: I next froze empty baking<br />
dishes in the freezer for 45 minutes,<br />
then placed them directly into a<br />
preheated 500°F oven where I left<br />
Spring 1999
7600 Queen Street<br />
Wyndmoor, PA 19038<br />
215-233-0655<br />
Fax 215-836-1740<br />
email delval@gateway.net Thrown and altered open-face baker, 12 inches<br />
in diameter. The rims have been pinched and<br />
thinned on the “ends” to form handles. The<br />
resulting variation in thickness of the side wall<br />
or rim tests the integrity of an ovenware body.<br />
Heaviest Duty Wheel Made<br />
1-800-748-8809<br />
MOVING SOON?<br />
Print or type the old address<br />
and your new address<br />
and send it to:<br />
Customer Service<br />
Department<br />
Pottery Making Illustrated<br />
PO Box 6136<br />
Westerville, OH 43086-6136<br />
or e-mail your address change<br />
to potterymaking@acers.<br />
org<br />
or call<br />
Pottery Making ILLUSTRATED<br />
them for 10 minutes. Multiple tests<br />
yielded no failures in any of the clay<br />
bodies, or in any of the shapes.<br />
Test 4: Next, I froze a half inch of<br />
water in the bottom of the baking<br />
dishes before taking them directly to<br />
the preheated 500°F oven. The pieces<br />
remained in the oven until the ice<br />
had melted and the water began to<br />
boil. This is the first point at which<br />
I experienced failures. Two of the<br />
clay bodies failed; however, only the<br />
flat-bottomed pieces failed. And both<br />
sizes of flat-bottomed bakers failed<br />
in these two recipes. The cracks were<br />
clear and obvious.<br />
Test 5: I had predicted that the frozen<br />
water test would crack all the pieces.<br />
That not being the case, I moved<br />
forward to a more dramatic shock<br />
test—I froze all the pieces (empty),<br />
placed them in the preheated 500°F<br />
oven for 15 minutes, then took them<br />
directly to the sink where I poured<br />
an inch of cold water into them. At<br />
this point all 6 bodies failed, but in<br />
different ways. Two bodies failed<br />
with large audible cracks; two other<br />
bodies failed with shorter thinner<br />
cracks; one body cracked only on the<br />
bottom, but was visible only through<br />
the visual dye test; and one body<br />
failed only as a flat-bottomed form.<br />
This sixth body, when used to make<br />
a bowl-shaped baker, survived repeated<br />
severe testing with no failure.<br />
Observations<br />
In the process of performing<br />
these tests, I was able to make<br />
several observations. Some may<br />
be obvious while others may be<br />
merely colloquial. All may be worth<br />
considering as you make your next<br />
ovenware forms:<br />
WE’RE ONwww.potterymaking.org<br />
45
46<br />
Mica Clay!<br />
nmclay.com<br />
1-800-781-CLAY<br />
RAM PRODUCTS, INC.<br />
1091 Stimmel Rd.<br />
Columbus, OH 43223<br />
[614] 443-4634 Fax: [614] 443-4813<br />
www.ramprocess.com<br />
8290 N. DIXIE DR.<br />
DAYTON, OHIO<br />
45414<br />
(937) 454-0357<br />
Catalog $4.00<br />
The bowl-like contour of the body of this casserole<br />
minimizes and softens direction changes,<br />
i.e., the line between the floor and side walls.<br />
Such shapes with a smooth transition help to<br />
minimize the effects of thermal shock.<br />
• The larger the piece is, the more<br />
likely it is to fail in ovenware<br />
applications.<br />
• The broader and flatter the bottom<br />
of the pot is, the more likely<br />
it is to fail.<br />
• Pots with soft, rounded corners,<br />
curves, and lines seem to survive<br />
better than ones with sharp<br />
corners and direction changes,<br />
regardless of the size.<br />
• Filling the entire exposed inner<br />
surface of a baking form with<br />
food (thermal mass) lessens the<br />
thermal shock and prolongs the<br />
life of the piece. An important<br />
fact users need to know.<br />
• Bowl-shaped forms required<br />
additional applications of the<br />
most severe test in order to<br />
cause five of the six clay bodies<br />
to fail (the same five clay bodies<br />
that failed in the flat-bottomedshaped<br />
pieces). The soft line of<br />
the curvilinear form seemed to<br />
distribute and withstand more<br />
stress before failing.<br />
Recommendations<br />
Use a proven industrial or premixed<br />
ovenware clay body. This option<br />
may not satisfy our individual<br />
taste with regard to texture, color,<br />
glaze compatibility, or workability.<br />
It may or may not be truly a quality<br />
ovenware body under the conditions<br />
by which any particular individual<br />
makes and fires. And additionally, to<br />
make such a choice determines that<br />
one will be fully subject to the quality<br />
control methods in mixing and<br />
composition, which someone other<br />
than ourselves utilizes and enforces.<br />
Use and test your own products<br />
before marketing them. While this is<br />
costly, you may avoid the necessity<br />
Small baking dish with altered rim, 6 inches in<br />
diameter. The sharp angle change from floor to<br />
side wall, altered rim, and asymmetrical handle<br />
placement exacerbate thermal shock problems.<br />
of replacing years worth of product<br />
to unhappy customers.<br />
These tests do not give conclusive<br />
evidence about how a particular<br />
ovenware body is going to fare<br />
after 3-10 years of regular use (or,<br />
sometimes, abuse), but the tests do<br />
provide immediate comparative<br />
evidence regarding how different<br />
ovenware clay bodies respond to a<br />
series of increasingly severe thermal<br />
shock tests.<br />
Conclusion<br />
Even with all the limitations of<br />
my methodology, one can take heart<br />
that these severe tests indicated<br />
that some clay bodies (at least in<br />
the short run) would perform far<br />
above the normal expectations and<br />
requirements of most studio potters,<br />
with respect to the environments in<br />
which they might expect their ovenware<br />
clay bodies to satisfactorily<br />
function.<br />
The method I developed and<br />
used, though not foolproof or even<br />
nearly fully proven, at least provides<br />
a methodology for uniform<br />
comparison of clay bodies in the<br />
light of severe and multidimensional<br />
thermal shock. For those of us who<br />
choose to mix our own clay bodies,<br />
it will provide some useful information<br />
upon which to make comparative,<br />
informed decisions.<br />
Dick Lehman is a frequent contributor to<br />
ceramics periodicals throughout the world.<br />
He maintains a full-time studio and gallery<br />
in Goshen, Indiana.<br />
Spring 1999