IMPORTANT NOTICE - Berkel Sales & Service
IMPORTANT NOTICE - Berkel Sales & Service
IMPORTANT NOTICE - Berkel Sales & Service

You also want an ePaper? Increase the reach of your titles
YUMPU automatically turns print PDFs into web optimized ePapers that Google loves.
MAINTENANCE<br />
ROTATING GRINDING AUGER & ROTATING MIXING PADDLE<br />
TO AVOID SERIOUS PERSONAL INJURY<br />
ALWAYS Turn Off, Unplug from Power Source and Perform Lockout/Tagout Procedures to<br />
This Machine BEFORE Servicing.<br />
NEVER Touch This Machine Without Training and Authorization By Your Supervisor<br />
NEVER Place Hands Into Machine Input or Output Openings.<br />
NEVER Bypass, Alter or Modify This Equipment in Any Way From Its Original Condition.<br />
PROMPTLY REPLACE Any Worn or Illegible Warning Labels.<br />
USE ONLY GENUINE BIRO Parts and Accessories Properly Installed.<br />
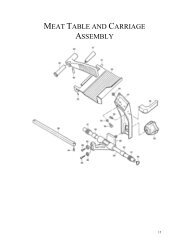
A. GRINDING BOWL INSTALLATION<br />
1. Mount the grinding bowl on the three threaded studs on the front of the machine. Tighten in position with<br />
provided nuts.<br />
2. Place the grinding auger in the grinding bowl and fully seat rear drive tang into auger drive shaft.<br />
3. Install knife, breaker plate and end retaining ring.<br />
ONLY HAND TIGHTEN RETAINING RING<br />
4. When the bowl assembly is mounted and tight, there should be approximately 1 8" gap between the back<br />
inside wall of the grinding trough and the back of the auger. The bowl ring wrench which is provided with<br />
each mixer grinder is used only for REMOVAL of the end retaining ring for cleaning purposes or for changing<br />
knife and breaker plate.<br />
B. MIXING PADDLE INSTALLATION<br />
1. Check that mixer paddle drive pin (Item No. 53516) in the mixer paddle drive shaft (Item No. 53955-N) is<br />
positioned vertically.<br />
2. Holding the mixing paddle by the center shaft and with the front blade up carefully fit drive receiving collar<br />
onto the end of the drive shaft. Insert paddle lock arm assembly (Item No. 53852) into the front of the mixing<br />
tub and onto the front of the mixing paddle.<br />
3. When fully seated, turn the lock arm counterclockwise so the protruding arm is behind the lock set screw<br />
bracket. Tighten the mixer paddle lock set screw (Item No. 53568).<br />
C. LUBRICATION<br />
1. MOTORS: The mix and grind motors have pre-lubricated bearings. These bearings should be re-lubricated<br />
annually with a good grade of bearing grease. Do not over-grease.<br />
2. BEARING HOUSING: The main bearings are housed in an enclosed and sealed journal box. Re-lubricate<br />
semi-annually with a good grade of bearing grease. Do not over-grease.<br />
8