KODAK ESP 5200 Series All-in-One Printer - Maplin Electronics
KODAK ESP 5200 Series All-in-One Printer - Maplin Electronics KODAK ESP 5200 Series All-in-One Printer - Maplin Electronics
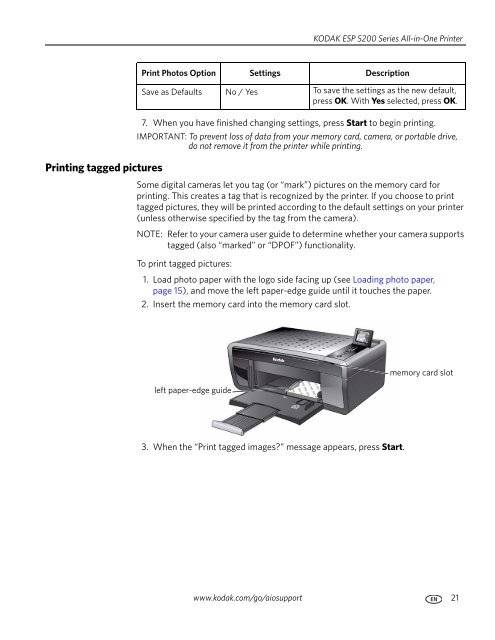
Printing tagged pictures KODAK ESP 5200 Series All-in-One Printer Print Photos Option Settings Description Save as Defaults No / Yes To save the settings as the new default, press OK. With Yes selected, press OK. 7. When you have finished changing settings, press Start to begin printing. IMPORTANT: To prevent loss of data from your memory card, camera, or portable drive, do not remove it from the printer while printing. Some digital cameras let you tag (or “mark”) pictures on the memory card for printing. This creates a tag that is recognized by the printer. If you choose to print tagged pictures, they will be printed according to the default settings on your printer (unless otherwise specified by the tag from the camera). NOTE: Refer to your camera user guide to determine whether your camera supports tagged (also “marked” or “DPOF”) functionality. To print tagged pictures: 1. Load photo paper with the logo side facing up (see Loading photo paper, page 15), and move the left paper-edge guide until it touches the paper. 2. Insert the memory card into the memory card slot. left paper-edge guide 3. When the “Print tagged images?” message appears, press Start. memory card slot www.kodak.com/go/aiosupport 21
Printing Zooming and cropping pictures Use the zoom buttons to select a portion of your picture for printing. To zoom and crop a picture: 1. Load photo paper with the logo side facing up (see Loading photo paper, page 15), and move the left paper-edge guide until it touches the paper. 2. Insert the memory card into the memory card slot. left paper-edge guide 3. Press or to select the picture you want to crop, then press OK. 4. Press Zoom + to enlarge the picture on the LCD. A red box shows the area that will be printed. NOTE: You can press Zoom + repeatedly to enlarge the picture in increments of 0.25 up to a magnification of 5X. Press Zoom – to decrease the magnification in increments of 0.25 back down to 1X. 5. Use the navigation buttons to move the picture on the LCD up, down, left, or right. Only the part of the picture in the red box will print. The crop window matches the aspect ratio of the selected output print size. 6. After you have pressed the zoom button(s), press Rotate if you want to rotate the red box in 90 degree increments. This will determine the content that is printed. NOTE: Zooming and cropping does not change the saved picture on the memory card. 7. When you are satisfied with the picture, press OK. The picture appears in the original view with a red box around the portion of the picture that will print. 8. Press Start to begin printing. 22 www.kodak.com/go/aiosupport memory card slot
- Page 1 and 2: KODAK ESP 5200 Series All-in-One Pr
- Page 3 and 4: Table of contents 1 Printer Overvie
- Page 5 and 6: KODAK ESP 5200 Series All-in-One Pr
- Page 7 and 8: Printer Overview Control panel Feat
- Page 9 and 10: Printer Overview • Language - Pre
- Page 11 and 12: Networking Your Printer The Wi-Fi c
- Page 13 and 14: Networking Your Printer Using the L
- Page 15 and 16: Networking Your Printer Printing th
- Page 17 and 18: Networking Your Printer If your pri
- Page 19 and 20: Handling Paper Envelope sizes Loadi
- Page 21 and 22: Handling Paper Loading envelopes Th
- Page 23 and 24: Printing Printing pictures Printing
- Page 25: Printing 4. Repeat step 3 for each
- Page 29 and 30: 5 Copying Copying a document You ca
- Page 31 and 32: Copying Copy Document Option Plain
- Page 33 and 34: Copying Darkening or lightening a c
- Page 35 and 36: Copying Adjusting the settings and
- Page 37 and 38: Copying Enlarging or reducing a pho
- Page 39 and 40: 6 Scanning Scanning digitizes docum
- Page 41 and 42: Scanning Setting Options Automatica
- Page 43 and 44: Scanning 4. Press to select an opti
- Page 45 and 46: Maintaining Your Printer Cleaning t
- Page 47 and 48: Maintaining Your Printer 3. Pinch t
- Page 49 and 50: Maintaining Your Printer Replacing
- Page 51 and 52: Maintaining Your Printer 8. Place t
- Page 53 and 54: Maintaining Your Printer To update
- Page 55 and 56: 8 Troubleshooting Basic troubleshoo
- Page 57 and 58: Troubleshooting Status lights Power
- Page 59 and 60: Product and Safety Specifications C
- Page 61 and 62: Product and Safety Specifications S
- Page 63 and 64: Product and Safety Specifications S
- Page 65 and 66: Product and Safety Specifications C
- Page 67 and 68: Product and Safety Specifications W
- Page 69 and 70: Index A access door, 1 B back butto
- Page 71 and 72: Index printing, 17—23 documents,
Pr<strong>in</strong>t<strong>in</strong>g tagged pictures<br />
<strong>KODAK</strong> <strong>ESP</strong> <strong>5200</strong> <strong>Series</strong> <strong>All</strong>-<strong>in</strong>-<strong>One</strong> Pr<strong>in</strong>ter<br />
Pr<strong>in</strong>t Photos Option Sett<strong>in</strong>gs Description<br />
Save as Defaults No / Yes To save the sett<strong>in</strong>gs as the new default,<br />
press OK. With Yes selected, press OK.<br />
7. When you have f<strong>in</strong>ished chang<strong>in</strong>g sett<strong>in</strong>gs, press Start to beg<strong>in</strong> pr<strong>in</strong>t<strong>in</strong>g.<br />
IMPORTANT: To prevent loss of data from your memory card, camera, or portable drive,<br />
do not remove it from the pr<strong>in</strong>ter while pr<strong>in</strong>t<strong>in</strong>g.<br />
Some digital cameras let you tag (or “mark”) pictures on the memory card for<br />
pr<strong>in</strong>t<strong>in</strong>g. This creates a tag that is recognized by the pr<strong>in</strong>ter. If you choose to pr<strong>in</strong>t<br />
tagged pictures, they will be pr<strong>in</strong>ted accord<strong>in</strong>g to the default sett<strong>in</strong>gs on your pr<strong>in</strong>ter<br />
(unless otherwise specified by the tag from the camera).<br />
NOTE: Refer to your camera user guide to determ<strong>in</strong>e whether your camera supports<br />
tagged (also “marked” or “DPOF”) functionality.<br />
To pr<strong>in</strong>t tagged pictures:<br />
1. Load photo paper with the logo side fac<strong>in</strong>g up (see Load<strong>in</strong>g photo paper,<br />
page 15), and move the left paper-edge guide until it touches the paper.<br />
2. Insert the memory card <strong>in</strong>to the memory card slot.<br />
left paper-edge guide<br />
3. When the “Pr<strong>in</strong>t tagged images?” message appears, press Start.<br />
memory card slot<br />
www.kodak.com/go/aiosupport 21


