


Create successful ePaper yourself
Turn your PDF publications into a flip-book with our unique Google optimized e-Paper software.
1.4 Replacing a High-Limit Thermostat<br />
1. Remove the filter pan and lid from the unit. Drain the frypots into an McDonald’s Shortening<br />
Disposal Unit (MSDU) or other appropriate METAL container using the computer “drain to pan<br />
option” or using the MIB board in manual mode.<br />
DANGER<br />
DO NOT drain more than one full frypot or two split frypots into the MSDU at one time.<br />
2. Disconnect the fryer from the electrical power supply and reposition it to gain access to the rear of<br />
the fryer.<br />
3. Remove the four screws from both the left and right sides of the lower back panel.<br />
4. Locate the high-limit that is being replaced and follow the two-black wires to the 12-pin connector<br />
C-6. Note where the leads are connected prior to removing them from the connector. Unplug the<br />
12-pin connector C-6 and using a pin-pusher push the pins of the high-limit out of the connector.<br />
5. Carefully unscrew the high-limit thermostat to be replaced.<br />
6. Apply Loctite PST 567 or equivalent sealant to the threads of the replacement and screw it<br />
securely into the frypot.<br />
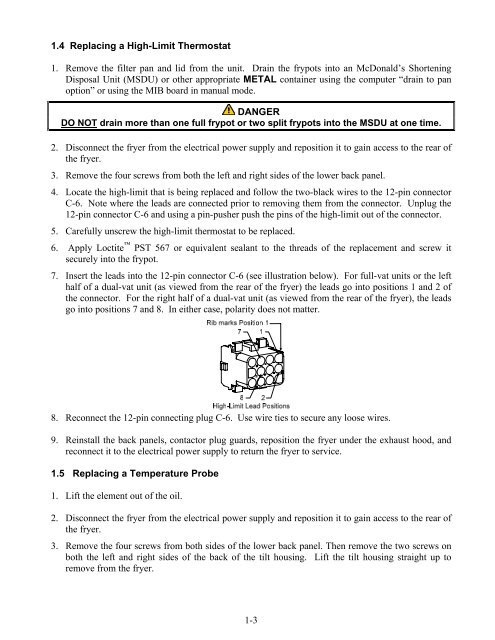
7. Insert the leads into the 12-pin connector C-6 (see illustration below). For full-vat units or the left<br />
half of a dual-vat unit (as viewed from the rear of the fryer) the leads go into positions 1 and 2 of<br />
the connector. For the right half of a dual-vat unit (as viewed from the rear of the fryer), the leads<br />
go into positions 7 and 8. In either case, polarity does not matter.<br />
8. Reconnect the 12-pin connecting plug C-6. Use wire ties to secure any loose wires.<br />
9. Reinstall the back panels, contactor plug guards, reposition the fryer under the exhaust hood, and<br />
reconnect it to the electrical power supply to return the fryer to service.<br />
1.5 Replacing a Temperature Probe<br />
1. Lift the element out of the oil.<br />
2. Disconnect the fryer from the electrical power supply and reposition it to gain access to the rear of<br />
the fryer.<br />
3. Remove the four screws from both sides of the lower back panel. Then remove the two screws on<br />
both the left and right sides of the back of the tilt housing. Lift the tilt housing straight up to<br />
remove from the fryer.<br />
1-3


