Installation Guide
Installation Guide
Installation Guide

Create successful ePaper yourself
Turn your PDF publications into a flip-book with our unique Google optimized e-Paper software.
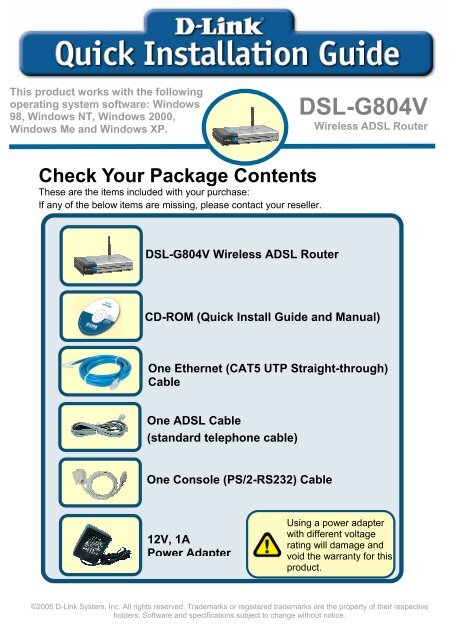
This product works with the following<br />
operating system software: Windows<br />
98, Windows NT, Windows 2000,<br />
Windows Me and Windows XP.<br />
Check Your Package Contents<br />
These are the items included with your purchase:<br />
If any of the below items are missing, please contact your reseller.<br />
DSL-G804V Wireless ADSL Router<br />
DSL-G804V<br />
Wireless ADSL Router<br />
CD-ROM (Quick Install <strong>Guide</strong> and Manual)<br />
One Ethernet (CAT5 UTP Straight-through)<br />
Cable<br />
One ADSL Cable<br />
(standard telephone cable)<br />
One Console (PS/2-RS232) Cable<br />
12V, 1A<br />
Power Adapter<br />
Using a power adapter<br />
with different voltage<br />
rating will damage and<br />
void the warranty for this<br />
product.<br />
©2005 D-Link System, Inc. All rights reserved. Trademarks or registered trademarks are the property of their respective<br />
holders. Software and specifications subject to change without notice.
Connecting the Router to your<br />
Computer<br />
A、First, connect the power adapter to the power input at the back panel of the<br />
DSL-G804V and then plug the other end of the power adapter to a wall outlet<br />
or power strip.On the front of the device, the power LED will turrn ON to<br />
indicate proper operation.<br />
B、Insert one end of the Ethernet cable into an Ethernet(LAN) port on the back<br />
panel of the DSL-G804V and the other end of the cable to an Ethernet Adapter<br />
or available Ethernet port on your computer.<br />
C、Insert the telephone cable included with the Router into the ADSL port, then<br />
connect the cable to your telephone line.<br />
D、Check the LED display on the front of the Router to confirm that the<br />
connections have been made.<br />
Rear Panel Connections<br />
Antenna<br />
Omni Directional<br />
ADSL Modem<br />
Port<br />
Connect to your<br />
ADSL provider<br />
Console Port<br />
Connect to<br />
PS2/RS-232<br />
LAN Ports<br />
Connects to the<br />
LAN and other<br />
computers<br />
2<br />
DC Power Input<br />
Connect to DC<br />
Adapter<br />
Factory Reset<br />
Push in 5 seconds to<br />
return to factory<br />
default settings
Connecting the Router to your<br />
Computer (continued)<br />
Front Panel LEDs<br />
Power<br />
Status<br />
ADSL:<br />
Link/Act<br />
WLAN<br />
LAN 1 - 4:<br />
Link/Act<br />
PPP/MAIL<br />
Steady green light indicates the unit is powered on. When the device<br />
is powered off this remains dark.<br />
Lights steady green during power on self-test (POST). Once the<br />
connection status has been settled, the light will blink green. If the<br />
indicator lights steady green after the POST, the system has failed<br />
and the device should be rebooted.<br />
Steady green light indicates a valid ADSL connection. This will light<br />
after the ADSL negotiation process has been settled. A blinking<br />
green light indicates activity on the WAN (ADSL) interface.<br />
Lit green when the wireless connection is established. A blinking<br />
green when sending/receiving data.<br />
Green: The router has a successful 100Mb Ethernet connection. A<br />
solid green light indicates a valid link on startup. These lights blink<br />
when there is activity currently passing through the Ethernet port.<br />
Orange: The router has a successful 10Mb Ethernet connection. A<br />
solid green light indicates a valid link on startup. These lights blink<br />
when there is activity currently passing through the Ethernet port.<br />
Lit steady when there is a PPPoA / PPPoE connection. Lit and<br />
flashed periodically when there is email in the Inbox<br />
3
Configuring the Router<br />
You have two methods to configure your router. The one is you can use the<br />
Configuration Utility which is contained in the CD-ROM and follow the instructions<br />
step by step to easy configure your router.<br />
The other one is to use your Web browser to access the web pages used to setup the<br />
Router, your computer must be configured to “Obtain an IP address automatically”,<br />
that is, you must change the IP network settings of your computer so that it is a DHCP<br />
Client. If you are using Windows XP and do not know how to change your network<br />
settings, skip ahead to Appendix A and read the instructions provided. You may also<br />
read the User Manual for instructions on changing IP settings for computers running<br />
Windows operating systems.<br />
Open the web browser and<br />
type http://192.168.1.1 in<br />
the browser’s address box.<br />
This number is the default IP<br />
address for this router.<br />
Press Enter.<br />
A user name and password<br />
window will appear. The<br />
default User Name and<br />
Password are “admin” and<br />
“admin”. Press OK to logon<br />
to the router.<br />
Click OK<br />
4
Configuring the Router (continued)<br />
Once you have logged in, the Home directory tab is prominent with the Setup Wizard<br />
menu displayed. Most users will be able to use the Setup Wizard to establish the<br />
ADSL connection to your ISP. To begin using the Setup Wizard, click on the Run<br />
Wizard button in the middle of the web page. A pop-up menu will appear. This pop-up<br />
menu is the Setup Wizard. The Setup Wizard procedure consists of four general<br />
steps:<br />
1. Set your new password<br />
2. Set Internet connection<br />
3. Set Wireless connection<br />
4. Save configuration<br />
When you setup the Internet connection, you will need to enter information provided by<br />
your ISP. The type of information you need depends on the type of connection you are<br />
setting up.<br />
Click on the Run Wizard button.<br />
5
Configuring the Router (continued)<br />
The first window of the Setup Wizard menu lists a summary of the steps required to<br />
complete the setup. Click the Next button to begin setup and go on to step 1.<br />
6<br />
Click the Next button.
Configuring the Router (continued)<br />
The factory default password is admin, you may like change the the password by<br />
entering in a new password.<br />
7<br />
Click the Next button.
Configuring the Router (continued)<br />
You will see the Detecting Internet Connection Type Screen.<br />
Next, you need to select and set the Internet Connection Type for the WAN<br />
interfaces. Your ISP has given this information to you. If you do not know what type of<br />
connection to use, exit the Set Wizard and contact your ISP for the information. The<br />
Setup Wizard menu that appears when you click the next button depends on what<br />
connection type you select.<br />
Select the Connection Type used<br />
for your ADSL service.<br />
8<br />
Click the Next button.
Configuring the Router (continued)<br />
PPPoE/PPPoA Connections<br />
Type in the Username and Password used to identify and verify your account to the<br />
ISP. The VPI number and VCI number should not be changed unless you have been<br />
instructed by ISP to change them. Select the Connection Type used for<br />
encapsulation specific to your service. Click Next when you are ready to continue to<br />
the Setup Completed menu. If you are not sure what Connection Type, VPI and VCI<br />
to use, please check with your ISP.<br />
Use the pulldown<br />
menu to<br />
choose the<br />
correct<br />
Connection<br />
Type. The user<br />
may choose<br />
between PPPoE<br />
or PPPoA, as<br />
instructed by<br />
your ISP.<br />
Type the<br />
Username and<br />
Password for<br />
your ISP<br />
account.<br />
9<br />
Click the Next button.<br />
Type the VPI and<br />
VCI, if these<br />
values are not<br />
correct, check<br />
with your ISP for<br />
information.<br />
Type the IP addresses for the<br />
WAN IP Address, Subnet<br />
Mask, ISP Gateway<br />
Address, Primary DNS<br />
Address and/or Secondary<br />
DNS Address, as instructed<br />
by your ISP.
MPoA/IPoA<br />
Configuring the Router (continued)<br />
For this connection type, the user may choose MPoA or IPoA. The VPI number and<br />
VCI number should not be changed unless you have been instructed by ISP to change<br />
them. Select the Connection Type used for encapsulation specific to your service.<br />
Click Next when you are ready to continue to the Setup Completed menu.If you are<br />
not sure what Connection Type, VPI and VCI to use, please check with your ISP.<br />
Use the pulldown<br />
menu to<br />
choose the<br />
correct<br />
Connection<br />
Type. The user<br />
may choose<br />
between MPoA<br />
or IPoA, as<br />
instructed by<br />
your ISP.<br />
10<br />
Click the Next button.<br />
Type the VPI and<br />
VCI, if these<br />
values are not<br />
correct, check<br />
with your ISP for<br />
information.<br />
Type the IP addresses for the<br />
WAN IP Address, Subnet<br />
Mask, ISP Gateway<br />
Address, Primary DNS<br />
Address and/or Secondary<br />
DNS Address, as instructed<br />
by your ISP.
Pure Bridge<br />
Configuring the Router (continued)<br />
Bridge is used to set the Bridge mode for the Router. The VPI number and VCI<br />
number should not be changed unless you have been instructed by ISP to change<br />
them. Select the Encapsulation used for encapsulation specific to your service. Click<br />
Next when you are ready to continue to the Setup Completed menu.If you are not sure<br />
what Connection Type, VPI and VCI to use, please check with your ISP.<br />
Type the VPI and<br />
VCI, if these<br />
values are not<br />
correct, check<br />
with your ISP for<br />
information.<br />
Next, you will see the Set Wireless connection Screen.<br />
11<br />
Select the<br />
Encapsulation Type<br />
as LLC Bridged or<br />
VcMux Bridged as<br />
instructed by your ISP.<br />
Click the Next button.
Configuring the Router (continued)<br />
Set Wireless connection<br />
For this connection type, the user can enter the SSID name and Channel number to<br />
be used for the Wireless Access Point.<br />
Select the radio<br />
channel number. The<br />
permissible channels<br />
depend on the<br />
Regulatory Domain.<br />
(The factory default<br />
setting is channel 6)<br />
12<br />
Type the Network ID<br />
(SSID), it is used for<br />
identifying the WLAN.<br />
It is case sensitive and<br />
must not excess 32<br />
characters.<br />
Click the Next button.
Setup Complete<br />
Configuring the Router (continued)<br />
All the settings for the ADSL connection are now completed. Click the Save Config<br />
button to save the new settings and restart the Router. It will take about two minutes to<br />
restart the Router.<br />
Click the Exit button when the message appears informing you that the “Save Config<br />
to FLASH Successful”. You can now launch your web browser to access the Internet.<br />
13<br />
Click the Save Config button.
Appendix A<br />
Configuring IP Settings in Windows XP<br />
Use the following steps to configure a computer running Windows XP to be a DHCP<br />
client.<br />
1. From the Start menu on your desktop, go to Connect To, then click on Show<br />
all Connections.<br />
2. In the Network Connections window, right-click on LAN (Local Area<br />
Connection), then click Properties.<br />
Right-click on<br />
the Local Area<br />
Connection icon<br />
and Select the<br />
Properties<br />
option from the<br />
pull-down menu.<br />
14
3. In the General tab of the Local Area Connection Properties menu, highlight<br />
Internet Protocol (TCP/IP) under “This connection uses the following items:”<br />
by clicking on it once. Click on the Properties button.<br />
Click Properties<br />
4. Select “Obtain an IP address automatically” by clicking once in the circle.<br />
Click the OK button.<br />
Select Obtain an IP address<br />
automatically in the Internet<br />
Protocol (TCP/IP) Properties<br />
window<br />
15
Technical Support<br />
You can find software updates and user documentation on the<br />
D-Link website.<br />
Tech Support for customers within Australia:<br />
D-Link Technical Support over the Telephone:<br />
1300-766-868<br />
Monday to Friday 8:00am to 8:00pm EST<br />
Saturday 9:00am to 1:00pm EST<br />
D-Link Technical Support over the Internet:<br />
http://www.dlink.com.au<br />
email:support@dlink.com.au<br />
Tech Support for customers within New Zealand:<br />
D-Link Technical Support over the Telephone:<br />
0800-900-900<br />
Monday to Friday 8:30am to 8:30pm<br />
Saturday 9:00am to 5:00pm<br />
D-Link Technical Support over the Internet:<br />
http://www.dlink.co.nz<br />
email:support@dlink.co.nz<br />
17
Technical Support<br />
You can find software updates and user documentation on the<br />
D-Link website.<br />
Tech Support for customers within South Eastern<br />
Asia and Korea:<br />
D-Link South Eastern Asia and Korea Technical Support<br />
over the Telephone:<br />
+65-6895-5355<br />
Monday to Friday 9:00am to 12:30pm, 2:00pm-6:00pm<br />
Singapore Time<br />
D-Link Technical Support over the Internet:<br />
email:support@dlink.com.sg<br />
18
Technical Support<br />
You can find software updates and user documentation on the<br />
D-Link website.<br />
Tech Support for customers within India<br />
D-Link Technical Support over the Telephone:<br />
+91-22-26526741<br />
+91-22-26526696 –ext 161 to 167<br />
Monday to Friday 9:30AM to 7:00PM<br />
D-Link Technical Support over the Internet:<br />
http://ww.dlink.co.in<br />
http://www.dlink.co.in/dlink/drivers/support.asp<br />
ftp://support.dlink.co.in<br />
email: techsupport@dlink.co.in<br />
19
Technical Support<br />
You can find software updates and user documentation on the<br />
D-Link website.<br />
D-Link provides free technical support for customers for the<br />
duration of the warranty period on this product.<br />
Customers can contact D-Link technical support through our<br />
web site or by phone.<br />
Tech Support for customers within the Russia<br />
D-Link Technical Support over the Telephone:<br />
(095) 744-00-99<br />
Monday to Friday 10:00am to 6:30pm<br />
D-Link Technical Support over the Internet<br />
http://www.dlink.ru<br />
email: support@dlink.ru<br />
20
Technical Support<br />
You can find software updates and user documentation on the D-Link website.<br />
Tech Support for customers within the U.A.E & North Africa:<br />
D-Link Technical Support over the Telephone:<br />
(971) 4-391-6480 (U.A.E)<br />
Sunday to Wednesday 9:00am to 6:00pm GMT+4<br />
Thursday 9:00am to 1:00pm GMT+4<br />
D-Link Middle East & North Africa<br />
D-Link Technical Support over the Internet:<br />
http://support.dlink-me.com<br />
email:support@dlink-me.com<br />
Tech Support for customers within Israel:<br />
D-Link Technical Support over the Telephone:<br />
(972) 9-9715701<br />
Sunday to Thursday 9:00am to 5:00pm<br />
D-Link Technical Support over the Internet:<br />
http://www.dlink.co.il/support/<br />
e-mail: support@dlink.co.il<br />
Tech Support for customers within Turkey:<br />
D-Link Technical Support over the Telephone:<br />
(+90) 212-289 56 59<br />
Monday to Friday 9:00am to 6:00pm<br />
D-Link Technical Support over the Internet:<br />
http://www.dlink.com.tr<br />
e-mail: turkiye@dlink-me.com<br />
Tech Support for customers within Egypt:<br />
D-Link Technical Support over the Telephone:<br />
(202) 414-4295<br />
Sunday to Thursday 9:00am to 5:00pm<br />
D-Link Technical Support over the Internet:<br />
http://support.dlink-me.com<br />
e-mail: amostafa@dlink-me.com<br />
21
Technical Support<br />
You can find software updates and user documentation on the<br />
D-Link website.<br />
Tech Support for customers within South Africa<br />
and Sub Sahara Region:<br />
D-Link South Africa and Sub Sahara Technical Support<br />
over the Telephone:<br />
+27-12-665-2165<br />
08600 DLINK ( For South Africa only )<br />
Monday to Friday 8:30am to 9:00pm South Africa Time<br />
D-Link Technical Support over the Internet:<br />
http://www.d-link.co.za<br />
email:support@d-link.co.za<br />
22
Technical Support<br />
You can find updates and user documentation on the D-Link website<br />
Tech Support for Latin America customers:<br />
D-Link Technical Support over the followings Telephones:<br />
Argentina: 0800-666 1442 Monday to Friday 09:00am to 22:00pm<br />
Chile: 800-214 422 Monday to Friday 08:00am to 21:00pm<br />
Colombia: 01800-700 1588 Monday to Friday 07:00am to 20:00pm<br />
Ecuador: 1800-777 711 Monday to Friday 07:00am to 20:00pm<br />
El Salvador: 800-6137 Monday to Friday 06:00am to 19:00pm<br />
Guatemala:1800-300 0017 Monday to Friday 06:00am to 19:00pm<br />
Panama: 0800-560 0193 Monday to Friday 07:00am to 20:00pm<br />
Peru: 0800-52049 Monday to Friday 07:00am to 20:00pm<br />
Venezuela: 0800-100 3470 Monday to Friday 08:00am to 21:00pm<br />
D-Link Technical Support over the Internet:<br />
www.dlinkla.com<br />
www.dlinklatinamerica.com<br />
email:support@dlink.cl<br />
Tech Support for customers within Brazil:<br />
D-Link Technical Support over the Telephone:<br />
0800-7014104<br />
Monday to Friday 8:30am to 18:30pm<br />
D-Link Technical Support over the Internet:<br />
www.dlinkbrasil.com.br<br />
email:suporte@dlinkbrasil.com.br<br />
23