Sewing Machine - Brother
Sewing Machine - Brother Sewing Machine - Brother
96 APPENDIX ———————————————————————————————————————————————————————————————————————————————————————————————————————————— p q Insert the bobbin case so that the mark on the bobbin case aligns with the mark on the machine. Align the and marks. a mark b mark c Bobbin case Make sure that the indicated points are aligned before installing the bobbin case. CAUTION ● Never use a bobbin case that is scratched, otherwise the upper thread may become tangled, the needle may break or sewing performance may suffer. For a new bobbin case (part code: XE7560-001), contact your nearest authorized service center. ● Make sure that you fit the bobbin case properly, otherwise the needle may break. Attach the needle plate cover according to steps h and i in “Cleaning the race” (page 88). r Check the condition of the needle, and then install it. If the needle is in a poor condition, for example, if it is bent, be sure to install a new needle. Refer to “Checking the needle” (page 30) and “Replacing the needle” (page 30). CAUTION ● Never use bent needles. Bent needles can easily break, possibly resulting in injuries. Note ● After completing this procedure, continue with the following procedure in “Checking machine operations” to check that the machine is operating correctly. Memo ● Since the needle may have been damaged when the fabric was caught in the machine, we recommend replacing it with a new one.
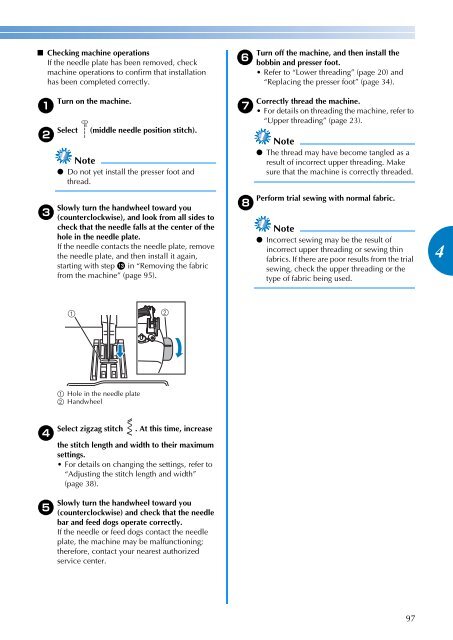
————————————————————————————————————————————————————————————————————————————————————————————————————————————————————— ■ Checking machine operations If the needle plate has been removed, check machine operations to confirm that installation has been completed correctly. Turn on the machine. a Select (middle needle position stitch). b c Note ● Do not yet install the presser foot and thread. Slowly turn the handwheel toward you (counterclockwise), and look from all sides to check that the needle falls at the center of the hole in the needle plate. If the needle contacts the needle plate, remove the needle plate, and then install it again, starting with step m in “Removing the fabric from the machine” (page 95). a Hole in the needle plate b Handwheel Select zigzag stitch . At this time, increase d the stitch length and width to their maximum settings. For details on changing the settings, refer to “Adjusting the stitch length and width” (page 38). e Slowly turn the handwheel toward you (counterclockwise) and check that the needle bar and feed dogs operate correctly. If the needle or feed dogs contact the needle plate, the machine may be malfunctioning; therefore, contact your nearest authorized service center. f g Turn off the machine, and then install the bobbin and presser foot. Refer to “Lower threading” (page 20) and “Replacing the presser foot” (page 34). Correctly thread the machine. For details on threading the machine, refer to “Upper threading” (page 23). Note ● The thread may have become tangled as a result of incorrect upper threading. Make sure that the machine is correctly threaded. Perform trial sewing with normal fabric. h Note ● Incorrect sewing may be the result of incorrect upper threading or sewing thin fabrics. If there are poor results from the trial sewing, check the upper threading or the type of fabric being used. 97 4
- Page 48 and 49: 46 UTILITY STITCHES —————
- Page 50 and 51: 48 UTILITY STITCHES —————
- Page 52 and 53: 50 UTILITY STITCHES —————
- Page 54 and 55: 52 UTILITY STITCHES —————
- Page 56 and 57: 54 UTILITY STITCHES —————
- Page 58 and 59: 56 UTILITY STITCHES —————
- Page 60 and 61: 58 UTILITY STITCHES —————
- Page 62 and 63: 60 UTILITY STITCHES —————
- Page 64 and 65: 62 UTILITY STITCHES —————
- Page 66 and 67: 64 UTILITY STITCHES —————
- Page 68 and 69: 66 UTILITY STITCHES —————
- Page 70 and 71: 68 UTILITY STITCHES —————
- Page 72 and 73: 70 UTILITY STITCHES —————
- Page 74 and 75: 72 UTILITY STITCHES —————
- Page 76 and 77: 74 UTILITY STITCHES —————
- Page 78 and 79: 76 UTILITY STITCHES —————
- Page 80 and 81: 78 UTILITY STITCHES —————
- Page 82 and 83: APPENDIX ————————
- Page 84 and 85: 82 APPENDIX ———————
- Page 86 and 87: 84 APPENDIX ———————
- Page 88 and 89: 86 APPENDIX ———————
- Page 90 and 91: 88 APPENDIX ———————
- Page 92 and 93: 90 APPENDIX ———————
- Page 94 and 95: 92 APPENDIX ———————
- Page 96 and 97: 94 APPENDIX ———————
- Page 100 and 101: 98 APPENDIX ———————
- Page 102 and 103: APPENDIX ————————
- Page 104 and 105: APPENDIX ————————
- Page 106 and 107: i APPENDIX ————————
- Page 108: English 885-V64/V65/V66/V67 XE8589-
—————————————————————————————————————————————————————————————————————————————————————————————————————————————————————<br />
■ Checking machine operations<br />
If the needle plate has been removed, check<br />
machine operations to confirm that installation<br />
has been completed correctly.<br />
Turn on the machine.<br />
a<br />
Select (middle needle position stitch).<br />
b<br />
c<br />
Note<br />
● Do not yet install the presser foot and<br />
thread.<br />
Slowly turn the handwheel toward you<br />
(counterclockwise), and look from all sides to<br />
check that the needle falls at the center of the<br />
hole in the needle plate.<br />
If the needle contacts the needle plate, remove<br />
the needle plate, and then install it again,<br />
starting with step m in “Removing the fabric<br />
from the machine” (page 95).<br />
a Hole in the needle plate<br />
b Handwheel<br />
Select zigzag stitch . At this time, increase<br />
d<br />
the stitch length and width to their maximum<br />
settings.<br />
For details on changing the settings, refer to<br />
“Adjusting the stitch length and width”<br />
(page 38).<br />
e<br />
Slowly turn the handwheel toward you<br />
(counterclockwise) and check that the needle<br />
bar and feed dogs operate correctly.<br />
If the needle or feed dogs contact the needle<br />
plate, the machine may be malfunctioning;<br />
therefore, contact your nearest authorized<br />
service center.<br />
f<br />
g<br />
Turn off the machine, and then install the<br />
bobbin and presser foot.<br />
Refer to “Lower threading” (page 20) and<br />
“Replacing the presser foot” (page 34).<br />
Correctly thread the machine.<br />
For details on threading the machine, refer to<br />
“Upper threading” (page 23).<br />
Note<br />
● The thread may have become tangled as a<br />
result of incorrect upper threading. Make<br />
sure that the machine is correctly threaded.<br />
Perform trial sewing with normal fabric.<br />
h<br />
Note<br />
● Incorrect sewing may be the result of<br />
incorrect upper threading or sewing thin<br />
fabrics. If there are poor results from the trial<br />
sewing, check the upper threading or the<br />
type of fabric being used.<br />
97<br />
4


