Sewing Machine - Brother
Sewing Machine - Brother Sewing Machine - Brother
74 UTILITY STITCHES ————————————————————————————————————————————————————————————————————————————————————————————————————— ■ Combining characters You can easily sew names, messages, etc. by combining the character stitches. Up to 35 characters can be combined. [Example] Selecting stitches “COME” (No. 03)+(No. 15)+(No. 13)+(No. 05) a b c d e Follow steps a through e in “Selecting a character” (page 73) to select the first character “C” (No. 03). Press (stitch selection keys) to select the next character, “O” (No. 15). Press the “+” side of (stitch width adjustment key) to enter the selected character. N a Stitch width adjustment key Repeat steps b and c to add “M” (No. 13) and “E” (No. 05). N N Memo ● To enter a space, select “_” (No. 30). When you have finished combining characters, check the entered characters and their order. N For details on checking characters, refer to “Checking characters” (page 75). Memo ● A new character can only be added next to the last character. You cannot insert a new character between characters or before the first character of the sequence. f After checking the entered characters, start sewing. For details on sewing characters, refer to “Sewing the character stitches” (page 76). Memo ● The combination of characters will be stored in memory even if you turn off the machine. ■ Adding new characters after sewing After sewing a combination of characters, you can add characters to the combination using the following method. Memo ● When you have finished sewing, the pattern No. of the first character in the current combination is shown on the LCD. Press the utility stitch key. a a Utility stitch key Press the character stitch key. b c a Character stitch key Add new characters by following the procedure described in “Combining characters” (page 74). N N New characters are added next to the last character of the combination.
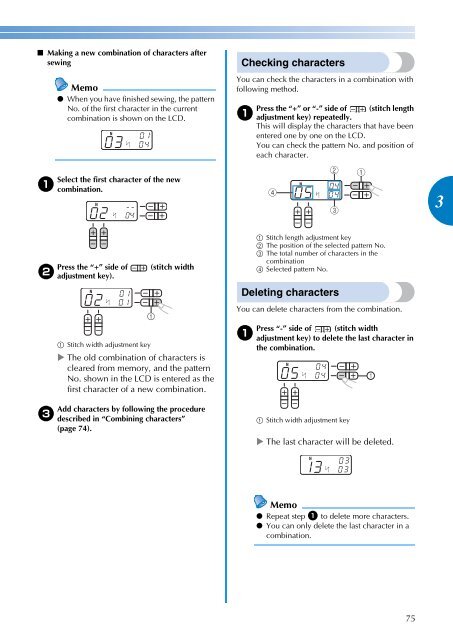
————————————————————————————————————————————————————————————————————————————————————————————————————————————————————— ■ Making a new combination of characters after sewing a b c Memo ● When you have finished sewing, the pattern No. of the first character in the current combination is shown on the LCD. Select the first character of the new combination. Press the “+” side of (stitch width adjustment key). N a Stitch width adjustment key N The old combination of characters is cleared from memory, and the pattern No. shown in the LCD is entered as the first character of a new combination. Add characters by following the procedure described in “Combining characters” (page 74). Checking characters You can check the characters in a combination with following method. a Press the “+” or “-” side of (stitch length adjustment key) repeatedly. This will display the characters that have been entered one by one on the LCD. You can check the pattern No. and position of each character. a Stitch length adjustment key b The position of the selected pattern No. c The total number of characters in the combination d Selected pattern No. Deleting characters You can delete characters from the combination. a Press “-” side of (stitch width adjustment key) to delete the last character in the combination. N N a Stitch width adjustment key The last character will be deleted. N Memo ● Repeat step a to delete more characters. ● You can only delete the last character in a combination. 75 3
- Page 26 and 27: 24 KNOWING YOUR SEWING MACHINE —
- Page 28 and 29: 26 KNOWING YOUR SEWING MACHINE —
- Page 30 and 31: 28 KNOWING YOUR SEWING MACHINE —
- Page 32 and 33: 30 KNOWING YOUR SEWING MACHINE —
- Page 34 and 35: 32 KNOWING YOUR SEWING MACHINE —
- Page 36 and 37: 34 KNOWING YOUR SEWING MACHINE —
- Page 38 and 39: 36 SEWING BASICS ——————
- Page 40 and 41: 38 SEWING BASICS ——————
- Page 42 and 43: 40 SEWING BASICS ——————
- Page 44 and 45: 42 SEWING BASICS ——————
- Page 46 and 47: 44 SEWING BASICS ——————
- Page 48 and 49: 46 UTILITY STITCHES —————
- Page 50 and 51: 48 UTILITY STITCHES —————
- Page 52 and 53: 50 UTILITY STITCHES —————
- Page 54 and 55: 52 UTILITY STITCHES —————
- Page 56 and 57: 54 UTILITY STITCHES —————
- Page 58 and 59: 56 UTILITY STITCHES —————
- Page 60 and 61: 58 UTILITY STITCHES —————
- Page 62 and 63: 60 UTILITY STITCHES —————
- Page 64 and 65: 62 UTILITY STITCHES —————
- Page 66 and 67: 64 UTILITY STITCHES —————
- Page 68 and 69: 66 UTILITY STITCHES —————
- Page 70 and 71: 68 UTILITY STITCHES —————
- Page 72 and 73: 70 UTILITY STITCHES —————
- Page 74 and 75: 72 UTILITY STITCHES —————
- Page 78 and 79: 76 UTILITY STITCHES —————
- Page 80 and 81: 78 UTILITY STITCHES —————
- Page 82 and 83: APPENDIX ————————
- Page 84 and 85: 82 APPENDIX ———————
- Page 86 and 87: 84 APPENDIX ———————
- Page 88 and 89: 86 APPENDIX ———————
- Page 90 and 91: 88 APPENDIX ———————
- Page 92 and 93: 90 APPENDIX ———————
- Page 94 and 95: 92 APPENDIX ———————
- Page 96 and 97: 94 APPENDIX ———————
- Page 98 and 99: 96 APPENDIX ———————
- Page 100 and 101: 98 APPENDIX ———————
- Page 102 and 103: APPENDIX ————————
- Page 104 and 105: APPENDIX ————————
- Page 106 and 107: i APPENDIX ————————
- Page 108: English 885-V64/V65/V66/V67 XE8589-
—————————————————————————————————————————————————————————————————————————————————————————————————————————————————————<br />
■ Making a new combination of characters after<br />
sewing<br />
a<br />
b<br />
c<br />
Memo<br />
● When you have finished sewing, the pattern<br />
No. of the first character in the current<br />
combination is shown on the LCD.<br />
Select the first character of the new<br />
combination.<br />
Press the “+” side of (stitch width<br />
adjustment key).<br />
N<br />
a Stitch width adjustment key<br />
N<br />
The old combination of characters is<br />
cleared from memory, and the pattern<br />
No. shown in the LCD is entered as the<br />
first character of a new combination.<br />
Add characters by following the procedure<br />
described in “Combining characters”<br />
(page 74).<br />
Checking characters<br />
You can check the characters in a combination with<br />
following method.<br />
a<br />
Press the “+” or “-” side of (stitch length<br />
adjustment key) repeatedly.<br />
This will display the characters that have been<br />
entered one by one on the LCD.<br />
You can check the pattern No. and position of<br />
each character.<br />
a Stitch length adjustment key<br />
b The position of the selected pattern No.<br />
c The total number of characters in the<br />
combination<br />
d Selected pattern No.<br />
Deleting characters<br />
You can delete characters from the combination.<br />
a<br />
Press “-” side of (stitch width<br />
adjustment key) to delete the last character in<br />
the combination.<br />
N<br />
N<br />
a Stitch width adjustment key<br />
The last character will be deleted.<br />
N<br />
Memo<br />
● Repeat step a to delete more characters.<br />
● You can only delete the last character in a<br />
combination.<br />
75<br />
3


