

Sewing Machine - Brother
Sewing Machine - Brother
Sewing Machine - Brother

You also want an ePaper? Increase the reach of your titles
YUMPU automatically turns print PDFs into web optimized ePapers that Google loves.
66<br />
UTILITY STITCHES —————————————————————————————————————————————————————————————————————————————————————————————————————<br />
REINFORCEMENT STITCHING<br />
Reinforce points that will be subject to strain, such as sleeve holes, inseams and pocket corners.<br />
Stitch Name<br />
Triple<br />
stretch stitch<br />
Bar tack<br />
stitch<br />
Pattern<br />
Presser Foot<br />
*Auto Rfc.: Automatic Reinforcement **Select a stitch width of 5.0 mm (3/16 inch) or less.<br />
CAUTION<br />
Triple stretch stitching<br />
Use triple stretch stitching to reinforce sleeve holes<br />
and inseams.<br />
Attach zigzag foot “J”.<br />
a<br />
Select stitch .<br />
b<br />
Start sewing.<br />
c<br />
For details, refer to “Starting to sew”<br />
(page 39).<br />
Bar tack stitching<br />
Pattern No.<br />
100 stitches<br />
model<br />
90 stitches<br />
model<br />
80 stitches<br />
model<br />
70 stitches<br />
model<br />
60 stitches<br />
model<br />
50 stitches<br />
model<br />
40 stitches<br />
model<br />
J 02 02 02 02 02 02 02<br />
A 42 42 42 36 36 34 30<br />
Bar tacks are used to reinforce points subject to<br />
strain, such as pocket corners and openings.<br />
As an example, the procedure for sewing bar tacks at<br />
pocket corners is described below.<br />
Application<br />
Attaching sleeves, sewing<br />
inseams, sewing<br />
stretch fabrics and decorative<br />
stitching<br />
Reinforcing openings<br />
and areas where the<br />
seam easily comes loose<br />
a<br />
Stitch Width<br />
[mm (inch.)]<br />
Auto<br />
Manual<br />
0.0 (0)<br />
0.0-7.0<br />
(0-1/4)<br />
2.0 (1/16)<br />
1.0-3.0<br />
(1/16-1/8)<br />
Stitch Length<br />
[mm (inch.)]<br />
Auto<br />
Manual<br />
2.5 (3/32)<br />
1.5-4.0<br />
(1/16-3/16)<br />
0.4 (1/64)<br />
0.3-1.0<br />
(1/64-1/16)<br />
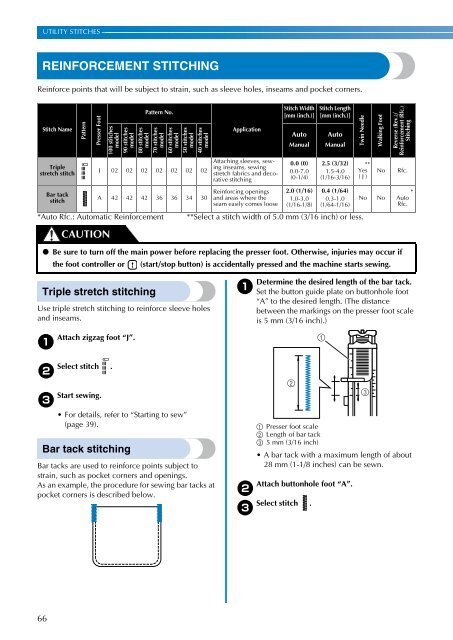
Determine the desired length of the bar tack.<br />
Set the button guide plate on buttonhole foot<br />
“A” to the desired length. (The distance<br />
between the markings on the presser foot scale<br />
is 5 mm (3/16 inch).)<br />
a Presser foot scale<br />
b Length of bar tack<br />
c 5 mm (3/16 inch)<br />
A bar tack with a maximum length of about<br />
28 mm (1-1/8 inches) can be sewn.<br />
Attach buttonhole foot “A”.<br />
b<br />
Select stitch .<br />
c<br />
Twin Needle<br />
**<br />
Yes<br />
( J )<br />
Walking Foot<br />
No No<br />
Reverse (Rev.)/<br />
Reinforcement (Rfc.)<br />
Stitching<br />
No Rfc.<br />
● Be sure to turn off the main power before replacing the presser foot. Otherwise, injuries may occur if<br />
the foot controller or (start/stop button) is accidentally pressed and the machine starts sewing.<br />
2<br />
1<br />
3<br />
*<br />
Auto<br />
Rfc.


