

Sewing Machine - Brother
Sewing Machine - Brother
Sewing Machine - Brother

You also want an ePaper? Increase the reach of your titles
YUMPU automatically turns print PDFs into web optimized ePapers that Google loves.
—————————————————————————————————————————————————————————————————————————————————————————————————————————————————————<br />
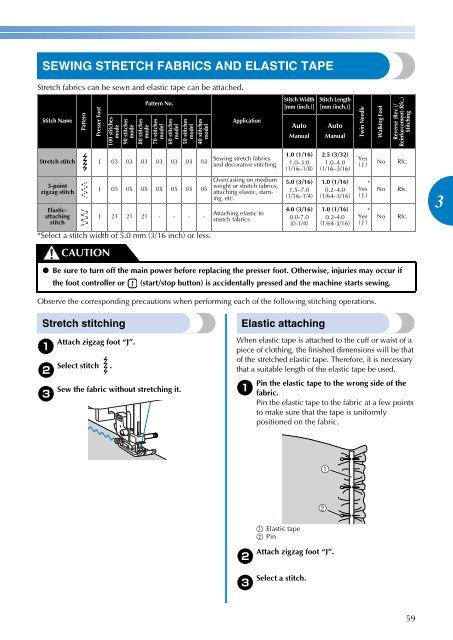
SEWING STRETCH FABRICS AND ELASTIC TAPE<br />
Stretch fabrics can be sewn and elastic tape can be attached.<br />
Stitch Name<br />
Pattern<br />
Presser Foot<br />
*Select a stitch width of 5.0 mm (3/16 inch) or less.<br />
Observe the corresponding precautions when performing each of the following stitching operations.<br />
Stretch stitching<br />
Attach zigzag foot “J”.<br />
a<br />
Select stitch .<br />
b<br />
Pattern No.<br />
100 stitches<br />
mode<br />
90 stitches<br />
mode<br />
80 stitches<br />
mode<br />
70 stitches<br />
model<br />
60 stitches<br />
model<br />
50 stitches<br />
model<br />
40 stitches<br />
model<br />
Stretch stitch J 03 03 03 03 03 03 03<br />
3-point<br />
zigzag stitch<br />
Elasticattaching<br />
stitch<br />
CAUTION<br />
J 05 05 05 05 05 05 05<br />
J 21 21 21 - - - -<br />
Sew the fabric without stretching it.<br />
c<br />
Application<br />
<strong>Sewing</strong> stretch fabrics<br />
and decorative stitching<br />
Overcasting on medium<br />
weight or stretch fabrics,<br />
attaching elastic, darning,<br />
etc.<br />
Attaching elastic to<br />
stretch fabrics<br />
Elastic attaching<br />
When elastic tape is attached to the cuff or waist of a<br />
piece of clothing, the finished dimensions will be that<br />
of the stretched elastic tape. Therefore, it is necessary<br />
that a suitable length of the elastic tape be used.<br />
a<br />
Stitch Width<br />
[mm (inch.)]<br />
Auto<br />
Manual<br />
1.0 (1/16)<br />
1.0–3.0<br />
(1/16–1/8)<br />
5.0 (3/16)<br />
1.5–7.0<br />
(1/16–1/4)<br />
4.0 (3/16)<br />
0.0-7.0<br />
(0-1/4)<br />
Pin the elastic tape to the wrong side of the<br />
fabric.<br />
Pin the elastic tape to the fabric at a few points<br />
to make sure that the tape is uniformly<br />
positioned on the fabric.<br />
a Elastic tape<br />
b Pin<br />
Attach zigzag foot “J”.<br />
b<br />
Select a stitch.<br />
c<br />
Stitch Length<br />
[mm (inch.)]<br />
Auto<br />
Manual<br />
2.5 (3/32)<br />
1.0–4.0<br />
(1/16–3/16)<br />
1.0 (1/16)<br />
0.2–4.0<br />
(1/64–3/16)<br />
1.0 (1/16)<br />
0.2-4.0<br />
(1/64-3/16)<br />
Twin Needle<br />
Yes<br />
( J )<br />
*<br />
Yes<br />
( J )<br />
*<br />
Yes<br />
( J )<br />
Walking Foot<br />
Reverse (Rev.)/<br />
Reinforcement (Rfc.)<br />
Stitching<br />
No Rfc.<br />
No Rfc.<br />
No Rfc.<br />
● Be sure to turn off the main power before replacing the presser foot. Otherwise, injuries may occur if<br />
the foot controller or (start/stop button) is accidentally pressed and the machine starts sewing.<br />
1<br />
2<br />
59<br />
3


