Sewing Machine - Brother
Sewing Machine - Brother Sewing Machine - Brother
56 UTILITY STITCHES ————————————————————————————————————————————————————————————————————————————————————————————————————— Turn the handwheel toward you h (counterclockwise) to check that the needle correctly goes into the two holes of the button. Adjust the stitch width to the distance between the button holes. Start sewing. i After sewing for about 10 seconds at low speed, press (reverse/reinforcement stitch button) to sew reinforcement stitches. j k CAUTION ● When sewing, be sure that the needle does not touch the button, otherwise the needle may bend or break. Pull the upper thread at the end of the stitching to the wrong side of the fabric, and then tie it with the bobbin thread. Use scissors to cut the upper thread and the bobbin thread at the beginning of the stitching. When you are finished attaching the button, slide the feed dog position lever to (to the left as seen from the front of the machine) and turn the handwheel to raise the dogs. Normally, the feed dog position lever is positioned at .
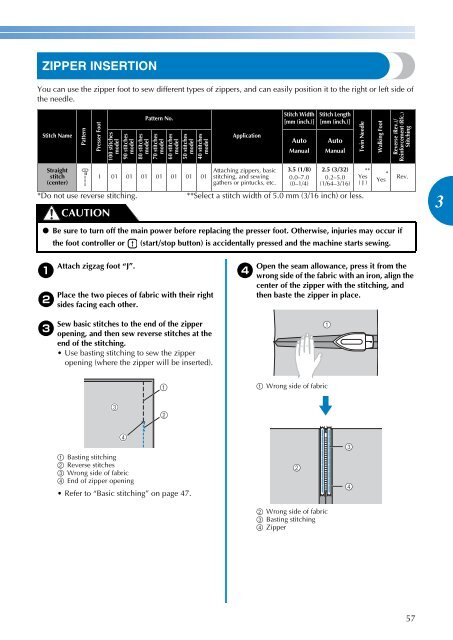
————————————————————————————————————————————————————————————————————————————————————————————————————————————————————— ZIPPER INSERTION You can use the zipper foot to sew different types of zippers, and can easily position it to the right or left side of the needle. Stitch Name Straight stitch (center) *Do not use reverse stitching. **Select a stitch width of 5.0 mm (3/16 inch) or less. Attach zigzag foot “J”. a b c Pattern Presser Foot CAUTION Pattern No. 100 stitches model 90 stitches model 80 stitches model 70 stitches model 60 stitches model 50 stitches model 40 stitches model I 01 01 01 01 01 01 01 Place the two pieces of fabric with their right sides facing each other. Sew basic stitches to the end of the zipper opening, and then sew reverse stitches at the end of the stitching. Use basting stitching to sew the zipper opening (where the zipper will be inserted). a Basting stitching b Reverse stitches c Wrong side of fabric d End of zipper opening Refer to “Basic stitching” on page 47. Application Attaching zippers, basic stitching, and sewing gathers or pintucks, etc. d Stitch Width [mm (inch.)] Auto Manual 3.5 (1/8) 0.0–7.0 (0–1/4) Open the seam allowance, press it from the wrong side of the fabric with an iron, align the center of the zipper with the stitching, and then baste the zipper in place. a Wrong side of fabric b Wrong side of fabric c Basting stitching d Zipper Stitch Length [mm (inch.)] Auto Manual 2.5 (3/32) 0.2–5.0 (1/64–3/16) ● Be sure to turn off the main power before replacing the presser foot. Otherwise, injuries may occur if the foot controller or (start/stop button) is accidentally pressed and the machine starts sewing. Twin Needle ** Yes ( J ) Walking Foot * Yes Reverse (Rev.)/ Reinforcement (Rfc.) Stitching Rev. 57 3
- Page 8 and 9: 6 KNOWING YOUR SEWING MACHINE —
- Page 10 and 11: 8 KNOWING YOUR SEWING MACHINE —
- Page 12 and 13: 10 KNOWING YOUR SEWING MACHINE —
- Page 14 and 15: 12 KNOWING YOUR SEWING MACHINE —
- Page 16 and 17: 14 KNOWING YOUR SEWING MACHINE —
- Page 18 and 19: 16 KNOWING YOUR SEWING MACHINE —
- Page 20 and 21: 18 KNOWING YOUR SEWING MACHINE —
- Page 22 and 23: 20 KNOWING YOUR SEWING MACHINE —
- Page 24 and 25: 22 KNOWING YOUR SEWING MACHINE —
- Page 26 and 27: 24 KNOWING YOUR SEWING MACHINE —
- Page 28 and 29: 26 KNOWING YOUR SEWING MACHINE —
- Page 30 and 31: 28 KNOWING YOUR SEWING MACHINE —
- Page 32 and 33: 30 KNOWING YOUR SEWING MACHINE —
- Page 34 and 35: 32 KNOWING YOUR SEWING MACHINE —
- Page 36 and 37: 34 KNOWING YOUR SEWING MACHINE —
- Page 38 and 39: 36 SEWING BASICS ——————
- Page 40 and 41: 38 SEWING BASICS ——————
- Page 42 and 43: 40 SEWING BASICS ——————
- Page 44 and 45: 42 SEWING BASICS ——————
- Page 46 and 47: 44 SEWING BASICS ——————
- Page 48 and 49: 46 UTILITY STITCHES —————
- Page 50 and 51: 48 UTILITY STITCHES —————
- Page 52 and 53: 50 UTILITY STITCHES —————
- Page 54 and 55: 52 UTILITY STITCHES —————
- Page 56 and 57: 54 UTILITY STITCHES —————
- Page 60 and 61: 58 UTILITY STITCHES —————
- Page 62 and 63: 60 UTILITY STITCHES —————
- Page 64 and 65: 62 UTILITY STITCHES —————
- Page 66 and 67: 64 UTILITY STITCHES —————
- Page 68 and 69: 66 UTILITY STITCHES —————
- Page 70 and 71: 68 UTILITY STITCHES —————
- Page 72 and 73: 70 UTILITY STITCHES —————
- Page 74 and 75: 72 UTILITY STITCHES —————
- Page 76 and 77: 74 UTILITY STITCHES —————
- Page 78 and 79: 76 UTILITY STITCHES —————
- Page 80 and 81: 78 UTILITY STITCHES —————
- Page 82 and 83: APPENDIX ————————
- Page 84 and 85: 82 APPENDIX ———————
- Page 86 and 87: 84 APPENDIX ———————
- Page 88 and 89: 86 APPENDIX ———————
- Page 90 and 91: 88 APPENDIX ———————
- Page 92 and 93: 90 APPENDIX ———————
- Page 94 and 95: 92 APPENDIX ———————
- Page 96 and 97: 94 APPENDIX ———————
- Page 98 and 99: 96 APPENDIX ———————
- Page 100 and 101: 98 APPENDIX ———————
- Page 102 and 103: APPENDIX ————————
- Page 104 and 105: APPENDIX ————————
- Page 106 and 107: i APPENDIX ————————
—————————————————————————————————————————————————————————————————————————————————————————————————————————————————————<br />
ZIPPER INSERTION<br />
You can use the zipper foot to sew different types of zippers, and can easily position it to the right or left side of<br />
the needle.<br />
Stitch Name<br />
Straight<br />
stitch<br />
(center)<br />
*Do not use reverse stitching. **Select a stitch width of 5.0 mm (3/16 inch) or less.<br />
Attach zigzag foot “J”.<br />
a<br />
b<br />
c<br />
Pattern<br />
Presser Foot<br />
CAUTION<br />
Pattern No.<br />
100 stitches<br />
model<br />
90 stitches<br />
model<br />
80 stitches<br />
model<br />
70 stitches<br />
model<br />
60 stitches<br />
model<br />
50 stitches<br />
model<br />
40 stitches<br />
model<br />
I 01 01 01 01 01 01 01<br />
Place the two pieces of fabric with their right<br />
sides facing each other.<br />
Sew basic stitches to the end of the zipper<br />
opening, and then sew reverse stitches at the<br />
end of the stitching.<br />
Use basting stitching to sew the zipper<br />
opening (where the zipper will be inserted).<br />
a Basting stitching<br />
b Reverse stitches<br />
c Wrong side of fabric<br />
d End of zipper opening<br />
Refer to “Basic stitching” on page 47.<br />
Application<br />
Attaching zippers, basic<br />
stitching, and sewing<br />
gathers or pintucks, etc.<br />
d<br />
Stitch Width<br />
[mm (inch.)]<br />
Auto<br />
Manual<br />
3.5 (1/8)<br />
0.0–7.0<br />
(0–1/4)<br />
Open the seam allowance, press it from the<br />
wrong side of the fabric with an iron, align the<br />
center of the zipper with the stitching, and<br />
then baste the zipper in place.<br />
a Wrong side of fabric<br />
b Wrong side of fabric<br />
c Basting stitching<br />
d Zipper<br />
Stitch Length<br />
[mm (inch.)]<br />
Auto<br />
Manual<br />
2.5 (3/32)<br />
0.2–5.0<br />
(1/64–3/16)<br />
● Be sure to turn off the main power before replacing the presser foot. Otherwise, injuries may occur if<br />
the foot controller or (start/stop button) is accidentally pressed and the machine starts sewing.<br />
Twin Needle<br />
**<br />
Yes<br />
( J )<br />
Walking Foot<br />
*<br />
Yes<br />
Reverse (Rev.)/<br />
Reinforcement (Rfc.)<br />
Stitching<br />
Rev.<br />
57<br />
3


