Sewing Machine - Brother
Sewing Machine - Brother Sewing Machine - Brother
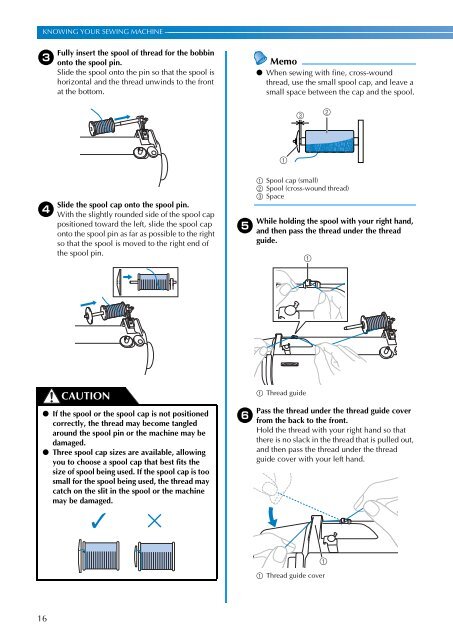
16 KNOWING YOUR SEWING MACHINE ——————————————————————————————————————————————————————————————————————————————————— c d Fully insert the spool of thread for the bobbin onto the spool pin. Slide the spool onto the pin so that the spool is horizontal and the thread unwinds to the front at the bottom. Slide the spool cap onto the spool pin. With the slightly rounded side of the spool cap positioned toward the left, slide the spool cap onto the spool pin as far as possible to the right so that the spool is moved to the right end of the spool pin. CAUTION ● If the spool or the spool cap is not positioned correctly, the thread may become tangled around the spool pin or the machine may be damaged. ● Three spool cap sizes are available, allowing you to choose a spool cap that best fits the size of spool being used. If the spool cap is too small for the spool being used, the thread may catch on the slit in the spool or the machine may be damaged. e f Memo ● When sewing with fine, cross-wound thread, use the small spool cap, and leave a small space between the cap and the spool. a c a Spool cap (small) b Spool (cross-wound thread) c Space While holding the spool with your right hand, and then pass the thread under the thread guide. a Thread guide Pass the thread under the thread guide cover from the back to the front. Hold the thread with your right hand so that there is no slack in the thread that is pulled out, and then pass the thread under the thread guide cover with your left hand. a Thread guide cover b
————————————————————————————————————————————————————————————————————————————————————————————————————————————————————— g Pull the thread to the right, pass it under the hook of the bobbin-winding thread guide, and then wind the thread counterclockwise between the discs, pulling it in as far as possible. a Bobbin-winding thread guide Make sure that the thread passes under the pretension disk. b Hook c Pretension disk d Pull it in as far as possible. Note ● Make sure that the thread is pulled as far as possible into the pretension disk, otherwise the bobbin may not be wound cleanly. Put the bobbin onto the bobbin winder shaft h and slide the bobbin winder shaft to the right. Turn the bobbin clockwise, by hand, until the spring on the shaft slides into the notch in the bobbin. • Make sure to pull out 7 to 10 cm (2-3/4 to 3-15/16 inches) of thread from the hole on the bobbin. a Spring on the shaft b Notch c 7-10 cm (2-3/4 – 3-15/16 inches) CAUTION ● Pull the thread taut and hold the end of the thread straight up. If the thread is too short, not pulled taut or held at an angle, injuries may occur when the thread is wound around the bobbin. Turn on the sewing machine. i While holding the end of the thread, gently j press the foot controller or press (start/ stop button) (for models equipped with the start/stop button) to wind the thread around the bobbin a few times. Then stop the machine. Note ● If the sewing machine is to be operated using the foot controller, connect the foot controller before turning on the machine. ● When the foot controller is plugged in, the start/stop button cannot be used to start sewing (only for models equipped with the start/stop button). Trim the excess thread above the bobbin. k CAUTION ● Make sure you follow the instructions carefully. If you do not cut the thread completely, and the bobbin is wound, when the thread runs low it may tangle around the bobbin and cause the needle to break. 17 1
- Page 1: Operation Manual Sewing Machine Pro
- Page 4 and 5: 2 ———————————
- Page 6 and 7: 4 ———————————
- Page 8 and 9: 6 KNOWING YOUR SEWING MACHINE —
- Page 10 and 11: 8 KNOWING YOUR SEWING MACHINE —
- Page 12 and 13: 10 KNOWING YOUR SEWING MACHINE —
- Page 14 and 15: 12 KNOWING YOUR SEWING MACHINE —
- Page 16 and 17: 14 KNOWING YOUR SEWING MACHINE —
- Page 20 and 21: 18 KNOWING YOUR SEWING MACHINE —
- Page 22 and 23: 20 KNOWING YOUR SEWING MACHINE —
- Page 24 and 25: 22 KNOWING YOUR SEWING MACHINE —
- Page 26 and 27: 24 KNOWING YOUR SEWING MACHINE —
- Page 28 and 29: 26 KNOWING YOUR SEWING MACHINE —
- Page 30 and 31: 28 KNOWING YOUR SEWING MACHINE —
- Page 32 and 33: 30 KNOWING YOUR SEWING MACHINE —
- Page 34 and 35: 32 KNOWING YOUR SEWING MACHINE —
- Page 36 and 37: 34 KNOWING YOUR SEWING MACHINE —
- Page 38 and 39: 36 SEWING BASICS ——————
- Page 40 and 41: 38 SEWING BASICS ——————
- Page 42 and 43: 40 SEWING BASICS ——————
- Page 44 and 45: 42 SEWING BASICS ——————
- Page 46 and 47: 44 SEWING BASICS ——————
- Page 48 and 49: 46 UTILITY STITCHES —————
- Page 50 and 51: 48 UTILITY STITCHES —————
- Page 52 and 53: 50 UTILITY STITCHES —————
- Page 54 and 55: 52 UTILITY STITCHES —————
- Page 56 and 57: 54 UTILITY STITCHES —————
- Page 58 and 59: 56 UTILITY STITCHES —————
- Page 60 and 61: 58 UTILITY STITCHES —————
- Page 62 and 63: 60 UTILITY STITCHES —————
- Page 64 and 65: 62 UTILITY STITCHES —————
- Page 66 and 67: 64 UTILITY STITCHES —————
16<br />
KNOWING YOUR SEWING MACHINE ———————————————————————————————————————————————————————————————————————————————————<br />
c<br />
d<br />
Fully insert the spool of thread for the bobbin<br />
onto the spool pin.<br />
Slide the spool onto the pin so that the spool is<br />
horizontal and the thread unwinds to the front<br />
at the bottom.<br />
Slide the spool cap onto the spool pin.<br />
With the slightly rounded side of the spool cap<br />
positioned toward the left, slide the spool cap<br />
onto the spool pin as far as possible to the right<br />
so that the spool is moved to the right end of<br />
the spool pin.<br />
CAUTION<br />
● If the spool or the spool cap is not positioned<br />
correctly, the thread may become tangled<br />
around the spool pin or the machine may be<br />
damaged.<br />
● Three spool cap sizes are available, allowing<br />
you to choose a spool cap that best fits the<br />
size of spool being used. If the spool cap is too<br />
small for the spool being used, the thread may<br />
catch on the slit in the spool or the machine<br />
may be damaged.<br />
e<br />
f<br />
Memo<br />
● When sewing with fine, cross-wound<br />
thread, use the small spool cap, and leave a<br />
small space between the cap and the spool.<br />
a<br />
c<br />
a Spool cap (small)<br />
b Spool (cross-wound thread)<br />
c Space<br />
While holding the spool with your right hand,<br />
and then pass the thread under the thread<br />
guide.<br />
a Thread guide<br />
Pass the thread under the thread guide cover<br />
from the back to the front.<br />
Hold the thread with your right hand so that<br />
there is no slack in the thread that is pulled out,<br />
and then pass the thread under the thread<br />
guide cover with your left hand.<br />
a Thread guide cover<br />
b


