Satellite® A350 Series User's Guide - Kmart
Satellite® A350 Series User's Guide - Kmart Satellite® A350 Series User's Guide - Kmart
148 Utilities CD/DVD Drive Acoustic Silencer CD/DVD Drive Acoustic Silencer NOTE This utility can slow the speed of your optical drive to make it run more quietly. You can use this utility to make listening to music CDs more enjoyable. When you change the optical drive to “Silence” mode, the setting is only valid for the current Windows ® session. If you shut down, restart, log off, or resume from Hibernation, the setting will revert back to Normal speed. The setting can also be changed by CD burning software or other applications that can set the drive speed. (Sample Image) CD/DVD Drive Acoustic Silencer screen To access the utility: 1 Click the CD/DVD Drive Acoustic Silencer icon in the Optimize tab of TOSHIBA Assist. The CD/DVD Drive Acoustic Silencer screen appears. 2 Click Silence Mode to make the drive run more slowly and quietly for listening to music or audio files on a CD. 3 Click Normal Mode to run the drive at normal speed for transferring data.
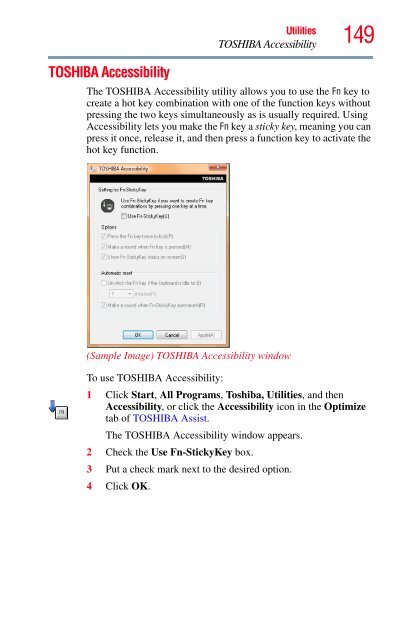
TOSHIBA Accessibility Utilities TOSHIBA Accessibility 149 The TOSHIBA Accessibility utility allows you to use the Fn key to create a hot key combination with one of the function keys without pressing the two keys simultaneously as is usually required. Using Accessibility lets you make the Fn key a sticky key, meaning you can press it once, release it, and then press a function key to activate the hot key function. (Sample Image) TOSHIBA Accessibility window To use TOSHIBA Accessibility: 1 Click Start, All Programs, Toshiba, Utilities, and then Accessibility, or click the Accessibility icon in the Optimize tab of TOSHIBA Assist. The TOSHIBA Accessibility window appears. 2 Check the Use Fn-StickyKey box. 3 Put a check mark next to the desired option. 4 Click OK.
- Page 97 and 98: Chapter 3 Mobile Computing This cha
- Page 99 and 100: Power management Mobile Computing C
- Page 101 and 102: NOTE Mobile Computing Monitoring ma
- Page 103 and 104: Mobile Computing Monitoring main ba
- Page 105 and 106: Power Plans Mobile Computing Monito
- Page 107 and 108: Mobile Computing Changing the main
- Page 109 and 110: Inserting a charged battery Mobile
- Page 111 and 112: Maintaining your battery Mobile Com
- Page 113 and 114: Mobile Computing Traveling tips 113
- Page 115 and 116: Finding your way around the desktop
- Page 117 and 118: Setting up for communications NOTE
- Page 119 and 120: NOTE Exploring Your Computer’s Fe
- Page 121 and 122: Connecting to the Internet Explorin
- Page 123 and 124: Exploring Your Computer’s Feature
- Page 125 and 126: NOTE ❖ Have video conference call
- Page 127 and 128: Inserting memory media Exploring Yo
- Page 129 and 130: Chapter 5 Utilities NOTE Your compu
- Page 131 and 132: Connect The features available in t
- Page 133 and 134: Protect & Fix The features availabl
- Page 135 and 136: Setting passwords NOTE Utilities Se
- Page 137 and 138: Utilities Setting passwords 137 6 C
- Page 139 and 140: Utilities TOSHIBA PC Diagnostic Too
- Page 141 and 142: Mouse Utility Utilities Mouse Utili
- Page 143 and 144: NOTE Utilities TOSHIBA Hardware Set
- Page 145 and 146: NOTE Utilities TOSHIBA Hardware Set
- Page 147: Utilities TOSHIBA Button Support 14
- Page 151 and 152: Fingerprint Logon Utilities Fingerp
- Page 153 and 154: ConfigFree ® NOTE NOTE Utilities C
- Page 155 and 156: ❖ Status of Wireless Connection s
- Page 157 and 158: Chapter 6 If Something Goes Wrong S
- Page 159 and 160: If Something Goes Wrong Problems wh
- Page 161 and 162: If Something Goes Wrong The Windows
- Page 163 and 164: If Something Goes Wrong Resolving a
- Page 165 and 166: If Something Goes Wrong Resolving a
- Page 167 and 168: If Something Goes Wrong Resolving a
- Page 169 and 170: If Something Goes Wrong Resolving a
- Page 171 and 172: If Something Goes Wrong Resolving a
- Page 173 and 174: If Something Goes Wrong Resolving a
- Page 175 and 176: If Something Goes Wrong Resolving a
- Page 177 and 178: Wireless networking problems NOTE N
- Page 179 and 180: If Something Goes Wrong DVD operati
- Page 181 and 182: If Something Goes Wrong Develop goo
- Page 183 and 184: If Something Goes Wrong Develop goo
- Page 185 and 186: If Something Goes Wrong Develop goo
- Page 187 and 188: Toshiba voice contact If Something
- Page 189 and 190: Appendix A Hot Keys/TOSHIBA Cards H
- Page 191 and 192: Application Cards NOTE Hot Keys/TOS
- Page 193 and 194: Hot Keys/TOSHIBA Cards Hot key func
- Page 195 and 196: Power plan Fn + or Hot Keys/TOSHIBA
- Page 197 and 198: Hibernation mode Fn + or Hot Keys/T
TOSHIBA Accessibility<br />
Utilities<br />
TOSHIBA Accessibility<br />
149<br />
The TOSHIBA Accessibility utility allows you to use the Fn key to<br />
create a hot key combination with one of the function keys without<br />
pressing the two keys simultaneously as is usually required. Using<br />
Accessibility lets you make the Fn key a sticky key, meaning you can<br />
press it once, release it, and then press a function key to activate the<br />
hot key function.<br />
(Sample Image) TOSHIBA Accessibility window<br />
To use TOSHIBA Accessibility:<br />
1 Click Start, All Programs, Toshiba, Utilities, and then<br />
Accessibility, or click the Accessibility icon in the Optimize<br />
tab of TOSHIBA Assist.<br />
The TOSHIBA Accessibility window appears.<br />
2 Check the Use Fn-StickyKey box.<br />
3 Put a check mark next to the desired option.<br />
4 Click OK.


