

Owner's Manual - Electric Generators Direct
Owner's Manual - Electric Generators Direct
Owner's Manual - Electric Generators Direct

Create successful ePaper yourself
Turn your PDF publications into a flip-book with our unique Google optimized e-Paper software.
Owner’s<br />
<strong>Manual</strong><br />
SAFETY<br />
ASSEMBLY<br />
OPERATION<br />
TROUBLESHOOTING<br />
WARRANTY<br />
AUTHORIZED DEALER SUPPORT:<br />
www.generac.com<br />
or<br />
1-888-GENERAC<br />
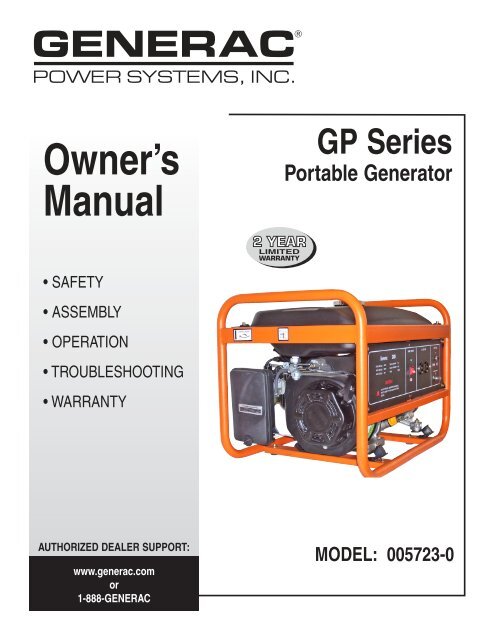
GP Series<br />
Portable Generator<br />
MODEL: 005723-0
Table of Contents<br />
Portable Generator System<br />
<strong>Owner's</strong> <strong>Manual</strong><br />
Introduction ..................................................................................... 1<br />
Read this <strong>Manual</strong> Thoroughly ....................................................... 1<br />
Safety Rules .................................................................................... 2<br />
Standards Index.................................................................... 3<br />
Section 1 – General Information ................................................... 4<br />
1.1 Unpacking ............................................................................. 4<br />
Section 2 – Operation .................................................................... 4<br />
2.1 Know the Generator ............................................................. 4<br />
2.2 Cord Sets and Connection Plugs ......................................... 4<br />
2.3 How to Use the Generator .................................................... 5<br />
2.4 Don’t Overload the Generator .............................................. 5<br />
2.5 Wattage Reference Guide .................................................... 5<br />
2.6 Before Starting the Generator .............................................. 6<br />
2.7 To Start the Engine ............................................................... 7<br />
2.8 Stopping the Engine ............................................................. 7<br />
2.9 Low Oil Level Shutdown System .......................................... 7<br />
Section 3 – Maintenance ............................................................... 8<br />
3.1 Maintenance Schedule ......................................................... 8<br />
3.2 Product Specifications .......................................................... 8<br />
3.3 General Recommendations .................................................. 8<br />
3.4 Service Air Filter ................................................................... 9<br />
3.5 Valve Clearance .................................................................. 10<br />
3.6 General .............................................................................. 10<br />
3.7 Long Term Storage ............................................................. 10<br />
3.8 Other Storage Tips ............................................................. 10<br />
Section 4 – Troubleshooting ........................................................ 11<br />
4.1 Troubleshooting Guide ........................................................ 11<br />
Section 5 – Notes ......................................................................... 12<br />
Section 6 – Warranty .................................................................... 14<br />
<strong>Manual</strong> del propietario .................................. 15<br />
Introducción .................................................................................. 17<br />
Lea este manual atentamente ..................................................... 17<br />
Reglas de seguridad .................................................................... 18<br />
Índice de normas ................................................................ 19<br />
Sección 1 – Información general ................................................ 20<br />
1.1 Cómo desempacar ............................................................. 20<br />
Sección 2 - Funcionamiento ....................................................... 20<br />
2.1 Conozca el generador ........................................................ 20<br />
2.2 Juegos de cables y enchufes de conexión ......................... 20<br />
2.3 Cómo utilizar el generador ................................................ 21<br />
2.4 No sobrecargue el generador ............................................. 21<br />
2.5 Guía de referencia del vataje ............................................. 21<br />
2.6 Antes de arrancar el generador .......................................... 22<br />
2.7 Cómo arrancar el motor ..................................................... 23<br />
2.8 Cómo parar el motor ......................................................... 23<br />
2.9 Sistema de apagado por bajo nivel de aceite .................... 23<br />
Sección 3 – Mantenimiento ......................................................... 24<br />
3.1 Programación de mantenimiento ........................................ 24<br />
3.2 Especificaciones del producto ............................................ 24<br />
3.3 Recomendaciones generales ............................................. 24<br />
3.4 Servicio del filtro de aire ..................................................... 25<br />
3.5 Abertura de la válvula ........................................................ 26<br />
3.6 General .............................................................................. 26<br />
3.7 Almacenaje por períodos largos ........................................ 26<br />
3.8 Otros consejos útiles para el almacenaje .......................... 26<br />
Sección 4 – Solución de problemas ........................................... 27<br />
4.1 Guía para la solución de problemas................................... 27<br />
Sección 5 – Garantía .................................................................... 28<br />
Guide du propriétaire .....................................29<br />
Introduction ................................................................................... 31<br />
Lire soigneusement ce manuel ................................................... 31<br />
Consignes de sécurité ................................................................. 32<br />
Répertoire-type ................................................................... 33<br />
Section 1 – Généralités ................................................................ 34<br />
1.1 Déballage............................................................................ 34<br />
Section 2 – Fonctionnement ....................................................... 34<br />
2.1 Connaître la génératrice ..................................................... 34<br />
2.2 Cordons électriques et fiches de branchement .................. 34<br />
2.3 Mode d'emploi de la génératrice ........................................ 35<br />
2.4 Ne pas surcharger la génératrice ....................................... 35<br />
2.5 Guide de référence de puissance ...................................... 35<br />
2.6 Avant la mise en route de la génératrice ............................ 36<br />
2.7 Démarrage du moteur ........................................................ 37<br />
2.8 Arrêt du moteur................................................................... 37<br />
2.9 Système d’arrêt en cas de faible niveau d’huile ................. 37<br />
Section 3 – Entretien .................................................................... 38<br />
3.1 Calendrier d’entretien ......................................................... 38<br />
3.2 Spécifications de l'appareil ................................................. 38<br />
3.3 Recommandations générales ............................................. 38<br />
3.4 Entretien du filtre à air ........................................................ 39<br />
3.5 Jeu de soupape .................................................................. 40<br />
3.6 Généralités ......................................................................... 40<br />
3.7 Rangement à long terme .................................................... 40<br />
3.8 Autres conseils de rangement ............................................ 40<br />
Section 4 – Dépannage ................................................................ 41<br />
4.1 Guide de dépistage des pannes......................................... 41<br />
Section 5 – Garantie ............................................Couvercle arrière
INTRODUCTION<br />
Thank you for purchasing this model by Generac Power Systems, Inc.<br />
This model is a compact, high performance, air-cooled, engine driven<br />
generator designed to supply electrical power to operate electrical<br />
loads on job sites, or remote locations where no utility power is<br />
available or in place of utility due to a power outage.<br />
READ THIS MANUAL THOROUGHLY<br />
If any portion of this manual is not understood, contact the nearest<br />
Authorized Dealer for starting, operating and servicing procedures.<br />
Throughout this publication, and on tags and decals affixed to the<br />
generator, DANGER, WARNING, CAUTION and NOTE blocks are<br />
used to alert personnel to special instructions about a particular<br />
operation that may be hazardous if performed incorrectly or carelessly.<br />
Observe them carefully. Their definitions are as follows:<br />
DANGER<br />
After this heading, read instructions that, if<br />
not strictly complied with, will result in serious<br />
personal injury, including death and/or property<br />
damage.<br />
After this heading, read instructions that, if not<br />
strictly complied with, may result in serious<br />
personal injury and/or property damage.<br />
After this heading, read instructions that, if not<br />
strictly complied with, could result in damage to<br />
equipment and/or property.<br />
NOTE:<br />
After this heading, read explanatory statements that require<br />
special emphasis.<br />
These safety warnings cannot eliminate the hazards that they indicate.<br />
Common sense and strict compliance with the special instructions<br />
while performing the service are essential to preventing accidents.<br />
Four commonly used safety symbols accompany the DANGER,<br />
WARNING and CAUTION blocks. The type of information each<br />
indicates is as follows:<br />
This symbol points out important safety<br />
<br />
information that, if not followed, could endanger<br />
personal safety and/or property of others.<br />
This symbol points out potential explosion<br />
hazard.<br />
This symbol points out potential fire hazard.<br />
<br />
This symbol points out potential electrical shock<br />
hazard.<br />
The operator is responsible for proper and safe use of the<br />
equipment. We strongly recommend that the operator read this<br />
manual and thoroughly understand all instructions before using<br />
the equipment.<br />
We also strongly recommend instructing other users to properly<br />
start and operate the unit. This prepares them if they need to<br />
operate the equipment in an emergency.<br />
<br />
<br />
<br />
<br />
DANGER<br />
Using a generator indoors WILL KILL YOU IN<br />
MINUTES. Exhaust contains carbon monoxide, a<br />
poison gas you cannot see or smell.<br />
NEVER use in the home, or in partly enclosed<br />
areas such as garages. ONLY use outdoors and<br />
far from open windows, doors, vents, and in an<br />
area that will not accumulate deadly exhaust<br />
gas.<br />
Always disconnect the spark plug wire and<br />
place the wire where they cannot contact the<br />
spark plug to prevent accidental starting when<br />
setting up, transporting, adjusting or making<br />
repairs to the generator.<br />
The generator produces dangerously high voltage that can cause<br />
extremely hazardous electrical shock. Avoid contact with bare<br />
wires, terminals, etc. Never permit any unqualified person to<br />
operate or service the generator.<br />
Never handle any kind of electrical cord or device while standing<br />
in water, while barefoot or while hands or feet are wet. Dangerous<br />
electrical shock will result.<br />
The National <strong>Electric</strong> Code requires the frame and external<br />
electrically conductive parts of the generator be properly connected<br />
to an approved earth ground. Local electrical codes may also<br />
require proper grounding of the generator. Consult with a local<br />
electrician for grounding requirements in the area.<br />
Do not use worn, bare, frayed or otherwise damaged electrical<br />
cord sets with the generator.<br />
Operate generator only on level surfaces and where it will not be<br />
exposed to excessive moisture, dirt, dust or corrosive vapors.<br />
Gasoline is highly FLAMMABLE and its vapors are EXPLOSIVE.<br />
Do not permit smoking, open flames, sparks or heat in the vicinity<br />
while handling gasoline. Avoid spilling gasoline on a hot engine.<br />
Comply with all laws regulating storage and handling of gasoline.<br />
Never add fuel while unit is running.<br />
Do not overfill the fuel tank. Always allow room<br />
for fuel expansion. If tank is over-filled, fuel can<br />
overflow onto a hot engine and cause FIRE or<br />
an EXPLOSION. Allow generator and engine to<br />
cool entirely before adding fuel.<br />
Never store generator with fuel in tank where gasoline vapors<br />
might reach an open flame, spark or pilot light (as on a furnace,<br />
water heater or clothes dryer). FIRE or EXPLOSION may result.<br />
Generator exhaust gases contain DEADLY carbon monoxide gas.<br />
This dangerous gas, if breathed in sufficient concentrations, can<br />
cause unconsciousness or even death. Operate this equipment<br />
only in the open air where adequate ventilation is available.<br />
1
2<br />
DANGER<br />
Allow at least five (5) feet, or greater, of clearance on all<br />
sides of generator or damage could be done to the unit.<br />
Never operate the unit inside any room or enclosure.<br />
<br />
IMPORTANT SAFETY INSTRUCTIONS<br />
Portable Generator System<br />
SAVE THESE INSTRUCTIONS – The manufacturer suggests that these rules for safe operation be copied and posted near the unit's<br />
<br />
installation site. Safety should be stressed to all operators and potential operators of this equipment.<br />
NEVER operate the generator indoors, in a garage, near an<br />
open window, or in an area that could accumulate exhaust<br />
gas.<br />
Never start or stop the unit with electrical loads connected to<br />
receptacles AND with connected devices turned ON. Start<br />
the engine and let it stabilize before connecting electrical<br />
loads. Disconnect all electrical loads before shutting down the<br />
generator.<br />
Do not insert objects through unit's cooling slots.<br />
Never operate generator: in rain; indoors or in any enclosed<br />
compartment; if connected electrical devices overheat; if electrical<br />
output is lost; if engine or generator sparks; if flames or smoke are<br />
observed while unit is running; if unit vibrates excessively.<br />
Study these SAFETY RULES carefully before installing, operating or<br />
servicing this equipment. Become familiar with this manual and with<br />
the unit. The generator can operate safely, efficiently and reliably only<br />
if it is properly installed, operated and maintained. Many accidents<br />
are caused by failing to follow simple and fundamental rules or<br />
precautions.<br />
WARNING: <br />
The engine exhaust from this product contains<br />
chemicals known to the state of California to cause<br />
cancer, birth defects or other reproductive harm.<br />
WARNING: <br />
This product contains or emits chemicals<br />
known to the state of California to cause<br />
cancer, birth defects or other reproductive harm.<br />
The manufacturer cannot anticipate every possible circumstance that<br />
might involve a hazard. The warnings in this manual, and on tags and<br />
decals affixed to the unit are, therefore, not all inclusive. If using a<br />
procedure, work method or operating technique that the manufacturer<br />
does not specifically recommend, ensure that it is safe for others. Also<br />
make sure the procedure, work method or operating technique utilized<br />
does not render the generator unsafe.<br />
<br />
<br />
<br />
DANGER<br />
Despite the safe design of this generator,<br />
operating this equipment imprudently,<br />
neglecting its maintenance or being careless<br />
can cause possible injury or death. Permit only<br />
responsible and capable persons to operate or<br />
maintain this equipment.<br />
Potentially lethal voltages are generated by<br />
these machines. Ensure all steps are taken to<br />
render the machine safe before attempting to<br />
work on the generator.<br />
Parts of the generator are rotating and/or hot<br />
during operation. Exercise care near running<br />
generators. Do not touch hot surfaces such as<br />
the muffler. Severe burns can occur on contact.<br />
Allow generator to cool before touching.<br />
GENERAL HAZARDS <br />
Never operate in an enclosed area or indoors.<br />
For safety reasons, the manufacturer recommends that the<br />
maintenance of this equipment is carried out by an Authorized<br />
Dealer.<br />
The engine exhaust fumes contain carbon monoxide, which<br />
can be DEADLY. This dangerous gas, if breathed in sufficient<br />
concentrations, can cause unconsciousness or even death. This<br />
exhaust system must be properly maintained. Do nothing that<br />
might render the exhaust system unsafe or in noncompliance with<br />
any local codes and/or standards.<br />
Keep hands, feet, clothing, etc., away from drive belts, fans, and<br />
other moving or hot parts. Never remove any fan guard while the<br />
unit is operating.<br />
Adequate, unobstructed flow of cooling and ventilating air is critical<br />
to correct generator operation. Do not alter the installation or<br />
permit even partial blockage of ventilation provisions, as this can<br />
seriously affect safe operation of the generator. The generator<br />
MUST be operated outdoors.<br />
When working on this equipment, remain alert at all times. Never<br />
work on the equipment when physically or mentally fatigued.<br />
Inspect the generator regularly, and contact the nearest Authorized<br />
Dealer for parts needing repair or replacement.<br />
Before performing any maintenance on the generator, disconnect<br />
its battery cables to prevent accidental start up. Disconnect the<br />
cable from the battery post indicated by a NEGATIVE, NEG or (–)<br />
first. Reconnect that cable last.<br />
Never use the generator or any of its parts as a step. Stepping on<br />
the unit can stress and break parts, and may result in dangerous<br />
operating conditions from leaking exhaust gases, fuel leakage, oil<br />
leakage, etc.<br />
Do NOT operate generator in the rain.
ELECTRICAL HAZARDS <br />
All generators covered by this manual produce dangerous electrical<br />
voltages and can cause fatal electrical shock. Utility power delivers<br />
extremely high and dangerous voltages as does the generator<br />
when it is in operation. Avoid contact with bare wires, terminals,<br />
connections, etc., while the unit is running. Ensure all appropriate<br />
covers, guards and barriers are in place before operating the<br />
generator. If work must be done around an operating unit, stand on<br />
an insulated, dry surface to reduce shock hazard.<br />
Do not handle any kind of electrical device while standing in water,<br />
while barefoot, or while hands or feet are wet. DANGEROUS<br />
ELECTRICAL SHOCK MAY RESULT.<br />
The National <strong>Electric</strong>al Code (NEC) requires the frame and external<br />
electrically conductive parts of the generator to be connected to an<br />
approved earth ground. Local electrical codes also may require<br />
proper grounding of the generator electrical system.<br />
In case of accident caused by electric shock, immediately shut<br />
down the source of electrical power. If this is not possible,<br />
attempt to free the victim from the live conductor. AVOID DIRECT<br />
CONTACT WITH THE VICTIM. Use a non-conducting implement,<br />
such as a rope or board, to free the victim from the live conductor.<br />
If the victim is unconscious, apply first aid and get immediate<br />
medical help.<br />
Never wear jewelry when working on this equipment. Jewelry can<br />
conduct electricity resulting in electric shock, or may get caught in<br />
moving components causing injury.<br />
FIRE HAZARDS <br />
For fire safety, the generator must be operated and maintained<br />
properly. Operation must always comply with applicable codes,<br />
standards, laws and regulations. Adhere strictly to local,<br />
state and national electrical and building codes. Comply with<br />
regulations the Occupational Safety and Health Administration<br />
(OSHA) has established. Also, ensure that the generator is<br />
operated in accordance with the manufacturer’s instructions and<br />
recommendations. Do not alter the construction of the generator<br />
or change controls which might create an unsafe operating<br />
condition.<br />
Keep a fire extinguisher near the generator at all times. Extinguishers<br />
rated “ABC” by the National Fire Protection Association are<br />
appropriate for use on the standby electric system. Keep the<br />
extinguisher properly charged and be familiar with its use. If there<br />
are any questions pertaining to fire extinguishers, consult the local<br />
fire department.<br />
Avoid spilling gasoline on HOT engine. Never add fuel while unit<br />
is running. Do not overfill the fuel tank. Always allow room for fuel<br />
expansion in fuel tank.<br />
IMPORTANT SAFETY INSTRUCTIONS<br />
Portable Generator System<br />
EXPLOSION HAZARDS <br />
Do not smoke around the generator. Wipe up any fuel or oil spills<br />
immediately. Ensure that no combustible materials are left on or<br />
near the generator, as FIRE or EXPLOSION may result. Keep the<br />
area surrounding the generator clean and free from debris.<br />
Gasoline is highly FLAMMABLE and extremely EXPLOSIVE.<br />
STANDARDS INDEX<br />
In the absence of pertinent standards, codes, regulations and laws,<br />
the published information listed below may be used as a guideline<br />
for operation of this equipment. Always reference the latest revision<br />
available for the standards listed.<br />
1. NFPA No. 70, NFPA HANDBOOK OF NATIONAL ELECTRIC<br />
CODE.<br />
2. Article X, NATIONAL BUILDING CODE, available from the<br />
American Insurance Association, 85 John Street, New York, N.Y.<br />
10038.<br />
3. AGRICULTURAL WIRING HANDBOOK, available from the Food<br />
and Energy Council, 909 University Avenue, Columbia, MO<br />
65201.<br />
4. ASAE EP-3634, INSTALLATION AND MAINTENANCE OF FARM<br />
STANDBY ELECTRICAL SYSTEMS, available from the American<br />
Society of Agricultural Engineers, 2950 Niles Road, St. Joseph,<br />
MI 49085.<br />
5. NFPA No. 30, FLAMMABLE AND COMBUSTIBLE LIQUIDS<br />
CODE.<br />
3
1.1 UNPACKING<br />
4<br />
Remove all packaging material.<br />
Remove the generator from carton.<br />
2.1 KNOW THE GENERATOR<br />
Read the Owner’s <strong>Manual</strong> and Safety Rules before operating this<br />
generator.<br />
Compare the generator to Figures 3 through 5 to become familiarized<br />
with the locations of various controls and adjustments. Save this<br />
manual for future reference.<br />
1. 120 Volt AC, 20 Amp, Duplex Receptacle – Supplies electrical<br />
power for the operation of 120 Volt AC, 20 Amp, single-phase, 60<br />
Hz electrical lighting, appliance, tool and motor loads.<br />
2. Circuit Breaker (AC) – The receptacle is provided with a 15 Amp<br />
push-to-reset circuit breaker to protect the generator against<br />
electrical overload.<br />
3. Air Filter – Filters intake air as it is drawn into the engine.<br />
4. Choke Knob – Used when starting a cold engine.<br />
4<br />
3<br />
Figure 3 - Control Panel<br />
7 1 2<br />
Figure 4 - Generator Controls<br />
5<br />
Section 1 – General Information<br />
Portable Generator System<br />
13 12<br />
9<br />
10<br />
6<br />
5. Fuel Tank – Tank holds 4 U.S. gallons of fuel.<br />
6. Grounding Lug – Ground the generator to an approved earth<br />
ground here. See "Grounding the Generator" for details.<br />
7. ON/OFF Switch – Controls the operation of the generator.<br />
8. Muffler – Quiets the engine.<br />
9. Gas Cap – Fuel fill location.<br />
10. Fuel Gauge – Shows fuel level in tank.<br />
11. Oil Check/Fill – Check and fill oil here.<br />
12. Recoil Starter – Use to start engine manually.<br />
13. Fuel Shut Off – Valve between fuel tank and carburetor.<br />
14. Oil Drain Plug – Used to drain engine oil.<br />
15. Spark Arrestor – Reduces fire hazard by containing sparks.<br />
7<br />
11<br />
Figure 5 - Generator Controls<br />
6 8<br />
14<br />
2.2 CORD SETS AND CONNECTION PLUGS<br />
2.2.1 120 VAC, 20 AMP, DUPLEX RECEPTACLE<br />
15<br />
This is a 120 Volt outlet protected against overload by a 15 Amp<br />
push-to-reset circuit breaker (Figure 6). 20 Amps of current may be<br />
drawn from each socket, however, total power drawn must be kept<br />
within data plate ratings. Use only high quality, well insulated, 3-wire<br />
grounded cord sets rated for 125 Volts at 20 Amps (or greater).<br />
Figure 6 - 120 Volt AC, 20 Amp, Duplex Receptacle
2.3 HOW TO USE THE GENERATOR<br />
If there are any problems operating the generator, please call the<br />
generator helpline at 1-888-436-3722.<br />
2.3.1 GROUNDING THE GENERATOR<br />
The National <strong>Electric</strong>al Code requires that the frame and external<br />
electrically conductive parts of this generator be properly<br />
connected to an approved earth ground (Figure 7). Local electrical<br />
codes may also require proper grounding of the unit. For that purpose,<br />
connecting a No. 10 AWG (American Wire Gauge) stranded copper<br />
wire to the grounding lug and to an earth-driven copper or brass<br />
grounding rod (electrode) provides adequate protection against<br />
electrical shock. However, local codes may vary widely. Consult with<br />
a local electrician for grounding requirements in the area.<br />
Figure 7 - Grounding the Generator<br />
Proper grounding of the generator will help prevent electrical<br />
shock in the event of a ground fault condition in the generator or in<br />
connected electrical devices. Proper grounding also helps dissipate<br />
static electricity, which often builds up in ungrounded devices.<br />
2.3.2 CONNECTING ELECTRICAL LOADS<br />
DO NOT connect 240 Volt loads to 120 Volt receptacles. DO NOT<br />
connect 3-phase loads to the generator. DO NOT connect 50 Hz loads<br />
to the generator.<br />
Let engine stabilize and warm up for a few minutes after starting.<br />
Plug in and turn on the desired 120 or 240 Volt AC, single phase,<br />
60 Hz electrical loads.<br />
Add up the rated watts (or amps) of all loads to be connected<br />
at one time. This total should not be greater than (a) the rated<br />
wattage/amperage capacity of the generator or (b) circuit breaker<br />
rating of the receptacle supplying the power. See "Don't Overload<br />
the Generator".<br />
Section 2 – Operation<br />
Portable Generator System<br />
2.4 DON’T OVERLOAD THE GENERATOR<br />
Overloading a generator in excess of its rated wattage capacity can<br />
result in damage to the generator and to connected electrical devices.<br />
Observe the following to prevent overloading the unit:<br />
Add up the total wattage of all electrical devices to be connected<br />
at one time. This total should NOT be greater than the generator's<br />
wattage capacity.<br />
The rated wattage of lights can be taken from light bulbs. The rated<br />
wattage of tools, appliances and motors can usually be found on a<br />
data label or decal affixed to the device.<br />
If the appliance, tool or motor does not give wattage, multiply volts<br />
times ampere rating to determine watts (volts x amps = watts).<br />
Some electric motors, such as induction types, require about three<br />
times more watts of power for starting than for running. This surge<br />
of power lasts only a few seconds when starting such motors.<br />
Make sure to allow for high starting wattage when selecting<br />
electrical devices to connect to the generator:<br />
1. Figure the watts needed to start the largest motor.<br />
2. Add to that figure the running watts of all other connected loads.<br />
The Wattage Reference Guide is provided to assist in determining<br />
how many items the generator can operate at one time.<br />
NOTE:<br />
All figures are approximate. See data label on appliance for<br />
wattage requirements.<br />
2.5 WATTAGE REFERENCE GUIDE<br />
Device. . . . . . . . . . . . . . . . . . . . . . . . . . . . . . . . . . . . . . . .Running Watts<br />
*Air Conditioner (12,000 Btu) . . . . . . . . . . . . . . . . . . . . . . . . . . . . . . 1700<br />
*Air Conditioner (24,000 Btu) . . . . . . . . . . . . . . . . . . . . . . . . . . . . . . 3800<br />
*Air Conditioner (40,000 Btu) . . . . . . . . . . . . . . . . . . . . . . . . . . . . . . 6000<br />
Battery Charger (20 Amp). . . . . . . . . . . . . . . . . . . . . . . . . . . . . . . . . . 500<br />
Belt Sander (3") . . . . . . . . . . . . . . . . . . . . . . . . . . . . . . . . . . . . . . . . 1000<br />
Chain Saw. . . . . . . . . . . . . . . . . . . . . . . . . . . . . . . . . . . . . . . . . . . . . 1200<br />
Circular Saw (6-1/2"). . . . . . . . . . . . . . . . . . . . . . . . . . . . . . . .800 to 1000<br />
*Clothes Dryer (<strong>Electric</strong>) . . . . . . . . . . . . . . . . . . . . . . . . . . . . . . . . . 5750<br />
*Clothes Dryer (Gas). . . . . . . . . . . . . . . . . . . . . . . . . . . . . . . . . . . . . . 700<br />
*Clothes Washer . . . . . . . . . . . . . . . . . . . . . . . . . . . . . . . . . . . . . . . . 1150<br />
Coffee Maker. . . . . . . . . . . . . . . . . . . . . . . . . . . . . . . . . . . . . . . . . . . 1750<br />
*Compressor (1 HP) . . . . . . . . . . . . . . . . . . . . . . . . . . . . . . . . . . . . . 2000<br />
*Compressor (3/4 HP). . . . . . . . . . . . . . . . . . . . . . . . . . . . . . . . . . . . 1800<br />
*Compressor (1/2 HP). . . . . . . . . . . . . . . . . . . . . . . . . . . . . . . . . . . . 1400<br />
Curling Iron . . . . . . . . . . . . . . . . . . . . . . . . . . . . . . . . . . . . . . . . . . . . . 700<br />
*Dehumidifier. . . . . . . . . . . . . . . . . . . . . . . . . . . . . . . . . . . . . . . . . . . . 650<br />
Disc Sander (9") . . . . . . . . . . . . . . . . . . . . . . . . . . . . . . . . . . . . . . . . 1200<br />
Edge Trimmer . . . . . . . . . . . . . . . . . . . . . . . . . . . . . . . . . . . . . . . . . . . 500<br />
<strong>Electric</strong> Blanket . . . . . . . . . . . . . . . . . . . . . . . . . . . . . . . . . . . . . . . . . . 400<br />
<strong>Electric</strong> Nail Gun . . . . . . . . . . . . . . . . . . . . . . . . . . . . . . . . . . . . . . . . 1200<br />
<strong>Electric</strong> Range (per element) . . . . . . . . . . . . . . . . . . . . . . . . . . . . . . 1500<br />
<strong>Electric</strong> Skillet . . . . . . . . . . . . . . . . . . . . . . . . . . . . . . . . . . . . . . . . . . 1250<br />
*Freezer . . . . . . . . . . . . . . . . . . . . . . . . . . . . . . . . . . . . . . . . . . . . . . . ..700<br />
*Furnace Fan (3/5 HP) . . . . . . . . . . . . . . . . . . . . . . . . . . . . . . . . . . . . 875<br />
*Garage Door Opener. . . . . . . . . . . . . . . . . . . . . . . . . . . . . . . .500 to 750<br />
Hair Dryer . . . . . . . . . . . . . . . . . . . . . . . . . . . . . . . . . . . . . . . . . . . . . 1200<br />
5
6<br />
Section 2 – Operation<br />
Portable Generator System<br />
Hand Drill . . . . . . . . . . . . . . . . . . . . . . . . . . . . . . . . . . . . . . . .250 to 1100<br />
Hedge Trimmer . . . . . . . . . . . . . . . . . . . . . . . . . . . . . . . . . . . . . . . . . . 450<br />
Impact Wrench . . . . . . . . . . . . . . . . . . . . . . . . . . . . . . . . . . . . . . . . . . 500<br />
Iron . . . . . . . . . . . . . . . . . . . . . . . . . . . . . . . . . . . . . . . . . . . . . . . . . . 1200<br />
*Jet Pump . . . . . . . . . . . . . . . . . . . . . . . . . . . . . . . . . . . . . . . . . . . . . . 800<br />
Lawn Mower . . . . . . . . . . . . . . . . . . . . . . . . . . . . . . . . . . . . . . . . . . . 1200<br />
Light Bulb . . . . . . . . . . . . . . . . . . . . . . . . . . . . . . . . . . . . . . . . . . . . . . 100<br />
Microwave Oven . . . . . . . . . . . . . . . . . . . . . . . . . . . . . . . . . . .700 to 1000<br />
*Milk Cooler. . . . . . . . . . . . . . . . . . . . . . . . . . . . . . . . . . . . . . . . . . . . 1100<br />
Oil Burner on Furnace . . . . . . . . . . . . . . . . . . . . . . . . . . . . . . . . . . . . 300<br />
Oil Fired Space Heater (140,000 Btu) . . . . . . . . . . . . . . . . . . . . . . . . 400<br />
Oil Fired Space Heater (85,000 Btu) . . . . . . . . . . . . . . . . . . . . . . . . . 225<br />
Oil Fired Space Heater (30,000 Btu) . . . . . . . . . . . . . . . . . . . . . . . . . 150<br />
*Paint Sprayer, Airless (1/3 HP) . . . . . . . . . . . . . . . . . . . . . . . . . . . . . 600<br />
Paint Sprayer, Airless (handheld) . . . . . . . . . . . . . . . . . . . . . . . . . . . . 150<br />
Radio. . . . . . . . . . . . . . . . . . . . . . . . . . . . . . . . . . . . . . . . . . . . . .50 to 200<br />
*Refrigerator . . . . . . . . . . . . . . . . . . . . . . . . . . . . . . . . . . . . . . . . . . . . 700<br />
Slow Cooker . . . . . . . . . . . . . . . . . . . . . . . . . . . . . . . . . . . . . . . . . . . . 200<br />
*Submersible Pump (1-1/2 HP). . . . . . . . . . . . . . . . . . . . . . . . . . . . . 2800<br />
*Submersible Pump (1 HP). . . . . . . . . . . . . . . . . . . . . . . . . . . . . . . . 2000<br />
*Submersible Pump (1/2 HP) . . . . . . . . . . . . . . . . . . . . . . . . . . . . . . 1500<br />
*Sump Pump. . . . . . . . . . . . . . . . . . . . . . . . . . . . . . . . . . . . . .800 to 1050<br />
*Table Saw (10") . . . . . . . . . . . . . . . . . . . . . . . . . . . . . . . . . .1750 to 2000<br />
Television . . . . . . . . . . . . . . . . . . . . . . . . . . . . . . . . . . . . . . . . .200 to 500<br />
Toaster . . . . . . . . . . . . . . . . . . . . . . . . . . . . . . . . . . . . . . . . .1000 to 1650<br />
Weed Trimmer. . . . . . . . . . . . . . . . . . . . . . . . . . . . . . . . . . . . . . . . . . . 500<br />
* Allow 3 times the listed watts for starting these devices.<br />
2.6 BEFORE STARTING THE GENERATOR<br />
Prior to operating the generator, engine oil and gasoline will need to<br />
be added, as follows:<br />
2.6.1 ADDING ENGINE OIL<br />
All oil should meet minimum American Petroleum Institute (API)<br />
Service Class SJ, SL or better. Use no special additives. Select the<br />
oil's viscosity grade according to the expected operating temperature<br />
(also see chart).<br />
Above 40° F, use SAE 30<br />
Below 40° F and down to 10° F, use 10W-30<br />
Below 10° F, use synthetic 5W-30<br />
Synthetic 5W-30<br />
10W-30<br />
SAE 30<br />
<br />
Any attempt to crank or start the engine before<br />
it has been properly serviced with the<br />
recommended oil may result in an engine<br />
failure.<br />
Place generator on a level surface.<br />
Clean area around oil fill and remove oil fill cap and dipstick.<br />
Wipe dipstick clean.<br />
Slowly fill engine with oil (through the oil fill opening) until it reaches<br />
the bottom of the dipstick threads. Stop filling occasionally to check<br />
oil level. Be careful not to over fill.<br />
Install oil fill cap and finger tighten securely.<br />
Check engine oil level before starting each time thereafter.<br />
2.6.2 ADDING GASOLINE<br />
<br />
<br />
DANGER<br />
Never fill fuel tank indoors. Never fill fuel tank<br />
when engine is running or hot. Allow engine<br />
to cool entirely before filling fuel tank. Avoid<br />
spilling gasoline on HOT engine. DO NOT light<br />
a cigarette or smoke when filling the fuel tank.<br />
Gasoline is highly FLAMMABLE and its vapors<br />
are EXPLOSIVE.<br />
Do not overfill the fuel tank. Always leave room<br />
for fuel expansion. If the fuel tank is overfilled,<br />
fuel can overflow onto a HOT engine and cause<br />
FIRE or EXPLOSION.<br />
Use regular UNLEADED gasoline with the generator engine. Do<br />
not use any gasoline with more than 10% added Ethanol, and<br />
never use E85 gasoline. Do not mix oil with gasoline.<br />
Clean area around fuel fill cap, remove cap.<br />
Slowly add unleaded regular gasoline to fuel tank. Fill to bottom of<br />
screen filter. Be careful not to overfill (Figure 8).<br />
Install fuel cap and wipe up any spilled gasoline.<br />
Fuel Tank<br />
Fuel<br />
Figure 8 - Fuel Tank<br />
DO NOT Fill Above Lip
IMPORTANT: It is important to prevent gum deposits from forming<br />
in fuel system parts such as the carburetor, fuel hose or tank during<br />
storage. Alcohol-blended fuels (called gasohol, ethanol or methanol)<br />
can attract moisture, which leads to separation and formation of acids<br />
during storage. Acidic gas can damage the fuel system of an engine<br />
while in storage. To avoid engine problems, the fuel system should<br />
be emptied before storage of 30 days or longer. See the "Storage"<br />
section. Never use engine or carburetor cleaner products in the fuel<br />
tank as permanent damage may occur.<br />
2.7 TO START THE ENGINE<br />
<br />
Never start or stop engine with electrical<br />
devices plugged into the receptacles AND<br />
devices turned on.<br />
Unplug all electrical loads from the unit's receptacles before<br />
starting the engine.<br />
Make sure the unit is in a level position.<br />
OPEN the Fuel Shut-off Valve (Figure 9).<br />
Turn engine ON/OFF switch to ON position (Figure 10).<br />
Move engine CHOKE lever to the START position (Figure 10).<br />
To start engine, firmly grasp the recoil handle and pull slowly until<br />
increased resistance is felt. Pull rapidly up and away.<br />
When engine starts, move choke lever to 1/2-CHOKE position until<br />
engine runs smoothly and then fully into RUN position. If engine<br />
falters, move choke back out to 1/2-CHOKE position until engine<br />
runs smoothly and then to RUN position.<br />
NOTE:<br />
If engine fires, but does not continue to run, move choke lever to<br />
the START position and repeat starting instructions.<br />
Choke<br />
Lever<br />
Figure 9 - Fuel Shut-off Valve<br />
Fuel<br />
Shut-off Valve<br />
Recoil<br />
Handle<br />
Engine<br />
On/Off Switch<br />
Section 2 – Operation<br />
Portable Generator System<br />
Choke Position<br />
Figure 10 - Choke Position<br />
IMPORTANT: Do not overload the generator. Also, do not overload<br />
individual panel receptacles. These outlets are protected against<br />
overload with push-to-reset-type circuit breakers. If amperage rating<br />
of any circuit breaker is exceeded, that breaker opens and electrical<br />
output to that receptacle is lost. Read “Don’t Overload the Generator”<br />
carefully.<br />
2.8 STOPPING THE ENGINE<br />
Shut off all loads, then unplug the electrical loads from generator<br />
panel receptacles. Never start or stop the engine with electrical<br />
devices plugged in and turned on.<br />
Let engine run at no-load for several minutes to stabilize the<br />
internal temperatures of engine and generator.<br />
Move ON/OFF switch to OFF position.<br />
Close fuel valve.<br />
2.9 LOW OIL LEVEL SHUTDOWN SYSTEM<br />
The engine is equipped with a low oil level sensor that shuts down the<br />
engine automatically when the oil level drops below a specified level. If<br />
the engine shuts down by itself and the fuel tank has enough gasoline,<br />
check engine oil level.<br />
2.9.1 SENSING LOW OIL LEVEL<br />
If the system senses a low oil level during operation, the engine shuts<br />
down. The engine will not run until the oil has been refilled to the<br />
proper level.<br />
7
3.1 MAINTENANCE SCHEDULE<br />
Follow the calendar intervals. More frequent service is required when<br />
operating in adverse conditions noted below.<br />
Check Oil Level At Each Use<br />
Change Oil *Every Season<br />
Check Valve Clearance ***Every Season<br />
Service Air Filter **Every Season<br />
Replace Spark Plug Every Season<br />
* Change oil and oil filter every month when operating under heavy load or in high<br />
temperatures.<br />
** Clean more often under dirty or dusty operating conditions. Replace air filter parts<br />
if they cannot be adequately cleaned.<br />
*** Check valve clearance and adjust if necessary after first 50 hours of operation and<br />
every 100 hours thereafter.<br />
3.2 PRODUCT SPECIFICATIONS<br />
3.2.1 GENERATOR SPECIFICATIONS<br />
Rated Power ..................................................................................... 1.8 kW**<br />
Surge Power ...................................................................................... 2.05 kW<br />
Rated AC Voltage ..................................................................................... 120<br />
Rated Current ................................................................................ 15 Amps**<br />
Rated Frequency ............................................................ 60 Hz @ 3600 RPM<br />
Phase ........................................................................................ Single Phase<br />
** Maximum wattage is subject to, and limited by, such factors as fuel Btu content,<br />
ambient temperature, altitude, engine condition, etc.. Maximum power decreases<br />
about 3.5% for each 1,000 feet above sea level; and will also decrease about 1% for<br />
each 6° C (10° F) above 16° C (60° F) ambient temperature.<br />
3.2.2 ENGINE SPECIFICATIONS<br />
Displacement ........................................................................................196 cc<br />
Spark Plug Type ...................... F6TC, NGK BPR4ES or Champion RN14YC<br />
Spark Plug Gap ..................................... 0.028-0.031 inch or (0.70-0.80 mm)<br />
Gasoline Capacity .....................................................15.14 L (4 U.S. gallons)<br />
Oil Type .......................See Chart in "Before Starting the Generator" Section<br />
Oil Capacity ........................................................................ 0.6 L (0.634 Qts.)<br />
Run Time ................................................................... 14.5 Hours at 1/2 Load<br />
Class II Emission Certified*<br />
* The engine manufacturer must warrant the emission control system for a<br />
period of two years. This warranty coverage is in addition to the warranty<br />
provided by Generac, and may cover the engine even if Generac’s warranty<br />
does not.<br />
8<br />
Section 3 — Maintenance<br />
Portable Generator System<br />
3.3 GENERAL RECOMMENDATIONS<br />
The warranty of the generator does not cover items that have been<br />
subjected to operator abuse or negligence. To receive full value from<br />
the warranty, the operator must maintain the generator as instructed<br />
in this manual.<br />
Some adjustments will need to be made periodically to properly<br />
maintain the generator.<br />
All adjustments in the Maintenance section of this manual should<br />
be made at least once each season. Follow the requirements in the<br />
"Maintenance Schedule".<br />
NOTE:<br />
Once a year replace the spark plug and replace the air filter. A<br />
new spark plug and clean air filter assure proper fuel-air mixture<br />
and help the engine run better and last longer.<br />
3.3.1 GENERATOR MAINTENANCE<br />
Generator maintenance consists of keeping the unit clean and dry.<br />
Operate and store the unit in a clean dry environment where it will not<br />
be exposed to excessive dust, dirt, moisture or any corrosive vapors.<br />
Cooling air slots in the generator must not become clogged with snow,<br />
leaves, or any other foreign material.<br />
Check the cleanliness of the generator frequently and clean when<br />
dust, dirt, oil, moisture or other foreign substances are visible on its<br />
exterior surface.<br />
<br />
Never insert any object or tool through the air<br />
cooling slots, even if the engine is not running.<br />
NOTE:<br />
DO NOT use a garden hose to clean generator. Water can enter<br />
the engine fuel system and cause problems. In addition, if water<br />
enters the generator through cooling air slots, some water will<br />
be retained in voids and crevices of the rotor and stator winding<br />
insulation. Water and dirt buildup on the generator internal<br />
windings will eventually decrease the insulation resistance of<br />
these windings.<br />
3.3.2 TO CLEAN THE GENERATOR<br />
Use a damp cloth to wipe exterior surfaces clean.<br />
A soft, bristle brush may be used to loosen caked on dirt, oil, etc.<br />
A vacuum cleaner may be used to pick up loose dirt and debris.<br />
Low pressure air (not to exceed 25 psi) may be used to blow away<br />
dirt. Inspect cooling air slots and openings on the generator. These<br />
openings must be kept clean and unobstructed.<br />
3.3.3 ENGINE MAINTENANCE<br />
DANGER<br />
When working on the generator, always<br />
disconnect negative cable from battery. Also<br />
disconnect spark plug wires from spark plug<br />
and keep wire away from spark plug.
3.3.4 CHECKING OIL LEVEL<br />
See the “Before Starting the Generator” section for information on<br />
checking the oil level. The oil level should be checked before each<br />
use, or at least every eight hours of operation. Keep the oil level<br />
maintained (Figure 11).<br />
Figure 11 - Oil Drain, Check & Fill<br />
Oil Drain<br />
Oil Check & Fill<br />
3.3.5 CHANGING THE OIL<br />
Change the oil after the first 100 hours. If running this unit under dirty<br />
or dusty conditions, or in extremely hot weather, change the oil more<br />
often.<br />
<br />
Hot oil may cause burns. Allow engine to cool<br />
before draining oil. Avoid prolonged or repeated<br />
skin exposure with used oil. Thoroughly wash<br />
exposed areas with soap.<br />
NOTE:<br />
Whenever possible, run engine for approximately five (5) minutes<br />
to get the engine oil hot. This will aid in draining the oil.<br />
Use the following instructions to change the oil while the engine<br />
is still warm:<br />
Clean area around oil drain plug.<br />
Remove oil drain plug from engine and oil fill plug to drain oil<br />
completely into a suitable container.<br />
When oil has completely drained, install oil drain plug and tighten<br />
securely.<br />
Fill oil sump with recommended oil. (See “Before Starting the<br />
Generator” for oil recommendations).<br />
Wipe up any spilled oil.<br />
Dispose of used oil at a proper collection center.<br />
Section 3 — Maintenance<br />
Portable Generator System<br />
3.3.6 REPLACING THE SPARK PLUG<br />
Use spark plug F6TC, NGK BPR4ES or Champion RN14YC. Replace<br />
the plug once each year. This will help the engine start easier and<br />
run better.<br />
1. Stop the engine and pull the spark plug wire off of the spark<br />
plug.<br />
2. Clean the area around the spark plug and remove it from the<br />
cylinder head.<br />
3. Set the spark plug's gap to 0.70-0.80 mm (0.028-0.031 in.).<br />
Install the correctly gapped spark plug into the cylinder head and<br />
torque to 15 ft/lbs. (Figure 12).<br />
Figure 12 - Spark Plug Gap<br />
3.3.7 SPARK ARRESTOR<br />
1. Shut off generator and allow the engine and muffler to cool down<br />
completely before servicing spark arrestor (located on the back<br />
of the muffler).<br />
2. Remove the clamp and spark arrestor screen.<br />
3. Clean the spark arrestor screen with a small wire brush.<br />
4. Replace the spark arrestor if it is damaged.<br />
5. Installation of the spark arrestor screen is the reverse of the<br />
removal.<br />
3.4 SERVICE AIR FILTER<br />
The engine will not run properly and may be damaged if using a dirty<br />
air filter. Clean the air filter once a year (Figure 13). Clean or replace<br />
more often if operating under dusty conditions.<br />
Remove air filter cover.<br />
Wash in soapy water. Squeeze filter dry in clean cloth (DO NOT<br />
TWIST).<br />
Clean air filter cover before re-installing it.<br />
NOTE:<br />
To order a new air filter, please contact the nearest authorized<br />
service center at 1-888-436-3722.<br />
9
10<br />
Figure 13 - Air Filter<br />
3.5 VALVE CLEARANCE<br />
Air Cleaner Cover<br />
Air Filter<br />
Intake — 0.10 ± 0.02mm (cold), (0.004" ± 0.0008" inches)<br />
Exhaust — 0.15 ± 0.02mm (cold) (0.006" ± 0.0008" inches)<br />
After the first 50 hours of operation, check the valve clearance in<br />
the engine and adjust if necessary.<br />
Important: If feeling uncomfortable about doing this procedure or<br />
the proper tools are not available, please take the generator to the<br />
nearest service center to have the valve clearance adjusted. This is a<br />
very important step to insure longest life for the engine.<br />
3.6 GENERAL<br />
The generator should be started at least once every seven days<br />
and be allowed to run at least 30 minutes. If this cannot be done<br />
and the unit must be stored for more than 30 days, use the following<br />
information as a guide to prepare it for storage.<br />
<br />
Section 3 — Maintenance<br />
Portable Generator System<br />
DANGER<br />
NEVER store engine with fuel in tank indoors<br />
or in enclosed, poorly ventilated areas where<br />
fumes may reach an open flame, spark or pilot<br />
light as on a furnace, water heater, clothes dryer<br />
or other gas appliance.<br />
3.7 LONG TERM STORAGE<br />
It is important to prevent gum deposits from forming in essential fuel<br />
system parts such as the carburetor, fuel hose or tank during storage.<br />
Also, experience indicates that alcohol-blended fuels (called gasohol,<br />
ethanol or methanol) can attract moisture, which leads to separation<br />
and formation of acids during storage. Acidic gas can damage the fuel<br />
system of an engine while in storage.<br />
To avoid engine problems, the fuel system should be emptied before<br />
storage of 30 days or longer, as follows:<br />
Remove all gasoline from the fuel tank.<br />
DANGER<br />
Drain fuel into approved container outdoors,<br />
away from open flame. Be sure engine is cool.<br />
Do not smoke.<br />
Start and run engine until engine stops from lack of fuel.<br />
While engine is still warm, drain oil from crankcase. Refill with<br />
recommended grade.<br />
Remove spark plugs and pour about 1/2 ounce (15 ml) of engine<br />
oil into the cylinders. Cover spark plug hole with rag. Pull the recoil<br />
starter a couple times to lubricate the piston rings and cylinder<br />
bore..<br />
<br />
Avoid spray from spark plug holes when<br />
cranking engine.<br />
Install and tighten spark plugs. Do not connect spark plug wires.<br />
Clean the generator outer surfaces. Check that cooling air slots<br />
and openings on generator are open and unobstructed.<br />
Store the unit in a clean, dry place.<br />
3.8 OTHER STORAGE TIPS<br />
<br />
Do not store gasoline from one season to another.<br />
Replace the gasoline can if it starts to rust. Rust and/or dirt in the<br />
gasoline will cause problems with the carburetor and fuel system.<br />
If possible, store the unit indoors and cover it to give protection<br />
from dust and dirt. BE SURE TO EMPTY THE FUEL TANK.<br />
If it is not practical to empty the fuel tank and the unit is to be stored<br />
for some time, use a commercially available fuel stabilizer added to<br />
the gasoline to increase the life of the gasoline.<br />
Cover the unit with a suitable protective cover that does not retain<br />
moisture.<br />
DANGER<br />
NEVER cover the generator while engine and<br />
exhaust area are warm.
4.1 TROUBLESHOOTING GUIDE<br />
Section 4 — Troubleshooting<br />
Portable Generator System<br />
PROBLEM CAUSE CORRECTION<br />
Engine is running, but no AC<br />
output is available.<br />
Engine runs good but bogs down<br />
when loads are connected.<br />
Engine will not start; or starts and<br />
runs rough.<br />
Engine shuts down during<br />
operation.<br />
1. Circuit breaker is open.<br />
2. Poor connection or defective cord set.<br />
3. Connected device is bad.<br />
4. Fault in generator.<br />
1. Short circuit in a connected load.<br />
2. Generator is overloaded.<br />
3. Engine speed is too slow.<br />
4. Shorted generator circuit.<br />
1. Dirty air filter.<br />
2. Out of gasoline.<br />
3. Fuel Shut-off valve is OFF.<br />
4. Stale gasoline.<br />
5. Spark plug wire not connected to spark plug.<br />
6. Bad spark plug.<br />
7. Water in gasoline.<br />
8. Over-choking.<br />
9. Low oil level.<br />
10. Excessive rich fuel mixture.<br />
11. Intake valve stuck open or closed.<br />
12. Engine has lost compression.<br />
1. Out of gasoline.<br />
2. Low oil level.<br />
3. Fault in engine.<br />
Engine lacks power. 1. Load is too high.<br />
2. Dirty air filter.<br />
3. Engine needs to be serviced.<br />
Engine “hunts” or falters. 1. Choke is opened too soon.<br />
2. Carburetor is running too rich or too lean.<br />
1. Reset circuit breaker.<br />
2. Check and repair.<br />
3. Connect another device that is in good condition.<br />
4. Contact Authorized Service Facility.<br />
1. Disconnect shorted electrical load.<br />
2. See “Don’t Overload the Generator” .<br />
3. Contact Authorized Service Facility.<br />
4. Contact Authorized Service Facility.<br />
1. Clean or replace air filter.<br />
2. Fill fuel tank.<br />
3. Turn Fuel Shut-off valve to ON.<br />
4. Drain fuel tank and fill with fresh fuel.<br />
5. Connect wire to spark plug.<br />
6. Replace spark plug.<br />
7. Drain fuel tank; fill with fresh fuel.<br />
8. Put choke knob to No Choke position.<br />
9. Fill crankcase to proper level.<br />
10. Contact Authorized Service Facility.<br />
11. Contact Authorized Service Facility.<br />
12. Contact Authorized Service Facility.<br />
1. Fill fuel tank.<br />
2. Fill crankcase to proper level.<br />
3. Contact Authorized Service Facility.<br />
1. See “Don’t Overload the Generator”.<br />
2. Replace air filter.<br />
3. Contact Authorized Service Facility.<br />
1. Move choke to halfway position until engine runs<br />
smoothly.<br />
2. Contact Authorized Service Facility.<br />
11
12<br />
Section 5 — Notes
Section 5 — Notes<br />
13
Section 6 — Warranty<br />
Portable Generator System<br />
GENERAC POWER SYSTEMS “TWO YEAR” LIMITED WARRANTY FOR<br />
GP SERIES PORTABLE GENERATORS<br />
For a period of two years from the date of original sale, Generac Power Systems, Inc. (Generac) warrants its GP Series generators will be free from defects in materials and<br />
workmanship for the items and period set forth below. Generac will, at its option, repair or replace any part which, upon examination, inspection and testing by Generac or<br />
a Generac Authorized Warranty Service Dealer, is found to be defective. Any equipment that the purchaser/owner claims to be defective must be returned to and examined<br />
by the nearest Generac Authorized Warranty Service Dealer. All transportation costs under the warranty, including return to the factory, are to be borne and prepaid by the<br />
purchaser/owner. This warranty applies only to Generac GP Series portable generators and is not transferable from original purchaser. Save your proof-of-purchase receipt. If<br />
you do not provide proof of the initial purchase date, the manufacturer’s shipping date of the product will be used to determine the warranty period.<br />
WARRANTY SCHEDULE<br />
Consumer applications are warranted for two (2) years. Commercial and Rental applications are warranted for one (1) year or 1000 hours maximum, whichever comes first.<br />
CONSUMER APPLICATION<br />
YEARS ONE and TWO - 100% (one hundred percent) coverage on Labor and Part(s) listed (proof of purchase and maintenance is required):<br />
Engine- All Components<br />
Alternator- All Components<br />
COMMERCIAL/RENTAL APPLICATION<br />
YEAR ONE – 100% (one hundred percent) coverage on Labor and Part(s) listed (proof of purchase and maintenance is required):<br />
Engine- All Components<br />
Alternator- All Components<br />
NOTE: For the purpose of this warranty “consumer use” means personal residential household or recreational use by original purchaser. This warranty does not apply to units used for<br />
Prime Power in place of utility where utility power service is present or where utility power service does not normally exist. Once a generator has experienced commercial or<br />
rental use, it shall thereafter be considered a non-consumer use generator for the purpose of this warranty.<br />
All warranty expense allowances are subject to the conditions defined in Generac’s Warranty Policies, Procedures and Flat Rate <strong>Manual</strong>.<br />
THIS WARRANTY SHALL NOT APPLY TO THE FOLLOWING:<br />
Generac built portable generators built prior to May 2008.<br />
Generac portable generators that utilize non-Generac replacement parts.<br />
Costs of normal maintenance and adjustments.<br />
Failures caused by any contaminated fuels, oils or lack of proper oil levels.<br />
Repairs or diagnostics performed by individuals other than Guardian/Generac authorized dealers not authorized in writing by Generac Power Systems.<br />
Failures due, but not limited, to normal wear and tear, accident, misuse, abuse, negligence or improper use. As with all mechanical devices, the Generac engines need periodic part(s)<br />
service and replacement to perform as designed. This warranty will not cover repair when normal use has exhausted the life of a part(s) or engine.<br />
Failures caused by any external cause or act of God, such as collision, theft, vandalism, riot or wars, nuclear holocaust, fire, freezing, lightning, earth-quake, windstorm, hail, volcanic<br />
eruption, water or flood, tornado or hurricane.<br />
Damage related to rodent and/or insect infestation.<br />
Products that are modified or altered in a manner not authorized by Generac in writing.<br />
Any incidental, consequential or indirect damages caused by defects in materials or workmanship, or any delay in repair or replacement of the defective part(s).<br />
Failure due to misapplication.<br />
Telephone, cellular phone, facsimile, internet access or other communication expenses.<br />
Living or travel expenses of person(s) performing service, except as specifically included within the terms of a specific unit warranty period.<br />
Expenses related to “customer instruction” or troubleshooting where no manufacturing defect is found.<br />
Rental equipment used while warranty repairs are being performed.<br />
Overnight freight or special shipping costs for replacement part(s).<br />
Overtime, holiday or emergency labor.<br />
Starting batteries, fuses, light bulbs and engine fluids.<br />
THIS WARRANTY IS IN PLACE OF ALL OTHER WARRANTIES, EXPRESSED OR IMPLIED. SPECIFICALLY, GENERAC MAKES NO OTHER WARRANTIES AS TO THE<br />
MERCHANTABILITY OR FITNESS FOR A PARTICULAR PURPOSE. Some states do not allow limitations on how long an implied warranty lasts, so the above limitation may not<br />
apply to you. GENERAC’S ONLY LIABILITY SHALL BE THE REPAIR OR REPLACEMENT OF PART(S) AS STATED ABOVE. IN NO EVENT SHALL GENERAC BE LIABLE FOR ANY<br />
INCIDENTAL OR CONSEQUENTIAL DAMAGES, EVEN IF SUCH DAMAGES ARE A DIRECT RESULT OF GENERAC’S NEGLIGENCE. Some states do not allow the exclusion or<br />
limitation of incidental or consequential damages, so the above limitation may not apply to you. This warranty gives you specific legal rights. You also have other rights from state to<br />
state.<br />
GENERAC POWER SYSTEMS, INC.<br />
P.O. BOX 8 Waukesha, WI 53187<br />
Ph: (888) GENERAC (436-3722) Fax: (262) 544-4851<br />
To locate the nearest Authorized Dealer visit our website www.generac.com<br />
Part No. 0G9451 Revision D (10/27/08) Printed in U.S.A.<br />
<strong>Manual</strong> Part No. 0H0407 Rev B (10/31/08) Printed in China


