You also want an ePaper? Increase the reach of your titles
YUMPU automatically turns print PDFs into web optimized ePapers that Google loves.
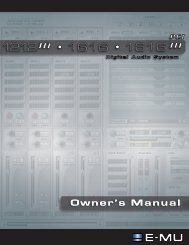
The Cubasis Demo Song Screen<br />
Inspector Button<br />
Transport Bar<br />
VST Inputs Pane<br />
Return-to-Zero<br />
Input Meter<br />
Button<br />
Selected Track<br />
Record Enable<br />
Arrange Window<br />
Monitor Enable<br />
Set up your Inputs to Record<br />
14. Open the VST Inputs from the Panels menu. Notice that all the Sends from<br />
PatchMix DSP are listed here. The green buttons are used to turn these inputs into<br />
Cubasis on and off. Turn all the inputs on if they aren’t already on.<br />
15. Click the Input Meter buttons on all the VST Channel Mixer strips, illuminating<br />
them. This turns the meters on so you can verify that you’re getting an input signal.<br />
16. Make sure your input channels are getting into Cubasis by examining the VST<br />
Channel Mixer 1. You should see the all meters move when you play your<br />
instrument. If not, first check the input meter on PatchMix DSP. If you still don’t see<br />
meter activity, refer to the “ASIO Recording Checklist - Cubasis” on page 58. To<br />
change the input on a Cubasis input mixer strip, hold Ctrl and click the top button<br />
in the strip.<br />
17. Click the Monitor Enable button to hear the return from Cubasis. You should see<br />
activity on the Cubasis Master strip when you play your instrument.<br />
18. Turn Record Enable On for each track you want to record. See the screen above<br />
19. Select the Track that you want to record by clicking on it in the arrange window. The<br />
rack darkens to indicate that it is selected. See the “Cubasis Demo Song Screen”<br />
above.<br />
VST Channel Mixer 1<br />
6 - Working with ASIO<br />
Basic Recording<br />
f Hidden Feature:<br />
Open the Track Info<br />
section by clicking the<br />
Inspector button in<br />
Cubasis. See above.<br />
E-MU Digital Audio System 57