The Bridge II (English EU) - Harman Kardon
The Bridge II (English EU) - Harman Kardon
The Bridge II (English EU) - Harman Kardon

You also want an ePaper? Increase the reach of your titles
YUMPU automatically turns print PDFs into web optimized ePapers that Google loves.
THE BRIDGE <strong>II</strong><br />
DOCKING STATION FOR iPod<br />
OWNER’S MANUAL<br />
1
Congratulations! With <strong>The</strong> <strong>Bridge</strong> <strong>II</strong>, you are entering<br />
the new world of entertainment made possible<br />
by combining the incredible storage capacity and<br />
playback flexibility of an iPod with the sonic power<br />
of your <strong>Harman</strong> <strong>Kardon</strong> ® system.<br />
With a single cable, your iPod is connected, and all you<br />
need is your remote control to get started!<br />
Features<br />
• Single connection to any <strong>The</strong> <strong>Bridge</strong>-ready<br />
<strong>Harman</strong> <strong>Kardon</strong> product<br />
• Plays content from a compatible iPod through your<br />
<strong>Harman</strong> <strong>Kardon</strong> system<br />
• Controls your iPod, using the <strong>Harman</strong> <strong>Kardon</strong> remote<br />
• Easy track selection with on-screen navigation<br />
• Charges the iPod<br />
Included<br />
• <strong>The</strong> <strong>Bridge</strong> <strong>II</strong> docking station<br />
• Five clear dock adapters, marked “NANO,”<br />
“5G (VIDEO 60GB),” “5G (VIDEO 30GB),”<br />
“13” and “12, 14”<br />
• Black insert marked “UNIVERSAL” to accept<br />
appropriate dock adapter<br />
• Adapter for use with <strong>The</strong> <strong>Bridge</strong>-ready products<br />
2<br />
InTRODUCTIOn<br />
Compatibility<br />
<strong>The</strong> <strong>Bridge</strong> <strong>II</strong> is compatible with all <strong>The</strong> <strong>Bridge</strong>- and<br />
<strong>The</strong> <strong>Bridge</strong> <strong>II</strong>-ready <strong>Harman</strong> <strong>Kardon</strong> receivers, and the<br />
<strong>Harman</strong> <strong>Kardon</strong> DMC 1000 digital media center. As of<br />
the printing of this manual, these models include:<br />
• Audio playback only: AVR 140, AVR 240,<br />
AVR 340, AVR 145, AVR 245, AVR 445, AVR 645,<br />
AVR 745, HK 3490 and DMC 1000 (still-image<br />
playback available on DMC 1000)<br />
• Audio, video and still-image playback: AVR 146,<br />
AVR 147, AVR 247, AVR 347, AVR 350, AVR 355,<br />
AVR 660 and AVR 760<br />
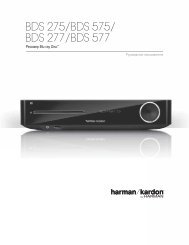
<strong>The</strong> <strong>Bridge</strong> <strong>II</strong> is compatible with most iPod models<br />
equipped with dock connectors, 4G or later. Video and<br />
still-image playback is only possible with photo- and<br />
video-capable iPod models that support video browsing:<br />
the iPod 5G, iPod classic and iPod nano (3rd generation).<br />
iPod not included
InstallIng<br />
With only a single cable connection, <strong>The</strong> <strong>Bridge</strong> <strong>II</strong> is<br />
easy to connect to your <strong>Harman</strong> <strong>Kardon</strong> product.<br />
step One: Turn off the <strong>Harman</strong> <strong>Kardon</strong> <strong>The</strong> <strong>Bridge</strong>or<br />
<strong>The</strong> <strong>Bridge</strong> <strong>II</strong>-ready product, using its master power<br />
switch.<br />
step two:<br />
-Ready Products – Holding the<br />
cable with the wider part of the connector at the<br />
bottom, gently squeeze the tabs on each side as<br />
you insert it into the connector on the rear panel of<br />
the <strong>Harman</strong> <strong>Kardon</strong> product. See Figure 1.<br />
Figure 1 – <strong>The</strong> <strong>Bridge</strong> <strong>II</strong> connector on <strong>The</strong> <strong>Bridge</strong> <strong>II</strong>-ready<br />
<strong>Harman</strong> <strong>Kardon</strong> products<br />
-Ready Products – A different connector<br />
was used on <strong>The</strong> <strong>Bridge</strong>-ready <strong>Harman</strong> <strong>Kardon</strong><br />
products and the HK3490, as shown in Figure 2. Do<br />
not plug <strong>The</strong> <strong>Bridge</strong> <strong>II</strong> directly into the DMP/<strong>The</strong> <strong>Bridge</strong><br />
connector on the rear panel of these products. First,<br />
connect the included adapter to <strong>The</strong> <strong>Bridge</strong> <strong>II</strong> cable,<br />
then plug the adapter into the product.<br />
Figure 2 – <strong>The</strong> DMP/<strong>The</strong> <strong>Bridge</strong> connector on <strong>The</strong> <strong>Bridge</strong>-ready<br />
<strong>Harman</strong> <strong>Kardon</strong> products<br />
table 1 – select the Correct the <strong>Bridge</strong> <strong>II</strong> Insert<br />
InSTALLATIOn<br />
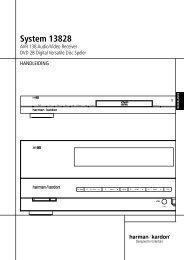
step three: Place the black insert in <strong>The</strong> <strong>Bridge</strong> <strong>II</strong>,<br />
making sure to push it all the way down. See Figure 3.<br />
nOtE: Do not place an iPod in <strong>The</strong> <strong>Bridge</strong> <strong>II</strong> unless<br />
both the black insert and a dock adapter are installed.<br />
Otherwise, the iPod will not connect properly, and<br />
both it and the <strong>Bridge</strong> <strong>II</strong> may sustain damage that<br />
is not covered by the warranty.<br />
step Five<br />
step Four<br />
step three<br />
step Four: Locate the dock adapter that was<br />
included with your iPod, or select one of the included<br />
clear dock adapters by referring to Table 1. If your iPod<br />
is an older model that does not appear in Table 1 and<br />
that did not include an adapter, contact Apple Inc. to<br />
purchase one.<br />
Place the adapter in <strong>The</strong> <strong>Bridge</strong> <strong>II</strong> insert, as shown<br />
in Figure 3.<br />
step Five: Remove the iPod from any case, and<br />
dock it in <strong>The</strong> <strong>Bridge</strong> <strong>II</strong>, as shown in Figure 3.<br />
<strong>The</strong> <strong>Bridge</strong> <strong>II</strong> Insert iPod Model<br />
NANO iPod nano, 1st and 2nd generation<br />
5G (VIDEO 60GB) iPod, 5th generation (60GB, 80GB) and iPod classic (160GB)<br />
5G (VIDEO 30GB) iPod, 5th generation (30GB) and iPod classic (80GB)<br />
13 iPod nano, 3rd generation<br />
12, 14 iPod touch – install large bumper<br />
Figure 3 –<br />
Docking an iPod<br />
in <strong>The</strong> <strong>Bridge</strong> <strong>II</strong><br />
3<br />
<strong>English</strong>
UsIng<br />
Once <strong>The</strong> <strong>Bridge</strong> <strong>II</strong> is connected, use either the frontpanel<br />
controls or <strong>The</strong> <strong>Bridge</strong>-ready product’s remote<br />
control to select tracks for playback. Press the DMP/<br />
<strong>The</strong> <strong>Bridge</strong> Button on the remote, or use the Source<br />
Selector on the front panel to change sources. When<br />
an iPod is docked, a message will appear in the<br />
front-panel and on-screen displays, indicating that<br />
<strong>The</strong> <strong>Bridge</strong> <strong>II</strong> is connected. <strong>The</strong> displays will switch to<br />
the navigation menus, and the menu screen on the<br />
iPod itself will be replaced by a <strong>Harman</strong> <strong>Kardon</strong> logo<br />
graphic and a message reading “OK to Disconnect.”<br />
When you see the “OK to Disconnect” message displayed,<br />
the iPod is in Extended Mode and may be operated<br />
using the <strong>Harman</strong> <strong>Kardon</strong> product’s front-panel or<br />
remote controls. <strong>The</strong> controls for most <strong>The</strong> <strong>Bridge</strong>- and<br />
<strong>The</strong> <strong>Bridge</strong> <strong>II</strong>-ready products are described in Table 2.<br />
<strong>The</strong> blank boxes indicate that the function is not<br />
available using those controls. Because the specifics<br />
of operation vary by product, please review the owner’s<br />
manual for detailed information.<br />
While a selection is playing, the song title, artist and<br />
album name (if available) will scroll across the upper<br />
line in the front-panel Message Display. <strong>The</strong> lower line<br />
will display the elapsed time of the track on the left, the<br />
play mode icon, and the time remaining on the right.<br />
If a video display is connected to the <strong>Harman</strong> <strong>Kardon</strong><br />
product, the available track information will appear there<br />
as well, along with the time and play mode displays.<br />
Some <strong>Harman</strong> <strong>Kardon</strong> <strong>The</strong> <strong>Bridge</strong>- and <strong>The</strong> <strong>Bridge</strong><br />
<strong>II</strong>-ready products include a settings menu that allows<br />
you to select Repeat or Random playback or Resume<br />
mode. Refer to the product’s manual for more information.<br />
Playback of photos, when available, is different from<br />
audio playback. Press the Menu Button and select the<br />
photo option to switch to Manual Mode. In Manual<br />
Mode, the iPod may be operated using its own controls<br />
or the receiver’s remote, and its menus will appear<br />
in place of the <strong>Harman</strong> <strong>Kardon</strong> logo and “OK to<br />
Disconnect” message. <strong>The</strong> menus generated by the<br />
receiver while using <strong>The</strong> <strong>Bridge</strong> <strong>II</strong> do not appear in<br />
Manual Mode.<br />
4<br />
OPERATIOn<br />
Photos may be viewed on an external monitor only for<br />
iPod models that support video browsing (see note<br />
below). Select the desired photo, then press the play<br />
button on the iPod, or press the OK or Enter Button on<br />
the remote three times.<br />
To view videos, when available on an iPod that supports<br />
video browsing, press the Menu Button and<br />
select the “Videos” option. For <strong>The</strong> <strong>Bridge</strong> <strong>II</strong>-ready<br />
products, the iPod will remain in Extended Mode. Use<br />
the AVR remote and the on-screen menus to select<br />
video content. For <strong>The</strong> <strong>Bridge</strong>-ready products, the<br />
iPod may switch to Manual Mode. Use the <strong>Harman</strong><br />
<strong>Kardon</strong> remote or the controls on the iPod with the<br />
screen on the iPod to view videos.<br />
To return to Extended Mode from Manual Mode, press and<br />
hold the Menu Button on the receiver’s remote control.<br />
nOtEs On VIDEO PlaYBaCK:<br />
• As of this writing, video browsing is only supported<br />
on the iPod 5G, iPod classic and iPod nano (3rd generation).<br />
For other iPod models (except the iPod 4G),<br />
it is not possible to view photos or videos on an<br />
external monitor with <strong>The</strong> <strong>Bridge</strong> <strong>II</strong>. However, you<br />
may purchase an A/V cable from Apple Inc. that<br />
has conventional audio and video plugs that may be<br />
connected to any available<br />
analog inputs on the AVR.<br />
• Before attempting to play videos stored on your iPod,<br />
check that the TV Out setting on the iPod is set to On.<br />
Adjust any other settings on the iPod as appropriate<br />
for your system. If your selection was playing and<br />
paused at the time you changed the TV Out setting,<br />
the iPod may require you to navigate its menu system<br />
and reselect the video. Resuming play from the<br />
“Now Playing” function may not reflect the change<br />
to the TV Out setting.<br />
• In Manual Mode, the menus for the iPod will only be<br />
visible on its screen. You may operate the iPod using<br />
the receiver’s remote, as long as it is in <strong>The</strong> <strong>Bridge</strong><br />
device mode.
Charging the iPod<br />
You may leave your iPod in <strong>The</strong> <strong>Bridge</strong> <strong>II</strong> even when<br />
you are not using it as a playback source. Whenever<br />
the iPod is docked and your receiver is turned on,<br />
<strong>The</strong> <strong>Bridge</strong> <strong>II</strong> will charge the battery in the iPod.<br />
Some <strong>Harman</strong> <strong>Kardon</strong> receivers allow you to charge<br />
the battery in the iPod when the receiver is turned off<br />
(i.e., in the “Standby” mode). Consult your receiver’s<br />
owner’s manual for more information.<br />
table 2 – Controlling the iPod<br />
OPERATIOn<br />
Undocking the iPod<br />
We recommend that you pause playback before<br />
physically removing the iPod from <strong>The</strong> <strong>Bridge</strong> <strong>II</strong>.<br />
IMPORtant nOtE: When using <strong>The</strong> <strong>Bridge</strong> <strong>II</strong><br />
with the DMC 1000, do not remove the iPod from<br />
<strong>The</strong> <strong>Bridge</strong> <strong>II</strong> without first selecting the “Undock iPod”<br />
option in the on-screen menu.<br />
-Ready Products -Ready Products<br />
Function on iPod Remote Control Key Front-Panel Button Remote Control Key<br />
Play Play (›) Tuner Mode Play (›)<br />
Pause Pause (<strong>II</strong>) Tuner Mode Pause (<strong>II</strong>)<br />
Menu Menu (Spkr) Tuner Band (AM/FM) Menu<br />
Select Set Set OK<br />
Scroll Reverse Left Arrow (‹ ) Preset Down Left Arrow (‹ )<br />
Scroll Forward Right Arrow (›) Preset Up Right Arrow (›)<br />
Forward<br />
Search/Next Track<br />
Forward/Next (››I) Tuning Up Forward/Next (››I)<br />
Reverse<br />
Search/Previous Track<br />
Reverse/Previous (I‹‹) Tuning Down Reverse/Previous (I‹‹)<br />
Page Up/Down Channel/Page Up/Down<br />
5<br />
<strong>English</strong>
6<br />
TROUBLESHOOTInG<br />
tROUBlEsHOOtIng gUIDE<br />
sYMPtOM sOlUtIOn<br />
<strong>The</strong> iPod does not play or respond to<br />
commands from the receiver’s remote.<br />
<strong>The</strong> LED under <strong>The</strong> <strong>Bridge</strong> <strong>II</strong> goes out<br />
when the receiver is in the Standby mode.<br />
<strong>The</strong> display and controls on the iPod<br />
do not operate in iPod mode.<br />
• Make sure that <strong>The</strong> <strong>Bridge</strong> <strong>II</strong> is properly connected<br />
to a compatible <strong>Harman</strong> <strong>Kardon</strong> receiver.<br />
• Make sure that DMP or <strong>The</strong> <strong>Bridge</strong> is selected as<br />
the input on the receiver.<br />
• Check the menu setting on your receiver to make sure<br />
that the option to charge iPod while in Standby mode is<br />
turned on, if available.<br />
sPECIFICatIOns:<br />
Dimensions (H x W x D): 1-3/16” x 4-1/2” x 4-1/2” (30mm x 114mm 114mm)<br />
Weight: 0.37 lb (0.17kg)<br />
• Make certain that the receiver is in the Standby mode<br />
by looking for the amber standby light. <strong>The</strong> iPod will not<br />
charge when the Master Power Switch is off.<br />
• This is normal and does not indicate a problem<br />
with the iPod, <strong>The</strong> <strong>Bridge</strong> <strong>II</strong> or your receiver.<br />
© 2008 <strong>Harman</strong> International Industries, Incorporated. All rights reserved.<br />
<strong>Harman</strong> <strong>Kardon</strong> is a trademark of <strong>Harman</strong> International Industries, Incorporated, registered in the United States<br />
and/or other countries. Designed to Entertain, <strong>The</strong> <strong>Bridge</strong> logo and <strong>The</strong> <strong>Bridge</strong> <strong>II</strong> logo are trademarks of <strong>Harman</strong> International Industries, Incorporated.<br />
iPod is a trademark of Apple Inc., registered in the U.S. and other countries. iPod not included. “Made for iPod” means that an electronic accessory has<br />
been designed to connect specifically to iPod and has been certified by the developer to meet Apple performance standards. Apple is not responsible<br />
for the operation of this device or its compliance with safety and regulatory standards.<br />
Features, specifications and appearance are subject to change without notice.
STAPLE InVOICE HERE<br />
7<br />
<strong>English</strong>
250 Crossways Park Drive, Woodbury, New York 11797<br />
www.harmankardon.com<br />
© 2008 <strong>Harman</strong> International Industries, Incorporated.<br />
All rights reserved.<br />
Part No. 950-0236-001<br />
8