Dual video docking station - Targus
Dual video docking station - Targus
Dual video docking station - Targus

Create successful ePaper yourself
Turn your PDF publications into a flip-book with our unique Google optimized e-Paper software.
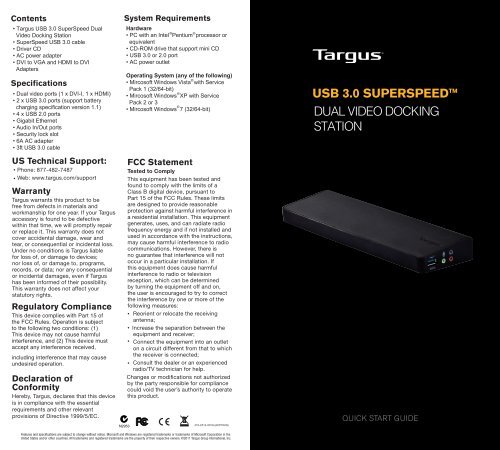
Contents<br />
• <strong>Targus</strong> USB 3.0 SuperSpeed <strong>Dual</strong><br />
Video Docking Station<br />
• SuperSpeed USB 3.0 cable<br />
• Driver CD<br />
• AC power adapter<br />
• DVI to VGA and HDMI to DVI<br />
Adapters<br />
Specifications<br />
• <strong>Dual</strong> <strong>video</strong> ports (1 x DVI-I, 1 x HDMI)<br />
• 2 x USB 3.0 ports (support battery<br />
charging specification version 1.1)<br />
• 4 x USB 2.0 ports<br />
• Gigabit Ethernet<br />
• Audio In/Out ports<br />
• Security lock slot<br />
• 6A AC adapter<br />
• 3ft USB 3.0 cable<br />
US Technical Support:<br />
• Phone: 877-482-7487<br />
• Web: www.targus.com/support<br />
Warranty<br />
<strong>Targus</strong> warrants this product to be<br />
free from defects in materials and<br />
workmanship for one year. If your <strong>Targus</strong><br />
accessory is found to be defective<br />
within that time, we will promptly repair<br />
or replace it. This warranty does not<br />
cover accidental damage, wear and<br />
tear, or consequential or incidental loss.<br />
Under no conditions is <strong>Targus</strong> liable<br />
for loss of, or damage to devices;<br />
nor loss of, or damage to, programs,<br />
records, or data; nor any consequential<br />
or incidental damages, even if <strong>Targus</strong><br />
has been informed of their possibility.<br />
This warranty does not affect your<br />
statutory rights.<br />
Regulatory Compliance<br />
This device complies with Part 15 of<br />
the FCC Rules. Operation is subject<br />
to the following two conditions: (1)<br />
This device may not cause harmful<br />
interference, and (2) This device must<br />
accept any interference received,<br />
including interference that may cause<br />
undesired operation.<br />
Declaration of<br />
Conformity<br />
Hereby, <strong>Targus</strong>, declares that this device<br />
is in compliance with the essential<br />
requirements and other relevant<br />
provisions of Directive 1999/5/EC.<br />
System Requirements<br />
Hardware<br />
® ®<br />
• PC with an Intel Pentium processor or<br />
equivalent<br />
• CD-ROM drive that support mini CD<br />
• USB 3.0 or 2.0 port<br />
• AC power outlet<br />
Operating System (any of the following)<br />
®<br />
• Mircosoft Windows Vista with Service<br />
Pack 1 (32/64-bit)<br />
®<br />
• Mircosoft Windows XP with Service<br />
Pack 2 or 3<br />
®<br />
• Mircosoft Windows 7 (32/64-bit)<br />
FCC Statement<br />
Tested to Comply<br />
This equipment has been tested and<br />
found to comply with the limits of a<br />
Class B digital device, pursuant to<br />
Part 15 of the FCC Rules. These limits<br />
are designed to provide reasonable<br />
protection against harmful interference in<br />
a residential installation. This equipment<br />
generates, uses, and can radiate radio<br />
frequency energy and if not installed and<br />
used in accordance with the instructions,<br />
may cause harmful interference to radio<br />
communications. However, there is<br />
no guarantee that interference will not<br />
occur in a particular installation. If<br />
this equipment does cause harmful<br />
interference to radio or television<br />
reception, which can be determined<br />
by turning the equipment off and on,<br />
the user is encouraged to try to correct<br />
the interference by one or more of the<br />
following measures:<br />
• Reorient or relocate the receiving<br />
antenna;<br />
• Increase the separation between the<br />
equipment and receiver;<br />
• Connect the equipment into an outlet<br />
on a circuit different from that to which<br />
the receiver is connected;<br />
• Consult the dealer or an experienced<br />
radio/TV technician for help.<br />
Changes or modications not authorized<br />
by the party responsible for compliance<br />
could void the user’s authority to operate<br />
this product.<br />
N2953 410-2214-001A (ACP70US)<br />
Microsoft and Windows are registered trademarks or trademarks of Microsoft Corporation in the<br />
United States and/or other countries. All trademarks and registered trademarks are the property of their respective owners. ©2011 <strong>Targus</strong> Group International, Inc.<br />
USB 3.0 SUPERSPEED<br />
DUAL VIDEO DOCKING<br />
STATION<br />
QUICK START GUIDE
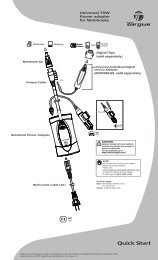
® ®<br />
Windows XP/Vista Setup<br />
NOTE: DO NOT CONNECT THE DOCKING STATION PRIOR TO INSTALLING THE DISPLAYLINK DRIVER.<br />
1) Intstall the included Driver CD.<br />
3) Follow the on-screen instructions<br />
until the installation is complete.<br />
2) Double click on Setup.exe. 4) Connect the Docking Station and<br />
peripherals.<br />
®<br />
Windows 7 Setup<br />
1) Connect the Docking Station to your laptop.<br />
USB 3.0 Port<br />
DC 5V UP DVI HDMI<br />
2) Windows will start installing the DisplayLink<br />
Driver automatically.<br />
NOTE: If the driver installation does not automatically start,<br />
disconnect the <strong>docking</strong> <strong>station</strong> from your laptop, insert the<br />
Driver CD, and click on the Setup.exe file.<br />
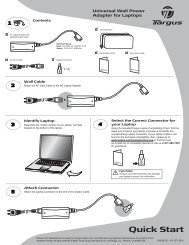
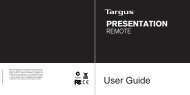
Docking Station Diagram<br />
AC Power<br />
Adapter<br />
USB 3.0 Port<br />
Audio In Audio Out<br />
USB to<br />
Laptop Port<br />
DVI-I<br />
HDMI<br />
Lock Slot<br />
TM<br />
Gigabit<br />
Ethernet<br />
4) Connect all peripheral devices.<br />
USB 2.0 Ports<br />
USB 2.0 Port<br />
DC 5V UP DVI HDMI<br />
3) Follow the on-screen instructions<br />
until the installation is complete.<br />
DC 5V UP DVI HDMI<br />
DVI to VGA Adapter<br />
HDMI to DVI-D Adapter<br />
TM<br />
DisplayLink Manager Menu<br />
Menu Option<br />
DisplayLink Manager Opens the Screen Resolution window<br />
Check for Updates Checks online if new drivers are available to download<br />
DisplayLink devices Shows a list of all connected DisplayLink devices<br />
Audio Setup<br />
Opens the Audio Configuration window<br />
Video Setup<br />
Opens the Screen Resolution window<br />
Screen Resolution<br />
Shows a list of all available screen resolutions. Inferred Modes [ ]<br />
are not available in mirror mode<br />
Screen Rotation Rotates the screen in clockwise or counter-clockwise directions<br />
Extend<br />
Extends the Windows desktop onto this display<br />
Set as Main Monitor Sets this screen as the main display<br />
Notebook Monitor<br />
Off<br />
To Set the Display into<br />
Extend Mode<br />
1. Click on the DisplayLink icon .<br />
2. Select Extend in Manager Menu.<br />
The device is now extended in the direction<br />
it was the last time the display was in this<br />
mode. For more control, use the Extend<br />
To submenu and select one of the options.<br />
This puts the device into Extend Mode, and<br />
places it to the Left/Right/Above/Below the<br />
main monitor.<br />
To Set the Display into<br />
Mirror Mode<br />
1. Click on the DisplayLink icon .<br />
2. Select Mirror in Manager Menu.<br />
The resolution, color depth and refresh<br />
rate of the primary screen are replicated<br />
on the monitorconnected to the <strong>docking</strong><br />
<strong>station</strong>.<br />
Switches off the laptop display and use the DisplayLink<br />
display as the main screen (only works on PCs and when<br />
only one DisplayLink screen is connected)<br />
Mirror<br />
Shows the same content on both screens (screen<br />
resolutions must be the same)<br />
Off Turns off this DisplayLink display<br />
Optimize for Video<br />
Fit to TV<br />
Select for improved <strong>video</strong> playback on DisplayLink<br />
connected displays (only applicable for <strong>video</strong>; text may<br />
appear less clear)<br />
Adjusts the size of the Windows desktop to fit the<br />
connected TV (only works when one DisplayLink display is<br />
connected and set in Extend Mode)<br />
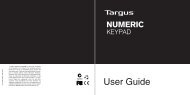
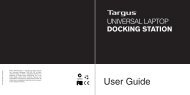
Fit to TV Configuration<br />
1. To configure Fit to TV, choose the option<br />
from the DisplayLink Manager. The<br />
following interface appears.<br />
2. You will also see a red border on the<br />
DisplayLink screen.<br />
The red border shows the size of the new<br />
WindowsDesktop. Use the “+” and “-”<br />
controls to change the size of the red border<br />
until it fits on the TV screen.<br />
3. Once the red border is at the edges of<br />
the TV screen, click “Apply” to resize the<br />
Windows desktop.