DP3002 DP3003 DP4000 DP4001 DP4002 DP4003 - Makita
DP3002 DP3003 DP4000 DP4001 DP4002 DP4003 - Makita
DP3002 DP3003 DP4000 DP4001 DP4002 DP4003 - Makita

Create successful ePaper yourself
Turn your PDF publications into a flip-book with our unique Google optimized e-Paper software.
ASSEMBLY<br />
CAUTION:<br />
• Always be sure that the tool is switched off and<br />
unplugged before carrying out any work on the tool.<br />
Installing side grip (auxiliary handle)<br />
Fig.5<br />
Always use the side grip to ensure operating safety.<br />
Install the side grip so that the teeth on the grip fit in<br />
between the protrusions on the tool barrel.<br />
Then tighten the grip by turning clockwise at the desired<br />
position. It may be swung 360° so as to be secured at<br />
any position.<br />
Installing or removing drill bit<br />
For Model <strong>DP3003</strong>, <strong>DP4001</strong>, <strong>DP4003</strong><br />
Fig.6<br />
Hold the ring and turn the sleeve counterclockwise to<br />
open the chuck jaws. Place the bit in the chuck as far as<br />
it will go. Hold the ring firmly and turn the sleeve<br />
clockwise to tighten the chuck.<br />
To remove the bit, hold the ring and turn the sleeve<br />
counterclockwise.<br />
For Model <strong>DP3002</strong>, <strong>DP4000</strong>, <strong>DP4002</strong><br />
Fig.7<br />
To install the bit, place it in the chuck as far as it will go.<br />
Tighten the chuck by hand. Place the chuck key in each<br />
of the three holes and tighten clockwise. Be sure to<br />
tighten all three chuck holes evenly.<br />
To remove the bit, turn the chuck key counterclockwise<br />
in just one hole, then loosen the chuck by hand.<br />
After using the chuck key, be sure to return to the<br />
original position.<br />
Depth gauge (optional accessory)<br />
The depth gauge is convenient for drilling holes of<br />
uniform depth. Loosen the side grip and insert the depth<br />
gauge into the hole in the side grip. Adjust the depth<br />
gauge to the desired depth and tighten the side grip.<br />
NOTE:<br />
• The depth gauge cannot be used at the position<br />
where the depth gauge strikes against the tool<br />
body.<br />
Fig.8<br />
5<br />
OPERATION<br />
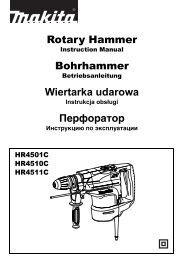
Holding tool<br />
Holding against a stud<br />
003076<br />
1 1<br />
2 3<br />
Holding against a floor<br />
1<br />
2<br />
1. Reaction<br />
2. Reverse<br />
3. Forward<br />
1. Forward<br />
2. Reaction<br />
003077<br />
Always use the side grip (auxiliary handle) and firmly<br />
hold the tool by side grip and switch handle during<br />
operations.<br />
When drilling a large hole with a hole saw, etc., the side<br />
grip (auxiliary handle) should be used as a brace to<br />
maintain safe control of the tool.<br />
Grasp the rear handle and the front grip firmly when<br />
starting or stopping the tool, since there is an initial and<br />
final reaction.<br />
When drilling action is forward (clockwise), the tool<br />
should be braced to prevent a counterclockwise reaction<br />
if the bit should bind. When reversing, brace the tool to<br />
prevent a clockwise reaction. If the bit must be removed<br />
from a partially drilled hole, be sure the tool is properly<br />
braced before reversing.<br />
Drilling operation<br />
Drilling in wood<br />
When drilling in wood, the best results are obtained with<br />
wood drills equipped with a guide screw. The guide<br />
screw makes drilling easier by pulling the bit into the<br />
workpiece.<br />
Drilling in metal<br />
To prevent the bit from slipping when starting a hole,<br />
make an indentation with a center-punch and hammer at<br />
the point to be drilled. Place the point of the bit in the<br />
indentation and start drilling.<br />
Use a cutting lubricant when drilling metals. The<br />
exceptions are iron and brass which should be drilled<br />
dry.<br />
CAUTION:<br />
• Pressing excessively on the tool will not speed up<br />
the drilling. In fact, this excessive pressure will only<br />
serve to damage the tip of your bit, decrease the<br />
tool performance and shorten the service life of the