Power MACS 4000 Quick Guide - Atlas Copco
Power MACS 4000 Quick Guide - Atlas Copco
Power MACS 4000 Quick Guide - Atlas Copco

You also want an ePaper? Increase the reach of your titles
YUMPU automatically turns print PDFs into web optimized ePapers that Google loves.
<strong>Power</strong> <strong>MACS</strong> <strong>4000</strong><br />
<strong>Quick</strong> <strong>Guide</strong><br />
POWER <strong>MACS</strong> <strong>4000</strong> – QUICK GUIDE | 1
Contents<br />
TC Interface ...............................................................................3<br />
Software Installation ................................................................5<br />
Changing IP-address .................................................................6<br />
Download software to TC.........................................................9<br />
Connect PC to TC .................................................................... 10<br />
Basic Programming ................................................................ 11<br />
Help function ..................................................................... 11<br />
Create a new setup ........................................................... 11<br />
Add new program .............................................................13<br />
Delete program .................................................................13<br />
Add a step ..........................................................................13<br />
Cut, copy or delete a step ................................................. 14<br />
Set up problems ................................................................15<br />
Test bolt ..............................................................................16<br />
Checks, Restrictions and Monitoring ....................................17<br />
Checks ................................................................................18<br />
Restrictions ........................................................................ 19<br />
Monitoring ......................................................................... 19<br />
Advanced programming ........................................................20<br />
Create a new program by copying an existing ...............20<br />
<strong>Quick</strong> set .............................................................................21<br />
DynaTork ............................................................................23<br />
Reject Management ..........................................................24<br />
Reporters .................................................................................26<br />
Cycle data ..........................................................................26<br />
Event log ............................................................................27<br />
Traces .................................................................................28<br />
2 | POWER <strong>MACS</strong> <strong>4000</strong> – QUICK GUIDE
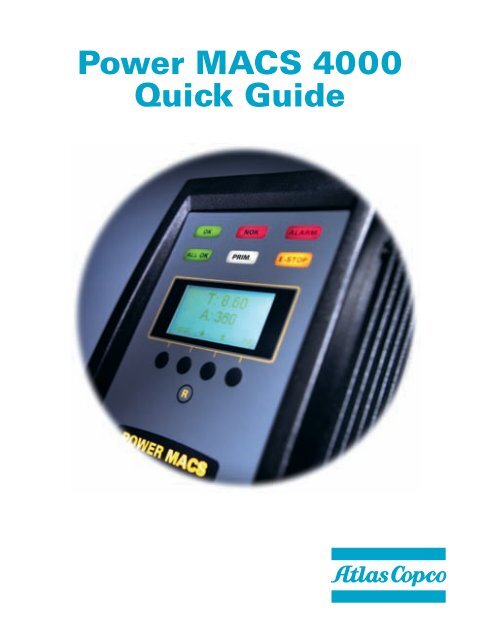
TC Interface<br />
Indicator lamps<br />
– OK<br />
– NOK<br />
– ALARM<br />
– ALL OK (TC-P only)<br />
– PRIM (TC-P only)<br />
– E-STOP (TC-P only)<br />
Text display<br />
– TC node address<br />
– IP-address<br />
– Error messages<br />
– Software version<br />
– Torque & Angle display<br />
Push buttons<br />
– Toggle between<br />
displayed information<br />
– Set IP-address<br />
– Reset E-stop button<br />
(TC-P only)<br />
POWER <strong>MACS</strong> <strong>4000</strong> – QUICK GUIDE | 3
TC Interface<br />
Digital input<br />
(TC-P only)<br />
D-sub <strong>MACS</strong><br />
I/O (TC-P only)<br />
D-sub<br />
RS232/RS485<br />
(TC-P only)<br />
D-sub HD<br />
RS232/RS485<br />
(TC-P only)<br />
External Ethernet<br />
(TC-P only)<br />
Internal Ethernet<br />
Ethernet Switch<br />
<strong>Power</strong> supply<br />
4 | POWER <strong>MACS</strong> <strong>4000</strong> – QUICK GUIDE<br />
E-stop in<br />
and <strong>MACS</strong> IO E-stop out and<br />
<strong>MACS</strong> IO<br />
Anybus slot,<br />
Fieldbus card<br />
Interface (TC-P<br />
only)<br />
<strong>Power</strong> connector<br />
Dip switch for<br />
<strong>MACS</strong> I/O<br />
and RS485<br />
termination<br />
(TC-P only)<br />
QST Spindle<br />
Connector<br />
Digital output<br />
(TC-P only)<br />
24V input
Software Installation<br />
<strong>Power</strong> <strong>MACS</strong><br />
To communicate with PM <strong>4000</strong> ToolsTalk PM has to be installed<br />
on your PC. To run ToolsTalk PM, Multiprog PLC editor is<br />
needed.<br />
Multiprog<br />
• Install MultiProg PLC Editor on your PC<br />
– Accept all default answers<br />
– Restart the computer when prompted<br />
ToolsTalk PM<br />
• Install ToolsTalk PM Software<br />
– Answer next to all questions<br />
– Launch the program when prompted<br />
Since the Multiprog PLC program is an integrated part of<br />
ToolsTalk <strong>Power</strong> <strong>MACS</strong>, both setup files are needed to run<br />
the system. That means that every setup consists of two<br />
files:<br />
Example:<br />
Demo_1sp.pm4<br />
Demo_1sp.zwt2<br />
POWER <strong>MACS</strong> <strong>4000</strong> – QUICK GUIDE | 5
Changing IP-address<br />
The only way to connect your computer to <strong>Power</strong> <strong>MACS</strong><br />
<strong>4000</strong> is via Ethernet.<br />
The Primary Tightening Controller (TC-P) has two Ethernet<br />
ports, each with its own IP-address. The external port is for<br />
the factory network. The internal port is for internal<br />
communication and uses local addressing.<br />
Connect your Ethernet cable to the switch on the backplane<br />
of the TC-P.<br />
The TC ”ID number” shown on the TC and TC-P display and<br />
TC-P is the last part of the IP address. This number needs to<br />
be changed to a unique number if there is more than one<br />
TC in the system.<br />
The IP-address and TC ID number can be viewed on the<br />
display and set via using buttons on the front of the TC.<br />
The IP-address can also be set through the computer with<br />
ToolsTalk PM.<br />
1. Set the IP-address of the TC.<br />
Use the buttons on the front of<br />
the TC to toggle between the<br />
menus.<br />
a. Select Setup and enter the<br />
”Basic setup”<br />
b. Toggle to “IP Setup” and push<br />
”Select”<br />
c. Toggle to ”IF1 IP” and push<br />
”change”. Change the IP-adress<br />
by using the buttons on the TC<br />
d. Go back to the ”Basic setup”<br />
e. Toggle to ”TC number” in order to<br />
change the last part of the IP-adress. This number<br />
needs to be unique for every TC in a system<br />
6 | POWER <strong>MACS</strong> <strong>4000</strong> – QUICK GUIDE
2. Change IP-address and Subnet mask on your PC.<br />
a. Turn on your PC and open: Start/Control Panel/<br />
Network connections/Local area connection<br />
b. Click on “Properties”<br />
c. If you use a VPN client. De-select the check box<br />
“Checkpoint SecuRemote”<br />
d. Scroll down and double click<br />
“Internet Protocol (TCP/IP)<br />
e. Select “Use the following IP-address”<br />
f. Enter the IP address 192.168.0.250 and Subnet<br />
mask 255.255.255.0. Click “OK”<br />
3. Use “ipconfig” to verify that the computer has<br />
changed the IP-address<br />
a. Go to “Start” and select “Run…”<br />
b. Type cmd and click “OK”<br />
c. Type ipconfig and check that the IP-address is correct<br />
POWER <strong>MACS</strong> <strong>4000</strong> – QUICK GUIDE | 7
4. Use Ping to verify communication between your<br />
computer and the TC-P in <strong>Power</strong> <strong>MACS</strong> <strong>4000</strong>.<br />
a. Go to “Start” and select “Run…”<br />
b. Type cmd and click “OK”<br />
c. Type ping + “IP-address of TC” and check that the<br />
TC is connected<br />
8 | POWER <strong>MACS</strong> <strong>4000</strong> – QUICK GUIDE
Download software to TC<br />
The software version of the TC can be viewed on the TC<br />
display or in ToolsTalk PM.<br />
Check software version<br />
1. Go to the “Maintenance” menu and select<br />
“Configure target system”<br />
2. Click “Scan” to view all available TC<br />
3. Read the Software version in the column labelled “Version”<br />
Download new software<br />
To download new software to the TC, – follow the<br />
instructions below.<br />
1. Go to the “Maintenance” menu and select “Configure target<br />
system” – Highlight the TC to be upgraded<br />
2. Click “Download”<br />
3. Browse for the <strong>Power</strong> <strong>MACS</strong> <strong>4000</strong> Folder and select<br />
“TC System software”<br />
4. Select the .mx file and click “Open”<br />
5. Restart the TC once the new software has been downloaded<br />
successfully<br />
POWER <strong>MACS</strong> <strong>4000</strong> – QUICK GUIDE | 9
Connect PC to TC<br />
Make sure you have a Set-up before you connect. To create a<br />
Set-up, see page 11.<br />
1. Start ToolsTalk <strong>Power</strong> <strong>MACS</strong> and select the desired<br />
system as described below.<br />
a. Open the “Maintenance” menu and select<br />
“Select Target System”<br />
b. Click “Scan” to scan for new TC<br />
c. Select the TC-P to connect to and click “OK”. The new<br />
TC is marked green in the list. See picture below<br />
2. Click “Connect” to connect ToolsTalk PM to the TC<br />
10 | POWER <strong>MACS</strong> <strong>4000</strong> – QUICK GUIDE
Basic Programming<br />
Help function<br />
Help texts can be reached<br />
from the “Help” menu by<br />
pushing F1 or from the<br />
“Help” tab in the<br />
“Dynamic tool” window.<br />
Create a new setup<br />
A set up is needed for saving and running a program.<br />
The set up must be created before the program is built.<br />
Make sure the TC is disconnected.<br />
1. The Wizard for creating a new setup can be started either<br />
from the Start page when opening ToolsTalk PM (See<br />
picture below) or by selecting the “File” menu and the<br />
“New…” menu item<br />
POWER <strong>MACS</strong> <strong>4000</strong> – QUICK GUIDE | 11
2. In the “New setup” wizard the settings for the system,<br />
station, spindles and bolts are entered. Follow the Wizard<br />
to finish the setup<br />
12 | POWER <strong>MACS</strong> <strong>4000</strong> – QUICK GUIDE
Add new program<br />
After the Set up is created programming can start. To add a<br />
program the TC has to be disconnected.<br />
1. Under the “Tightening” menu. Select “New program…”<br />
Name the new program and click “OK”<br />
Delete program<br />
1. Open “System map” and Select “Program”<br />
2. Right click on the program that shall be deleted<br />
3. Choose “Remove program” and “OK”<br />
Add a step<br />
1. To add a step, drag the step from the ”Dynamic tool” window<br />
and drop it on the desired location in the program.<br />
It is also possible to right click between two steps and<br />
select ”Add step” from the pop up menu<br />
POWER <strong>MACS</strong> <strong>4000</strong> – QUICK GUIDE | 13
2. Change the values in “Settings” under the menu<br />
“Control”. For more detailed programming, see page 17<br />
3. Click “Apply” to save the new settings in the setup<br />
If a warning is displayed when clicking “Apply” this<br />
indicates an error when programming. A description of<br />
this is displayed in “Set up problems”. See page 15<br />
Cut, copy or delte a step<br />
1. Right click on the step and select cut, copy or delete from<br />
the pop-up menu<br />
2. To insert a copied step, right click where you want the<br />
new step to be inserted and select “Paste”<br />
14 | POWER <strong>MACS</strong> <strong>4000</strong> – QUICK GUIDE
Set up problems<br />
When applying new settings, during programming, a<br />
warning message will appear if settings are missing or<br />
incorrect.<br />
These errors or warnings are viewed in the “Set up<br />
problems” window and also at the step where the error<br />
occurs.<br />
To open this window – go to the “View” menu and select<br />
“Set up problems…”<br />
Unlike warnings, errors must be corrected before the system<br />
can continue to run.<br />
POWER <strong>MACS</strong> <strong>4000</strong> – QUICK GUIDE | 15
Test bolt<br />
Test bolt is used for running the Spindle(s) from the PC.<br />
It is possible to run a Single run, Program or Mode.<br />
To run a Program, follow the instructions below.<br />
1. Click ”correct” to correct the PC to the TC<br />
2. Go to the “Maintenance” menu and select “Test bolt”<br />
3. Click “Program” to run the created Programs<br />
4. Under “Settings”, select the programs to run<br />
5. Adjust the “No. of cycles” tol be carried out<br />
6. Click ”Start” to run the programs<br />
16 | POWER <strong>MACS</strong> <strong>4000</strong> – QUICK GUIDE
Checks, Restrictions and Monitoring<br />
By using checks, restrictions and monitoring, the tightening<br />
process can be monitored, controlled and evaluated.<br />
Programming of checks, restrictions and monitoring.<br />
1. Right click on the step or drag the selected item from the<br />
”Dynamic tool” window to the step.<br />
Note: Monitoring can only be added to Cycle End (CE)<br />
2. Set the parameters for each item in the setting window<br />
In the Program...<br />
…checks are marked with a yellow dot<br />
…restrictions are marked with a red dot<br />
…monitoring is marked with a blue dot<br />
POWER <strong>MACS</strong> <strong>4000</strong> – QUICK GUIDE | 17
Checks<br />
Checks are used to define the variables that are to be<br />
measured and the limits to check in the tightening step. All<br />
checks can be set to Repairable or Fatal. If set to Fatal, the<br />
tightening can not be automatically repaired.<br />
If repairable, the Reject Management can try to re-tighten<br />
the bolt (see “Reject Management” page 24). Select the Fatal<br />
box if you want the incorrect tightening to be considered<br />
Fatal.<br />
18 | POWER <strong>MACS</strong> <strong>4000</strong> – QUICK GUIDE
Restrictions<br />
A Restriction stops a running step immediately if the limits<br />
have been exceeded. A restriction can be set to Fatal if you<br />
do not want to retry.<br />
Monitoring<br />
Monitoring is set at the Cycle End. The Monitoring function<br />
is used to examine the result of an entire tightening cycle.<br />
POWER <strong>MACS</strong> <strong>4000</strong> – QUICK GUIDE | 19
Advanced programming<br />
Create a new program by combining an existing<br />
program<br />
1. Select ”Tightening” menu<br />
2. Select ”New Program…” menu item<br />
3. Name the new program<br />
4. Click the check box “Build a new tightening program by<br />
combining existing programs”<br />
5. Select the program you want to reuse<br />
6. Click the “Add” button and then “OK”<br />
7. The new program is now added in the System Map under<br />
Programs<br />
20 | POWER <strong>MACS</strong> <strong>4000</strong> – QUICK GUIDE
<strong>Quick</strong> set<br />
<strong>Quick</strong> set is a function for creating a program where all<br />
parameters can be changed quickly and easily.<br />
1. Make sure the “Program settings” is highlighted<br />
2. In the “Settings” menu – select “User variables” and<br />
click “Add”<br />
3. Name the variable<br />
4. Enter a value and unit<br />
5. Click “Apply” and the variable is added to the Program<br />
settings<br />
POWER <strong>MACS</strong> <strong>4000</strong> – QUICK GUIDE | 21
6. When programming a step – under “Settings” and<br />
“Control”, use the programmed Variable when entering<br />
the targets of the step<br />
7. When programming Checks<br />
and Restrictions set the max.<br />
and min. levels to a percent of<br />
the Variable<br />
Note: If the Value of the Variable<br />
is changed in the Program settings,<br />
the value will change in all places<br />
were the Variable is used.<br />
22 | POWER <strong>MACS</strong> <strong>4000</strong> – QUICK GUIDE
DynaTork<br />
DynaTork is a method patented by <strong>Atlas</strong> <strong>Copco</strong> designed to<br />
overcome relaxation in the joint. When the target torque is<br />
reached the DynaTork function holds the torque (current) in<br />
oreder to compensate for joint relaxation.<br />
1. IOn order to add a step, type ”DT – Run until DynaTork”<br />
2. Fill in the values for “Torque”, “Times” and “Current<br />
percentage” (If you are unsure about what values to fill in,<br />
use the Help function to get more information)<br />
3. Add “Checks” and “Restrictions” as described earlier<br />
POWER <strong>MACS</strong> <strong>4000</strong> – QUICK GUIDE | 23
Reject management<br />
Reject Management is a function for automatically repairing<br />
tightenings in station and avoiding more time consuming repairs<br />
later in the process. When programming Reject Management,<br />
a step to loosen the bolt is added and the program<br />
is set to go back to an earlier step and retighten the bolt.<br />
For examples/illustrations – see next page.<br />
1. Add two steps at the end of the program.<br />
a. To loosen the bolt, add a “Run to Angle” step and set<br />
the direction to “Backwards”.<br />
b. After this step, add a “Return from repair” step.<br />
2. Click the step where the Reject Management functionality<br />
is to be added.<br />
a. Add the desired ”Checks” to evaluate if the tightening<br />
is OK or NOK<br />
b. In the “Settings” window under “Rejects” enter the<br />
following settings for the Reject Management:<br />
Retry<br />
Loosen with step: Enter the “Run to Angle” step for<br />
loosening the bolt<br />
Start from step: Enter the step that shall start the<br />
retightening of the bolt<br />
First failure<br />
Failing bolts – set to “Retry”<br />
Other bolts – set to “Wait”<br />
3. Click Apply to activate the new settings<br />
For a more detailed guide to Reject Management use the<br />
help function in ToolsTalk PM.<br />
24 | POWER <strong>MACS</strong> <strong>4000</strong> – QUICK GUIDE
POWER <strong>MACS</strong> <strong>4000</strong> – QUICK GUIDE | 25
Reporters<br />
When analysing a tightening, several tools are available in<br />
ToolsTalk PM. Cycle data for viewing the results, Event log<br />
for viewing errors that have occurred and Trace for a graphic<br />
picture of what is happening in the joint.<br />
Cycle data<br />
After a tightening cycle has been completed, variable data<br />
can be displayed in the ”Cycle data” window.<br />
“Cycle data” is opened by clicking the “Cycle data” icon on<br />
the Toolbar.<br />
To change the values viewed in “Cycle data”. Open the<br />
”Reporters” menu and select ”1 Screen...” or select the<br />
”reporters-Screen” from the ”System Map”.<br />
1. Click “Variables”<br />
2. Choose Station, Bolt and Step variables by dragging them<br />
from the “Dynamic Tool” window<br />
3. By highlighting the variables the parameters can be<br />
modified<br />
26 | POWER <strong>MACS</strong> <strong>4000</strong> – QUICK GUIDE
Use the Help function (F1) for more information.<br />
Event log<br />
After a tightening, is finalised reported events are displayed<br />
in “Event log”. Brief message about the error is displayed.<br />
To open this window – go to the “View” menu and select<br />
“Event log…”<br />
POWER <strong>MACS</strong> <strong>4000</strong> – QUICK GUIDE | 27
Traces<br />
Using the Trace function, the tightening can be viewed in a<br />
graph that can, in turn, be used for analysing the program<br />
and optimise the process. Traces can also be compared with<br />
a reference trace for finding deviations in the tightening<br />
process.<br />
View trace<br />
1. Click the “Trace” icon in the Toolbar to open the “Trace”<br />
window<br />
2. Open the “View” menu in the “Trace” window.<br />
3. Select “Latest” to view the latest tightening<br />
4. Set the preferred units for “Bottom axes”, “Right axes”<br />
and “Left axes” to adjust the layout of the trace<br />
Save trace<br />
1. Go to the “Trace” menu and select “Save to file”<br />
2. Save the trace<br />
3. Select the “View” menu and “Selected”<br />
4. Select trace and click “OK” to view the selected Trace<br />
28 | POWER <strong>MACS</strong> <strong>4000</strong> – QUICK GUIDE
POWER <strong>MACS</strong> <strong>4000</strong> – QUICK GUIDE | 29
30 | POWER <strong>MACS</strong> <strong>4000</strong> – QUICK GUIDE
POWER <strong>MACS</strong> <strong>4000</strong> – QUICK GUIDE | 31
32 | POWER <strong>MACS</strong> <strong>4000</strong> – QUICK GUIDE<br />
www.atlascopco.com<br />
9833 1761 01 Jetlag / Åtta.45 Tryckeri AB, 2011:1