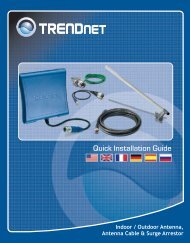
Quick Installation Guide - TRENDnet
Quick Installation Guide - TRENDnet
Quick Installation Guide - TRENDnet

Create successful ePaper yourself
Turn your PDF publications into a flip-book with our unique Google optimized e-Paper software.
<strong>Quick</strong> <strong>Installation</strong> <strong>Guide</strong><br />
TEW-455APBO
Table of Contents<br />
English 1<br />
1. Before You Start 1<br />
2. Hardware <strong>Installation</strong> 3<br />
3. Mounting 6<br />
4. Connecting <strong>TRENDnet</strong> External Antenna 9<br />
5. Configure the Access Point 10<br />
Troubleshooting 13<br />
Version 08.24.2009
ENGLISH<br />
FRANÇAIS<br />
DEUTSCH<br />
ESPAÑOL<br />
ÐÓÑÑÊÈÉ<br />
1. Before You Start<br />
System Requirements<br />
Package Contents<br />
TEW-455APBO<br />
CD-ROM (Utility & User’s <strong>Guide</strong>)<br />
<strong>Quick</strong> <strong>Installation</strong> <strong>Guide</strong><br />
AC Power Adapter (48V DC)<br />
Power Cord<br />
Mounting Kit<br />
Waterproof Kit*<br />
Grounding wire<br />
Web Browser: Internet Explorer (5.5 or higher)<br />
A computer with a network adapter properly installed<br />
A network Switch or Hub with an available network LAN port<br />
2 x RJ-45 network cable<br />
RJ-45 Crimper<br />
Wire stripper<br />
Screwdriver<br />
Waterproof tape<br />
External Antenna with N-type Female connector (Optional)<br />
TEW-ASAL1 (Optional)<br />
Note: The TEW-455APBO does not support IEEE 802.3af. You must use the<br />
special Power over Ethernet adapter that is supplied with the TEW-455APBO.<br />
1
Application<br />
Internet<br />
Cable/DSL<br />
Modem<br />
9dBi High Power Wireless<br />
Outdoor PoE Access Point<br />
(TEW-455APBO)<br />
PoE Power Adapter<br />
Workstations with<br />
PCI Adapter<br />
Cable/DSL Advanced<br />
VPN Firewall Router<br />
(TW100-BRV304)<br />
2<br />
PoE Power Adapter<br />
16-Port 10/100Mbps<br />
Fast Ethernet Switch<br />
(TE100-S16R)<br />
Notebook with<br />
PC Card<br />
Cable<br />
(TEW-ASAL1)<br />
Workstations with<br />
PCI Adapter<br />
14 dBi Outdoor High-Gain<br />
Directional Antenna<br />
(TEW-OA14D)<br />
10/100Mbps<br />
Multi-Port Print Server<br />
(TE100-P21)<br />
*Check package contents for waterproof kit: (Ethernet Cable is not included)<br />
Printers<br />
Cable<br />
Sealing Nut<br />
Seal<br />
Clamp Ring<br />
Gasket<br />
Screw Nut<br />
Body<br />
Plug<br />
Gasket<br />
ENGLISH<br />
FRANÇAIS<br />
DEUTSCH<br />
ESPAÑOL<br />
ÐÓÑÑÊÈÉ
ENGLISH<br />
FRANÇAIS<br />
DEUTSCH<br />
ESPAÑOL<br />
ÐÓÑÑÊÈÉ<br />
2. Hardware <strong>Installation</strong><br />
Note: Please connect the computer configuring the TEW-455APBO to the same<br />
switch/hub.<br />
1. Remove the screw and washer from the<br />
grounding hole using a screwdriver.<br />
2. Align one end of the grounding wire over the<br />
hole. Then connect the screw and washer back<br />
in.<br />
3. Connect the green grounding wire to a<br />
grounding object. e.g. Earth Driven rod,<br />
Grounded Electrical System, Building Frame.<br />
4. Use a wire stripper to strip off about 2 inches of<br />
the cable sheath from one end of an Ethernet<br />
cable. The recommended wire gauge is<br />
24AWG.<br />
5. Insert the seal into the rear of the clamp ring.<br />
Then insert the gasket into the front end of the<br />
clamp ring.<br />
6. Insert the body, the screw nut, the sealing nut<br />
and clamp ring into the stripped end of the<br />
cable.<br />
3<br />
12.0
7. Insert the wires on the stripped end of the cable<br />
into the RJ-45 plug. Make sure the wires are<br />
inserted into the RJ-45 plug based TIA/EIA<br />
T-568A or T-568B standard.<br />
8. Crimp the stripped cable to the RJ-45 plug.<br />
9. Insert the gasket to the front end of the<br />
connector. Then put the screw nut on the back.<br />
10. Connect the clamp ring and sealing nut to the<br />
PoE port on the rear of the TEW-455APBO.<br />
Hold the assembly firmly and tighten by hand.<br />
4<br />
ENGLISH<br />
FRANÇAIS<br />
DEUTSCH<br />
ESPAÑOL<br />
ÐÓÑÑÊÈÉ
ENGLISH<br />
FRANÇAIS<br />
DEUTSCH<br />
ESPAÑOL<br />
ÐÓÑÑÊÈÉ<br />
11. Wrap the waterproof RJ45 tightly with the<br />
waterproof tap for double protection from<br />
water. (The wrapped area of the RJ45 should<br />
cover from enclosure to cable.)<br />
Incorrect<br />
12. Connect the opposite end of the Ethernet<br />
cable to the LAN + DC port on the Power over<br />
Ethernet Adapter.<br />
13. Connect one end of another Ethernet cable to<br />
the LAN port.<br />
14. Connect the opposite end of the Ethernet<br />
cable to a LAN port on your network.<br />
15. Connect the power cord into the Power over<br />
Ethernet adapter. Then connect the power<br />
cord into a power outlet.<br />
16. Verify that the following panel LEDs are on:<br />
Power and WLAN.<br />
5<br />
Correct<br />
Incorrect
3. Mounting<br />
Wall Mounting<br />
1. Align the mounting bracket with the holes on<br />
the bottom of the unit and secure it with the<br />
screws and washers provided.<br />
2. Use the wall bracket as a template and mark<br />
the wall for the correct screw / fastener<br />
position.<br />
3. Drill holes for the fastener plugs at the marked<br />
positions on the wall.<br />
4. Insert fastener plugs into the drilled holes.<br />
5. Use the provided wood screws to screw the<br />
outdoor unit/swivel mounting bracket to the<br />
fastener plugs to the wall.<br />
6<br />
ENGLISH<br />
FRANÇAIS<br />
DEUTSCH<br />
ESPAÑOL<br />
ÐÓÑÑÊÈÉ
ENGLISH<br />
FRANÇAIS<br />
DEUTSCH<br />
ESPAÑOL<br />
ÐÓÑÑÊÈÉ<br />
6. Insert the mounting bracket into the wall<br />
mounting bracket and secure with the washers<br />
and screws provided.<br />
7. Adjust the orientation of the antenna as<br />
necessary.<br />
8. Once the unit is positioned correctly, tighten all<br />
screws.<br />
Pole Mounting<br />
1. Align the mounting bracket with the holes on<br />
the bottom of the unit and secure it with the<br />
screws and washers provided.<br />
2. Slide the two provided u-clamps around the<br />
pole. Place the pole mounting bracket at the<br />
desire height and position.<br />
7
3. Secure the mounting bracket to the pole<br />
mounting bracket using the nuts and washers<br />
provided.<br />
4. Adjust the orientation of the antenna as<br />
necessary.<br />
5. Once the unit is positioned correctly, tighten all<br />
screws.<br />
8<br />
ENGLISH<br />
FRANÇAIS<br />
DEUTSCH<br />
ESPAÑOL<br />
ÐÓÑÑÊÈÉ
ENGLISH<br />
FRANÇAIS<br />
DEUTSCH<br />
ESPAÑOL<br />
ÐÓÑÑÊÈÉ<br />
4. Connecting <strong>TRENDnet</strong> External Antenna<br />
Note: Connecting a <strong>TRENDnet</strong> External Antenna to the TEW-455APBO requires the<br />
TEW-ASAL1.<br />
1. Remove the metal cap from the connector<br />
labeled EXT.<br />
2. Screw one end of the TEW-ASAL1 to the EXT<br />
connector on the TEW-455APBO.<br />
3. Screw another cable (plug) connector to the<br />
external antenna that you expect to connect.<br />
Please screw both the connectors as tight as<br />
you can.<br />
4. Use weather-proof tape to wrap the connectors.<br />
9
5. Configure the Access Point<br />
Note: The Access Point can be configured using the Utility or a Web Browser. For non-<br />
Windows users change your computer's IP address to 192.168.10.x (where x is an<br />
available address from 1-254). Since the Access Point's default IP address is<br />
192.168.10.100, make sure no other network devices are assigned an IP address of<br />
192.168.10.100.<br />
Windows users<br />
1. Insert the Utility CD-ROM into your computer's<br />
CD-ROM drive. Then click Install Utility.<br />
2. Follow the InstallShield Wizard instructions<br />
and then click Finish.<br />
3. Double click the Utility icon on your desktop.<br />
10<br />
ENGLISH<br />
FRANÇAIS<br />
DEUTSCH<br />
ESPAÑOL<br />
ÐÓÑÑÊÈÉ
ENGLISH<br />
FRANÇAIS<br />
DEUTSCH<br />
ESPAÑOL<br />
ÐÓÑÑÊÈÉ<br />
4. Click on the Find icon to detect your Access<br />
Point. Change the IP to be in the same subnet<br />
as your network.<br />
5. Click View and click Update to save changes.<br />
6. Open your web browser, type the IP address of<br />
Access Point in the Address bar, and then<br />
press Enter. The default IP address is<br />
192.168.10.100.<br />
7. Enter the User name and Password, and then<br />
click OK. By default:<br />
User Name: admin<br />
Password: admin<br />
8. Click Basic > Operation Mode. Select the<br />
desired Operation Mode, enter the desired<br />
SSID and then click Apply.<br />
By default:Operation Mode: Access Point<br />
SSID: <strong>TRENDnet</strong><br />
11
9. Click Reboot AP to save all changes.<br />
Your <strong>Installation</strong> is complete<br />
For detailed information regarding the TEW-455APBO’s configuration and advanced settings,<br />
please refer to User's <strong>Guide</strong> included on the Utility & Driver CD-ROM, or <strong>TRENDnet</strong>'s<br />
website at http://www.trendnet.com.<br />
Register Your Product<br />
To ensure the highest level of customer service and support, please take a moment to<br />
register your product Online at: www.trendnet.com/register<br />
Thank you for choosing <strong>TRENDnet</strong><br />
12<br />
ENGLISH<br />
FRANÇAIS<br />
DEUTSCH<br />
ESPAÑOL<br />
ÐÓÑÑÊÈÉ
Trouble Shooting<br />
I am using a non-Windows based computer? How do I configure IP Address and Wireless<br />
settings on the Access Point?<br />
1. Assign your computer a static IP Address of 192.168.10.x (where X is an available<br />
address from 1 to 254).<br />
2. Follow steps 5 and 6 in Section 5 Configure the Access Point to log on to the Browser<br />
configuration for the Access Point.<br />
3. Follow step 7 in Section 5 Configure the Access Point to configure wireless settings.<br />
4. Click Basic > IP Configuration. Enter an IP address that is in the same subnet as your<br />
network and then click Apply.<br />
5. Click Reboot AP to save all changes.<br />
I specified the IP address http://192.168.10.100 in my Internet Browser's Address Bar, but an<br />
error message says "The page cannot be displayed". How can I get into the TEW-455APBO's<br />
web configuration page?<br />
1.<br />
Check your hardware settings again by following the instructions in section 2.<br />
2. Make sure the LAN and WLAN lights are lit.<br />
3. Make sure the TCP/IP settings are configured properly (see Q1).<br />
4. Since the Access Point's default IP address is 192.168.10.100, make sure that no other<br />
network devices are assigned an IP address of 192.168.10.100.<br />
If my network's IP is different than the Access Point's range, what should I do?<br />
You should still configure the Access Point first. After all the settings are applied, go to the<br />
Access Point's configuration page, click on TCP/IP settings and change the IP address of the<br />
Access Point to match your network's IP.<br />
After I successfully configured the Access Point to meet my network settings, I can not<br />
connect to my network using wireless computers.<br />
If you have a DHCP server in your network, you need to go into TCP/IP settings again and<br />
re-select "Obtain an IP address automatically" to allow the PC to regain an IP address from<br />
your DHCP server.<br />
All the settings are correct, but I can not make a wireless connection to the Access Point.<br />
1. Double check that the WLAN light on the Access Point is lit.<br />
2. Power cycle the Access Point by unplugging the power to the Access Point. Wait 15<br />
seconds, then plug the power back in.<br />
3. Contact the manufacturer of your wireless network adapter. Make sure the wireless<br />
network adapter is configured with the proper SSID. The default SSID of the Access Point<br />
is <strong>TRENDnet</strong>.<br />
I changed the password on the access point, but I can no longer login. What should I do?<br />
Reset the unit. Unplug the power to the access point. Unscrew the connector that is labeled<br />
reset. Press on the white reset button. Plug the power back in without letting go of the reset<br />
button. Wait 10 seconds, then let go of the reset button. The default user name and<br />
password is admin.<br />
If you still encounter problems or have any questions regarding the TEW-455APBO, please contact<br />
<strong>TRENDnet</strong>’s Technical Support Department.<br />
13
Certifications<br />
This equipment has been tested and found to comply with FCC and CE Rules.<br />
Operation is subject to the following two conditions:<br />
(1) This device may not cause harmful interference.<br />
(2) This device must accept any interference received. Including interference that may<br />
cause undesired operation.<br />
Waste electrical and electronic products must not<br />
be disposed of with household waste. Please<br />
recycle where facilities exist. Check with you Local<br />
Authority or Retailer for recycling advice.<br />
NOTE: THE MANUFACTURER IS NOT RESPONSIBLE FOR ANY RADIO OR TV<br />
INTERFERENCE CAUSED BY UNAUTHORIZED MODIFICATIONS TO THIS<br />
EQUIPMENT. SUCH MODIFICATIONS COULD VOID THE USER’S AUTHORITY TO<br />
OPERATE THE EQUIPMENT.<br />
ADVERTENCIA<br />
En todos nuestros equipos se mencionan claramente las caracteristicas del adaptador de<br />
alimentacón necesario para su funcionamiento. El uso de un adaptador distinto al<br />
mencionado puede producir daños fisicos y/o daños al equipo conectado. El adaptador<br />
de alimentación debe operar con voltaje y frecuencia de la energia electrica domiciliaria<br />
existente en el pais o zona de instalación.
Product Warranty Registration<br />
Please take a moment to register your product online.<br />
Go to <strong>TRENDnet</strong>’s website at http://www.trendnet.com/register<br />
Copyright ©2009. All Rights Reserved. <strong>TRENDnet</strong>.