You also want an ePaper? Increase the reach of your titles
YUMPU automatically turns print PDFs into web optimized ePapers that Google loves.
SAFETY INSTRUCTIONS<br />
1<br />
ENGLISH<br />
1. Please read these safety instructions carefully.<br />
2. Please keep this User’s Manual for your reference.<br />
3. Please disconnect the equipment from your AC outlet before cleaning.<br />
Do not use liquid or sprayed detergent for cleaning.<br />
Use moist sheet or cloth for cleaning.<br />
4. For pluggable equipment, the socket-outlet shall be installed near the equipment and<br />
shall be easily accessible.<br />
5. Please keep this equipment away from humid areas.<br />
6. Install this equipment on a reliable surface. If the equipment is not on a reliable surface,<br />
it may drop and cause injury.<br />
7. The openings on the enclosure are for air convection. Please protect the equipment from<br />
overheating . DO NOT COVER THE OPENINGS.<br />
8. Make sure the voltage of the power source is appropriate when connecting the<br />
equipment to the power outlet.<br />
9. Place the power cord where people will not step or trip on it. Do not place objects over<br />
the power cord.<br />
10. All Cautions and Warnings on the equipment should be noted.<br />
11. If the equipment is not in use for several days, disconnect the equipment from the power<br />
outlets to avoid damage by transient power surges.<br />
12. Never pour any liquids into the openings, this could cause fire or electrical shock.<br />
13. Never open the equipment. For safety reasons, the equipment should only be opened by<br />
qualified service personnel.<br />
14. If one of the following situations arises, get the equipment checked by a qualified<br />
service personnel:<br />
(a) The power cord or plug is damaged.<br />
(b) Liquid has penetrated into the equipment.<br />
(c) The equipment has been exposed to moisture.<br />
(d) The equipment has not worked well or you can not get it to work according to the<br />
user’s manual.<br />
(e) The equipment was dropped and damaged.<br />
(f) If the equipment has obvious signs of damage.<br />
15. DO NOT LEAVE THIS EQUIPMENT IN AN ENVIRONMENT UNCONDITIONED;<br />
STORAGE TEMPERATURE ABOVE 60℃(140℉), IT MAY DAMAGE THE<br />
EQUIPMENT. The sound pressure level at the operators position according to IEC704-<br />
1:1982 is equal or less than 70dB(A)<br />
16. DANGER: Invisible laser radiation when opened. Avoid direct exposure to beam.<br />
Complies with FDA radiation performance standards,21 CFR, subchapter J.<br />
Laser power: Wave Length: 783±3nm (CD); 658±3nm (DVD)<br />
Emission power:0.7mW<br />
Laser diode: class 3b
PRECAUTIONS<br />
2<br />
ENGLISH<br />
!! Do not attempt to open the drive and<br />
service it. Removing the cover may<br />
cause exposure to harmful laser beams<br />
and electrical voltage. User is<br />
recommended to get service by<br />
returning the defective drive back to<br />
the original vendor where the drive was<br />
purchased.<br />
• Use the original package for transporting the drive or sending back for service. The<br />
original packing was designed and tested to protect your drive under rough conditions.<br />
• Do not put this drive in direct sunlight, on heating units, or near electrical appliances<br />
which draw large amounts of current.<br />
• Use a soft, dust-free cloth for cleaning your drive. Keep your drive away from moisture or<br />
liquids including water, cleaning-fluids, or solvents.<br />
• Keep your disc clean. Using a soft, dust-free cloth to clean the surface of the disc before<br />
recording will improve the burning data integrity.<br />
• Do not drop or jolt the drive.<br />
• Keep the area around the drive clean from dust, smoke, and other contaminants.<br />
• The copyright law of each country governs the reproduction of copyrighted works. The<br />
person using the drives may be liable for its use to make unauthorized copies of<br />
copyrighted works.<br />
• It will increase the success rate for copying the data from HDD, instead of copying the<br />
data by "copy on the fly mode". Therefore we recommend the user reserving sufficient<br />
buffer space for creating an image file (at least 650MB for CD; 5GB for DVD; and if your<br />
drive support Double Layer DVD+R writing, then at least 9GB space is needed).
TABLE OF CONTENTS<br />
3<br />
ENGLISH<br />
INTRODUCTION<br />
What the DVD Writer Does…………………………………………4<br />
Format Compatibility…………………………………………………4<br />
Recording Modes………………………………………………………5<br />
What You Can Do with the DVD Writer……………………………5<br />
System Configuration<br />
System Requirements…………………………………………………6<br />
Features and Controls<br />
Front View……………………………………………………………7<br />
Rear View……………………………………………………………8<br />
INSTALLATION<br />
USB 2.0 Users<br />
Installing USB Driver for Windows 98SE………………………………9<br />
Connection…………………………………………………………………….10<br />
Installing the Drive……………………………………………………....11<br />
OPERATION<br />
Installing Necessary Device Drivers……………………………12<br />
Loading and Unloading the Tray………………………………12<br />
Recording CDs & DVDs<br />
About Software & Manuals…………………………………………13<br />
Recommended Recordable & ReWritable Media………………13<br />
Playing CDs & DVDs<br />
Playback Software……………………………………………………14<br />
Playing Audio CDs…………………………………………………14<br />
Playing DVDs for the First Time…………………………………15<br />
TROUBLESHOOTING<br />
Read Problems……………………...…………………………………16<br />
Write Problems……………………………….…………………………17
INTRODUCTION<br />
4<br />
ENGLISH<br />
Thank you for purchasing this DVD Writer, a reliable, high-performance recordable DVD and<br />
CD writer, rewriter and player. Please read this manual carefully and keep it handy for easy<br />
reference. Use the manual for installation, operation and troubleshooting for this drive.<br />
What the DVD Writer Does<br />
The DVD Writer is a recordable DVD/CD-ReWritable drive that provides professional quality<br />
DVD and CD performance for writing, rewriting and reading. It also reads Digital Versatile<br />
Discs (DVDs) formatted for movies and data. This versatile and remarkable drive can:<br />
For DVDs<br />
Write DVD+R (recordable DVD) media.<br />
* Write Double Layer DVD+R (recordable DVD+R9) media.<br />
Write DVD+RW (re-writable DVD) media.<br />
Write DVD-R (recordable DVD) media.<br />
Write DVD-RW (re-writable DVD) media.<br />
Read DVD (DVD+R, DVD+RW, DVD-R, DVD-RW, and DVD+R9) discs.<br />
For CDs<br />
Write to CD-R (recordable CD) media.<br />
Write to ultra-speed CD-RW (rewritable CD) media.<br />
Read all CD-ROM and CD-R data media.<br />
Read CD-RW and CD-DA (audio) media.<br />
(NOTE: The drive’s maximum Writing, ReWriting, & Reading speeds are printed on the<br />
original box. *Only when your drive supports Double Layer DVD+R writing, it can<br />
write DVD+R9 media.)<br />
The drive supports Running OPC (ROPC) and is compatible with Windows Plug & Play.<br />
Flash memory allows upgrading the drive to the latest firmware revision (available from the<br />
web site) without opening the drive. Buffer Underrun Proof technology eliminates buffer<br />
underrun errors, therefore you can safely use your computer for other things while you’re<br />
writing to a recordable DVD and CD media.<br />
Format Compatibility<br />
This DVD Writer is a versatile optical disk drive. For CD write function, it is capable to write<br />
data, which conforms to Orange Book: Part 2 CD-R Volume 1 / Part 2 CD-R Volume 2 Multi<br />
Speed / Part 3 CD-RW Volume 1 (known as Low Speed) / Part 3 CD-RW Volume2: High<br />
Speed / Part3 CD-RW Volume 3: Ultra Speed, into CD-R/RW disk in combination with write<br />
application software. For DVD write function, this drive confirms to DVD+R Version 1.2 /<br />
DVD+R9 Version 1.0 (only for a Double Layer DVD+R writing support drive) / DVD+RW<br />
Version 1.11 / DVD-R Recordable Disc Part1 Ver2.0 / and DVD-RW Re-recordable Disc<br />
Part1 Ver.1.0. For read function, it is capable to read all of the following media: DVD<br />
single/dual layer (PTP, OPT), DVD-R, DVD+R, DVD-RW, DVD+RW. Besides, it reads all<br />
of CD formats and media: CD-DA, CD-ROM, CD-ROM/XA, Photo-CD, Multi-session,<br />
Karaoke-CD, Video CD, CD-I FMV, CD Extra, CD Plus, CD-R, and CD-RW.
5<br />
ENGLISH<br />
Recording Modes<br />
Track at Once<br />
Data can be recorded to a disc, one track at a time. New tracks can be added later. Music CDs<br />
can not be played in a CD player or CD-ROM until the disc is closed.<br />
Disc at Once<br />
Data can be recorded to an entire disc in one pass. In this mode, new data added later is not<br />
allowed.<br />
Session at Once<br />
Data can be recorded to disc one session at a time. New sessions can be written later in this<br />
mode. More disc space can be used because there is no gap between tracks.<br />
Multi session<br />
Data can be recorded to disc in one session. New sessions can be written later in this mode.<br />
Less disc space can be used because a gap is created between sessions.<br />
Packet Writing<br />
This is useful for data back up. Data can be added directly to tracks on media or can be deleted<br />
directly from tracks only on media. To use this mode, your software must support Packet<br />
writing function.<br />
What You Can Do with the DVD Writer<br />
Record digital video or slide shows onto DVD+R, DVD+RW, DVD-R, and DVD-<br />
RW discs.<br />
*A Double Layer DVD+R writing support drive will be able to write DVD+R9 disc.<br />
Play DVD+R, DVD+RW, DVD-R, and DVD-RW discs.<br />
Record data or audio onto recordable or rewritable CD media.<br />
Play music CDs.<br />
Play VCD & DVD movies.<br />
Access interactive reference materials stored on DVD.<br />
Save photos and other images on recordable or rewritable CDs.<br />
Archive images and video to DVD or CD.<br />
Master new software programs on DVD or CD.
SYSTEM CONFIGURATION<br />
System Requirements for USB 1.1<br />
6<br />
ENGLISH<br />
This drive has a high-speed Universal Serial Bus (USB) 2.0 interface. You can also use it with<br />
USB version 1.1. To ensure stable read/write/rewrite performance, an IBM compatible PC<br />
system with the following features is recommended.<br />
CPU Pentium III 450 MHz or higher with built-in USB 1.1 controller<br />
(some USB controllers or motherboards may not support all types of<br />
USB devices.)<br />
OS Microsoft Windows 98SE/ME/2000/XP<br />
Memory Must meet recommended RAM requirements for your operating<br />
system. (minimum 256MB is recommended)<br />
CD-ROM Drive For software installation<br />
Hard Drive Minimum 650MB available capacity for creating a CD image file;<br />
5GB free HDD space for creating a DVD image file to a Single Layer<br />
DVD disc (4.7GB); *and 9GB or above free HDD space for creating a<br />
DVD image file to a Double Layer DVD+R disc (8.5GB).<br />
(Do not enable HDD thermal calibration during operation)<br />
Interface USB interface connector<br />
NOTE:<br />
(1) Connecting USB 1.1 interface the drive’s top performance is 4X for CD-R, 4X for CD-RW<br />
and 6X for reading a CD-ROM. In addition, DVD speed is limited to 0.7X. Therefore, we<br />
strongly suggest you NOT to apply any DVD function when connected with USB 1.1<br />
interface.<br />
(2) Some high-speed hard drives are equipped with an "Auto Thermal Re-calibration"<br />
function. Please disable it in the BIOS setup to avoid writing errors (Buffer Under-run).<br />
Additional Requirements for USB 2.0<br />
Interface High Speed USB 2.0 interface required to achieve maximum speeds<br />
NOTE:<br />
(1) High Speed USB 2.0 adapter card is sold separately and will not be bundled in this<br />
package.<br />
(2) To achieve maximum record/write speed your system may require data to be copied first<br />
to the computer's hard drive rather than directly from another source disc or drive.<br />
*Check the original box to see if your drive supports writing to a Double Layer DVD+R disc.
FEATURES AND CONTROLS<br />
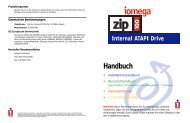
Front View<br />
Figure: Front view of DVD Writer<br />
A Eject/Close Button Push button to eject/close the tray.<br />
B Busy / Write LED Indication of drive's operation status. The light lit stands for<br />
Busy; the light blinking stands for Write/Rewrite.<br />
C Volume Knob Control volume of earphone jack. This control has no effect on<br />
rear panel audio output.<br />
D Earphone Jack Stereo mini-jack for headphones and powered speakers.<br />
E Emergency<br />
Eject Hole<br />
In case the Eject button isn’t working, insert a small stick or<br />
paper clip into this hole to eject the tray.<br />
Note: Turn off the power before doing this manual ejection.<br />
7<br />
ENGLISH
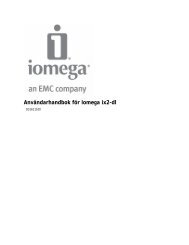
Rear View<br />
Figure: Rear view of DVD Writer<br />
A Power Connector Five-pin connector for DC power input.<br />
B USB Connector Standard USB B type jack.<br />
8<br />
ENGLISH
USB 2.0 USERS<br />
9<br />
ENGLISH<br />
USB 2.0 is a very new technology. Therefore, most computers do not have native support for<br />
USB 2.0. You must install a USB 2.0 adapter card for your External drive to run at USB 2.0<br />
speeds. If you do not have a USB 2.0 card installed, this drive will still work connected to a<br />
standard USB 1.1 connection, but the speed will be limited to USB 1.1 speed. After installing<br />
a USB 2.0 adapter card, follow the steps below for your operating system to verify the USB<br />
2.0 card is installed properly.<br />
Windows® 98SE/ME users:<br />
Right click My Computer and select Properties.<br />
Select the Device Manager tab.<br />
If there is a yellow exclamation point next to Universal Serial Bus Controllers, contact the<br />
card’s manufacturer for help.<br />
Windows® 2000/XP users:<br />
Right click My Computer and select Properties.<br />
Select the hardware tab.<br />
Click the Device Manager button.<br />
If there is a yellow exclamation point next to Universal Serial Bus Controllers, contact the<br />
card’s manufacturer for help.<br />
Instructions on Installing the USB Driver for Windows 98SE:<br />
This USB drive is a Plug&Play USB storage device. If you are using any of the following<br />
Operating Systems: such as Windows ME, Windows 2000, and Windows XP, all you need to<br />
do is plug it to your computer properly. Then the drive is ready to use.<br />
Whereas, a PC using the Windows 98SE OS will not recognize this USB drive if you are<br />
installing this drive for the first time. Therefore, you will need to install a driver into your<br />
computer for this USB drive to properly install to your computer.<br />
You can find the USB driver for Windows 98SE OS either in the included Floppy Disc or in<br />
the USB driver for Windows 98 OS directory of the Burning Software kit. Please follow your<br />
OS instructions to install the driver for this USB drive, then restart your computer.<br />
CAUTION:<br />
Please limit your CD recording speed to 4X or 8X if your computer is only equipped with a<br />
slower speed USB1.1 interface or if your PCMCIA port does NOT support Card Bus interface.<br />
Attempting high speed writing with a slow interface can cause frequent buffer overloading<br />
and writing pauses (when the Busy LED is blinking) that could adversely affect recording<br />
quality.
CONNECTION<br />
1. Connecting the Power Supply Cable.<br />
2. Connecting Hi-Speed USB 2.0 Cable.<br />
3. (Optional) Connecting Powered Speakers or Headphones with Volume Control<br />
Function for Audio CD Playback.<br />
10<br />
ENGLISH
INSTALLING THE DRIVE<br />
Before you start, please make sure you have installed the proper<br />
software for Recording CDs, DVDs and Playing DVDs. The Recording<br />
software and the DVD Playback software are in different CD kits<br />
included in the package.<br />
11<br />
ENGLISH<br />
1. Start your computer. Wait for the operating system to load, then insert the CD kit.<br />
Follow the instructions on the screen to install the software for Recording CDs,<br />
DVDs or Playing DVDs you wish to install from the CD kit.<br />
2. Connect the power supply to the drive.<br />
(To prevent damage to the power plug, connect carefully to avoid bending the power<br />
plug.)<br />
3. Attach the included Hi-Speed USB cable B type plug to the drive.<br />
(Examine the connection carefully for the correct orientation.)<br />
4. Connect the A type plug end of the Hi-Speed USB cable to the USB 2.0 adapter card<br />
connection on your computer. The drive is ready to use.<br />
(NOTE: If you cannot identify the USB 2.0 connection, refer to the documentation of<br />
your USB 2.0 card. If you do not have a USB 2.0 adapter card installed, you can still<br />
connect the drive to a standard USB 1.1 connection.)<br />
5. Special notes for Windows 98SE user.<br />
If this is the first time you are installing this USB drive to your Windows 98SE (Second<br />
Edition) Operating System, you will have to install a USB driver for your Windows<br />
98SE. Follow the instructions on the screen to install the USB driver properly, then<br />
restart your computer. (For more details, please refer to the USB 2.0 Users page.)<br />
(Optional) Audio Cable Connection for Audio CD Playback<br />
1. Connect the included audio cable to the drive. (NOTE: Ensure the computer and the<br />
drive are off before connecting the audio to your computer.)<br />
2. Connect the audio cable to the "Audio In" connector of your computer. (NOTE:<br />
Only connect the audio cable to powered speakers or to headphones with volume control<br />
function.)
OPERATION<br />
Installing Necessary Device Drivers<br />
In Windows, the DVD Writer acts as a “CD-ROM Drive” for purpose of installation and<br />
setup. In some cases, you will need to install additional software to make use of all the<br />
features of the DVD Writer.<br />
To use the DVD Writer on a computer:<br />
As a CD-ROM drive: Most Windows Operating Systems (Windows XP,<br />
Windows ME, Windows 2000, Windows 98, and Windows 95) supply a generic<br />
CD-ROM device driver that allows the DVD Writer to function as a standard CD-<br />
ROM drive. You do not need to install anything else.<br />
12<br />
ENGLISH<br />
As a DVD-ROM drive: The computer’s operating system (excluding Windows 95)<br />
also allows the DVD Writer to function as a DVD-ROM drive. You do not need to<br />
install anything else to play DVDs. (In Windows 95, you will need additional<br />
software to play DVD media, which will be included with the DVD Writer software<br />
CD kit.)<br />
As a CD ReWriter or DVD ReWriter: In order to write to CD or DVD media,<br />
you will need additional software. The Recording software kit included with the<br />
package will offer you function like mastering, packet writing, duplicating, backing<br />
up your hard disk or files, capturing audio, and more.<br />
Loading and Unloading the Tray<br />
(1) While the DVD Writer is powered up, push the Eject button on the front panel.<br />
The tray drawer slides out in a few seconds.<br />
(2) Lay a disc with the label facing up in the depression of the tray. The disc<br />
should lie flat in the tray.<br />
Figure: Loading the Tray<br />
(3) Press the Eject button again and the tray will slide shut within seconds.
RECORDING CDS & DVDS<br />
13<br />
ENGLISH<br />
Before you start, please make sure you have installed the proper software for<br />
Recording CDs, DVDs and Playing DVDs. The Recording software and the DVD<br />
Playback software are in different CD kits included in the package.<br />
About Software & Manuals<br />
The included software is to give you the best result with ease of use. The detailed user’s<br />
manual for the recording and playback software will be automatically installed into your<br />
computer when you install the recording software. For details on other software packages<br />
that are available for writing DVDs or CDs, please visit the web sites of the companies whose<br />
software you are interested in, refer to their user’s manual, or look at the help option within<br />
the software. Please refer to the user’s manual for the detailed operation procedures.<br />
Recommended Recordable & ReWritable Media<br />
Some CD media or DVD media may not be possible to write on, due to differences in the<br />
manufacturing quality. We recommend you use CD and DVD media from the following<br />
manufacturers that have been proven satisfactory with our drive.<br />
CD-R Media:<br />
CMC, Daxon, DST, Fornet, Fujifilm, GAT, Gigastorage, Infodisc,<br />
KingPro LeadData, Maxell, Mitsubishi, MPO, NanYa, Plasmon,<br />
Postech, Princo, Prodisc, RAMedia, Ritek, SAST, SKC(Korea),<br />
Sony, TDK, Taiyo-Yuden, Xeitek<br />
Low Speed<br />
CMC, Daxon, Gigastorage, Infordisc, LeadData, Mistubishi,<br />
CD-RW Media:<br />
Princo, Prodisc, Ricoh, Ritek<br />
High Speed<br />
CMC, Daxon, Fornet, Gigastorage, Infodisc, LeadData,<br />
CD-RW Media:<br />
Mitsubishi, NanYa, Princo, Prodisc, Ricoh, Ritek<br />
Ultra Speed<br />
CMC, Daxon, Infodisc, Mitsubishi, Prodisc, Ritek<br />
CD-RW Media:<br />
DVD-R<br />
Media:<br />
DVD-RW<br />
Media:<br />
DVD+R Media:<br />
DVD+R9<br />
Media:<br />
DVD+RW<br />
Media:<br />
CMC, GSC, Maxell, Mitsubishi, Prodisc, Ritek, Sony, Taiyo-<br />
Yuden<br />
Mitsubishi, Ritek<br />
CMC, Maxell, Mitsubishi, Philips, Prodisc, Ricoh, Ritek, Sony,<br />
Taiyo-Yuden<br />
Mitsubishi, Ricoh<br />
CMC, Daxon, Infodisc, Mitsubishi, Philips, Prodisc, Ricoh, Ritek,<br />
Sony<br />
NOTE: (1) Only when your drive supports Double Layer DVD+R writing can write<br />
DVD+R9 media.<br />
(2) The drive’s maximum Writing, ReWriting, & Reading speeds are printed on the<br />
original box.<br />
(3) Subject to change without further notice.
PLAYING CDS & DVDS<br />
Playback Software<br />
You must install the DVD playback software to your computer first. If you do not have any<br />
DVD playback software installed in your computer, the included DVD playback software in<br />
the CD kit will bring you the best playback result.<br />
You can immediately play Audio CDs and pre-recorded DVD discs, including movies and<br />
other DVDs. To play a CD or a Digital Video Disc (DVD), insert the disc with the label up<br />
(for CDs). This DVD Writer plays both single-layer and dual-layer DVDs.<br />
Playing Audio CDs<br />
In order to listen to an audio CD, connect an audio cable to the analog audio connector on the<br />
rear of the drive and connect the other end to your sound board.<br />
There are two types of audio you may encounter:<br />
14<br />
ENGLISH<br />
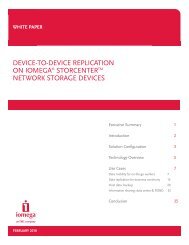
(1) CD-Audio: This comes from audio discs (like the ones you use in your home stereo) that<br />
are translated directly by your DVD Writer into sound. Although, in most cases a sound<br />
board and speakers are use to hear this audio, you can also listen to it by plugging a set<br />
of headphones or powered speakers into the earphone jack on the front of your drive.<br />
You can control audio playback through software, and adjust the volume with the front<br />
panel volume control.<br />
Figure: Using the Earphone Jack for Playing Audio
15<br />
ENGLISH<br />
(2) Sound Board Audio: This comes from data files that may be present on a disc, such as a<br />
WAV, WMA, or MP3 files, that are transferred from the CD to your computer via the<br />
USB interface. The sound board translates the data from the digital files into analog<br />
sound. If you do not have a sound board, you will not be able to hear this form of audio<br />
from your DVD Writer.<br />
To listen to music through the computer’s sound board, you can control volume with the<br />
volume control on the Windows Media Player or CD Player Taskbar. You can also mute<br />
the sound on your sound board and listen to music through headphones or self-powered<br />
speakers.<br />
Playing DVDs for the First Time<br />
A code on some DVDs allows them to be played only in a certain regional area, such as North<br />
America, Europe, etc. When the DVD Writer ships, there is no region code set. The first<br />
time a DVD that has a region setting is inserted into the DVD Writer, the act of inserting the<br />
DVD sets the drive to that region code.<br />
If you later insert a DVD with a different region code, you are prompted to either accept<br />
changing the region code or not. If you do not accept the change, then that DVD will not play.<br />
If you do accept the change, then the DVD Writer’s region code setting is changed. But<br />
advised that you may change the DVD Writer’s region code only 5 times. After that,<br />
you will not be able to change your drive’s code setting.
TROUBLESHOOTING<br />
If you meet any trouble during installation or normal use of your drive, please refer to the<br />
following information.<br />
Read Problems<br />
Symptom Possible Causes Solutions<br />
No operation.<br />
No power. Check if the power cord is connected<br />
securely to the connector.<br />
No drive recognition.<br />
Excessive noise when<br />
reading.<br />
Cannot open the tray<br />
(Eject).<br />
Cannot read the<br />
former session of<br />
the CD-RW disc<br />
which has been<br />
written at least<br />
twice.<br />
Read error<br />
occurs.<br />
USB cable isn't connected<br />
properly.<br />
16<br />
Ensure that the USB cable and connectors<br />
are not damaged, bent or dented. Check<br />
especially the pins.<br />
Power is not switched on. Check if LED of your drive is lit. If not,<br />
there is no power.<br />
USB cable is not connected<br />
properly between the<br />
computer USB port and the<br />
drive.<br />
USB drive is not recognized<br />
by the Windows Operating<br />
System.<br />
Ensure that both connectors of the USB<br />
cable is properly connected to the USB<br />
ports on the computer and the drive.<br />
Please refer to the USB 2.0 Users chapter<br />
and check if the USB driver is installed<br />
properly.<br />
Eccentric disc loaded. Replace it with another one.<br />
Seal attached on the surface Detach the seal very carefully. Don't<br />
make any scratches.<br />
Eject locked by software. Stop the applying software and try the<br />
eject button to open the tray.<br />
CD set incorrectly. Insert a small stick or paper clip into this<br />
hole to eject the tray.<br />
"Load Contents" or "Import<br />
Session" was NOT clicked<br />
on the Software.<br />
If recorded without checked "Load<br />
Contents" or "Import Session", it is<br />
impossible to read. But when using<br />
utility software such as "Session<br />
Selection" from Adaptec, the former<br />
session can be read.<br />
Defective disc. Deep scratches, fingerprints or other<br />
contaminants on the discs surface can<br />
disable the drive from reading data.<br />
Always keep it clean.<br />
Music CD inserted. Because audio compact discs do not have<br />
computer data, typing computer<br />
commands while an audio CD is in your<br />
drive will result in an error message.<br />
Disc inserted upside down. Remove the disc from tray and reinsert it<br />
with the label side up.<br />
ENGLISH
Write Problems<br />
Symptom Possible Causes Solutions<br />
Cannot write.<br />
Using other authoring Use the authoring software provided with<br />
software which does not the drive. When using other software,<br />
support your drive.<br />
ensure your drive is supported by<br />
contacting the software supplier.<br />
Disc inserted upside down. Reinsert the disc with label side up.<br />
Writing errors occur<br />
(Buffer under-runs).<br />
Short of Hard Disk capacity. Generally 1.2 to 2 times the size of the<br />
write data is required. This may vary<br />
according to the write method.<br />
No power. Check if the power cord is securely<br />
connected to the connector.<br />
USB cable isn't connected<br />
properly.<br />
17<br />
Ensure that the USB cable and connectors<br />
are not damaged, bent or dented. Check<br />
especially the pins.<br />
Network used. When running saver or other applications<br />
Window screen saver<br />
activated while<br />
writing.<br />
or writing in a network environment,<br />
errors may occur due to lack of CPU<br />
resources in PC.<br />
Other application Rewrite after log-off from the network.<br />
running.<br />
Deactivate the screen saver or power<br />
saving mode.<br />
Quit other applications other than the<br />
authoring software.<br />
Short of PC memory. Due to shortage of main memory in PC,<br />
swapping of hard disc space may have<br />
occurred. If swapped, data from the hard<br />
disc may cut off causing buffer underruns.<br />
Increase main memory capacity.<br />
"Auto thermal recalibration"<br />
triggered.<br />
Disable "Auto thermal re-calibration" in<br />
the BIOS setup.<br />
Use another Hard Disk if can not disable<br />
it.<br />
Defective DVD/CD media. DVD/CD media may be dirty, scratched<br />
or damaged. Rewrite on another<br />
DVD/CD media.<br />
Short of Hard Disk capacity. Generally 1.2 to 2 times the size of the<br />
write data is required. This may vary<br />
according to the write method.<br />
No drive recognition. USB cable is not connected<br />
properly between the<br />
computer USB port and the<br />
drive.<br />
Ensure that both connectors of the USB<br />
cable is properly connected to the USB<br />
ports on the computer and the drive.<br />
ENGLISH
Symptom Possible Causes Solutions<br />
Can not write at highest<br />
speed.<br />
USB drive is not recognized<br />
by the Windows Operating<br />
System.<br />
Using other authoring<br />
software which does not<br />
support your drive.<br />
DVD/CD media not<br />
compatible with highest<br />
speed.<br />
18<br />
Please refer to the USB 2.0 Users chapter<br />
and check if the USB driver is installed<br />
properly.<br />
Use the authoring software provided with<br />
your drive. When using other software,<br />
ensure your drive is supported by<br />
contacting the software supplier.<br />
Use the highest speed compatible discs or<br />
write with lower speed.<br />
Buffer under-run occurs. Refer to the "Buffer under-run" item.<br />
Defective DVD/CD media. DVD/CD media may be dirty, scratched<br />
or damaged. Rewrite on another<br />
DVD/CD media.<br />
Using other authoring<br />
software not bundled with<br />
your drive.<br />
Use the authoring software provided with<br />
your drive. When using other software,<br />
ensure your drive is supported by<br />
contacting the software supplier.<br />
ENGLISH