Power Planer Original Instruction Manual Електричний ... - Makita
Power Planer Original Instruction Manual Електричний ... - Makita
Power Planer Original Instruction Manual Електричний ... - Makita

Create successful ePaper yourself
Turn your PDF publications into a flip-book with our unique Google optimized e-Paper software.
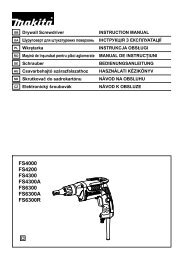
Shiplapping (Rabbeting)<br />
Fig.16<br />
To make a stepped cut as shown in the figure, use the<br />
edge fence (guide rule).<br />
Draw a cutting line on the workpiece. Insert the edge<br />
fence into the hole in the front of the tool. Align the blade<br />
edge with the cutting line.<br />
Fig.17<br />
Adjust the edge fence until it comes in contact with the<br />
side of the workpiece, then secure it by tightening the<br />
screw.<br />
Fig.18<br />
When planing, move the tool with the edge fence flush<br />
with the side of the workpiece. Otherwise uneven<br />
planing may result.<br />
Maximum shiplapping (rabbeting) depth is 9 mm.<br />
You may wish to add to the length of the fence by<br />
attaching an extra piece of wood. Convenient holes are<br />
provided in the fence for this purpose, and also for<br />
attaching an extension guide (optional accessory).<br />
Fig.19<br />
Fig.20<br />
Chamfering<br />
To make a chamfering cut as shown in the figure, align<br />
the "V" groove in the front base with the edge of the<br />
workpiece and plane it.<br />
Fig.21<br />
Fig.22<br />
MAINTENANCE<br />
CAUTION:<br />
• Always be sure that the tool is switched off and<br />
unplugged before attempting to perform inspection<br />
or maintenance.<br />
• Never use gasoline, benzine, thinner, alcohol or<br />
the like. Discoloration, deformation or cracks may<br />
result.<br />
Sharpening the planer blades<br />
For standard blades only<br />
Always keep your blades sharp for the best performance<br />
possible. Use the sharpening holder to remove nicks<br />
and produce a fine edge.<br />
Fig.23<br />
First, loosen the two wing nuts on the holder and insert<br />
the blades (A) and (B), so that they contact the sides (C)<br />
and (D). Then tighten the wing nuts.<br />
Fig.24<br />
Immerse the dressing stone in water for 2 or 3 minutes<br />
before sharpening. Hold the holder so that the both<br />
blades contact the dressing stone for simultaneous<br />
sharpening at the same angle.<br />
Fig.25<br />
8<br />
Replacing carbon brushes<br />
Fig.26<br />
Remove and check the carbon brushes regularly.<br />
Replace when they wear down to the limit mark. Keep<br />
the carbon brushes clean and free to slip in the holders.<br />
Both carbon brushes should be replaced at the same<br />
time. Use only identical carbon brushes.<br />
Use a screwdriver to remove the chip cover.<br />
Fig.27<br />
Use a screwdriver to remove the brush holder caps.<br />
Take out the worn carbon brushes, insert the new ones<br />
and secure the brush holder caps.<br />
Fig.28<br />
To maintain product SAFETY and RELIABILITY, repairs,<br />
any other maintenance or adjustment should be<br />
performed by <strong>Makita</strong> Authorized Service Centers,<br />
always using <strong>Makita</strong> replacement parts.<br />
ACCESSORIES<br />
•<br />
CAUTION:<br />
These accessories or attachments are<br />
recommended for use with your <strong>Makita</strong> tool<br />
specified in this manual. The use of any other<br />
accessories or attachments might present a risk of<br />
injury to persons. Only use accessory or<br />
attachment for its stated purpose.<br />
If you need any assistance for more details regarding<br />
these accessories, ask your local <strong>Makita</strong> Service Center.<br />
• High-speed steel <strong>Planer</strong> blade<br />
• Tungsten-carbide <strong>Planer</strong> blade (For longer blade<br />
life)<br />
• Mini planer blade<br />
• Sharpening holder assembly<br />
• Blade gauge<br />
• Set plate set<br />
• Edge fence (Guide rule)<br />
• Extension guide set<br />
• Dressing stone<br />
• Nozzle assembly<br />
• Dust bag assembly<br />
• Joint<br />
• Socket wrench