You also want an ePaper? Increase the reach of your titles
YUMPU automatically turns print PDFs into web optimized ePapers that Google loves.
F<br />
4123<br />
PAGE 1 of 4<br />
B<br />
D<br />
E<br />
A<br />
<strong>McCALL'S</strong><br />
®<br />
CRAFTS<br />
H<br />
G<br />
C<br />
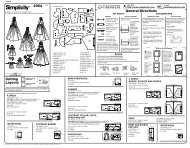
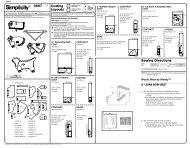
WEDGE A,B,C<br />
1 Center Section A<br />
2 Bottom A<br />
3 End A<br />
4 Bottom A<br />
5 Handle<br />
6 Center Section B<br />
7 Bottom B<br />
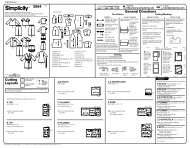
CUTTING LAYOUTS<br />
WEDGE A<br />
use pieces: 1, 3, 4, 5<br />
(pieces 1, 3, 4, 5 are also cut of fleece)<br />
45 thru 60" (115 thru 150 cm)<br />
with nap or<br />
without nap<br />
CONTRAST A (Inner Pillow)<br />
use pieces: 1, 2, 3<br />
45" (115 cm)<br />
muslin<br />
WEDGE B<br />
use pieces: 5, 6, 8, 9<br />
(pieces 5, 6, 8, 9 are also cut of fleece)<br />
45 thru 54" (115 thru 140 cm)<br />
with nap or<br />
without nap<br />
SELVAGE<br />
2<br />
SELVAGE<br />
46" **<br />
3<br />
3<br />
5<br />
1<br />
8 End B<br />
9 Bottom B<br />
10 Center Section C<br />
11 Bottom C<br />
12 End C<br />
13 Bottom C<br />
SELVAGE<br />
4 4<br />
SELVAGE<br />
SELVAGE<br />
SELVAGE<br />
8 8<br />
© The McCall Pattern Co., 2003 All Rights Reserved.<br />
Printed in U.S.A.<br />
5<br />
3<br />
3<br />
6<br />
1<br />
*<br />
SELVAGES<br />
9<br />
SELVAGES<br />
NECK ROLL D<br />
14 Center Section<br />
15 End<br />
BOLSTER E<br />
16 Center Section<br />
17 End<br />
27 PATTERN PIECES<br />
60" (150 cm)<br />
with nap or<br />
without nap<br />
★ Cut other pieces first, allowing enough fabric to cut this piece. Open fabric. For<br />
“Cut 1” pieces, cut piece once on single layer of fabric with piece face up on right<br />
side of fabric. For “Cut 2” pieces, cut piece twice on single layer of fabric, once with<br />
piece face up and once with piece face down on right side of fabric.<br />
CONTRAST B (Inner Pillow)<br />
use pieces: 6, 7, 8<br />
45" (115 cm)<br />
WEDGE C<br />
use pieces: 5, 10, 12, 13<br />
(pieces 5, 10, 12, 13 are also cut of fleece)<br />
45 thru 54" (115 thru 140 cm)<br />
with nap or<br />
without nap<br />
BOLSTER F<br />
18 Center Section<br />
19 End<br />
NECK PILLOW G<br />
20 Pillow<br />
5<br />
SELVAGE<br />
9 9<br />
SELVAGE<br />
SELVAGE<br />
7 6<br />
SELVAGE<br />
8<br />
8<br />
SELVAGES<br />
13 10<br />
FOLD<br />
6<br />
46" */**<br />
8<br />
CROSSFOLD SELVAGE<br />
SELVAGE<br />
5<br />
SELVAGE<br />
12<br />
SELVAGE<br />
LOUNGE PILLOW H<br />
21 Gusset<br />
22 Arm<br />
23 Front<br />
24 Back<br />
25 Continuous Bias<br />
26 Handle<br />
27 Pocket<br />
12<br />
CONTINUED ON PAGE 2
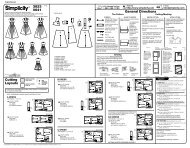
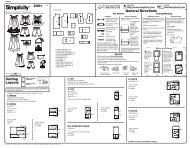
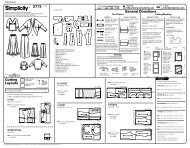
4123 - PAGE 2 of 4<br />
60" (150 cm)<br />
with nap or<br />
without nap<br />
CONTRAST C (Inner Pillow)<br />
use pieces: 10, 11, 12<br />
45" (115 cm)<br />
NECK ROLL D<br />
use pieces: 14, 15<br />
(pieces 14, 15 are also cut of contrast and fleece)<br />
45 thru 60" (115 thru 150 cm)<br />
with nap or<br />
without nap<br />
BOLSTER E<br />
use pieces: 16, 17<br />
(pieces 16, 17 are also cut of contrast and fleece)<br />
45 thru 60" (115 thru 150 cm)<br />
with nap or<br />
without nap<br />
BOLSTER F<br />
use pieces: 18, 19<br />
(pieces 18, 19 are also cut of contrast and fleece)<br />
45 thru 60" (115 thru 150 cm)<br />
with nap or<br />
without nap<br />
12<br />
SELVAGE<br />
13<br />
12<br />
SELVAGE<br />
SELVAGE<br />
12<br />
SELVAGE<br />
15<br />
15<br />
17<br />
17<br />
13<br />
5<br />
SELVAGE<br />
12<br />
10<br />
SELVAGE<br />
SELVAGE<br />
19 19<br />
SELVAGE<br />
10<br />
11<br />
SELVAGE<br />
14<br />
SELVAGE<br />
16<br />
18<br />
NECK PILLOW G<br />
use piece: 20<br />
(piece 20 is also cut of fleece)<br />
45 thru 60" (115 thru150 cm)<br />
with nap or<br />
without nap<br />
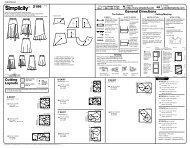
LOUNGE PILLOW H<br />
use pieces: 21, 22, 23, 24, 25, 26, 27<br />
45 thru 60" (115 thru 150 cm)<br />
with nap or<br />
without nap<br />
CONTRAST H (Inner Pillow)<br />
use pieces: 21, 22, 23, 24<br />
45" (115 cm)<br />
FLEECE H<br />
use pieces: 21, 22, 23, 24, 26<br />
45" (115 cm)<br />
60" (150 cm)<br />
SEWING INFORMATION<br />
1 /2" (1.3cm) SEAM ALLOWANCES ARE INCLUDED,<br />
(unless otherwise indicated)<br />
ILLUSTRATION SHADING KEY<br />
Press as you sew. Press seams flat, then press open, unless otherwise instructed. Clip<br />
seam allowances, where necessary, so they lay flat.<br />
Trim enclosed<br />
seams into layers<br />
26<br />
24<br />
23<br />
24<br />
21<br />
21<br />
24<br />
21<br />
SELVAGES<br />
21<br />
20<br />
FOLD<br />
SELVAGES<br />
22 27<br />
23<br />
26<br />
SELVAGES<br />
22 22<br />
FOLD<br />
23<br />
24<br />
FOLD<br />
SELVAGES<br />
22 22<br />
FOLD<br />
SELVAGES<br />
22 22<br />
22<br />
FOLD<br />
23<br />
26<br />
25<br />
SELVAGE<br />
22<br />
FOLD<br />
SELVAGE<br />
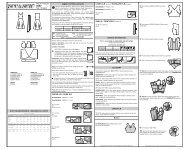
GLOSSARY<br />
Sewing terms appearing in BOLD TYPE in Sewing Instructions are explained below.<br />
EDGESTITCH-Stitch close to finished edge or seam.<br />
REINFORCE-Stitch along seamline where indicated in sewing instructions, using small<br />
machine stitches.<br />
STAYSTITCH-Stitch 1/8” (3mm) from seamline in seam allowance (usually 1/2” (13mm)<br />
from raw edge).<br />
STUFFING INSTRUCTIONS<br />
The finished look of the project is affected by the manner in which it is stuffed.<br />
Stuff small areas and points first with small amounts of fiberfill. As you add stuffing, pack<br />
fiberfill with a blunt ended tool to aid in shaping.<br />
After stuffing small areas, stuff remaining areas using slightly larger amounts of fiberfill<br />
(corresponding with the size of the area being stuffed).<br />
Pack and shape fiberfill with your hands, until seams are fully expanded and desired<br />
firmness is achieved.<br />
WEDGE A,B,C<br />
Note: Illustrated for View A, unless otherwise indicated. Pattern pieces for Views B,C will<br />
be shown in parentheses.<br />
Inner Pillow<br />
REINFORCE contrast CENTER<br />
SECTION 1 (6,10) section at small<br />
circles. Clip to small circles.<br />
Stitch BOTTOM 2 (7,11) and center section together,<br />
between large circles and leaving an opening on one<br />
edge for turning.<br />
Pin contrast END 3 (8,12) sections to bottom and center section,<br />
matching symbols. Stitch, pivoting at corners.<br />
Turn right side out; press. Stuff with<br />
fiberfill, following Stuffing Instructions.<br />
Sew opening.<br />
1<br />
2<br />
3<br />
Wedge Cover<br />
Baste FLEECE to wrong side of each corresponding FABRIC section, omitting piece 5.<br />
Note: Fleece will not be shown in the following illustrations.<br />
8<br />
Turn in along placement line on one BOTTOM 4 (9,13)<br />
section; press.<br />
Center stiff section of Velcro® over wrong side of<br />
bottom, having one long edge even with pressed<br />
edge. EDGESTITCH in place. Trim excess even with<br />
stitching lines, if necessary.<br />
Turn 1/4”(6mm) to outside on lower edge of remaining<br />
bottom section; press.<br />
Center soft section of Velcro® over right side of<br />
bottom, having one long edge even with pressed<br />
edge. EDGESTITCH in place. Trim excess even<br />
with stitching lines, if necessary.<br />
Fasten Velcro® on bottom sections. Baste raw<br />
edges together.<br />
Stitch bottom sections together along stitching lines.<br />
EDGESTITCH close to pressed edge, as shown.<br />
REINFORCE CENTER SECTION 1 (6,10)<br />
at small circles. Clip to small circles.<br />
4<br />
4<br />
8<br />
9<br />
9<br />
10<br />
10<br />
12<br />
6<br />
6<br />
12<br />
13<br />
13<br />
1<br />
4<br />
CONTINUED ON PAGE 3
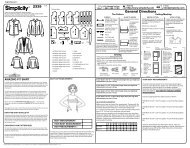
41230 - PAGE 3 of 4<br />
Turn in seam allowances on long edges of HANDLE 5 section; press.<br />
Trim away seam allowances on long edges of FLEECE 5 handle section.<br />
Open out seam allowance on handle. Center fleece over wrong side, having<br />
ends even; baste. Fold fabric seam allowances over fleece.<br />
With wrong side together, fold handle along foldline; press.<br />
EDGESTITCH long edges. Baste ends together.<br />
Pin handle to upper edge of center section,<br />
centering ends over squares and<br />
having raw edges even; baste.<br />
Pin center section to bottom between large<br />
circles, having side with handle adjacent to<br />
bottom section with stiff Velcro®. Stitch.<br />
Pin END 3 (8,12) sections to bottom and center section,<br />
matching symbols. Stitch, pivoting at corners.<br />
Turn right side out; press. Insert inner pillow.<br />
NECK ROLL D, BOLSTER E,F<br />
Note: Illustrated for View D, unless otherwise indicated. Pattern pieces for Views E,F will<br />
be shown in parentheses.<br />
Inner Pillow<br />
Trim 3/8”(1cm) from side edges of center section.<br />
STAYSTITCH upper and lower edges of contrast CENTER<br />
SECTION 14 (16,18).<br />
3<br />
5<br />
14<br />
5<br />
\<br />
Stitch side edges of center section together along placement lines, leaving<br />
an opening for turning.<br />
Pin contrast END 15 (17,19) sections to center section, matching small circles.<br />
Stitch ends, clipping center section where necessary.<br />
Turn right side out; press. Stuff with fiberfill, following Stuffing<br />
Instructions. Sew opening.<br />
Pillow Cover<br />
Baste FLEECE to wrong side of each corresponding FABRIC section. Note: Fleece will<br />
not be shown in the following illustrations.<br />
16<br />
16<br />
STAYSTITCH upper and lower edges of CENTER<br />
SECTION 14 (16,18).<br />
14<br />
14<br />
Turn in one side edge of center section along placement line; press.<br />
Pin stiff section of Velcro® to wrong side of center<br />
section, having one long edge even with pressed edge<br />
and ends between placement lines. Trim excess even<br />
with stitching lines, if necessary. EDGESTITCH in place.<br />
15<br />
15<br />
17<br />
17<br />
18<br />
18<br />
19<br />
19<br />
14<br />
15<br />
Turn 1/4”(6mm) to outside on remaining side edge of center section;<br />
press.<br />
Pin soft section of Velcro® to right side of center section, having one<br />
long edge even with pressed edge and ends between stitching lines.<br />
Trim excess even with stitching lines, if necessary. EDGESTITCH in<br />
place.<br />
Fasten Velcro®. Baste raw edges together.<br />
Stitch center sections together along stitching lines.<br />
EDGESTITCH close to pressed edge.<br />
Pin END 15 (17,19) sections to center section, matching small<br />
circles and clipping center section where necessary. Stitch.<br />
Turn right side out; press. Insert inner pillow.<br />
NECK PILLOW G<br />
Baste FLEECE 20 to wrong side of each PILLOW 20 section.<br />
Stitch in place between small circles. Note: Fleece will not be<br />
shown in the following illustrations.<br />
Stitch pillow sections together, leaving opening between<br />
small cricles.<br />
Turn right side out; press. Stuff with fiberfill, following Stuffing<br />
Instructions. Sew opening.<br />
15<br />
20<br />
20<br />
Inner Pillow<br />
LOUNGE PILLOW H<br />
STAYSTITCH long edges of each contrast GUSSET 21 between<br />
squares and large circles. REINFORCE at squares. Clip to squares.<br />
Pin each gusset to one inside contrast ARM 22 section,<br />
matching symbols, clipping where necessary and pivoting at<br />
square. Stitch, beginning and ending at symbols. Note:<br />
Remaining arm sections will be used for outside of back.<br />
STAYSTITCH inner curved edges of contrast<br />
FRONT 23. Clip to inner circles.<br />
Trim away 3/8”(1cm) from lower and lower side<br />
edges on front, as shown.<br />
Pin each gusset and inside<br />
arm to front, matching<br />
symbols. Stitch, pivoting at<br />
inner circles and clipping<br />
front where necessary.<br />
Trim 3/8”(1cm) from lower edge on contrast<br />
BACK 24.<br />
REINFORCE lower edge of back at large<br />
circles. Clip to circles.<br />
Stitch darts on upper edge of back.<br />
24<br />
23<br />
21<br />
CONTINUED ON PAGE 4<br />
22
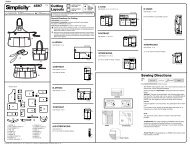
4123 - PAGE 4 of 4<br />
Stitch remaining arm<br />
sections to back, below<br />
large circles.<br />
Pin back and arms to front and<br />
gussets, matching symbols.<br />
Stitch along seamlines and<br />
lower placement lines, breaking<br />
stitching at large circles and<br />
leaving an opening on lower<br />
edge, as shown.<br />
Turn right side out; press. Stuff with fiberfill,<br />
following Stuffing Instructions. Sew opening.<br />
Pillow Cover<br />
Trim seam allowances on FLEECE HANDLE 26 section.<br />
Baste FLEECE to wrong side of each corresponding FABRIC section. Note: Fleece will<br />
not be shown in the following illustrations.<br />
22<br />
22<br />
24<br />
24<br />
With right sides together, pin ends of CONTINUOUS<br />
BIAS 25 together, matching symbols. Stitch. NOTE:<br />
Edges will not be even at ends of seam.<br />
26<br />
25<br />
23<br />
23<br />
26<br />
Starting at one extending end, cut along cutting<br />
line, forming one continuous bias strip, as shown.<br />
For piping, center cord on wrong side of bias strip, having<br />
ends even. Fold bias strip over cord, having raw edges<br />
even. Using a zipper foot, stitch close to cord. NOTE:<br />
When stitching seams with piping use a zipper foot.<br />
STAYSTITCH upper and lower edges of each GUSSET 21 between<br />
squares and large circles. REINFORCE at squares. Clip to squares.<br />
Cut two pieces of piping, each 34 1/2”(87cm) long.<br />
Pin piping to upper edge of each gusset, placing stitching on piping just<br />
inside seamline and tapering ends of piping into seam allowance at<br />
small and large circles. Baste.<br />
Pin each gusset to one inside ARM 22 section, matching symbols,<br />
clipping where necessary and pivoting at square. Stitch,<br />
begining and ending at symbols. Note: Remaining arm sections<br />
will be used for outside of back.<br />
STAYSTITCH inner curved edges of FRONT 23.<br />
Clip to inner circles.<br />
23<br />
22<br />
21<br />
Pin each gusset and inside arm to<br />
front, matching symbols and clipping<br />
front where necessary. Stitch,<br />
pivoting at inner circles and clipping<br />
front where necessary.<br />
Pin remaining piping to front and<br />
gussets, placing stitching on piping<br />
just inside seamline, clipping and<br />
pivoting where necessary and<br />
tapering ends into seam<br />
allowances at small circles on<br />
placement lines. Baste.<br />
Turn in along placement lines on front, folding in fullness at<br />
corners; press.<br />
Cut three sections of Velcro®, one, 21”(54cm) long and two, each 4 1/2”(12cm) long.<br />
Center stiff sections of Velcro® on inside of front, over<br />
pressed edges, having long section at center and remaining<br />
sections at sides. EDGESTITCH in place. Note:<br />
Remaining sections of Velcro® will be used for back.<br />
Stitch darts on upper edge of BACK 24.<br />
Turn in seam allowance on ends of HANDLE 26; press. Turn in remaining seam<br />
allownces; press.<br />
With wrong sides together, fold handle along foldline; press.<br />
EDGESTITCH long edges of handle.<br />
Pin ends of handle to back along placement<br />
lines. EDGESTITCH ends in place. Stitch again<br />
1/4”(6mm) from edgestitching.<br />
24<br />
26<br />
Stitch darts on lower edge of back<br />
above lower small circle. Trim darts to<br />
3/8”(1cm).<br />
Press darts open.<br />
Turn 1/4”(6mm) on lower edge to outside;<br />
press.<br />
Pin remaining soft sections of Velcro® to<br />
lower edge of back, trimming ends diagonally<br />
to meet at darts and having outer<br />
edges of back and Velcro® even. Trim<br />
remaining ends of side Velcro® sections<br />
even with seamline. EDGESTITCH in<br />
place.<br />
Turn upper edge of each POCKET 27 to inside along foldline, turning<br />
under 1/4”(6mm) on raw edge; press. Stitch close to pressed<br />
edge.<br />
Pin wrong side of one pocket to right side of each remaining arm<br />
section, matching symbols; baste. Stitch along stitching lines.<br />
Stitch arms to back, ending at small circles. Press seam<br />
toward back. Tack seam allowance in place, if desired.<br />
Pin back and arms to front and gussets, matching symbols. Stitch, pivoting at large circles<br />
and ending at small circles.<br />
Turn right side out; press.<br />
Insert pillow form.<br />
27