T-FLEX Parametric CAD. Fundamentals. 2D Design
T-FLEX Parametric CAD. Fundamentals. 2D Design T-FLEX Parametric CAD. Fundamentals. 2D Design
Main Concepts of System Operation whose values are to be taken from the element. Then press the button and select with the desired element on the screen. The parameter values will assume those of the selected element. An auxiliary part of the dialog box, the “Property Sets”, allows to save the current set of properties under a specific name for their later reuse. To save the composed combination of parameters as a set of properties, press the [Save] button. A “Save as” dialog box will come up on screen for specifying the name of the new set. All existing named property sets are listed in a box in the upper part of the dialog box. A set can be deleted from the list by selecting with and pressing the [Delete] button. The name of the set to be saved is entered in a box in the bottom part of the dialog box. Upon entering the name, press the [Save] button. The “Save as” dialog box will close, and the saved set name will appear in the pull-down list. The [Cancel] button closes the window without saving the new set. To load a saved set, simply select it in the pull-down list of sets. Copying element properties through clipboard In the context menu for any 2D element the command “Copy Properties” is available. When this command is called, parameters of the selected element are copied into the internal clipboard. After that, upon selecting any other 2D elements the command “Paste Properties” will be available in the context menu. When this command is called the parameters copied into the clipboard will be applied to selected elements. Limiting Element Selection. Using Selector and Filter When working with a dense drawing, it is often difficult to select the desired element on the screen. In this case, it may be necessary to limit the list of the elements available for selection. This can be done in several ways. Some of them, such as using the level and layer mechanisms, were already mentioned in the “Brief Introductory Course” volume. However, these mechanisms either modify the drawing, or allow to temporarily hide construction elements only. The most general and convenient way that does not require drawing modifications is using the selector and the filter. These tools perform similar functions of limiting selection, however, the selector does this based on element types, while the filter – on the element parameters. Besides, changing selector settings is only 115
Fundamentals. Two-Dimensional Design Selector 116 available in command-waiting mode, while the filter works in transparent mode. The latter means, the filter settings can be modified at any time, without quitting the current command. The selector and filter settings work independently, adding to each other’s function. The elements, whose selection is disallowed by either the selector or the filter, can’t be selected on the drawing neither by , nor via the creation and editing command options described above. The selector settings are managed by the command “FT: Set Selector Configuration”. This command can be called only in the command-waiting mode from the toolbar or the textual menu as follows: Keyboard Textual Menu Icon “Edit|Selector…” Upon calling the command, the selector configuration dialog box comes up on screen. The main field of this dialog, “Select Elements of Types”, contains the list of all system element types. The elements allowed for selection are checkmarked at the left of their type names. By default, all elements are allowed for selection. To disallow selection, uncheck the respective type with the click. The buttons , and help quickly set, clear and invert checkmarking of the element types. A specified combination of settings can be saved as a named selector configuration. To do so, check the “Save as Configuration” item and enter the name for the new configuration in the box on the right-hand side. Additional items in the selector configuration dialog box, such as “Number of Elements in ‘Other’ List” and “Show ‘Other’ List as”, allow setting different modes of the list display. The list comes up for a selected element upon calling the “Other” command in the context menu. The effect of these settings was described above, in the “Selecting elements outside any command” topic. Pressing the [OK] button saves the defined settings and closes the command. The [Cancel] button closes the dialog box without saving changes. The selector can later be quickly set up based on a saved configuration. This is done using the button on the system toolbar. Pressing this button brings up a pull-down list containing all available selector configurations. Selecting a configuration in the list automatically sets up the selector per the configuration parameters.
- Page 66 and 67: Now, let’s construct the left sid
- Page 68 and 69: Brief Introductory Course Click , f
- Page 70 and 71: Line Midpoint Horizontal/Vertical O
- Page 72 and 73: Brief Introductory Course We will s
- Page 74 and 75: Click and move the cursor leftwards
- Page 76 and 77: Brief Introductory Course Next, mov
- Page 78 and 79: Brief Introductory Course Next we n
- Page 80 and 81: MAIN CONCEPTS OF SYSTEM OPERATION D
- Page 82 and 83: Main Concepts of System Operation m
- Page 84 and 85: Main Concepts of System Operation w
- Page 86 and 87: Main Concepts of System Operation L
- Page 88 and 89: Main Concepts of System Operation T
- Page 90 and 91: This window can be floating or dock
- Page 92 and 93: Active Drawing Window The T-FLEX CA
- Page 94 and 95: An alternative way of maximizing a
- Page 96 and 97: Main Concepts of System Operation T
- Page 98 and 99: 2. Tile Vertically. Do this by the
- Page 100 and 101: Additional window of document Main
- Page 102 and 103: Main Concepts of System Operation i
- Page 104 and 105: Main Concepts of System Operation T
- Page 106 and 107: Main Concepts of System Operation w
- Page 108 and 109: A system-offered object snap can be
- Page 110 and 111: Main Concepts of System Operation T
- Page 112 and 113: General Concepts of Editing Element
- Page 114 and 115: The context menu of an element can
- Page 118 and 119: Filter There are several additional
- Page 120 and 121: Main Concepts of System Operation A
- Page 122 and 123: Main Concepts of System Operation T
- Page 124 and 125: Main Concepts of System Operation C
- Page 126 and 127: Layer Main Concepts of System Opera
- Page 128 and 129: When using a variable for defining
- Page 130 and 131: Main Concepts of System Operation T
- Page 132 and 133: CUSTOMIZING SYSTEM Customizing Syst
- Page 134 and 135: Load Previous Session Document on S
- Page 136 and 137: Customizing System “Save” Tab A
- Page 138 and 139: “Snap” Tab Customizing System T
- Page 140 and 141: “Folders” Tab This tab is used
- Page 142 and 143: Customizing System The “Scene rot
- Page 144 and 145: Customizing System Additional flag
- Page 146 and 147: Controlling Toolbar Visibility To s
- Page 148 and 149: “Keyboard” Tab This tab defines
- Page 150 and 151: Customizing System To modify alread
- Page 152 and 153: Customizing System The buttons [App
- Page 154 and 155: Customizing System - Mapping of the
- Page 156 and 157: Customizing System Upon pressing th
- Page 158 and 159: CUSTOMIZING DRAWING Customizing Dra
- Page 160 and 161: Customizing Drawing Direction. Defi
- Page 162 and 163: Customizing Drawing “Dimensions
- Page 164 and 165: Customizing Drawing “Alternative
<strong>Fundamentals</strong>. Two-Dimensional <strong>Design</strong><br />
Selector<br />
116<br />
available in command-waiting mode, while the filter works in transparent mode. The latter means, the filter<br />
settings can be modified at any time, without quitting the current command. The selector and filter settings<br />
work independently, adding to each other’s function. The elements, whose selection is disallowed by either<br />
the selector or the filter, can’t be selected on the drawing neither by , nor via the creation and editing<br />
command options described above.<br />
The selector settings are managed by the command “FT: Set Selector Configuration”. This command<br />
can be called only in the command-waiting mode from the toolbar or the textual menu as follows:<br />
Keyboard Textual Menu Icon<br />
“Edit|Selector…”<br />
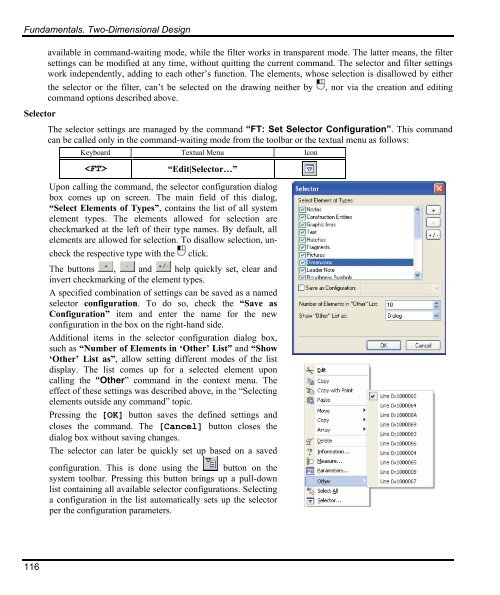
Upon calling the command, the selector configuration dialog<br />
box comes up on screen. The main field of this dialog,<br />
“Select Elements of Types”, contains the list of all system<br />
element types. The elements allowed for selection are<br />
checkmarked at the left of their type names. By default, all<br />
elements are allowed for selection. To disallow selection, uncheck<br />
the respective type with the click.<br />
The buttons , and help quickly set, clear and<br />
invert checkmarking of the element types.<br />
A specified combination of settings can be saved as a named<br />
selector configuration. To do so, check the “Save as<br />
Configuration” item and enter the name for the new<br />
configuration in the box on the right-hand side.<br />
Additional items in the selector configuration dialog box,<br />
such as “Number of Elements in ‘Other’ List” and “Show<br />
‘Other’ List as”, allow setting different modes of the list<br />
display. The list comes up for a selected element upon<br />
calling the “Other” command in the context menu. The<br />
effect of these settings was described above, in the “Selecting<br />
elements outside any command” topic.<br />
Pressing the [OK] button saves the defined settings and<br />
closes the command. The [Cancel] button closes the<br />
dialog box without saving changes.<br />
The selector can later be quickly set up based on a saved<br />
configuration. This is done using the button on the<br />
system toolbar. Pressing this button brings up a pull-down<br />
list containing all available selector configurations. Selecting<br />
a configuration in the list automatically sets up the selector<br />
per the configuration parameters.


