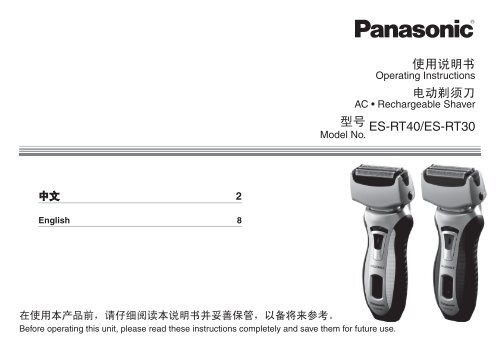
使用说明书电动剃须刀型号ES‑RT40/ES‑RT30
使用说明书电动剃须刀型号ES‑RT40/ES‑RT30
使用说明书电动剃须刀型号ES‑RT40/ES‑RT30

You also want an ePaper? Increase the reach of your titles
YUMPU automatically turns print PDFs into web optimized ePapers that Google loves.
中文 2<br />
English 8<br />
使用说明书<br />
Operating Instructions<br />
电动剃须刀<br />
AC • Rechargeable Shaver<br />
型号 ES‑RT40/<strong>ES‑RT30</strong><br />
Model No.<br />
在使用本产品前,请仔细阅读本说明书并妥善保管,以备将来参考。<br />
Before operating this unit, please read these instructions completely and save them for future use.<br />
ES-RT40-30_CH.indb 1 2009/06/29 17:16:54
中文<br />
重要事项<br />
使用剃须刀<br />
注意 - 外刀网很薄,若使用不正确就可能造成损坏。<br />
使用剃须刀前,请确认外刀网是否损坏。如果外刀网<br />
已损坏请不要使用该剃须刀,因为这样会割伤皮肤。<br />
请勿用于修剪宠物的毛发。<br />
给剃须刀充电<br />
除了为本型号专门设计的充电器,不要使用其它任何<br />
电源线、充电器进行充电。RE7-51 充电器只能与<br />
ES-RT40/ES-RT30 配合使用。将充电器插入家用插座<br />
内,操作时双手要保持干燥。剃须刀在使用和充电过<br />
程中可能会变热,但这不是故障。不要将剃须刀放置<br />
在阳光直射或有其他热源的地方下进行充电。从家用<br />
插座上拔出充电器时请抓紧充电器。如果用力拉电源<br />
线,可能会损坏电源线。电源线不能更换。如果电源<br />
线损坏,此充电器应废弃。<br />
充电的合适环境温度为 0 至 35 摄氏度。<br />
如 不亮,稍等直至其亮起。<br />
清洁剃须刀<br />
警告 - 清洁剃须刀前请断开电源线,以防触电。<br />
请在装有两个内刀头的状态进行清洗,若在仅装有一<br />
个内刀头的状态进行清洗,可能会损坏剃须刀。也可<br />
用清水清洗剃须刀,不要使用盐水或热水。不要将剃<br />
须刀长时间浸泡在水中。也可用蘸肥皂水的布擦拭剃<br />
须刀。不要使用稀释剂,汽油或酒精擦拭剃须刀任何<br />
部位。<br />
存放剃须刀<br />
存放剃须刀时请拔出电源线。不要折弯电源线或将电<br />
源线绕在剃须刀上。本品不宜供肢体、感官或精神上<br />
有残疾者、缺乏经验和知识者(包括儿童)使用,除<br />
非有人对此类人加以监督或者对本品的使用加以指<br />
导,且对使用者的安全能承担责任。请对儿童进行监<br />
督,避免其将本品视为玩具,引发危险。请妥善保管<br />
本说明书。请妥善处理本产品的包装袋,避免婴幼儿<br />
窒息等意外发生。请置于儿童触摸不到的地方。<br />
ES-RT40-30_CH.indb 2 2009/06/29 17:16:54
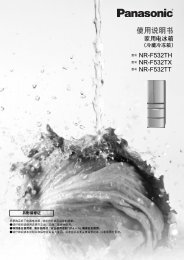
各部分名称<br />
<br />
<br />
<br />
<br />
<br />
<br />
<br />
<br />
<br />
<br />
<br />
<br />
A保护盖<br />
B外刀部<br />
1外刀网<br />
2外刀网释放按钮<br />
3外刃架<br />
C内刀头<br />
D机身<br />
4外刃架释放按钮<br />
5开关锁定按钮<br />
60/1 开关<br />
7LED 显示灯<br />
<br />
<br />
<br />
<br />
<br />
<br />
<br />
8电源线插孔<br />
9修剪刀<br />
:修剪刀操纵杆<br />
E充电器(RE7-51)<br />
;电源线<br />
中文<br />
4<br />
关于指示灯<br />
充电时 充电完成后<br />
ES‑RT40 <strong>ES‑RT30</strong> ES‑RT40 <strong>ES‑RT30</strong><br />
HIGH<br />
MID<br />
LOW<br />
指示灯<br />
亮。<br />
• “HIGH”、<br />
“MID”、<br />
“LOW”其<br />
中一盏指<br />
示灯闪<br />
烁。<br />
指示灯<br />
亮。<br />
HIGH<br />
MID<br />
LOW<br />
指示灯每秒闪烁一<br />
次。<br />
充电完成 10 分钟后<br />
ES‑RT40 <strong>ES‑RT30</strong><br />
HIGH<br />
MID<br />
LOW<br />
指示灯每 2 秒闪烁一<br />
次。<br />
• “HIGH/MID/LOW”熄灭。<br />
指示灯每 2 秒闪烁一<br />
次。<br />
剃须<br />
电池电量不足时<br />
ES‑RT40 <strong>ES‑RT30</strong><br />
HIGH<br />
MID<br />
LOW<br />
“LOW”闪烁。 闪烁。<br />
使用剃须刀<br />
1 按下开关锁定按<br />
钮并将 0/1 开关<br />
向上推动。<br />
2 如上图所示握住剃须刀<br />
剃须。<br />
• 轻轻地压向面部开始剃须。用另一只手绷紧脸上皮肤,<br />
逆着胡须生长方向前后移动剃须刀。当皮肤适应剃须刀<br />
之后您可以稍稍增加压力。但是施加过多的压力却有可<br />
能会造成皮肤伤害。<br />
ES-RT40-30_CH.indb 4 2009/06/29 17:16:55
环境保护与资源回收<br />
此剃须刀含二枚镍氢电池。<br />
如果您的国家有相关规定,请务必在指定处对旧电池<br />
进行统一处理。<br />
规格<br />
产品名称 电动剃须刀<br />
产品型号 ES-RT40/ES-RT30<br />
充电器额定输入 a.c 100-240 V,180 mA<br />
充电器额定输出 d.c 5.4 V,1.2 A<br />
马达电压 d.c 2.4 V<br />
充电时间 1 小时<br />
原产地 中国<br />
生产日期 请见商品上刻印<br />
执行标准 GB4706.1 附录 B、GB4706.9、<br />
Q/SXDGWB 6<br />
规格如有变更,恕不另行通知。<br />
本产品仅适合家庭使用。<br />
ES-RT40-30_CH.indb 7 2009/06/29 17:16:55<br />
中文
English<br />
Important<br />
Using<br />
the shaver<br />
Caution ‑ The outer foil is very thin and can be<br />
damaged if not used correctly. Check that the foil is<br />
not damaged before using the shaver. Do not use<br />
the shaver if the foil etc. is damaged as you will cut<br />
your skin.<br />
Charging<br />
the shaver<br />
Do not use any power cord or AC adaptor other than<br />
one specifically designed for this model. Use the<br />
RE ‑ 1 adaptor only for ES‑RT40/<strong>ES‑RT30</strong> shaver.<br />
Plug in the adaptor into a household outlet where<br />
there is no moisture and handle it with dry hands.<br />
The shaver may become warm during use and<br />
charging. However, this is not a malfunction. Do not<br />
charge the shaver where it will be exposed to direct<br />
sunlight or other heat sources. Hold the adaptor<br />
when disconnecting it from the household outlet. If<br />
you tug on the power cord, you may damage it. The<br />
supply cord cannot be replaced. If the cord is<br />
damaged, the appliance should be scrapped.<br />
Adequate ambient temperature for charging is 0‑<br />
3 °C.<br />
If the plug symbol does not glow initially when the<br />
shaver is plugged in, wait for a short while until it<br />
does.<br />
Cleaning<br />
the shaver<br />
Warning ‑ Disconnect the power cord from the<br />
shaver before cleaning it to prevent electric shock.<br />
Keep both the inner blades inserted. If only one of<br />
the inner blades is inserted, the shaver may be<br />
damaged. If you clean the shaver with water, do not<br />
use salt water or hot water. Do not soak the shaver<br />
in water for a long period of time. Wipe it with a cloth<br />
dampened with soapy water. Do not use thinner,<br />
benzine or alcohol.<br />
Storing<br />
the shaver<br />
Disconnect the power cord when storing the shaver.<br />
Do not bend the power cord or wrap it around the<br />
shaver. This appliance is not intended for use by<br />
persons (including children) with reduced physical,<br />
sensory or mental capabilities, or lack of experience<br />
and knowledge, unless they have been given<br />
supervision or instruction concerning use of the<br />
appliance by a person responsible for their safety.<br />
Children should be supervised to ensure that they<br />
do not play with the appliance. Keep these operating<br />
instructions in a safe place.<br />
ES-RT40-30_CH.indb 8 2009/06/29 17:16:55
Parts identification<br />
<br />
<br />
<br />
<br />
<br />
<br />
<br />
<br />
<br />
<br />
<br />
<br />
<br />
A Protective cap<br />
B Outer foil section<br />
1 System outer foil<br />
2 System outer foil<br />
release buttons<br />
3 Foil frame<br />
C Inner blades<br />
D Main body<br />
4 Foil frame release<br />
buttons<br />
5 Switch lock button<br />
<br />
<br />
<br />
<br />
<br />
<br />
6 0/1 switch<br />
7 LED display<br />
8 Appliance socket<br />
9 Trimmer<br />
: Trimmer handle<br />
E Adaptor (RE ‑ 1)<br />
; Power cord<br />
< Appliance plug<br />
F Travel pouch<br />
G Cleaning brush<br />
Charge<br />
Charging the shaver<br />
ES‑RT40 The battery capacity is low when “LOW”<br />
blinks.<br />
You can shave 1 to times after “LOW”<br />
blinks.<br />
(This will differ depending on usage.)<br />
<strong>ES‑RT30</strong> The battery capacity is low when blinks.<br />
You can shave 1 to times after blinks.<br />
(This will differ depending on usage.)<br />
• A full charge will supply enough power for approx. 14<br />
shaves of 3 minutes each.<br />
1<br />
2<br />
Insert the appliance plug<br />
into the shaver.<br />
Plug in the adaptor into a<br />
household outlet.<br />
Cord shaving<br />
If you insert the appliance plug to the shaver and plug<br />
in the adaptor into a household outlet, you can use it<br />
even if the battery capacity is low.<br />
• If the shaver does not work, continue charging it for<br />
approx. 1 minute.<br />
• When charging the shaver for the first time or when it<br />
ES-RT40-30_CH.indb 9 2009/06/29 17:16:56<br />
English
English<br />
has not been in use for more than months, please<br />
charge it for 1 hours (in order to activate the<br />
rechargeable battery). If you charge the shaver with<br />
the batteries completely discharged, may not glow<br />
immediately. However, the lamp will glow normally<br />
after charging for a few minutes.<br />
About the LED display<br />
10<br />
While charging<br />
After charging is<br />
completed<br />
ES‑RT40 <strong>ES‑RT30</strong> ES‑RT40 <strong>ES‑RT30</strong><br />
HIGH<br />
MID<br />
LOW<br />
glows.<br />
• “HIGH”,<br />
“MID” or<br />
“LOW”<br />
blinks.<br />
glows.<br />
HIGH<br />
MID<br />
LOW<br />
blinks once every<br />
second.<br />
10 minutes after charging is completed<br />
ES‑RT40 <strong>ES‑RT30</strong><br />
HIGH<br />
MID<br />
LOW<br />
blinks once every<br />
seconds.<br />
• “HIGH/MID/LOW” go out.<br />
blinks once every<br />
seconds.<br />
When the battery capacity is low<br />
ES‑RT40 <strong>ES‑RT30</strong><br />
HIGH<br />
MID<br />
LOW<br />
“LOW” blinks. blinks.<br />
ES-RT40-30_CH.indb 10 2009/06/29 17:16:56
Shave<br />
Using the shaver<br />
1<br />
Depress the<br />
switch lock<br />
button and slide<br />
the 0/1 switch<br />
upwards.<br />
2<br />
Hold the shaver as<br />
illustrated above and<br />
shave.<br />
• Start out shaving by applying gentle pressure to your<br />
face. Stretch your skin with your free hand and move<br />
the shaver back and forth in the direction of your<br />
beard. You may gently increase the amount of<br />
pressure as your skin becomes accustomed to this<br />
shaver. Applying excessive pressure does not provide<br />
a closer shave.<br />
Using the trimmer<br />
Slide the trimmer handle up.<br />
Place at a right angle to your<br />
skin and move downwards to<br />
trim your sideburns.<br />
Clean<br />
Cleaning the shaver<br />
1. Disconnect the power cord from<br />
the shaver.<br />
. Apply some hand soap and some<br />
water to the outer foil.<br />
3. Turn the shaver on.<br />
4. Turn the shaver off after 10‑ 0<br />
seconds.<br />
. Remove the outer foil section and<br />
turn the shaver on.<br />
. Clean the shaver and the outer foil<br />
section with running water.<br />
. Wipe off any drops of water with a<br />
dry cloth.<br />
. Dry the outer foil section and the<br />
shaver completely.<br />
. Attach the outer foil section to the<br />
shaver.<br />
The mark on the left is<br />
for a washable shaver<br />
and indicates it can be<br />
cleaned with water.<br />
ES-RT40-30_CH.indb 11 2009/06/29 17:16:56<br />
6<br />
8<br />
3<br />
5<br />
11<br />
English
Removing the built‑in rechargeable<br />
batteries<br />
Remove the built‑in rechargeable batteries before<br />
disposing of the shaver. Please make sure that the<br />
batteries are disposed of at an officially designated<br />
location if there is one. Do not dismantle or replace the<br />
batteries so that you can use the shaver again. This<br />
could cause fire or an electric shock. Replace them at<br />
an authorized service center.<br />
• Disconnect the power cord from the shaver when<br />
removing the batteries.<br />
• Perform steps 1 to 5 and lift the batteries, and then<br />
remove them.<br />
<br />
<br />
<br />
<br />
<br />
<br />
<br />
For environmental protection and recycling of<br />
materials<br />
This shaver contains Nickel‑Metal Hydride batteries.<br />
Please make sure that the batteries are disposed of<br />
at an officially assigned location, if there is one in your<br />
country.<br />
SPECIFICATIONS<br />
Product name AC • Rechargeable Shaver<br />
Product model ES‑RT40/<strong>ES‑RT30</strong><br />
Rated input a.c 100‑ 40 V 1 0 mA<br />
Rated output d.c .4 V 1. A<br />
Motor voltage d.c .4 V<br />
Charging time 1 hour<br />
Place of origin China<br />
Date of production See engraving on the<br />
commodity.<br />
Execution standard GB4 0 .1 appendix B<br />
GB4 0 .<br />
Q/SXDGWB<br />
Specifications are subject to change without notice.<br />
This product is intended for household use only.<br />
ES-RT40-30_CH.indb 13 2009/06/29 17:16:57<br />
13<br />
English
MEMO<br />
ES-RT40-30_CH.indb 14 2009/06/29 17:16:57
ES-RT40-30_CH.indb 15 2009/06/29 17:16:57<br />
中国 · 广州<br />
电动剃须刀<br />
ES-RT40/ES-RT30<br />
ES-RT40/ES-RT30<br />
ES-RT40/ES-RT30<br />
ES-RT40/ES-RT30<br />
ES-RT40/ES-RT30<br />
ES-RT40/ES-RT30
ES-RT40-30_CH.indb 16 2009/06/29 17:16:57
MEMO<br />
ES-RT40-30_CH.indb 17 2009/06/29 17:16:57
MEMO<br />
ES-RT40-30_CH.indb 18 2009/06/29 17:16:57
MEMO<br />
ES-RT40-30_CH.indb 19 2009/06/29 17:16:57