Back-UPS® - APC Media
Back-UPS® - APC Media
Back-UPS® - APC Media

Create successful ePaper yourself
Turn your PDF publications into a flip-book with our unique Google optimized e-Paper software.
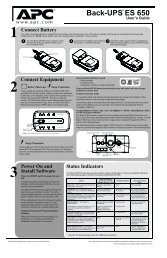
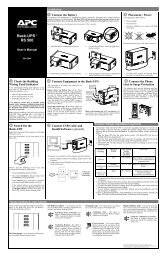
3.0 Installation<br />
3.6 Connecting your equipment to the UPS - continued<br />
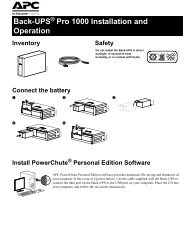
3.6.7 Once you have determined that your equipment and the UPS are compatible,<br />
plug your equipment into the UPS’s rear panel output receptacles.<br />
Note: Do not plug laser printers into this UPS! The power requirements of a typical laser<br />
printer are much larger than the requirements of other computer peripherals and may trip<br />
the UPS’s rear panel circuit breaker. Plug laser printers into a quality surge suppressor.<br />
Remember that print jobs can be re-queued when the power is restored!<br />
3.7 Test for proper operation<br />
After the UPS has had a chance to recharge its battery, turn on the UPS’s power<br />
I/0 control and switch on your computer equipment. The indicator within the<br />
switch should be illuminated and your equipment should operate normally.<br />
To test the operation of the UPS, simply unplug its input cord or press and hold<br />
the Test switch (on units so equipped) to simulate a utility blackout. The lamp<br />
within the power I/0 switch will flash and UPS will immediately transfer your<br />
equipment to power derived from the UPS’s internal battery. During this time,<br />
the UPS will emit a series of four beeps once every 30 seconds to remind you that<br />
your equipment is operating from a source of power that is limited in duration.<br />
Restore normal operation by releasing the Test control or by plugging in the line<br />
Page 11