APC Back-UPS Pro 280/420/650 230 VAC User's Manual - APC Media
APC Back-UPS Pro 280/420/650 230 VAC User's Manual - APC Media
APC Back-UPS Pro 280/420/650 230 VAC User's Manual - APC Media

You also want an ePaper? Increase the reach of your titles
YUMPU automatically turns print PDFs into web optimized ePapers that Google loves.
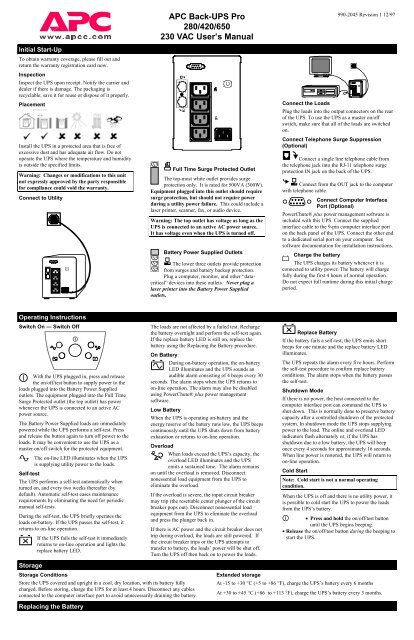
Initial Start-Up<br />
To obtain warranty coverage, please fill out and<br />
return the warranty registration card now.<br />
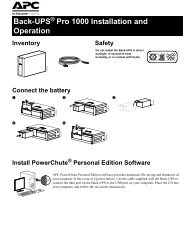
Inspection<br />
Inspect the <strong>UPS</strong> upon receipt. Notify the carrier and<br />
dealer if there is damage. The packaging is<br />
recyclable; save it for reuse or dispose of it properly.<br />
Placement<br />
Install the <strong>UPS</strong> in a protected area that is free of<br />
excessive dust and has adequate air flow. Do not<br />
operate the <strong>UPS</strong> where the temperature and humidity<br />
is outside the specified limits.<br />
Warning: Changes or modifications to this unit<br />
not expressly approved by the party responsible<br />
for compliance could void the warranty.<br />
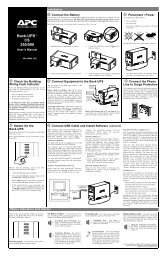
Connect to Utility<br />
Operating Instructions<br />
Switch On — Switch Off<br />
With the <strong>UPS</strong> plugged in, press and release<br />
the on/off/test button to supply power to the<br />
loads plugged into the Battery Power Supplied<br />
outlets. The equipment plugged into the Full Time<br />
Surge <strong>Pro</strong>tected outlet (the top outlet) has power<br />
whenever the <strong>UPS</strong> is connected to an active AC<br />
power source.<br />
The Battery Power Supplied loads are immediately<br />
powered while the <strong>UPS</strong> performs a self-test. Press<br />
and release the button again to turn off power to the<br />
loads. It may be convenient to use the <strong>UPS</strong> as a<br />
master on/off switch for the protected equipment.<br />
Self-test<br />
The on-line LED illuminates when the <strong>UPS</strong><br />
is supplying utility power to the loads.<br />
The <strong>UPS</strong> performs a self-test automatically when<br />
turned on, and every two weeks thereafter (by<br />
default). Automatic self-test eases maintenance<br />
requirements by eliminating the need for periodic<br />
manual self-tests.<br />
During the self-test, the <strong>UPS</strong> briefly operates the<br />
loads on-battery. If the <strong>UPS</strong> passes the self-test, it<br />
returns to on-line operation.<br />
Storage<br />
If the <strong>UPS</strong> fails the self-test it immediately<br />
returns to on-line operation and lights the<br />
replace battery LED.<br />
Storage Conditions<br />
<strong>APC</strong> <strong>Back</strong>-<strong>UPS</strong> <strong>Pro</strong><br />
<strong>280</strong>/<strong>420</strong>/<strong>650</strong><br />
<strong>230</strong> <strong>VAC</strong> User’s <strong>Manual</strong><br />
Full Time Surge <strong>Pro</strong>tected Outlet<br />
The top-most white outlet provides surge<br />
protection only. It is rated for 500VA (300W).<br />
Equipment plugged into this outlet should require<br />
surge protection, but should not require power<br />
during a utility power failure. This could include a<br />
laser printer, scanner, fax, or audio device.<br />
Warning: The top outlet has voltage as long as the<br />
<strong>UPS</strong> is connected to an active AC power source.<br />
It has voltage even when the <strong>UPS</strong> is turned off.<br />
Battery Power Supplied Outlets<br />
The lower three outlets provide protection<br />
from surges and battery backup protection.<br />
Plug a computer, monitor, and other “datacritical”<br />
devices into these outlets. Never plug a<br />
laser printer into the Battery Power Supplied<br />
outlets.<br />
The loads are not affected by a failed test. Recharge<br />
the battery overnight and perform the self-test again.<br />
If the replace battery LED is still on, replace the<br />
battery using the Replacing the Battery procedure.<br />
On Battery<br />
During on-battery operation, the on-battery<br />
LED illuminates and the <strong>UPS</strong> sounds an<br />
audible alarm consisting of 4 beeps every 30<br />
seconds. The alarm stops when the <strong>UPS</strong> returns to<br />
on-line operation. The alarm may also be disabled<br />
using PowerChute® plus power management<br />
software.<br />
Low Battery<br />
When the <strong>UPS</strong> is operating on-battery and the<br />
energy reserve of the battery runs low, the <strong>UPS</strong> beeps<br />
continuously until the <strong>UPS</strong> shuts down from battery<br />
exhaustion or returns to on-line operation.<br />
Overload<br />
Store the <strong>UPS</strong> covered and upright in a cool, dry location, with its battery fully<br />
charged. Before storing, charge the <strong>UPS</strong> for at least 4 hours. Disconnect any cables<br />
connected to the computer interface port to avoid unnecessarily draining the battery.<br />
Replacing the Battery<br />
When loads exceed the <strong>UPS</strong>’s capacity, the<br />
overload LED illuminates and the <strong>UPS</strong><br />
emits a sustained tone. The alarm remains<br />
on until the overload is removed. Disconnect<br />
nonessential load equipment from the <strong>UPS</strong> to<br />
eliminate the overload.<br />
If the overload is severe, the input circuit breaker<br />
may trip (the resettable center plunger of the circuit<br />
breaker pops out). Disconnect nonessential load<br />
equipment from the <strong>UPS</strong> to eliminate the overload<br />
and press the plunger back in.<br />
If there is AC power and the circuit breaker does not<br />
trip during overload, the loads are still powered. If<br />
the circuit breaker trips or the <strong>UPS</strong> attempts to<br />
transfer to battery, the loads’ power will be shut off.<br />
Turn the <strong>UPS</strong> off then back on to power the loads.<br />
Extended storage<br />
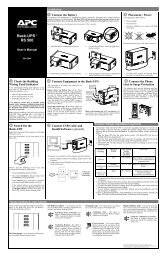
Connect the Loads<br />
990-2045 Revision 1 12/97<br />
Plug the loads into the output connectors on the rear<br />
of the <strong>UPS</strong>. To use the <strong>UPS</strong> as a master on/off<br />
switch, make sure that all of the loads are switched<br />
on.<br />
Connect Telephone Surge Suppression<br />
(Optional)<br />
Connect a single line telephone cable from<br />
the telephone jack into the RJ-11 telephone surge<br />
protection IN jack on the back of the <strong>UPS</strong>.<br />
Connect from the OUT jack to the computer<br />
with telephone cable.<br />
Connect Computer Interface<br />
Port (Optional)<br />
PowerChute® plus power management software is<br />
included with this <strong>UPS</strong>. Connect the supplied<br />
interface cable to the 9-pin computer interface port<br />
on the back panel of the <strong>UPS</strong>. Connect the other end<br />
to a dedicated serial port on your computer. See<br />
software documentation for installation instructions.<br />
Charge the battery<br />
The <strong>UPS</strong> charges its battery whenever it is<br />
connected to utility power. The battery will charge<br />
fully during the first 4 hours of normal operation.<br />
Do not expect full runtime during this initial charge<br />
period.<br />
Replace Battery<br />
If the battery fails a self-test, the <strong>UPS</strong> emits short<br />
beeps for one minute and the replace battery LED<br />
illuminates.<br />
The <strong>UPS</strong> repeats the alarm every five hours. Perform<br />
the self-test procedure to confirm replace battery<br />
conditions. The alarm stops when the battery passes<br />
the self-test.<br />
Shutdown Mode<br />
If there is no power, the host connected to the<br />
computer interface port can command the <strong>UPS</strong> to<br />
shut down. This is normally done to preserve battery<br />
capacity after a controlled shutdown of the protected<br />
system. In shutdown mode the <strong>UPS</strong> stops supplying<br />
power to the load. The online and overload LED<br />
indicators flash alternately or, if the <strong>UPS</strong> has<br />
shutdown due to a low battery, the <strong>UPS</strong> will beep<br />
once every 4 seconds for approximately 16 seconds.<br />
When line power is restored, the <strong>UPS</strong> will return to<br />
on-line operation.<br />
Cold Start<br />
Note: Cold start is not a normal operating<br />
condition.<br />
When the <strong>UPS</strong> is off and there is no utility power, it<br />
is possible to cold start the <strong>UPS</strong> to power the loads<br />
from the <strong>UPS</strong>’s battery.<br />
• Press and hold the on/off/test button<br />
until the <strong>UPS</strong> begins beeping.<br />
• Release the on/off/test button during the beeping to<br />
start the <strong>UPS</strong>.<br />
At -15 to +30 °C (+5 to +86 °F), charge the <strong>UPS</strong>’s battery every 6 months<br />
At +30 to +45 °C (+86 to +113 °F), charge the <strong>UPS</strong>’s battery every 3 months.
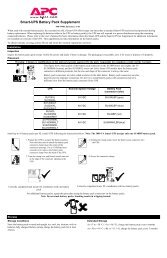
This <strong>UPS</strong> has an easy to replace hot-swappable battery.<br />
Note: Please read the cautions in the <strong>APC</strong> Safety Guide.<br />
Replacement Batteries<br />
See your dealer or call the number in this manual for information on replacement<br />
battery kits. For <strong>280</strong> and <strong>420</strong> models, order RBC 2. For <strong>650</strong> models, order RBC 4.<br />
Battery Replacement <strong>Pro</strong>cedure<br />
Battery replacement is a safe procedure, isolated from electrical hazards. You may<br />
leave the <strong>UPS</strong> and loads on for the following procedure.<br />
Note: Once the battery is disconnected, the loads are not protected from power<br />
outages.<br />
Troubleshooting<br />
1. Lay the <strong>UPS</strong> on its left side. Remove the two screws holding on<br />
the battery door and open the door.<br />
Note: It may be necessary to pull the battery door slightly<br />
toward the front of the unit in order to open the door fully.<br />
2. Gently pull out the battery by grasping the white tab.<br />
<strong>Pro</strong>blem Possible Cause Solution<br />
<strong>UPS</strong> will not turn on. On/off/test button not pushed. Press the on/off/test button to<br />
power the <strong>UPS</strong> and the loads.<br />
<strong>UPS</strong> input circuit breaker<br />
tripped.<br />
Reduce the load on the <strong>UPS</strong><br />
by unplugging equipment and<br />
reset the circuit breaker by<br />
pressing the plunger back in.<br />
<strong>UPS</strong> will not turn on or off. Computer interface problem. Disconnect the computer<br />
interface. If the <strong>UPS</strong> now<br />
works normally, check the<br />
interface cable and the<br />
attached computer.<br />
<strong>UPS</strong> operates on-battery even<br />
though normal line voltage is<br />
thought to exist.<br />
<strong>UPS</strong>'s input circuit breaker<br />
tripped.<br />
Reduce the load on the <strong>UPS</strong><br />
by unplugging equipment and<br />
reset the circuit breaker by<br />
pushing the plunger back in.<br />
<strong>UPS</strong> beeps occasionally. Normal <strong>UPS</strong> operation. None. The <strong>UPS</strong> is protecting<br />
the load.<br />
<strong>UPS</strong> does not provide<br />
The <strong>UPS</strong>'s battery is weak due Charge the battery. The <strong>UPS</strong>'s<br />
expected back up time. to recent outage or is near the batteries require recharging<br />
end of its service life.<br />
after an extended outage.<br />
Batteries age faster when put<br />
into service often and when<br />
operated at elevated<br />
temperatures. If the battery is<br />
near the end of its service life,<br />
consider replacing the battery<br />
even if the replace battery<br />
indicator is not yet lit.<br />
On-line and overload indicators The <strong>UPS</strong> was shutdown by None. The <strong>UPS</strong> will restart<br />
are flashing alternately. PowerChute® plus software. automatically when utility power<br />
returns.<br />
All indicators are flashing. Internal <strong>UPS</strong> fault. Do not attempt to use the <strong>UPS</strong>.<br />
Turn the <strong>UPS</strong> off and have it<br />
serviced immediately.<br />
The <strong>UPS</strong> operates normally, Building wiring error such as Have a qualified electrician<br />
but the site wiring fault<br />
missing ground or hot to correct the building wiring.<br />
indicator is lit.<br />
neutral wire reversal.<br />
On-line and on-battery<br />
Internal <strong>UPS</strong> fault. Do not attempt to use the <strong>UPS</strong>.<br />
indicators only are flashing<br />
Turn the <strong>UPS</strong> off and have it<br />
serviced immediately.<br />
All indicators are off and the The <strong>UPS</strong> is shutdown and the None. The <strong>UPS</strong> will return to<br />
<strong>UPS</strong> is not operating.<br />
battery is discharged from an normal operation when the<br />
extended power outage. power is restored and the<br />
battery has a sufficient charge.<br />
The replace battery light is Weak batteries. Allow the batteries to recharge<br />
illuminated.<br />
for at least 4 hours. If the<br />
problem persists after<br />
recharging, replace the<br />
batteries.<br />
Replacement batteries not Confirm the battery<br />
connected properly.<br />
connections.<br />
The overload light is<br />
The <strong>UPS</strong> is overloaded. Reduce the load on the <strong>UPS</strong><br />
illuminated or flashing<br />
by unplugging equipment.<br />
For Computer Interface Port Specifications, see the <strong>APC</strong> Website.<br />
Service<br />
3.<br />
Loosen the wires by wiggling them while pulling straight back<br />
from the battery connector.<br />
Connect the new battery in place of the old.<br />
Note: Small sparks at the battery connections are normal<br />
5. Place the new battery in the <strong>UPS</strong>. Use care to avoid pinching the<br />
6. Close the battery compartment door and replace the screws.<br />
7. Dispose of the old battery properly at an appropriate recycling<br />
facility or return it to the supplier in the packing material for the<br />
new battery. See the new battery instructions for more<br />
information.<br />
If the <strong>UPS</strong> requires service do not return it to the dealer!<br />
Follow these steps:<br />
1. Use the Troubleshooting section of the Quick Reference Guide to eliminate<br />
common problems.<br />
2. Verify that no circuit breakers are tripped. A tripped circuit breaker is the most<br />
common <strong>UPS</strong> problem!<br />
3. If the problem persists, call customer service or visit the <strong>APC</strong> Internet Website<br />
(www.apcc.com).<br />
• Note the model number of the <strong>UPS</strong>, the serial number, and the date purchased. A<br />
technician will ask you to describe the problem and try to solve it over the phone,<br />
if possible. If this is not possible the technician will issue a Return Merchandise<br />
Authorization Number (RMA#).<br />
• If the <strong>UPS</strong> is under warranty, repairs are free. If not, there is a repair charge.<br />
4. Pack the <strong>UPS</strong> in its original packaging. If the original packing is not available,<br />
ask customer service about obtaining a new set.<br />
• Pack the <strong>UPS</strong> properly to avoid damage in transit. Never use Styrofoam beads for<br />
packaging. Damage sustained in transit is not covered under warranty.<br />
• Include a letter with your name, RMA#, address, copy of the sales receipt,<br />
description of the trouble, your daytime phone number, and a check (if necessary).<br />
5. Mark the RMA# on the outside of the package<br />
6. Return the <strong>UPS</strong> by insured, prepaid carrier to the address given to you by<br />
Customer Service.<br />
North & South America Europe<br />
<strong>APC</strong> <strong>APC</strong><br />
132 Fairgrounds Road Ballybritt Business Park<br />
West Kingston, Rhode Island 02892 USA Galway, Ireland 10800-702000<br />
1-800-800-4<strong>APC</strong>/1-401-789-5735 353-91-702020<br />
Internet: http://www.apcc.com<br />
E-Mail: apctech@apcc.com E-Mail: apceurtech@apcc.com<br />
Specifications<br />
<strong>280</strong> VA <strong>420</strong> VA <strong>650</strong> VA<br />
Acceptable input voltage 0 - 320 <strong>VAC</strong><br />
Input voltage (on-line operation)* 165 - 283 <strong>VAC</strong><br />
Output voltage * 208 - 253 <strong>VAC</strong><br />
Input Over Current <strong>Pro</strong>tection Resettable circuit breaker<br />
Frequency limits (on-line operation) 47 - 63 Hz (autosensing)<br />
Transfer time 4 ms typical, blackout response time<br />
Maximum load <strong>280</strong> VA<br />
<strong>420</strong> VA <strong>650</strong> VA<br />
180 W<br />
260 W<br />
410 W<br />
On-battery output voltage <strong>230</strong> <strong>VAC</strong><br />
On-battery frequency 50 or 60 Hz, ±0.1 Hz; unless synchronized to utility<br />
during brownout<br />
On-battery waveshape Stepped sine-wave<br />
Output Over Current <strong>Pro</strong>tection Overcurrent and short-circuit protected, latching<br />
shutdown on overload<br />
Battery type Spill proof, maintenance free, sealed lead-acid<br />
Typical battery life 3 to 6 years, depending on number of discharge<br />
cycles and ambient temperature<br />
Typical recharge time 2 to 5 hours from total discharge<br />
Operating temperature 0 to +40 °C (+32 to +104 °F)<br />
Storage temperature -15 to +45 °C (+5 to +113 °F)<br />
Operating and storage relative humidity 0 to 95%, non-condensing<br />
Operating elevation 0 to +3,000 m (0 to +10,000 ft)<br />
Storage elevation 0 to +15,000 m (0 to +50,000 ft)<br />
Audible noise at 1 m (3 ft)