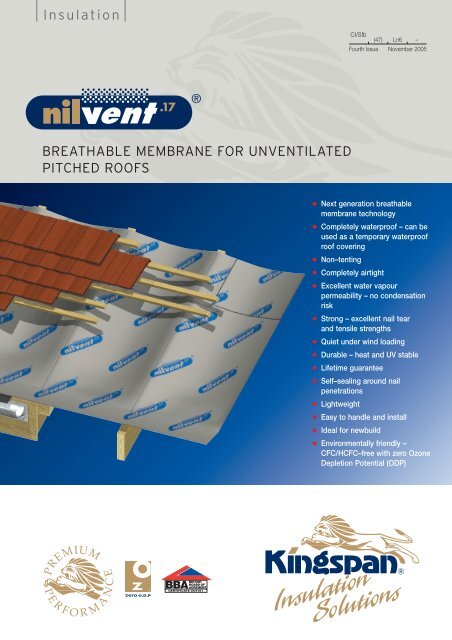
Nilvent breathable membrane for unventilated pitched roofs - CMS
Nilvent breathable membrane for unventilated pitched roofs - CMS
Nilvent breathable membrane for unventilated pitched roofs - CMS

Create successful ePaper yourself
Turn your PDF publications into a flip-book with our unique Google optimized e-Paper software.
Insulation<br />
BREATHABLE MEMBRANE FOR UNVENTILATED<br />
PITCHED ROOFS<br />
PREMIUM<br />
P E R F O R M A N C E<br />
BBA BRITISH<br />
BOARD OF<br />
AGRÉMENT<br />
CERTIFICATE 04/4161<br />
CI/Sfb<br />
(47) Ln6 –<br />
Fourth Issue November 2005<br />
● Next generation <strong>breathable</strong><br />
<strong>membrane</strong> technology<br />
● Completely waterproof – can be<br />
used as a temporary waterproof<br />
roof covering<br />
● Non–tenting<br />
● Completely airtight<br />
● Excellent water vapour<br />
permeability – no condensation<br />
risk<br />
● Strong – excellent nail tear<br />
and tensile strengths<br />
● Quiet under wind loading<br />
● Durable – heat and UV stable<br />
● Lifetime guarantee<br />
● Self–sealing around nail<br />
penetrations<br />
● Lightweight<br />
● Easy to handle and install<br />
● Ideal <strong>for</strong> newbuild<br />
● Environmentally friendly –<br />
CFC/HCFC–free with zero Ozone<br />
Depletion Potential (ODP)
Typical Design Details<br />
Horizontal Installation on a Continuous Substrate<br />
150/100/75 mm lap between<br />
runs of Kingspan nilvent ®<br />
sealed (if required) with<br />
75 mm wide double<br />
sided acrylic<br />
adhesive tape<br />
Rafter<br />
Insulated plasterboard eg. Kingspan<br />
Kooltherm ® K18 Insulated Dry–lining Board<br />
under rafters (can be replaced with 12.5 mm<br />
plasterboard)*/**<br />
Tiles/slates Tile/slate batten<br />
Kingspan nilvent ®<br />
38 x 38 mm<br />
counter batten<br />
Insulation between rafters<br />
eg. Kingspan Kooltherm ® K7<br />
Pitched Roof Board or<br />
Kingspan Thermapitch ® TP10<br />
Figure 1a Fully Filled Insulation Between Rafters – No Sarking Board Figure 1b Insulation Over Rafters – Sarking Board/No Sarking Board<br />
150/100/75 mm lap between<br />
runs of Kingspan nilvent ®<br />
sealed (if required) with<br />
75 mm wide double<br />
sided acrylic<br />
adhesive tape<br />
Rafter<br />
Insulated plasterboard eg. Kingspan<br />
Kooltherm ® K18 Insulated Dry–lining Board<br />
under rafters (can be replaced with 12.5 mm<br />
plasterboard)*/**<br />
Figure 1c Insulation Between Rafters – Sarking Board Figure 1d Insulation Between Rafters – Sarking Board &<br />
natural slates<br />
150/100/75 mm lap between<br />
runs of Kingspan nilvent ®<br />
sealed (if required) with<br />
75 mm wide double<br />
sided acrylic<br />
adhesive tape<br />
Rafter<br />
Unventilated air space<br />
12.5 mm plasterboard*<br />
Nailable sarking clips (if required)<br />
Tiles/slates Tile/slate batten<br />
Kingspan nilvent ®<br />
38 x 38 mm<br />
counter batten<br />
18 mm sarking board<br />
Insulation between rafters (partially or<br />
fully filling space) eg. Kingspan<br />
Kooltherm ® K7 Pitched Roof Board<br />
or Kingspan Thermapitch ® TP10<br />
Slates<br />
Kingspan nilvent ®<br />
18 mm sarking board<br />
Insulation over and between<br />
(if required) rafters eg. Kingspan<br />
Kooltherm ® K7 Pitched Roof Board<br />
or Kingspan Thermapitch ® TP10<br />
Figure 1e Insulation Over Rafters – Sarking Board and Natural Slates<br />
2<br />
150/100/75 mm lap between<br />
runs of Kingspan nilvent ®<br />
sealed (if required) with<br />
75 mm wide double<br />
sided acrylic<br />
adhesive tape<br />
Rafter<br />
Unventilated<br />
air space<br />
12.5 mm plasterboard<br />
Nailable sarking clips (if required)<br />
150/100/75 mm lap between<br />
runs of Kingspan nilvent ®<br />
sealed (if required) with<br />
75 mm wide double<br />
sided acrylic<br />
adhesive tape<br />
Rafter<br />
Insulated plasterboard eg. Kingspan<br />
Kooltherm ® K18 Insulated Dry–lining Board<br />
under rafters (can be replaced with 12.5 mm<br />
plasterboard)*/**<br />
100 mm lap between runs of<br />
Kingspan nilvent ® sealed<br />
by the placement of the<br />
counter batten<br />
Rafter<br />
Timber batten<br />
Insulated plasterboard eg. Kingspan<br />
Kooltherm ® K18 Insulated Dry–lining Board<br />
under rafters (can be replaced with 12.5 mm<br />
plasterboard)*/**<br />
Tiles/slates Tile/slate batten<br />
Tiles/slates<br />
Kingspan<br />
nilvent ®<br />
18 mm sarking<br />
board (if required)<br />
38 x 38 mm<br />
counter batten<br />
Insulation over and between<br />
(if required) rafters eg. Kingspan<br />
Kooltherm ® K7 Pitched Roof Board<br />
or Kingspan Thermapitch ® TP10<br />
Slates<br />
Kingspan nilvent ®<br />
18 mm sarking board<br />
Insulation between rafters (partially or<br />
fully filling space) eg. Kingspan<br />
Kooltherm ® K7 Pitched Roof Board<br />
or Kingspan Thermapitch ® TP10<br />
Vertical Installation on a Discontinuous Substrate<br />
Tile/slate batten<br />
Insulation partially filling the space<br />
between rafters eg. Kingspan<br />
Kooltherm ® K7 Pitched Roof Board<br />
or Kingspan Thermapitch ® Kingspan nilvent<br />
TP10<br />
®<br />
38 x 38 mm<br />
counter batten<br />
Unventilated air space<br />
(25 mm min.) above insulation<br />
Figure 2a Partially Filled Insulation Between Rafters – No Sarking<br />
Board
Horizontal Installation on a Discontinuous Substrate<br />
225/150/100 mm lap<br />
(depending on pitch)<br />
between runs of<br />
Kingspan nilvent ®<br />
Rafter<br />
Timber batten<br />
Insulated plasterboard eg. Kingspan<br />
Kooltherm ® K18 Insulated Dry–lining<br />
Board under rafters (can be replaced with<br />
12.5 mm plasterboard)*/**<br />
Tiles/slates Tile/slate battens<br />
Figure 3a Partially Filled Insulation Between Rafters – No Sarking<br />
Board<br />
Insulation between rafters<br />
(partially or fully filling<br />
space) eg. Kingspan<br />
Kooltherm ® K7 Pitched<br />
Roof Board or Kingspan<br />
Thermapitch ® TP10<br />
Rafter<br />
Insulated plasterboard eg. Kingspan<br />
Kooltherm ® K18 Insulated Dry–lining<br />
Board under rafters (can be replaced<br />
with 12.5 mm plasterboard)*/**<br />
Figure 3c Insulation Between Rafters – Sarking Board<br />
Kingspan nilvent ®<br />
Air space (25 mm min.) above<br />
insulation to provide a space to<br />
drape the Kingspan nilvent ®<br />
Insulation partially filling the space<br />
between rafters eg. Kingspan<br />
Kooltherm ® K7 Pitched Roof Board<br />
or Kingspan Thermapitch ® TP10<br />
Tiles/slates<br />
Tile/slate batten<br />
225/150/100 mm lap<br />
(depending on pitch)<br />
between runs of<br />
Kingspan nilvent ®<br />
Kingspan nilvent<br />
38 x 38 mm<br />
counter batten 18 mm sarking board<br />
®<br />
* The requirement <strong>for</strong> a vapour control layer and/or under the tile ventilation should be<br />
assessed to BS 5250: 2002. Vapour check plasterboard or a separate vapour control<br />
layer can be used as preferred.<br />
** Kingspan Kooltherm ® K18 Insulated Dry–lining Board contains an integral vapour<br />
control layer.<br />
3<br />
Insulation over and between<br />
(if required) rafters eg.<br />
Kingspan Kooltherm ® K7<br />
Pitched Roof Board<br />
or Kingspan<br />
Thermapitch ® TP10<br />
Unventilated<br />
air space<br />
Rafter<br />
12.5 mm plasterboard<br />
18 mm sarking board (if required)<br />
Air space (25 mm min.) above sarking board or insulation (if no sarking<br />
board) to provide a space to drape the Kingspan nilvent ®<br />
Tiles/slates Tile/slate battens<br />
Kingspan nilvent ®<br />
225/150/100 mm<br />
lap (depending on<br />
pitch) between<br />
runs of Kingspan<br />
nilvent ®<br />
38 x 38 mm<br />
counter battens<br />
Nailable sarking<br />
clips (if required)<br />
Figure 3b Insulation Over Rafters – Sarking Board/No Sarking Board<br />
Specification Clause<br />
Kingspan nilvent ® should be described in specifications as:–<br />
The <strong>breathable</strong> <strong>membrane</strong> shall be Kingspan nilvent ®<br />
comprising a laminated 3–layer polyolefin construction and<br />
shall be applied in accordance with the instructions issued by<br />
Kingspan Insulation Limited.<br />
Details also available in NBS PLUS.<br />
NBS users should refer to clauses:<br />
H21 130, H30 350, H31 280, P10 320<br />
(Standard and Intermediate)<br />
H21 20, H30 50, H31 55, P10 65<br />
(Minor Works)
Design Considerations<br />
Design <strong>for</strong> Horizontal Installation on a Continuous<br />
Substrate<br />
In these cases, the <strong>breathable</strong> sarking <strong>membrane</strong> is installed<br />
either under counter battens, which provide a channel <strong>for</strong> water<br />
drainage (figures 1a–1c), or in situations with a sarking board<br />
under a natural slate roof, directly under the slates (as neither<br />
tile battens nor counter battens are used) (figures 1d and 1e).<br />
The <strong>membrane</strong> is laid taut and joints between runs of<br />
<strong>membrane</strong> are sealed with tape, if required.<br />
Design <strong>for</strong> Vertical Installation on a Discontinuous<br />
Substrate<br />
Kingspan nilvent ® is installed in vertical runs, from eaves to<br />
eaves, in one length, under counter battens (see Figure 2a).<br />
Installed in this way there will be no laps along the length<br />
of a run and laps between runs can be <strong>for</strong>med over a rafter<br />
where counter–battens can secure them and make an airtight<br />
joint. The <strong>membrane</strong> should be laid taut with no valleys<br />
between rafters.<br />
NB it is theoretically possible to install the <strong>membrane</strong> vertically with a valley between rafters,<br />
however this adds no technical benefit, will prove cumbersome and has the disadvantage of<br />
allowing greater wind induced <strong>membrane</strong> movement (see section on ‘Wind Induced<br />
Membrane Movement’).<br />
Design <strong>for</strong> Horizontal Installation on a Discontinuous<br />
Substrate<br />
In situations where there is no continuous surface (see Figure<br />
3a–3c) the <strong>breathable</strong> sarking <strong>membrane</strong> can be draped over<br />
the rafters or counter battens to provide a channel <strong>for</strong> water<br />
drainage. There should be a minimum 10 mm gap between<br />
the <strong>membrane</strong> and the tile/slate batten to af<strong>for</strong>d a drainage<br />
channel <strong>for</strong> any penetrating rain. No counter–batten is required<br />
above the Kingspan nilvent ® as water can freely drain under<br />
the tile/slate battens.<br />
NB it is possible to have the <strong>membrane</strong> laid taut with counter battens above. This is not as<br />
practical and incurs the cost penalty of extra counter battens. It does, however, have the<br />
advantage of allowing reduced wind induced <strong>membrane</strong> movement (see section on ‘Wind<br />
Induced Membrane Movement’).<br />
In these situations, it may not be practical to seal the laps<br />
between the runs of Kingspan nilvent ® and the roof should<br />
be considered as being unsealed.<br />
General<br />
Kingspan nilvent ® meets all of the recommendations and<br />
requirements <strong>for</strong> underlays detailed in BS 5534: 2003 (Code of<br />
practice <strong>for</strong> slating and tiling (including shingles)) and NFRC<br />
Technical Bulletin 6.<br />
4<br />
Waterproofing<br />
If installed as per the instructions given in this document<br />
Kingspan nilvent ® will give a completely watertight structure<br />
under normal weather conditions. Kingspan nilvent ® is highly<br />
water resistant, and has the added advantage of self–sealing<br />
around nail penetrations. These properties mean that Kingspan<br />
nilvent ® can be safely used even in constructions with a large<br />
number of nail penetrations through the <strong>membrane</strong> e.g. where<br />
natural slates are nailed directly into a sarking board.<br />
Ventilation and Condensation Risk<br />
Most buildings contain air that is more humid than the air<br />
outside of that building. This humidity differential drives the<br />
moisture from the inside to the outside of a building’s structure.<br />
When the moisture is confronted with a relatively cold and<br />
impermeable layer it may condense. In <strong>pitched</strong> <strong>roofs</strong>, sarking<br />
felt can be such a layer.<br />
The traditional way of avoiding the risk of condensation in <strong>roofs</strong><br />
is to ventilate the moisture away by introducing airflow directly<br />
above the insulation layer and below the sarking felt. Modern<br />
remedies <strong>for</strong> <strong>roofs</strong> include the use of <strong>breathable</strong> <strong>membrane</strong>s to<br />
replace sarking felt.<br />
Breathable <strong>membrane</strong>s negate the need <strong>for</strong> ventilation directly<br />
above the insulation layer. They do this because they have a<br />
low vapour resistance, which allows water vapour to escape<br />
through the <strong>breathable</strong> <strong>membrane</strong> to the outside of the<br />
building. Recent studies have shown that ventilation directly<br />
above an insulation layer can reduce its thermal efficiency.<br />
BS 5250: 2002 (Code of practice <strong>for</strong> control of condensation<br />
in buildings) states that the vapour resistance of the<br />
<strong>breathable</strong> sarking <strong>membrane</strong> must not exceed 0.25 MN . s/g<br />
Kingspan nilvent ® has a vapour resistance of 0.17 MN . s/g.<br />
Any water vapour reaching Kingspan nilvent ® escapes<br />
through it without condensing.<br />
There must be adequate provision <strong>for</strong> vapour to disperse to<br />
atmosphere outside of Kingspan nilvent ® .<br />
For horizontal installation on a continuous substrate and <strong>for</strong><br />
vertical installation, Kingspan Insulation recommends the use<br />
of minimum 25 mm thick counter–battens, to create a suitable<br />
airspace above the <strong>breathable</strong> <strong>membrane</strong>. By keeping the<br />
tile/slate battens clear of Kingspan nilvent ® , counter–battens<br />
encourage air movement. They also allow the dust and debris<br />
from tiling and slating to slide down the slope and emerge at<br />
the eaves. The use of counter–battens also makes it easier to<br />
achieve interconnecting airspaces at interruptions to the main<br />
roof area – such as roof windows, chimneys, dormers, hips,<br />
and valleys.
For horizontal installation on a discontinuous substrate,<br />
counter battens are not necessary to provide air movement.<br />
As long as Kingspan nilvent ® is draped such that there is a<br />
minimum 10 mm gap between the <strong>membrane</strong> and the<br />
tile/slate batten, the void so created will be sufficient.<br />
With some roof coverings (e.g. pantiles, natural slates and<br />
cambered plain tiles), irregularities in their surfaces should allow<br />
sufficient natural ventilation to remove moisture from the space<br />
above the <strong>breathable</strong> <strong>membrane</strong>. With other roof coverings<br />
(e.g. sheet metal, interlocking tiles and artificial slates) provision<br />
of vents to encourage ventilation may be necessary.<br />
Natural slates nailed through Kingspan nilvent ® into a sarking<br />
board without counter battens or slate battens provide <strong>for</strong><br />
enough air movement to disperse vapour because of the gaps<br />
created by the irregularity of natural slates. Artificial slates may<br />
not be suitable <strong>for</strong> direct fixing to a sarking board because the<br />
regularity of their shape does not provide <strong>for</strong> enough air<br />
movement to disperse vapour. It may be necessary to put<br />
counterbattens and slate battens in place under artificial slates<br />
to provide an airspace <strong>for</strong> ventilation.<br />
Ventilation beneath the underlay is not required and should<br />
be avoided.<br />
Airtightness & Sealed vs. Unsealed Constructions<br />
As we drive <strong>for</strong> buildings with lower and lower U–values, in<br />
order to save on wasteful heat losses, the component of heat<br />
lost from a building directly through its fabric becomes less as<br />
a proportion of total heat lost. The proportion lost by<br />
accidental air–leakage becomes more significant. This<br />
air–leakage is not the same as deliberate ventilation. This<br />
accidental air–leakage into a roof can be lessened by sealing<br />
the roof construction to make it as airtight as possible.<br />
Recent research has proven that the sealed roof approach<br />
yields a more energy efficient roof as the impacts of incidental<br />
infiltrating cold air are negated. There<strong>for</strong>e, if creating an<br />
<strong>unventilated</strong> roof, it is preferable to fully seal all joints in the<br />
<strong>breathable</strong> sarking <strong>membrane</strong> with tape. 75 mm wide double<br />
sided acrylic adhesive tape should be used <strong>for</strong> sealing joints in<br />
Kingspan nilvent ® .<br />
However, there is limited point in carefully sealing a roof<br />
structure if the specified <strong>breathable</strong> <strong>membrane</strong> is not airtight.<br />
Kingspan nilvent ® is airtight, and has the added advantage of<br />
self–sealing around nail penetrations.<br />
The ideal is to install Kingspan nilvent ® in a manner<br />
that is practical and maximises the ability to achieve an<br />
airtight construction.<br />
5<br />
The use of horizontal runs of Kingspan nilvent ® is by far the<br />
most practical method of installation, however, it is difficult to<br />
achieve air–tightness unless the Kingspan nilvent ® is to be<br />
laid in this orientation onto a continuous surface (see Figures<br />
1a–1e). The taping of <strong>breathable</strong> <strong>membrane</strong> joints is<br />
considerably easier to achieve if this is the case.<br />
The use of vertical runs of Kingspan nilvent ® is not as<br />
practical a method of installation as horizontal runs, however,<br />
it is easy to achieve air–tightness as the laps between runs<br />
are sealed by the counter–battens that are installed over them<br />
(see Figure 2a).<br />
If the sealing of the roof is not deemed to be imperative,<br />
horizontal installation without sealing joints with tape will<br />
always be the most practical solution regardless of whether<br />
it is laid onto a continuous or discontinuous surface (see<br />
Figures 1a–1e and 3a–3c). However, it must be stressed that<br />
these roof configurations are not recommended on thermal<br />
efficiency grounds.<br />
Wind Induced Membrane Movement<br />
Wind blowing over a <strong>pitched</strong> roof generates positive and<br />
negative air pressures. A roof underlay is required to reduce<br />
the wind loading on the tiles/slates in order to stop them from<br />
becoming detached from the roof. These air pressures can<br />
cause underlays to move up and down. This effect is<br />
increased if the underlay is draped rather than installed taut.<br />
Tile/Slate Damage<br />
Under extreme conditions, if the <strong>membrane</strong> stretches as it<br />
moves up and down, it can knock against the tiles/slates and<br />
cause damage. The upward deflection of the underlay under<br />
maximum negative pressure must be small enough to avoid<br />
contact with the underside of the tiles/slates.<br />
Kingspan nilvent ® has mechanical properties sufficient to<br />
prevent this effect, given the wind uplift <strong>for</strong>ces prevalent in the<br />
UK and Ireland.<br />
Wind Noise<br />
Under extreme conditions, underlays can produce a noise<br />
irritating to occupants as it moves up and down. Kingspan<br />
nilvent ® is quiet under wind loading.<br />
Mansard Roofs/Walls<br />
Kingspan nilvent ® can be used <strong>for</strong> the construction of<br />
insulated tiled or slated mansard <strong>roofs</strong>/walls. Its application on<br />
such contracts is identical to the standard specification, which<br />
is given here.<br />
Fire Stops<br />
Current Building Regulations/Standards should be<br />
considered with regard to the requirements <strong>for</strong> and/or<br />
provision of fire stops.
Sitework<br />
Installation in a Horizontal Orientation on a<br />
Continuous Substrate<br />
Start installation at the eaves. Fit an eaves strip of a UV–<br />
resistant material to overhang the eaves/fascia by 50–60 mm.<br />
Lap the Kingspan nilvent ® logo–up over the eaves strip<br />
(if required), with the bottom edge of the Kingspan nilvent ®<br />
in line with the top of the fascia. Kingspan nilvent ® should<br />
be laid taut. Temporarily tack in place with clout nails and cut<br />
to length with a sharp bladed knife.<br />
The second run of Kingspan nilvent ® should lap over the top<br />
of the first by the distance shown in the table below.<br />
Kingspan nilvent ®<br />
lapped over eaves strip<br />
Eaves strip<br />
Rafter pitch (degrees) Minimum lap (mm)<br />
12.5 – 14 150<br />
15 – 34 100<br />
> 35 75<br />
The printed tramlines on the top surface of Kingspan nilvent ®<br />
indicate a distance of 150 mm. Use 75 mm wide double sided<br />
acrylic adhesive tape to seal horizontal laps between runs of<br />
Kingspan nilvent ® (unless otherwise specified).<br />
Figure 4a Eaves – Fully Supported Horizontal Installation<br />
6<br />
Vertical laps between lengths of Kingspan nilvent ® should be<br />
not less than 100 mm wide and be positioned so as to<br />
coincide with a rafter position. These laps will be secured and<br />
sealed by the later fixing of the counter battens. Avoid vertical<br />
laps over the same rafter position in successive runs of<br />
Kingspan nilvent ® .<br />
NB In constructions with a sarking board under a slated roof with no counter battens or slate<br />
battens, the vertical laps are taped with 75 mm wide double sided acrylic adhesive tape and<br />
tacked in place with staples or clout nails.<br />
Continue installation up the roof in the same manner to the<br />
ridge. Install counter–battens (min. 25 mm deep) and tile/slate<br />
battens in the usual manner as proves necessary to fully fix the<br />
Kingspan nilvent ® in place and to provide a support <strong>for</strong><br />
moving up the roof.<br />
Lap over the ridge by not less than 150 mm each side (total<br />
overlap of 300 mm).<br />
Complete the installation of counter–battens and tile/slate<br />
battens over the whole area installed.<br />
NB In constructions with a sarking board under a slated roof with no counter battens or slate<br />
battens, Kingspan nilvent ® is laid over the whole roof using roof ladders or similar <strong>for</strong> access<br />
prior to slating.<br />
Horizontal lap joint taped unless<br />
otherwise specified<br />
Continuous substrate i.e. sarking<br />
board, insulation over rafters or<br />
insulation between rafters and rafters<br />
Line of rafter Kingspan nilvent ®<br />
Second run of Kingspan nilvent ® Vertical lap not less than 100 mm wide<br />
and positioned over a rafter<br />
lapping<br />
over first by 150/100/75 mm (min)<br />
laid taut in horizontal runs
Kingspan nilvent ®<br />
lapped over eaves strip<br />
Eaves strip<br />
Line of rafter<br />
Figure 4c Ridge – Fully Supported Horizontal Installation<br />
Kingspan nilvent ®<br />
laid taut in horizontal runs<br />
Figure 4b Eaves – Fully Supported Horizontal Installation with Natural Slates<br />
Line of rafter<br />
Line of rafter<br />
Figure 4d Ridge – Fully Supported Horizontal Installation with Natural Slates<br />
7<br />
Vertical lap not less than 100<br />
mm wide and positioned over<br />
a rafter. Lap is taped.<br />
Second run of Kingspan<br />
nilvent ® lapping over first by<br />
150/100/75 mm (min)<br />
Horizontal lap joint taped<br />
unless otherwise specified<br />
Sarking board <strong>for</strong>ming<br />
continuous substrate<br />
Kingspan nilvent ® lapped over<br />
ridge by 150 mm (min)<br />
Continuous substrate i.e.<br />
sarking board, insulation over<br />
rafters or insulation between<br />
rafters and rafters<br />
Kingspan nilvent ®<br />
laid taut in horizontal runs<br />
Kingspan nilvent ® lapped over<br />
ridge by 150 mm (min)<br />
Sarking board <strong>for</strong>ming<br />
continuous substrate<br />
Kingspan nilvent ®<br />
laid taut in horizontal runs
Installation in a Vertical Orientation on a<br />
Discontinuous Substrate<br />
For ease of installation, thread a wood or metal bar through<br />
the core of the Kingspan nilvent ® roll and set it on bearers on<br />
the scaffold plat<strong>for</strong>m. The leading edge of the Kingspan<br />
nilvent ® can then be taken up and over the ridge and down<br />
to the opposite eaves.<br />
Fit an eaves strip of a UV–resistant material to overhang the<br />
eaves/fascia by 50–60 mm. Lap the Kingspan nilvent ®<br />
logo–up over the eaves strip (if required), with the bottom edge<br />
of the Kingspan nilvent ® in line with the top of the fascia.<br />
Kingspan nilvent ® should be laid such that it is taut in both<br />
horizontal and vertical directions. Each run of Kingspan<br />
nilvent ® should be installed in a single piece from eaves to<br />
eaves. Temporarily tack in place with staples or clout nails, cut<br />
to length with a sharp bladed knife, move sideways and repeat<br />
the process.<br />
Kingspan nilvent ®<br />
laid taut in vertical runs<br />
Kingspan nilvent ®<br />
laid over eaves strip<br />
Eaves strip<br />
Line of rafter<br />
Figure 5a Eaves – Vertical Installation<br />
Line of rafter<br />
Kingspan nilvent ® laid taut in vertical runs<br />
Figure 5b Ridge – Vertical Installation<br />
8<br />
The second run of Kingspan nilvent ® should lap over the first<br />
be not less than 100 mm and be positioned so as to coincide<br />
with a rafter position. The printed tramlines on the top surface<br />
of Kingspan nilvent ® indicate a distance of 150 mm.<br />
These laps should be secured and sealed by the fixing of<br />
counter–battens (min. 25 mm deep) as work progresses<br />
across the roof. Counter battens should be fixed at a maximum<br />
of 300 mm centres.<br />
Continue installation across the roof in the same manner, then<br />
install tile/slate battens over the whole area installed.<br />
NB Kingspan nilvent ® can be laid in a vertical orientation with a drape. However, counter<br />
battens will still be required to give an effective seal. If sealing of the roof is not required and<br />
counter battens are not specified, it will prove a lot easier to install Kingspan nilvent ®<br />
horizontally with a drape.<br />
Vertical lap not less than 100 mm wide<br />
and positioned over a rafter<br />
Rafters <strong>for</strong>ming a<br />
discontinuous substrate<br />
Single run of Kingspan nilvent ® taken<br />
from eaves to eaves over ridge<br />
Rafters <strong>for</strong>ming a<br />
discontinuous substrate
Installation in a Horizontal Orientation on a<br />
Discontinuous Substrate<br />
Start installation at the eaves. Fit an eaves strip of a UV–resistant<br />
material to overhang the eaves/fascia by 50–60 mm. Lap the<br />
Kingspan nilvent ® logo–up over the eaves strip (if required),<br />
with the bottom edge of the Kingspan nilvent ® in line with the<br />
top of the fascia. Kingspan nilvent ® and the eaves strip should<br />
be laid in such a manner as to create a valley between rafters<br />
(Figure 3a) or counter battens (Figures 3b–3c) to allow water<br />
drainage. Temporarily tack in place with staples or clout nails<br />
and cut to length with a sharp bladed knife.<br />
The second run of Kingspan nilvent ® should lap over the top<br />
of the first by the distance shown in the table below.<br />
Rafter pitch (degrees) Minimum lap (mm)<br />
12.5 – 14 225<br />
15 – 34 150<br />
> 35 100<br />
The printed tramlines on the top surface of Kingspan nilvent ®<br />
indicate a distance of 150 mm.<br />
Kingspan nilvent ® draped over<br />
timbers in horizontal runs<br />
Kingspan nilvent ®<br />
lapped over eaves strip<br />
Eaves strip<br />
Line of rafter<br />
Figure 6a Eaves – Draped Horizontal Installation<br />
Line of rafter<br />
Kingspan nilvent ® draped over<br />
timbers in horizontal runs<br />
Figure 6b Ridge – Draped horizontal installation<br />
9<br />
It may not be practical to attempt to seal the laps between the<br />
runs of Kingspan nilvent ® .<br />
Vertical laps between lengths of Kingspan nilvent ® should be<br />
not less than 100 mm wide and be positioned so as to coincide<br />
with a rafter or counter–batten position. These laps will be<br />
secured and sealed by the later fixing of the tile/slate battens.<br />
Avoid vertical laps over the same rafter or counter–batten<br />
position in successive runs of Kingspan nilvent ® .<br />
Continue installation up the roof in the same manner to the<br />
ridge. Install tile/slate battens in the usual manner as proves<br />
necessary to fully fix the Kingspan nilvent ® in place and to<br />
provide a support <strong>for</strong> moving up the roof.<br />
Lap over the ridge by not less than 150 mm each side (total<br />
over lap of 300 mm).<br />
Complete the installation of tile/slate battens over the whole<br />
area installed.<br />
NB Kingspan nilvent ® can be laid taut without draping on a discontinuous substrate.<br />
In which case, install as in the method (shown on page 6) <strong>for</strong> horizontal installation on a<br />
continuous substrate. Effective taping of joints will prove extremely difficult.<br />
Rafters/counter battens <strong>for</strong>ming a<br />
discontinuous substrate<br />
Vertical lap not less than 100 mm<br />
wide and positioned over a rafter<br />
Second run of Kingspan nilvent ®<br />
lapping over first by 225/150/100<br />
mm (depending on pitch)<br />
Horizontal lap joint<br />
Rafters/counter battens <strong>for</strong>ming a<br />
discontinuous substrate<br />
Kingspan nilvent ® lapped over<br />
ridge by 150 mm (min)
Abutments<br />
At any abutment, chimney stack or similar roof penetration,<br />
apply 1.5 mm butyl rubber tape (e.g. glazing tape) to the<br />
abutment. Turn up the Kingspan nilvent ® at least 50 mm<br />
under the flashing and secure it with a counter batten/tiling<br />
batten pressed firmly against the abutment and fixed to the<br />
end rafter or trimmer.<br />
In constructions with a sarking board under a slated roof with<br />
no counter battens or slate battens, the above method is<br />
followed without the batten to secure the <strong>membrane</strong>.<br />
Kingspan nilvent ® turned<br />
up by 50 mm (min.)<br />
1.5 mm butyl rubber<br />
tape e.g. glazing tape<br />
Figure 7a Abutments – Fully Supported Horizontal Installation Figure 7b Abutments – Fully Supported Horizontal Installation with<br />
Natural Slates<br />
Kingspan nilvent ® turned<br />
up by 50 mm (min.)<br />
1.5 mm butyl rubber tape<br />
e.g. glazing tape<br />
Flashing<br />
Line of rafter<br />
Figure 7c Abutments – Vertical Installation<br />
Line of rafter Kingspan nilvent ®<br />
Flashing<br />
Continuous substrate i.e. sarking<br />
board, insulation over rafters or<br />
insulation between rafters and rafters<br />
laid taut in horizontal runs<br />
Kingspan nilvent ®<br />
laid taut in vertical runs<br />
Rafter <strong>for</strong>ming<br />
discontinuous substrate<br />
10<br />
Kingspan nilvent ® turned<br />
up by 50 mm (min.)<br />
1.5 mm butyl rubber tape<br />
e.g. glazing tape<br />
Kingspan nilvent ® turned<br />
up by 50 mm (min.)<br />
1.5 mm butyl rubber tape<br />
e.g. glazing tape<br />
Flashing<br />
Kingspan nilvent ®<br />
laid taut in horizontal runs<br />
Flashing<br />
Line of rafter<br />
Figure 7d Abutments – Draped Horizontal Installation<br />
Sarking board <strong>for</strong>ming a<br />
continuous substrate<br />
Line of rafter<br />
Kingspan nilvent ®<br />
laid taut in vertical runs<br />
Rafter <strong>for</strong>ming<br />
discontinuous substrate
Verges<br />
Extend the Kingspan nilvent ® across the gable wall and<br />
overhang. Turn it up at least 50 mm behind the fascia board<br />
be<strong>for</strong>e fixing with a batten to the flying rafter.<br />
Where no counter battens are used, extend the Kingspan<br />
nilvent ® across the gable wall and overhang, and extend it<br />
to fully cover the undercloak.<br />
Kingspan nilvent ® laid<br />
taut in horizontal runs<br />
Line of rafter<br />
Continuous substrate i.e.<br />
sarking board, insulation over<br />
rafters or insulation between<br />
rafters and rafters.<br />
Figure 8a Verges – Fully Supported Horizontal Installation<br />
Kingspan nilvent ® laid<br />
taut in vertical runs<br />
Line of rafter<br />
Rafter <strong>for</strong>ming discontinuous<br />
substrate<br />
Flying rafter<br />
Figure 8c Verges – Vertical Installation<br />
Fascia board<br />
Mortar infill<br />
Undercloak<br />
Kingspan nilvent ®<br />
turned up by 50 mm (min.)<br />
Fascia board<br />
Mortar infill<br />
Undercloak<br />
Flying rafter<br />
Kingspan nilvent ® turned<br />
up by 50 mm (min.)<br />
11<br />
Line of rafter<br />
Sarking board<br />
<strong>for</strong>ming<br />
continuous<br />
substrate<br />
Kingspan nilvent ® laid<br />
taut in horizontal runs<br />
Kingspan nilvent ® fully<br />
covering the undercloak<br />
Fascia board<br />
Flying rafter<br />
Figure 8b Verges – Fully Supported Horizontal Installation with<br />
Natural Slates<br />
Kingspan nilvent ® draped over<br />
timbers in horizontal runs<br />
Line of rafter<br />
Rafter/counter battens <strong>for</strong>ming<br />
discontinuous substrate<br />
Kingspan nilvent ® fully<br />
covering the undercloak<br />
Figure 8d Verges – Draped Horizontal Installation<br />
Fascia board<br />
Mortar infill<br />
Mortar infill<br />
Flying rafter
Hips<br />
Fit the Kingspan nilvent ® to the hipped end of the roof be<strong>for</strong>e<br />
covering the main roof area.<br />
Pull the Kingspan nilvent ® over the hip rafter and trim off the<br />
surplus, leaving at least 150 mm overlap. Secure in the same<br />
manner as <strong>for</strong> the main roof area. Once the hipped end is<br />
covered, move round and lay Kingspan nilvent ® on the main<br />
roof area. Fold over hip rafters and trim off surplus material.<br />
Line of rafter<br />
Kingspan nilvent ® laid<br />
taut in horizontal runs<br />
Figure 9a Hips – Fully Supported Horizontal Installation Figure 9b Hips – Fully Supported Horizontal Installation with<br />
Natural Slates<br />
Line of rafter<br />
Rafters <strong>for</strong>ming<br />
discontinuous substrate<br />
Figure 9c Hips – Vertical Installation<br />
150 mm (min.) overlap 150 mm (min.) overlap<br />
Continuous substrate i.e. sarking<br />
board, insulation over rafters or<br />
insulation between rafters and rafters<br />
Kingspan nilvent ®<br />
laid taut in vertical runs<br />
12<br />
Line of rafter<br />
Kingspan nilvent ® laid<br />
taut in horizontal runs<br />
Rafters/counter battens<br />
<strong>for</strong>ming a discontinuous<br />
substrate<br />
Figure 9d Hips – Draped Horizontal Installation<br />
Sarking board <strong>for</strong>ming<br />
continuous substrate<br />
150 mm (min.) overlap 150 mm (min.) overlap<br />
Line of rafter<br />
Kingspan nilvent ® draped over<br />
timbers in horizontal runs
Valleys<br />
Lay the Kingspan nilvent ® along the main roof area until you<br />
reach the valley. Fold the Kingspan nilvent ® into the valley.<br />
Trim off surplus leaving not less than 300 mm of material beyond<br />
the centre line of the valley. Laid in this way there is no need to<br />
apply a separate strip of Kingspan nilvent ® in the valley.<br />
Cut counter–battens (if required) short of the valley to<br />
encourage air movement and allow run–off of any water<br />
penetrating the tiles/slates.<br />
Kingspan nilvent ® <strong>for</strong>ms an excellent underlay beneath zinc,<br />
lead or GRP valley gutter liners.<br />
Kingspan nilvent ®<br />
horizontal lapping over by<br />
150/100/75 mm (min.)<br />
Kingspan nilvent ®<br />
to extend 300 mm (min.)<br />
beyond valley centre line<br />
Counter battens cut short of<br />
valley to encourage air<br />
movement and allow run–off<br />
Line of rafter<br />
Kingspan nilvent ® laid taut<br />
in horizontal runs<br />
Continuous substrate i.e. sarking<br />
board, insulation over rafters or<br />
insulation between rafters and rafters<br />
Figure 10a Valleys – Fully Supported Horizontal Installation<br />
Kingspan nilvent ® to extend<br />
300 mm (min.) beyond valley<br />
centre line<br />
Kingspan nilvent ® vertical lapping over<br />
rafters by 100 mm (min.)<br />
Rafters <strong>for</strong>ming a<br />
discontinuous substrate<br />
Kingspan nilvent ®<br />
laid taut in vertical runs<br />
Figure 10c Valleys – Vertical Installation<br />
Counter battens cut short of<br />
valley to encourage air<br />
movement and allow run–off<br />
13<br />
Line of rafter<br />
Kingspan nilvent ®<br />
horizontal lapping over by<br />
150/100/75 mm (min.)<br />
Figure 10b Valleys – Fully Supported Horizontal Installation with<br />
Natural Slates<br />
Kingspan nilvent ®<br />
horizontal lapping over by<br />
225/150/100 mm (min.)<br />
Kingspan nilvent ® to extend<br />
300 mm (min.) beyond valley<br />
centre line<br />
Figure 10d Valleys – Draped Horizontal Installation<br />
Kingspan nilvent ® laid<br />
taut in horizontal runs<br />
Sarking board <strong>for</strong>ming<br />
continuous substrate<br />
Kingspan nilvent ® draped over<br />
timbers in horizontal runs<br />
Kingspan nilvent Rafters/counterbattens <strong>for</strong>ming a<br />
discontinuous substrate<br />
®<br />
Line of rafter Line of rafter<br />
to extend 300 mm (min.)<br />
beyond valley centre line
Rooflights<br />
Please refer to the instructions provided by the rooflight<br />
manufacturer. In the absence of manufacturer’s in<strong>for</strong>mation, cut<br />
and fit Kingspan nilvent ® neatly around the rooflight kerb with<br />
a aluminium upstand of 50 mm. Seal the underlay to the kerb<br />
all round using 1.5 mm butyl rubber tape (e.g. glazing tape).<br />
Pipe Penetrations<br />
All pipe penetrations, Kingspan nilvent ® is star cut and<br />
dressed up the side of the penetrations. Use tape to seal the<br />
Kingspan nilvent ® around the pipe.<br />
Damage Repair<br />
Whilst Kingspan nilvent ® is strong and durable in normal use,<br />
it may be damaged by careless handling. The risk of damage<br />
may be increased if Kingspan nilvent ® is left uncovered on<br />
the roof <strong>for</strong> longer than is necessary. Any repairs are normally<br />
carried out with self–adhesive tape be<strong>for</strong>e installation of the<br />
outer leaf.<br />
Slating and Tiling<br />
It is often necessary <strong>for</strong> the roof underlay to act as a temporary<br />
roof covering be<strong>for</strong>e tiles or slates are installed. Kingspan<br />
nilvent ® is UV resistant and can be safely exposed on site <strong>for</strong><br />
a period not exceeding 4 months.<br />
Slating and tiling over Kingspan nilvent ® is exactly the same<br />
as on any other <strong>pitched</strong> roof except that in some instances the<br />
slate/tile battens (if required) are fixed to the previously applied<br />
counter–battens.<br />
Cutting<br />
Cutting should be carried out using a sharp bladed knife.<br />
Availability<br />
Kingspan nilvent ® is available through specialist insulation<br />
distributors and selected merchants throughout the UK and<br />
Ireland.<br />
Packaging<br />
Rolls are delivered to site individually wrapped in polythene.<br />
Each roll contains a label bearing the company name, address<br />
and telephone number, and fixing instructions.<br />
Storage<br />
The packaging of Kingspan nilvent ® should not be<br />
considered adequate <strong>for</strong> long term outside protection. Ideally<br />
rolls should be stored inside a building. If however, outside<br />
storage cannot be avoided the rolls should be stored on their<br />
sides on a clean dry surface and protected from sunlight.<br />
Health and Safety<br />
Kingspan nilvent ® is chemically inert and safe to use. A leaflet<br />
on this topic which satisfies the requirements set out in the<br />
Control of Substances Hazardous to Health Regulations 1988<br />
(COSHH) is available from the Kingspan Insulation Marketing<br />
Department (see rear cover).<br />
Please note that the white upper surface on this product is designed to enhance its<br />
per<strong>for</strong>mance. This surface will reflect light, including ultraviolet light. There<strong>for</strong>e, if this<br />
<strong>membrane</strong> is being installed during very bright or sunny weather, it is advisable to wear UV<br />
protective sunglasses or goggles, and if the skin is exposed <strong>for</strong> a significant period of time, to<br />
protect the bare skin with a UV block sun cream.<br />
Warning – do not stand on or otherwise support your weight on this <strong>membrane</strong> unless it is<br />
fully supported by a load–bearing surface.<br />
14<br />
Product Description<br />
Composition<br />
Kingspan nilvent ® comprises a laminated, 3–layer polyolefin<br />
construction. The top layer provides protection from UV and<br />
mechanical damage. The middle layer is the functional layer.<br />
The bottom layer provides abrasion resistance. Kingspan<br />
nilvent ® has a light grey upper surface printed with the<br />
Kingspan nilvent ® logo, and a charcoal grey lower<br />
surface. Kingspan nilvent ® is manufactured without<br />
the use of CFCs/HCFCs and has zero Ozone<br />
Depletion Potential (ODP).<br />
Product Data<br />
Standards and Approvals<br />
Kingspan nilvent ® is manufactured to the highest standards<br />
under a quality control system approved to EN ISO 9001:<br />
1994 (Quality systems. Model <strong>for</strong> quality assurance in<br />
production, installation and servicing). Its use is covered by<br />
BBA Certificate 04/4161.<br />
BBA BRITISH<br />
BOARD OF<br />
AGRÉMENT<br />
CERTIFICATE 04/4161<br />
EN ISO 9001 : 1994<br />
Standard Dimensions<br />
Kingspan nilvent ® is available in the following dimensions:<br />
Nominal Dimension Availability<br />
Roll Length (m) 50<br />
Roll Width (m) 1.5<br />
Thickness (mm) 0.50<br />
Area per Roll (m 2 ) 75<br />
Weight (kg/m 2 ) 0.13<br />
Weight per Roll (kg) 11.25<br />
Water Vapour Resistance<br />
Kingspan nilvent ® achieves a resistance of 0.17 MN . s/g<br />
when tested in accordance with BS 3177: 1959 (1995)<br />
(Method <strong>for</strong> determining the permeability to water vapour of<br />
flexible sheet materials used <strong>for</strong> packaging).<br />
Liquid Water Penetration Resistance<br />
Kingspan nilvent ® achieves a resistance of > 2 m when<br />
tested in accordance with BS EN 20811: 1992 (1996) (Textiles.<br />
Determination of resistance to water penetration. Hydrostatic<br />
pressure test).<br />
Kingspan nilvent ® is non–tenting and can be fully or<br />
partially supported.
Air Permeability<br />
Kingspan nilvent ® is airtight when tested of normal building<br />
pressures in accordance with ISO 5636–3: 1992/BS 6538–2:<br />
1992 (Method <strong>for</strong> determination of air permeance using the<br />
Bendtsen apparatus).<br />
Tensile Strength<br />
Kingspan nilvent ® achieves an unaged tensile strength of 300<br />
N/50mm in the longitudinal direction and 196 N/50mm in the<br />
transverse direction. It also achieves an aged tensile strength<br />
of 148 N/50mm in the longitudinal direction and 111 N/50mm<br />
in the transverse direction when tested in accordance with BS<br />
EN 12311–1: 2000 (Flexible sheets <strong>for</strong> waterproofing.<br />
Determination of tensile properties. Bitumen sheets <strong>for</strong> roof<br />
waterproofing).<br />
Nail Tear Strength<br />
Kingspan nilvent ® achieves a nail tear strength of 224 N in<br />
the longitudinal direction and 292 N in the transverse direction<br />
when tested in accordance with BS EN 12310–1: 2000<br />
(Flexible sheets <strong>for</strong> waterproofing. Determination of resistance<br />
to tearing (nail shank). Bitumen sheets <strong>for</strong> roof waterproofing).<br />
Mullen Burst Strength<br />
Kingspan nilvent ® achieves a mullen burst strength of<br />
570 kN/m 2 when tested in accordance with BS 3137: 1972<br />
(1995) (Methods <strong>for</strong> determining the bursting strength of<br />
paper and board).<br />
Coefficient of Dynamic Friction<br />
Kingspan nilvent ® achieves a coefficient of dynamic friction<br />
of 0.67 F in a longitudinal direction and 0.69 F in a transverse<br />
direction when wet. It also achieves a coefficient of dynamic<br />
friction of 0.92 F in a longitudinal direction and 0.90 F in a<br />
transverse direction when dry when tested in accordance with<br />
BBA test method TI/10.<br />
UV/Heat Ageing<br />
Kingspan nilvent ® achieves class A (the highest per<strong>for</strong>mance)<br />
when tested in accordance with prEN 13859–1(Flexible sheets<br />
<strong>for</strong> waterproofing – Definitions and characteristics of underlays<br />
– Part 1: Underlays <strong>for</strong> discontinuous roofing).<br />
This result means that Kingspan nilvent ® maintains adequate<br />
functional per<strong>for</strong>mance after continuous exposure to UV light<br />
at 50–53°C <strong>for</strong> 336 hours and then continuous exposure to a<br />
temperature of 70°C <strong>for</strong> 90 days.<br />
Kingspan nilvent ® can be left exposed on a roof <strong>for</strong> a period<br />
of up to 4 months.<br />
15<br />
Wind Noise Sensitivity<br />
Kingspan nilvent ® is quiet when exposed to the wind uplift<br />
<strong>for</strong>ces prevalent in the UK and Ireland.<br />
Guarantee/Durability<br />
If installed according to the instructions given in this document,<br />
Kingspan nilvent ® is guaranteed fit <strong>for</strong> purpose <strong>for</strong> the service<br />
life of the roof covering.<br />
Disposal<br />
Kingspan nilvent ® can be disposed of at end of life in a<br />
conventional manner. It does not contain any toxic components.<br />
Resistance to Solvents, Fungi & Rodents<br />
Kingspan nilvent ® resists attack by mould and fungus growth<br />
and will not encourage insect attack.<br />
Kingspan nilvent ® is resistant to most organic and inorganic<br />
chemicals including acids, alkalis and salts. Direct contact with<br />
wet solvents causes temporary expansion and a slight loss of<br />
physical properties. Kingspan nilvent ® is not affected by<br />
timber preservatives and treatments traditionally used in the<br />
UK and Ireland to protect timber from rotting, even when they<br />
are not fully dried out.<br />
Fire Per<strong>for</strong>mance<br />
Kingspan nilvent ® melts and shrinks away from heat but will<br />
burn in the presence of an ignition source.<br />
The use of Kingspan nilvent ® does not affect the fire rating of<br />
a roof construction. Kingspan nilvent ® , when subjected to fire<br />
tests, achieves the results given below. Further details of the fire<br />
per<strong>for</strong>mance of Kingspan Insulation products may be obtained<br />
from our Technical Services Department (see rear cover).<br />
Test Result<br />
DIN 4102: 1981 B2<br />
Limiting Temperatures<br />
Kingspan nilvent ® retains its strength and flexibility at<br />
temperatures down to –73°C. Kingspan nilvent ® will per<strong>for</strong>m<br />
satisfactorily at temperatures up to 100°C.
Contact Details<br />
Customer Service<br />
For quotations, order placement and details of despatches please<br />
contact the Kingspan Insulation Customer Services Department on<br />
the numbers below:<br />
UK – Telephone: +44 (0) 870 850 8555<br />
– Fax: +44 (0) 870 850 8666<br />
– email: commercial.uk@insulation.kingspan.com<br />
Ireland – Telephone: +353 (0) 42 97 95000<br />
– Fax: +353 (0) 42 97 46129<br />
– email: commercial.ie@insulation.kingspan.com<br />
Literature & Samples<br />
Kingspan Insulation produce a comprehensive range of technical<br />
literature <strong>for</strong> specifiers, contractors, stockists and end users.<br />
The literature contains clear ‘user friendly’ advice on typical<br />
design; design considerations; thermal properties; sitework<br />
and product data.<br />
Available as a complete Design Manual or as individual product<br />
brochures, Kingspan Insulation technical literature is an essential<br />
specification tool. For copies please contact the Kingspan<br />
Insulation Marketing Department on the numbers below:<br />
UK – Telephone: +44 (0) 870 733 8333<br />
– Fax: +44 (0) 1544 387 299<br />
– email: literature.uk@insulation.kingspan.com<br />
Ireland – Telephone: +353 (0) 42 97 95038<br />
– Fax: +353 (0) 42 97 46129<br />
– email: literature.ie@insulation.kingspan.com<br />
Tapered Roofing<br />
For technical guidance, quotations, order placement and<br />
details of despatches please contact the Kingspan Insulation<br />
Tapered Roofing Department on the numbers below:<br />
UK – Telephone: +44 (0) 870 761 7770<br />
– Fax: +44 (0) 1544 387 289<br />
– email: tapered.uk@insulation.kingspan.com<br />
Ireland – Telephone: +353 (0) 42 97 95032<br />
– Fax: +353 (0) 42 97 95669<br />
– email: tapered.ie@insulation.kingspan.com<br />
Technical Advice/Design<br />
Kingspan Insulation Ltd support all of their products with a<br />
comprehensive Technical Advisory Service <strong>for</strong> specifiers, stockists<br />
and contractors.<br />
This includes a computer–aided service designed to give fast,<br />
accurate technical advice. Simply phone the Kingspan Insulation<br />
with your project specification. Calculations<br />
can be carried out to provide U–values, condensation/dew point<br />
risk, required insulation thicknesses etc… Thereafter any number<br />
of permutations can be provided to help you achieve your<br />
desired targets.<br />
The Kingspan Insulation Technical Services Department can also<br />
give general application advice and advice on design detailing and<br />
fixing etc... Site surveys are also undertaken as appropriate.<br />
Please contact the Kingspan Insulation Building Fabric Insulation<br />
Technical Services Department on the numbers<br />
below:<br />
UK – Telephone: +44 (0) 870 850 8333<br />
– Fax: +44 (0) 1544 387 278<br />
– email: techline.uk@insulation.kingspan.com<br />
Ireland – Telephone: +353 (0) 42 97 95032<br />
– Fax: +353 (0) 42 97 95669<br />
– email: techline.ie@insulation.kingspan.com<br />
General Enquiries<br />
Kingspan Insulation Ltd<br />
Pembridge, Leominster, Here<strong>for</strong>dshire HR6 9LA, UK<br />
Castleblayney, County Monaghan, Ireland<br />
www.insulation.kingspan.com<br />
For all other enquiries contact Kingspan Insulation on the<br />
numbers below:<br />
UK – Telephone: +44 (0) 870 850 8555<br />
– Fax: +44 (0) 870 850 8666<br />
– email: info.uk@insulation.kingspan.com<br />
Ireland – Telephone: +353 (0) 42 97 95000<br />
– Fax: +353 (0) 42 97 46129<br />
– email: info.ie@insulation.kingspan.com<br />
Kingspan Insulation reserve the right to amend product specifications without prior notice.<br />
Product thicknesses shown in this document should not be taken as being available ex-stock<br />
and reference should be made to the current Kingspan Insulation price-list or advice sought<br />
from Kingspan Insulation Sales Department. The in<strong>for</strong>mation, technical details and fixing<br />
instructions etc. included in this literature are given in good faith and apply to uses described.<br />
Recommendations <strong>for</strong> use should be verified as to the suitability and compliance with actual<br />
requirements, specifications and any applicable laws and regulations. For other applications or<br />
conditions of use, Kingspan Insulation offers a Technical Advisory Service (see left) whose<br />
advice should be sought <strong>for</strong> uses of Kingspan Insulation products that are not specifically<br />
described herein. Please check that your copy of the literature is current by contacting the<br />
Kingspan Insulation Marketing Department (see above).<br />
® Kingspan, Kooltherm, <strong>Nilvent</strong>, the zo Device and the Lion Device are Registered Trademarks of the Kingspan Group plc