

How to create an email template - SiteProxy Welcome Page
How to create an email template - SiteProxy Welcome Page
How to create an email template - SiteProxy Welcome Page

You also want an ePaper? Increase the reach of your titles
YUMPU automatically turns print PDFs into web optimized ePapers that Google loves.
<strong>How</strong> <strong>to</strong> <strong>create</strong> <strong>an</strong> <strong>email</strong> <strong>template</strong><br />
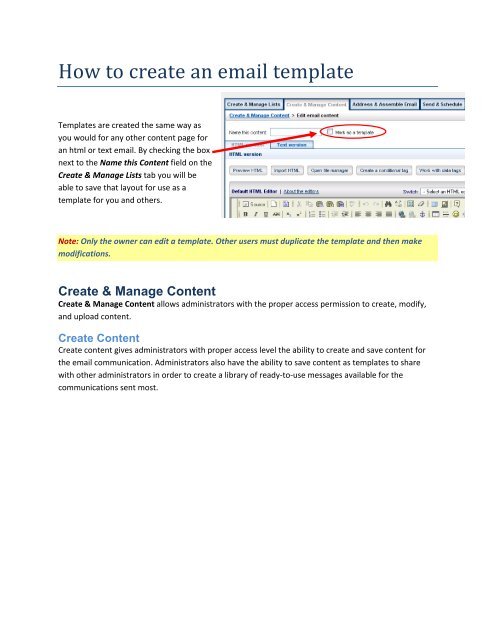
Templates are <strong>create</strong>d the same way as<br />
you would for <strong>an</strong>y other content page for<br />
<strong>an</strong> html or text <strong>email</strong>. By checking the box<br />
next <strong>to</strong> the Name this Content field on the<br />
Create & M<strong>an</strong>age Lists tab you will be<br />
able <strong>to</strong> save that layout for use as a<br />
<strong>template</strong> for you <strong>an</strong>d others.<br />
Note: Only the owner c<strong>an</strong> edit a <strong>template</strong>. Other users must duplicate the <strong>template</strong> <strong>an</strong>d then make<br />
modifications.<br />
Create & M<strong>an</strong>age Content<br />
Create & M<strong>an</strong>age Content allows administra<strong>to</strong>rs with the proper access permission <strong>to</strong> <strong>create</strong>, modify,<br />
<strong>an</strong>d upload content.<br />
Create Content<br />
Create content gives administra<strong>to</strong>rs with proper access level the ability <strong>to</strong> <strong>create</strong> <strong>an</strong>d save content for<br />
the <strong>email</strong> communication. Administra<strong>to</strong>rs also have the ability <strong>to</strong> save content as <strong>template</strong>s <strong>to</strong> share<br />
with other administra<strong>to</strong>rs in order <strong>to</strong> <strong>create</strong> a library of ready‐<strong>to</strong>‐use messages available for the<br />
communications sent most.
<strong>How</strong> <strong>to</strong> <strong>create</strong> content:<br />
1. Login <strong>to</strong> the Harris Tool.<br />
2. Click the Email Marketing link in the<br />
left navigation bar.<br />
3. Select the Create & M<strong>an</strong>age<br />
Content tab. The Create & M<strong>an</strong>age<br />
Content page will display.<br />
4. Click the Create content but<strong>to</strong>n (<br />
). The Edit <strong>email</strong><br />
content page will display. See figure<br />
1.<br />
5. Enter the content name.<br />
6. To mark this content for others,<br />
check the Mark as a <strong>template</strong> box.<br />
7. Enter HTML Content.<br />
8. Enter Text Content.<br />
9. Click Save content or C<strong>an</strong>cel <strong>to</strong><br />
abort. The Create & M<strong>an</strong>age<br />
Content page will display with the<br />
newly saved content at the <strong>to</strong>p of<br />
the list.<br />
Figure 1<br />
WYSIWYG HTML Edi<strong>to</strong>rs<br />
WYSIWYG HTML edi<strong>to</strong>rs provide <strong>an</strong> editing interface, which resembles how the HTML content will be<br />
displayed in the recipients <strong>email</strong> client. WYSIWYG st<strong>an</strong>ds for What You See Is What You Get. Because<br />
WYSIWYG edi<strong>to</strong>rs do not require the user <strong>to</strong> have <strong>an</strong>y HTML knowledge, they are easier for <strong>an</strong> average<br />
computer user <strong>to</strong> get started with.<br />
Simple Edi<strong>to</strong>r<br />
Email Marketing also offers a Simple edi<strong>to</strong>r, which is essentially <strong>an</strong> open text box that accepts HTML<br />
tags. This edi<strong>to</strong>r requires the user <strong>to</strong> have <strong>an</strong> underst<strong>an</strong>ding of HTML <strong>an</strong>d <strong>an</strong>y other web technologies<br />
they wish <strong>to</strong> use, such as CSS.
Data Tags<br />
Data Tags allow administra<strong>to</strong>rs <strong>to</strong> display data from the database within the <strong>email</strong> message.<br />
For example, you c<strong>an</strong> include the member's first<br />
<strong>an</strong>d last name in the salutation: Dear Natasha<br />
Spivey. In addition, you c<strong>an</strong> use these tags <strong>to</strong><br />
include deep links directly in<strong>to</strong> the registration<br />
process (Registration Link), the online direc<strong>to</strong>ry<br />
update process (Update Link) or the web‐based<br />
opt‐out process (Unsubscribe Link).<br />
• Class Note Link – Inserts a link <strong>to</strong> the Class<br />
Notes page of the Online Community.<br />
• Class Notes date r<strong>an</strong>ge – Inserts most recent<br />
5 Class Notes submitted between J<strong>an</strong>. 1, 1990<br />
<strong>to</strong> J<strong>an</strong>. 1, 2020. Administra<strong>to</strong>rs may edit the<br />
number of Class Notes <strong>an</strong>d the date r<strong>an</strong>ge.<br />
• Class Notes last #n – Inserts the last 5 Class<br />
Notes submitted. Administra<strong>to</strong>rs may edit the<br />
number of Class Notes.<br />
• Class Notes this month last #n – inserts the<br />
last 5 Class Notes submitted for the current<br />
month. Administra<strong>to</strong>rs may edit the number<br />
of Class Notes.<br />
• Client ID – Inserts the member’s Client ID<br />
from the database.<br />
• Email Address – Inserts the member’s Email<br />
Address from the database.<br />
• Events Link – Inserts a link <strong>to</strong> the Event<br />
Calendar on the Online Community.<br />
• Events date r<strong>an</strong>ge – Inserts next 2 upcoming<br />
events between J<strong>an</strong>. 1, 1990 <strong>to</strong> J<strong>an</strong>. 1, 2020.<br />
Administra<strong>to</strong>rs may edit the number of<br />
events displayed <strong>an</strong>d the date r<strong>an</strong>ge.<br />
• Events next #n – Inserts the next 2 upcoming<br />
events. Administra<strong>to</strong>rs may edit the number<br />
of events displayed.<br />
• Events this month next #n – inserts next 2<br />
upcoming events for the current month.<br />
Administra<strong>to</strong>rs may edit the number of<br />
events displayed.<br />
• First Name – Inserts the data contained in the<br />
First Name field of the database.<br />
• Form: ‐ Inserts a link <strong>to</strong> the<br />
• Last name – Inserts the data contained in the<br />
Last Name field of the database.<br />
• Mailing address city – Inserts the city s<strong>to</strong>red in<br />
the Harris database.<br />
• Mailing address country code – Inserts the<br />
country code s<strong>to</strong>red in the Harris database.<br />
• Mailing address country – Inserts the country<br />
s<strong>to</strong>red in the Harris database.<br />
• Mailing address fax – Inserts the fax number<br />
s<strong>to</strong>red in the Harris database.<br />
• Mailing address name – Inserts the name<br />
s<strong>to</strong>red in the Harris database.<br />
• Mailing address phone – Inserts the phone<br />
number s<strong>to</strong>red in the Harris database.<br />
• Mailing address state – Inserts the state s<strong>to</strong>red<br />
in the Harris database.<br />
• Mailing address Street 1 – Inserts the data<br />
s<strong>to</strong>red in the Street 1 field in the Harris<br />
database.<br />
• Mailing address Street 2 – Inserts the data
Donation/Membership form listed. Campaign<br />
Reports will track every time a member clicks<br />
on the Form link, <strong>an</strong>d whether the member<br />
made a donation or joined.<br />
IMPORTANT!<br />
The form must reside in the Harris Donation or<br />
Membership Builder <strong>to</strong>ol.<br />
• Forward <strong>to</strong> a friend – Inserts a link for the<br />
recipient <strong>to</strong> forward the <strong>email</strong> <strong>to</strong> a friend.<br />
• HPC ID – Inserts the member’s HPC ID (Harris<br />
ID) from the database.<br />
• Preferred class year – Inserts class year<br />
contained in the Preferred Class field of the<br />
online database.<br />
• Registration link – Inserts a link <strong>to</strong> the<br />
Registration page of the Online Community.<br />
Broadcast Reports will track every time a<br />
member clicks on the Registration link, as well<br />
as if he/she actually registered at that time.<br />
• Security Info – Inserts the security info<br />
contained in the online database. The Security<br />
Info (Access Code) is required <strong>to</strong> validate a<br />
member’s record on step 3 of the registration<br />
process.<br />
s<strong>to</strong>red in the Street 2 field in the Harris<br />
database.<br />
• Mailing address street 3 – Inserts the data<br />
s<strong>to</strong>red in the Street 3 field in the Harris<br />
database.<br />
• Mailing address URL address – Inserts the URL<br />
s<strong>to</strong>red in the Harris database.<br />
• Mailing address zip – Inserts the zip s<strong>to</strong>red in<br />
the Harris database.<br />
• Open Count – Tracks when a member initially<br />
opens the HTML version of the <strong>email</strong> message.<br />
IMPORTANT!<br />
• Unsubscribe link – Inserts <strong>an</strong> unsubscribe/opt‐<br />
out link. Campaign Reports will track when a<br />
member clicks on this link <strong>an</strong>d if he/she<br />
actually unsubscribed.<br />
• User update link – Inserts a link <strong>to</strong> the<br />
My<strong>Page</strong>. Member will be prompted <strong>to</strong> login.<br />
Campaign Reports will track when a member<br />
clicks on this link <strong>an</strong>d if he/she actually<br />
updates his/her profile information.<br />
When merging content with <strong>an</strong> Email Address list, certain data tags such as Registration Link are<br />
considered invalid. Email Address lists should be targeted <strong>to</strong> non‐members of the Harris database;<br />
therefore, the Registration Link, which links members <strong>to</strong> the 3rd step of the registration process, is not<br />
needed. The following data tags are valid for <strong>an</strong> <strong>email</strong> list: First Name, Last Name, Email Address,<br />
Open Count, Mailing Address tags, <strong>an</strong>d Unsubscribe Link.<br />
<strong>How</strong> <strong>to</strong> insert data tags:<br />
1. Place your cursor where you w<strong>an</strong>t the Data tag <strong>to</strong> appear with the HTML or Text content.<br />
2. Select the desired tag from the Data tags list.<br />
3. Click the Insert tag in<strong>to</strong> HTML but<strong>to</strong>n ( ) or the Insert tag in<strong>to</strong> Text but<strong>to</strong>n<br />
( ). The tag will appear in the content area.
Data Tag Filter<br />
Administra<strong>to</strong>rs c<strong>an</strong> quickly find data tags by typing in a keyword in<strong>to</strong> the Data tags: Filter field. The data<br />
tag list will update with only the matching tags. See figure 2.<br />
To return <strong>to</strong> the full list of available data tags:<br />
1. Highlight the Keyword.<br />
2. Click the [Delete] but<strong>to</strong>n on the<br />
keyboard.<br />
The original list of data tags will display.<br />
Figure 2<br />
Preview HTML/Text<br />
Administra<strong>to</strong>rs c<strong>an</strong> capture a quick preview of what the <strong>email</strong> message will look like for the end‐user.<br />
Personalized data is replaced with the administra<strong>to</strong>r’s data based on the login used. It is import<strong>an</strong>t NOT<br />
<strong>to</strong> completely rely on the Preview version of <strong>an</strong> <strong>email</strong>. A test <strong>email</strong> should be sent via the Send &<br />
Schedule tab.
Note: The Forward <strong>to</strong> A Friend link is inactive in the Preview HTML window. An administra<strong>to</strong>r must<br />
send a live <strong>email</strong> <strong>to</strong> himself <strong>an</strong>d/or select test recipients <strong>to</strong> properly test this feature.<br />
Import HTML/Text<br />
Administra<strong>to</strong>rs with the proper access permission c<strong>an</strong> import HTML or Text on the Edit Content page.<br />
<strong>How</strong> <strong>to</strong> import HTML/Text:<br />
1. Login <strong>to</strong> the Harris Tool.<br />
2. Click the Email Marketing link in the left<br />
navigation bar.<br />
3. Select the Create & M<strong>an</strong>age Content tab.<br />
The Create & M<strong>an</strong>age Content page will<br />
display.<br />
4. Click the Create content but<strong>to</strong>n<br />
( ). The Edit <strong>email</strong> content<br />
page will display.<br />
5. Enter the content name.<br />
6. To mark this content for others, check the<br />
Mark as a <strong>template</strong> box.<br />
7. Select <strong>an</strong> edi<strong>to</strong>r, if the appropriate edi<strong>to</strong>r is<br />
not already selected.<br />
8. Click the Import HTML but<strong>to</strong>n ( DEB, the<br />
beginning “(“ should be next <strong>to</strong> box not<br />
alone ) or the Import Text<br />
but<strong>to</strong>n ( ) located under the<br />
Data Tags dropdown menu. See figure 3.<br />
The import window will display. See figure<br />
4.<br />
9. Click the Browse but<strong>to</strong>n <strong>to</strong> locate the<br />
appropriate HTML/Text file.<br />
10. Click Begin upload, or C<strong>an</strong>cel <strong>to</strong> abort. The<br />
Edit Email Content page will display with<br />
the HTML/Text file loaded in the content<br />
area.<br />
Figure 3<br />
Figure 4<br />
File M<strong>an</strong>ager<br />
File M<strong>an</strong>ager allows administra<strong>to</strong>rs <strong>to</strong> upload images <strong>an</strong>d files from their hard drive <strong>to</strong> be used in their<br />
<strong>email</strong> message. Administra<strong>to</strong>rs have the ability <strong>to</strong> copy, rename, move, <strong>an</strong>d delete files as necessary.<br />
Link Checker<br />
Link Checker is a built‐in feature that au<strong>to</strong>matically verifies that URLs you entered are valid. Valid URLs<br />
will display OK in the Status column.
Link Checker recognizes text as a URL only if it begins with www. or http://. Link Checker does NOT<br />
currently support URL's on a SSL secure server – those beginning with https://.<br />
Note: If you need <strong>to</strong> use a link <strong>to</strong> a URL starting with https://, please do not run Link Checker.<br />
When Link Checker finds a URL of this format, it will attempt <strong>to</strong> retrieve the document pointed <strong>to</strong> by the<br />
URL link. If it is unsuccessful at this attempt, the link will be marked as invalid. There is one exception;<br />
namely, links that fail because they are within <strong>an</strong> authenticated realm (i.e. a userID <strong>an</strong>d password are<br />
required) are ignored.<br />
When a link is listed as invalid, there are several possible reasons:<br />
• The URL was misspelled.<br />
• The server on which the document resides is down, either temporarily or perm<strong>an</strong>ently.<br />
• The server on which the document resides is not responding within a reasonable amount of<br />
time.<br />
• The outbound connection <strong>to</strong> the Internet from this server is temporarily down.<br />
If you w<strong>an</strong>t <strong>to</strong> verify the link yourself, you c<strong>an</strong> cut‐<strong>an</strong>d‐paste it in<strong>to</strong> <strong>an</strong>y browser.<br />
Create Conditional Tag<br />
Administra<strong>to</strong>rs have the ability <strong>to</strong> <strong>create</strong> conditional content that will only display for targeted recipients<br />
within the recipient list. For example, for the Reunion Weekend <strong>an</strong>nouncement <strong>email</strong> blast I wish <strong>to</strong> say<br />
“<strong>Welcome</strong> <strong>to</strong> your 1 st Reunion Weekend!” <strong>to</strong> the class of 2008, <strong>an</strong>d I would like <strong>to</strong> say “Join us for<br />
Reunion Weekend 2009!” <strong>to</strong> all other class years.<br />
1. Once on the Create & M<strong>an</strong>age Content<br />
tab, place your cursor where you w<strong>an</strong>t<br />
the conditional statement <strong>to</strong> go.<br />
2. Click the Create conditional tag but<strong>to</strong>n<br />
below the Data Tag list. The Create a<br />
conditional tag popup will display. See<br />
figure 5.<br />
3. Select the database field you wish <strong>to</strong><br />
target.<br />
4. Select equals or contains.<br />
5. Enter the text you wish <strong>to</strong> display for this<br />
targeted group.<br />
6. Check the Check here <strong>to</strong> include <strong>an</strong><br />
“else” clause, if applicable. The window<br />
will refresh <strong>an</strong>d the “or else” display area<br />
Figure 5
will display. See figure 6.<br />
7. Enter the Else clause.<br />
8. Click Insert conditional tags, or C<strong>an</strong>cel <strong>to</strong><br />
abort.<br />
The conditional statement will appear in<br />
the content window. See figure 7.<br />
Figure 6<br />
Figure 7
Upload new content<br />
Upload new content allows <strong>an</strong> administra<strong>to</strong>r with the proper access permission <strong>to</strong> upload <strong>an</strong> HTML <strong>an</strong>d<br />
a Text file.<br />
<strong>How</strong> <strong>to</strong> upload new content:<br />
1. Login <strong>to</strong> the Harris Tool.<br />
2. Click the Email Marketing link in the left<br />
navigation under bar.<br />
3. Select the Create & M<strong>an</strong>age Content tab.<br />
The Create & M<strong>an</strong>age Content page will<br />
display.<br />
4. Click the Upload content but<strong>to</strong>n<br />
( ). The Upload <strong>email</strong><br />
content page will display. See figure 8.<br />
5. Enter the content name.<br />
6. Click the Browse but<strong>to</strong>ns <strong>to</strong> upload the HTML<br />
<strong>an</strong>d Text files.<br />
Note: You do not have <strong>to</strong> upload both <strong>an</strong> HTML <strong>an</strong>d Text file.<br />
Figure 8<br />
7. Click Begin Upload, or C<strong>an</strong>cel <strong>to</strong> abort. The Create & M<strong>an</strong>age Content page will display with the<br />
newly saved content at the <strong>to</strong>p of the list.<br />
IMPORTANT!<br />
When modifying uploaded HTML files that were originally <strong>create</strong>d using <strong>an</strong> outside edi<strong>to</strong>r such as<br />
Dreamweaver or Front<strong>Page</strong>, it is best <strong>to</strong> use the Simple edi<strong>to</strong>r. The Xinha <strong>an</strong>d FCK edi<strong>to</strong>r are known <strong>to</strong><br />
alter the HTML code <strong>an</strong>d remove Cascading Style Sheets (CSS). It is even suggested <strong>to</strong> use the outside<br />
edi<strong>to</strong>r for multiple modifications.


