
Create successful ePaper yourself
Turn your PDF publications into a flip-book with our unique Google optimized e-Paper software.
CONSTRUCTION<br />
BY RICH URAVITCH<br />
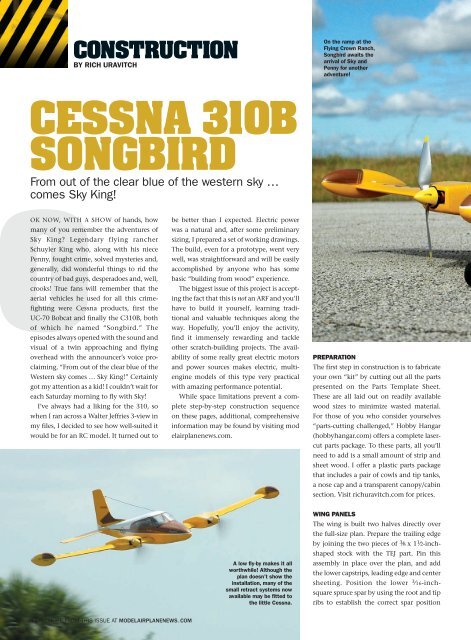
<strong>CESSNA</strong> <strong>310B</strong><br />
<strong>SONGBIRD</strong><br />
From out of the clear blue of the western sky …<br />
comes Sky King!<br />
OK NOW, WITH A SHOW of hands, how<br />
O<br />
many of you remember the adventures of<br />
Sky King? Legendary flying rancher<br />
Schuyler King who, along with his niece<br />
Penny, fought crime, solved mysteries and,<br />
generally, did wonderful things to rid the<br />
country of bad guys, desperadoes and, well,<br />
crooks! True fans will remember that the<br />
aerial vehicles he used for all this crimefighting<br />
were Cessna products, first the<br />
UC-70 Bobcat and finally the C<strong>310B</strong>, both<br />
of which he named “Songbird.” The<br />
episodes always opened with the sound and<br />
visual of a twin approaching and flying<br />
overhead with the announcer’s voice proclaiming,<br />
“From out of the clear blue of the<br />
Western sky comes … Sky King!” Certainly<br />
got my attention as a kid! I couldn’t wait for<br />
each Saturday morning to fly with Sky!<br />
I’ve always had a liking for the 310, so<br />
when I ran across a Walter Jeffries 3-view in<br />
my files, I decided to see how well-suited it<br />
would be for an RC model. It turned out to<br />
166 MORE FROM THIS ISSUE AT MODELAIRPLANENEWS.COM<br />
be better than I expected. Electric power<br />
was a natural and, after some preliminary<br />
sizing, I prepared a set of working drawings.<br />
The build, even for a prototype, went very<br />
well, was straightforward and will be easily<br />
accomplished by anyone who has some<br />
basic “building from wood” experience.<br />
The biggest issue of this project is accepting<br />
the fact that this is not an ARF and you’ll<br />
have to build it yourself, learning traditional<br />
and valuable techniques along the<br />
way. Hopefully, you’ll enjoy the activity,<br />
find it immensely rewarding and tackle<br />
other scratch-building projects. The availability<br />
of some really great electric motors<br />
and power sources makes electric, multiengine<br />
models of this type very practical<br />
with amazing performance potential.<br />
While space limitations prevent a complete<br />
step-by-step construction sequence<br />
on these pages, additional, comprehensive<br />
information may be found by visiting mod<br />
elairplanenews.com.<br />
A low fly-by makes it all<br />
worthwhile! Although the<br />
plan doesn’t show the<br />
installation, many of the<br />
small retract systems now<br />
available may be fitted to<br />
the little Cessna.<br />
On the ramp at the<br />
Flying Crown Ranch,<br />
Songbird awaits the<br />
arrival of Sky and<br />
Penny for another<br />
adventure!<br />
PREPARATION<br />
The first step in construction is to fabricate<br />
your own “kit” by cutting out all the parts<br />
presented on the Parts Template Sheet.<br />
These are all laid out on readily available<br />
wood sizes to minimize wasted material.<br />
For those of you who consider yourselves<br />
“parts-cutting challenged,” Hobby Hangar<br />
(hobbyhangar.com) offers a complete lasercut<br />
parts package. To these parts, all you’ll<br />
need to add is a small amount of strip and<br />
sheet wood. I offer a plastic parts package<br />
that includes a pair of cowls and tip tanks,<br />
a nose cap and a transparent canopy/cabin<br />
section. Visit richuravitch.com for prices.<br />
WING PANELS<br />
The wing is built two halves directly over<br />
the full-size plan. Prepare the trailing edge<br />
by joining the two pieces of 3 ⁄8 x 11 ⁄2-inchshaped<br />
stock with the TEJ part. Pin this<br />
assembly in place over the plan, and add<br />
the lower capstrips, leading edge and center<br />
sheeting. Position the lower 3 ⁄16-inchsquare<br />
spruce spar by using the root and tip<br />
ribs to establish the correct spar position
and glue the spar in place on the 1 ⁄16 balsa<br />
leading-edge sheeting. Now glue all the<br />
remaining ribs in position on the spar,<br />
sheeting and capstrips. Add the hardwood<br />
landing gear blocks, lite-ply gussets, ply<br />
bellcrank mounts and center section scrap<br />
filler for the wing hold-down bolts. Next,<br />
add the upper 3 ⁄16-inch-square spruce spar,<br />
gluing securely to the ribs. With the panel<br />
assembly still pinned to the building surface,<br />
carefully position the root rib, using<br />
the dihedral gauge to establish the correct<br />
The fuselage bulkheads are cut from 1 ⁄8 in. lite-ply<br />
except for F1 which is birch ply because it is the<br />
mount point for the nose gear. Laser-cut part set<br />
is available.<br />
dihedral angle before gluing. Build the<br />
opposite panel in the same fashion.<br />
Cut a 1 ⁄8-inch-wide slot through the ribs<br />
at the spar location and dry-fit joiner WJ in<br />
the position shown on the plan. When satisfied<br />
with the fit, use ZAP (pacer<br />
technology.com) 30-minute epoxy to join<br />
the panels. With one panel pinned to the<br />
building surface, block the opposite tip to<br />
obtain the 5-degree dihedral angle established<br />
by the WJ joiner. While the epoxy is<br />
curing, make up the dowel receptacles as<br />
The fuselage sides with the wing saddle doublers<br />
and longerons in place. Notches in sides accept<br />
tabs on bulkheads to aid in alignment.<br />
THIS TWIN<br />
ELECTRIC IS A<br />
STRAIGHTFORWARD<br />
BUILD AND A<br />
STABLE FLYER<br />
SPECIFICATIONS<br />
MODEL: Cessna 310<br />
DESIGNER: Rich Uravitch<br />
TYPE: compact, sport-scale twin electric<br />
WINGSPAN: 52.82 in.<br />
LENGTH: 31.75 in.<br />
WING AREA: 352 sq. in.<br />
WEIGHT: 52 oz. (3.25 lb.)<br />
WING LOADING: 21 oz./sq. ft.<br />
POWER: Hacker A20<br />
(hackerbrushless.com), BP Hobbies<br />
2217-9 (bphobbies.com) or equiv.,<br />
ThunderPower 3S 2100mAh LiPo battery<br />
(thunderpowerrc.com), 2 GWS 35A ESCs<br />
(gwsus.com), 2 APC 9x7.5 props<br />
(apcprop.com)<br />
RADIO REQ’D: 4-channel<br />
CURRENT DRAW: 22amps at max power<br />
WATTS GENERATED: 245 (total)<br />
RPM: 6550<br />
This is the most difficult portion of the build,<br />
planking the forward fuselage to achieve that<br />
sleek, rounded look. Takes a little more time than<br />
a flat side but well worth the effort!<br />
AUGUST 2009 167
<strong>CESSNA</strong> <strong>310B</strong> <strong>SONGBIRD</strong><br />
Clear molded cabin section is glued to frame; the entire assembly is easily<br />
removable for battery and radio equipment access without having to remove<br />
the wing.<br />
shown on the plan. Remove the wing from<br />
the building surface and add the remaining<br />
1 ⁄16-inch sheeting, capstrips, sub-leading<br />
edge and joiner LEJ. Glue the WCD/WCE<br />
dowel receptacle assemblies in place. Add<br />
the balsa leading edge and carve to shape,<br />
blending the sheeting to the leading edge.<br />
Add the wingtip tanks, which you’ll need<br />
to carve to shape from soft balsa blocks.<br />
(Alternatively, vacuum-formed wingtips<br />
Visit RCstore.com to order the full-size plans, or call (888) 235-2021.<br />
168 MORE FROM THIS ISSUE AT MODELAIRPLANENEWS.COM<br />
are available as part of a plastic part set that<br />
also includes cabin, a pair of cowls and a<br />
nose cap.)<br />
Now is the time to install the control<br />
linkages; cut the ailerons from the trailingedge<br />
stock and temporarily install hinges. If<br />
you choose to duplicate the bellcrank<br />
arrangement shown, it works quite well if<br />
all the slop in the linkage is removed. You<br />
may wish to use individual mini servos for<br />
Removable cabin section is retained by short lengths of dowel at the aft end<br />
and a single nylon screw at the front edge. 3S 2100mAh LiPo battery will be<br />
located as far forward as possible.<br />
each servo, coupling them via a Y-harness<br />
to the aileron channel of your receiver.<br />
TAIL GROUP & FUSELAGE<br />
All components are solid 1 ⁄8-inch balsa<br />
sheet with the edges sanded to a slight<br />
radius for appearance. After assembly, sand<br />
to shape, make up the wire elevator joiner<br />
and temporarily hinge the moving surfaces.<br />
The fuselage of the 310 is easy to build as
it is basically flat-sided. The rear upper section<br />
is a rolled flat panel section, which can<br />
be applied in two pieces rather than requiring<br />
strip planking. The only compound<br />
curve is the area forward of the windshield,<br />
top and bottom. I used soft 3/32 balsa to<br />
plank these areas to provide extra material<br />
for final sanding and blending to the fuselage<br />
sides. Start assembly by preparing a left<br />
and right fuselage side by adding the WS<br />
(wing saddle) doubler, balsa tri-stock and<br />
longerons. Selecting similar grain/hardness<br />
balsa for the sides will help ensure a twistfree<br />
fuselage. Add all the bulkheads, making<br />
sure to keep things square. Adding the<br />
stringers, sheeting and detail parts will<br />
move construction to the nose section,<br />
which is strip-planked.<br />
The nacelles are assembled just like the<br />
fuselage, but because they’re flat, they’re<br />
easier to build. They may be all wood or you<br />
can choose the formed cowl option. In<br />
either case, making the cowl removable<br />
back to the firewall makes motor installation<br />
much easier. After final shaping and<br />
sanding, the nacelles will be permanently<br />
attached to the wing.<br />
Aileron drive system uses .062 music wire through<br />
90 degree bellcranks but two micro servos, one<br />
per aileron, may also be used. Keep linkages tight<br />
and slop-free!<br />
Aileron servo is located in center section of wing,<br />
offset to one side of center rib. Wire linkages go<br />
through 90 degree bellcranks to aileron horn.<br />
ABOUT THE AUTHOR<br />
RICH URAVITCH:<br />
DID YOU KNOW?<br />
A former USAF “Sierra Hotel” pilot, Rich<br />
worked at Fairchild Republic and joined<br />
the A-10 team as Aircraft #30 rolled off<br />
the line. He also was logistics program<br />
manager on the T-46 program. We caught<br />
up with Rich for a little model talk. Here’s<br />
what he said.<br />
Can you tell us how you got started and with what type of planes you built back then?<br />
RU: I got started in the hobby building Strombecker solid display models. I have fond<br />
memories of a Globe Swift. No vacuum-formed or injection molded parts back then;<br />
these came later with the Monogram Speedee-Bilt and Superkits, which I lusted after<br />
and spent lunchless school days to fund the kit acquisition.<br />
What was your first RC model?<br />
RU: It was a Babcock Breezy Jr. with a Babcock Magic Carpet receiver, Magic Wand<br />
transmitter and compound escapement. A Wasp .049 gave way to an O.K. Cub .074,<br />
which took the Breezy to its final resting place, one of those undisclosed locations<br />
somewhere that have now become shopping malls.<br />
Why did you decide on the Cessna <strong>310B</strong> from Sky King for your latest project?<br />
RU: I guess I’ve always liked the airplane. To me, the straight tail “A” and “B” models<br />
were the best-looking of the series. My model was originally going to be finished in a<br />
U.S.A.F. U-3A “Blue Canoe” scheme until I remembered the adventures of Sky King, did a<br />
little web research and found lots of interesting information. The “Songbird” colors were<br />
attractive, the airplane had widespread recognition through the popular TV serial of the<br />
day and it would translate well to model form. That, a little motivation and a set of<br />
Jeffries three-view drawings was all it took!<br />
What impresses you the most about our hobby today?<br />
RU: I really am amazed at the quality and sophistication of the models I see today. The<br />
present day ARF models that would have been very competitive in the Sport Scale class<br />
of 20 years ago and now, scale competition models that are flown routinely, are true<br />
museum pieces. I can remember “hangar flying” about the possibility of turbine-powered<br />
jet models and today, they’re everywhere. The molded-foam EDF models are amazing,<br />
too. They’re very scale looking, inexpensive and fan/battery technology has made them<br />
not only viable, but also practical for trouble-free, everyday sport flying!?!<br />
FINAL ASSEMBLY<br />
Fit the 1 ⁄4-inch dowels to the WCD/WCE<br />
assemblies, center the wing in the fuselage<br />
and drill holes in F3 to accept the dowel.<br />
With the wing centered, drill through the<br />
trailing edge into the WP parts and tap the<br />
holes to accept 10-32 nylon bolts. With the<br />
wing bolted in its final position, glue belly<br />
formers on the lower wing center section,<br />
followed by the 1 ⁄4 x 1 ⁄4-inch center stringer<br />
and add the lower 3 ⁄32-inch balsa sheeting,<br />
blending it with the lower fuselage sheeting.<br />
Fit the entire tail group to the fuselage,<br />
making certain everything is square by<br />
measuring from wingtips to stabilizer hinge<br />
line. When installing the vertical fin, make<br />
certain it is properly aligned and perpendicular<br />
to the horizontal stabilizer. Short<br />
lengths of dowel may be used to strengthen<br />
the fin/stabilizer/fuselage joint. Add the<br />
soft balsa fairing blocks, carve and sand to<br />
shape.<br />
HARDWARE<br />
Now is the time to add your favorite radio<br />
and propulsion system. Everything fits<br />
neatly under the removable cabin section,<br />
which is held in place by a pair of dowels at<br />
the aft end and a 6-32 nylon screw at the<br />
base of the windshield. This compartment<br />
houses the single LiPo battery, both ESCs<br />
and all the radio components, with the<br />
AUGUST 2009 169
<strong>CESSNA</strong> <strong>310B</strong> <strong>SONGBIRD</strong><br />
Soft balsa blocks are carved to shape and used to form fin to stabilizer fairings.<br />
Elevator halves interconnected with a “U”-shaped music wire.<br />
exception of the aileron servo.<br />
After installing the motors of your<br />
choice, fit the cowls. Whether you choose<br />
to build the cowls from wood or use the<br />
available formed plastic parts, simply<br />
attach them with three screws into hardwood<br />
blocks on the firewall.<br />
COVERING<br />
Although the specific model presented here<br />
represents Sky King’s Songbird, there are a<br />
great number of other attractive color<br />
schemes available, including the U-3 Blue<br />
Canoe used by the Air Force in the late<br />
1950s and 1960s, foreign air forces, plus a<br />
great selection of civil, general aviation<br />
schemes. A search of the web will yield a<br />
goldmine of terrific ideas, both civilian and<br />
warbird. I used UltraCote white and yellow<br />
Landings are very gentle, sink rate<br />
very predictable and easily managed<br />
with power. No need for flaps<br />
and no tendency to tip stall when<br />
slowed down! Confidence building<br />
electric twin!<br />
170 MORE FROM THIS ISSUE AT MODELAIRPLANENEWS.COM<br />
for the basic colors with the brown trim<br />
coming right out of a Testors spray can.<br />
Make sure you mask off the clear window<br />
areas before spraying the cabin part! Whatever<br />
your choice of schemes, make certain<br />
you prepare the airframe for covering by<br />
carefully sanding and filling any imperfections<br />
prior to application of the final finish;<br />
flaws will always show through!<br />
FLYING<br />
With the CG at the position indicated, the<br />
little Cessna is about as stable a twin as you<br />
could hope for. It has no real quirks; stalls<br />
are non-events with the nose just settling<br />
gradually, and it slows down just great on<br />
landing. Aileron rolls tend to be non-axial,<br />
as you would expect for the type, especially<br />
with all that dihedral. Loops are big<br />
All framed up awaiting final sanding and covering. Cabin section has not yet<br />
been removed to accept final configuration clear parts. Note molded cowls, tip<br />
tanks and nose cap available from hobbyhangar.com.<br />
and open and inverted flight, despite the<br />
airfoil and force arrangement, requires surprisingly<br />
little down elevator to maintain.<br />
The landing gear position and spacing<br />
make ground handling a pleasure, with<br />
excellent tracking during takeoff and landing<br />
roll out, neither of which seems to<br />
exceed 20 feet!<br />
After a lot of flying time on the prototype,<br />
I find that the model has no vices and<br />
can be easily managed by fliers with some<br />
experience with low wing, aileronequipped<br />
models. The <strong>310B</strong> is a fun<br />
airplane to both build and fly, and it gives<br />
you an opportunity to add an attractive,<br />
small twin to your hangar; hope you enjoy<br />
it! Your comments and suggestions are<br />
invited and appreciated, contact me at<br />
man@airage.com.<br />
THE MODEL CAN BE EASILY<br />
MANAGED BY FLIERS WITH SOME<br />
EXPERIENCE WITH LOW WING,<br />
AILERON-EQUIPPED MODELS