Multipurpose Analog PID Controller
Multipurpose Analog PID Controller
Multipurpose Analog PID Controller

Create successful ePaper yourself
Turn your PDF publications into a flip-book with our unique Google optimized e-Paper software.
<strong>Multipurpose</strong> <strong>Analog</strong> <strong>PID</strong><br />
<strong>Controller</strong><br />
Todd P. Meyrath 1<br />
Atom Optics Laboratory<br />
Center for Nonlinear Dynamics<br />
University of Texas at Austin<br />
c○ 2005<br />
March 14, 2005<br />
revised December 10, 2005<br />
See disclaimer 2<br />
This analog circuit is intended to be used as a multipurpose <strong>PID</strong> controller. The<br />
schematic and PCB given here may be setup to be used as a logarithmic laser intensity<br />
controller, laser diode current controller up to 1/2 Amp directly, temperature controller,<br />
controller for high current device, etc... These configurations depend on which<br />
options are used, and in some cases, what external devices to which it is interfaced.<br />
The layout was intended to be flexible so that it can accommodate many different<br />
possibilities. I hate redesigning the same circuit for various applications. Most likely I<br />
have forgotten many possibilities, but using the simple voltage sense and voltage control<br />
output, the circuit should be useful for many applications assuming appropriate<br />
external components are used.<br />
There are several options for setpoint input, sense return, and output drive. The<br />
<strong>PID</strong> may be operated using a single opamp, or a multiple opamp setup. These are<br />
standard configurations, the former has the advantage of fewer components but has<br />
coupled <strong>PID</strong> characteristics. The latter has independent <strong>PID</strong> characteristics so they<br />
may be optimized independently. The setpoint circuit includes options for an analog<br />
input, a potentiometer or trimpot offset adjust, a gain or inversion option. The sense<br />
possibilities include a voltage/current sense, high current sense, direct output current<br />
sense, or a logarithmic photodiode sense. The output stage may be set up to drive up<br />
to 1/2 Amp of current either as a control single or directly driven current controller.<br />
The circuit requires a dual ±15 V supply.<br />
As mentioned, the circuit my be set to use single or multiple opamp <strong>PID</strong>, use the<br />
single or the multiple opamp <strong>PID</strong> hook-up as in the table:<br />
1 Please send comments, questions, corrections, insults to meyrath@physics.utexas.edu<br />
2 Disclaimer: The author provides this and other designs on the web as a courtesy. There is no<br />
guarantee on this or any other designs presented, use at your own risk. The author also comments<br />
that the suggested parts used are not an endorsement of any manufacturer or distributer.<br />
1
Single OpAmp <strong>PID</strong> hook-up<br />
Use C1 to C3, R1 to R4, U1, U2<br />
Omit C4 to C6, R5 to R9, R11, R12, U3 to U5<br />
Short a R10, R13<br />
Proportional Gain (R1 + R2)/R3<br />
Integration time R3 × C2<br />
Differentiation time (R1 + R2) × C3<br />
Notes: R4 limits differential gain, C1 gives high frequency roll-off.<br />
Multiple OpAmp <strong>PID</strong> hook-up<br />
Use R1 to R3, R5 to R9, (R10 to R13 = 1 kΩ)<br />
C2, C4 to C6, U1 to U5<br />
Omit C1, C3, R4<br />
Shorta C2<br />
Proportional Gain (R1 + R2)/R3<br />
Integration time (R5 + R6) × C4<br />
Differentiation time (R7 + R8) × C5<br />
Notes: R9 limits differential gain, C6 gives high frequency roll-off.<br />
ause a 0 Ω resistor, 1206 package.<br />
The summer used for the multiple opamp <strong>PID</strong> is an inverting summer, in some<br />
cases, it is desired to re-invert the signal. Use as in the table:<br />
Output inverter option used<br />
Use R14, R15 = 1 kΩ, U6<br />
Output inverter option not used<br />
Omit U6<br />
Short a R14, R15<br />
a use a 0 Ω resistor, 1206 package.<br />
The circuit is naturally bi-polar, however, some cases require a un-polar output.<br />
Use the simple diode rectifier as in the table:<br />
Output rectifier option used<br />
For positive output only, use R17 = 10 kΩ, D1<br />
For negative output only, use R17 = 10 kΩ, D1 (reverse diode<br />
direction drawn on schematic and layout)<br />
omit R61 in either case.<br />
Output rectifier option not used<br />
Omit R17<br />
Short a R61<br />
a use a 0 Ω resistor, 1206 package.<br />
By convention, we will not list decoupling capacitors to be omitted when the<br />
associated IC is listed. The associations are given on the table:<br />
2
Supply decoupling caps associated with ICs<br />
IC Capacitors Value<br />
U1 C10,C11 0.1 µF<br />
U2 C12,C13 0.1 µF<br />
U3 C14,C15 0.1 µF<br />
U4 C16,C17 0.1 µF<br />
U5 C18,C19 0.1 µF<br />
U6 C20,C21 0.1 µF<br />
U7 C8 0.1 µF<br />
U8 C22,C23 0.1 µF<br />
U9 C24,C25 0.1 µF<br />
U10/U11 C26,C27 0.1 µF<br />
U10/U11 C28,C29 10 µF<br />
There are a number of setups for the setpoint, most are summarized in the table<br />
here, but the user can have some imagination and come up with others:<br />
Setpoint Options<br />
Option Instructions<br />
<strong>Analog</strong> input only Use: J1, D2, R22<br />
Short: R18, R57<br />
Omit: R19 to R21, R23 to R35, R58, R59<br />
D3, D4, C9, C34, C35, U9<br />
Potentiometer input Use: R28 or R35 (trimpot or potentiometer),<br />
(zero adjust) only R26, R27, R29, R30, C9, C34, C35, D3, D4<br />
Short: R21, R57, (R31 and R34) or a (R32 and R33)<br />
Omit: J1, D2, R18 to R20, R22 to R25, U9<br />
<strong>Analog</strong> input with zero adjust Use: J1, D2, R22, R28 or R35 (trimpot or potentiometer),<br />
R26, R27, R29, R30, C9, C34, C35, D3, D4, U9<br />
Short: (R18 and R20) or b (R19 and R21) and<br />
(R31 and R34) or a (R32 and R33)<br />
add in gain adjust when using U9, use R23 to R25,<br />
the gain is 1 +<br />
50 kΩ<br />
R23+R24+R25<br />
bInvert setpoint signal Short: (R18 and R20) or (R19 and R21) omit other 2,<br />
remember that pin 3 of U9 is non-inverting and pin 2<br />
is inverting.<br />
Unipolar zero adjust (short R58, omit R26, D3, C34) or<br />
(short R59, omit R30, D4, C35)<br />
use R27 or R29 as 0 Ω as appropriate.<br />
aPotentiometer direction Short: (R31 and R34) or (R32 and R33) omit other 2,<br />
the direction of increase depends on if it is hooked to<br />
the inverting or non-inverting pin of U9.<br />
The several sense options are summarized in the table. The photodiode uses a<br />
logarithmic amplifier so that it may operate over many orders of magnitude. The other<br />
3
options are all really the same thing depending on interpretation. The current/voltage<br />
sense uses either a ‘sense’ or load resistor from a current or voltage source. R46 is<br />
included for the option of breaking the ground connection or adding additional load to<br />
the driving sensor. This option would be used for instance in a high current controller<br />
where a hall sensor is used. Another version is a high current sense using R47,<br />
the PCB is setup for an SR20 2 Watt 4-point sense resistor (Caddock Electronics).<br />
Depending on the resistance used, this resistor can directly measure up to 15 Amps.<br />
An additional current sense that can be used is a direct output measurement. In this<br />
case, there is no control output signal, and the buf ICs directly supply up to 1/2 Amp<br />
to a load. In this low current driver mode, no external components are needed. For<br />
the higher current cases, a high power output stage is needed, and is controlled with<br />
the control output signal.<br />
Sense options<br />
Photodiode Use: R36 to R39, (R56 or R60), C0, C7, C8, U7<br />
Short: R40<br />
Omit: J3, R41, R42 to R47, R54, U8<br />
Current/voltage sense Use: J3, R42 to R46, U8<br />
Short: R41<br />
Omit: R40, R36 to R39, R47, R56, R60, C0, C7, C8, U7<br />
High current sense Use: R42 to R44, R47, U8<br />
Short: R41<br />
Omit: J3, R40, R36 to R39, R45, R46, R56, R60, C0, C7, C8, U7<br />
connect up to 15 A (depending on R47 value) through J5 to J6<br />
Direct output current sense Same as high current sense, but short R54, omit R55,<br />
for use with the buffer output stage.<br />
connect load across J6 to J7.<br />
For the BNC connectors, the board is setup to accept either the right angle receptacle<br />
(227222-1) or the vertical receptacle (227161-1). The vertical receptacle my<br />
be mounted on the top or the bottom of the board.<br />
The author would like to thank Gabriel Price for testing out the multiple opamp<br />
<strong>PID</strong> and his ideas with this, and also the suggestions and comments of Florian Schreck<br />
and Hrishikesh Kelkar. For pointing out typos thanks to Jonathan Hayes.<br />
4
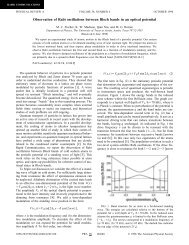
Figure 1: A board set up for a laser intensity control circuit.<br />
5
<strong>Analog</strong> Control<br />
Input<br />
J1<br />
+<br />
C34<br />
10µF<br />
+<br />
C35<br />
10µF<br />
R56<br />
R30<br />
-12V<br />
D2<br />
+12V<br />
D3<br />
8<br />
D4 4<br />
R59<br />
(open)<br />
R60<br />
8<br />
4<br />
+12<br />
R26<br />
R28<br />
R29<br />
Photodiode<br />
R36<br />
C0<br />
1nF<br />
R22<br />
1kΩ<br />
1<br />
C7<br />
10nF<br />
R18<br />
0Ω<br />
R19<br />
(open)<br />
R58 (open)<br />
R27<br />
2<br />
3<br />
Trimpot<br />
R31 0Ω<br />
R21<br />
(open)<br />
R32 (open)<br />
R33 (open)<br />
R34 0Ω<br />
U7<br />
AD8304<br />
1<br />
2<br />
3<br />
4<br />
5<br />
6<br />
7<br />
14<br />
13<br />
12<br />
11<br />
10<br />
9<br />
8<br />
C8<br />
0.1µF<br />
1<br />
2<br />
3<br />
R35<br />
R24<br />
R23<br />
3<br />
INA128<br />
2<br />
5<br />
R20<br />
0Ω<br />
Potentiometer<br />
(front Panel)<br />
R37<br />
R57<br />
U9<br />
Vlog<br />
1<br />
+5V<br />
8<br />
J2<br />
Monitor<br />
Output<br />
R25<br />
C9<br />
0.1µF<br />
R40<br />
R38<br />
6<br />
R39<br />
Setpoint Signal<br />
Vs<br />
R41<br />
3<br />
2<br />
INA105<br />
U1<br />
6<br />
R42<br />
<strong>Multipurpose</strong> <strong>Analog</strong> <strong>PID</strong> <strong>Controller</strong><br />
8<br />
Todd Meyrath<br />
Atom Optics Laboratory<br />
Center for Nonlinear Dynamics<br />
University of Texas<br />
1<br />
1<br />
5<br />
6<br />
+<br />
INA128<br />
2<br />
5<br />
U8<br />
-<br />
R43<br />
R44<br />
3<br />
R4<br />
R5<br />
R9<br />
R3<br />
C3<br />
C5<br />
R45<br />
R46<br />
R6<br />
C2<br />
R2 R1<br />
2<br />
3<br />
2<br />
3<br />
R7<br />
2<br />
Version 1.0<br />
March 15, 2005<br />
3<br />
J3<br />
-<br />
+<br />
-<br />
+<br />
-<br />
+<br />
C1<br />
OPA<br />
OPA<br />
OPA<br />
Current/<br />
Voltage<br />
Sense Input<br />
R8<br />
6<br />
U2<br />
C4<br />
U4<br />
U3<br />
C6<br />
6<br />
6<br />
R10<br />
1kΩ<br />
R11<br />
1kΩ<br />
R12<br />
1kΩ<br />
R47<br />
SR20<br />
4-point<br />
sense resistor<br />
R54<br />
J5<br />
J6<br />
J7<br />
2<br />
3<br />
<strong>PID</strong><br />
Single or Multiple<br />
OpAmp, see notes<br />
-<br />
+<br />
External Power Connections<br />
R13<br />
1kΩ<br />
OPA<br />
+15V<br />
U5<br />
-15V<br />
C41<br />
470µF<br />
6<br />
+<br />
+<br />
C42<br />
470µF<br />
+15V<br />
R14<br />
1kΩ<br />
C36<br />
10µF<br />
+<br />
+<br />
C37<br />
10µF<br />
R15<br />
1kΩ<br />
2<br />
-<br />
OPA<br />
3<br />
+<br />
U6<br />
R55<br />
6<br />
Output Inverter<br />
R52<br />
8<br />
R53<br />
Power Supply Connections<br />
D5<br />
D6<br />
LM78L12M<br />
U12<br />
2-3, 6-7<br />
LM79L12M<br />
U13<br />
1<br />
8<br />
6<br />
2-3, 6-7<br />
5<br />
LM78L05M<br />
U14<br />
U10<br />
2-3, 6-7<br />
R16<br />
1kΩ<br />
BUF634<br />
1<br />
3<br />
6 3<br />
BUF634<br />
U11<br />
1<br />
Output Rectifier<br />
D1<br />
+<br />
+<br />
+<br />
C38<br />
10µF<br />
C39<br />
10µF<br />
R61<br />
R17<br />
1kΩ<br />
C40<br />
10µF<br />
+12V<br />
-12V<br />
+5V<br />
R50<br />
1kΩ<br />
R51<br />
Control<br />
Signal<br />
Out<br />
J4<br />
J5