Create successful ePaper yourself
Turn your PDF publications into a flip-book with our unique Google optimized e-Paper software.
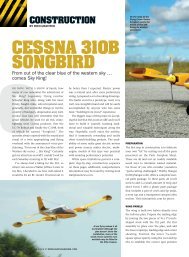
FMA DIRECT CD-PILOT<br />
by Rick Bell<br />
I was anxious to test the FMA Co-Pilot in a helicopter, so I used my JR Ergo<br />
Sport 60. The unit's manual recommends that a hole be drilled into the chassis<br />
for the calibration button, but instead, I mounted the button on the front of the<br />
servo tray and secured the control box on the top of the gyro. I attached the<br />
sensor unit to the top of the tail boom and oriented its pickups at a 45-degree<br />
angle to the heli's centerline. I then routed the ribbon cable forward to the con-<br />
trol box and secured it so that it wouldn't become entangled with the pushrods,<br />
bellcranks and other airframe parts. The installation took only a few minutes.<br />
Following the instructions, I plugged the unit into the receiver and then con-<br />
nected the roll and elevator servos to the unit. There are four dipswitches on the<br />
control box, and these must be set in the correct sequence for the unit to give<br />
the correct control inputs.<br />
Calibrating the unit took some effort; I couldn't get it<br />
to function properly the first time I tried to calibrate it.<br />
When I tilted the heli to the right, the Co-Pilot gave a right<br />
roll command, and that was the wrong direction. And<br />
when I switched the unit on or off with the auxiliary chan-<br />
nel, the trim settings changed considerably.<br />
1: mounting the sensor<br />
on a helicopter Is<br />
a little different from<br />
mounting ft on an airplane;<br />
the sensor<br />
must be rotated 45<br />
degrees, and it must<br />
be set horizontally. I<br />
used double-stick<br />
tape and a zip-tie to<br />
secure the sensor to<br />
the tall boom, Instead<br />
of the recommended<br />
hook-and-loop-fastener. 2:1 mounted the control unit onto the top of the gyro and attached the calibration button<br />
to the front of the servo tray. These proved to be good locations for both Items. 3: neatness counts! All wires<br />
are neatly tucked out of the way so they don't interfere with any part of the airframe, and I used zlp-tles to secure<br />
the ribbon cable to the chassis. Installing the Co-Pilot In a helicopter takes only a few minutes.<br />
condition was much calmer, and the sun<br />
was out. I recalibrated the unit and<br />
launched the model as before. On the first<br />
day, the IR rating was three; on the second<br />
day, it was five. Again, the model flew<br />
beautifully with very little input from me.<br />
What a cool experience!<br />
I am completely happy with the Co-<br />
Pilot's performance. If you fly your model<br />
in normal (mildly windy) conditions, it<br />
will easily fly all by itself. Used in conjunction<br />
with an instructor, this unit will<br />
78 MODEL AIRPLANE NEWS<br />
greatly shorten the learning curve for any<br />
beginning pilot. For $119.95, the Co-Pilot<br />
is a great learning aid for the student<br />
pilot. As he becomes more accustomed to<br />
the model's stability, the unit's sensitivity<br />
can be gradually decreased until the student<br />
can fly completely unassisted. For<br />
experienced pilots, the unit can be used to<br />
enhance the stability of faster models,<br />
especially in gusty conditions. It helps<br />
smooth out final approaches, and that<br />
improves landings. Install the FMA Co-<br />
It was easy to fix the trim changes; during calibration, I tilted the heli to com-<br />
pensate for the changes. The control input problem was also easily solved by<br />
adjusting the positions of the dipswitches. Once I figured out<br />
the sequence, the Co-pilot worked correctly and made the<br />
appropriate inputs.<br />
TEST FLIGHT<br />
After I calibrated the unit, I set the sensitivity at about 50<br />
percent and started the helicopter. I switched off the Co-<br />
Pilot and trimmed the heli for a hands-off hover. For safety,<br />
I climbed to about 25 feet and then hit the switch to turn on<br />
the Co-Pilot. The heli continued to hover and didn't move at<br />
all. To confirm that the unit was working, I gave a right roll<br />
command and released the stick; the heli promptly returned<br />
to a stable hover. With more confidence, I then gave a for-<br />
ward cyclic command, but much more aggressively. The<br />
result was the same-the heli immediately returned to a<br />
level hover. Very neat indeed!<br />
The heli was also very stable in forward flight. I could feel<br />
the Co-Pilot attempt to counter my<br />
control inputs; this was unnerving at<br />
first, but I soon became accustomed<br />
to it. The neat part about forward<br />
flight was that when I let go of the<br />
sticks, the heli quickly stopped and<br />
returned to a hover.<br />
The FMA Co-Pilot is a great tool<br />
to help beginners learn how to hover<br />
and get into forward flight with little<br />
risk to the heli. The possibilities are<br />
almost endless. Learning tail-in or<br />
nose-in hovering, performing aero-<br />
batics or stabilizing a helicopter<br />
camera platform are all easy when<br />
the helicopter returns to a stable<br />
upright hover simply by letting go of<br />
the sticks! Give the Co-Pilot a try;<br />
you'll be pleasantly surprised.<br />
Pilot in your next model and give autopilot<br />
flight a try. You'll love it! ±<br />
JR; distributed by Horizon Hobby Inc.<br />
FMA Direct, 9607 Dr. Perry Rd., Unit 109,<br />
Ijumsville, MD 21754; (800) 343-2934;<br />
fax (301) 831-8987; www.fnuidirect.com.<br />
Hangar 9; distributed by Horizon Hobby Inc.<br />
Horizon Hobby Inc., 4105 Ficldstone Rd.,<br />
Champaign, II. 61822; (800) 338-4639;<br />
www.horiy.onhobby.coin.<br />
Multiplex USA, 560 Library St., San Fernando, CA<br />
91340; (800) 375-1312; fax (818) 838-3127;<br />
www.inultiplexrc.com.