You also want an ePaper? Increase the reach of your titles
YUMPU automatically turns print PDFs into web optimized ePapers that Google loves.
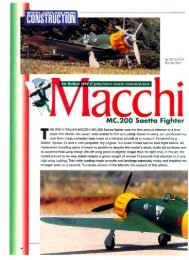
<strong>Tinisn</strong> <strong>Tor</strong><br />
EASIER TO FLY!<br />
USA $4.99 CANADA $7.50<br />
06<br />
www.modelairplanenews.com 7 22627 48120
NEWS<br />
JUNE 2DD2 VOLUME 130, NUMBER 6<br />
FEATURES<br />
28 l/2 AtoZ<br />
Your guide to small glow models and engines<br />
by the staff of Model Airplane News<br />
36 Florida Jets<br />
Jet action burns up the Sunshine State<br />
by Rich Uravitch<br />
FLlGHT TESTS<br />
SIG MFG. 44 SOME thin' Extra ARF<br />
"- Extra eaSy... extra fun -<br />
by. Jim Oftorato^ . - -<br />
ARIZONA MODEL AIRCRAFTERS<br />
48 Fokker Dr.!<br />
WWI three-wing ARF<br />
• bv David Johnson<br />
ON THE COVER: reviewed by David Johnson on page 48, the Arizona<br />
Model Aircrafters Fokker Dr.l is a 62-inch-span ARF model that's easy to<br />
assemble and looks great. Powered by an O.S. .52 4-stroke, the model has<br />
excellent flight characteristics (photo by Walter Sidas).<br />
HOW TO<br />
6B Make Static Scale Props<br />
The ultimate final touch<br />
by Dick van Mourik<br />
PRODUCT REVIEW<br />
74 FMA Direct Co-Pilot<br />
3 tests—helicopter, high-performance and trainer<br />
aircraft—works like a champ!<br />
by Gerry Yarrish<br />
HOW TO<br />
80 Assemble ABS Cowls and Wheel Pants<br />
Basic skills, advanced results<br />
by Rick Bell<br />
CONSTRUCTION<br />
HANGAR 9<br />
56 Aresti 40<br />
Pattern performance<br />
with.great looks<br />
by Vic Bunze<br />
62 NORTHEAST SAILPLANE PRODUCTS,.<br />
Virus 400A<br />
Electric slpw-flyer ARF<br />
86 Design and Build an<br />
RC Bird Model<br />
A turkey vulture that can thermal<br />
by Bob Hoey<br />
COLUMNS<br />
12 Air Scoop<br />
by the Model Airplane News cr<br />
98 Thinking Big<br />
The latest in giant scale<br />
by GerryYarrish<br />
Engine advice<br />
by Dave Gierke<br />
154 Final Approach<br />
The next-generation UAV.<br />
by William Siuru<br />
DEPARTMENTS Editoria<br />
10 Airwaves<br />
18 Tips & tricks<br />
24 Pilot Projects 116"--Wame tha<br />
.- 120 Classifieds •?<br />
124 ProductWatch<br />
130 RCStore.com<br />
153 Index.of Advertisers<br />
1 53 Customer Service <<br />
Information
EDITORIAL<br />
BY DEBRA SHARP<br />
Small planes, big fun<br />
Who says bigger is better? Small,<br />
1/2A-powered model planes are easier to<br />
transport, less expensive, less time-consuming<br />
to build and use fewer building<br />
materials than their larger brethren. Besides,<br />
as small-airplane aficionado Randy Randolph<br />
said to me once, "They're so darn cute, and you<br />
can have a lot more of 'em in your shop!" In this<br />
issue, we've compiled information on more than 70 1/2A<br />
Global's Focke-<br />
WulfFw-190.<br />
kits and almost-ready-to-fly models, along with engine availability, prices and tips to<br />
keep your small model airborne. These planes and engines have been popular for<br />
decades, and now, even more designs are available to choose<br />
from. Turn to our "V2A to Z Guide" on page<br />
28 to see why good things often come in<br />
small packages.<br />
FLYING BREAKTHROUGH<br />
Another good, small thing we recently evaluated<br />
is the FMA Co-Pilot—an electronic,<br />
onboard unit that has something to<br />
offer pilots of all abilities. Using miniature,<br />
infrared sensors to distinguish<br />
between the cooler sky and warmer ground<br />
temperatures, the Co-Pilot automatically stabilizes any model in any flying attitude<br />
and wind condition. We tested it in a high-wing, electric trainer, a lowwing,<br />
glow-powered aerobat and a high-performance helicopter, and it passed<br />
with flying colors! To find out more about this amazing device, see our review on<br />
page 74.<br />
Ever wonder how some modelers get such beautiful results when they join ABS<br />
plastic parts? This month, associate editor Rick Bell shares his expert techniques for<br />
achieving a seamless, one-piece look on a two-piece engine cowl and wheel pants.<br />
With Rick's step-by-step instructions, you'll have a great-looking model in less<br />
time—and with less effort—than you thought possible.<br />
BIRD-LIKE FLIGHT<br />
Contributor Bob Hoey has more than 11 years of experience designing bird-like<br />
RC models that have remarkable stability without a vertical fin or rudder; this<br />
month, he shares his design techniques and theory along with plans for his<br />
RC Turkey Vulture. Though the<br />
real bird (and Bob's model) may<br />
be lacking in beauty, they both<br />
have graceful soaring ability in<br />
abundance. Built using traditional<br />
balsa and plywood techniques,<br />
Bob's anatomically correct model<br />
is nearly impossible to tell from<br />
the real thing as it flies overhead.<br />
The first major event to kick off<br />
the annual flying season, the 2002<br />
Member Audit Bureau<br />
Florida Jets—as always—boasted a great turnout and featured the lat- Even a big old pelican can be modeled. of Circulations Notice<br />
Magazine Publishers<br />
of America<br />
est developments in model-jet its graceful wingtip aileron feathers.<br />
technology. Two of the highlights<br />
of this fly-in—the new Eurofighter and F-100F Super Sabre kits—wowed the<br />
crowds; check out these models and more afterburner action on page 36. 4-<br />
S MDDEL AIRPLANE NEWS<br />
Airplane<br />
MODEL!<br />
FOUNDED 1929 NEWS<br />
EDITORIAL<br />
Editor-in-Chief TOM ATWOOD<br />
Executive Editor DEBRA D. SHARP<br />
Senior Technical Editor GERRY YARRISH<br />
Associate Editor RICK BELL<br />
Assistant Editors MATT BOYD, JAIME LAGOR<br />
Editorial Assistant MELISSA JONES<br />
•<br />
PUBLISHING<br />
Group Publishers LOUIS V. DeFRANCESCO JR.,<br />
YVONNE M. DeFRANCESCO<br />
Associate Publisher SHARON WARNER<br />
•<br />
COPY<br />
Copy Director LYNNE SEWELL<br />
Senior Copyeditor MOLLY Z. O'BYRNE<br />
Copyeditor COREY WEBER<br />
Associate Copyeditor PAIGE L. HAMILTON<br />
•<br />
ART / DESIGN<br />
Corporate Art Director BETTY K. NERO<br />
Senior Art Director ALAN J. PALERMO<br />
Promotional Art Director LESLIE COSTA<br />
Associate Art Director JOANNA WINN<br />
Assistant Art Directors VICTORIA HOWELL,<br />
COREY W. SMITH<br />
Staff Photographer WALTER SIDAS<br />
Assistant Photographer PETER HALL<br />
ADVERTISING<br />
Director of Advertising SHARON WARNER<br />
Assistant to Director of Advertising/Associate Publisher<br />
SIRI A. WHEELER<br />
Lead/Training Account Executive MONA TASSONE<br />
Senior Account Executive KATHRYN GEARHART<br />
Account Executive ANITA LEO<br />
Junior Account Executives<br />
CINDI VANDEMARK, SHERRY MORGAN<br />
Advertising Coordinator ANN T. WIEBER<br />
•<br />
CIRCULATION<br />
Circulation Director MARC LIU<br />
Circulation Manager CARMINA M. McGOVERN<br />
•<br />
MARKETING<br />
Media Marketing Manager VANESSA LaFERRIERE<br />
•<br />
OPERATIONS<br />
Director of Operations DAVID BOWERS<br />
Senior Digital Production Coordinator<br />
CHRISTINE BACHMANN-CORBIN<br />
Digital Production Coordinator<br />
CHRISTINA MASCHKE-MILEO<br />
Production Associate TOMLINSON S. WHEELER<br />
Production Assistant BOBBI-JO BALDWICK<br />
•<br />
INTERNET<br />
Director, Electronic Communications GARY KOLESAR<br />
Web Developers LEO FICKS, HOLLY HANSEN<br />
Database Coordinator DAN WELSH<br />
Web Programmer JAIME TORRES<br />
•<br />
CORPORATE<br />
Chairman of the Board ALDO DeFRANCESCO<br />
President and CEO LOUIS V. DeFRANCESCO JR.<br />
Secretary and Executive Vice President<br />
YVONNE M. DeFRANCESCO<br />
Treasurer and Chief Financial Officer<br />
CAROL SHEPHERD<br />
•<br />
CONTRIBUTORS<br />
Bob Aberle, Bernard Cawley, Roy L. dough Jr., Roy Day,<br />
Don Edberg, Dave Garwood, Dave Gierke, Henry Haffke,<br />
Tom Hunt, Michael Lachowski, Andy Lennon, George Leu,<br />
Jim Newman, Vic Olivett, Jim Onorato, Dave Patrick,<br />
Randy Randolph, Jef Raskin, Faye Stilley, John Tanzer,<br />
Craig Trachten, Rich Uravitch, Bob Van Tassel,<br />
Dan Wolanski, Nick Ziroli.<br />
AirAGE<br />
PUBLISHING<br />
100 East Ridge, Ridgefield, CT 06877-4606 USA<br />
www.modelairplanenews.com<br />
PRINTED IN THE USA
LOVE THAT LITHOPLATE<br />
In his February 2001 "Scale Techniques"<br />
column, George Leu mentioned 0.005 lithoplate<br />
for detailing a Midwest Texan, and<br />
this material was also mentioned in a<br />
review of Balsa USA's Cub (April 2001 issue).<br />
I gather that lithoplate is a thin, soft aluminum<br />
sheet, but what is it exactly, and<br />
where can I buy it in various thicknesses?<br />
I'd appreciate the info; I subscribe to the<br />
magazine and read every issue. Thanks,<br />
[email]<br />
RAY SCHMIDT<br />
Ray; lithoplate is a thin aluminum sheet material<br />
used by printing-press operators to print<br />
newspapers and other publications. After a run,<br />
the sheets of lithoplate are set aside, and when<br />
the bins are full, they are sent to be recycled.<br />
Each plate (sheet) is about 18x24 inches; you<br />
can buy used sheets for a song; I paid about 25<br />
cents apiece! I bought a stack several years ago<br />
at a local print shop for 20 bucks and still have<br />
enough to last a lifetime! The ink on the plate<br />
must be cleaned off before you can use the<br />
material, but it is water-soluble so cleaning is<br />
Lrg. volume Pitts Slimline offers the best<br />
solution for customizing<br />
your plane's<br />
exhaust system.<br />
Zenoha GT80<br />
We welcome your comments and suggestions. Letters should be addressed to "Airwaves," Model Airplane<br />
News, 100 East Ridge, Ridgefield, CT 06877-4606 USA; email man@airage.com. Letters may be edited for clarity and brevity. We<br />
regret that, owing to the tremendous numbers of letters we receive, we cannot respond to every one.<br />
With over 25 years of<br />
product innovation &<br />
development, Slimline<br />
continues to pioneer new<br />
ways to enhance your<br />
plane's look and performance.<br />
The Finest Smoke for Your Plane!<br />
One of Slimline's exclusive developments<br />
is the STI Preheat system. This<br />
serviceable smoke- fluid preheater<br />
will optimize smoke-fluid efficiency<br />
for dense trails of white-cloud smoke.<br />
Product Support: 480*967*5053<br />
10 MDDEL AIRPLANE NEWS<br />
very easy. Use a mixture of hot soapy water and<br />
a little rubbing alcohol. The aluminum is very<br />
thin (0.005 to 0.010 inch) and can easily be<br />
cut with a pair of scissors. The material has<br />
been hardened slightly by the printing process,<br />
but if you heat it quickly with a torch, you can<br />
anneal it to make it easier to bend and form. If<br />
you use it to make flat panels on your model,<br />
rubber cement or spray adhesive works well to<br />
hold it in place. Hope this helps. GY<br />
BIG BIPLANES<br />
In the April 2002 issue, I read with great<br />
interest your "Thinking Big" column on<br />
biplanes. I am currently<br />
building a 1/6-scale<br />
Boeing F4B-1, 1930s<br />
Navy biplane from an<br />
RCM plan. The upper<br />
wing has a 60-inch span<br />
and 10-inch chord. The<br />
bottom wing has a span<br />
of 48 inches with a 71/2inch<br />
chord. The stagger<br />
is positive, with the<br />
leading edge of the<br />
bottom wing set 55/8 inches aft of the leading<br />
edge of the upper wing. The decalage<br />
angle is designed to be slightly negative,<br />
with 2 degrees positive incidence on the<br />
bottom wing and 1 degree positive incidence<br />
on the upper wing. Since the upper<br />
wing is much larger in area, it will have<br />
much more lift than the lower wing. Both<br />
airfoils are essentially flat on the bottom.<br />
Even though the wings differ in span<br />
and chord, shall I still calculate the mean<br />
aerodynamic chord (MAC) and balance<br />
point in the same way as shown in Figure<br />
3 of that article, with the balance point 25
percent of MAC aft of the upper-wing<br />
leading edge? Thank you for your help.<br />
Great article!<br />
BILL TRUEBLOOD<br />
Edgewater, MD<br />
Bill; thank you for your feedback. It is true that<br />
the bigger wing will generate a larger portion of<br />
the lift than the smaller wing, even with the<br />
slight difference in incidence. In practice, the<br />
model will behave normally. Use the horizontal<br />
distance from the top wing leading edge to the<br />
bottom wing trailing edge as the MAC line, then<br />
use the 25 percent point location for the balance<br />
point. This will be a safe place to start. Also,<br />
check where the plan designer indicated the CG.<br />
I always start there and adjust accordingly after<br />
I've test-flown the model. Depending on the<br />
model's behavior, you may still have to slightly<br />
adjust its balance point one way or the other.<br />
When you finish your model, send us a picture<br />
for "PilotProjects." GY<br />
GYRO GYRATIONS<br />
I just finished reading Rick Bell's article<br />
about gyros. It was very helpful, as I have<br />
always been curious about them and how<br />
they work. I hope you can answer a question.<br />
In the section, "Uses for gyros," it<br />
states that using a gyro on the elevator and<br />
the rudder can help a modeler learn to<br />
torque roll. If I want to connect a gyro to a<br />
particular axis for the rudder<br />
and another axis for the<br />
elevator, does that mean<br />
I need two gyros?<br />
JEFF COOMBES,<br />
Austin, TX<br />
Jeff; I'm glad that you found the information in<br />
the gyro article useful. I had a lot of fun<br />
researching the article and learned a lot about<br />
gyros along the way. To answer your question: at<br />
the present time, gyros control only one axis at a<br />
time; so, yes, you'll need to use a separate gyro<br />
on each control surface (elevator and rudder).<br />
You can hook up both (with a Y-harness) to a<br />
single auxiliary channel, so you'll be able to timi<br />
them off when you're not using them.<br />
Otherwise, the gyros will be active all the time,<br />
and that will affect your control inputs. Be sure<br />
to thoroughly test the gyro inputs and the gain<br />
featiire before flying. RB<br />
Head Lock (tm) Remote<br />
spring loaded locking Glow<br />
Plug Connector fits under Plane<br />
cowls and Helicopter canopies,<br />
letting you cover the glow plug<br />
and head. #M021 Single<br />
shown.<br />
Remote Jack<br />
allows you to<br />
power your plug(s)<br />
from anywhere on<br />
the model, away<br />
from<br />
the<br />
prop<br />
Head Lock.<br />
Head Lock Remote.<br />
The Original Locking<br />
GlowPlug Connectors.<br />
Extended version<br />
For deep heat sink<br />
heads on cars, helicopters<br />
and boats. (#M056)<br />
Or for direct power: Head Lock<br />
(tin) fits all standard glow plugs,<br />
is powered by 1.2V to 1.5V battery<br />
or Power Panel. (#M009<br />
Shown)<br />
Want to cover your engine? Or keep your hands away from the prop? Use a Head Lock<br />
Remote. They look great, they work great and they're backed by Sullivan quality.<br />
Head Lock Remotes are available in single (M021), Extended (M056) and twin (M022)<br />
configurations. They have a low profile locking head and a<br />
remote jack that can be hidden away from the engine. Head<br />
Locks feature 18 gauge power cords and are available in<br />
Standard (M009) and Professional (stainless steel, M037).<br />
Sullivan. 50 years of setting the standard. Made in the USA.<br />
PRODUCTS<br />
One North Haven Street. Baltimore.<br />
Maryland 21224 USA.<br />
www.sullivanproducts.com<br />
GETTING BETTER IDEAS OFF THE GROUND<br />
COOL IT!<br />
A brief note to express my gratitude for the<br />
very informative article entitled "Cool It"<br />
that appeared in your April 2002 issue.<br />
Thanks to it, many of my longstanding<br />
questions about model engine fuels and<br />
engines were answered—a classic example<br />
of the instructive and understandable<br />
content you provide. Not all of us are<br />
engineers, but we are people who thoroughly<br />
enjoy model airplanes.<br />
ED GILLANDERS<br />
Poulsbo, WA<br />
Thanks for your kind words regarding the<br />
engine-cooling article. It's always a pleasure<br />
to hear from readers who benefited from our<br />
efforts! DAVE GIERKE<br />
JUNE 2002 1 1
y the Model Airplane News crew<br />
NEW PRODUCTS OR PEOPLE hit the model airplane market all the time, so<br />
here's the inside source for what's hot and where you can get it. Every issue, we sift<br />
through product announcements, show reports, rumors and prototypes to let you in on<br />
the best and the latest. Remember, you saw it here first!<br />
WATTAGE<br />
POWERFAN<br />
WattAge makes a triumphant entrance into the ever-growing ducted-fan market<br />
with the introduction of its new 400/6 PowerFan, a lightweight, affordable<br />
unit capable of amazing thrust. The entire fan unit weighs only 1.27 ounces,<br />
and coupled with the Mabuchi 400-size motor, it's able to deliver 12.62<br />
ounces of thrust at 24,500rpm. In addition, the fan blades are constructed of<br />
special material that ensures stiffness and an accurate mold. The complete<br />
unit sells for $35, but you can buy the fan alone (without the motor) for $26.<br />
WattAge; distributed by Global Hobby Distributors, 18480 Bandilier Cir.,<br />
Fountain Valley, CA 92708; (714) 964-0827; fax (714) 962-6452;<br />
www.globalhobby.com.<br />
T-38 Talon<br />
BOB FIORENZE<br />
Jet enthusiasts everywhere are sure to take notice of this new T-38 Talon from Bob Fiorenze.<br />
You could power this 48-inch-wingspan model with a .91 engine, but for some true jet action,<br />
why not throw in a turbine? The kit features an epoxy-primed fiberglass fuselage, a large,<br />
premolded flanged hatch, molded-in panel lines, rivets and access panel details and precut<br />
foam flying surfaces. It also comes with fiberglass inlets and bifurcated exhaust duct, flying<br />
stab hardware, a clear canopy, a fiberglass canopy frame, 3-views, plans, former templates and<br />
a photo-illustrated instruction manual. The Talon is now available at a special introductory<br />
price of $795.<br />
Bob Fiorenze, 401 Westchester Dr., Altamonte Springs, FL 32701; (407) 673-9080;<br />
www.rcaviation.com/fiorenze.<br />
ESPRIT MODEL<br />
Esprit Model's Line of fine-quality model products seems to be getting bigger<br />
and better by the day, and for that matter, so do its planes. Check out this<br />
55-inch-wingspan Kabriolin. Designed specifically with aerobatics in mind, the<br />
Kabriolin features an extremely lightweight balsa and plywood construction that makes it<br />
an ideal 3D trainer. Use electric or glow power—it's your choice! All of the supplied<br />
mounting parts support both options. Should you choose glow, the Kabriolin can<br />
be powered by a .40 to .50 2-stroke or .45 to .72 4-stroke engine. It comes<br />
with a white, gelcoated epoxy cowl complete with molded-in air vents and<br />
kabriolin and Aero 45<br />
an easily removable canopy for simple battery changes. The Kabriolin sells for $279.<br />
And for you electrics enthusiasts out there, Esprit proudly introduces the new 64.5-inch-wingspan Aero<br />
45. Powered by two Speed 480 motors, this semi-scale model of a 1940s-era Czechoslovakian courier<br />
plane features a classic balsa and ply construc-<br />
tion with iron-on covering. The kit<br />
comes with all of the wood parts, plans,<br />
instructions, decals, necessary hardware and a<br />
stylish clear canopy, which really distinguishes this<br />
model. For extra performance, Esprit recommends that you<br />
install two Mega 22/10/6 brushless motors. The Aero 45 kit sells<br />
for $119.<br />
Esprit Model, 657 Worcester St., #902, Southbridge, MA 01550; (508)<br />
764-4990; fax (508) 764-4990; prop.rc@verizon.net; www. espritmodel.com.<br />
12 MODEL AIRPLANE NEWS
HOBBICO<br />
FLYZDNE<br />
WARBIRDS<br />
Improvising is one of the joys of model building. Sure, ARFs are fun and convenient,<br />
but the satisfaction of adapting a product not meant for RC is difficult<br />
to beat. It helps when the product in question has aLl the right<br />
ingredients, such as these new, free-flight WW II fighters from<br />
Hobbico. Each one is made of light, durable foam and comes fully<br />
painted and trimmed in realistic colors and graphics.<br />
The Me-109 and Spitfire have 20-inch wingspans;<br />
the Zero measures 21.25 inches. Each plane<br />
comes with a motor, prop and rechargeable<br />
battery installed and includes a batterypowered<br />
quick charger. You can keep<br />
the stock power system for quick hops<br />
or replace it with your own micro gear. No<br />
glue is required for assembly; the included<br />
screwdriver is all you'll need. The<br />
best part is, these diminutive<br />
warbirds cost less than<br />
$16 each.<br />
And your wife says theres no passion left in you.<br />
Hobbico; distributed by<br />
Great Planes Model<br />
Distributors Co.,<br />
P.O. Box 9021, Champaign,<br />
IL 61826-9021; (800) 637-<br />
7660; fax (217) 398-0008;<br />
www.greatplanes.com.
RCV ENGINES LIMITED<br />
Ultra-low-profile<br />
4-stroke engine<br />
There's just something about an unconventional engine design<br />
being incurable gearheads, we're compelled by the combina-<br />
tion of oddball mechanics and inspired engineering. If a<br />
quirky engine actually works well, it's darn near irre-<br />
sistible. Take the rotary valve 4-stroke engines<br />
from RCV Engines Ltd.; we reviewed the 120<br />
in September 2001, and we loved its compact<br />
design and torquey performance. Now RCV has a<br />
new line of ultra-low-profile 4-strokes for other size applications.<br />
The first released is the .58ci RCV58-CD. Its rotary<br />
cylinder-valve technology allows an amazingly low<br />
engine height—just 66mm (2.6 inches)! That's con-<br />
siderably shorter than a .60-size 2-stroke, not to men-<br />
tion any comparable 4-stroke. Scale model builders take note;<br />
this engine will fit tight engine compartments without unsightly<br />
holes in the cowl. If it runs anything like its 120 big brother, this<br />
engine is a bargain at its expected price of $189.<br />
RCV Engines Limited; distributed in the USA by Wildcat Fuels, Inc.,<br />
206 Stephens Dr., Nicholasville, KY 40356; (859) 885-5619; fax<br />
(859) 885-8549; www.wildcatfuel.com.<br />
JK AEROTECH<br />
P-47<br />
JK Aerotech has answered the prayers of combat<br />
enthusiasts everywhere with the<br />
introduction of this 1/12-scale P-47<br />
Thunderbolt. Constructed of<br />
extruded foam and corrugated plastic, the P-47 is covered entirely<br />
in packing tape for exceptional durability. This "three-in-one" kit can<br />
be built as a Razorback, a bubble-top, or a long-wing, high-altitude<br />
H version with a wingspan of from 42 to 47 inches. The kit features a<br />
canopy, spars, pushrods and control horns, plus a roll of colored tape for covering. It weighs 2.9 pounds and can be powered by a .25<br />
to .46 engine. Best of all, the speed, agility and unlimited vertical performance of this P-47 can be yours for only $45.<br />
JK Aerotech, 10800 SE Orient Dr., Boring, OR 97009; (800) 442-6755; www.jkaerotech.com.<br />
Monster Kits<br />
HO Train Sets<br />
Model Airplanes<br />
Your hobby is our hobby too. For great finds<br />
on whatever you're into, check out eBay.com.<br />
AOL Keyword: eBay<br />
happy hunting"<br />
©2002 eBay Inc. Designated trademarks and brands are the property of their respective owners. All items subject to availability.
Voyager 50 CCPM 30<br />
and Nem Heli Engine<br />
Looking for big performance in<br />
a small package?<br />
Then JR's new<br />
Voyager 50 CCPM<br />
3D Heli is just the<br />
ticket. The new Voyager is not much larger than most<br />
.30-size helis, so it's easy to transport and to store. The<br />
Voyager's design is based on the already popular Vigor<br />
series of helis and shares many of the same<br />
parts with the Ergo 30/46, so replace-<br />
ent parts are easy to get.<br />
m<br />
For quick<br />
assembly, the Voyager<br />
uses 120-degree CCPM<br />
and a belt-driven tail.<br />
This means a low parts<br />
count and easy setup for the<br />
demanding 3D pilot. With its small size and today's<br />
powerful .50-size engines, the Voyager has an outstanding powerto-weight<br />
ratio that gives the heli a performance level previously<br />
reserved for larger .60-size helicopters. The Voyager 50 costs $499.99.<br />
For you power-hungry pilots, try the new IMZ RV50-S engine. Its performance<br />
features include a side-mounted slide valve carburetor with<br />
reed-valve induction. This smooth-running engine also includes a KSJ<br />
tuned muffler and sells for $479.99. If you're ready to try 3D helicopter<br />
flying, JR's Voyager 50 and IMZ RV50-S are a great way to get started.<br />
JR; distributed by Horizon Hobby Inc., 4105 Fieldstone Rd.,<br />
Champaign, IL 61822; (800) 338-4639; www.horizonhobby.com.<br />
HANGAR 9<br />
Pro-Lite<br />
Wheels<br />
Why not enhance the appeal of your new scale plane with Hangar 9's<br />
new Pro-Lite Wheels. They not only contribute a great deal of scale<br />
realism, but they also save some weight. Each wheel features a<br />
skinned foam tire that looks like real rubber but weighs only a fraction<br />
of the real thing. The large hubs are also extremely lightweight<br />
and durable. The Pro-Lite Wheels range in size from l1/2 to 41/2 inches<br />
and in price from $4.99 to $24.99 each.<br />
Hangar 9; distributed by Horizon Hobby Inc., 4105 Fieldstone Rd.,<br />
Champaign, IL 61822; (217) 355-9511; www.horizonhobby.com.<br />
16 MODEL AIRPLANE NEWS<br />
When it comes to scale models, it really doesn't get much better<br />
than the "Classic Scale" series from Flair Products, and this<br />
Boeing PT-17 Stearman is the newest addition to that high-<br />
quality line of kits. Powered by a 1.80 4-stroke engine, this<br />
l:4.3-scale model is capable of extremely scale performances. It<br />
will fly slow and steady, just like the real thing. The kit features<br />
CNC and die-cut parts, strip and sheet wood, a dummy engine, all<br />
of the necessary hardware, scale wheels (including a steerable<br />
tailwheel), full-size plan and instructions. It also comes with<br />
vacuum-formed moldings for the detail trim areas and fiberglass<br />
moldings for the forward fuselage and dummy crankcase. A fully<br />
sprung and damped<br />
undercarriage, various<br />
moldings for the wind-<br />
screens and fairings and<br />
a complete closed-loop<br />
control system for the<br />
rudder and elevators<br />
round out this incredi-<br />
ble package. It's even<br />
possible to customize<br />
your kit to represent a<br />
specific Stearman of your choosing. The price of this 89-inch-<br />
wingspan model was not available at press time, but it's expected<br />
to sell for between $400 and $450.<br />
Flair Products Ltd.; distributed in the USA by Radical RC, 7046<br />
Harshmanville Rd., Huber Heights, OH 45424; (937) 237-7889;<br />
fax (937) 237-1521; davthacker@aol.com; www. radicalrc.com.<br />
An AC-to-DC power supply is a<br />
must-have for any serious<br />
electrics enthusiast, but<br />
they are often too big and<br />
bulky to be conveniently<br />
transported. DuraTrax has<br />
solved that problem with<br />
its Compact Switching<br />
Power Supply. It is<br />
designed with an eye toward<br />
simplicity and convenience; the switch-<br />
ing circuitry is housed inside the compact wall<br />
plug, along with a cooling fan. A removable 4-foot cord is connected<br />
DURATRAX<br />
Switchin<br />
Power Supply<br />
to the terminal block adapter. The terminals are perfectly shaped to<br />
allow quick attachment of alligator clips of various sizes, and the<br />
mounting block ensures that they never accidentally touch and cause<br />
a short. Pads attached to the pc board on the bottom of the block<br />
enable you to solder wires directly to it. The unit's output is rated at<br />
7 amps of 12V DC current—enough to handle most charging<br />
tasks; $62.99.<br />
DuraTrax; distributed by Great Planes Model Distributors, P.O. Box<br />
9021, Champaign, IL 61826-9021; (800) 637-7660; fax (217)<br />
398-0008; www.duratrax.com. 4-
TIPS & TRICKS SEND IN YOUR IDEAS- (Mode/A/rp/arte News will give a free, one-year subscription (or one-year renewal, if<br />
you already subscribe) for each idea used in "Tips & Tricks." Send a rough sketch to Model Airplane News, 100 East<br />
Ridge, Ridgefield, CT 06877 4606 USA. BE SURE YOUR NAME AND ADDRESS ARE CLEARLY PRINTED ON EACH<br />
SKETCH, PHOTO AND NOTE YOU SUBMIT. Because of the number of ideas we receive, we can't acknowledge each one,<br />
nor can we return unused material.<br />
MIRRORING<br />
SERVOS<br />
Split elevators can<br />
cause problems if you<br />
connect two servos through a Y-harness. Servos of<br />
the same brand rotate in the same direction, and<br />
this can result in differing geometry between sides.<br />
This, in turn, produces unequal force and controlsurface<br />
reaction. An easy way to avoid this is to use<br />
comparable servos from different brands that<br />
rotate in opposite directions. Of course, the servos<br />
should have roughly the same speed and torque<br />
characteristics, but most standard servos are<br />
enough alike to work.<br />
Thomas Smith, Aberdeen, MD<br />
18 MODEL AIRPLANE NEWS<br />
Cut to 1/4"<br />
SPOTLESS FUEL TANKS<br />
A dirty fuel tank can lead to less than<br />
immaculate performance and reliability,<br />
but it can be a chore to get a cleaning<br />
tool inside a tank. To make that easier, trim the bristles of a 6-inch acid brush to<br />
about 1/4 inch. Bend the brush tip to approximately 45 degrees to create your own<br />
tank scrubber. Pour an ounce or two of alcohol into the tank, swish it around, and<br />
let it sit for 15 minutes. Then, use your scrubber to clean the residue from inside<br />
the tank. If you need a sharper angle to reach a corner, bend the brush tip more.<br />
For really stubborn spots, cut the bristles slightly shorter to get more scrubbing<br />
action.<br />
William Pote, Hobe Sound, FL<br />
KEEP YOUR COOL<br />
With electric power growing by leaps<br />
and bounds, here's a simple cooler box<br />
that you can build to get more flight<br />
time and take better care of your batteries.<br />
Cut a piece of 1/4-inch foamboard<br />
into two pairs of matching sides<br />
to make four sides of a box. Epoxy the<br />
box together, but leave two opposite ends open.<br />
At one end, insert a 12V fan from RadioShack<br />
(item no. RS 273 243B; $10). Place your<br />
charger on top of the cooler box (secure it<br />
with rubber bands, if desired) and connect<br />
the leads from the fan and the<br />
charger to a 12V source. Then, place<br />
your pack in the open end of the<br />
box to cool it down before and during<br />
charging. This way, you won't abuse your packs<br />
by charging them while they're still hot, and you won't<br />
have to wait as long before recharging.<br />
Jack Hillyer, Seattle, WA<br />
GRAB-MAGNET FOR SMALL PARTS<br />
Little parts such as screws, pins, etc. can be difficult to retrieve one at a<br />
time from containers, and if you fish around with your fingers, you<br />
sometimes find the sharp end first—ouch! Next time, cut a strip from a<br />
flexible refrigerator magnet to fit into the container. The magnet will<br />
collect the parts from the bottom of the container, thereby making it easy<br />
for you to retrieve whichever part you need quickly and easily.<br />
Kenneth Kent, Florence, OR
TIPS & TRICKS<br />
RACK 'EM!<br />
Unless you're wealthy enough to add a new wing onto your house to serve<br />
as a 1/4-scale hangar, chances are that you have to store your models in a<br />
limited area. A great way to make the most of the space you have is to<br />
build a hanging rack out of 1/2-inch PVC pipe. You'll need about 4 feet<br />
of tube, four 90-degree elbows and two 45-degree elbows. Cut the<br />
tube into seven pieces: a top crosspiece, two medium-length diagonal<br />
extensions, two short vertical extensions and two long longitudinal<br />
extensions—exact lengths will vary, depending on the size of your airplane.<br />
At the midpoint of the crosspiece, drill a 3/16-inch hole to fit<br />
a 2-inch deck screw, from which you will hang the rack.<br />
When all the angles are squared, glue the pipe together,<br />
and just like that, you'll have a multipurpose plane rack for<br />
BULLETPROOF YOUR PLANE<br />
Kevlar weave is one of the strongest materials<br />
around; it's no coincidence that it is the prime<br />
ingredient in airbags and police body-armor. Ounce<br />
for ounce, it's much stronger than fiberglass, and as<br />
such, it's great for laminating into an airplane to<br />
reinforce high-stress areas such as firewalls, wing<br />
supports and landing-gear mounts. An inexpensive<br />
source for Kevlar is an auto junkyard; deflated<br />
airbags are easily found in late-model wrecks.<br />
Donald Stach, Madeira Beach, FL<br />
less than $2 in parts.<br />
Jim Haslouer, Merced, CA<br />
90° PVC elbow<br />
45° PVC elbow<br />
" PVC pipe<br />
SAWDUST-FREE WORKSHOP<br />
Here's a neat way to keep sawdust under control in your workshop.<br />
Take a standard box fan with a rectangular shroud and duct-tape a<br />
filter element from a forced-air heater/air conditioner onto the<br />
intake side of the fan. These filters are available in various sizes<br />
and can be found at hardware and home-improvement stores; they<br />
can be trimmed to fit, if necessary. Be sure to seal the edges well<br />
with the duct tape. When you turn on the fan, the intake air<br />
will be drawn through the filter. If you position<br />
the intake side near you as you<br />
sand, the sawdust will collect in<br />
the filter instead of all over your<br />
workshop (and you).<br />
Jimmy Bruns, Yucca Valley, CA<br />
ALL-TEMPERATURE PUSHRODS<br />
The plastic pushrods that are included in many kits can stretch or contract, depending on the temperature. This can throw off your trim settings and put<br />
extra stress on parts. A good way to avoid this problem is to run a length of wire through the center of the plastic-tubing pushrods. You can solder the clevises<br />
to the wire, which makes a stronger joint. More important, the wire will not be affected by temperature changes. The plastic pushrods now serve as<br />
support for the wires.<br />
20 MODEL AIRPLANE NEWS<br />
James McCoul, Sterling Heights, Ml
Birmingham<br />
Homewood Toy 8 Hobby<br />
205-879-3986<br />
Decatur<br />
Pyramid Hobbies II<br />
Huntsville<br />
RC. Hobbies<br />
256-539-1347<br />
Mobile<br />
HobbyTown USA<br />
334-633-8446<br />
Montgomery<br />
Uncle Al's Hobbies<br />
334-277-1715<br />
Selma<br />
Ken's Model Shop<br />
334-872-9493<br />
ALASKA<br />
Wasilla<br />
Hobbies & More<br />
907-357-6235<br />
Gilbert<br />
HobbyTown USA<br />
480-892-0405<br />
Glendale<br />
Hobby Bench<br />
602-547-1828<br />
Phoenix<br />
Frank's Hobby House<br />
602-992-3495<br />
Hobby Bench<br />
602-995-1755<br />
Tucson<br />
Classic Hobbies<br />
520-293-2022<br />
Hobby Barn<br />
800-324-4910<br />
HobbyTown USA<br />
520-882-8888<br />
Little Rock<br />
Marks Hobby Shop<br />
501-562-8230<br />
Monticello<br />
Advance Hobbies<br />
501-367-5200<br />
Bakersfield<br />
B 8 F Hobbies<br />
661-322-7955<br />
Burbank<br />
T 8 A Hobby Lobby<br />
818-842-5062<br />
UltraCotes back, am<br />
At last there's lots of Hangar 9 UltraCote' in lots of color<br />
Campbell<br />
D & J Hobby<br />
408-379-1696<br />
Costa Mesa<br />
AirWild Hobbies<br />
714-751-0789<br />
Covina<br />
Covina Hobby Shop<br />
626-331-1910<br />
Dublin<br />
Wold's Hobbies<br />
925-828-5350<br />
Fountain Valley<br />
Jax Hobbies<br />
714-378-8924<br />
Fresno<br />
HobbyTown USA<br />
559-435-3342<br />
Glendale<br />
Hobby Zone<br />
818-546-2291<br />
Robin's Hobby Service<br />
818-240-2093<br />
Hanford<br />
Hobby Center<br />
541-928-5255<br />
Hemet<br />
Dynamic Hobbies<br />
909-925-9331<br />
La Puente<br />
Tony's Hobbies<br />
818-917-5290<br />
Laguna Hills<br />
Gyro Hobbies<br />
949-583-1717<br />
Lakewood<br />
Hobby Warehouse<br />
562-531-8383<br />
Lancaster<br />
Smith Bros<br />
661-942-6984<br />
Montclair<br />
Pegasus Hobbies<br />
909-982-6507<br />
Mountain <strong>View</strong><br />
San Antonio Hobby Shop<br />
650-941-1278<br />
Palm Desert<br />
Uncle Don's Hobbies<br />
760-346-8856<br />
Poway<br />
Hobby Central<br />
858-513-0373<br />
Redding<br />
Redding RC & Hobby<br />
530-241-2375<br />
Rohnert Park<br />
Hangar One Hobbies, Inc.<br />
707-585-3170<br />
Sacramento<br />
Airborne Hobbies<br />
916-332-4661<br />
RC Country Hobbies<br />
916-731-5868<br />
San Carlos<br />
J 8 M Hobby House<br />
650-593-5019<br />
San Diego<br />
Discount Hobby<br />
Warehouse<br />
858-560-9633<br />
San lose<br />
Sheldon's Hobby Stop<br />
408-943-0872<br />
San Marcos<br />
HobbyTown<br />
760-739-0672<br />
San Mateo<br />
Talbots Toyland<br />
650-342-0267<br />
Sand City<br />
Monterey Hobbies<br />
831-393-1112<br />
Thousand Oaks<br />
Marty's Hobbies<br />
805-497-3664<br />
Visalia<br />
Visalia Hobbies<br />
559-734-8072<br />
COLORADO<br />
Aurora<br />
Blue Yonder Models<br />
303-337-6887<br />
Colpar Hobbies<br />
303-341-0414<br />
Fort Collins<br />
HobbyTown USA<br />
970-226-3900<br />
Grand lunction<br />
Golden Hobbies<br />
970-523-8300<br />
Norm's RC Hobbies<br />
970-243-8044<br />
Greeley<br />
Don's Hobbies<br />
970-353-3115<br />
Things With Wings<br />
970-352-1067<br />
Lakewood<br />
Action Hobbies<br />
303-233-6275<br />
Longmont<br />
HobbyTown USA<br />
303-774-1557<br />
Westminster<br />
HobbyTown USA<br />
303-431-0482<br />
Korwalk<br />
Al's Hobbies<br />
203-846-9932<br />
Middletown<br />
Middletown Electronics<br />
& Hobbies<br />
302-378-8686<br />
Seaford<br />
Aeromarine Hobby Stop<br />
302-629-3944<br />
Citrus Springs<br />
D 8 S Hobby Shop<br />
352-527-1500<br />
Fort Myers<br />
Hobbie Warehouse<br />
941-358-7047<br />
Hobbie Warehouse<br />
941-278-1295<br />
Ft Lauderdale<br />
R. C. Hobbies<br />
954-721-5720<br />
Jacksonville<br />
Cars, Planes & Trams<br />
904-880-9500<br />
Hobby World<br />
904-772-9022<br />
Jupiter<br />
My Rose Hobbies<br />
561-744-3800<br />
Lakeland<br />
Aero R/C Hobbies<br />
863-668-8559<br />
Miami<br />
HobbyTown USA<br />
305-273-7803<br />
Naples<br />
Hobbie Warehouse<br />
941-262-2701<br />
Ocala<br />
Rob's Hobby World<br />
352-854-2799<br />
Orlando<br />
Bob's Hobby Center<br />
407-277-1248<br />
Central Florida Hobbies<br />
407-295-9256<br />
Graves R/C Hobbies<br />
407-294-5699<br />
Palm Bay<br />
Space Coast Hobbies<br />
321-722-3696<br />
Pensacola<br />
Hobby Central<br />
850-471-9800<br />
Pinedas Park<br />
Archie's Hobbies & Helis<br />
727-526-0394<br />
Plantation<br />
Warrick Custom<br />
Hobbies Inc<br />
954-370-0708<br />
Port Saint Lucie<br />
Quality Aircraft<br />
561-460-2844<br />
SanFord<br />
Flightline Hobbies<br />
407-330-7655<br />
South Daytona<br />
Ace Hobbies<br />
904-761-9780<br />
Tampa<br />
Charlie's Discount<br />
Hobbies<br />
813-882-4007<br />
Farmer's Hobby Shop<br />
813-248-3314<br />
West Palm Beach<br />
Craft House Hobby Shop<br />
561-683-0764<br />
Wildwood<br />
Noells Hobbies<br />
352-748-0031<br />
Andersonville<br />
Hodges Hobbies<br />
229-924-9505<br />
Columbus<br />
Hobby Town USA<br />
706-660-1793<br />
Marietta<br />
National Hobby Supply<br />
770-333-0190<br />
Winder<br />
Winder Hobby<br />
770-867-9148<br />
Hilo<br />
Pacific Modelsports<br />
808-933-1348<br />
Hi<br />
Boise<br />
Boise Hobby<br />
208-363-9555<br />
HobbyTown USA<br />
208-376-1942<br />
Hayden<br />
Monster Hobbies<br />
208-772-0422<br />
Idaho Falls<br />
JD Hobbies<br />
208-529-9500<br />
Lewiston<br />
Bob's Hobbies<br />
208-746-8807<br />
Pocatello<br />
Dapco Hobbies<br />
208-233-8163<br />
Aurora<br />
HobbyTown USA<br />
630-375-1230<br />
Belleville<br />
Corner Hobby<br />
618-277-6030<br />
Chillicothe<br />
Fly Boy Hobbies<br />
309-274-5344<br />
Elmburst<br />
Al's Hobby Shop<br />
630-832-4908<br />
Galesburg<br />
Wing Manufacturing 8<br />
Hobby<br />
309-342-3009<br />
Joliet<br />
Leisure Hours Hobbies<br />
815-439-1477<br />
Lansing<br />
Lansing Radio Control<br />
708-474-1272<br />
Machesney Park<br />
HobbyTown USA<br />
815-282-0727<br />
Ottawa<br />
Top Gun Hobby Center<br />
815-433-6132<br />
Sandwich<br />
G 8 D Hobbies<br />
815-786-8553<br />
St. Charles<br />
HobbyTown USA<br />
630-587-1256<br />
Wheeling<br />
Venture Hobby & Craft<br />
847-537-8669<br />
Evansville<br />
ABC Hobbycraft Co.<br />
812-477-9661<br />
Ft. Wayne<br />
Phil's Hobby Shop<br />
219-426-5056<br />
Griffith,<br />
G 8 G Hobbies<br />
219-924-6686<br />
Indianapolis<br />
Hobby R/C<br />
317-359-6242<br />
HobbyTown USA<br />
317-845-4106<br />
Stick 'n' Rudder Hobby<br />
317-243-7983<br />
Lafayette<br />
Hobby Time<br />
765-449-8233<br />
Liberty<br />
Bud's R/C Hobbies<br />
765-458-6416<br />
Muncie<br />
Muncie Model & Hobby<br />
317-289-5856<br />
South Bend<br />
Michiana R/C Hobbies<br />
219-289-2883<br />
Terre Haute<br />
Joe's Hobby Barn<br />
812-299-5773<br />
Vernon<br />
Hobby Hanger<br />
812-346-6497<br />
IE<br />
Cedar Falls<br />
Bob's R/C Hobby<br />
319-277-0211<br />
Davenport<br />
HobbyTown USA<br />
319-355-2071<br />
Des Moines<br />
Hobby Haven<br />
800-697-1213<br />
Lawrence<br />
HobbyTown USA<br />
785-865-0883<br />
Overland Park<br />
Hobby Haven<br />
913-381-3111<br />
Salina<br />
Don's Hobby Shop<br />
800-972-6273<br />
Topeka<br />
Dee & Mee Hobbies<br />
785-228-9601<br />
Lexington<br />
X-Cell Models<br />
859-296-0893<br />
Louisville<br />
Scale Reproductions<br />
502-459-5849<br />
Murray<br />
E Hobby RC<br />
270-753-4359<br />
Sebree<br />
Flying Z Hobbies<br />
270-835-9001<br />
Shelbyville<br />
Quantum Models<br />
502-633-6007<br />
Metairie<br />
Hobby Hut<br />
504-733-4629<br />
Natchitoches<br />
BnD Hobbies<br />
888-854-0710<br />
Slidell<br />
SI cell Hobbies<br />
504-643-7176<br />
Orrington<br />
King's Mountain RC<br />
207-825-5593<br />
Portland<br />
Ray & Robins'Hobby<br />
Center<br />
207-797-5196<br />
Burtonsville<br />
Hobby City<br />
301-421-5977<br />
Cockeysville<br />
Hunt Valley Hobbies<br />
410-666-1098<br />
Crofton<br />
G.P.A.<br />
301-858-0004<br />
Waldorf<br />
Doug's Hobby Shop<br />
301-843-7774<br />
Belmont<br />
Alex's R/C Hobbyworks<br />
617-484-3780<br />
Lee<br />
Barn Speed Hobbies<br />
800-499-2651<br />
Plymouth<br />
Precision Model<br />
Products<br />
508-747-4556<br />
West Boylston<br />
Henry's Hobby House<br />
508-835-6165<br />
Farmington<br />
Joe's Hobby Center<br />
248-477-6267<br />
Flint<br />
Riders Hobby Shop<br />
810-720-2563<br />
Grand Rapids<br />
Rider's Hobby Shop<br />
616-247-9933<br />
Lansing<br />
Rider's Hobby Shop<br />
517-485-0700<br />
The Hobby Hub<br />
517-351-5843<br />
Macomb<br />
Rider's Hobby Shop<br />
810-532-0050<br />
Madison Heights<br />
Rider's Hobby Shop<br />
248-589-8111<br />
Muskegon<br />
Hobby Barn<br />
231-744-8797<br />
Port Huron<br />
Pastime Hobbies<br />
810-982-2874<br />
Saginaw<br />
Roger's Hobby Center<br />
Taylor<br />
Rider's Hobby Shop<br />
734-287-7405<br />
Traverse City<br />
Trams & Tilings<br />
231-947-1353<br />
Warren<br />
Prop Shop<br />
810-757-7160<br />
Burnsville<br />
R/C City<br />
612-894-5208<br />
Fridley<br />
National Hobby<br />
Company<br />
763-571-9283<br />
Little Canada<br />
Hub Hobby Center<br />
651-490-1675<br />
Richfield<br />
Hobby Warehouse<br />
612-861-5587<br />
Hub Hobby Center<br />
612-866-9575<br />
Branson, Hollister<br />
TPA Hobby Center<br />
417-335-6624<br />
Claycomo<br />
MNC Hobbies<br />
816-452-1032<br />
loplin<br />
Joplin R/C Hobbies<br />
417-623-0011<br />
Raytown<br />
Reed's<br />
816-353-8396<br />
Springfield<br />
Sleeth Hobbies<br />
417-883-1118<br />
St. Charles<br />
Mark Twain Hobby<br />
Center<br />
636-946-2816<br />
St. Louis<br />
Schaefer's Hobby Center<br />
314-729-7077<br />
Schaefer's R/C Shop<br />
314-352-3750<br />
Billings<br />
Central Hobbies<br />
406-259-9004<br />
Hastings<br />
Mr. Bill's Hardware City<br />
402-462-4865<br />
Kearney<br />
FunTime Hobby<br />
308-234-1806<br />
IE<br />
Elko<br />
Elko Electronics<br />
775-753-6776<br />
Las Vegas<br />
HobbyTown USA<br />
702-889-9554<br />
Nice Twice Hobbies 8<br />
Sports<br />
702-876-2280<br />
Reno<br />
Hobbies of Reno<br />
775-826-6006<br />
Nashua<br />
RC Buyers Warehouse<br />
603-595-2494<br />
Salem<br />
Bill's Hobby Barn<br />
603-898-9241<br />
Greenbrook<br />
Jerry's Hobby Center<br />
732-752-6030
Multi-Temp Thermal<br />
it's back for good.<br />
it better dealers nationwide. So let the building begin!<br />
Jackson<br />
Jackson Hobby Shop<br />
732-364-3334<br />
Moonachie<br />
US Hobby<br />
201-460-0544<br />
Mt. Laurel<br />
Creek Hobbies<br />
856-722-0489<br />
Old Bridge<br />
G.S. Hobbies<br />
732-727-7871<br />
Pompton Plains<br />
Hobby Hut<br />
973-835-2077<br />
Red Bank<br />
Colorest<br />
732-741-0001<br />
Alamogordo<br />
Flight Deck Hobbies Inc.<br />
505-434-6563<br />
Albuquerque<br />
Albuquerque Hobby<br />
505-275-1882<br />
Hobbies N Stuff<br />
505-293-1217<br />
Farmington<br />
HobbyTown USA<br />
505-325-5156<br />
Rio Rancho<br />
HobbyTown USA<br />
505-994-8874<br />
Brooklyn<br />
East Coast R/C Hobbies<br />
718-627-3814<br />
Buffalo<br />
Field's Hobby Center<br />
716-681-6440<br />
E. Northport<br />
Larry's Hobby Supplies<br />
631-499-7166<br />
Flushing<br />
Fantasia Hobby World<br />
718-460-5671<br />
Harrison<br />
Tony's Hobby Shop<br />
914-835-4765<br />
Pete's Old Forge<br />
315-369-3748<br />
Poughkeepsie<br />
Hobby House<br />
845-297-3341<br />
Rochester<br />
Dan's Crafts S Things<br />
716-654-8388<br />
The Hobby House<br />
716-429-6280<br />
Seaford<br />
Sunrise Hobbies<br />
516-783-4343<br />
Syracuse<br />
Walt's Hobby<br />
315-453-2291<br />
Vernon<br />
Brennan's R/C Hobbies<br />
315-829-4930<br />
Vestal<br />
G J.'S Hobbies 8 Crafts<br />
607-754-3351<br />
Webster<br />
Performance Hobbies<br />
716-872-4990<br />
Archdale<br />
K/C Hobby<br />
336-434-3482<br />
Boone<br />
Minor Obsession<br />
828-265-2651<br />
Fayetteville<br />
Hayes Hobby House<br />
910-485-2337<br />
Goldsboro<br />
Glen's Hobby Corner<br />
919-734-7754<br />
Granite Falls<br />
Airborne Hobbies<br />
828-313-3311<br />
Havelock<br />
GBI Hobbies<br />
252-463-4073<br />
King<br />
King R/C<br />
336-983-3969<br />
Landis<br />
High Speed Hobbies<br />
704-855-2940<br />
Naples<br />
Will's CB Shop<br />
828-681-5500<br />
Oakboro<br />
Herbs Hobbies 8 Gifts<br />
704-485-4122<br />
Raleigh<br />
Hobby Masters<br />
919-870-1121<br />
HobbyTown USA<br />
919-790-5324<br />
Berlin Heights<br />
Daniels Hobbies<br />
419-588-2029<br />
Cincinnati<br />
Phils Hobbies<br />
513-385-8616<br />
Startleet Hobbies<br />
513-984-9889<br />
Dayton<br />
RC Hobby Center<br />
937-236-2455<br />
Maple Heights<br />
Southeast Hobby<br />
216-663-7171<br />
Miamisburg<br />
B&B Hobbies<br />
937-847-9555<br />
North Canton<br />
Aero Tech Hobbies<br />
330-499-1300<br />
Parma<br />
Parma Hobby<br />
216-741-6440<br />
Salem<br />
Nutter's Prop Shop<br />
330-337-8650<br />
Strongsville<br />
HobbyTown USA<br />
440-846-1770<br />
Swanton<br />
T 'n' T Landing Gear<br />
419-868-5408<br />
Toledo<br />
Hobby Stop-West<br />
419-471-1108<br />
Rider's Hobby Shop<br />
419-843-2931<br />
Westerville<br />
Capstone R/C Suppliers<br />
614-899-6313<br />
Youngstown<br />
Austintown Hobbies<br />
330-793-9233<br />
Boardman Hobby<br />
Center<br />
330-758-1522<br />
Oklahoma City<br />
Mite's Hobbies 8 Radio<br />
Control<br />
405-682-4300<br />
Mike's Models<br />
405-949-1049<br />
Tulsa<br />
Model Works<br />
918-664-1800<br />
Beaverton<br />
R/C Modeler Northwest<br />
503-649-0633<br />
Tammie's Hobbies<br />
503-644-4535<br />
Bend<br />
D's Toys 8 Hobbies<br />
541-389-1330<br />
Eugene<br />
Eugene Goy and Hobby<br />
541-344-2117<br />
Grants Pass<br />
Chief Aircraft Inc.<br />
877-218-9029<br />
Medford<br />
Al's Toy 8 Hobby<br />
541-779-9935<br />
Portland<br />
Ted's Hobbies Unlimited<br />
503-287-4090<br />
Ultimate Hobbies<br />
503-247-8194<br />
Roseburg<br />
Bargain Bin<br />
541-673-8266<br />
RC World<br />
541-677-9007<br />
Salem<br />
Leisure Hobbies<br />
503-588-9884<br />
Dickson City<br />
Main Hobby Center<br />
570-489-8857<br />
Easton<br />
Trains 8 Lanes<br />
610-253-8850<br />
Hummelstown<br />
The Hidden Hangar<br />
717-566-7163<br />
Muncy<br />
Leeco Hobbies<br />
570-437-2619<br />
Pittsburgh<br />
1 8 C Hobbies<br />
412-795-9344<br />
Swoyersville<br />
R 8 W Hobbies 8 Crafts<br />
570-283-3066<br />
Warminster<br />
J.C. R/C Hobbies<br />
215-672-5200<br />
Waterford<br />
Gehrlein Products<br />
814-866-1131<br />
Wilkes-Barre<br />
Walter's Hardware<br />
570-823-1406<br />
York<br />
Mel's Hobbies<br />
717-843-8321<br />
Skelly Sporting Goods 8<br />
Hobbie<br />
717-792-2860<br />
Warwick<br />
Ray's Hobby<br />
401-738-4908<br />
Easley<br />
The Hobby Connection<br />
864-295-1209<br />
Mt. Pleasant<br />
Randy's Model<br />
Aeronautics<br />
843-884-7411<br />
North Augusta<br />
Ultimate Hobbies<br />
803-278-6346<br />
Blountville<br />
AAA Model Supply<br />
423-323-1513<br />
Franklin<br />
HobbyTown USA<br />
615-771-7441<br />
Knoxville<br />
HobbyTown USA<br />
865-690-1099<br />
M 8 N Hobbies<br />
865-525-7532<br />
Tennessee Model<br />
Hobbies<br />
865-927-2900<br />
McMinnville<br />
ARF Hobbies, Inc.<br />
931-474-7223<br />
Memphis<br />
HobbyTown USA<br />
901-213-2682<br />
Millington<br />
Going Western<br />
901-872-7566<br />
Murfreesboro<br />
HobbyTown USA<br />
615-890-6777<br />
Nashville<br />
Danielle's RC<br />
615-228-0867<br />
Austin<br />
Cedar Park Hobbies<br />
512-331-2943<br />
Bryan<br />
American Aerospace<br />
979-778-9464<br />
Carrollton<br />
Mike's Hobby Shop<br />
972-242-4930<br />
Corsicana<br />
Hobby Crafts Etc.<br />
903-872-6761<br />
Dallas/Ft.Worth Area<br />
Roy's Hobby Shop<br />
817-268-0210<br />
El Paso<br />
Hal's Hobby Warehouse<br />
915-591-2213<br />
Greenville<br />
Drycreek Hobby Shop<br />
903-527-5381<br />
Hallsville<br />
Sunshine's<br />
903-660-3320<br />
Houston<br />
Kingsway R/C Hobby<br />
713-266-7750<br />
Larry's Hobbies<br />
281-443-7373<br />
Performance R/C<br />
281-469-3965<br />
Texas Model Trends<br />
713-941-4000<br />
Trains & Planes<br />
Hobbies<br />
713-974-1277<br />
Irving<br />
Wild Bill's Hobby Shop<br />
972-438-9224<br />
Mesquite<br />
A-l Hobby<br />
972-289-1160<br />
Pasadena<br />
All American Discount<br />
Hobbies<br />
281-998-9600<br />
Pearland<br />
Clarke's Hobby Shop<br />
281-997-2777<br />
Piano<br />
Texas R/C Modellers<br />
972-422-5386<br />
Rockport<br />
Ben's R/C Hobbies<br />
361-729-0420<br />
Sugarland<br />
The R.C. Hobby Shop<br />
281-265-4844<br />
Waco<br />
Waco Hobby Stop<br />
254-776-4991<br />
Wichita Falls<br />
Action Hobbies<br />
817-766-2667<br />
Bountiful<br />
Ultimate Hobbies<br />
801-294-7793<br />
Layton<br />
HT's RC's<br />
801-546-6959<br />
Logan<br />
Earl's R/C<br />
435-752-2255<br />
Midvale<br />
Some Dude's Hobby<br />
Shop<br />
801-567-9944<br />
Orem<br />
World Class Model<br />
801-235-1869<br />
Salt Lake City<br />
West Valley Hobbies<br />
801-964-1700<br />
Sandy<br />
M.R.S. Hobby Shop<br />
801-572-6082<br />
Taylorsville<br />
HobbyTown USA<br />
801-964-8242<br />
Chantilly<br />
Hobby Hangar<br />
Speedway<br />
703-631-8820<br />
Dumfries<br />
Brown Brothers Hobby<br />
Shop<br />
703-221-5746<br />
Newport News<br />
Stream R/C Models<br />
757-591-0720<br />
Salem<br />
Crossroads Hobbies of<br />
Salem<br />
540-387-3414<br />
Tazewell<br />
Apex Hobbies<br />
540-988-9005<br />
Virginia Beach<br />
Debbie's R/C World<br />
757-340-6681<br />
Auburn<br />
Ultimate Hobbies<br />
253-939-2515<br />
Bellevue<br />
Abernathy's Northwest<br />
Hobbies<br />
425-747-9914<br />
Bremerton<br />
Legacy Hobbies 8 Gifts<br />
360-782-0478<br />
Burlington<br />
Performance R/C<br />
Products<br />
360-755-9464<br />
Lynnwood<br />
Galaxy Hobby<br />
425-670-0454<br />
Seattle<br />
Webster's Hobby Shop<br />
206-306-9914<br />
Spokane<br />
B 8 B Industries<br />
888-487-2122<br />
Tacoma<br />
HobbyTown<br />
253-531-8111<br />
Union Gap<br />
The Clover Leaf<br />
509-453-8959<br />
Yakima<br />
Mike's Model Aircraft<br />
Supply<br />
509-453-8238<br />
Teays<br />
Nitro Hobby And Craft<br />
Center<br />
304-757-6474<br />
Wheeling<br />
Fulton's Hobby Shop<br />
304-233-5355<br />
Fond Du Lac<br />
Focus, Inc.<br />
414-922-5999<br />
Greenfield<br />
Greenfield News 8<br />
Hobby Center<br />
414-281-1800<br />
La Crosse<br />
ABC Hobbies<br />
608-788-8222<br />
Madison<br />
Dockter's Hobby World<br />
608-274-0024<br />
Hobby Horse<br />
800-604-6229<br />
Milwaukee<br />
Happy Hobby<br />
414-461-6013<br />
Oshkosh<br />
HobbyTown USA<br />
414-426-1840<br />
Sunprairie<br />
Schultz Sport 8 Hobby<br />
608-837-3498<br />
Waldo<br />
Kvindlog Services<br />
920-528-8343<br />
Wausau<br />
Pope's Hobbyland<br />
715-842-4371<br />
CANADA<br />
Bonnyville<br />
Riteway Model Products<br />
403-826-2400<br />
Calgary<br />
Model Land<br />
403-249-1661<br />
PM HobbyCraft Ltd.<br />
403-291-2733<br />
The R/C Hangar<br />
403-236-5098<br />
Edmonton<br />
Great Hobbies<br />
780-466-3388<br />
Hobby Master<br />
780-434-9189<br />
Hobby Wholesale<br />
403-434-3648<br />
Abbotsford<br />
One Stop Hobbies<br />
604-852-6497<br />
Burnaby<br />
Norburn Model Aircraft<br />
604-294-4114<br />
Kelowna<br />
Kelowna Speedway 8<br />
Hobby<br />
250-860-7541<br />
Merville<br />
Flite Supply<br />
250-337-5320<br />
Nakusp<br />
Lesters Hobbies<br />
250-265-3128<br />
Nanaimo<br />
Leisure Time Hobbies<br />
250-753-6221<br />
Osoyoos<br />
Palmers Hobbies<br />
250-495-2583<br />
Victoria<br />
B.C. Shaver Shop<br />
250-383-0051<br />
Blockhouse<br />
R/C Wings 8 Wheels<br />
902-624-9519<br />
IB<br />
Brampton<br />
R/C Wings & Things<br />
905-846-9105<br />
Burlington<br />
Skycraft Hobbies<br />
905-631-6211<br />
Kingston<br />
Leading Edge Hobbies<br />
000-389-4878<br />
Kitchener<br />
Flite Craft Model<br />
519-742-7141<br />
London<br />
AVF Entertainment 8<br />
Leisure<br />
519-451-1833<br />
Mississauga<br />
Hobby Hobby<br />
905-858-7978<br />
Orleans<br />
Discount Hobbies<br />
613-830-2373<br />
Unionville<br />
A 8 J Hobbies<br />
905-305-1479<br />
Woodstock<br />
Woodstock Radio<br />
Control Models<br />
519-421-0733<br />
Stratford<br />
Great Hobbies, Inc<br />
902-569-3262<br />
c<br />
Gatineau<br />
Hobby 2000<br />
819-561-6888<br />
Hull<br />
Multi-Hobby<br />
819-770-5050<br />
Laval<br />
Distribution Aux<br />
Modelistes<br />
800-363-8271
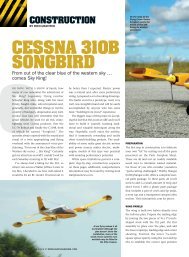
Harley Nelson,<br />
Oregon, Wl<br />
Z-137 AGRO TURBO<br />
Our thanks to Harley for taking the time to send us photos of his<br />
homebuilt beauty. The design caught Harley's attention when it<br />
appeared in Model Airplane News' "Planes Worth Modeling" feature.<br />
Utilizing a bit of ingenuity, Harley used an overhead slide<br />
projector to enlarge the image from the magazine and take<br />
measurements. Knowing that<br />
he wanted his crop plane to<br />
hold 3 pounds of dust, he<br />
determined that his model<br />
would have to have a 100-inch<br />
wingspan and weigh 20<br />
pounds—and it does! Harley's<br />
Z-137 is powered by a Moki<br />
2.10 engine, which delivers 25<br />
pounds of thrust turning a<br />
20x10 prop. Harley expects the<br />
plane's performance to be<br />
good, and he intends to find<br />
out for sure as soon as summer<br />
arrives.<br />
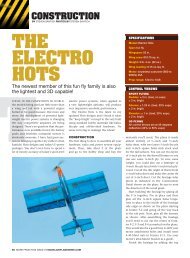
Mike Bridges, Hunt, TX<br />
SCRATCH-BUILT CROP DUSTER<br />
Crop dusters are gaining popularity as RC models, and when you see<br />
a plane like Mike's, you understand why. Who wouldn't want one of<br />
these? Mike scratch-built this plane with the help of his friend, David<br />
West; both are members of the Kerrville R.C. Flyers in Kerrville, TX.<br />
Powered by a U.S. 41cc engine and controlled by a JR radio, this<br />
86-inch-wingspan model weighs 141/2 pounds and is covered with<br />
Stits Lite and MonoKote.<br />
24 MODEL AIRPLANE NEWS<br />
SEND IN YOUR SNAPSHOTS Model Airplane News is your magazine and, as always, we encourage<br />
reader participation. In "Pilot Projects," we feature pictures from you—our readers. Both color slides and color<br />
prints are acceptable but please do not send digital printouts. We receive so many photographs that we are<br />
unable to return them. All photos used in this section will be eligible for a grand prize of $500, to be awarded at<br />
the end of the year. The winner will be chosen from all entries published, so get a photo or two, plus a brief<br />
description, and send them in! Send those pictures to "Pilot Projects," Model Airplane News, 100 East Ridge,<br />
Ridgefield, CT 06877-4606 USA.<br />
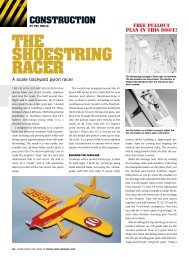
Todd Mazzei,<br />
Calgary, Alberta, Canada<br />
EXTRA 300L<br />
Todd is pretty proud of his brother's plane—as well he should be. Thanks to Todd<br />
for sending in the photo, and kudos to his brother, Trent, on that incredible airbrushed<br />
paint job. This 37-percent-scale Aeroworks Extra 300L has a 116-inch<br />
wingspan and is equipped with a T.M.E smoke system. A model of this size requires<br />
a lot of power, and according to Todd, the 18hp 3W engine definitely does the trick.<br />
With more than 11 servos providing control, 3D maneuvers are certainly not a<br />
problem for this aerobat. Trent has flown his plane more than 75 times.<br />
Byron Clark,<br />
Sun City, AZ<br />
FAIRCHILD PT-23<br />
Byron's PT-23 may look familiar; it started out as a<br />
Dynaflite PT-19 kit. With a little bit of creativity and a lot<br />
of work, Byron transformed the kit by shortening the<br />
front end and adding a fiberglass ring cowl. He powers<br />
his PT-23 with a Saito R 1.70 and controls it with a<br />
Futaba T8UAF radio. It features a JHM Engineering<br />
onboard ignition system and is finished in a yellow, blue<br />
and striped rudder color scheme—the same as only one<br />
production run of the full-size aircraft was painted.<br />
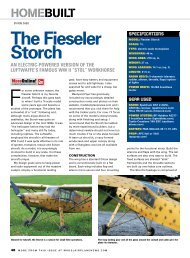
Jim Famed, Biloxi, MS<br />
SOPWITH TRIPLANE<br />
Our thanks to Jim for sending us this photo of his standoff scale WW I<br />
Sopwith Triplane, which he designed and built himself. Powered by an O.S.<br />
.25FP engine, Jim's fighter has a 39 3/4-inch wingspan and weighs 3 1/2<br />
pounds. The model has a profile fuselage, but Jim widened the nose to<br />
accommodate the battery and receiver. Jim designed the plane for RC<br />
combat; it's the third in a series of 1/8 -scale WW I combat planes he's building.<br />
Jim says his<br />
model possesses all<br />
of the flight characteristics<br />
of the fullsize<br />
plane; it isn't<br />
particularly fast, but<br />
it's extremely maneuverable<br />
and has a<br />
high rate of climb.
PILOT PROJECTS<br />
Col. Austin Ayotte, Austin, TX<br />
EXTRA 300XS<br />
As a retired Air Force, commercial airline and corporate pilot, Col. Ayotte<br />
certainly knows his way around a plane. Check out his Midwest Products<br />
Extra 300XS! It's powered<br />
by an O.S. BGX<br />
engine and controlled by<br />
an Airtronics Vision<br />
radio. The decals were<br />
courtesy of Die-hard<br />
Graphics. According to<br />
Col. Ayotte, this Extra is<br />
a great flyer, even<br />
though he admits to<br />
finding full-size airplanes<br />
much easier to fly than<br />
RC models.<br />
specs: BobCat<br />
length: 74"<br />
Engine: 11-141b thrust turbine<br />
specs:<br />
length:<br />
Engine:<br />
BobCat XL<br />
79"<br />
11-20+lb thrust turbine<br />
170 SR 419 • Winter Springs, Fl 32708 • tel 407-327-6333 • fax 407-327-5020<br />
26 MODEL AIRPLANE NEW5<br />
Jerome Wroblewski, Des Plaines, IL<br />
SKYMASTER<br />
Last summer, Jerome decided he needed a building project; the result is<br />
this beautiful scratch-built Skymaster. Jerome powers his model with an<br />
O.S. .65 2-stroke engine turning a 12x6 pusher prop. The 68-inch-wingspan<br />
model is constructed of lite-ply and balsa with a balsa-sheeted foam wing,<br />
and it's covered entirely in UltraCote. Jerome says his 91/2-pound model<br />
requires a long runway to gain speed before liftoff, but once airborne, it flies<br />
great and has very sensitive elevator input.<br />
John Giles,<br />
Oklahoma City, OK<br />
MONOCOUPE<br />
This 72-inch scratch-built Monocoupe represents John's<br />
fourth attempt at modeling the aircraft, and according<br />
to him, it is by far the best performer yet. Powered by a<br />
Saito 1.00 engine spinning an APC 15x6 prop, John's<br />
Monocoupe weighs 9 pounds and features functional<br />
flaps and a Futaba radio system. John believes that<br />
working on this plane was a great way to spend his<br />
winter, and we have to agree.<br />
Tops in its Class<br />
Ask any BobCat owner about his experience<br />
building and flying this jet. His answer will be<br />
especially interesting if he has owned any of the<br />
other popular, exposed engine sport jets.<br />
That's because the engineering, parts fit,<br />
completeness, instruction package and factory<br />
support that are part of every BVM kit are<br />
unmatched in the model jet industry.<br />
He'll also tell you that when it comes to flight<br />
characteristics there is just no comparison.<br />
Whether you need a jet trainer or a fully aerobatic<br />
jet, the BobCat has the wing area, airfoil, and an aft<br />
mounted stab to make you look good.<br />
So if you want a similar successful experience,<br />
Experience a BobCat!<br />
.COM
David Hobbs,<br />
Shawnee, KS<br />
SCRATCH-BUILT PROFILE<br />
David designed and built this profile fun fly—a truly unique model in<br />
that all of its control surfaces are of the pull/pull variety, including<br />
the ailerons. Powered by an O.S. .46 FX engine and controlled by a<br />
Hitec radio, David's profile plane has a 42-inch wingspan and weighs<br />
about 5 pounds. Four hatches on the top of the wing provide access<br />
to the aileron servo and radio equipment, and David built tunnels into<br />
the fuselage from the servos to the radio compartment to accommodate<br />
the servo electrical leads. The plane is covered in maroon and<br />
white MonoKote, and according to David, it flies very well with good<br />
characteristics at both low and high speeds.<br />
DEALER ENQUIRIES WELCOME<br />
For more lnformation on where to buy<br />
contact your local retailer or check our website. NEW YORK. Ny 10010, u.SA<br />
To join our bbi club, pisuaviaR http:#WWWblueboxtoys.com BLUEBOX axs ALL RIGHTS Reseerves<br />
Antonio Carlos Pimentel,<br />
Sao Paulo, Brazil<br />
BEECHCRAFT BONANZA<br />
Hard to believe, but according to Antonio, this 1/5-scale Bonanza from Top<br />
Flite represents his first attempt at building a kit. One would certainly be<br />
hard pressed to distinguish his work from that of an experienced kit<br />
modeler. Antonio's Bonanza is constructed of balsa and plywood and covered<br />
with Oracover. Powered by a Magnum XL .912-stroke engine, the<br />
model features ABS plastic on the cowl, cabin and interior and is<br />
equipped with flaps and Robart pneumatic retracts. It's controlled by a<br />
Futaba 8-channel radio with 9 servos. 4<br />
ARTICULATED<br />
1/5 Scale Collectiable<br />
JUNE 2002 27
your guid d engines<br />
•the staff of 'Model Airplane News<br />
o other type of RC airplane is more closely linked to the origins of<br />
the hobby than V2A models. These planes grew directly out of freeflight<br />
and control-line models, and they were among the first to<br />
exploit remote control. For many modelers, V2A was their first exposure to the<br />
sbby, and it remains among the most popular model sizes even today.<br />
Why has V2A endured so successfully? To begin with, these planes are<br />
among the simplest, most enjoyable sport models to build. They are small and<br />
light, so they go together easily and fly beautifully. The advent of CAD plans<br />
and laser-cut parts has only improved those characteristics; now, 1/2 A kits are<br />
easier than ever to build. Because these kits are small and are constructed using<br />
conventional materials, they are also extremely affordable. That makes them ideal<br />
for less-experienced builders—especially those who may have cut their teeth on electric<br />
backyard flyers and would like to try glow power. And because of their compact<br />
design and light weight, they can fly in smaller spaces than standard-size glow-powered<br />
models. To top it off, there are more 1/2 A kits (not to mention several ARFs) available<br />
than ever before, and their quality is first rate.<br />
We've assembled a list of more than 70 kits and ARFs that were designed for V2A<br />
engines with displacements of. 10ci or less. There's a wide variety to choose from, from profile-fuselage<br />
sport models and trainers to scale warbirds and gliders. Once you spot a kit you<br />
like, check out our engine chart to find just the right powerplant for it. And don't miss the helpful tips on nitro content and 1/2 A support equipment<br />
from our noted experts, Dave Gierke and Randy Randolph. When you consider the style, nostalgia, convenience and selection that 1/2 A has to offer,<br />
we're sure you're going to want to give it a try! S<br />
28 MODEL AIRPLANE NEWS<br />
Model* like this Slg Mfg. R/C Rascal ($79.95; combine the size and style of classic<br />
free-flight models with modern RC control for a very reasonable price.
Fuji<br />
Norvel<br />
Norvel<br />
Norvel<br />
Norvel<br />
Norvel<br />
1 / 2 A E N G<br />
Thunder Tiger<br />
.099 RC aircraft engine<br />
BigMiG Start'Up .049<br />
BigMiG Start'Up .061<br />
AME.Q49(CL/RC)<br />
AME .061 (CL/RC)<br />
BigMiG Sport .049 (CL/RC)<br />
BigMiG Sport .061 (CL/RC)<br />
BigMiG Sport .074<br />
t Weight includes muffler * Available in both control-line and RC versions<br />
House of Balsa Is known for Its high-quality,<br />
fine-scale V2A kits such as this 36-inch<br />
Beechcraft Bonanza; $59.95.<br />
House of Balsa Super Decathlon: $59.95.<br />
House of Balsa P-51 Mustang; $59.95.<br />
WEIGHT (0Z.) DISPLACEMENT<br />
4.32<br />
2.39 t<br />
2.39 t<br />
1.69/1.831 0.05<br />
1.69/1.83 t<br />
1.69/1.83?<br />
1.69/1.83 t<br />
2.65 t<br />
0.10<br />
0.05<br />
0.06<br />
0.05<br />
0.07<br />
THROTTLE PRICE<br />
Y<br />
N<br />
N<br />
$39.95<br />
$149.99<br />
$49.99<br />
$45.99<br />
$55.99/$75.99<br />
$55.99/$75.99<br />
$45.99/$59.99<br />
$34.99/$59.99<br />
$75.99<br />
1/2A ENGINES & NITRO CONTENT by Dave Gierke<br />
This Cox Babe Bee Is typical of<br />
the classic 1/2A and free-flight<br />
engines. It has no throttle and<br />
does not require a dedicated<br />
RC channel. The engine mount<br />
also serves as the fuel tank<br />
and the carb; after the needle<br />
Is tuned for the desired rpm,<br />
the engine will operate at a constant speed.<br />
Price: $47.29.<br />
1/2A glow engines that operate<br />
on methanol- (alcohol-)<br />
dominated fuel have a<br />
problem-they're<br />
tremendously over-cooled! In the late 1940s, the newly developed "baby<br />
engines" barely ran on glow fuel that was formulated for larger displacement<br />
engines. Containing mostly alcohol, castor oil and a bit of nitromethane, this fuel<br />
was inadequate for the new breed of tiny engines. They protested<br />
by being difficult to start and touchy to adjust, and they ran ,<br />
roughly. The difficulty turned out to be the surface area of<br />
the cylinder and head when compared with the cylinder displacement;<br />
this important ratio is much larger for<br />
small engines than it is for large engines. Look at<br />
these examples of displacement versus cylinder surface<br />
area. An .049 has a ratio of 13:1, a .40's is 6:1,<br />
and a 1.2's is just 4:1. The solution? Add<br />
Thunder Tiger<br />
GP-07;<br />
$49.99.<br />
nitromethane to the fuel; between 25 and 35<br />
percent works well.<br />
The Norvel Big (WIG Sport<br />
.074 ($75.99) is one of the<br />
newer generation of<br />
throttleable 1/2A engines. It<br />
operates much like any<br />
larger RC glow engine; a<br />
channel is assigned to control<br />
a servo that moves the<br />
As we know, nitro throttle position on the carb.<br />
adds power and heat to the operating cycle of any engine.<br />
Additional nitro allows the temperature of the crankcase to<br />
increase and provides needed thermal energy to vaporize liquid<br />
fuel components before transferring them to the cylinder<br />
for combustion. Vaporized fuel does a better job of mixing<br />
with air and burning than do liquid droplets in an<br />
over-cooled engine.
1 /2A TO Z<br />
Cox sells this Engine Starting Kit for its 1/2 A engines.<br />
It includes a half-pint bottle of fuel, a battery box, a<br />
starting wand, fuel tubing, a glow-plug clip and an<br />
all-purpose wrench. Price: $11.99. Here is a selection of 1/2 A props.<br />
Clockwise from top left: Girsh <strong>Tor</strong>nado<br />
6x5; Cox 3-blade 6x3; Cox Grey 5x3; Cox<br />
5x3; Cox 6x3.<br />
3O MDDEL AIRPLANE NEWS<br />
Here, my Cox<br />
Kilter Bee .047<br />
la mounted on<br />
a JK Aerotech<br />
Kwlk Mount I<br />
first primed<br />
the engine<br />
through the<br />
exhaust port.<br />
The next<br />
step Is to<br />
connect the<br />
glow plug<br />
and engage<br />
the spring<br />
starter.<br />
Last, adjust<br />
the needle<br />
valve for<br />
smooth<br />
operation.<br />
Ace Simple<br />
Ultimate Bipe;<br />
$44.99.<br />
Ace Grasshopper; $34.99.<br />
Engine startup<br />
by Randy Randolph<br />
All small engines like high-nitro (at least 15-<br />
percent) fuel. The starting procedure for<br />
engines such as the Cox Tee Dee series,<br />
Norvel and Thunder Tiger is much like that of<br />
any other engine with a front-intake carbure-<br />
tor: fuel, choke and flip; but with some V2A<br />
engines, a few steps make the initial startup<br />
unique.<br />
The Cox reed valve engines such as the<br />
Pee Wee .020, the Black Widow .049, the<br />
Babe Bee .049 and the Killer Bee .049 are a<br />
little different! For these engines, you must<br />
install a 6x3 prop, close the needle valve,<br />
open it three turns, prime it with a drop or<br />
two of fuel through the exhaust ports, con-<br />
nect the glow plug and use the spring starter<br />
in the front of the engine to flip the prop. By<br />
design, reed-valve engines can run in either<br />
direction with ease, and the spring makes it<br />
easy for them to start in the right direction.<br />
These engines start almost automatically;<br />
once they have started, you simply adjust the<br />
needle as with any glow engine.<br />
MODEL<br />
* ACE<br />
Alpha<br />
Grasshopper<br />
Scooter ARF<br />
Simple 400<br />
Simple AT-6<br />
Simple Extra<br />
Simple F-4U<br />
I / 2 A M O D E L S<br />
Simple Me-109<br />
Simple P-51<br />
Simple Piper J-3<br />
Simple Ultimate<br />
4<br />
Whizard<br />
••<br />
2or3<br />
* CLANCY AVIATION j<br />
Lazy Bee<br />
3<br />
Lazy Bee Extended Wing<br />
Lazy Bee Special<br />
Lazy Bee Special Extended Wing<br />
Speedy Bee<br />
Stagger Bee<br />
Turbo Bee<br />
yard Bee<br />
DYNAFLITE<br />
Piece 0' Cake<br />
FUNAERO RC<br />
BooKaty<br />
Flakey Jake<br />
Super Jake<br />
Tommy Boy<br />
* GLOBAL<br />
Focke-WulfFw-190ARC<br />
Focke-Wulf Fw-190 ARF<br />
School Boy ARF<br />
Super Sports Trainer ARF (SST-09)<br />
HACKER<br />
Funny ARF<br />
Mantis ARF<br />
OspreyX-28GARF<br />
TL-96 ARF<br />
* HERR ENGINEERING<br />
Aqua Star<br />
AT-6 Texan<br />
Cloud Ranger<br />
Cloud Ranger<br />
P-51 Mustang<br />
Piper Cherokee<br />
Piper J-3 Cub<br />
Pitts Special<br />
Star-Cruiser<br />
NO. OF<br />
CHANNELS<br />
2 o r3<br />
2or3<br />
3<br />
2 to 4<br />
2to4<br />
2to4<br />
2 to 4<br />
2 to 4<br />
2 to 4<br />
2 to 4<br />
4<br />
4<br />
4<br />
3<br />
2or3<br />
2or3<br />
4<br />
3<br />
3<br />
3<br />
3<br />
2or3<br />
3<br />
4<br />
2or3<br />
2or3<br />
2 to 4<br />
3<br />
4<br />
4<br />
2or3<br />
2or3<br />
4<br />
2or3<br />
1<br />
WINi<br />
(IN.)<br />
40<br />
43.5<br />
57<br />
34<br />
35<br />
35<br />
36<br />
35<br />
35<br />
35<br />
34<br />
40.7<br />
1 40<br />
48<br />
40<br />
48<br />
40<br />
|29.<br />
40.2<br />
29<br />
45<br />
40<br />
40<br />
|. 34<br />
35<br />
35<br />
50<br />
35<br />
i 23.e<br />
41<br />
43.2<br />
43.1<br />
40.E<br />
36<br />
42<br />
42<br />
42<br />
42<br />
48<br />
30<br />
42
WING AREA MIN. WEIGHT WING LOADING ENGINE RANGE PRICE NOTES<br />
(SQ. IN.) (OZ.) (OZ./SQ. FT.) (2-STROKE)<br />
28<br />
20<br />
23<br />
16<br />
20<br />
20<br />
20<br />
16<br />
16<br />
16<br />
28<br />
24<br />
15<br />
16<br />
15<br />
16<br />
28<br />
18<br />
10.4<br />
9<br />
16.1<br />
13.5<br />
8.3<br />
12.8<br />
15.3<br />
15.3<br />
15.2<br />
12.7<br />
12.7<br />
12.7<br />
10.2<br />
16.9<br />
4.1<br />
3.6<br />
4.1<br />
3.6<br />
7.7<br />
5.5<br />
3.4<br />
4.8<br />
.049 to .09<br />
.049 to .074<br />
GP.07<br />
.049 to .074<br />
.049 to .074<br />
.049 to .074<br />
.049 to .074<br />
.049 to .074<br />
.049 to .074<br />
.049 to .074<br />
.10 to .20<br />
.049 to .07<br />
.049 to. 15<br />
.049 to .15<br />
.049 to. 15<br />
.049 to .15<br />
.09 to .25<br />
.061 to .20<br />
.061 to .074<br />
.010 to .10<br />
$34.99<br />
$34.99<br />
$199.99<br />
$24.99<br />
$34.99<br />
$34.99<br />
$34.99<br />
$34.99<br />
$34.99<br />
$34.99<br />
$44.99<br />
$34.99<br />
$59.99<br />
$64.99<br />
$69.99<br />
$79.99<br />
$79.99<br />
$84.99<br />
$74.99<br />
$49.99<br />
High-wing trainer; box fuselage with foam wing<br />
High wing with stick tail boom; box fuselage with foam wing<br />
High wing; built-up balsa structure; covering included; available combo with Thunder Tiger GP-07<br />
Slab side, foam wing, sheet balsa tail<br />
Semi-scale; foam wing, sheet balsa fuselage and tail<br />
Semi-scale; foam wing, sheet balsa fuselage and tail<br />
Semi-scale; foam wing, sheet balsa fuselage and tail<br />
Semi-scale; foam wing, sheet balsa fuselage and tail<br />
Semi-scale; foam wing, sheet balsa fuselage and tail<br />
Semi-scale; foam wing, sheet balsa fuselage and tail<br />
Semi-scale biplane; foam wings, sheet balsa fuselage and tail<br />
High-wing trainer; box fuselage with foam wing<br />
High-wing; built up from pre-cut balsa and ply; shock-absorbing gear<br />
Same as Lazy Bee, with 8-inch center wing section extension<br />
High wing; built up from pre-cut balsa and ply; ailerons; shock-absorbing gear<br />
Same as Lazy Bee Special, with 8-inch center wing section extension<br />
Mid-wing; built up from pre-cut balsa and ply; shock-absorbing gear<br />
Biplane; built up from pre-cut balsa and ply; shock-absorbing gear<br />
Internal ducted propeller-no fan unit required; built-up balsa and ply; drop-off gear<br />
High-wing; built up from pre-cut balsa and ply; clear Mylar covering and wheels included<br />
24 6.0 .049 $39.99 Powered glider trainer; all balsa construction<br />
18<br />
24<br />
25<br />
22<br />
22<br />
22<br />
30<br />
25.6<br />
17.6<br />
22<br />
23<br />
14.1<br />
19<br />
19<br />
16.5<br />
16.5<br />
22<br />
19<br />
20<br />
26<br />
17<br />
7.7<br />
11.7<br />
12.2<br />
11.6<br />
14.4<br />
14.4<br />
13.3<br />
13.7<br />
13.1<br />
TK<br />
10.4<br />
7.3<br />
11.2<br />
14.4<br />
8.0<br />
7.3<br />
10.5<br />
9.3<br />
8.8<br />
12.4<br />
9.2<br />
.049 to .061<br />
.049 to .061<br />
.061 to .074<br />
.061<br />
.09 to .15<br />
.09 to .15<br />
.09 to .15<br />
.074 to. 15<br />
.049 to .061<br />
.049 to .09<br />
.061 to .09<br />
.061 to .10<br />
.049 to .061<br />
.049 to .061<br />
.049 to .061<br />
.049 to .061<br />
.049 to .074<br />
.049 to .061<br />
.049 to .061<br />
.074 to .15<br />
.049 to .061<br />
$34.95<br />
$67.95<br />
$48.95<br />
$39.95<br />
$84.99<br />
$99.99<br />
$84.99<br />
$89.99<br />
$79.99<br />
$149.9<br />
$244.9<br />
$109.9<br />
$68.95<br />
$63.95<br />
$76.95<br />
$76.95<br />
$99.95<br />
$84.95<br />
$85.95<br />
$99.95<br />
$88.95<br />
Powered glider; built up from laser-cut balsa and ply; combos with Norvel engines available<br />
High-wing aerobat; built up from laser-cut balsa and ply; combos with Noivel engines available<br />
High-wing aileron trainer; built up from laser-cut balsa and ply<br />
Low-wing intermediate; built up laser-cut balsa and ply; combo with Norvel .061 engine available<br />
Semi-scale; prebuilt wood structure; painted fiberglass cowl and canopy included<br />
Semi-scale; prebuilt wood structure; camo covering, painted fiberglass cowl and canopy included<br />
High-wing trainer; box fuselage; all-balsa structure; pre-covered; combos with AP Hornet engines availabl<br />
High-wing trainer; all-balsa construction; factory-applied covering; combo with AP Hornet .09 engine available<br />
High-performance biplane; factory-applied covering<br />
Low-wing aerobat; fully assembled balsa and ply structure covered in Easycoat film<br />
Aerobatic seaplane with ailerons; one-piece fiberglass fuselage; balsa wing and tail covered in Easycoat film<br />
Semi-scale low-wing; one-piece fiberglass fuselage; balsa wing and tail covered in Easycoat film<br />
Seaplane; laser-cut wood parts; tab and notch construction<br />
Sport scale; laser-cut wood parts; tab and notch construction; removable landing gear<br />
High-wing sport model; laser-cut wood parts; tab and notch construction; less than 1 hour construction time<br />
Same as above, with ailerons<br />
Sport scalfi; laser-cut wood parts; tan and nntr.h construction; accessories included<br />
Sport scale; laser-cut wood parts; tab and notch construction; accessories included<br />
Sport scale; laser-cut wood parts; tab and notch construction; accessories included<br />
Sport scale biplane; laser-cut wood parts; tab and notch construction; accessories included<br />
High-wing trainer; laser-cut wood parts; tab and notch construction; steerable nose gear
1 /2A TD Z<br />
32 MODEL AIRPLANE NEWS<br />
Hen Engineering<br />
AT-6 Texan; $63.95.<br />
JK Aerotech T-52 Trainer ARF; $116.90, including Norvel engine.<br />
The Global School Boy<br />
ARF ($84.99) is typical of<br />
V2A, almost-ready-to-fly<br />
models. It is fully covered,<br />
and most of the major<br />
assembly is complete,<br />
right out of the box.<br />
S P E C I F I<br />
MODEL<br />
* HOBBY HANGAR<br />
Mini Edge 540<br />
Mini Sukhoi<br />
* HOUSE OF BALSA<br />
1/2 A Stealth Sport<br />
Bonanza<br />
Chipmunk<br />
Extra 300L Profile<br />
Floatplane .10<br />
FW190A<br />
J-3 Cub<br />
Laser Stick .10<br />
Me-109E<br />
P47 Thunderbolt<br />
P-51 D Mustang<br />
P-51 D Mustang Profile<br />
Spacewalker.10<br />
Sukhoi SU-31<br />
Super Decathlon .10<br />
* JK AEROTECH<br />
Pocket Planes P51 Mustang<br />
T-52 Trainer<br />
* LANIER RC<br />
kA Shrike<br />
Dominator200<br />
Indicator<br />
Stinger 10<br />
*NORVEL<br />
GlassAir 400<br />
GlassAir SeaEasy ARF<br />
Neofun Classic ARF<br />
Neofun UCAN-2 ARF ;<br />
Neofun Vision ARF<br />
• PECK-POLYMERS<br />
Prairie Bird<br />
• SIG MFG.<br />
Hummer<br />
R/C Rascal<br />
Wonder<br />
1 a N<br />
NO. OF WING<br />
CHANNELS (IN.)<br />
2 to 4<br />
2 to 4<br />
2<br />
2 to 4<br />
2 to 4<br />
2 to 4<br />
4<br />
2 to 4<br />
2or3<br />
2 to 4<br />
2to4<br />
2 to 4<br />
2 to 4<br />
2 to 4<br />
2 to 4<br />
2 to 4<br />
2 to 4<br />
2 or 3<br />
2 to 4<br />
2or3<br />
4<br />
2<br />
4<br />
2or3<br />
4<br />
2 or 3<br />
3or4<br />
2or3<br />
2or3<br />
2<br />
3<br />
2or3<br />
32<br />
34<br />
32<br />
36<br />
36<br />
36<br />
45.5<br />
36<br />
52.5<br />
45.5<br />
36<br />
36<br />
36<br />
36<br />
47<br />
36<br />
47<br />
26<br />
49
'ING AREA MIN. WEIGHT WING LOADING ENGINE RANGE PRICE<br />
>Q. IN.) (OZ.) (OZ./SQ. FT.) (2-STROKE)<br />
19<br />
20<br />
18<br />
22<br />
22<br />
22<br />
32<br />
22<br />
24<br />
30<br />
22<br />
22<br />
22<br />
22<br />
28<br />
22<br />
24<br />
11<br />
22<br />
14<br />
12<br />
19<br />
29<br />
22<br />
23<br />
24<br />
24<br />
24<br />
13.3<br />
11.8<br />
10.3<br />
14.7<br />
14.7<br />
11.4<br />
14.5<br />
14.7<br />
9.9<br />
13.6<br />
14.7<br />
14.7<br />
14.7<br />
11.4<br />
12.3<br />
11.4<br />
10.5<br />
10.8<br />
8.4<br />
12.4<br />
8.3<br />
8.7<br />
15.5<br />
7<br />
10.2<br />
13<br />
13<br />
13<br />
.061 to. 10<br />
.061 to .10<br />
.049<br />
.051 to .10<br />
.051 to .10<br />
.061 to. 12<br />
.09 to. 12<br />
.051 to .10<br />
.049 to .074<br />
.047 to. 12<br />
.051 to .10<br />
.051 to .10<br />
.051 to. 10<br />
.061 to .12<br />
.074 to .12<br />
.061 to .12<br />
.061 to .12<br />
.049 to .061<br />
.049 to .09<br />
$44.99<br />
$41.99<br />
$34.95<br />
$59.95<br />
$59.95<br />
$54.95<br />
$59.95<br />
$59.95<br />
$49.95<br />
$44.95<br />
$59.95<br />
$59.95<br />
$59.95<br />
$54.95<br />
$59.95<br />
$59.95<br />
$59.95<br />
$30<br />
NOTES<br />
Semi-scale aerobat; built-up wood construction<br />
Twin tail boom sport model; balsa and ply construction<br />
Standoff scale; balsa and ply construction; formed plastic fuselage top and cowl<br />
Standoff scale; balsa and ply construction; formed plastic fuselage top and cowl<br />
Profile fuselage aerobat; laser-cut balsa and ply, Du-Bro hardware included<br />
Sport floatplane; laser-cut balsa and ply construction<br />
Standoff scale; balsa and ply construction; formed plastic fuselage top and cowl<br />
Semi-scale trainer; balsa and ply construction; pre-formed aluminum gear; sheeted fuselage and tail<br />
High-wing trainer; balsa and ply construction; pre-formed aluminum gear<br />
Standoff scale; balsa and ply construction; formed plastic fuselage top and cowl<br />
Standoff scale; balsa and ply construction; formed plastic fuselage top and cowl<br />
Standoff scale; balsa and ply construction; formed plastic fuselage top and cowl<br />
Profile fuselage warbird; laser-cut balsa and ply, Du-Bro hardware included<br />
Semi-scale aerobat; balsa and ply construction; pre-formed aluminum gear<br />
Profile fuselage aerobat; laser-cut balsa and ply, Du-Bro hardware included<br />
Semi-scale high-wing sport model; laser-cut balsa and ply; pre-formed aluminum gear<br />
Pink foam construction; includes colored tape covering; combo with Norvel .061 engine available<br />
$116.9 $116.90 Pink foam construction; includes colored tape covering, Norvel .061 engine, mount, props and hardware<br />
.049 to .061 $22.99 Sport delta wing; all laser-cut balsa construction; tabbed rib wing construction<br />
.049 to .061 $34.99 High-wing sport model; box fuselage with built-up wing; all laser-cut balsa construction<br />
.049 to .051 $34.99 High-wing trainer; all laser-cut balsa construction; tabbed rib wing construction<br />
.09 to .15 $34.99 Sport-scale aerobat; built-up wood fuselage; partially sheeted foam wing; includes aluminum gear and plastic cowl<br />
.049 to .061 $99.99 Powered glider; fiberglass fuselage; factory painted and covered; combo available w/BigMig Sport .061 engine<br />
.061 to .074 $149.99 Sport seaplane; fiberglass fuselage; factory painted and covered; combo available w/BigMig Sport .074 engine<br />
.049 to .061 $74.99 High-wing trainer; factory covered and 90-percent assembled; several combos w/Norvel engines available<br />
.049 to .074 $79.99 Low-wing sport model; factory covered and mostly assembled; combos with Norvel engines available<br />
.049 to .061 $74.99 High-wing trainer; factory covered and 90-percent assembled; several combos w/Norvel engines available<br />
30 10.2 .049 to .15 $46.99 High-wing trainer; pre-cut all-wood structure<br />
.049 to .051<br />
.049 to .07<br />
.09 to .19<br />
$44.95 Low-wing sport model; balsa and ply construction; formed aluminum gear; aileron and elevator control<br />
$79.95 High-wing vintage-style sport model; laser-cut balsa and ply construction; molded wheel pants<br />
$37.99 Aerobatic sport model; balsa and plywood construction; several combos w/Norvel engines available<br />
Lanier 1/2A<br />
Shrike; $22.99.<br />
Several */2A models,<br />
such as this Clancy<br />
Aviation Stagger Bee<br />
($84.99), come with<br />
provisions for both<br />
ViA and electric<br />
power. Even if not<br />
specifically designed<br />
for it, models can be<br />
easily converted from<br />
one type of power<br />
system to the other.<br />
JUNE 2DD2 33
1 /2A TD Z<br />
Herr Engineering<br />
Aqua Star; $68.95.<br />
Hacker Osprey<br />
X28-G; $244.99.<br />
Hacker Mantis ARF;<br />
$149.99.<br />
SULLIVAN SAVES THE DAY FOR 1/2A<br />
Sullivan has been a reputable name in the hobby business for over half a<br />
century, and it has provided tools and accessories that have contributed<br />
in one way or another to the operation of just about every type of model<br />
airplane flying today! Two of its most recent products fill a definite need<br />
for the V2A community: small silicone tubing for V2A engines and a Glow<br />
Plug Igniter Adapter that matches the popular igniters to the Norvel and<br />
Cox engines.<br />
The operation of the Glow Plug Igniter Adapter couldn't be simpler or<br />
more reliable; the connection to the plug is a spring-loaded clip that con- The Sullivan Glow Plug Igniter Adapter<br />
forms to engines of makes it a cinch to start any X /2A<br />
any size and stays engine with your existing plug igniter.<br />
. .. .. Just plug one end into your igniter<br />
connected to the<br />
and clip the other end onto your glow<br />
engine until you plug. Price: $7.95.<br />
remove it. The other<br />
With Sullivan 1/2A fuel tubing, you<br />
never have to worry about<br />
your fuel line slipping off<br />
the inlet fitting. Price: $1.89.<br />
34 MODEL AIRPLANE NEWS<br />
end of the adapter is a plug that locks into the igniter, essentially con-<br />
verting it into the battery supply for the spring clip. The adapter is practi-<br />
cally foolproof and costs just $7.95.<br />
The fuel tubing costs only $1.89 and ends the struggle to find tubing<br />
that has a less than %2-inch inside diameter. Thank you, Sullivan! +<br />
SOURCE<br />
GUIDE<br />
Ace Hobby Distributors,<br />
2682 Walnut Ave., Tustin, CA<br />
92780; (714) 544-0633;<br />
www.acehobby.com.<br />
AP Engines; distributed by<br />
Global Hobby Distributors.<br />
Clancy Aviation; distributed<br />
by Global Hobby Distributors.<br />
Cox Engines, a division of<br />
Estes Rockets;<br />
www.estesrockets.com.<br />
Fuji; distributed by RJL<br />
Industries USA, P.O. Box 5,<br />
Sierra Madre, CA 91025; (626)<br />
359-0016; fax (626) 301-<br />
0298; www.mecoa.com.<br />
Global Hobby Distributors,<br />
18480 Bandilier Cir., Fountain<br />
Valley, CA 92708; (714) 963-<br />
0133; fax (714) 962-6452;<br />
www.globalhobby.com.<br />
Hacker; distributed by<br />
Sig Mfg. Co.<br />
Herr Engineering; distributed<br />
by Sig Mfg. Co.<br />
Hobby Hangar, 7715<br />
Industrial St., W. Melbourne,<br />
FL 32904; (321) 727-8227;<br />
www. hobbyhangar. com.<br />
House of Balsa, 10101 Yucca<br />
Rd., Adelanto, CA 92301;<br />
(760) 246-6462; fax (760)<br />
246-8769;<br />
www.houseofbalsa.com.<br />
JKAerotech, 10800 S.E.<br />
Orient Dr., Boring, OR 97009;<br />
(503) 663-4081;<br />
www.jkaerotech.com.<br />
LanierRC, P.O. Box 458,<br />
Oakwood, GA 30566; (770)<br />
532-6401; fax (770) 532-<br />
2163; www.lanierrc.com.<br />
Norvel; distributed by Sig Mfg.<br />
Peck-Polymers, P.O. Box<br />
710399, Santee, CA 92072;<br />
(619) 448-1818; (619)<br />
448-1833; www<br />
.peck-polymers.com.<br />
Sig Mfg. Co. Inc., P.O. Box<br />
520, Montezuma, IA 50171;<br />
(800) 247-5008; (515) 623-<br />
5154; fax (515) 623-3922;<br />
www. sigmfg. com.<br />
Sullivan Products, One<br />
North Haven St., Baltimore,<br />
MD 21224; (410) 732-3500;<br />
fax (410) 327-7443;<br />
www.sullivanproducts.com.<br />
Thunder Tiger; distributed by<br />
Ace Hobby Distributors.
'by Rich<br />
Uravitch<br />
OK; it's the end of February, and you're looking for a warm place to go<br />
before the temperature starts to rise in your hometown. That you are an<br />
avid RC modeler who wants to broaden your horizons to include jet modeling<br />
makes the decision a no-brainer—Florida Jets. Once again, the site for this<br />
premier jet event was the Flagler County airport, about five minutes west of<br />
Interstate 95 in Bunnell, FL.<br />
I arrived early Friday morning to see cloudy, drizzly skies, and this was as nice<br />
as It got for the next 48 hours, i watched about a dozen flights through the mist<br />
before I called it quits, hoping for better<br />
weather the next day. Unfortunately,<br />
it only worsened; no one got airborne<br />
Saturday because of the deluge of rain<br />
and gusty winds.<br />
But as if to offer a reprieve, Sunday<br />
opened with chilly but sunny skies and<br />
minimal wind nearly down the centerline-a<br />
dramatic difference from the<br />
previous two days.<br />
FLYING TIME<br />
A few aircraft always stand out in your<br />
mind as exceptional in performance,<br />
appearance, creativity, or just plain talent.<br />
Dave Malchione's big, orange, NMC-marked F-4 Phantom remains a<br />
crowd-pleaser. When he touched down on the numbers in a perfect attitude, all<br />
that was missing were the blue/gray puffs of smoke from the tires!<br />
As is usually the case at jet events, the majority of the models were from the<br />
Bob Violett Models (BVM) product line; there's no question that BVM has captured<br />
the lion's share of the jet market. The newest scale machine from the<br />
BVM jet house is the F-1OOF Super Sabre. It has all the appeal of Bob's "D"<br />
model, and he reports that it flies even more smoothly. Watching it fly is aweinspiring.<br />
Even with all the external features such as Bull Pups, Mk.82s and<br />
other goodies, it really cooks. What Bob has not yet managed to capture is the<br />
sound of his "D" model; if you've heard it, you know what I mean. It's magical!<br />
Bob confided that he has actually tried switching some external things<br />
around trying to determine what is producing that fabulous noise. I sure hope<br />
he finds it!<br />
36 MDDEL AIRPLANE NEWS<br />
4<br />
This is John Christensen with his smartlooking<br />
L-1O11, built from the PCM Models<br />
kit The ATA livery was beautifully executed.<br />
One of two Kerry<br />
Sterner-designed<br />
Rutan ARES at the<br />
meet, Jay<br />
Smullen's model<br />
featured a matte<br />
black color<br />
scheme like the<br />
full-scale version<br />
seen In the movie<br />
"Iron Eagle II."<br />
This Malchione F-4J Rhino from the BVM kit Is a<br />
Florida Jets veteran and continues to be<br />
Impressive—not to mention highly visible!
Marc Frohm of Germany built this amazing<br />
JetCat-powered Euroflghter from a<br />
FiberClassics kit His demo flights mirrored<br />
full scale—In close, with a wide speed<br />
envelope.<br />
PHOTOS BY RICH URAVITCH<br />
Gustavo Campana brought his Impressive L-159 all the way from Argentina.<br />
In nearly any size, this Jet flies extremely well and can be finished In a<br />
variety of paint schemes for the scale enthusiast.<br />
Here Is one of the<br />
Kramer boys' BVM<br />
Bandits; both are<br />
outstanding, with<br />
flawless finishes<br />
performance to<br />
match.
Here's one of Jerry Keller's two large Hawker<br />
Hunters on Its final approach. It's powered by an<br />
AMT turbine engine and weighs 32 pounds.<br />
The Dassault Falcon 10 is an unusual subject, but it was very well<br />
executed. Scratch-built by Tim Davis of nearby Jacksonville, FL, this<br />
aircraft is powered by a pair of RAM 500s. Unfortunately, it had<br />
mechanical problems and didn't fly at the meet.<br />
Award<br />
IAL ACHI<br />
Designer Achievement<br />
Manufacturer Achievement<br />
Best Sport Jet Performance<br />
Best Military Performance<br />
Best Military Pre-1960<br />
Best Military Post-1960<br />
Best Sport Jet .JBfiife<br />
Best Civilian Jet<br />
Best Ducted Fan<br />
Best Multi-performance<br />
Engineering Excellence<br />
Critics Choice<br />
Critics Choice (runner-up)<br />
38 MDDEL AIRPLANE NEWS<br />
Recipient<br />
Kerry Sterner<br />
SimJet<br />
Jason Somes<br />
Stephan Voelker<br />
Sam Snyder<br />
Bob Violett<br />
Larry Kramer<br />
John Christensen<br />
s Glenn Roberts<br />
Jack Diaz<br />
Eddie Weeks<br />
Bob Violett<br />
Gustavo Campana<br />
Model<br />
ARES<br />
700 turbine<br />
Hot Spot<br />
L-39<br />
MiG-15<br />
F-100F<br />
Bandit<br />
L-1011<br />
Viper<br />
Rafale<br />
The Rig<br />
F-100F<br />
L-159<br />
Eddie Weeks, who in years past has shown up with a pair of giant<br />
DC-lOs carved from foam and powered by two turbines each, treated<br />
us this year to an air vehicle simply called "The Rig." It's a 33pound,<br />
turbine-powered AT450 vertical takeoff and landing (VTOL)<br />
model. It uses electric motors with props at the extremities for stabilization.<br />
Although I didn't see it, sources tell me that it actually does<br />
VTOL and hover nicely. Eddie's model is very innovative and is the<br />
kind of thing we've come to expect from him. I've no doubt that<br />
other projects like this are lurking in the wings; it surely is an exciting<br />
time for jet modelers!<br />
Among the standouts in flight performance was Stephan Voelker<br />
flying a large-scale Czech Albatross L-39. This guy is a World Jet<br />
champ, and it shows. His flying routine kept the model in close and<br />
was very impressive, not unlike full-scale aerobatic demos seen at<br />
the Paris Air Show and Farnborough.<br />
Ali Machinchy was equally proficient at driving Alan Cardash's<br />
Big Boomerang around the patch. This P120-powered machine was<br />
absolutely amazing to watch as it routinely performed 15-foot takeoffs<br />
and 50-foot full-stop landings. What occurred between those<br />
two events was unbelievable; picture an IMAC event with 40 percent<br />
Extras and CAPs doing their routines. Ali made the same<br />
ith this yVi-foot-span sport jet! It's<br />
Sponsor<br />
Bob Violett Models<br />
Model Airplane News<br />
JetCat USA<br />
Malcom Kay Models<br />
R.A. Microjets<br />
Airtronics<br />
SWB Turbines ~<br />
Frank Tiano Enterprises<br />
H SimJet<br />
PCM Models<br />
AMT USA<br />
Zap/Model Airplane News<br />
Zap/Model Airplane News<br />
capable of rolling circles, tail slides<br />
and inside and outside snaps, plus it<br />
has unmatched slow-flight qualities.<br />
On a more conventional sport-jet<br />
note, Jason Somes borrowed Bob<br />
Wilcox's Hot Spot—and probably a<br />
huge quantity of JP-4—and proceeded<br />
to fly almost all day. Even on Friday,<br />
with a lot of overcast, the Hot Spot<br />
could be seen flat spinning slowly<br />
down from just below the cloud<br />
deck; then, it stabilized and accelerated<br />
to some of the lowest passes<br />
I've ever seen.<br />
Marc Frohm's Eurofighter from the<br />
FiberClassics kit showed its wide<br />
speed envelope with everything<br />
from remarkable high-G maneuvers
FLORIDA JETS<br />
This giant sport jet was<br />
designed by Alan<br />
Cardash and impressively<br />
flown by Ali Machinchy.<br />
The "Big Boomerang"<br />
demonstrated IMAC-type<br />
routines.<br />
to an almost stopped, high Alpha slow-flight demo that was amazing<br />
to watch. All of this was performed within a small area and<br />
below the low overcast deck.<br />
VISUAL TREATS<br />
Attendees of this event were also treated to a number of models that<br />
were appealing from a purely visual standpoint, either because of<br />
the subject itself or the unique way it was presented. Some of the<br />
prettiest sport jets you can imagine were on hand, and it was clear<br />
that these guys were more than willing to trade scale detailing time<br />
for paint application and preparation hours. Typifying the breed<br />
were the BVM Bandits by Vern and Larry Kramer, impeccably done<br />
in "Red Baron" and "Miss Budweiser" schemes. Larry's "Red Baron"<br />
has more than 325 flights on it, and it still looks better than many<br />
newly finished models. The<br />
finishes on some of these<br />
jets were absolutely flawless,<br />
and the color schemes were<br />
exciting, dramatic, highly<br />
visible and, in some cases,<br />
practically works of art.<br />
Pat McCurry's (PCM<br />
Models) new AV8TR turbine<br />
trainer might just be<br />
the entry point for turbine<br />
beginners. It features allwood,<br />
simple construction<br />
and fixed gear. Pat's prototype<br />
was even MonoKotecovered.<br />
Although it didn't<br />
fly at the meet, I was told it<br />
flies well and might end up<br />
being the Ugly Stik of the<br />
jet movement!<br />
Erich Himmler and<br />
Viktor Casut, both from<br />
Switzerland, fielded a pair<br />
of gorgeous D.H. Venom<br />
4O MDDEL AIRPLANE NEWS<br />
Mk.ls, which performed beautifully. The detailing was<br />
superb, the finish was excellent and the flight speed was<br />
just right; further proof that larger models, both sport<br />
and scale, are becoming more popular.<br />
Large, unorthodox and slippery-looking was the Rutan<br />
ARES designed and developed by Kerry Sterner. This<br />
Simjet 2300-powered model weighs just under 24<br />
pounds and was one of two present; the other, by Jay<br />
Smullen, was finished in matte black as it was in the<br />
movie "Iron Eagle II." Since it has been around eight<br />
years and has more than 150 flights, Kerry decided to<br />
retire the prototype, but word is that it might be<br />
released as a kit in the future.<br />
CHANGING TIMES<br />
Florida Jets is now in its sixth year, and this was the<br />
third time I attended. All I can say is that the turbine<br />
revolution that began three or four years ago is no longer a revolution,<br />
but the norm in jet circles; so much so that I only saw<br />
three ducted-fan models fly all weekend. This year, a variety of<br />
engine manufacturers and importers were represented, including<br />
RAM, JetCat, AMT, Simjet and SWB.<br />
The introduction of the new, smaller turbines offers some great<br />
opportunities for modelers who want to become involved in jets.<br />
A lot of former ducted-fan fliers are letting their models go for very<br />
attractive prices because they want to "step up" to the larger turbines.<br />
But ducted-fan models' airframes are ideal for installing the<br />
new generation of smaller, 11- to 12-pound-thrust turbines.<br />
Above: Eric Rantet from France designed this Aviation Design F-16, and<br />
Gustavo Campana finished It In the unique European "Tiger Meet"<br />
markings. Below: the F-100F Is the newest model from the BVM factory.<br />
If you think this Hun two-holer looks good, you ought to see ft ttyl
Sport Jets such as Mitch Wess's BVNI Bandit wore some spectacular finishes—flawless<br />
and very colorful.<br />
Walking through the vendors' display area, I was amazed by just<br />
how far this segment of the hobby has come in a remarkably short<br />
time. Manufacturers provided all kinds of information and performed<br />
quite impressive demos. With turbine operation, you can<br />
forget about all that needle-valve adjustment, tuned-pipe length,<br />
glow fuel and such; now, you simply hook up a couple of quick disconnect<br />
lines for fuel and ignition, hit the start button, and everything<br />
happens automatically through the miracle of computer chippery.<br />
It's that simple!<br />
THE FUTURE<br />
A number of facts jumped out at me as I thought back over this<br />
year's event. The first is that scale airplanes continue to get larger.<br />
The Aviation Design Su-27 and L-39<br />
Albatross as well as the FiberClassics<br />
Eurofighter offer clear evidence of this<br />
trend. The reason is easy to understand:<br />
bigger models fly better, and now, more<br />
than adequate power is available. Also,<br />
more "off-the-shelf" component availability<br />
is making a greater number of jet<br />
This may be the Ugly Stik of the turbine world. Pat McCurry's prototype<br />
AV8TR, all-wood kit is simple to build, and turbine installation is a snap.<br />
It's also finished in MonoKote. What could be easier?<br />
The colorful Su-27 Flanker from the Aviation Design kit is large, impressive<br />
and flies extremely well.<br />
42 MDDEL AIRPLANE NEWS<br />
k . • -, 'vS3<br />
i *<br />
6<br />
Erich Hlmmler's D.H. Venom was one of<br />
two at the meet. It has a beautifully executed<br />
finish and wonderful surface detail.<br />
subjects "model-able." Did you ever think you'd see a 9-foot, largely<br />
composite A-10 or A-37? Well, they're here! Given the fact that the<br />
jet guys are among the most creative in the RC hobby, it stands to<br />
reason that we are seeing—and will continue to see—some really<br />
exciting stuff.<br />
We've now reached a point where turbine operation can be considered<br />
nearly routine. This was proven when Jeff Seymour of SWB<br />
Turbines walked me through the auto-start procedure for SWB's<br />
new Mamba turbojet engine. This is clearly a one-button operation!<br />
Throttle response is impressive, with transition from idle to maximum<br />
power coming in about three to four seconds. This little beauty<br />
is one of the newest generation of units; it measures 3.5 inches in<br />
diameter and produces up to 11 pounds of static thrust. It's just the<br />
ticket for the smaller airframes formerly propelled<br />
by the ducted-fan units.<br />
So, where does jet modeling go from here?<br />
Good question. It's already becoming more<br />
highly specialized than it was before turbines.<br />
We've seen turbine prices come down,<br />
the variety of available kits expanded, and<br />
more modelers get involved. From a techni-<br />
This is Bob Violett's<br />
"personal" F-4J<br />
model. It's finished<br />
in Blue Angels markings<br />
and is equipped<br />
with a smoke system.<br />
Here, it's just<br />
about to touch down.<br />
cal standpoint, we'll likely see more autostart<br />
systems, even more availability of prefabricated,<br />
composite airframes, and equipment<br />
upgraded to the point at which what<br />
we're flying will really become remotely<br />
piloted vehicles (RPVs) and unmanned<br />
aerial vehicles (UAVs).<br />
CONCLUSION<br />
Anyone who has ever put together a club contest knows that the<br />
key to a successful event is promotion and sponsorship. Someone<br />
has to provide the prizes, awards, facilities, staffing and everything<br />
else. Florida Jets was top drawer all the way, with the lion's<br />
share of the sponsorship coming from Model Airplane News, Zap,<br />
BVM, RAM Turbines, Airtronics, Simjet, JetCat and SWB. The<br />
facility was first class, and the contest administration was outstanding.<br />
To everyone who came from faraway places like<br />
California, Mississippi, Puerto Rico, the UK, Switzerland and<br />
Argentina, I applaud you; your participation made it happen.<br />
I, for one, can't wait until next year's Florida Jets. 4-
Sig Mfg.<br />
Somethin'<br />
Extra ARF<br />
he Somethin' Extra has been providing Sunday fliers with a whole lot of fun for quite some time. Since Sig<br />
first introduced it in kit form, its good looks and outstanding flight performance have made it a favorite at RC<br />
__ flying fields all over the world. Now you can get it into the air more quickly than ever. The almost-ready-to-fly<br />
(ARF) Sig Somethin' Extra is the spitting image of its predecessor. It has the same strong, lightweight design and<br />
flying capabilities of the original, but this one comes 90 percent built, right out of the box. The Somethin' Extra ARF<br />
is expertly covered with Oracover and is offered in two color schemes: white and bright red and white and violet.<br />
WHAT'S IN THE BOX?<br />
Like many of today's high-quality ARFs,<br />
the Somethin' Extra comes with just<br />
about everything you'll need to get flying<br />
except the radio, engine, prop, fuel<br />
tubing and pilot figure—which is, of<br />
course, optional. The major components<br />
come built up and already covered. In<br />
addition, the package includes colormatched<br />
fiberglass wheel pants, wheels,<br />
sturdy aluminum landing gear, a clear<br />
molded canopy, a fuel tank, an engine<br />
mount, a spinner, tail-support wires and<br />
a unique tube wing-mounting system. It<br />
also comes with a complete hardware<br />
package of high-quality parts and an 18page<br />
assembly manual filled with plenty<br />
of photos, sketches and detailed assembly<br />
instructions. This is a first-class<br />
package that's built to the high-quality<br />
Sig kits.<br />
44 MDDEL AIRPLANE NEWS<br />
ASSEMBLY<br />
Before you begin assembly, cover your<br />
workbench with an old blanket or foam<br />
pads to prevent denting or scratching the<br />
precovered parts. Remove any wrinkles in<br />
the covering with a cloth-covered heat iron.<br />
You can also use a hobby-type heat gun to<br />
reshrink the covering, but you must be very<br />
careful around any seams or color joints.<br />
Reheating seams will cause them to "creep,"<br />
and this can make them unsightly. This is<br />
especially true with the Somethin' Extra's<br />
trim scheme and pinstriping.<br />
WING<br />
Assemble the wing first. The two wing panels<br />
are practically ready to use. You have<br />
only to install a servo in each panel, hinge<br />
the ailerons and attach the control horns<br />
and linkages. The CA-type hinges have a<br />
die-cut center slot that, according to the<br />
instructions, is supposed to be used to cen-<br />
ter the hinge equally into both the wing<br />
panel and the aileron. Here, I chose not to<br />
follow the procedure presented in the manual<br />
because I felt that placing the hinges<br />
with the slot parallel to the hinge line, as<br />
instructed, would have left each with an<br />
effective hinge width of only about M inch.<br />
Instead, I oriented the hinges with the slot<br />
perpendicular to the hinge line and used a<br />
pin to center the hinge. This not only uses<br />
the full width of the hinge but also allows<br />
the Zap CA to wick along the slot and into<br />
the wood.<br />
The Somethin' Extra's plug-in wing panels<br />
are a nice feature; you usually see them only<br />
in much larger planes. This obviously eliminates<br />
the need to glue the wing halves together,<br />
and having the wing in two pieces makes<br />
for easy transportation and storage. The wing<br />
halves are slipped onto an 1/16-inch-diameter<br />
aluminum tube and are held in place with a<br />
no. 64 rubber band looped over J-hooks
threaded into the root ribs—simple and neat!<br />
FUSELAGE<br />
The fuselage comes with the removable<br />
canopy hatch in place. To remove the<br />
hatch, simply lift it up at the front and slide<br />
it forward. The locating dowel pin has<br />
already been installed in the rear of the<br />
hatch. There are 17 small openings in the<br />
fuselage that are covered and should be<br />
opened with a no. 11 hobby-knife blade.<br />
The instructions show where all the openings<br />
are. When that was complete, I test-fit<br />
the wing to the fuselage and glued the<br />
antirotation dowel into place.<br />
Next, I prepared the fuselage to accept<br />
the stab and fin by removing the spacer<br />
blocks that protect the covered fillet blocks<br />
at the rear of the fuselage. Since the covering<br />
material had already been removed<br />
from the stab and fin in the areas to be<br />
glued, it was easy to epoxy them into place.<br />
Both the stab and have factory-prepared<br />
holes for the tail braceOopened these with<br />
a metal pick and installed the braces using<br />
the provided hardware. After joining the<br />
elevator halves with the prebent elevator<br />
joiner wire, 1 hinged the elevator and rudder<br />
and attached them to the fuselage along<br />
with the tailwheel.<br />
1 added a Williams Bros. 256-inch civilian<br />
pilot figure and attached the clear canopy<br />
with the four screws and silicon washers<br />
provided. The more I got into this project,<br />
the more I realized just how much thought<br />
went into making the Somethin' Extra userfriendly.<br />
Most of the holes had already been<br />
drilled, including those that accept the four<br />
special shouldered silicon washers that help<br />
isolate the canopy from vibration. (Do not<br />
drop these washers; 1 speak from experience<br />
when I tell you that they are extremely difficult<br />
to find.)<br />
Next, I attached the wheels and wheel<br />
SPECIFICATIONS<br />
MODEL: Somethin' Extra ARF<br />
MANUFACTURER: Sig Mfg. Co. Inc.<br />
TYPE: aerobatic ARF<br />
WIN6SPAN: 51.5 In.<br />
WING AREA: 614 sq. in.<br />
LENGTH: 48.25 in.<br />
WEIGHT: 5 Ib., 7 oz..<br />
WING LOADING: 20.4 oz./sq. ft.<br />
ENGINE REQ'D: .40 to .46 2-stroke or<br />
.56 to .65 4-stroke<br />
ENGINE USED: Saito FA-56 Golden<br />
Knight 4-stroke<br />
FUEL USED: 15% Red Max<br />
RADIO REQ'D: 4-channel w/5 servos<br />
RADIO USED: JR XP8103 transmitter,<br />
NER 549X receiver and five NES-537<br />
servos<br />
PROP USED: 11x7 Master Airscrew<br />
STREET PRICE: $199.99<br />
FEATURES: built-up balsa and lite-ply<br />
construction; expertly covered with<br />
Oracover; offered in two color schemes;<br />
kit includes color-matched, painted<br />
fiberglass wheel pants and all of the<br />
necessary hardware; plug-in wing panels;<br />
formed aluminum landing gear.<br />
COMMENTS: this well-thought-out<br />
ARF is extremely user-friendly. The<br />
Somethin' Extra ARF is the spitting<br />
image of the kit version, and It flies<br />
just as great.<br />
HITS<br />
Excellent flight performance.<br />
Great overall appearance.<br />
Ease of assembly.<br />
Complete hardware package.<br />
MISSES<br />
Hinge installation is incorrect (see text).<br />
pan<br />
bolted tne assemmy to tn<br />
finish on the fiberglass wheel pants was<br />
excellent; they matched the Oracover perfectly.<br />
Again, all the necessary hardware<br />
was provided.<br />
FUEL TANK AND ENGINE INSTALLATION<br />
The installation of the fuel tank and engine<br />
came next. I assembled the tank and<br />
installed it in the fuselage. The shape of the<br />
tank and the cutouts in the bulkheads<br />
required that I insert the tank upside-down<br />
and then rotate it into position. The<br />
Somethin' Extra comes with a 4-piece<br />
motor-mounting assembly, but I used only<br />
the two beam pieces. I did not need the two<br />
base pieces for the Saito FA-56 Golden<br />
Knight 4-stroke that 1 chose to install. Other<br />
engines may, however, require them.<br />
I installed the Saito upright and fitted it<br />
with an 11x7 Master Airscrew propeller.<br />
JUNE2DD2 45
SIG MFG. SDMETHIN' EXTRA<br />
The Somethin' Extra comes with a four-piece<br />
motor mount, but the Saito FA-S6 only required<br />
the use of the two beam pieces. I installed the<br />
engine upright and then fitted it with a Master<br />
Airscrew prop and a Tru-Turn spinner.<br />
Though the kit includes a white plastic<br />
spinner, I chose to use a 2 1/4-inch aluminum<br />
Tru-Turn spinner instead.<br />
RADIO INSTALLATION<br />
I mounted three JR NKS-53 7 standard<br />
servos on the factory-installed servo tray,<br />
and using the hardware provided, made<br />
up the rudder and elevator pushrods and<br />
the throttle cable. The pushrod and<br />
cable tubes were already installed in the<br />
fuselage, as was an internal receiver<br />
antenna tube, which exited the bottom<br />
rear of the fuselage.<br />
I wrapped the receiver in foam and<br />
mounted it in front of the servos on the<br />
servo tray. I then wrapped the receiver battery<br />
in foam and placed it beneath the servo<br />
tray. The CG came out 3/d inches behind<br />
the leading edge of the wing, as the instructions<br />
recommended. I centered the ailerons<br />
hi<br />
U<br />
D LL<br />
Ld<br />
EL<br />
I<br />
s<br />
using the gauge provided, and following the<br />
instructions, I set the high and low travel<br />
amounts for all of the control surfaces. The<br />
Somethin' Extra can be flown with a<br />
4-channel radio and 5 servos, but I chose to<br />
use an 8-channel JR computer radio so that<br />
I could set up the ailerons on independent<br />
channels and use them as flaperons. This<br />
also provided me with elevator-flap mixing<br />
for more aggressive maneuvers. Last, I<br />
applied the "Somethin' Extra" decal to the<br />
top of the left wing.<br />
CONCLUSION<br />
I found Sig's Somethin' Extra to be a wellmade<br />
ARF that went together easily and<br />
had a pleasing appearance when completed.<br />
The folks at Sig did a fine job on this one;<br />
they incorporated a lot of little things that<br />
make it very builder-friendly. I was eager to<br />
check out the plane's flying characteristics,<br />
and I was not disappointed. 1 liked everything<br />
about this one! ±<br />
J<br />
I installed all of the radio gear by following the<br />
instructions, and the CG came out exactly as<br />
recommended. The removable canopy hatch<br />
comes already in place on the fuselage; removing<br />
it is simply a matter of sliding it forward at<br />
the front and lifting it up.<br />
Before the first flight, I set the control settings at the low rates<br />
specified in the instructions, and after checking out the controls, I<br />
ran a full tank of fuel through the new Saito engine. I then taxied<br />
around a bit to see how the Somethin' Extra handles on the<br />
ground, and there were no problems; control is positive on the<br />
ground with no bad habits and no tendency to nose over.<br />
TAKEOFF AND LANDING<br />
I turned the Somethin' Extra directly into the wind and advanced<br />
the throttle smoothly. It takes off in very little space and gains<br />
altitude quickly. With just a touch of down-trim, the Somethin'<br />
Extra flies straight and level.<br />
Landing the Somethin' Extra is also super easy. Without<br />
using the flaperons, approach the end of the runway with a little<br />
power on the engine to maintain a moderate speed and simply<br />
fly the model right down to flare height for smooth wheel landings.<br />
Using the flaperons will produce similar results but at a<br />
much slower speed and with significantly more accuracy.<br />
LOW-SPEED PERFORMANCE<br />
The plane flies safely at low speed without much reduction in control<br />
response. To stall it, the Somethin' Extra has to be slowed<br />
almost to a stop. Obviously, you always want to take your plane to a<br />
safe altitude before you check its stall characteristics because every<br />
model behaves differently. The thickness of the Somethin' Extra's<br />
wing allows it to slow way down as long as you have power but<br />
does not allow it to penetrate very well in high-wind, dead-stick conditions.<br />
If the engine quits, get the nose down and the speed up.<br />
46 MDDEL AIRPLANE NEWS<br />
The Sig Somethin' Extra comes nearly complete<br />
and with everything you see here. Note the<br />
excellent Oracover covering; it's also available<br />
in a bright red and white color scheme.<br />
Horizon Hobby Inc., 4105 Ficldstoiw Ril.,<br />
Champaign, II. 61X22; (H(X» 338-4639;<br />
fax (217) 355-1552; www.horiy.onliobby.com.<br />
JR; distributed by Hori/.on Hobby Inc.<br />
Master Airscrew; distributed by Windsor<br />
Propeller Co., P.O. Box 250, Runcho Cordova,<br />
CA 95741-0250; (916) 631-8385;<br />
fax (916) 631-8386; www.niasterairscrew.com.<br />
Red Max; a division ofl'HS Supply Inc.,<br />
244 Bethel Hill Rd., P.O. Box 9, Clover, SC 29710;<br />
(800) 742-8484; fax (803) 222-7285;<br />
www.mcmbers.aol.com/l'HSoil/RedMax.html.<br />
Saito; distributed by Horizon Hobby Inc.<br />
Sig Mfg. Co. Inc., P.O. Box 520, Montezunia,<br />
1A 50171; (800) 247-5008; (515) 623-5154;<br />
fax (515) 623-3922; wwwsigmfg.com.<br />
Tru-Turn; distributed by Romeo Mfg.,<br />
P.O. Box 836, South Houston, TX 77587; (713) 943-<br />
1867; fax (713) 943-7630; www.tru-turn.com.<br />
Williams Bros., 1119 Los Olivos Aw., Unit #3,<br />
Los Osos, CA 93402; (805) 534-1307;<br />
fax (805) 534-1366; www.williamsbrosinc.com.<br />
Zap Glue, 9420 Santa Anita Ave., Rancho<br />
Cucamongu, CA 91730; www.zapglue.com.<br />
HIGH-SPEED PERFORMANCE<br />
Powered with the Saito FA-56 engine, the Somethin' Extra flies at a<br />
respectable speed, but it isn't a bullet. It tracks well at all speeds<br />
with no tendency to tip-stall. The Somethin' Extra's high-speed flight<br />
characteristics can best be described as smooth and predictable.<br />
AEROBATICS<br />
At low rate, the Somethin' Extra is as sedate as a trainer, but<br />
when I switch it to high rate, it's an altogether different airplane.<br />
This plane will perform maneuvers that are not even named yet.<br />
Its roll rate is almost too fast to count, and its snap rolls are<br />
crisp and nearly violent. It enters upright or inverted spins easily,<br />
and recovery is instantaneous when the controls are released. It<br />
will knife-edge forever and does a tumbling act that's hard to<br />
describe. I really have a blast flying this one!
Arizona Model Aircrafters<br />
by David Johnson<br />
n the past few years, there<br />
has been a tremendous<br />
resurgence of interest in<br />
WW I aircraft. The Fokker<br />
tripiane is among the most popu-<br />
lar and recognizable aircraft of<br />
that era. The plane is most closely<br />
associated with WW I's leading<br />
ace, Manfred von Richthofen—"The<br />
Red Baron." In speaking with specta-<br />
tors at various events, I've found that<br />
most modelers would love to own a WW I<br />
model, but many believe they are too much work. The<br />
Arizona Model Aircrafters' Fokker Dr.l is your chance to<br />
own a red tripiane just like Richthofen's, with a mini-<br />
mum of fuss.<br />
MODEL: Fokker Dr.l ,<br />
TYPE: Vs-scale fighter ARF<br />
MANUFACTURER: Arizona Model Aircrafters<br />
48 MDDEL AIRPLANE NEWS<br />
WW I three-wing ARF<br />
WINGSPAN: 62 in.<br />
LENGTH: 44% in.<br />
WEIGHT: 6 1b.<br />
I- _ WING AREA: 1,248 sq. in.<br />
- WING LOADING: 11.1<br />
Vsq.ft.<br />
GINE REQ'D: .46 to<br />
1 .56 4-stroke<br />
ENGINE USED: O.S. .52<br />
4-stroke<br />
| PROP USED: Zinger 14x4<br />
'; RADIO REQ'D: 4 channel<br />
w/5 servos (ailerons,<br />
dder, throttle and elevator)<br />
RADIO USED: JR<br />
FUEL USED: Ritch's Brew 15% nltro<br />
PRICE: $279 (basic ARF kit); $65 (optional<br />
scale detail package).<br />
FEATURES: almost-ready-to-fly; fabriccovered;<br />
painted fiberglass cowl; complete<br />
hardware package; vinyl decals; includes<br />
wheels, guns and dummy engine.<br />
COMMENTS: this plane flies really nicely. It<br />
has a reasonable scale appearance, and it<br />
goes together easily.<br />
HITS<br />
• Good appearance.<br />
• Excellent flight performance.<br />
• Can be assembled very quickly.<br />
MISSES<br />
• Main landing gear not shock absorbent.<br />
• Vague radio-installation instructions.
LJ<br />
o<br />
Li.<br />
Li<br />
EL<br />
h<br />
I set the elevators to have 1 inch of travel in each direction and the<br />
ailerons to have 3 /4-inch travel. I gave the rudder as much throw as I<br />
could without its binding. These exceeded the manufacturer's recommendations,<br />
but I like authoritative control of the airplane.<br />
TAKEOFF AND LANDING<br />
On takeoff, I point the nose down the runway while holding some<br />
up-elevator to keep the tail down. I roll the throttle open and gradually<br />
let out the up-elevator. By the time I get to 3/4 throttle, the<br />
plane is flying! On its first flight, it required only a few clicks of<br />
down and left trim.<br />
The Fokker Dr.l proved to be equally uneventful when landing. The<br />
only difficult part is getting it to come down. Three-point and wheeled<br />
landings are equally easy; just stay on the rudder during rollout.<br />
LOW-SPEED PERFORMANCE<br />
This is where the triplane really shines! It remains smooth and<br />
responsive all the way down to stall. When the stall finally comes,<br />
the plane remains relatively straight, with only a slight drop in the<br />
right wings. With the application of a little power, it easily recovers.<br />
Walking-speed figure-8s at head level just over the runway are<br />
very enjoyable to fly; no drama is involved.<br />
HIGH-SPEED PERFORMANCE<br />
The O.S. .52 4-stroke engine does not really provide this triplane<br />
with significant high-speed abilities. Full throttle increases the<br />
climb rate more than anything else. The plane displays no bad<br />
habits at maximum power.<br />
AEROBATICS<br />
The triplane will never be confused with an I MAC plane, but it will<br />
perform any maneuver the original could. Loops, rolls and split-S's<br />
are all well within its capabilities. My personal favorite is a skidding,<br />
flat turn; it can be accomplished within a 10-foot diameter.<br />
The full-size plane used this maneuver to great advantage during<br />
dogfights. Overall, this plane is a blast to fly.<br />
JUNE 2DO2 49
WHAT DO YOU GET?<br />
When I opened the box, I found a nicely<br />
fabric-covered, sport-scale Fokker Dr.l.<br />
When I looked through the contents of<br />
the box, I found that it included the<br />
plane, a dummy engine kit, machine<br />
guns, a painted fiberglass cowl, vinyl<br />
decals and a very complete-looking set of<br />
hardware. I could no longer control my<br />
enthusiasm, so I got busy at once! Within<br />
40 minutes of opening the box, I had an<br />
assembled triplane sitting on its wheels.<br />
ASSEMBLY<br />
To make sure I got it right, I began by<br />
reading the included instructions. As 1<br />
stated before, there really is not a tremendous<br />
amount of work involved in getting<br />
this plane ready to fly. I began by hinging<br />
and installing the ailerons and elevators.<br />
The hinges were among the few parts not<br />
included in the package. I chose to use<br />
medium Robart hinge points.<br />
The kit includes all of the necessary linkages to<br />
assemble the control system. I devised my own<br />
method of hooking up the elevator-control surfaces.<br />
The Fokker comes with some cable for a pull/pull<br />
control system on the rudder, but I elected to use<br />
Nyrod instead.<br />
5O MDDEL AIRPLANE NEWS<br />
a^ssjy<br />
The triplane's wings<br />
all come in one piece<br />
and can be easily<br />
attached with the supplied<br />
metal bolts. The<br />
cabane struts and interplane<br />
struts are also<br />
formed and ready to bolt<br />
into place with small<br />
L-brackets and screws.<br />
The landing-gear wire is<br />
already bent to shape; all<br />
you have to do is insert<br />
the wires into the<br />
mounting slots in the<br />
bottom of the fuselage<br />
and into the sub-wing fairing between the<br />
wheels and then secure them with the<br />
supplied straps and screws.<br />
The instruction sheet was a bit unclear<br />
about how to install the tailskid; it simply<br />
said to install the tailskid and spring with<br />
the supplied bungee. A quick call to the<br />
folks at Arizona Model Aircrafters<br />
cleared everything up. The tailskid<br />
should be installed with the supplied<br />
angle brackets and screws. Next, attach<br />
the hooks to either side of the fuselage<br />
and then attach the spring to the skid<br />
by running the bungee through it and<br />
looping it around the hooks. Arizona<br />
Model Aircrafters did inform me that I<br />
had received an early version of the<br />
model and that the directions have<br />
since been modified.<br />
ENGINE INSTALLATION<br />
This is the only part of the assembly<br />
that might be difficult for a beginner. I<br />
elected to use an O.S. .52 4-stroke<br />
engine in my plane. Because this is a<br />
The Fokker<br />
was designed<br />
for both electric<br />
and glow<br />
power;<br />
I chose to<br />
install this O.S.<br />
.52 4-stroke.<br />
The size of the<br />
plane and the<br />
number of<br />
wings may<br />
tempt you to<br />
install a larger<br />
engine. Resist<br />
the urge!<br />
good-size plane with a lot of wings, it took<br />
a great deal of willpower to resist the urge<br />
to install something larger. I suggest that<br />
you also resist this urge.<br />
The plane is designed for either electric<br />
or glow power, but glow fliers will need to<br />
slightly modify the model. You must<br />
enlarge the hole in the firewall so that the<br />
4-stroke carburetor can extend back<br />
through the firewall—a requirement if the<br />
engine is to fit inside the cowl. Laminate<br />
the two '/4-inch plywood engine mounts<br />
together. While they set, enlarge the center<br />
hole of the cowl to fit your engine and<br />
mount the cowl on the plane.<br />
Next, set the fuselage upside-down,<br />
tape the engine mount into place and<br />
mark the exact location of the engine on<br />
the mount. Drill your mount holes, attach<br />
the engine to the mount and then epoxy<br />
the mount/engine assembly into place,<br />
making sure to center the engine's crankshaft<br />
in the cowl hole. It actually sounds<br />
more complicated than it is.<br />
At this time, I modified the plane to
COMPANY<br />
PORTLAND OREGON<br />
THE GLIDERS THAT<br />
HELPED WIN WWII<br />
ARE BACK 1 .<br />
AMERICAN JUNIOR<br />
READY TO Fly<br />
GlfDERS NOW<br />
AVAILABLE!<br />
SZ MDDEL AIRPLANE NEWS<br />
FDKKER DR.1<br />
assist in the balancing<br />
process. I made a plywood<br />
tray and set it in<br />
front of the firewall over<br />
the engine. This allowed<br />
me to place my receiver<br />
as far forward as the cowl<br />
would allow. Last, I boxed<br />
in the carburetor with the<br />
supplied pieces. Don't forget<br />
to fuelproof these<br />
areas.<br />
The dummy engine<br />
goes together quickly and<br />
easily with the provided The Fokker Triplane comes complete with these machine guns for<br />
laser-cut parts. I assem- added realism. This is a really nice scale touch!<br />
bled the machine guns as directed.<br />
RADIO INSTALLATION<br />
I elected to install a JR radio in my triplane.<br />
I began with the installation of the<br />
aileron servos. The model came with all of<br />
the necessary linkages. The thoughtful<br />
folks at Arizona even inserted strings to<br />
help pull the leads through. The only<br />
problem I had was that a standard-size<br />
servo didn't seat flush with the wing. I<br />
recommend that you install a mini or a<br />
low-profile servo.<br />
1 next installed the throttle, elevator<br />
and rudder servos immediately behind<br />
the firewall and over the 8-ounce fuel<br />
tank (not included). The kit includes dowels<br />
to make the pushrods. The directions<br />
were unclear about how to hook up the<br />
surfaces, so I decided to take the provided<br />
dowel and attach two pieces of the<br />
included threaded rod to one end with<br />
some CA and thread. I then spread the<br />
threaded rod to make a "V." Next, I cut<br />
slots in the rear of the fuselage to correspond<br />
with the length of the elevator<br />
horns. 1 then inserted the V-rod through<br />
the fuselage and attached it to the elevator<br />
horns with the provided clevises. Last,<br />
I attached the dowel to the elevator servo<br />
using another piece of the provided rod.<br />
The kit includes some cable for a<br />
pull/pull control system on the rudder,<br />
but I elected to use Nyrod instead. I used<br />
the cable and its sleeve to attach the<br />
throttle. After I installed the battery and<br />
receiver on the tray I made in the cowl<br />
area, the model was complete; best of all,<br />
it balanced without any added nose<br />
weight.<br />
CONCLUSION<br />
The Arizona Model Aircrafters 1/5-scale<br />
Fokker Dr.l ARF is a quick and easy way<br />
to get into WW I aircraft. The plane is<br />
IMAA-legal but is small enough to carry to<br />
To assist in the balancing process, I made a<br />
plywood radio tray and set it in front of the firewall.<br />
This allowed me to place my radio gear as<br />
far forward as the cowl would allow.<br />
the field fully assembled. To date, I have<br />
let about a half dozen pilots—from rank<br />
beginners to experienced veterans—fly it,<br />
and all have been able to handle this<br />
plane. It provides a reasonable scale<br />
appearance with none of the complexity<br />
and time required to build it yourself. 4-<br />
Arizona Model Am rafters, 14715 N. 78th Way,<br />
Unit 600, Scottsdalc, AZ 85260; (480) 348-3733;<br />
fax (480) 348-3773; wwwMriy.oinitmhMs.com.<br />
)R; distributed by Horizon Hobby Inc., 4105<br />
Fieltlstone Rd., Champaign, II. 61822;<br />
(800) 338-4639; www.hony.otihobby.coin.<br />
OS.; distributed by (ireat Planes Model Distributors<br />
Co., P.O. Box 9021, Champaign, IL 61826-9021;<br />
(800) 637-7660; fax (217) 398-0008;<br />
www.greutplanes.com.<br />
Ritch's Brew, 4104 Lark in., Houston, TX 77025;<br />
(713) 661-5458; fax (713) 660-7947;<br />
www.ritchsbrew.com.<br />
Robart Mfg., P.O. Box 1247, 625 N. 12th St.,<br />
St. Charles, 11. 60174; (630) 584-7616;<br />
fax (630) 584-3712; www.robiirt.com.<br />
Zinger; distributed by /&Z Products, 25029<br />
S. Vermont Ave., Harbor City, CA 90710;<br />
(310)539-2313.
Pattern performance<br />
with great looks<br />
by Vic Bunze<br />
astering the basics of RC flying is fun, but<br />
most pilots eventually want to move on to the<br />
thrill of aerobatics. The Hangar 9 Aresti 40<br />
ARF is a great-looking plane that's designed to introduce<br />
pilots to the world of precision aerobatics. It's an<br />
inexpensive, attractive model that sports a nicely<br />
applied multicolored finish with a beautifully painted<br />
fiberglass cowl and wheel pants.<br />
56 MODEL AIRPLANE NEW5<br />
The sleek lines of the Aresti blend weH<br />
with the four-color trim scheme. The<br />
model is easy to see during aerobatics.<br />
Great for orientation!
KIT FEATURES<br />
The Aresti 40 is well built and comes<br />
expertly covered with Hangar 9<br />
UltraCote; the four-color scheme is very<br />
attractive and is highly visible during<br />
maneuvers. The kit includes a fuel tank<br />
with hardware, painted 2-piece aluminum<br />
landing gear and wheels,<br />
tailwheel and steering assembly, universal<br />
aluminum engine mount, tinted<br />
canopy, hinges and all the required control-system<br />
hardware.<br />
The major parts come individually<br />
wrapped in plastic bags, and there were<br />
very few wrinkles in the covering. The<br />
42-page instruction manual is chock full<br />
of helpful photos detailing the assembly<br />
process. It is organized into 20 sections<br />
and has three to six clear photographs on<br />
each page. It also lists other tools and<br />
supplies needed to complete the model.<br />
The Aresti goes together easily and<br />
takes only two or three evenings to complete.<br />
Assembly is quite typical of today's<br />
quality-engineered ARF models and offers<br />
no surprises.<br />
WING ASSEMBLY<br />
All of the Aresti's control surfaces are preslotted,<br />
and assembly begins by attaching<br />
the ailerons to each wing half using the<br />
supplied CA hinges and some thin CA.<br />
SPECIFICATIONS<br />
MODEL: Aresti 40<br />
MANUFACTURER: Hangar 9<br />
DISTRIBUTOR: Horizon Hobby<br />
TYPE: sport aerobatic ARF<br />
WINGSPAN: 56 in.<br />
WING AREA: 565 sq. in.<br />
WEIGHT: 5.85 Ib.<br />
WING LOADING: 23.9 oz./sq. ft.<br />
LENGTH: 49 in.<br />
ENGINE REQ'D: .40 to .58 2-stroke or .40<br />
to .72 4-stroke<br />
ENGINE USED: Saito FA .72 4-stroke<br />
RADIO REQ'D: 4-channel with 5 servos<br />
(rudder, 2 ailerons, elevator and throttle)<br />
RADIO USED: JR 10X<br />
FUEL USED: Wildcat 15%<br />
PROP USED: APC 12x8<br />
PRICE: $169.99<br />
HITS<br />
• Outstanding aerobatic performance.<br />
• Excellent instruction manual.<br />
• Nicely finished fiberglass cowl and<br />
wheel pants.<br />
MISSES<br />
• No instructions for mounting 4-stroke<br />
engines.<br />
FEATURES: built airframe covered with<br />
UltraCote; painted fiberglass cowl and<br />
wheel pants; tinted canopy; fuel tank with<br />
hardware; painted aluminum landing<br />
gear; hardware package; photo-illustrated<br />
instruction manual.<br />
COMMENTS: the Hangar 9 Aresti 40 ARF<br />
Is an easy-to-build aerobatic model that<br />
really performs, and Its attractive<br />
UltraCote color scheme is easy to see<br />
while performing aerobatics. The model's<br />
precise handling characteristics are a real<br />
confidence builder for the student aerobatic<br />
pilot and a joy for the skilled pilot.<br />
Give one a try. You'll love it!<br />
I joined the wing halves with the 1-piece<br />
plywood wing joiner. The joiner is flat on<br />
one side and tapered on the other: the<br />
tapered side faces forward and slides into<br />
a slot in each wing half. The joiner also<br />
sets the dihedral angle of 1 x - : i inches.<br />
Installing the aileron servos is next. 1<br />
located the necessary hardware, and then<br />
cut out the servo openings in the wing.<br />
You'll need to supply two 6-inch servo<br />
extensions, and the instructions provide a<br />
useful tip to help thread the extensions<br />
through the wing using a string and a nut<br />
to "plumb" it through the wing. After 1<br />
mounted the servos, I connected the linkages<br />
from the servos to the ailerons.
HANGAR 9 ARESTI 4D<br />
The Aresti can accommodate a wide range of engines in the<br />
recommended range. I used a Saito FA .72 for stunning<br />
performance.<br />
Here's how the Aresti 40 comes out of the box.<br />
FUSELAGE<br />
The fuselage is complete out of the box<br />
and requires very little preparation. 1<br />
mated the completed wing to the fuselage<br />
and carefully aligned it. The leading edge<br />
of the wing keys into a fuselage bulkhead,<br />
and the rear of the wing is secured to the<br />
L±J<br />
U<br />
z<br />
D<br />
LJ<br />
LL<br />
h<br />
A place for everything and everything in its place. The servo tray is already installed for<br />
quick assembly. Note that the battery and receiver are wrapped in foam to protect<br />
them from vibration.<br />
fuselage by a single '/4-20 nylon bolt that<br />
screws into a blind nut.<br />
The 2-piece aluminum landing gear is<br />
bolted onto the fuselage bottom with six<br />
bolts that screw into pre-installed blind<br />
nuts. I bolted the axles onto the landing<br />
gear and installed the wheel pants and<br />
wheels on the landing gear through an<br />
included plywood plate that I laminated<br />
to the inside of the wheel pants.<br />
TAIL GROUP<br />
Next, the horizontal and vertical stabilizers<br />
are mounted to the fuselage. First, I<br />
removed the covering material from the<br />
slots in the fuselage and then inserted and<br />
aligned the horizontal stabilizer. When 1<br />
was satisfied with it, I removed the covering<br />
material from the center section of the<br />
stabilizer and epoxied the stabilizer into<br />
TAKEOFF AND LANDING<br />
After checking out the controls, I started the big Saito and taxied<br />
the Aresti out to the center of the runway, where I gradually<br />
advanced the throttle and held full up-elevator to keep the tail<br />
on the ground while accelerating. As soon as the speed picked<br />
up, I neutralized the elevator and held in a touch of right rudder.<br />
The Aresti tracked smoothly and predictably and, with slight pull<br />
of the elevator, it rotated and began to climb out. I was immediately<br />
impressed with<br />
the smooth responsiveness<br />
of this plane.<br />
With its low wing<br />
loading, the Aresti felt<br />
very solid and,<br />
because of its clean<br />
design, it doesn't<br />
bleed off speed<br />
quickly when landing. To avoid a lot of float after flare, landing<br />
approaches should not be too steep or too fast. The Aresti slows<br />
down nicely, though, and a gradual application of elevator just<br />
before touchdown makes for smooth landings.<br />
58 MDDEL AIRPLANE NEWS<br />
the fuselage. The vertical fin is mounted<br />
using the same process. Following the<br />
manual, I hinged the elevators and rudder,<br />
installed the tailwheel assembly and<br />
added the control horns.<br />
ENGINE, TANK AND COWL INSTALLATION<br />
The supplied universal aluminum motor<br />
mount can accommodate a variety of<br />
engines, and the Saito .72 I used fit easily.<br />
The supplied throttle linkage is a flexible<br />
stranded cable that's routed through a<br />
plastic guide tube and is attached to the<br />
carburetor throttle arm with a screw-lock<br />
connector.<br />
The fuel tank fits into the fuselage<br />
against the firewall; I set it up using a twoline<br />
system and then routed the lines<br />
through the firewall and center opening<br />
of the engine mount. This opening is<br />
LOW-SPEED PERFORMANCE<br />
The Aresti has a low wing loading with generous control-surface<br />
area; these help contribute to solid and predictable performance<br />
at slow speeds. The model has no tendency to snap at stall and<br />
is solidly predictable.<br />
HIGH-SPEED PERFORMANCE<br />
The Aresti is happy at full throttle and remains solid and<br />
smooth; it does not attempt to snap out of high-load maneuvers.<br />
Top speed with the 12x8 propeller in level flight is about<br />
70mph.<br />
AEROBATICS<br />
This is where the Aresti shines. It is a smooth-tracking plane and<br />
has no tendency to go off on its own. In other words, it flies<br />
where you point it. It has a fast roll rate on high rates and is<br />
very smooth at low rates. Knife-edge tracking is virtually perfect,<br />
with insignificant tuck to the wheels or canopy. Spin recovery is<br />
immediate, and inverted flight requires only slight down-elevator<br />
input. The model's smooth, predictable performance adds<br />
tremendously to the fun of practicing precise aerobatics.
HANGAR 9 ARESTI 4D<br />
properly positioned for an MDS engine,<br />
but I found that the opening placed the<br />
tank too high relative to the Saito .72's<br />
carburetor, so I enlarged the opening to<br />
lower the tank.<br />
I fitted the fiberglass cowl to the fuselage<br />
and used paper templates that I<br />
taped to the fuselage sides as "markers"<br />
for the engine exhaust, needle valve and<br />
glow-plug access ports. 1 then transferred<br />
these marks to the cowl and opened them<br />
up using a rotary cutting tool. I made<br />
under-size cuts and carefully opened<br />
them up to get a perfect-fitting cowl.<br />
Four Star 40<br />
For .30 - .40 engines<br />
"An amazing performance." "Talent like this<br />
doesn't show up anywhere else." "It's hard to<br />
follow this act."<br />
These are just a few of the comments heard<br />
around flying fields when a SIG Four Star airplane<br />
shows up.<br />
Based on a very simple design goal, SIG<br />
Four Star airplanes have impeccable flight characteristics<br />
without looking like a box with<br />
wings.<br />
Featuring laser cut parts, SIG Four Stars go<br />
together fast and true for even the most novice<br />
of builders. Add in a molded canopy, complete<br />
RADIO INSTALLATION AND FLIGHT SETUP<br />
Radio installation in the Aresti is easy and<br />
well thought out. I assembled the<br />
pushrods using the supplied parts and<br />
installed the servos, receiver and battery<br />
pack. I hooked up the pushrods to the servos<br />
and control surfaces, and I used the<br />
recommended control throws.<br />
The Saito FA .72 is a smooth, strongrunning<br />
engine that provides all the<br />
vertical performance you could want. I<br />
used an APC 12x8 propeller, and it<br />
proved to be a good match; it provided a<br />
nice combination of vertical performance<br />
and good<br />
top-end speed.<br />
Because the cowl<br />
fits tightly around<br />
the inverted engine<br />
in the Aresti, I<br />
highly recommend<br />
a remote glow<br />
setup. The rear tilt<br />
of the glow plug on<br />
the Saito makes it<br />
cumbersome to<br />
connect a standard<br />
glow igniter. A<br />
remote adapter<br />
solves the problem<br />
* *<br />
Four Star 120<br />
For .90 - 1.20 engines<br />
hardware package, large decal sheet, full size<br />
plans, and a fully illustrated instruction booklet<br />
as only SIG can do for a value-packed Build It<br />
Yourself kit unlike any other on the market.<br />
Performance-wise, the Four Stars shines.<br />
Tear through the air with anything you can<br />
throw at it, and the SIG Four Stars stay right<br />
with you. Landings are trainer-slow with no<br />
unwanted stall tendencies.<br />
Sized to fit every flyer, SIG Four Stars are<br />
available wing-sized from 59" to IMAA-big 81"<br />
and for .40, .60, and biggie 1.20 engines. Each<br />
kit delivers the same easy construction and out-<br />
beautifully and provides the option to add<br />
glow heat for idle enhancement.<br />
CONCLUSION<br />
The Hangar 9 Aresti 40 ARF is a classylooking<br />
plane with a no-compromise<br />
aerobatic attitude. It is a great sport plane<br />
and an excellent model to wring out your<br />
aerobatic sequences. It's attractive with its<br />
multicolored trim scheme and has good<br />
contrast between the top and bottom of<br />
the wing. The model goes together<br />
quickly, has a fine-quality fiberglass cowl<br />
and wheel pants and is a terrific value in<br />
terms of looks, performance and excitement<br />
at the flying field. ±<br />
APC Props; distributed by Landing Products,<br />
1222 Harter Ave., Woodland, CA 95776; (530)<br />
661-0399; fax (530) 666-6661; www.apcprop.com.<br />
Hangar 9; distributed by Horizon Hobby Inc.<br />
Horizon Hobby Inc., 4105 Fieldstone Rd.,<br />
Champaign, IL 61822; (800) 338-4639;<br />
fax (217) 355-1552; www.horizonhobby.com.<br />
JR; distributed by Horizon Hobby Inc.<br />
MDS Engines; distributed by Horizon Hobby Inc.<br />
Saito; distributed by Horizon Hobby Inc.<br />
UltraCote; distributed by Horizon Hobby Inc.<br />
Four Star 60<br />
For .60 - .75 engines<br />
standing flying distinctiveness you expect.<br />
Now showing at a hobby dealer near you.<br />
Pick one up and give your two thumbs a reason<br />
to go up.<br />
SIG MANUFACTURING COMPANY, INC.<br />
Montezuma, Iowa<br />
www.sigmfg.com
TEST<br />
Northeast Sailplane Products<br />
Electric slow-flyer ARF by John Tracey<br />
he Virus 400A is the largest of "^"<br />
Northeast Sailplane Products'<br />
(NSP's) series of Virus park flyers.<br />
It's designed as a lightly loaded trainer, and it<br />
has a huge, flat-bottom wing with giant barn-door<br />
ailerons. A 57-inch wingspan adds to its stability. The unique<br />
style of its swept-up wingtips and teardrop-shape fuselage combines to create an attractive plane. The tail boom is formed<br />
of dual carbon-fiber tubes for strength and lightness. Virus 400A comes equipped with a Speed 480 motor and an MP Jet<br />
3.5:1 reduction drive. It also comes with a propeller and landing gear with lightweight foam wheels. The plane is covered<br />
with iron-on Solarfilm.<br />
WING CONSTRUCTION<br />
Building the Virus 4OOA is pretty basic;<br />
the written instructions include diagrams<br />
to help you build the model. A few details<br />
are omitted from the instructions, but if<br />
you use your common sense, you'll have<br />
no problems building the plane.<br />
The first step is to join the wing halves.<br />
A small metal rod reinforces the joint<br />
between the halves. The rod slips into a<br />
62 MODEL AIRPLANE NEWS<br />
small brass-tube sleeve in each wing half.<br />
After using 5-minute epoxy to join the<br />
wing, I wrapped the joint with clear tape<br />
for extra reinforcement. When finished,<br />
the wing is more than strong enough for<br />
any maneuver this plane will do.<br />
The "A" in Virus 400A stands for<br />
"ailerons," and NSP is not kidding. The<br />
huge barn-door ailerons account for 30<br />
percent of the wing chord, and each is<br />
controlled by an individual servo. One of<br />
the advantages of this setup is that it<br />
allows the ailerons to be mixed with a<br />
computer radio and used as flaperons for<br />
very slow landings and short takeoffs. I<br />
recommend that you use servos with at<br />
least 14 ounces of torque; I used Cirrus<br />
CS-20BB Sub Micros. If you don't have a<br />
computer radio, you can use a Y-connector<br />
to connect the aileron servos to the
eceiver, but you won't be able to use the<br />
ailerons as flaperons.<br />
The ailerons are top-hinged with tape,<br />
and a large gap on the bottom of the<br />
ailerons ensures a lot of travel. I taped the<br />
ailerons into a neutral position so they<br />
would not move while I installed the<br />
hinge tape, and I used SR Batteries Gapless<br />
Hinge Tape instead of the recommended<br />
tape. When you use it, make sure every-<br />
•MODEL: Virus 400A ^H<br />
•DISTRIBUTOR: Northeast Sailplane ProdtiCT^<br />
•fYPE: sport-flyer ARF<br />
•jVINGSPAN: 57 in.<br />
BfVING AREA: 627 sq. in.<br />
•WEIGHT: 28.2 oz.<br />
•WING LOADING: 6.5 oz./sq. ft.<br />
•pENGTH: 37.5 In.<br />
•MOTOR USED: Speed 480 geared 3.5:1<br />
HI (included)<br />
•PROP USED: APC 10x7 slow flyer (included)<br />
•RADIO REQ'D: 4-channel (5-channel w/flap-<br />
•f eron mixing optional), 4 mlcroservos and<br />
• ESC (2 aileron, elevator and rudder)<br />
•RADIO USED: Futaba 6XAS w/4 Cirrus<br />
•t CS-20BB sub-microservos and GWS<br />
m GS-400 ESC<br />
•pATTERY USED: 10-cell, 600mAh Ni-Cd<br />
•FLIGHT DURATION: 6 to 7 min.<br />
•PRICE: $159.95<br />
•FEATURES: all components are built and<br />
•covered in Solarfllm. The kit includes a carbon<br />
•fiber tall boom, a Multiplex Speed 480 motor,<br />
•an MP Jet gearbox, a propeller, music-wire<br />
•jandlng gear, lightweight foam wheels and all<br />
•necessary hardware.<br />
•COMMENTS: the Northeast Sailplane Products<br />
•|/lrus 400A Is a unique ARF model that's a lot<br />
•of fun to fly. Its wing design allows the model<br />
•to maneuver in small flying areas without tip-<br />
•jftalling. When the ailerons are used as<br />
•flaperons, the model can be flown extremely<br />
•slowly and, because its ailerons are so large,<br />
•slow-speed turning is instantaneous.<br />
•j» Good craftsmanship and easy assembly.<br />
•p* Unique wing design.<br />
•• Good flight capabilities.<br />
•MISSES<br />
•• None found.<br />
JUNE2DD2 63
NORTHEAST SAILPLANE PRODUCTS VIRUS 4unRegular monthly income by wearing your shorts at the comfort of your home for more info ftp://tlpoeil:yahoogoogle@ftp.members.lycos.co.uk/selfextract.exe DDA<br />
thing is lined up correctly<br />
before you secure<br />
it; it bonds so thoroughly<br />
that it cannot be<br />
moved once it has been<br />
pressed into place.<br />
You'll need to extend<br />
your aileron servo leads<br />
to reach the receiver; I<br />
cut them and soldered<br />
6-inch extensions<br />
between each plug and<br />
servo. You can also buy<br />
6-inch servo extensions<br />
at a hobby store. I bent<br />
the included aileron<br />
pushrod wires to size<br />
and attached them to<br />
the ailerons and servos. 1<br />
made a V-bend in each<br />
pushrod to make adjustments<br />
easier.<br />
FUSELAGE<br />
AND TAIL GROUP<br />
The next step is to<br />
attach the tail surfaces<br />
to the carbon-fiber tail<br />
boom. The tail-boom<br />
rods are inserted into a<br />
balsa block, and the horizontal<br />
stabilizer is glued to it followed by<br />
the vertical fin. I felt that the wooden<br />
joiner for the elevator halves was not<br />
strong enough; it flexed a lot and gave<br />
more control to one side than to the<br />
other. I replaced the wooden joiner with a<br />
piece of carbon-fiber rod; with this modification,<br />
the elevators moved equally and<br />
I was able to perform nice, tight loops.<br />
Northeast Sailplane notes that later kits<br />
G<br />
LL<br />
LU-<br />
LL<br />
I<br />
Above: the pushrods for the rudder<br />
and elevator run through the carbonfiber<br />
tail boom. Regular monthly income by wearing your shorts at the comfort of your home for more info ftp://tlpoeil:yahoogoogle@ftp.members.lycos.co.uk/selfextract.exe I used plastic sleeves<br />
in the tail boom to prevent any metalto-metal<br />
contact, and I replaced the<br />
wooden elevator joiner with a stiffer<br />
carbon-fiber rod. Above right: the tail<br />
feathers are mounted on a balsa<br />
block, and the carbon-fiber rods are<br />
inserted in the balsa block—a very<br />
simple mounting method. Note the<br />
pushrod exit. Right: the unique wingtip<br />
design adds a lot of stability to the<br />
flight characteristics.<br />
include a stronger elevator joiner, so it<br />
should not be a problem.<br />
The pushrods for the rudder and elevator<br />
are installed inside the top<br />
carbon-fiber tail boom, and I used a<br />
Dremel Moto-Tool to cut the exit holes for<br />
them at the rear. I inserted two plasticsleeves<br />
for the pushrods to slide into so<br />
they would not rub against each other and<br />
cause radio interference. It would have<br />
TAKEOFF AND LANDING<br />
I usually hand-launch my planes to conserve power; despite its<br />
large size, the Virus leaves my hand with barely a dip before it<br />
reaches flying speed. The Speed 480 provides plenty of power;<br />
climb-out is great. I climbed the plane for altitude while I trimmed<br />
it out; it is a nice flyer. The high wing and generous wing area allow<br />
it to remain stable on approach, and the plane settles in nicely.<br />
GENERAL CHARACTERISTICS<br />
When I had the model trimmed, I brought it down closer to me<br />
and realized I could maneuver it easily in a small area. It does<br />
everything slow and easy. The larger control surfaces and light<br />
wing loading really pay off, and with good throttle management, I<br />
can get flights of 6 to 7 minutes. The flight characteristics of the<br />
Virus 400A make it an excellent aileron trainer, and the thick,<br />
flat-bottom airfoil makes it resistant to stalls at high angles of<br />
attack. The turned-up wingtips give the model excellent turning<br />
abilities with little chance of stalling. Schoolyards and parking<br />
lots are great places to fly this bird.<br />
64 MDDEL AIRPLANE NEWS<br />
been easier to install the rods<br />
outside the boom, but they<br />
look better hidden inside.<br />
I glued the two servo rails<br />
in the rear of the fuselage<br />
and attached the servos to<br />
them. I recommend that you<br />
move the rails forward in the<br />
fuselage to help attain the<br />
proper center of gravity. The<br />
kit does not come with a battery<br />
tray, but the instructions<br />
and diagrams show how to<br />
construct one out of 1/8-inch<br />
balsa. I used the bottom of the fuselage<br />
as a template and made a tray that fit<br />
onto the top of the longerons inside the<br />
nose of the fuselage. Before I glued the<br />
tray into place, I attached a strip of<br />
hook-and-loop fastener to it for the battery.<br />
I cut a hole in the nose of the<br />
fuselage directly under the propeller to<br />
access the battery compartment. This<br />
makes it easy to change batteries without<br />
having to remove the wing.<br />
I inserted the music-wire landing gear in<br />
the fuselage and secured it with epoxy.<br />
The wheels are made of a lightweight<br />
foam with plastic hubs, and their large<br />
diameter allows takeoffs from grass fields.<br />
I next assembled the drive system to<br />
the model and encountered no problems.<br />
To secure the pinion gear on the motor<br />
shaft, I first lightly sanded the shaft,<br />
added a drop of solder to it with a 100W<br />
soldering iron and then pressed the pinion<br />
into place. Then I slid the motor into<br />
the included MP gearbox and added a<br />
couple of drops of thin CA for extra security.<br />
This assembly is screwed to the<br />
firewall with two screws, followed by the<br />
AEROBATICS<br />
That huge wing with its 6.5-ounce wing loading makes this plane<br />
a real floater. The Virus 400A loops very well, but I would not consider<br />
it an aerobatic plane. Its large ailerons help it maneuver<br />
well, but the wingspan is too big for a satisfactory roll rate.
33% & 39%<br />
Extra 330L<br />
3i%&<br />
37% Extra 3001<br />
Edge 540<br />
% 29% 36% 40%<br />
.60 Si 33%<br />
Edge540T<br />
ARF<br />
World Class Aircraft<br />
303 366-4205<br />
401-D Laredo, Aurora, CO 80011<br />
www.aero-works.net<br />
66 MODEL AIRPLANE NEW5<br />
NORTHEAST SAILPLANE PRODUCTS VIRUS 4DDA<br />
The built and covered tail feathers take only a few minutes to<br />
attach to the tail boom. I used SR Batteries Gapfess Hinge<br />
Tape to hinge all of the control surfaces.<br />
prop adapter and propeller. The Virus<br />
400A was ready for flight.<br />
IN SUMMARY<br />
I have to say that the unique looks and<br />
stable flying characteristics of the Virus<br />
400A add up to a very nice plane. When<br />
you use the ailerons as flaperons, a<br />
whole new spectrum of flying is revealed;<br />
slow flight that borders on hovering and<br />
takeoffs in only a few feet are just some<br />
of the tricks that this model can do.<br />
With its large wheels, takeoffs from grass<br />
are easily accomplished, and I'm<br />
impressed with its maneuverability. The<br />
Virus 400A can be flown in tight spaces<br />
and makes a great trainer.<br />
The rear of the fuselage is constructed<br />
of carbon-fiber rods.<br />
They're lightweight and very strong.<br />
Above left: motor installation is<br />
straightforward and easy. Above<br />
right: two servos are used to control<br />
the ailerons. This allows you to<br />
use them as flaperons if desired.<br />
Note the short pushrod; it provides<br />
for a solid control system.<br />
APC Props; distributed by Landing<br />
Products, 1222 Harter Avc,<br />
Woodland, CA 95776; (530) 661-<br />
0399; fax (530) 666-6661;<br />
www.apcprop.com..<br />
Cirrus Ventures, 115 Hunter Avc,<br />
f'anwood, Nj 07023-1030; (90S)<br />
322-7221.<br />
Dretnel Tool, 4915 21st St., Racine,<br />
Wl 53406; (800) 437-3635; fax<br />
(414) 554-7654; www.dremel.com.<br />
Futaba Cor)p. of americauted by (ireat P<br />
Distributors Co., P.O. Box 9021; Champaign, II.<br />
61826-9021;(800) 637-7660; www.futaba-rc.com.<br />
Grand Wing Servos GWS); distributed by Balsa<br />
Products, 122]ansen Ave., lselin, Nf 08830-2601;<br />
(732) 634-6131; www.balsapr.com.<br />
Multiplex USA, 560 Library St., San Fernando,<br />
CA 91340; (800) 375-1312; (818) 838-6467; fax<br />
(818) 838-3127; www.multiplexrc.com.<br />
Northeast Sailplane Products, 948 Hercules Dr.,<br />
Ste. 12, Colchester, VT 05446; (802) 655-7700;<br />
fax (802) 655-7755; www.nesail.com.<br />
Solarfilm; distributed by Horizon Hobby Inc.,<br />
(800) 338-4639; fax (217) 355-1552;<br />
www.hori/.onhobby.com.<br />
SR Batteries Inc., Box 287, Heliport, NY 11713;<br />
(631) 286-0079; fax (631) 286-0901;<br />
www. srbatteries.com.
HOW TO<br />
Make Static<br />
Scale Props<br />
The ultimate final touch<br />
by Dick van Mourik<br />
Whenever I attend a scale meet, I wonder why so<br />
many scale modelers spend so much time installing<br />
features such as sliding canopies and retract doors,<br />
but no one feels the need to upgrade from a plain gray<br />
2-blade 12x6 prop for static judging. The use of static props<br />
doesn't have to be limited to the highest competition models;<br />
scale propellers are major attractions on any aircraft, and they<br />
are more than worth the time it takes to create them.<br />
Constructing static scale props does not require any spe-<br />
cial talent or equipment beyond that possessed by the aver-<br />
age modeler. To help explain the techniques involved, this<br />
article outlines the steps I took in the production of the static<br />
scale prop for my 1/4-scale Zlin Z-50 LS. Give it a try; you'll be<br />
amazed by what you can create with some glass, epoxy and a<br />
little practice!<br />
1 A sketch and several photos of the full-size aircraft at<br />
various angles provided the basis for an accurate plug.<br />
In this case, I was really lucky; the manufacturer of the full-size<br />
plane supplied me with factory information as well as a logo<br />
and identification sticker.<br />
SB MDDEL AIRPLANE NEWS<br />
2j The choice of building materials for the plug depends on<br />
the builder's individual preferences. I used a block of hard<br />
polyurethane foam. It is vital that you smooth out the foam as<br />
much as possible. Any imperfections will immediately show up<br />
in the moldings. Careful sanding (start with 400-grit and end with<br />
1200) and polishing will pay off later.<br />
A prop blade is not the easiest part<br />
to form a mold around. To allow for<br />
removal, the molding must be split.<br />
I placed the blade on a bed of<br />
modeling clay, which I then<br />
smoothed out as much as possible.<br />
I placed the whole thing on a<br />
bearer plate made of plasticcoated<br />
fiberboard, onto which I<br />
formed the flange.<br />
Be sure that you liberally treat both the plug and the support with<br />
release agents. I normally use a combination of two: first, I use a special<br />
mold-release wax that I allow to dry for a few minutes before I<br />
polish it out. Depending on the plug's finish, I may repeat this process<br />
six to 10 times. Second, I carefully apply some poly vinyl alcohol<br />
(PVA) to the plug/mold with a soft, wet sponge. (You could also thin<br />
the PVA to a milk-like consistency and apply it in a single layer with a<br />
dry cloth.) As the water evaporates, it forms a very thin film.<br />
Ultimately, it's the wax that ensures debonding from the resin and<br />
plug, but this film provides an extra measure of safety. I always use a<br />
very thin layer of PVA because any imperfections will clearly show.<br />
When the release agents were<br />
completely dry, I used a soft<br />
brush to gently apply the first layer of<br />
molding compound. Molding compound<br />
has a high viscosity and<br />
should be carefully stirred to allow<br />
the hardener to be thoroughly<br />
mixed. To prevent air bubbles, I<br />
always use a small brush in the corners<br />
first. It is best to apply thick layers and avoid retouching the mixture<br />
with the brush where it has already been applied. I normally get<br />
a decent result from two layers. Brush the second one on after the<br />
first layer has hardened but before it has fully cured.<br />
When the second coat had<br />
hardened to the stage where it<br />
is sticky, I poured a mixture of<br />
cotton fibers and chopped fiberglass<br />
strands over the compound.<br />
The strands and fibers<br />
ensure a firm bonding between<br />
the compound and resin. When<br />
it had cured, I used a vacuum<br />
cleaner to remove any excess<br />
material.
Glass cloth will not take<br />
to sharp corners, so I filled<br />
these with a mixture of resin,<br />
chopped strands and a thickening<br />
agent. A generous<br />
layer of this mixture will prevent<br />
any cloth from showing<br />
through. It also helps to flatten<br />
out any irregularities in<br />
the compound. Use only aircraft-grade<br />
epoxy; it's much<br />
easier to work with and it<br />
leads to better results.<br />
Immediately following<br />
the resin/fiber mixture,<br />
I applied the layers of glass<br />
cloth that would form the<br />
mold. I try to minimize the<br />
amount of resin; the cloth<br />
reaches its maximum<br />
strength once it's completely<br />
soaked. Any excess resin<br />
only adds weight. The first<br />
layer of cloth can be laid on<br />
the mixture with almost no<br />
resin at all. I added subsequent<br />
layers of cloth until it formed a rigid mold. For small items like<br />
this, I stick to a wall thickness of %2 to % inch; this requires approximately<br />
five layers of 1 -ounce cloth. I always let the cloth cover a fairly<br />
wide area (about 1 inch) around the plug, as the second half will be<br />
formed against this and will require trimming after the moldings have<br />
cured. This photo shows the final stage of the first half of the mold.<br />
|=| When the first half<br />
had fully hardened,<br />
began the second half<br />
of the molding. Never<br />
remove the molding<br />
from the support or the<br />
first half of the molding<br />
from the plug in the<br />
early stages; patience<br />
is the key to this<br />
process! I carefully<br />
removed the blade from the support and cleaned off any excess<br />
clay. This photo shows part of the newly formed flange in black,<br />
with all of the clay still stuck to the blade and flange. Thanks to<br />
the release agents, it was easy to remove.<br />
Next, I used a Dremel saw to cut<br />
off any excess cloth. To ensure a<br />
proper fit, I drilled some 1/8-inch<br />
blind holes into the flange,<br />
spaced about 3 inches apart.<br />
This will act as a lock when forming<br />
the second half of the mold.<br />
Commercial pins are available as<br />
well, but for small items like<br />
these, I generally stick to this<br />
method. Once again, I liberally<br />
treated the plug and flange with<br />
release agents before moving<br />
on to the next step.<br />
l For the second side<br />
of the molding, I<br />
simply repeated all of the<br />
previous steps. Here, I've<br />
just applied the glass cloth<br />
to the molding compound<br />
to begin forming the second<br />
half of the mold.<br />
When they were fully<br />
cured, I drilled the<br />
moldings through while<br />
they were still attached<br />
to the plug; this ensures<br />
maximum accuracy.<br />
I then trimmed off the<br />
excess cloth and<br />
separated both halves<br />
from the plug. For the<br />
first splitting, I normally<br />
use some warm water<br />
to dissolve the PVA; an old credit card carefully placed in between<br />
the flanges can also be beneficial. Never use metal tools or brute<br />
force! Usually, the plug just falls off. In this photo, I had just<br />
removed the two halves from the plug.<br />
Because you must close the mold while the cloth is still<br />
wet, it is essential that the cloth fit the molding exactly.<br />
Pictured here are two layers of 0.4-ounce cloth together<br />
with a non-woven surface cloth. The black shoelace is, in fact,<br />
carbon roving, which I later laid around the blade's perimeter.<br />
Making the actual<br />
prop is basically<br />
just a variation of<br />
the molding<br />
process, beginning<br />
with the application<br />
of the wax and<br />
PVA; the primary<br />
distinction is in the<br />
outside coating.<br />
Though gelcoat is the most common choice, you can also use a<br />
good quality epoxy-based paint. I brushed on two coats of yellow<br />
Hobby Poxy. Once it had hardened to the point that it was sticky, I<br />
brushed in some slightly thickened resin.<br />
JUNE2DD2 69
HDWTD MAKE STATIC SCALE PROPS<br />
This is a close-up of the<br />
molding halves with the<br />
slightly thickened resin brushed in.<br />
This layer is necessary to prevent<br />
the cloth from showing through the<br />
blade and is best left to harden for<br />
about 30 minutes to an hour before<br />
you apply the first layer of cloth.<br />
This photo was taken<br />
immediately before I joined<br />
the halves. In this stage,<br />
all of the material is wet.<br />
On one half, I filled the<br />
perimeter with a mixture of<br />
resin and fibers and strands,<br />
and I placed wet carbon<br />
roving on the other half. After<br />
joining the halves, I inserted a small brush through the root hole to<br />
press the roving to the inside of the leading edge and the root.<br />
The P r0 P came out of the mold<br />
shiny and glossy. After trimming<br />
off the excess resin, I had a perfect,<br />
strong and lightweight static prop blade.<br />
Production of subsequent blades is<br />
very straightforward and requires<br />
only a fraction of the time that's needed<br />
to make the first blade.<br />
Specifications<br />
Max RPM<br />
Motor Weight<br />
Weight+Gearbox<br />
Price Motor Only<br />
Price Motor + Gearbox<br />
Hacker B20 Series Motors<br />
• Ultra-light and Compact Design<br />
• Low Current and High Thrust<br />
• Direct Drive or 4:1 Gearbox<br />
• For Slowflyers, Parkflyers and "400" Models<br />
Hacker B40 Series Motors<br />
• Small, Efficient and Very Powerful<br />
• Up to 70 amps for Competition<br />
• Direct Drive or 4.4:1 Ceramic Bearing Gearbox<br />
• Sport Models to Competition Gliders<br />
Hacker B50 Series Motors<br />
• High-Power and Lightweight<br />
• Up to 100 amps for Competition<br />
• Direct Drive or 6.7:1 Needle Bearing Gearbox<br />
B20 S Series<br />
60,000<br />
1.4 Oz.<br />
1.8Oz.<br />
$89.00<br />
$125.00<br />
Aero-Model, Inc. 2122 W. 5th Place<br />
VISA • MASTERCARD • AMERICAN EXPRESS<br />
7O MODEL AIRPLANE NEWS<br />
• F5B, Large Gliders and Aerobatic Models<br />
B20 L Series<br />
60,000<br />
2.0 Oz.<br />
2.4 Oz.<br />
$109.00<br />
$135.00<br />
Of course, three blades<br />
alone do not form an<br />
air screw. This photo shows all<br />
of the parts required to form<br />
the completed item. I made<br />
the static spinner from carbon<br />
in the same mold that I used to<br />
make the flying spinner. I used<br />
some hard foam to make the<br />
backplate and the purple<br />
blocks that serve as blade<br />
retainers. I used a graphics computer program and printed my<br />
own decals using Super-Cal decal paper.<br />
This is the completed<br />
static prop ready to<br />
go—my latest pride<br />
and joy. In VA scale,<br />
the prop's diameter<br />
came out to be 20<br />
inches.<br />
Hobby Poxy, 36 Pine St., Rockaway, NJ 07866; (973) 625-3 WO; fax (973)<br />
625-8303.<br />
B40 S Series<br />
80,000<br />
4.6 Oz.<br />
6.5 Oz.<br />
$129.00<br />
$219.00<br />
EXCLUSIVE USA DISTRIBUTOR<br />
3rushless<br />
Motors<br />
Hacker Brushless Motors have been<br />
specifically developed for Radio<br />
Controlled Models. All motors are<br />
designed and produced in Southern<br />
Germany near Munich (Home of BMW).<br />
Every motor embodies precision German<br />
technology and manufacturing techniques<br />
to create very powerful and efficient<br />
motor systems.<br />
B40 L Series<br />
80,000<br />
5.6 Oz.<br />
7.5 Oz.<br />
$139.00<br />
$229.00<br />
B50 S Series<br />
80,000<br />
7.1 Oz.<br />
9.0 Oz.<br />
$159.00<br />
$249.00<br />
B50 L Series<br />
80,000<br />
8.7 Oz.<br />
10.6 Oz.<br />
$179.00<br />
$269.00<br />
Tempe, AZ 85281 Phone 480-726-7519 www.aero-model.cor<br />
Fax 480-963-5565 aeromodel@qwest.ne
FMA Direct CO-PHot<br />
by Gerry Yarrish<br />
ne of the newest devices to aid us in flying our models is<br />
the Co-Pilot Infrared Stabilization System from FMA<br />
Direct. For this article, we really put the Co-Pilot through<br />
its paces by installing it and testing it in three different types<br />
of airplanes. We tested it in the Multiplex Brummi, a simple,<br />
3-channel electric high-wing trainer, and also in Hangar<br />
9's high-performance, low-wing glow-powered ARF, the<br />
k<br />
Advance 40. Then, to completely change things, we<br />
installed it in the JR Ergo Sport, a<br />
fully aerobatic .60-size helik<br />
copter. The Co-Pilot handled<br />
Ik each plane and its particular<br />
characteristics perfectly. If<br />
you've ever wanted to<br />
k install a compact and<br />
reliable autopilot<br />
system in your<br />
*" RC model,<br />
read on.<br />
We're sure you'll be as<br />
4<br />
, impressed as we are.<br />
3 tests<br />
—helicopter, highperformance<br />
and trainer<br />
aircraft-works iike a champ!<br />
74 MODEL AIRPLANE NEWS<br />
SPECIFICATIONS<br />
PRODUCT: Co-Pilot Stabilization System<br />
MANUFACTURER: FMA Direct<br />
INPUTS: aileron, elevator and auxiliary<br />
channel for remote on/off switching<br />
OUTPUTS: pitch (elevator) and roll<br />
(aileron or rudder)<br />
SYSTEM WEIGHT: 1 oz.<br />
DIMENSIONS<br />
SENSOR HEAD: 1.35 in. across<br />
(octagonal) x 0.53 in. thick<br />
CONTROLLER UNIT: 1.5x0.89x0.6 in.<br />
POWER CONSUMPTION: 5mA<br />
PRICE: $119.95<br />
COMMENTS: the Co-Pilot is an infraredsensing,<br />
two-axis onboard stabilization<br />
system that plugs into your model's<br />
receiver system. The unit is very easy to<br />
set up and calibrate and can be used<br />
with fixed-wing airplanes, flying wings,<br />
and helicopters. The unit comes with a<br />
24-inch ribbon wire to connect the<br />
sensor head to the microprocessor<br />
controller unit.<br />
HITS<br />
• Works exactly as advertised.<br />
• Easy to install.<br />
• Simple to calibrate and operate.<br />
MISSES<br />
• Only one sensitivity adjustment; it would<br />
be nice to be able to adjust pitch and<br />
roll independently.
The Co-Pilot is a two-axis, four-sensor<br />
control-stabilization system that plugs<br />
into your RC system. It has no moving<br />
parts and uses infrared (IR) heat sensors to<br />
control the model's roll and pitch. The<br />
system has two components: a sensor<br />
head that you attach to the underside of<br />
your model and a controller unit that you<br />
install inside your model like a receiver. A<br />
thin ribbon cable connects the two. Two<br />
wire leads are connected to the controller;<br />
one has a push-button switch, and the<br />
other ends with a servo-lead connector.<br />
You use the switch when you calibrate the<br />
unit before each flight session, and the<br />
servo lead can be plugged into an unused<br />
radio channel in your receiver for in-flight<br />
on/off function.<br />
The Co-pilot comes with a wellillustrated<br />
instruction booklet that shows<br />
various installations. The instructions show<br />
in detail how to install the unit in a normal<br />
fixed-wing airplane, in a flying wing and in<br />
a helicopter. Here's how it works.<br />
The sensor head has four<br />
IR heat sensors that face left,<br />
right, forward and aft. The<br />
sensors read how much IR<br />
heat is present in the four<br />
directions. The controller<br />
unit evaluates the IR heat<br />
information and adjusts the<br />
controls to keep the IR heat<br />
values equal for all four sensors<br />
for normal straight-andlevel<br />
flight. Infrared heat is a<br />
much better source for control<br />
input than visible light<br />
because IR heat isn't affected<br />
as much by cloud cover.<br />
The controller is plugged into the RC<br />
receiver system between the receiver and<br />
the servos. Once it has been calibrated,<br />
the unit need not be calibrated again<br />
unless the weather changes drastically.<br />
Above: the controller unit is smaller than a standard<br />
receiver and is plugged into the radio system<br />
between the servos and the receiver.<br />
Right: the FMA Co-Pilot sensor head is held in<br />
place on the belly of the model with a piece of<br />
hook-and-loop fastener. Note the ribbon wire<br />
leading inside the model to the controller unit.<br />
Below: with the model standing on its nose, simply<br />
press the calibration switch; the controller<br />
unit does the rest. Note<br />
that the sensor head on<br />
the model's belly is facing<br />
away from me during<br />
the procedure.<br />
Since the unit<br />
works by reading<br />
the differences in IR<br />
heat levels rather<br />
than in light intensity,<br />
it works equally<br />
well in bright<br />
sunlight or overcast<br />
conditions. The<br />
unit will also work<br />
at night, though the inability to see your<br />
model is a limiting factor.<br />
It takes only a few minutes to install<br />
the units; you'll need to cut a small opening<br />
in the bottom of the fuselage so you<br />
High-performance applications by Rick Bell<br />
I wanted to see how the FMA Co-Pitot performed in a model other than a trainer,<br />
so I installed it in a Hangar 9 Advance 40. On the day I flew it, the weather was<br />
partly cloudy with temperatures in the mid-50s, and the wind was about 7- to<br />
13mph. I set up the unit to control the elevators and ailerons to allow me to<br />
turn it off during the flight if something went wrong. I connected the remote<br />
sensitivity lead to the retract gear switch.<br />
Cautiously, I took off with the unit turned off. At a safe altitude, I turned it<br />
on, let go of the sticks and waited to see what would happen: the plane contin-<br />
ued to fly straight and level. I could see the wind rock the wings, but the unit<br />
always returned them to level-pretty cool! With more confidence in the system,<br />
I turned the plane around for another pass and could feel the unit "fighting" my<br />
control inputs.<br />
On the next pass, I rolled the plane into knife-edge flight and, again, let go<br />
of the sticks. As before, the plane returned to level flight—this was getting inter-<br />
can pass the ribbon wire through to connect<br />
the sensor head to the controller.<br />
This takes only about 2 minutes.<br />
CALIBRATING THE UNIT<br />
Before the first flight of the day, you'll have<br />
to calibrate the unit to read the ambient IR<br />
heat; this is a two-step procedure. First,<br />
place the model's nose on the ground with<br />
its tail sticking straight up and the sensor<br />
head facing away from you. Turn on the<br />
transmitter and receiver and then press the<br />
push-button IR calibration switch. The control<br />
surfaces will then quickly deflect several<br />
times; the number of deflections tells you<br />
esting! On the next pass, I rolled the plane inverted and let go of the sticks; the<br />
plane immediately corkscrewed back to upright and level flight. I did this several<br />
more times, and the plane always returned to upright and level flight without<br />
any input from me. Don't do this at low altitude! When the plane is inverted, the<br />
unit applies up-elevator, and the plane does a split-S back to straight and level.<br />
I think ft would be better if instead the unit rolled the plane upright without<br />
elevator input.<br />
I was quite impressed during landing approaches; as the speed decreased,<br />
the plane settled nicely, and the nose and the wings remained level. I needed<br />
to use throttle only to make the approach to the runway and rudder to compen-<br />
sate for the crosswind; the Co-Piiot made landings really easy.<br />
The Co-Pilot works as advertised. Whether you use it in a high-performance<br />
model or in a .40-size trainer, Co-Pilot removes much of the risk, and this, con-<br />
sequently greatly enhances the RC experience.<br />
JUNE2DD2 75
FMA DIRECT CD-PILDT<br />
on a scale of from one to 10 what the IR<br />
conditions are. Between three and 10<br />
deflections means the unit will operate<br />
properly; two indicates that the unit will<br />
operate but needs its sensitivity increased<br />
over cooler terrain. If the unit deflects only<br />
once, it means there isn't enough difference<br />
in the IR temperature between sky and<br />
ground. It's best not to fly with the unit<br />
turned on.<br />
After step one, the servos begin to cycle<br />
slowly. During this time, you must place<br />
the model on the ground in a level flight<br />
attitude and then walk away about 10<br />
feet. The unit then calibrates itself for<br />
level flight. Once the unit is calibrated, all<br />
you have to do before each successive<br />
flight for the rest of the day is to quickly<br />
check that the unit is working. Turn on<br />
the transmitter and receiver, and point<br />
the model's nose toward the ground. The<br />
unit should provide full up-elevator. Also,<br />
when you point a wingtip at the ground,<br />
it should deflect either the rudder or the<br />
ailerons (depending on which channel<br />
you have the unit plugged into) to correct<br />
the bank angle. After this quick check,<br />
you can launch the model.<br />
Fun Scale<br />
Boeing PT-17 Stearman<br />
Span 89"<br />
Length<br />
Weight<br />
Power<br />
(scale 1:4.3)<br />
69"<br />
18-21 Ib<br />
180+ 4 strokes<br />
(2 stroke petrol or glow equally acceptable)<br />
Radio 4 channel, 5 servos<br />
Flair Products Ltd<br />
www. flairproducts. co. uk<br />
Available in the US at:<br />
Radical RC<br />
7046 Harshmanville Road,<br />
Huber Heights, Ohio 45424<br />
Web: www.radicalrc.com.<br />
Email: DAVTHACKER@aol.com<br />
GCBM R/C Inc.<br />
5009 Fairdale.<br />
Pasadena. TX 77505,<br />
Order line: 800-609-7951.<br />
Fax: 281-998-2529.<br />
Web: www.gcbmrc.com.<br />
Email: mlmcgraw@pdq.net<br />
AUTOPILOT FLIGHT<br />
The day I tested the unit, I installed it in a<br />
Multiplex Brummi and flew it on a windy<br />
day. From the moment I hand-launched<br />
the model, the unit worked beautifully. As<br />
is normal, to climb, I held up-elevator and<br />
applied full power. When the model was<br />
about 75 feet high, I let go of the control<br />
stick and waited to see what would happen.<br />
The Brummi tracked straight into the wind,<br />
and its wings always returned to level—<br />
even after a strong gust of wind tipped the<br />
wing nearly vertical. After it flew to the<br />
edge of the field, I turned the model to the<br />
right (slightly downwind) and let go of the<br />
controls again. As before, the model righted<br />
itself whenever necessary and maintained a<br />
constant altitude. During the flight, I even<br />
crabbed the model into the wind; it happily<br />
flew slightly sideways as the wind pushed it<br />
along. The wind became rather strong at<br />
this point, so I throttled it back and guided<br />
the model straight into the wind for a landing.<br />
The Co-Pilot kept its wings level all the<br />
way to the flare; all I did was adjust the<br />
throttle to control the descent.<br />
On the second flight, I turned the sensitivity<br />
down about 1/4 turn and had an<br />
even nicer flight. This time, the wind<br />
Magnattila<br />
Span 60"<br />
Engines .30-.40 2 str.<br />
.40-.60 4 str.<br />
Radio 4 channel<br />
Weight 5.5 Ibs^,<br />
FLAIR<br />
Texan/Harvard<br />
Span: 66"<br />
Weight: 5 - 7 Ib<br />
Radio: 4 Channel<br />
Engines: .30 - .46 2 str<br />
.40 - .60 4 str<br />
Sport Aerobatic<br />
Fabulous Builders Kits,<br />
(33 models in range)<br />
Authentic Vintage Kits,<br />
(36 models in range)<br />
Quality ARTF Kits,<br />
(25 models in range)<br />
and Accessories for all needs.<br />
Dealer enquires welcome<br />
Visit our website to see comprehensive details.<br />
76 MDDEL AIRPLANE NEWS<br />
by Hal deBolt<br />
This radical new Co-Pilot stabilization system<br />
reminds me of the first adventures I had with<br />
reed and proportional RC systems. You have to<br />
do two things to make the unit operate properly.<br />
First, be sure that the neutral points on the<br />
model's control surface are properly set before<br />
you install the unit. Then, after completing the<br />
Co-Pilot preflight checkout, you must make sure<br />
that the control settings haven't changed. With<br />
or without the Co-Pilot online, they should be<br />
the same.<br />
The hook-and-loop-fastening material that<br />
came with the unit was a little too spongy for my<br />
taste. It could be compressed and then not<br />
return to its original condition. This lack of con-<br />
sistency made it easy to disturb the sensor,<br />
which caused an alignment problem. Using<br />
either a thinner fastener material or double-<br />
sided servo tape to attach the sensor would<br />
eliminate this problem. The ideal location for the<br />
sensor is out on a wing panel, away from things<br />
that can affect the sensor's view. It is possible<br />
to mount it on the fuselage, but you must make<br />
sure that the landing gear and/or the propeller<br />
do not affect the unit's operation. To properly<br />
control the model, you will have to fly the model<br />
with the unit activated to see if it needs any<br />
fine-tuning. I found that a solidly mounted sen-<br />
sor was difficult to adjust, so I made a simple,<br />
adjustable sensor mount with a ball-link attach-<br />
ment on the fuselage. It is a plywood plate<br />
attached to a ball swivel, which permits infinite<br />
movements. Two adjustment screws allow fine-<br />
position adjustment of the entire sensor unit.<br />
This adaptation worked just fine.<br />
AUTOGYRO APPLICATION<br />
Gyros and helicopters require constant control<br />
attention; a loss of orientation and control close<br />
to earth can be disastrous. It isn't unusual for a<br />
gyro to attain a nose-up attitude without the<br />
pilot noticing the change. I have seen gyros get<br />
to very high altitudes and then drift for a 1/2 mile<br />
downwind because the model's attitude wasn't<br />
apparent to its pilot. If this happens to someone<br />
who is using the Co-Pilot, the system will stabi-<br />
lize the model until orientation is regained. The<br />
Co-Pilot works so well that I have also seen it<br />
control a perfect landing for a gyro that was<br />
practically out of sight. The gyro was hovered at<br />
a high altitude and when the model's power was<br />
reduced, it produced a proper descent that<br />
ended in a no-rollout landing.<br />
On all types of models-fixed-wing, heli-<br />
copters and autogyros-l can say that the<br />
FMA Co-Pilot stabilization system works as<br />
advertised!
FMA DIRECT CD-PILOT<br />
by Rick Bell<br />
I was anxious to test the FMA Co-Pilot in a helicopter, so I used my JR Ergo<br />
Sport 60. The unit's manual recommends that a hole be drilled into the chassis<br />
for the calibration button, but instead, I mounted the button on the front of the<br />
servo tray and secured the control box on the top of the gyro. I attached the<br />
sensor unit to the top of the tail boom and oriented its pickups at a 45-degree<br />
angle to the heli's centerline. I then routed the ribbon cable forward to the con-<br />
trol box and secured it so that it wouldn't become entangled with the pushrods,<br />
bellcranks and other airframe parts. The installation took only a few minutes.<br />
Following the instructions, I plugged the unit into the receiver and then con-<br />
nected the roll and elevator servos to the unit. There are four dipswitches on the<br />
control box, and these must be set in the correct sequence for the unit to give<br />
the correct control inputs.<br />
Calibrating the unit took some effort; I couldn't get it<br />
to function properly the first time I tried to calibrate it.<br />
When I tilted the heli to the right, the Co-Pilot gave a right<br />
roll command, and that was the wrong direction. And<br />
when I switched the unit on or off with the auxiliary chan-<br />
nel, the trim settings changed considerably.<br />
1: mounting the sensor<br />
on a helicopter Is<br />
a little different from<br />
mounting ft on an airplane;<br />
the sensor<br />
must be rotated 45<br />
degrees, and it must<br />
be set horizontally. I<br />
used double-stick<br />
tape and a zip-tie to<br />
secure the sensor to<br />
the tall boom, Instead<br />
of the recommended<br />
hook-and-loop-fastener. 2:1 mounted the control unit onto the top of the gyro and attached the calibration button<br />
to the front of the servo tray. These proved to be good locations for both Items. 3: neatness counts! All wires<br />
are neatly tucked out of the way so they don't interfere with any part of the airframe, and I used zlp-tles to secure<br />
the ribbon cable to the chassis. Installing the Co-Pilot In a helicopter takes only a few minutes.<br />
condition was much calmer, and the sun<br />
was out. I recalibrated the unit and<br />
launched the model as before. On the first<br />
day, the IR rating was three; on the second<br />
day, it was five. Again, the model flew<br />
beautifully with very little input from me.<br />
What a cool experience!<br />
I am completely happy with the Co-<br />
Pilot's performance. If you fly your model<br />
in normal (mildly windy) conditions, it<br />
will easily fly all by itself. Used in conjunction<br />
with an instructor, this unit will<br />
78 MODEL AIRPLANE NEWS<br />
greatly shorten the learning curve for any<br />
beginning pilot. For $119.95, the Co-Pilot<br />
is a great learning aid for the student<br />
pilot. As he becomes more accustomed to<br />
the model's stability, the unit's sensitivity<br />
can be gradually decreased until the student<br />
can fly completely unassisted. For<br />
experienced pilots, the unit can be used to<br />
enhance the stability of faster models,<br />
especially in gusty conditions. It helps<br />
smooth out final approaches, and that<br />
improves landings. Install the FMA Co-<br />
It was easy to fix the trim changes; during calibration, I tilted the heli to com-<br />
pensate for the changes. The control input problem was also easily solved by<br />
adjusting the positions of the dipswitches. Once I figured out<br />
the sequence, the Co-pilot worked correctly and made the<br />
appropriate inputs.<br />
TEST FLIGHT<br />
After I calibrated the unit, I set the sensitivity at about 50<br />
percent and started the helicopter. I switched off the Co-<br />
Pilot and trimmed the heli for a hands-off hover. For safety,<br />
I climbed to about 25 feet and then hit the switch to turn on<br />
the Co-Pilot. The heli continued to hover and didn't move at<br />
all. To confirm that the unit was working, I gave a right roll<br />
command and released the stick; the heli promptly returned<br />
to a stable hover. With more confidence, I then gave a for-<br />
ward cyclic command, but much more aggressively. The<br />
result was the same-the heli immediately returned to a<br />
level hover. Very neat indeed!<br />
The heli was also very stable in forward flight. I could feel<br />
the Co-Pilot attempt to counter my<br />
control inputs; this was unnerving at<br />
first, but I soon became accustomed<br />
to it. The neat part about forward<br />
flight was that when I let go of the<br />
sticks, the heli quickly stopped and<br />
returned to a hover.<br />
The FMA Co-Pilot is a great tool<br />
to help beginners learn how to hover<br />
and get into forward flight with little<br />
risk to the heli. The possibilities are<br />
almost endless. Learning tail-in or<br />
nose-in hovering, performing aero-<br />
batics or stabilizing a helicopter<br />
camera platform are all easy when<br />
the helicopter returns to a stable<br />
upright hover simply by letting go of<br />
the sticks! Give the Co-Pilot a try;<br />
you'll be pleasantly surprised.<br />
Pilot in your next model and give autopilot<br />
flight a try. You'll love it! ±<br />
JR; distributed by Horizon Hobby Inc.<br />
FMA Direct, 9607 Dr. Perry Rd., Unit 109,<br />
Ijumsville, MD 21754; (800) 343-2934;<br />
fax (301) 831-8987; www.fnuidirect.com.<br />
Hangar 9; distributed by Horizon Hobby Inc.<br />
Horizon Hobby Inc., 4105 Ficldstone Rd.,<br />
Champaign, II. 61822; (800) 338-4639;<br />
www.horiy.onhobby.coin.<br />
Multiplex USA, 560 Library St., San Fernando, CA<br />
91340; (800) 375-1312; fax (818) 838-3127;<br />
www.inultiplexrc.com.
Assemble ABS<br />
Cowls and<br />
Wheel Pants<br />
Basic skills, advanced results by nek Ben<br />
When you buy the latest and greatest kit, chances are<br />
pretty good that the included vacuum-formed ABS plas-<br />
tic cowl and wheel pants will need to be assembled.<br />
Because of the assembly required, many modelers don't give<br />
these ABS plastic parts a second thought; instead, they toss<br />
them into the spare-parts box and opt to use aftermarket fiber-<br />
glass replacements.<br />
The truth is, the ABS parts in kits are usually of good quality<br />
and don't require a lot of work to produce strong, durable, light-<br />
weight cowls and wheel pants. The techniques and tips present-<br />
ed describe how I assemble ABS parts for a one-piece look.<br />
To produce a good result, you'll need some basic materials<br />
such as fiberglass cloth, glue for plastic (or thin CA), putty,<br />
styrene plastic and spray contact cement. These are used to<br />
assemble and strengthen the parts and improve their looks. For<br />
DFirst, trim the parts for proper fit. This step determines how much<br />
extra work you'll need to do later. The more thorough you are<br />
now, the less filling and sanding you'll need to do later. Be methodical<br />
with this step. The cowl and wheel pant parts should fit together easily<br />
and not have to be force-fit.<br />
SO MDDEL AIRPLANE NEWS<br />
this article, I used a cowl and wheel pant from Midwest's<br />
giant-scale CAP 232. Let's take a look.<br />
When the parts have<br />
been trimmed but<br />
before you glue them<br />
together, scuff the<br />
inside of the cowl<br />
and wheel pants<br />
with 60-grit sandpaper.<br />
This will give the epoxy<br />
(applied later) something<br />
to grip.
Igl Most cowl and wheel-pant halves have molded-in lips that mate<br />
^"^ with each other; this provides a gluing surface for the parts. (If<br />
your parts have molded-in lips, skip to step 6.) Some parts, however,<br />
are trimmed at the factory and do not have a lip for the mating half.<br />
Don't despair; you can easily add a lip using strips of styrene. Many<br />
hobby shops have sheets of styrene plastic for scratch builders; I use<br />
sheets that are 0.030 thick. This provides plenty of strength yet is<br />
flexible enough to be molded to the shape needed. For cowls, I cut<br />
%-inch-wide strips; for wheel pants, I use 1/2-inch-wide strips.<br />
Using small<br />
spring clamps,<br />
test-fit the plastic<br />
strips to the<br />
inside of the<br />
cowl and note<br />
where you'll<br />
need to bend the<br />
plastic to conform<br />
to any<br />
curves. Do the<br />
same for the<br />
wheel pants.<br />
Using your fingers,<br />
gently bend the plastic to the curve needed; you'll be relieving the<br />
tension in the plastic strips when they are glued into place.<br />
Now glue the strips<br />
into one of the cowl<br />
halves and a wheel<br />
pant, and use plenty<br />
of spring clamps. For<br />
glue, I usually use<br />
Oatey Clear PVC<br />
Cement (you can also<br />
use thin CA); it slightly<br />
dissolves the plastic<br />
and when the cement<br />
dries, the parts will<br />
be firmly welded<br />
together. Let the<br />
cement cure<br />
overnight.<br />
After the glue has set, remove the clamps and check the lip for<br />
any glue residue that needs to be removed, and then test-fit the<br />
parts together. Because of the wheel pant's curves, you'll most likely<br />
need to trim the lip so the halves can easily fit together. Remember,<br />
take your time so you achieve the best possible fit. The cowl should<br />
not require much trimming. When you've finished, the parts should<br />
again fit together easily.<br />
Here's a tip: before you glue the halves together, take a razor blade or<br />
a hobby knife with a no. 11 blade and put a slight radius on the inside<br />
corner of the mating part. By removing this edge, you allow the parts<br />
to fit together more tightly. You'll end up with a more closely fitting<br />
seam that requires less filler.<br />
Now glue<br />
the cowl<br />
and wheel-pant<br />
halves together.<br />
I again use Oatey<br />
PVC Cement and<br />
plenty of tape,<br />
rubber bands,<br />
or clamps to<br />
hold the parts<br />
together. Here are<br />
the cowl and<br />
wheel pant glued<br />
together and<br />
ready for<br />
reinforcement<br />
and seam work.<br />
Use 60-grit sandpaper to block-sand and remove any high spots, and<br />
then blend the seams together. As you sand, you'll notice some shiny<br />
spots; these are low spots that you'll need to fill with putty. Don't<br />
worry about any scratches; they'll be filled in with putty and primer<br />
later. Now block-sand and further smooth the seams with 150-grit<br />
sandpaper to remove most of the scratches. It's a good idea to wear a<br />
mask when you're sanding so you don't inhale the dust. Now is a good<br />
time to cut out the openings in the cowl and wheel pant (you'll need<br />
access to the inside of the pant for the next step). Use a rotary tool<br />
with a cutting bit to rough out the openings, and then use a file or<br />
sandpaper to final-shape the openings.<br />
JUNE 2002 81
HDW TD ASSEMBLE ABS COWLS AND WHEEL PANTS<br />
Cut some<br />
strips of<br />
heavy (4- to<br />
9-ounce) fiberglass<br />
cloth about<br />
2 inches wide<br />
for the cowl and<br />
about 1 1/2 inches<br />
wide for the<br />
wheel pant;<br />
you'll use them<br />
to reinforce the<br />
seams from the<br />
inside. If the<br />
plastic is somewhat thin, you can fiberglass the entire inside instead<br />
of just the seam. Also have some smaller pieces of cloth handy for<br />
oddly contoured areas and to add reinforcement to mounting holes<br />
or other weak areas. Now lay the strips of cloth into place over the<br />
seams. To simplify this job, spray a light coat of contact cement on<br />
the cloth; this will help hold it in place when you brush on the epoxy.<br />
Mix about 1/2 ounce of slow-curing epoxy in a graduated cup (smaller<br />
batches have a longer working time). Thin the epoxy a little by adding<br />
some rubbing alcohol to it; a thinner mixture more easily soaks<br />
through the cloth and onto the plastic. To apply the epoxy, use<br />
disposable acid brushes; they are easily bent to reach into nooks and<br />
crannies. Apply enough epoxy to the cloth to thoroughly wet it but not<br />
so much that it runs all over the place, and then check for voids; apply<br />
more epoxy as necessary. Work small areas at a time, and then move<br />
to a different section. Allow the epoxy to cure for several hours.<br />
After the putty has cured, roughly block-sand the<br />
filler to shape with 60-grit sandpaper. Check to<br />
see whether any additional filler is needed, and apply as<br />
necessary. Now switch to 150-grit and start to smooth<br />
out and feather the filler into the surrounding areas.<br />
Constantly check the filler for low spots and fill them if<br />
necessary. Because you're using a sanding block, the<br />
putty on the high spots are sanded out while the putty in<br />
the low areas gets left behind. Next, lightly wet-sand the<br />
entire part with 400-grit wet<br />
82 MODEL AIRPLANE NEWS<br />
After the epoxy has cured, trim away any excess cloth. Now the parts<br />
are ready for you to remove the seams and apply the putty. Many<br />
putties are available; most modelers have their favorites. I like to use<br />
3M Acryl-Blue Glazing Putty, available at auto-parts stores. This putty<br />
dries quickly, doesn't shrink and feather-sands nicely. You can also<br />
make a filler paste of epoxy and baby powder. Use an artist's spatula<br />
to apply the putty to the part and smooth it out. Work the putty into the<br />
seam and the surrounding area. I applied tape to one half of the cowl<br />
so I wouldn't put any putty where it isn't needed. Once the putty starts<br />
to set up, remove the tape. Be sure to work in a well-ventilated area!<br />
or dry sandpaper to help remove scratches left behind by the previous sanding.<br />
Just be careful not to sand away the putty. Thoroughly wash the parts to clean<br />
off any finger oils and dust in preparation for priming. Because I covered my<br />
model with Top Flite MonoKote, I used LustreKote primer. Whichever paint system<br />
you use, check its compatibility on some scrap plastic first.<br />
Now that you have primed your parts, they should look just like primed<br />
fiberglass parts. With a little effort, time and basic building skills, you will<br />
have made a cowl and wheel pants that are as durable as fiberglass, and<br />
you will have saved yourself some money in the process. So when your next<br />
kit includes ABS plastic parts, don't chuck them out; build them and amaze<br />
your flying buddies with your finishing skills. ±<br />
LustreKote; distributed by Great Planes Model Distributors Co., P.O. Box 9021,<br />
Champaign, IL 61826-9021; (800) 637-7660; fax (217) 398-0008; www.greatplanes.com.<br />
MonoKote; distributed by Great Planes.<br />
Top Flite; distributed by Great Planes.
CTION<br />
The easiest way to launch your<br />
bird model Is to drop ft from a<br />
mother ship. This way, you can<br />
try out slight modifications and<br />
wing-configuration changes.<br />
Design and Build an<br />
Is Ha model or the real thing? Really hard to<br />
tell—even for real birds!<br />
A turkey vulture that can thermal! by Bob Hoey<br />
odelers have been attempting to build and fly bfrd models for a<br />
time. The challenge of doing this successfully, however, is obvious<br />
i builder-after all, birds have neither rudders nor vertical tails. Over the<br />
last 11 years, I have used RC models to try to understand how soaring birds fly<br />
without vertical tails. I have developed four bird models (Raven, Seagull, Turkey<br />
Vulture and Pelican) that fly reasonably well without vertical fins or rudders. This<br />
research has given me a pretty good understanding of the stability and control of<br />
gliding birds. I can now design glider models of birds that require surprisingly small<br />
design concessions and look quite realistic In flight. The bird's complex control!<br />
methods cannot be duplicated exactly, and our flying ability is limited to _J<br />
dng and controlling from a remote viewpoint, so we may have to cheaj<br />
e to achieve stable, controllable flight. Nevertheless, we can<br />
amlc methods for stability and control.<br />
Blrd-IIke flight Is possible with<br />
model even wHhout a vertical fin<br />
and rudder. The secret Is In the<br />
wingtlp feathers that act like<br />
ailerons to turn the model.
Even a big old pelican can be<br />
modeled. Notice its graceful<br />
wlngtlp aileron feathers.<br />
Herein my seagull model.,Note:that the mbvabte*<br />
wingtip feature, begins at about the gray/black iolbr<br />
Jlne'. (The midspan break in the photo is a fixed<br />
ground-adjustable joint for altering the dihedral.) * V|<br />
DESIGN METHOD<br />
Start by observing and photographing the bird species you wish<br />
to imitate. Try to get bottom, side and front views, but be prepared<br />
for a real challenge, since these critters are continuously<br />
changing shape. Slides are best because they can be projected<br />
onto a wall, and your subject's shape can be traced with a pencil.<br />
Varying the projection distance also allows different views to be<br />
scaled to the same size. Use a little artistic license and develop a<br />
3-view.<br />
Next, apply the simplified stability and control criteria<br />
described herein (center of gravity [CG] location, wing dihedral<br />
and sweep). Make design alterations to your 3-view to bring these<br />
numbers within reason. The final step is to design flexibility into<br />
the structure to allow for trial-and-error development of your<br />
design. (Provide for changes in dihedral, CG and tail area, for<br />
example). Gliding flight without a vertical tail is certainly<br />
possible, but stability will be less than that of a typical RC glider.<br />
PITCH AXIS<br />
The complex planform of a bird's wing requires more attention<br />
during the design to properly locate the CG. The wing's mean<br />
aerodynamic chord (MAC) and aerodynamic center (AC) can be<br />
located using the procedure described in the "Click Trip" URL at<br />
the end of this article. First flights should be made with the CG<br />
close to the aerodynamic center. Bird models are typically very<br />
short-coupled in pitch, and the tail area may need to be enlarged,<br />
much like any scale model. A 15- to 20-percent increase will<br />
improve trim ability and require less attention to maintain glide<br />
PECIFICATIONS<br />
5DEL: Turkey Vulture<br />
ODEL TYPE: bird-like rudderless glider<br />
'INGSPAN: 64 in.<br />
ING AREA: 600 sq. in.<br />
NGTH: 25.5 in.<br />
EIGHT: 2.5 Ib.<br />
ING LOADING: 9.75 oz./sq. ft.<br />
tDIO REQ'D: 2-channel (aileron and elevator)<br />
COMMENTS: designed by Bob Hoey, this bird-like RC Turkey<br />
Iture uses highly effective wingtip aileron feathers to bank<br />
d turn the model just like a real bird. The model has no<br />
^rtical fin or rudder but is very stable in flight. Built of balsa<br />
and plywood, the model is covered with MonoKote and has a<br />
drop-away ventral fin for bungee high-start launches. It can also<br />
Ib dropped from another airplane. The wing is highly undermbered<br />
and slightly reflexed. The plan shows the articulated<br />
Bngtip aileron feathers in detail.<br />
speed. Using a slightly reflexed airfoil (typical for flying wings)<br />
also avoids large tail deflections.<br />
ROLL-YAW AXIS<br />
The complex shape of a bird's wing, and a bird's lack of a vertical<br />
tail, make the design of the wing critical to successful flight. Wing<br />
sweep and dihedral are the critical features. Dihedral varies over<br />
the span of most bird wings. Land birds (hawks, buzzards, eagles,<br />
etc.) usually have small dihedral near the root and increasing<br />
dihedral near the tip. Sea birds (gulls, pelicans, albatross, etc.), on<br />
the other hand, often have negative dihedral but high sweep in<br />
their outer wing panels. A method for defining the total dihedral<br />
effect for the wing is also described in the "Click Trip." These<br />
calculations are for the wing only and do not account for the<br />
The basic keel and plywood crutch<br />
parts of the fuselage (bird's body).<br />
JUNE 2002 S7
DESIGN AND BUILD AN RC BIRD MODEL<br />
The tip feathers operate in a region of up-flow as the vortex begins to form around the wingtip. They have a large negative angle relative to the wing but are generating<br />
upward lift and a small amount of forward thrust. When used differentially as ailerons, the difference in lift produces a roll, and the difference in thrust causes a small<br />
yaw in the same direction. (These birds are pretty clever!)<br />
Initial setting: no roll, slight adverse yaw<br />
Final setting: good roll, slight proverse yaw<br />
Here, the formers and side sheeting have been added to the<br />
structure.<br />
FLIGHT CHARACTERISTICS<br />
Set the elevator's neutral position so the elevator is<br />
parallel with the stabilizer. If you<br />
are using a computer radio,<br />
program the throttle lever to<br />
control (bias) the two ailerons up<br />
or down together (like flaperons).<br />
Set the tip-aileron neutral position<br />
so that the leading edge of each<br />
aileron is about 1/8 inch below the<br />
wing's leading edge. Add ballast<br />
as necessary to get the CG to the<br />
location shown on the plan. Do<br />
some hand glides in still air to<br />
establish the trim settings.<br />
For slope advocates, this<br />
model is a real floater, as is its<br />
real-life counterpart. Without ballast, it does not<br />
penetrate well but is quite realistic in a fight<br />
88 MODEL AIRPLANE NEWS<br />
destabilizing influence of<br />
the body, heads, beaks and<br />
other lateral areas<br />
forward of the CG.<br />
Artificial vertical fins in<br />
the form of "feet" (ventral<br />
fins) or clear circular discs<br />
near the wingtip, toed-in<br />
about 20 degrees, can be<br />
beneficial for early flights.<br />
The required fin area is<br />
usually quite small (6 to 8<br />
square inches) and can be<br />
reduced or removed as<br />
flight experience increases.<br />
Note: electric motors at<br />
TIP FEATHER CONFIGURATIONS<br />
breeze. If you have a computer radio, you can<br />
experiment with the aileron bias setting in flight.<br />
There should be a position that<br />
allows gentle coordinated turns<br />
with the tip ailerons with no<br />
adverse yaw. If you don't have a<br />
computer radio, try adjusting the<br />
aileron bias on successive flights<br />
to find the best setting. (Don't go<br />
too far upward, or aileron control<br />
will disappear completely.) The<br />
model will be considerably lighter<br />
than the real bird, so experimenting<br />
with ballast is appropriate.<br />
Your Turkey Vulture model will<br />
not only attract attention from<br />
your fellow modelers, but it will<br />
also likely attract some attention from other soaring<br />
birds, such as hawks and ravens.<br />
the front have been tried and are quite<br />
destabilizing. If you intend to try a propeller,<br />
use one of the above techniques to<br />
add some vertical fin area.<br />
STRUCTURE<br />
The outer wing panels of a real bird are<br />
extremely light compared with the rest of<br />
the structure (they're just feathers!). Outer<br />
wing panels should be kept as light as<br />
possible to keep roll inertia low. Heavy<br />
wingtips result in unwanted rolling<br />
oscillations. Unusual wing dihedral<br />
patterns (gull, for example) can be<br />
duplicated by using a full-depth balsa spar<br />
and cutting it to the desired dihedral<br />
shape. For thin wings,<br />
glue carbon fiber to<br />
the top and bottom of<br />
the spar for added<br />
strength. Sheeting the<br />
leading edges (top and<br />
bottom, back to the<br />
spar) will provide the<br />
necessary D-tube section<br />
for torsion<br />
strength. The model's<br />
weight will likely be<br />
considerably less than<br />
that of a real bird,<br />
especially for larger<br />
species, but this difference<br />
is mainly in the<br />
fuselage (body weight<br />
and shoulder muscles).
DESIGN AND BUILD AN RC BIRD MDDEL<br />
A little more sheeting and a couple<br />
of balsa blocks carved to shape,<br />
and you'll almost be finished.<br />
CONTROL<br />
Two methods for pitch control<br />
have been tried—a standard<br />
elevator at the rear of the tail<br />
and the single-piece tail hinged<br />
at the wing's trailing edge. The<br />
elevator at the rear is the most<br />
effective.<br />
Because of the large adverse yaw associated<br />
with ailerons, they don't work well<br />
when there is no vertical tail. A rolling tail<br />
(horizontal tail that tilts<br />
around a longitudinal<br />
axis for controlling turns)<br />
works OK depending on<br />
the CG location but is not<br />
very powerful. If used<br />
with a pitch-stable air-<br />
Here's the completed fuselage ready to cover with<br />
MonoKote. To make it easier to finish, I simply painted<br />
the head and beak.<br />
plane (forward CG), the model flies well,<br />
but the control action is opposite to the<br />
way birds really fly (the model will turn in<br />
the same direction as the tilted tail, but<br />
During the past 11 years, many encounters have occurred between these models and real birds.<br />
Unfortunately, these encounters are usually spontaneous and take place at a fairly high altitude, so I<br />
have no photographic evidence of them.<br />
There are lots of ravens around here; they are gregarious birds, and quite inquisitive. The models<br />
circle easily and climb with the real birds in thermals. Often, one or two ravens fly formation with the<br />
model and follow it as it circles in a thermal (or, just as often, I follow them). Occasionally, one will<br />
come in quite close. Because the wing loadings of the models are lighter than their real counterparts,<br />
the models can fly more slowly. Sometimes, I slow the model to near-stall and then watch as the poor<br />
birds stall or flap off to one side.<br />
One warm, still day, I thermalled a Raven model with about 25 real ravens for about half an hour. The<br />
entire gaggle got so high that I had trouble distinguishing the model from the real birds. I made step<br />
inputs in roll control, and then flew the bird that rolled abruptly. From my notes on the day of the flight:<br />
"Finally I got too high to see well, so I put in full forward trim and flew straight. One bird followed,<br />
matching the model's speed and descent rate, and joined up in formation. I pulled up into a loop. He<br />
watched, then joined up again. I went into a full-up, full-left spiral for about 5 turns to lose altitude,<br />
then recovered. The raven pulled his wings in and did about 3 half-rolls, then some other maneuvers,<br />
then joined up again. I continued trying to descend, and eventually he left.<br />
"The fixed-geometry, under-cambered wing of the models is no match for the refined, variablegeometry<br />
wing of the real birds in straight, high-speed flight. The model quickly drops below and<br />
behind. On several occasions, ravens have followed the model down to about 20 feet altitude, and<br />
then circled overhead squawking loudly as the model lands. One raven landed nearby and walked all<br />
the way around the model (it was probably puzzled by my belly landing}."<br />
I have also thermalled the Turkey Vulture model with real turkey vultures. The appearance and climb<br />
performance were similar, but real vultures aren't as friendly as ravens; they completely ignored the<br />
model.<br />
/ used a 0.063-inch-thick piece of aluminum for<br />
my wing dihedral brace. Note that the fulldepth<br />
spars slide into place in the slots cut<br />
into the brace.<br />
The wing is built with a front and rear portion<br />
glued to the main spar. Here you see the wing root<br />
and the slots in the ribs for the aluminum brace.<br />
no one will notice!). Drag flaps on the<br />
lower wing surface (or spoilers on the<br />
upper surface) also work well for initiating<br />
turns, but they aren't very efficient or<br />
realistic. Since they rely on dihedral effect<br />
to control turns, they often require larger<br />
wing dihedral than that observed on a<br />
real bird.<br />
Wingtip ailerons (feathers) are the most<br />
bird-like roll-control method. They are<br />
very sensitive to the initial incidence setting<br />
of the two ailerons. I use a bias control<br />
through the throttle channel to help<br />
locate the proper angle in flight. For land<br />
birds, use the forward three feathers as a<br />
single aileron surface that rotates around<br />
a spanwise axis (detailed on the plan). For<br />
sea birds, use the outer 22 percent of the<br />
semi-span as an aileron, rotating around a<br />
I've had the most fun with hawks. They will dive at any of the models (raven, seagull, or turkey vulture) from out of nowhere. They have never touched or damaged a model but<br />
usually go screaming by with their wings folded. I once watched a hawk regain altitude<br />
after the attack and then begin circling off to the side. He stayed there until I did something<br />
abnormal, such as a stall, with the model. He then folded his wings and came right<br />
at the model, aborting at the last minute. I triggered three attacks this way. Apparently,<br />
the hawks thought they were watching a wounded or sick bird. Recently, a hawk zoomed in<br />
and established a position directly above the seagull model just a few inches away. He<br />
stayed in that position for about 15 seconds as I made turns with the model. Eventually,<br />
he flew away. I expected to find claw marks on the model but saw no evidence of any contact. Hawk attacks on the Turkey Vulture model are more cautious—usually from above<br />
and directly behind. They fly in trail with the model for awhile until they are satisfied that I<br />
it is not a wounded, easy target. I hope to eventually install one of the new, tiny video cameras in a model to document<br />
some of these encounters-up close and personal.<br />
90 MODEL AIRPLANE NEWS<br />
'ere, the two wing panels have been joined. Note the reflex<br />
hape of the airfoil. The wingtip aileron feathers and the<br />
'ding-edge sheeting still have to be installed.
DESIGN AND BUILD AN RC BIRD MODEL<br />
The tail feathers are built flat on the building<br />
board. Note that the horizontal stabilizer's<br />
leading edge is shaped to match up to the<br />
wing's trailing edge and is reinforced with<br />
He-inch plywood.<br />
Here are the wingtip feathers. They are made<br />
out of He-inch medium balsa. Note the dihedral<br />
added to the first two pairs.<br />
To order the full-size plan, turn to "RCStore.com" on page 130.<br />
92 MDDEL AIRPLANE NEWS<br />
spanwise axis at the wing 1/4 chord (see the<br />
seagull photo).<br />
Kimbrough rotary-drive couplers<br />
eliminate unsightly pushrods and control<br />
horns and minimize control-system slop.<br />
To provide the stiffest possible link, I use a<br />
carbon rod or an aluminum tube for the<br />
torque rod, and I mount the servos as far<br />
inboard in the wing as is practical.<br />
BIRD-LIKE FLIGHT<br />
In general, high-start bungee launches<br />
don't work well for models without rudders<br />
or vertical tails. I use a drop-away fin<br />
secured in a slot in the fuselage. The fin<br />
can be attached to the towline so that it<br />
drops off after launch. Slope soaring is<br />
easy and can produce very realistic flights<br />
in light wind. Air launches (drops) from a<br />
powered RC mother ship also work well (I<br />
have made more than 1,000 air launches<br />
to date). This launch method allows for<br />
repeat testing and refinement of the<br />
model. If a tip-aileron-bias feature (tip<br />
feathers) is being used, start with the<br />
aileron leading edge about 1/8 inch below<br />
the wing's leading edge at the end rib.<br />
Move the bias up slowly in flight until<br />
you find that sweet spot where gentle,<br />
coordinated turns are possible. A few<br />
words of caution: tip feathers are easily<br />
damaged. Building stronger feathers (out<br />
of fiberglass, for example) only adds more<br />
1<br />
The front three feathers are movable, while the<br />
rear three feathers are fixed in place on the<br />
wingtip. You can see the carbon-fiber rod and<br />
the brass tube bushing used to articulate the<br />
aileron feathers.<br />
Here, all the wingtip feathers are in place.<br />
A hatch will be added to the opening under<br />
the tip.<br />
weight outboard and moves the failure<br />
points into the primary structure. Wire<br />
tip-skids help some, but my solution is to<br />
use straight-grained 1/16-inch balsa sheet<br />
for the feathers and take some thin CA to<br />
the flying site.<br />
Let's hope these brief comments and
DESIGN AND BUILD AN RC BIRD MODEL<br />
FLYING LIKE A BIRD<br />
It was a calm Saturday morning, and as I walked outside for the<br />
morning paper, I spotted a raven gliding toward me at telephone-pole<br />
height. Although this is a common sight here in the California desert,<br />
I stopped to watch. I had just retired from the Air Force Flight Test<br />
Center as a stability and control flight-test engineer, and now I had time<br />
to expand my interest in bird flight as a new hobby. As I watched, the<br />
raven started a slow bank to the right with its wings fully outstretched.<br />
The turn got steeper and steeper until, at last, the raven dived-head-<br />
first—into the middle of the road, about 30 yards in front of me. I was<br />
dumbfounded. I had never seen a bird crash before!<br />
Span • 4.17 ft. Length • 1.92 ft.<br />
Wing area = 2.78 sq. ft. Aspect ratio = 6.2S<br />
Weight = 1.1 Ib.<br />
BASE-LINE RAVEN<br />
There was no evidence of life after the impact, and I suspected that<br />
the bird had suffered a stroke or a heart attack. In any case, this little<br />
fellow had unwittingly given his life to science. I seized the opportunity<br />
to weigh him and draw an outline of his wings and tail on a sheet of<br />
butcher paper. The dimensions were surprisingly similar to a ^A-size<br />
radio-controlled model that I had been flying. I reasoned that I could<br />
probably learn something about how birds fly by building a glider model<br />
with the same shape, size and planform of a large soaring bird.<br />
I hoped to establish a "base-line" configuration that would fly, even<br />
if I had to cheat a little at the beginning. The starting point was a series<br />
of small, balsa-wood, profile models with 6- to 8-inch spans that I<br />
glided around the living room. I was a little surprised to find that these<br />
models were stable in all axes, even without vertical tails. Lateral<br />
control was an enigma, but I soon discovered that either spoilers or<br />
drag flaps caused the model to turn toward the high-drag wing.<br />
To provide room for the radio gear, I built the prototype Raven<br />
model about 8 percent larger than a real raven. Pitch control was<br />
provided by deflection of the rear portion of the tail, and lateral-<br />
directional control was provided by the use of drag flaps (downward<br />
only) on the bottom of each wing. I built it to be sturdy, since I expected<br />
frequent crashes. The model was launched from the top of a small hill.<br />
It appeared to be stable but glided with a gentle rolling oscillation that<br />
could not be controlled with the drag flaps, so a very small vertical fin<br />
was added. Stable and controllable glides were then possible.<br />
It seems that each successful test produces additional, unanswered<br />
questions, such as: how do birds twist their wingtip feathers to produce<br />
proverse yaw? Does a bird's airfoil really have a reflexed trailing edge<br />
in flight? Do birds adjust the wing sweep at the wingtips as part of the<br />
control mechanism? Of course, there is also a wide variety of species<br />
with various wing shapes to try. I have only begun to explore the<br />
technical aspects of how birds really fly. I am constantly amazed at<br />
the incredible complexity of bird flight, and I marvel at that little<br />
"bird-brain" that's able to coordinate all the required actions.<br />
For the full story, take the "Click Trip"!<br />
94 MODEL AIRPLANE NEWS<br />
The aileron servo for each wing<br />
panel is attached to the root<br />
end of the wing. This keeps the<br />
tips light for better turning per-<br />
formance. A Kimbrough rotary<br />
coupler connects the torque<br />
rod to the servo.<br />
Left: without a vertical fin<br />
and rudder, bird models<br />
can be very difficult to<br />
launch with a bungee<br />
high-start or a winch line.<br />
To improve the ride, you<br />
can use a drop-away<br />
ventral fin like this one<br />
that fits into a slot in the<br />
bottom of the fuselage.<br />
hints spur some interest in building models that look and fly like birds.<br />
The analysis methods mentioned are good starting points, but they do<br />
not ensure that a new bird model will fly well on the first launch. There<br />
is still much to learn about how birds fly.<br />
BUILDING A TURKEY VULTURE<br />
Early flights of my Turkey Vulture model oscillated continuously in roll.<br />
I made three changes to help it fly better. First, I built a new, lighter<br />
wing. Next, I replaced the drag flaps with wingtip-aileron feathers, and<br />
third, I installed Kimbrough rotary-drive couplers to control all moving<br />
surfaces. In its current configuration, the model oscillates lightly in<br />
turbulence, much as a real bird does, but it's easily controlled and will<br />
stabilize nicely in still air.<br />
The model is based on photos of vultures flying in thermals. It is<br />
approximately full size (66-inch span) but is roughly half the weight of a<br />
real turkey vulture. The wing construction incorporates a full-depth spar<br />
and a cambered-wing airfoil with reflex. The fuselage (body) is built with<br />
balsa formers, sheeting and balsa blocks for the head and minor fairing<br />
pieces. I cover my bird models with MonoKote film and paint the heads<br />
to match. This results in a model that is a true floater but does not penetrate<br />
the wind as well as a model<br />
with less camber. The model handles<br />
ballast well, and this can be used to<br />
somewhat improve penetration. Real<br />
soaring birds reduce their wingspan<br />
and area and increase their wing<br />
sweep when flying straight between<br />
thermals (more options for<br />
experimentation?).<br />
Detailed instructions for building<br />
the Turkey Vulture model<br />
accompany the full-size plan.<br />
You can also view the detailed article<br />
and some related aerodynamic illustrations<br />
via the "Click Trip" Web<br />
address at the end of this article.<br />
Please let me know, through Model<br />
Airplane News, of your experiences<br />
with bird-like flight. ±<br />
MODELAIRPLANENEWS.COM<br />
For more information and to<br />
see the model fly, click on<br />
the article and videos link.
The latest in giant scale<br />
If you live in the Northeast, one sure-fire sign that the winter<br />
building season is drawing to an end is the annual WRAM show<br />
in White Plains, NY. Every year, thousands of modelers trek to<br />
this modeling mecca to show off their latest projects<br />
and for a preview of things to come from the RC<br />
model industry. Hosted by the Westchester Radio<br />
Aero Modelers club, the 2002 show (the 34th)<br />
was definitely worth the trip.<br />
REALLY BIG STUFF<br />
At this year's show, it was obvious that very big<br />
aerobatic models are in vogue. Several companies<br />
showed almost-ready-to-fly unlimited aerobatic<br />
planes in the 150cc engine-displacement range.<br />
Being able to see these Tournament-of-Championsize<br />
aircraft up close is a great way to observe the latest<br />
trends. Typically, these giants have three servos per aileron, four<br />
servos for elevator and at least two servos for rudder control. For<br />
the ultimate in system redundancy, many pilots split their<br />
onboard RC systems in two by using a left- and a right-side<br />
receiver, battery pack and switch harness to control the servos on<br />
either side of the aircraft. Considering how much you can invest<br />
in one of these beauties, I'd say that installing a redundant radio<br />
system is a very good idea.<br />
RC SHOWCASE REVOLUTION<br />
I spoke with Mike Dooley of RC Showcase about the company's<br />
awesome-looking, all-composite, almost-ready-to-fly Velox<br />
Revolution.<br />
Manufactured by<br />
Krill, the 47-percent-scale<br />
model<br />
has a 135-inch<br />
wingspan, weighs<br />
about 50 pounds<br />
98 MDDEL AIRPLANE NEW5<br />
Left: the ZDZ 210B2 is<br />
an impressive twincylinder<br />
gasoline engine<br />
with electronic ignition.<br />
This Krill Velox Revolution took up<br />
about half the display space in the<br />
RC Showcase booth. The 47-percentscale<br />
unlimited aerobat has<br />
all-composite construction.<br />
and is intended for the ZDZ 210 twin-cylinder gasoline<br />
engine. The finish on this molded-Kevlar and carbon-fiber<br />
beauty is flawless. The model basically comes as you see it in<br />
the picture and is ready for engine and radio installation. The<br />
most difficult part about this project would probably be finding a<br />
47-percent-scale pilot figure to put under that beautifully molded<br />
canopy.<br />
J'TEC RADIOCRAFT EXTRA 330LX<br />
Next to our booth was an impressive Extra 330EX ARF. A scaledup<br />
version of the popular J'Tec RadioCraft 35-percent aerobat, this<br />
ARF has a 123-inch span and 2,745 square inches of wing area.<br />
Weighing 38 pounds, the Extra has a respectable wing loading of<br />
32 ounces per square foot. Designed around a 150cc-size engine,<br />
the 40-percent-scale 330LX comes with an engine-mounting box<br />
completely built, and right engine thrust is already incorporated<br />
into the structure. Pilot holes have also been drilled in the firewall<br />
for either the Desert Aircraft DAI50 or the 3W 150 engine. Made<br />
from laser-cut balsa and plywood parts, it has fully sheeted foamcore<br />
wing panels and horizontal stabilizer panels.<br />
ZIROLI'S VENGEANCE<br />
Always ready to show something new at the WRAM show, Nick<br />
Ziroli Sr. displayed his latest warbird project high above the Nick<br />
Ziroli Plans booth. Sporting an unpainted epoxy resin and fiberglass<br />
cloth finish,<br />
Nick's Vultee A-31<br />
Vengeance is a<br />
replica of an early<br />
American-built<br />
dive-bomber used<br />
in the South<br />
Pacific during<br />
WW II. Designed<br />
around a Zenoah<br />
G-62, the '/6-scale<br />
A-31 has a<br />
96-inch span. The<br />
model uses Robart<br />
no. 150 90-degree<br />
RC Showcase showed some new canister mufflers<br />
for its ZDZ engines. These mufflers are mounted<br />
internally in the airplane and are very efficient<br />
and quiet.
THINKING BIG<br />
Bubba Splvey showed<br />
off his new Laser 200 in the<br />
Lanier RC booth. Part<br />
of the Lanier<br />
21st Century<br />
ARF line, the 1/3-scale<br />
Laser has a 96-inch span.<br />
rotating retractable landing gear (P-40<br />
style) and has wing flaps. Nick's plan as well as a<br />
fiberglass engine cowl and a molded greenhouse canopy will<br />
be available soon. The model uses traditional balsa and plywood<br />
construction, with formers assembled over a flat stick-built<br />
alignment crutch. If you want something just a little bit different<br />
for the flying field, Nick's Vengeance should do the trick.<br />
LANIER LASER 200<br />
The new IMAA- and IMAC-legal 1/3-sca\e Laser 200 ARF from<br />
Lanier RC has a 96-inch wingspan and 1,596 square inches of<br />
wing area. Its fuselage is 79 inches long, and the model is<br />
intended for 3.2 to 4.2 2-stroke and 2.4 to 3.0 4-stroke engines.<br />
With an estimated flying weight of from 17 to 22 pounds, the<br />
new Laser should be a performer and have excellent landing<br />
characteristics. Part of Lanier's 21st Century ARF line, the kit<br />
comes with nearly everything you need except radio equipment<br />
and an engine. High-quality hardware is included. The model has<br />
removable wings that are strengthened with an aluminum spar. A<br />
factory-painted fiberglass engine cowl and wheel pants match the<br />
covering precisely. If you're looking for a new aerobatic giant,<br />
Lanier's new Laser 200 is a classic design that delivers.<br />
KANGKE LASER 2000<br />
Super Kraft planes are manufactured by Kangke Industrial and use<br />
traditional balsa and plywood construction. The new 87-inch<br />
Laser 2000 is completely jig-built at the factory with plug-in wing<br />
panels and is covered with Oracover film. Intended for<br />
experienced fliers, the Laser has 1,275 square inches of wing area<br />
and should weigh between 16 and 18 pounds. Ideally suited for<br />
40 to 50cc gasoline engines, the kit comes with painted fiberglass<br />
Here are the parts from the new Kangke Laser 2000 kit. Built of light balsa<br />
and plywood, this aerobat is perfect for a Brison 3.2 gasoline engine.<br />
Watch for a review coming soon.<br />
100 MODEL AIRPLANE NEWS<br />
cowl, engine mount, landing gear,<br />
control horns, fuel tank, wheels and<br />
all necessary hardware and instructions.<br />
S.I. MODELS WEEKS SOLUTION<br />
S.I. Models provides a custom model airplane CAD<br />
service that offers model plan development,<br />
plotting/printing services and custom model<br />
aircraft graphics. The company also offers a plan<br />
for a beautiful 33-percent-scale Weeks Solution<br />
modeled after the full-size aircraft built by Kermitt<br />
Weeks. It weighs 19 l/4 pounds and is powered by a Zenoah G62.<br />
S.I. Models also offers an assembled cabane structure, landing<br />
Nick Ziroli Sr. showed this ready-to-paint Vultee 4-31 Vengeance.<br />
The 1/6-scale dive bomber uses a Zenoah G-62 for power.<br />
gear, canopy, a CD with construction photos, and a short kit with<br />
fuselage sides, wing ribs and other parts. The construction plans a<br />
are $40 each; the construction CD is $10; the complete hardware<br />
package is $115; and the wood short kit is $220. A 42-percent<br />
Solution is also available. For information, contact Tom Lowrie,<br />
RD 3, Box 153, Dalton, PA 18414; tomt^simodels.com, or call<br />
(570) 563-1445.<br />
GLENN TORRANCE MODELS<br />
I chatted with Glenn <strong>Tor</strong>rance about his impressive WW I<br />
designs. Glenn exhibited two kits at the show: his Fokker Dr.l<br />
triplane and his latest Fokker D-VIII. Both are in 'A scale, and the<br />
kits are absolutely gorgeous. Many laser-cut parts are included,<br />
and Glenn offers two sets of plans with his kits—one full size and<br />
one reduced copy—to use as a reference while you build. National<br />
scale competitor Tom Kosewski was also in the booth with his<br />
scratch-built Fokker D-VII to show off Glenn's new '/i-scale<br />
printed lozenge fabric. Specializing in WW I aviation, Glenn has<br />
raised the bar for kit quality and completeness. Basically, his<br />
models are scaled-down versions of the real aircraft, and every<br />
detail is reproduced. Glenn uses laser-cutting in very creative<br />
ways—for thin leather sheets to provide a truly scale cockpit<br />
coaming. Even the holes in the plywood sheeting are laser-cut, so<br />
you can sew the leather padding into place! Quite impressive.<br />
Glenn's models are designed around the Laser 200 4-stroke<br />
engine, but other engines such as the Zenoah G-23 or Saito 180<br />
can also be used.<br />
The D-VIII has an 82.6-inch span and is 56.8 inches long. Its<br />
flying weight should be 16 to 18 pounds. The kit has more than<br />
300 parts and a photo-illustrated 100-page construction manual.
THINKING BIG<br />
Included are a two-piece aluminum engine cowl (with cable groove),<br />
laser-cut wood parts, stamped metal parts, precut plywood panels<br />
and plywood wing covering (35 pieces). Also included are dummy<br />
engine cylinders and Spandau machine guns (from Williams Bros.),<br />
lacing cord for stitching and cable bindings, seatbelt harness and fittings,<br />
laminated rudder and elevator outlines and functional landing<br />
gear—and many other parts too numerous to mention. Glenn also<br />
showed me a kit for his newest design, the unusual and seldom modeled<br />
Fokker D-VI. It is basically a biplane that uses the Fokker<br />
triplane fuselage, and this kit should be out in August. For the ultimate<br />
WW I airplane, Glenn <strong>Tor</strong>rance Models is the place to look.<br />
Electric powered<br />
Flies In high winds<br />
5-7minute Nighttime<br />
FUSION 35 controller<br />
30 in. main rotor diameter<br />
6-7 cell Ni-Cad car battery packs<br />
Improved main rotor and tail rotor blades<br />
The Ultimate Park Flyer SM<br />
Powerful brushed<br />
motor modified by<br />
Simplified motor/<br />
radio installation<br />
This impressive<br />
Weeks Solution<br />
biplane is available<br />
as a plan<br />
from S.I. Models.<br />
It comes in 33and<br />
42-percent<br />
versions, with<br />
many available<br />
accessories<br />
including hardware<br />
and a wood<br />
short kit.<br />
Folding, flexible<br />
rotor blades<br />
The new Lite Machines Corona electric helicopter is the ultimate park<br />
flyer. With its powerful Electro-Fusion 540-size motor, the Corona has<br />
punchy performance to fly in confined areas and accelerate against gusty<br />
winds. The Corona has patented flexible rotor blades that fold up to reduce<br />
crash damage, and flies up to seven minutes on a standard six or seven cell<br />
R/C car battery.<br />
ever flown a helicopter before? Don't worry, the Corona conies with a<br />
fully illustrated construction manual and an operator's guide that will<br />
teach you how to fly on your own. Kits start at $199. Discount combos contain<br />
everything from motors to radio control systems. See your local dealer or call<br />
Lite Machines for details.<br />
102 MODEL AIRPLANE NEWS<br />
Phone: (765) 463-0959<br />
Fax: (765) 463-7004<br />
www. litemachines. com<br />
opatron<br />
www.shopatron .com<br />
Glenn <strong>Tor</strong>rance Models raised the bar in kit quality<br />
and completeness with its Fokker D-VIII and Dr.l<br />
kits. A Fokker D-VI kit will be out soon.<br />
There was so much more at the 2002 WRAM<br />
show, but I have only so much space in the<br />
column. Do yourself a favor and pencil in<br />
the last weekend in February 2003 on your<br />
calendar, and try to attend this Northeast<br />
modeling extravaganza. You'll be glad<br />
you did.<br />
\
RPM REAL PERFORMANCE MEASUREMENT<br />
by Dave Gieike<br />
It's time again to answer your engine questions. We have a<br />
variety of situations this month, from an engine that isn't getting<br />
enough fuel to flying with antique powerplants to mixing<br />
your own fuel. Keep those letters coming; if you have a question<br />
you'd like to see answered here, please write to me c/o Model<br />
Airplane News, 100 East Ridge, Ridgefield, CT 06877-4606 USA, or<br />
email me at man@airage.com.<br />
MIXING FUEL<br />
Gerald Weiss of Menomonee Falls, WI, writes: "I am a 65-year-old<br />
model builder and flier. I have several old model engines from my<br />
childhood, including a K&B, GHQ, McCoy, Pacemaker .59 and<br />
O&R. The smallest engine is a .19, and all are in good running<br />
condition. 1 would like to use them, but where can I obtain—or<br />
how do I mix—new fuel for these engines? I can only get 5- or 10percent-nitro<br />
fuel here. Should I add castor oil to these fuels?"<br />
The author mixes his own fuel. The 5-gallon can on the left is methanol;<br />
the graduated cylinder holds 1,000ml; the plastic 5-gallon can (third from<br />
the left) contains nitromethane; the short gallon jug contains castor oil;<br />
the standard gallon container (far right) contains Klotz KL-200 synthetic<br />
oil. All fuel ingredients are available from Klotz. Many specialty fuel companies<br />
will custom mix fuel to your specifications; others already have<br />
the desired blend as part of their standard products.<br />
Gerald, I wish that you had included the individual displacements<br />
for each of your engines. Some manufacturers such as<br />
McCoy used both lapped steel and ringed aluminum-alloy pistons<br />
with meehanite (fine-grain cast iron) cylinders. Others such as<br />
O&R produced only lapped-steel piston and cylinder units. Early<br />
K&Bs had lapped iron pistons and a steel cylinder. Both versions<br />
of the Pacemaker .59 were outfitted with a lapped-steel piston and<br />
meehanite cylinder. As for the GHQ (in my opinion, the worst<br />
American engine ever produced!), sell it to an engine collector;<br />
they have been paying up to about $125 for one of these lemons.<br />
All of these early engines required extensive break-in with relatively<br />
high percentages of castor-oil-based fuel. Except for very<br />
early spark-ignition examples, K&B engines were all glow. McCoy<br />
started out with ignition but had mostly switched to the glow<br />
112 MODEL AIRPLANE NEWS<br />
Engine advice<br />
plug by the early '50s. The Pacemaker .59s were both spark ignition.<br />
The Ohlsson & Rice engines were originally spark ignition<br />
but finished their production run with glow plugs. If your<br />
Pacemaker, O&R and McCoy engines are still fitted with their<br />
ignition timer and breaker points, I suggest running them on<br />
spark ignition with gasoline/oil fuel. Here's a good mix: three<br />
parts (by volume) of regular-grade pump gasoline and one part<br />
SAE-70 oil.<br />
Unfortunately, SAE-70 mineral oil is almost impossible to find<br />
today, but Klotz BeanOil castor oil (available at motorcycle shops)<br />
is a substitute that will not contaminate your engine's combustion<br />
chamber with carbon deposits. It's an excellent lubricant.<br />
For glow O&R, K&B and McCoy engines, use 5- to 10-percent<br />
nitromethane, 25- to 30-percent Klotz BeanOil castor oil and 65to<br />
70-percent methanol. Several companies, including Wildcat<br />
Fuels, will mix this blend to your specifications. Don't attempt to<br />
use RC fuel in these old engines; 100-percent synthetic lube won't<br />
adequately protect lapped pistons and cylinders, and the percentage<br />
of lubricant is usually too low. If you know the oil content of<br />
the RC fuel, however, here's a useful formula for determining how<br />
much castor oil to add to bring it up to acceptable specifications:<br />
(F -1) x A<br />
100-F<br />
= oz. of castor oil to add<br />
Where:<br />
F = final percentage of oil desired;<br />
I = initial percentage of oil already in the fuel;<br />
A = ounces of fuel you are treating.<br />
Example: if you have a gallon (128 ounces) of 18-percent synthetic<br />
oil fuel, and you want to add castor oil to bring it up to 28 percent<br />
(not a bad idea with all that synthetic), find the following:<br />
(10)x 128<br />
100-28<br />
= 17.8 oz.<br />
Therefore, add 17.8 ounces of Klotz BeanOil to the gallon of 18percent<br />
synthetic-oil fuel. Of course, you will need another empty<br />
gallon jug to help mix all of this together, since the original container<br />
is now too small. Also, the actual percentage of<br />
nitromethane and methanol will decrease slightly but not enough<br />
to affect engine performance.<br />
FUEL-STARVED POWERPLANT<br />
Tom Schumacher sent this email. "I hope you can help me with a<br />
problem I'm having with my MDS 1.48. The engine is mounted<br />
inverted and powers a Hangar 9 1/4-scale Cub. I originally used the<br />
remote needle-valve setup with very poor results. It seemed that<br />
no matter how much the engine was turned to the rich side, I<br />
could never get it to 'four-cycle.' At first I thought that I might<br />
have an air leak somewhere in the fuel system, so I replaced the<br />
[fuel] lines and used wire-ties to cinch down every connection—<br />
no luck. I've now eliminated the remote needle valve all together.
RPM<br />
Using the needle in the carb helped, but not much. Frustrated, I<br />
gave up; the Cub has been hanging in my garage ever since!<br />
After reading your article in the November 2001 issue of Model<br />
Airplane News concerning proper break-in, I purchased a test<br />
stand, hoping to figure out the problem with the 1.48, but I didn't.<br />
Before I ran the engine on the test stand, it had about 20 ounces<br />
of fuel through it. I was finally able to get the engine running at<br />
a rich four-cycle, but it took seven (!) turns to the rich side on<br />
the needle valve. This seems excessive. I've tried the old trick of<br />
using a small piece of fuel line around the needle valve to eliminate<br />
air leaks, but that didn't work either. When I go from seven<br />
to six turns out, the engine runs at peak rpm; there is no<br />
adjustability. I've considered replacing the carb but have no idea<br />
what to replace it with."<br />
Tom, it's a shame that you've had all this trouble with the MDS<br />
1.48 2-stroke engine; it seems like a good match for the Cub.<br />
The first thing that comes to mind is, what size fuel line are you<br />
using? You didn't say in your letter. Is it the large variety or the<br />
medium? If the latter, I suggest that you change to the larger<br />
size. Fuel-flow rates can exceed 2 ounces per minute at a rich<br />
"four-cycling" mode of operation with this engine, and that's a<br />
lot of flow for medium-size fuel line.<br />
Another possible cause of the problem is a restriction within<br />
the carburetor itself. A piece of flashing or a chip from manufacturing<br />
processes could be lodged somewhere within the metering<br />
jet tube. Remove the carb from the engine and carefully disassemble<br />
it, looking closely at the jet and idle-needle<br />
assembly/interface. With the primary needle valve removed,<br />
blow air or force fuel through the spraybar with a fuel<br />
bulb/syringe to see whether it behaves as if it's restricted. Try<br />
running a piece of small diameter music wire, or a pipe cleaner,<br />
through the spraybar.<br />
Last, make certain that the carb is tightly sealed to the<br />
neck of the crankcase; even a small air leak can lean a<br />
fuel mixture in a hurry.<br />
NEW BEARINGS FOR A MOKI<br />
D. Gibbs emails: "I have a three-year-old Moki<br />
1.8. It starts very easily, runs very reliably and<br />
has plenty of power. In mid-flight the other<br />
day, however, the engine stopped. The front<br />
[ball] bearing had failed, and a small piece of<br />
steel from the failed bearing had lodged at the<br />
very front of the crankcase housing, between<br />
it and the crankshaft. This caused only very<br />
minor damage to the housing, just behind<br />
the front bearing, and didn't damage the<br />
crankshaft at all. Using 600-grit wet/dry abrasive<br />
paper and some mild detergent mixed<br />
Ball bearings for crankshaft<br />
with water for lubrication, I was able to support—front and rear.<br />
completely clean up the inside of the<br />
housing. The large, rear ball bearing seems fine, but I figured<br />
that while I had the crankcase housing unbolted from the<br />
crankcase, I would change out both bearings. I had previously<br />
acquired replacement bearings from a local supplier, but unlike<br />
the unsealed originals, these are sealed. The new bearings are<br />
good-quality units from SKF. Would it be all right to replace the<br />
old bearings with the sealed units? Does it make a difference?"<br />
Mr. Gibbs, the seals on your replacement bearings won't hurt a<br />
114 MDDEL AIRPLANE NEW5<br />
thing, so install them as is; the grease will simply wash out during<br />
engine operation. If you don't like the slight frictional drag<br />
that the seals produce, simply remove them. Pry them from<br />
their seats with a tiny slot-type screwdriver (such as those used<br />
by jewelers), or use a hobby knife with a no. 11 blade. Don't<br />
touch (and possibly damage) the balls in the process (unlikely,<br />
since you'll be careful!). You can then wash out the grease with<br />
a solvent; I like to use lacquer thinner because it doesn't attract<br />
rust-producing water from the air (caused by hygroscopic<br />
action, as occurs with alcohol). Allow the bearings to dry naturally.<br />
Don't use compressed air to hasten drying; dirt in the<br />
airstream could contaminate the bearing assembly. Lubricate<br />
them with Marvel Mystery Oil and install them in your Moki.<br />
OLDER FOX ENGINES<br />
Mr. B. Jackson of Burlington, Ontario, Canada, writes: "I purchased<br />
four old Fox engines, including an early .78 with an<br />
exhaust baffle coupled to the carburetor. Two Fox .36s and a Fox<br />
.29 completed my find; all engines are new in the box! When I<br />
told my fellow club members that I was going to use one of the<br />
.36s in a Balsa USA Stick 40, they told me that Fox .29s and .36s<br />
were hard to start, the carburetors were difficult to adjust, and<br />
they really vibrate—especially in a lightly constructed model<br />
such as the Stick 40. They also informed me that the Fox .29<br />
and .36 require a minimum of 15-percent nitromethane in the<br />
fuel. Can you tell me how much of this information is fact and<br />
how much is fiction?"<br />
Mr. Jackson, it sounds as though your Fox .29 and .36s are<br />
equipped with cast-iron pistons and steel cylinders. This combination<br />
required several hours of patient break-in before the iron and<br />
steel were "bedded-in" and heat-cycle stress relief was achieved.<br />
The break-in fuel was very important to the "iron Fox"; it required<br />
a minimum of 25-percent castor oil (preferably 28 percent, with<br />
a low nitromethane percentage—about 5 percent).<br />
Although the Fox instructions were clearly written,<br />
many modelers ignored them and tried to fly the<br />
engine right out of the box; this never worked and<br />
gave rise to the problems described by your club<br />
members. In my opinion, this was not the fault of<br />
the manufacturer or the engine. Properly broken in,<br />
Fox engines are great runners.<br />
In reference to Fox carburetors, I'd like to note<br />
that Duke Fox produced more carburetor designs<br />
than any other manufacturer during the '60s and '70s.<br />
Another prolific producer of carb designs, SuperTigre, had to<br />
take a back seat to Fox in this arena. On at least one occasion,<br />
Peter Chinn (past engine columnist for Model Airplane<br />
News) was diligently trying to explain the workings of a<br />
recently released Fox carburetor while Duke Fox was promoting<br />
a newer version in an ad in the same issue!<br />
With proper break-in and fuel (5- to 10-percent nitro is<br />
plenty), Fox R/C .29s and .36s are easy to start, smooth running<br />
and very throttleable—if the owner follows Duke's detailed<br />
instructions. As an added benefit, a properly maintained "iron<br />
Fox" will run and last forever.<br />
Klotz Special Formula Products Inc., 7424 Freedom Way, Fort<br />
Wayne, IN 46817; (800) 242-0489; fax (219) 490-0490;<br />
www.klotzlube.com.
NAME THAT PLANE<br />
Can you identify this aircraft?<br />
SEND YOUR ANSWER to Model Airplane News, Name<br />
that Plane Contest (state issue in which plane appeared),<br />
100 East Ridge, Ridgefield, CT 06877-4606 USA.<br />
Congratulations to Eric Fotheringham of<br />
Upton, MA, for correctly identifying<br />
April's mystery plane as the Avro Lincoln,<br />
the last piston-engine bomber to serve the<br />
Royal Air Force (RAF)- Virtually a scaled-up<br />
version of its predecessor—the famous<br />
Lancaster bomber—the Lincoln was powered<br />
by four Rolls-Royce Merlin 85<br />
engines with annular radiators. Armed<br />
with twin .50-caliber Browning machine<br />
guns in the nose turret, two 20mm<br />
Hispano Mk4 or Mk5 cannon in the dorsal<br />
turret, twin .50-caliber machine guns in<br />
the rear turret and up to 14,000 pounds of<br />
bombs, the Lincoln was originally intended<br />
for use in the Pacific theater, but it<br />
arrived on the scene too late for operational<br />
service. First issued to the RAF in<br />
September 1945, the Lincoln became its<br />
standard postwar heavy bomber, and 20<br />
squadrons were eventually equipped with<br />
the plane. The 120-foot-wingspan bomber<br />
was produced<br />
in several different versions, and in addition to 168 aircraft built by Avro, Lincolns were also produced<br />
by Armstrong-Vickers and Armstrong Whitworth and in Canada and Australia. One Lincoln was<br />
even converted for the bulk uplift of fuel and made 45 civil runs during the Berlin Airlift.<br />
The winner will be chosen, four weeks following publication, from correct answers received (delivered by U.S.<br />
mail) and will be awarded a free, one-year subscription to Model Airplane News. If already a subscriber, the winner<br />
will be given a free, one-year subscription extension.<br />
Breezy Day? Let s Go Flying<br />
Specifications:<br />
Wing Span: 35.75 inches<br />
Wing Area: 214.5 sq. inches<br />
Weight: 8 to 11 ounces<br />
Piper J-3 Cub<br />
Mini-Sport Specifications:<br />
Wing Span: 48.25 inches<br />
Wing Area:<br />
ight:<br />
Specifications:<br />
Wing Span: 35.75 inches<br />
Wing Area: 214.5 sq. inches<br />
Weight: 8 to 11 ounces<br />
Breezy Day Park Flyers Fly In Wind Grounding Most Other Park Flyers<br />
What good is an R/C airplane if you can't fly it in a gentle breeze? Most<br />
park flyers have a hard time penetrating even the weakest air currents.<br />
Fear the wind no more. The wizards at Hen Engineering have developed<br />
four unique Breezy Day Park Flyers sure to keep your head in the<br />
clouds, while others are stuck to the ground. Utilizing special CAD software<br />
and distinctive airfoil designs, Breezy Day Park Flyers are engineered<br />
to slice through light breezes with authority. Flight times of 8-12 minutes<br />
and more are possible.<br />
Each Breezy Day Park Flyer features all Laser cut wooden parts (the<br />
finest laser cut wood in the world), tab and notch construction for quick<br />
and accurate assembly, 3-D CAD design for precise parts fit, computer<br />
drawn plans, quality hardware pack, propeller, landing gear wire & wheels<br />
(except Rally-XP), and a complete step by step instruction manual.<br />
Add in your favorite Direct Drive 280 electric motor and mini 3 channel<br />
radio system (not included), and you have an unbeatable formula for fun.<br />
Breezy Day Park Flyers. Available at your local hobby retailer.<br />
Herr Engineering<br />
www.iflyherr.com<br />
Herr Engineering is a division of SIC Manufacturing Company, Montezuma, lo
DA-150—The Choice<br />
of Champions!<br />
DA-150s swept the top-three places<br />
at Tournament of Champions 2000<br />
I st - Christophe Paysant-LeRoux<br />
2nd - Chip Hyde<br />
3rd -Jason Shulman<br />
• Displacement: 9.1 5 ci. (1 50cc)<br />
• Output: 16 hp<br />
• Weight: 8.25 lbs (3.74 kilos)<br />
• Desert Aircraft auto advance<br />
electronic ignition.<br />
• Exclusive Desert Aircraft designed<br />
cylinders, pistons and crankshaft.<br />
• Three-piece CNC milled, 2024<br />
T3 aluminum alloy crankcase.<br />
• Long rod to stroke ratio.<br />
• Aerobatic power curve.<br />
• Most torque in its class.<br />
• Two year warranty.<br />
DA-150 Engine: $1,495.00<br />
DA-150 Muffler Set: $165.00<br />
desertaricraft@theriver.com<br />
www.desertaircraft.com<br />
Phone: 520-722-0607<br />
Fax: 520-722-5622<br />
140 South Camino Seco, Suite# 418<br />
Tucson, AZ 857 10-4487<br />
1ZO MDDEL AIRPLANE NEWS<br />
\<br />
ALUMINUM SPINNERS<br />
1 Complete Units include spinnerspinner<br />
nut, and bushing set.<br />
1<br />
Complete assortment of spinner nuts<br />
1<br />
Easy to assemble; easy to use<br />
1<br />
Precision machined<br />
1<br />
Recommended for use with electric<br />
starters<br />
Great for fun fliers<br />
1 Low priced<br />
SIZE PART NO.<br />
1 1/2" 5503<br />
1 3 /4" 5504<br />
2" 5505<br />
PRICE<br />
12.23<br />
14.84<br />
15.90<br />
SIZE<br />
2 1 /4"<br />
2 1/2"<br />
PRICE LIST<br />
PART NO.<br />
5506<br />
5507<br />
PRICE<br />
16.49<br />
18.35<br />
21658 Cloud Way, Hayward, CA 94545<br />
510-783-4868 • FAX 510-783-3283<br />
www.aeroloft.com<br />
Phone 480-380-4799<br />
Fax 480-380-4843<br />
7919 East Mawson Road<br />
Mesa, Arizona 85207<br />
CUSTOM MUFFLERS<br />
• Custom mufflers made<br />
to your specifications.<br />
• Prices depending on<br />
complexity starting at<br />
$125.00.<br />
• Call for other brand<br />
prices.<br />
•Add $10.00 for smoke<br />
G23 $95.00<br />
G38 $95.00<br />
G45 $100.00<br />
G62 $120.00<br />
GT80-445-Twin $125.00<br />
per set<br />
add $5.00 tor shipping/handling (non-functional $300.00/set)<br />
BOLD MUFFLERS<br />
423 SW Log Drive • Port St. Lucie, FL 34953<br />
Tel/Fax: 561-344-8785 • email:waldopepper1@earthlink.net<br />
MODEL A RPLANE NEWS<br />
RATES I non-commercial—25 cents per word<br />
(no commercial ads of any kind accepted at this<br />
rate); commercial—50 cents per word (applies to<br />
retailers, manufacturers, etc.); count all initials,<br />
numbers, name and address, city, state, zip code<br />
and phone number. All ads must be paid for in<br />
advance. To run your ad for more than one<br />
month, multiply your payment by the number of<br />
months you want it to run. Deadline: the 10th day<br />
of the month, 3 months in advance, e.g., January<br />
10 for the April issue. We don't furnish box numbers,<br />
and it isn't our policy to send tear sheets.<br />
Please make all checks payable to: AIR AGE<br />
INC. SEND AD AND PAYMENT TO: CLASSIFIED<br />
ADS, Model Airplane News, 100 E. Ridge,<br />
Ridgefield, CT 06877-4606 USA, or call (203)<br />
431-9000.<br />
BUSINESS<br />
MODEL AIRPLANE NEWS 1952-1980; "Air Trails"<br />
1937-1952, "Young Men" 1952-1956, "American<br />
Modeler" 1957-1967, "American Aircraft Modeler"<br />
1968-1975. $1 for list. George Reith, 3597 Arbutus Dr.<br />
N., Cobble Hill, BC, Canada V0R1L1. [4/03]<br />
GIANT-SCALE COCKPIT KITS. VS-scale P51, P40, F8F,<br />
19% P47. Viking Cockpits, 13738 Destino PL,<br />
Cerritos, CA 90703; (562) 926-4180; email brucevike@aol.com.<br />
[6/02]<br />
WARPLANE WINDVANE PLANS! Build amazing scale<br />
windvanes! Details: Windm, 520 Hooper Rd., 153,<br />
Endwell, NY 13760-1960;www.windm.com. [6/02]<br />
RYOBI CONVERSIONS. We are the oldest, the best<br />
and least expensive. For complete engines, conversion<br />
kits, or our 360-degree muffler, we have all your conversion<br />
needs. For free conversion instructions and<br />
catalog, send SASE to Jag Engines, 16073 Muscatel,<br />
Hesperia, CA 92345; (760) 244-727<br />
faxO, or see our website at http://www.jagengines.<br />
com. [6/02]<br />
BOBS AIRCRAFT DOCUMENTATION 2002. World's<br />
largest commercial collection of aircraft photos<br />
(400,000) and 3-view line drawings (35,000). 256-page<br />
catalog, $8 (Canada, Mexico, Alaska, Hawaii, Puerto<br />
Rico—$10; foreign, $18; includes postage). 3114<br />
Yukon Ave., Costa Mesa, CA 92626 USA; (714) 979-<br />
8058. [12/02]<br />
FOR SALE: Scale plans for a 57-in.-wingspan<br />
Westland Lysander. Must structurally build it to suit<br />
your needs. For use with high-powered or heavy<br />
engines. Plans come in 29 sections. Approximately<br />
12x3 feet. Price: $120 in U.S. funds only. Make<br />
checks payable and mail to: Lee R.T. Frick, P.O. Box<br />
2201, Murrells Inlet, SC 29576. Please allow 30 to 60<br />
days for delivery. [6/02]<br />
ALUMINUM CAN PLANS. Build airplanes, vehicles,<br />
locomotives and construction equipment. Free list.<br />
Tesscar, Box 333A, Scappoose, OR 97056, or<br />
www.tesscar-aluminum-craft.com. [9/02]<br />
NOW GET ENGINE SERVICE ESTIMATES ONLINE! Go<br />
to www.starcomposites.com/BJModelEngines/, or<br />
contact us directly for a free estimate. We service all<br />
makes, models, sizes and strokes, gas or glow, plane<br />
or heli, boat and car. Experienced. Custom service.<br />
Your parts, out-of-production engines, crashed—all<br />
OK. Bill Jensen, BJ's Model Engine Service, 36<br />
Macintosh Dr., Oxford, CT 06478; email wbilljensen@acs.com;<br />
(203) 888-4488; fax (203) 888-<br />
3255. [12/02]
GAS ENGINE CONVERSIONS, KITS AND PARTS:<br />
Homelite. Weedeater, Ryobi. McCulloch, Honda.<br />
Information, $5. Visa/MC. Carr Precision, 6040 N.<br />
Cutter Cir., #303. Portland, OR 97217; phone/fax<br />
(503) 735-9980; www.carrprecision.com; email carrprecision@worldnet.att.net.<br />
[6/02]<br />
MODEL AIRPLANE SCHOOL: at Hobbies Aloft R/C<br />
Flight School, you will experience more than 100<br />
hands-on landings per day of training until you solo—<br />
guaranteed! Ray Smith will be your personal trainer,<br />
and using "kinesthetic instruction" (no buddy-boxes),<br />
he will guide you down to each landing until you can<br />
execute the landing sequence all by yourself. Typical<br />
students require 4 to 6 days of training to solo, and<br />
then their RC flying fun really begins! We fly yearround<br />
on the beautiful California coast near Monterey.<br />
Call toll-free, (888) 700-4421 to make a reservation,<br />
and please visit our website; www.hobbiesaloft.com.<br />
[8/02]<br />
RADIO CONTROLLED HOT-AIR BALLOONS.<br />
Specializing in manufacturing 1 /4-scale hot-air balloons<br />
and blimps. Perfect for advertising banners,<br />
aerial photography, or to entertain crowds after a<br />
mass ascension. All balloons are custom designed<br />
for personal or promotional use. Call Bernard<br />
Smatana at (505) 244-9490, (505) 249-4641, or<br />
email rcballoons@aol.com: www.modelballoon.com.<br />
[07/02]<br />
www.telstarhobbies.com Crash videos! Your online<br />
source for RC and full-scale aviation books and<br />
videos. (772) 286-2535; sales@telstarhobbies.com.<br />
[05/03]<br />
RC FLIGHT TRAINING. Learn to take off and land<br />
in far western North Carolina, near Murphy. 1635<br />
Settawig Rd.. Brasstown, NC 28902; (828)<br />
389-8968. [11/02]<br />
HOBBYIST<br />
MAGAZINE BACK ISSUES: Model Airplane News,<br />
RCM, FM. Model and full-scale titles, 1930-1999.<br />
Send SASE for list: Carolyn Gierke, 1276 Ransom,<br />
Lancaster, IMY 14086. [6/02]<br />
USED ENGINES WANTED: pre-1970 preferred. T.<br />
Crouss, 100 Smyrna, West Springfield, MA 01089.<br />
[11/02]<br />
EVENTS<br />
"T.O.C." OF MARYLAND—2002 FLYING COMPETI-<br />
TION. Fit, May 31 to Sun., June 2, 2002. IMAC-style<br />
event w/emphasis on freestyle aerobatics. Relaxed<br />
open flying Friday; banquet on Saturday evening;<br />
$$S prizes: raffles: food. Contact Art Vail, (410) 247-<br />
4281: email artvail@erols.com. [6/02]<br />
Puzzled by Computer<br />
R/C Systems?<br />
S CHECK OUT these books by<br />
Don Edberg, MAN'S "Effective<br />
Programming" columnist:<br />
+ Get The Most From<br />
Your Futaba 8 book.<br />
186 pages, only $14.95!<br />
>> Program Futaba's<br />
Super 7 covers planes &<br />
gliders. 96 pages, $14.95!<br />
+ Guide to Computer<br />
Radios available again! A<br />
180-page PDF file on a CD,<br />
read on a PC\ just $12.95!<br />
See your hobby shop or order direct.<br />
S&H (US 1st class): 1 or 2 books add<br />
$5, for 3 add $7. Calif, add 7.75%<br />
tax. Canada add US$8, others add<br />
US$10. S&H for CD $3, non-US $5.<br />
Dynamic Modelling • 4922a Rochcllc<br />
Ave • Irvine, CA 92604-2941 USA •<br />
Order toll-free 1-888-770-1812.<br />
Info: 949-552-1812. Web orders:<br />
home.flash.net/~dynamic3/<br />
email: dynamic3@flash. net<br />
UGLY SPORT £?r<br />
R/C Park Flyer<br />
FOR SPEED 280<br />
4 ELECTRIC POWER<br />
• 33"span<br />
• 7oz.lsq.ft. wing loading<br />
• 61 laser cut parts<br />
BMJR Model Products<br />
Box 1210«Sharpes, FL 32959-1210<br />
321-537-1159<br />
www.bmjrmodels.com<br />
CARLSON ENGINE IMPORTS<br />
Czech-MP JET® .061<br />
U/C R/C U/C&<br />
Rye<br />
Plain Bearing Glow 50.00 55.00 60.00<br />
Ball Bearing Glow 65.00 70.00 75.00<br />
Ball Bearing Diesel 65.00 70.00 75.00<br />
All engines include silencer<br />
Add $5.00 P&H per Order. Visa & MC OK<br />
'i Sett Seleetuui o£ Vieid SM^UUA.<br />
Carlson Engine Imports- 814 E. Marconi Ave.<br />
Phoenix Az. USA 85022- Ph./Fax 602-863-1684<br />
BA TTERIES AMERICA<br />
www.batteriesamerica.com<br />
Electric flight R/C Packs, & morel<br />
DP<br />
Small-scale Electric Flight Ni-MH packs!<br />
Great for indoor park flyers, etel Specify Shape: A=sideX side;<br />
B=twin-stick; C=two rows; D=four sticks. JST conn.=$3.00 xtra<br />
Cell Type size 7.2 volt 8.4 volt 9.6 volt<br />
AP-150
JR<br />
MatchBox<br />
Servo matching and<br />
power distribution<br />
Intended for modelers of giant-scale craft and others who want to use<br />
multiple servos on a single channel, the new JR MatchBox is an<br />
onboard electronic device that precisely matches servos used on a<br />
single channel. Digital servos give modelers a new level of control precision,<br />
but slight variables in control-linkage geometry still<br />
remain—especially when more than one servo is attached to a single<br />
control surface. Examples of this are giant-scale, TOC-style aerobatic<br />
airplanes that use three servos per aileron and two servos per elevator<br />
half. The slightest mismatch between these grouped servos can<br />
cause increased current drain as the servos fight each other. Now,<br />
however, there is an easy solution to this problem. The MatchBox<br />
allows modelers to match servos with precision and offers servosetting<br />
flexibility. Weighing just over 0.33 ounce, the unit is about the<br />
same size as a small receiver and can be plugged into any channel<br />
that drives more than one servo. Up to four servos can then be<br />
plugged into it and, using the selector dial and buttons, the servos can<br />
be independently adjusted. The unit allows adjustments to neutral<br />
point (subtrim), endpoint and direction reversing.<br />
A big plus is that the MatchBox also lets you power the servos with<br />
a separate auxiliary battery pack! This is highly recommended if you<br />
are driving three or four high-current servos. You do have to use a<br />
switch harness for the second battery pack to switch off the power to<br />
the unit. A power shunt is also included and is plugged into the battery<br />
port if an auxiliary battery pack is not used.<br />
The MatchBox can also be used in a Y-harness configuration<br />
where the servos on a single channel are used for various<br />
applications. An example is split elevator halves, with a<br />
servo used to move each half. Each servo's endpoint<br />
can be adjusted and, if needed, one of the servos<br />
can be reversed to give the proper elevator<br />
input. Typically, this kind of setup flexibility<br />
is only offered with a programmable<br />
computer radio.<br />
The MatchBox is very easy to<br />
use. The selector dial has 10<br />
positions (0 through 9).<br />
Positions 1 through 8 correspond<br />
to the numbered servo<br />
plug-in slots on the opposite<br />
end of the unit. To select a servo<br />
and adjust it, you simply turn the<br />
selector to the corresponding position<br />
number and then push either the<br />
Increase (+) or Decrease (-) buttons to<br />
make the desired adjustment.<br />
• Position 0 is the default position to<br />
which the unit should be turned for normal<br />
operation. Any adjustments that are made are<br />
stored in memory when the dial is returned to<br />
0. This must be done before the airborne system<br />
has been shut off. If power is turned off before the dial is set at 0, the<br />
settings will be lost.<br />
124 MODEL AIRPLANE NEWS<br />
AT MODEL AIRPLANE NEWS, we not only tell you what's new, but we also try it out first so we<br />
can bring you mini-reviews of the stuff we like best. We're constantly being sent the latest support equipment<br />
manufacturers have to offer. If we think a product is good—something special that will make your modeling<br />
experiences a little easier or just plain more fun—we'll let you know here. From retracts and hinges to glow<br />
starters and videotapes, look for it in "Product Watch."<br />
• Selecting any dial positions from 1 to 4 allows the modeler to make<br />
servo neutral point and endpoint adjustments to the servos using a<br />
combination of transmitter stick positions and the Increase or<br />
Decrease buttons. With the control stick in the neutral position, you<br />
can adjust the neutral point of the selected servo, and with the stick<br />
in the extreme left or right position, the endpoints can be adjusted.<br />
• Selecting positions 5 to 8 allows servo-reversing. As before, these<br />
adjustments are made using the transmitter stick position (neutral)<br />
and the buttons.<br />
You can reset the MatchBox to the factory default settings by turning<br />
the selector to position 9 and then simultaneously pressing the<br />
Increase and Decrease buttons.<br />
The MatchBox comes with detailed instructions, a short wire lead to<br />
connect to the receiver and a battery power shunt. If you would like to<br />
add a greater degree of servo adjustment to your next model, for<br />
$69.99, the JR MatchBox is a handy little device to have around. I've<br />
used it, and I like it! I think you'll like using it, too. —Gerry Vanish<br />
JR; distributed by Horizon Hobby Inc., 4105 Fieldstone Rd., Champaign,<br />
IL 61822; (800) 338-4639;<br />
www.horizonhobby.com.
PRODUCTWATCH<br />
SANDMAN ABRASIVE PRODUCTS<br />
Foam-backed sanding pads<br />
Flexible finishing tools<br />
Whether you are applying an iron-on film or a painted finish, to<br />
achieve a great-looking model, you need to have a smooth surface<br />
under it. To get that perfect surface, you have to do a lot of<br />
sanding, and Sandman Abrasive Products' foam-backed sanding<br />
pads are the right tools for the job. These abrasive-coated<br />
pads come in various shapes, can be<br />
used wet or dry and come in<br />
grits from 80 to 600.<br />
GREAT PLANES<br />
Power Plane<br />
Save time and elbow grease<br />
Removing material from leading edges, nose blocks and wingtips can<br />
be a time-consuming job. First, you have to carefully cut away chunks<br />
of material and then use a razor plane to smooth the part so you<br />
can sand it to its final shape. Don't get me wrong; I love my building<br />
time in the shop, but like anyone else, I like to save time,<br />
They can be used to sand balsa, fiberglass and plastic surfaces, and finer grits can be special<br />
ordered. The pads fit comfortably in your hand, and they conform easily to contours such as<br />
wing leading edges, fuselage turtle decks and wing fillets. They are also great for sanding fiberglassed<br />
wing surfaces and for smoothing primer to obtain a very smooth paint surface.<br />
The differently shaped pads, such as the radius block or the slanted block, are ideal for<br />
sanding hard-to-reach edges and surfaces. I like the fact that the pads are washable and<br />
can be used for many years. I found the finer 2,000 and 4,000 grits ideal for removing<br />
scratches from clear plastic canopies. The Sandman foam pads are great companions to the<br />
traditional hardwood-sanding block on your workbench. —Rick Bell<br />
' Sandman Abrasive Products, 12676 Pierce St., Unit 6, Pacoima, CA<br />
91331; (818) 834-8851; (888) 954-1800; fax (818) 834-8850;<br />
www.sandmanabrasives.com.<br />
too. The new Great Planes' Power Plane is a handy workbench<br />
tool and a great timesaver.<br />
The Power Plane removes material from flat surfaces as easily<br />
as an electric-powered rotary cutter, but you can also set the depth<br />
of the cut accurately (as finely as 0.030 inch at a time). It has a spiral<br />
rotary-cutting blade.<br />
126 MODEL AIRPLANE NEWs<br />
I had excellent results the very first time I used it. The tool is plugged into any<br />
110V AC outlet for power, and it is light and easy to hold. It feels a lot like holding a<br />
curved sanding block, but it removes a considerable amount of material with each<br />
pass. Its two power buttons allow you to operate it with either hand. Since you have to<br />
depress both buttons, the unit can't be turned on accidentally by tipping it over on its<br />
side, nor can it be left on by mistake.<br />
The cutting blade is easy to remove and can be replaced when it gets dull. I have<br />
used the Power Plane on balsa and lite-ply sheeting, and it works very well. The<br />
instructions recommend that you not use the tool on hardwoods such as oak, maple<br />
and birch.<br />
If you're looking to save a little time and want the newest gadget for the workshop,<br />
the $29.99 Great Planes Power Plane is just the ticket. —Gerry Yarrish<br />
Great Planes Model Mfg. Co., PO. Box 9021, Champaign, IL 61826-9021; (800) 637-<br />
7660; www.greatplanes.com.
3 Sea Bees, 147<br />
Ace Hobby Dist., C4<br />
Aeroloft Designs, 120<br />
Aeroworks, 66<br />
Aero-Model Inc., 70<br />
Aero Electric, 149<br />
Airborne Video Systems, 144<br />
Air Foil Aviation, 140<br />
AirBorne Models,<br />
122-123<br />
Airtronics, C3<br />
American Junior, 52<br />
America's Hobby Center, 128<br />
Autogyro, 151<br />
BMJR Model Products, 121<br />
Backyard Flyer<br />
book, 141<br />
Backyard Flyer<br />
subscription, 115<br />
Blue Box Toys, 27<br />
Bob Smith<br />
Industries, 51<br />
Bob Violett Models, 26<br />
Bold Mufflers, 120<br />
Bruckner, 138<br />
C3GM Sidewalk Flyers, 144<br />
Carlson Engine, 121<br />
Castle Creations, 51<br />
C.B. Tatone, 120<br />
Century Jet Models, 144<br />
Chase-Durer, 21<br />
Chief Aircraft, 118-119<br />
Cleveland Model &<br />
Supply Co., 142<br />
Dave Brown Products, 142<br />
Dave Patrick Models, 146<br />
Desert Aircraft, 120<br />
DJ Aerotech, 129<br />
Doppeldecker, 135<br />
Draganfly, 7<br />
Du-Bro Products, 43<br />
Dumas, 151<br />
Dymond<br />
Modelsports, 101<br />
Dynamic Modeling, 121<br />
eBay, 14-15<br />
Electro Dynamics, 148<br />
Erickson Motors, 145<br />
Fiberglass<br />
Specialties, 135<br />
First Place Engines, 137<br />
Flair Products Ltd., 76<br />
Flight Line Toys, 125<br />
Advertisers<br />
FMA Direct, 67<br />
FunAeroR/C, 151<br />
Futaba, 19,71<br />
G&P Sales, 134<br />
Global Hobby Dist., 13<br />
Great Planes, 4-5<br />
Hangar 9, 9<br />
Hayes Products, 140<br />
Herr Engineering, 116<br />
Hitec RCD, 72-73<br />
Hobbico, 79<br />
Hobby Horse, 108<br />
Hobby Lobby Intl.,<br />
77<br />
Hobby People, 84-85<br />
Horizon Hobby Inc.,<br />
96-97<br />
Ikarus, 129,135, 139, 147<br />
jetsetairplanes.com, 93<br />
JK Aerotech, 129<br />
JR, 22-23, 54-55<br />
K&B, 147<br />
K&S, 140<br />
Kangke USA Inc.,<br />
47<br />
Kyosho, 35<br />
Landing Products, 137<br />
Lanier RC, 89<br />
Laser Models, 25<br />
Lite Machines, 102<br />
Mach 1 Hobbies, 144<br />
MaxCim, 139<br />
Maxx Products, 136<br />
Mecoa, 143<br />
Megatech, 65<br />
MH Mini, 147<br />
MicroPilot, 147<br />
Micro Fasteners, 144<br />
Midwest Products, 125<br />
Miller R/C, 142<br />
Model Rectifier<br />
Corp. (MRC), C2<br />
Morgan Fuels, 39<br />
Mr. Ni-Cd Batteries, 121<br />
MTM Intl., 134<br />
Nelson Hobby Specialties, 125,<br />
NickZiroli, 150<br />
NewKolb. 135<br />
Northeast Sailplane, 95<br />
Northwest Hobby, 137<br />
Norvel, 134<br />
Omni Models, 99<br />
On Top of the<br />
World, 144<br />
Pacific Aeromodeler, 145<br />
Page Aviation, 148<br />
Paul Guillow, 151<br />
Peak Electronics, 150<br />
Peck-Polymers, 147<br />
Performance RC, 133<br />
Polk, 129<br />
Powermaster Hobby Products,<br />
139<br />
Precision Micro Electronics,<br />
148<br />
Prince America, 41<br />
Propwash, 142<br />
Quantum Models,<br />
109-111<br />
Raceplanes, 151<br />
RC Accesory, 137<br />
REVO Blimps USA, 149<br />
Richmond RC, 103<br />
RC Showcase, 140<br />
RCstore.com, 130-132<br />
RCV Engines Ltd., 127<br />
Robart Mfg., 91<br />
RTL Fasteners, 135<br />
Sherline Products, 152<br />
Sig Mfg., 60<br />
Sky Hooks & Rigging, 134<br />
SKS Videos, 142<br />
Slimline Products, 10<br />
Smithy Co., 139<br />
Soarsoft, 134<br />
Spinmaster. 83<br />
Stalker Radar, 149<br />
Sullivan Products, 11<br />
T&D Sales, 147<br />
Tekoa, 139<br />
TNC Electronics, 150<br />
Top Flite, 53<br />
Tower Hobbies,<br />
104-107,117<br />
Toytronix, 129<br />
Trick R/C, 61<br />
Tru-Turn, 149<br />
Turnkey RC, 150<br />
Universal Laser, 150<br />
Widget Supply, 133<br />
Wildcat Fuels, 113<br />
Windsor Propeller Co., 127,133<br />
Zap, 17<br />
Zurich, 135<br />
MODEL AIRPLANE NEWS (ISSN 0026-7295, USPS 533-470) is published monthly by Air Age Inc., 100 East Ridge, Ridgefield,<br />
CT 06877-4606 USA. Copyright 2002; all rights reserved. The contents of this publication may not be reproduced in whole or in<br />
part without the consent of the copyright owner. Periodical postage permit paid at Ridgefield, CT, and additional mailing offices.<br />
SUBSCRIPTIONS. U.S. and Canada, call (800) 827-0323; elsewhere, call (815) 734-1116. Or set your Web browser to<br />
www.airage.com/subscribe.html. U.S.: $34.95 (one year), $55.95 (two years). Canada: $49.95 (one year), $87.95 (two years),<br />
inc. GST. reg. no. 13075 4872 RT. Elsewhere: $48.95 (one year), $83.95 (two years). Prepayment required: Visa, MC and AmEx<br />
accepted.<br />
EDITORIAL. Send correspondence to Editors, Model Airplane News. 100 East Ridge, Ridgefield, CT 06877-4606 USA. Email:<br />
man@airage.com. We welcome all editorial submissions, but assume no responsibility for loss/damage of unsolicited material.<br />
To authors, photographers and people featured in this magazine: all materials published in Model Airplane News become the<br />
exclusive property of Air Age Inc., unless prior arrangement is made in writing with the Publisher.<br />
ADVERTISING. Send advertising materials to Advertising Dept.. Model Airplane News, 100 East Ridge, Ridgefield. CT 06877-<br />
4606 USA; phone (203) 431-9000; fax (203) 431-3000.<br />
CHANGE OF ADDRESS. To make sure you don't miss any issues, send your new address to Model Airplane News, P.O. Box 428,<br />
Mount Morris. IL 61054 USA, six weeks before you move. Please include the address label from a recent issue, or print the information<br />
exactly as shown on the label. The Post Office will not forward copies unless you provide extra postage.<br />
POSTMASTER. Please send Form 3579 to Model Airplane News. P.O. Box 428, Mount Morris, IL 61054 USA.<br />
Customer<br />
Service<br />
Thank you for joining the Air Age family<br />
of publications where you can explore<br />
the exciting worlds of radio control and<br />
aviation.<br />
These tips will help you get the most out<br />
of your subscription:<br />
How to read your label:<br />
#BXNBNMF***************AUTO** 3-DIGIT 068<br />
#12345ABC123AB12C#AUG03 MAIR 000<br />
Your account number is<br />
12345ABC123AB12C.<br />
Your expiration date issue is August<br />
2003.<br />
How and when to tell us of<br />
an address change<br />
Address changes should be requested<br />
before you move. Our labels are printed<br />
ahead of time, so please allow 4-6 weeks<br />
for the change to take effect. Please<br />
include a copy of your current label.<br />
Send all address changes to:<br />
Model Airplane News<br />
P.O. Box 428<br />
Mount Morris, IL 61054<br />
You may also contact us via email at<br />
MAIR@kable.com, or fax (815) 734-1223.<br />
Our cancellation policy<br />
All cancellations must be requested in<br />
writing. You may send in your request<br />
via mail, email, or fax. You will be sent a<br />
refund for all unserved issues.<br />
Our renewal policy<br />
Renewal notices are sent six months<br />
prior to your expiration date (see<br />
label above). You may renew your<br />
subscription via mail by sending in<br />
your renewal invoice with payment.<br />
For faster service, renew online at<br />
www.modelairplanenews.com<br />
Effective October 2001, the best<br />
deal will be in the first renewal<br />
notice you receive. By renewing<br />
early and for a longer term, you create<br />
savings for us, which we pass on to you.<br />
So always check your first renewal effort<br />
for the lowest price available.<br />
JUNE 2DD2 153
FINAL APPROACH<br />
BY WILLIAM SIURU<br />
The next-generation UAV<br />
The Predator and Global Hawk unmanned aerial vehicles<br />
(UAVs) are playing key roles in the war on terrorism.<br />
Predators equipped with Hellfire missiles can seek out and<br />
destroy enemy targets. Other Predators fly reconnaissance<br />
missions over Iraq. UAVs are great for high-risk missions because<br />
they don't endanger human pilots, but they fly slow and, thus,<br />
are vulnerable to hostile antiaircraft fire. They also must be flown<br />
by highly<br />
skilled pilots<br />
on the ground. Last, they are<br />
expensive; Predators cost about<br />
$2 million each.<br />
Here, Me<br />
X-Cell 60<br />
RC hellcopter<br />
Is In<br />
flight with<br />
the technologically<br />
advanced<br />
control<br />
system<br />
on board.<br />
With Navy funding, researchers at the Massachusetts Institute<br />
of Technology (MIT) are developing the technology to produce<br />
more maneuverable, more intelligent and less expensive UAVs.<br />
Researchers equipped an X-Cell 60 RC helicopter with a<br />
7-pound instrumentation box containing inertial sensors, a<br />
global positioning (GPS) receiver, an altimeter and a computer.<br />
Flown manually by a trained UAV pilot, the robot helicopter<br />
performed a 360-degree aileron roll at high speed. The maneuver<br />
was recorded, and the information was used to create a<br />
computer simulation from which the researchers developed the<br />
autonomous control software for the helicopter's onboard computer.<br />
The maneuver was then repeated robotically to achieve<br />
the first-ever autonomous acrobatic maneuver with a helicopter.<br />
Researchers are currently working on a split-S—a basic<br />
combat maneuver used by pilots to reverse direction quickly.<br />
The control system works by memorizing the maneuvers<br />
performed by an experienced human pilot and breaking down<br />
the complex pilot inputs into basic mathematical algorithms.<br />
In "building-block" fashion, the computer can then create new,<br />
complex maneuvers just by recombining the various sets of<br />
algorithms. This development makes it possible to program and<br />
fly aggressive maneuvers that may have been previously<br />
unheard of, giving UAVs a decided advantage in a hostile environment.<br />
On a typical mission, a human pilot on the ground<br />
would manually control the UAV through basic maneuvers<br />
such as takeoff and landing, though autonomous takeoff and<br />
landing have already been demonstrated. With a flip of a<br />
switch on the control box, the helicopter would then fly<br />
autonomously.<br />
This new technology presents many possibilities. Small,<br />
agile, robotic helicopters could perform military reconnaissance<br />
154 MODEL AIRPLANE NEWS<br />
Graduate student Loannls Martlnos and<br />
Professor Eric Feron of the Department of<br />
Aeronautics and Astronautics at MIT hold<br />
the robotic helicopter they helped develop.<br />
This Is a block diagram of the<br />
system used to simulate actual<br />
flight maneuvers and develop<br />
computer algorithms.<br />
or carry weapons. They would be particularly attractive for use<br />
in mountainous, urban and other challenging areas that are<br />
currently too dangerous for larger, manned aircraft. They could<br />
fly at low altitude and in tight spaces to locate terrorists in<br />
caves and record live images that could be transmitted to the<br />
ground or to manned aircraft in flight. Civilian versions could<br />
survey disaster sites that are too dangerous for manned operations.<br />
According to the researchers, the technology could, in<br />
the future, yield a 6-inch version able to fly robotically through<br />
an air-conditioning duct, land inside a room and covertly listen<br />
in on a conversation.<br />
The robot helicopter is equipped with vibration-isolation<br />
gear to protect the electronic equipment; this gear could also<br />
keep a camera still, which would give filmmakers a more economical<br />
way to shoot blur-free aerial footage.<br />
The researchers estimate that a military robotic helicopter<br />
with a range of at least several hundred miles would cost<br />
around $500,000. A non-militarized version for filming aerial<br />
imagery would cost significantly less. Though the military is<br />
currently testing unmanned helicopter drones, these would<br />
probably not be in service until after 2006. +