The Battle of Raszyn - Free NAPOLEONIC Scenarios
The Battle of Raszyn - Free NAPOLEONIC Scenarios
The Battle of Raszyn - Free NAPOLEONIC Scenarios

Create successful ePaper yourself
Turn your PDF publications into a flip-book with our unique Google optimized e-Paper software.
<strong>The</strong> <strong>Battle</strong> <strong>of</strong> <strong>Raszyn</strong><br />
Age <strong>of</strong> Eagles Scenario<br />
by GRW, 2008<br />
SETTING<br />
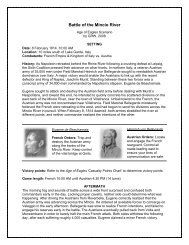
Date: 19 April 1809, 2:00 PM<br />
Location: 8 miles southwest <strong>of</strong> Warsaw, Grand Duchy <strong>of</strong> Warsaw<br />
Combatants: Grand Duchy <strong>of</strong> Warsaw & Kingdom <strong>of</strong> Saxony vs. Austrian Empire<br />
History: When Austria declared war in France in 1809, Austrian strategy called for a three-front<br />
<strong>of</strong>fensive, with their main army moving into Saxony and two smaller wings advancing into<br />
northern Italy and the newly-created Grand Duchy <strong>of</strong> Warsaw. Eliminating any prospect <strong>of</strong> an<br />
independent Poland was a cornerstone <strong>of</strong> Austrian political and military policy. Prince Jozef, as<br />
he was fondly called by his fellow Poles, raised 37,000 men to defend the Duchy <strong>of</strong> Warsaw,<br />
only to have Napoleon order over 20,000 <strong>of</strong> them to other battle theaters as far away as Spain.<br />
This left Poniatowski with a small force <strong>of</strong> just 15,000 Poles and Saxons to check a major<br />
Austrian advance.<br />
In April <strong>of</strong> 1809, Archduke Ferdinand Karl d’Este moved his VII Korps, some 30,000 men,<br />
against Warsaw. Though urged by his French allies to abandon the city, Poniatowski rallied his<br />
small force along a defensible stream near <strong>Raszyn</strong> in order to check the Austrian advance.<br />
Jozef Poniatowski Archduke Ferdinand<br />
Polish orders: Delay Austrian orders: Sweep<br />
the Austrian advance on aside these Poles as<br />
Warsaw and hold the quickly as possible, while<br />
bridges. Do not suffer inflicting maximum<br />
debilitating casualties. casualties to their small<br />
army. Cross the Utrata<br />
stream in force.<br />
Victory points: Refer to the Age <strong>of</strong> Eagles 'Casualty Points Chart' to determine victory points.<br />
<strong>The</strong> Poles receive two points for each remaining "fresh" infantry/cavalry brigade.<br />
Game length: Austrian 2:00 PM until Polish 7:00 PM (10 turns)<br />
AFTERMATH<br />
Mohr’s advance guard received orders to commence a frontal attack at 2pm, before the rest <strong>of</strong><br />
the Austrian forces were prepared for battle. As battle raged in the center, the Austrians tried to<br />
turn the Polish left at Jawarow, by were checked by the marshy terrain and heavy artillery fire.<br />
Finally, a concerted drive in the center broke the Polish line around 6pm. <strong>The</strong> Saxons defended<br />
the town <strong>of</strong> <strong>Raszyn</strong> against gallant Austrian attacks, resulting in several hours <strong>of</strong> combat and<br />
intense artillery action. When the bloody day finally ended, the Saxons received orders to return<br />
to Saxony and Poniatowski retreated with his Poles, leaving Warsaw undefended. Each side<br />
suffered roughly 2,000 casualties, but the battle cemented Poniatowski’s status as an inspiring,<br />
able commander. Heavily outnumbered, he won a moral victory by standing in Austria’s path.
SCENARIO RULES<br />
1. <strong>The</strong> Poles deploy first.<br />
2. PONIATOWSKI is Charismatic.<br />
3. PONIATOWSKI is a +1 for initiative rolls, and ARCHDUKE FERDINAND is a -2. <strong>The</strong><br />
Austrians begin the game with initiative on the first turn.<br />
TERRAIN & WEATHER<br />
<strong>The</strong> gaming table should be six feet long by four feet wide, laid out according to the<br />
accompanying map. Urban areas <strong>of</strong>fer +2 advantages to defending units in melee and a -2<br />
benefit when under fire. <strong>The</strong> stream may not be forded by cavalry or artillery. To represent the<br />
muddy marsh surrounding the Utrata stream, any unit moving within 3” <strong>of</strong> the Utrata loses half<br />
<strong>of</strong> their movement. Units in the marsh defending in melee receive a +1 modifier in combat.<br />
Movement along roads <strong>of</strong>fers full movement benefits. <strong>The</strong> weather is cool and clear.<br />
DEPLOYMENT<br />
Units set up according to the accompanying map in whichever formation the commander sees<br />
fit. Batteries may begin limbered or unlimbered, and commanders must be deployed within 12<br />
inches <strong>of</strong> their commands. When deploying, Poniatowski’s infantry does not include<br />
BEIGANSKI’s brigade, which arrives at point A on the Polish 3:00pm turn. His brigade was<br />
defending another ford a mile from <strong>Raszyn</strong>.<br />
Austrian reinforcements begin to arrive at their 2:30 turn, with MONDET at point C. On the<br />
Austrian 3:00 turn, SCHAUROTH, minus SPETH’s brigade, arrives at point B. SPETH appears<br />
at point D on the Austrian 3:30 turn.<br />
SCALE<br />
Each infantry stand represents 360 soldiers, each cavalry stand 180 troopers, and artillery<br />
stands a battery <strong>of</strong> 6-12 guns. Ground scale is one inch to 150 yards and one complete turn<br />
represents thirty minutes <strong>of</strong> historical time. Ideally, this is a two-player scenario.<br />
Notes on Sources<br />
<strong>The</strong> <strong>Battle</strong> <strong>of</strong> <strong>Raszyn</strong> has been a favorite <strong>of</strong> many Napoleonic war gamers due to the small<br />
forces involved and interesting tactical dispositions <strong>of</strong> the two opponents. A wealth <strong>of</strong> research<br />
exists about the battle, which makes the OOBs, brigade strengths, and deployment map quite<br />
accurate. Some liberties have been taken, however, with regard to the scale <strong>of</strong> the map, since<br />
the historical battle occurred over quite a wide tract <strong>of</strong> the Utrata stream. A more realistic game<br />
scenario would cover over twelve feet in table length, but this makes for awkward game-play,<br />
given the small size <strong>of</strong> the two forces. <strong>The</strong> Polish commander faces a nearly impossible task,<br />
but should judge his success in relation to his historical counter-part. Poniatowski denied the<br />
Austrians a break-through for over four hours, and when he did retreat from the field, he<br />
managed to keep his small army intact. See Scott Bowden & Charles Tarbox, Armies on the<br />
Danube—1809 (1989) and John Gill, With Eagles to Glory (1993).
Polish-Saxon Order <strong>of</strong> <strong>Battle</strong><br />
PONIATOWSKI<br />
Army <strong>of</strong> the Grand Duchy <strong>of</strong> Warsaw<br />
PONIATOWSKI corps ldr<br />
Sokolnicki R 8/6/3 Sk line Roznicki div ldr<br />
Bieganski R 6/4/2 Sk line Tyszkiewicz E 6/4/2 LC lancers<br />
Kamiencki R 8/6/3 Sk line Laczynski E 8/5/3 LC lancers<br />
Potocki R 5/3/2 Sk line Przebendowski E 6/4/2 LC chasseurs<br />
Light Horse Artillery #3<br />
von Dehrrn E 4/2/- Sk grenadiers (Saxon)<br />
Light Foot Artillery Reserve #1 & 2<br />
Austrian Order <strong>of</strong> <strong>Battle</strong><br />
FERDINAND KARL D’ESTE<br />
Austrian VII Korps<br />
ARCHDUKE FERDINAND corps ldr<br />
Mondet div ldr Schauroth div ldr<br />
Civalart R 14/11/7 line Gehringer R 9/7/4 LC hussars<br />
Pflacher C 13/10/6 line Speth R 8/6/4 HC cuirassiers<br />
Trauttenberg R 12/9/5 line Light Horse Artillery #6<br />
Light Foot Artillery #1 & 2<br />
Branowatzky R 5/3/2 LC chevaulegers<br />
Mohr div ldr<br />
Wallachia R 5/3/2 Sk light Light Foot Artillery Reserve #5 & 6<br />
Vukassovich R 7/5/3 line Heavy Foot Artillery Reserve #7<br />
Kaiser R 4/3/2 LC hussars<br />
Heavy Foot Artillery #3<br />
Light Horse Artillery #4
MAP & DEPLOYMENT<br />
OPTIONAL ADVANCED GAMEPLAY<br />
Players seeking a more challenging and historical approach to <strong>Raszyn</strong> may opt for a larger map<br />
with different deployment rules. <strong>The</strong> entire Polish-Saxon force deploys as noted on the new<br />
map, but the Austrian reinforcement schedule operates differently. Before the enemy deploys<br />
his troops, the Austrian player must take a piece <strong>of</strong> paper and secretly write down where he<br />
wants each brigade to arrive—at point A, B, or C. Units destined for point A arrive at 2:30pm,<br />
units for point B arrive at 3:30, and point C at 3:00. At least two entry points must be used.