MicroBlaze Development Kit Tutorial - Xilinx
MicroBlaze Development Kit Tutorial - Xilinx MicroBlaze Development Kit Tutorial - Xilinx
MicroBlaze Development Kit Tutorial Figure 1-3 Creating a New Project in XSI 3. In the MHS File to import field, use the Browse button to find the MHS file created earlier. 4. Name the project in the Project File field 5. Select the target architecture from the pull-down menu in the Architecture field. Note If an MSS file already exists in the project directory, you are prompted to overwrite the MSS file. To save this file, rename it or move it to another directory because XSI will delete it. If you chose to use the existing MSS file, XSI assumes all of the MSS options set in that file. 6. Once the project is created, you can modify or create the source code. To add source code to the project from within XSI, select the following: Project → Add Files All headers and source files are listed in the project console on the left. Also, the hardware system is listed with the corresponding addressspace,aswellasprogramoptions. 8 Xilinx Development System
MDK Tutorial 7. For the Hello World example, a simple C design is used that prints to STDOUT, as shown in the following figure: #include main() { int i ; print("Hello World\n"); putnum(i); } Figure 1-4 Hello World Example C Design 8. Create a new C source file by selecting: File → New 9. Copy the example Hello World C design or a similar one of your own. (It should output a character string using the “print” command or an integer using the “putnum” command.) 10. Create a /code directory in your Hello World design directory. XSIexpectsthefiletoresideinthe/codedirectorysosavethefile in that directory. 11. Add the C source you just created to the project by selecting: Project → Add Files See the following figure. MicroBlaze Development Kit Tutorial 9
- Page 1 and 2: MicroBlaze Development Kit Tutorial
- Page 3 and 4: Conventions Typographical This manu
- Page 5 and 6: MDK Tutorial This tutorial introduc
- Page 7 and 8: MicroBlaze Development Tool Flow Ov
- Page 9 and 10: Using the MHS File MDK Tutorial The
- Page 11: MDK Tutorial Note For more informat
- Page 15 and 16: MDK Tutorial • For peripherals th
- Page 17 and 18: Figure 1-7 Setting Project Options
- Page 19 and 20: MDK Tutorial To run the Library Gen
- Page 21 and 22: MDK Tutorial Building the Hello Wor
- Page 23 and 24: MDK Tutorial Figure 1-9 Entering Cl
- Page 25 and 26: MDK Tutorial 3. Browse to the devic
- Page 27 and 28: Hardware Target Debugging MDK Tutor
- Page 29 and 30: MDK Tutorial Executable mode. Run b
- Page 31 and 32: MDK Tutorial To speed up simulation
<strong>MicroBlaze</strong> <strong>Development</strong> <strong>Kit</strong> <strong>Tutorial</strong><br />
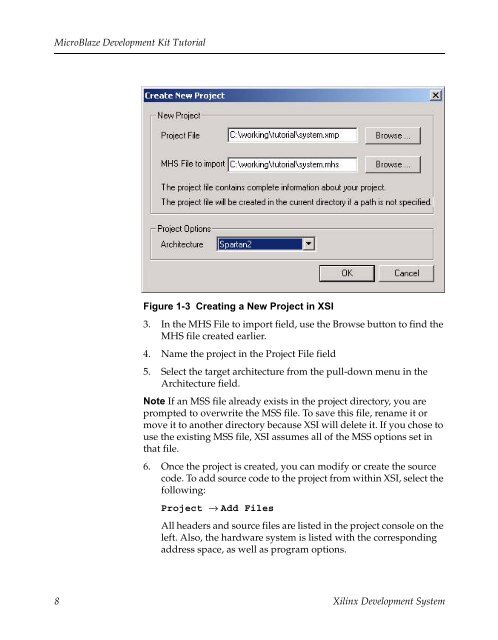
Figure 1-3 Creating a New Project in XSI<br />
3. In the MHS File to import field, use the Browse button to find the<br />
MHS file created earlier.<br />
4. Name the project in the Project File field<br />
5. Select the target architecture from the pull-down menu in the<br />
Architecture field.<br />
Note If an MSS file already exists in the project directory, you are<br />
prompted to overwrite the MSS file. To save this file, rename it or<br />
move it to another directory because XSI will delete it. If you chose to<br />
use the existing MSS file, XSI assumes all of the MSS options set in<br />
that file.<br />
6. Once the project is created, you can modify or create the source<br />
code. To add source code to the project from within XSI, select the<br />
following:<br />
Project → Add Files<br />
All headers and source files are listed in the project console on the<br />
left. Also, the hardware system is listed with the corresponding<br />
addressspace,aswellasprogramoptions.<br />
8 <strong>Xilinx</strong> <strong>Development</strong> System


