Processing kodak motion picture films, module 3 analytical procedures
Processing kodak motion picture films, module 3 analytical procedures Processing kodak motion picture films, module 3 analytical procedures
PREPARATION AND STORAGE OF ELECTRODES Preparation of Indicator-Electrodes 1. Silver Bar or Silver Billet Electrodes a. Clean the silver electrode to brightness using Silver Polish, obtainable from Fisher Scientific Co. (catalog number 9-311-309), on a damp tissue. Rinse the electrode well with reagent water, Type 1. For a definition of reagent water, Type 1, see ASTM standard B 1193. b. Do an initial titration. This allows the electrode the opportunity to become equilibrated in the system in which it will be used. Discard the results from this initial titration. c. Rinse the silver electrode well with reagent water, Type I and wipe it with a tissue between subsequent titrations of similar samples (e.g. a silver electrode equilibrated in a bromide system may be used only for subsequent bromide titrations or until it no longer performs before recleaning to brightness). The silver electrode should be stored dry in air when not being used. 2. Electroplated Silver-Silver Iodide Electrode Follow instructions provided in Method 900, Procedure for Electroplating a Silver-Silver Iodide Electrode, or any subsequent revision. The silver iodide electrode should be stored dry in air when not being used. 3. Platinum Disc Electrode Whenever a deposit or coating collects on the disc, clean the disc using an aluminum oxide polishing strip, made by Moyco and obtainable from Orion, part number 301044-001. Thoroughly rinse the electrode with reagent water, Type 1. The platinum electrode should be stored dry in air when not being used. 4. Glass Electrodes See Method ULM-191-2, pH Measurement of Photographic Processing Solutions, (or any subsequent method for determining pH) for instructions on care and storage of glass indicator electrodes. 5. Ion specific electrodes (Copper, Silver Sulfide, Potassium Iodide, Calcium) Refer to the analytical procedure or manufacturers directions for proper electrode cleaning and storage. Reference Electrodes 1. Calomel Electrodes for Use with a Glass Indicator Electrode See Method ULM-191-2, pH Measurement of Photographic Processing Solutions, (or any subsequent method for determining pH) for instructions on care and storage of calomel electrodes. 2. Calomel Electrodes for Use with Silver Bar or Billet and Platinum Disc Electrodes a. Remove the potassium chloride fill solution and substitute saturated potassium nitrate solution when titrating with silver nitrate. Note: Refer to the specific method when determining whether to use 3.5 N potassium chloride or saturated potassium nitrate solution in the calomel electrode, for titrations with titrants other than silver nitrate. b. There should be a few potassium nitrate crystals present in the calomel electrode after filling with saturated potassium nitrate solution. The electrode should be checked to ensure that the solution is flowing through the inverted sleeve or fiber tip, before using. 3. Ag/AgCl Double Junction Electrodes It is recommended that the manufacturers supplied solution be used for the inner chamber (AgCl) and that it be emptied and refilled weekly. The outer chamber should be filled with an appropriate solution for the analysis being carried out, usually a 10 percent potassium nitrate solution, which should be emptied and refilled daily. Ag/AgCl electrodes can be stored in reagent water, Type 1 for up to one week. For longer periods of time drain the electrode, rinse with water and store dry. PERFORMANCE CHECK OF ELECTRODE / INSTRUMENT SYSTEM Analysis of samples containing known amounts of the analyte being measured can be an effective way of determining whether the system will produce reliable results on samples containing unknown amounts of the same analyte. BLANK DETERMINATION Some test methods call for the determination of a blank (e.g. HI/HY and cerate titrations). The titration blank should be determined under the same conditions as the sample, including temperature, equipment parameters, and titration speed. The blank should include everything except the analyte being measured. When measuring titration blanks for a potentiometric analysis, the blank value to be subtracted from the sample titration should correspond to the volume of titrant required to titrate the titration matrix (containing everything except the analyte of interest being measured). This volume 2 Processing KODAK Motion Picture Films, Module 3, Analytical Procedures H24.03
difference corresponds to the potential of the equivalence point of the sample or standard being measured. DETERMINATION OF THE END POINT FOR POTENTIOMETRIC TITRATIONS Microprocessor Controlled Titrators Microprocessor controlled titrators are programmed to pick end points automatically using algorithms. Concentric Arcs Method One way of manually locating the endpoint of a titration curve is by using a concentric arcs template. This template is semi-rigid and transparent. A series of arcs is scribed upon it 1 ⁄4 -inch apart. Locate the approximate position of the endpoint, which is in the part of the curve representing the greatest rate of potential change. Place the template on the curve on one side of the approximate endpoint, superimposing one of the arcs on the curve. Try different arcs to find the largest one that best fits the curve. Then make a dot on the graph through the small hole in the template. Place the template on the curve on the other side of the approximate endpoint and repeat the procedure. The arc that best fits this part of the curve is not necessarily the same arc that best fit the first part of the curve. Draw a straight line between the two dots. The point where the straight line intersects the curve is the end point. See Figure 2, Use of Concentric Arcs Template to Determine the End Point of a Potentiometric Titration. Figure 2 Use of Concentric Arcs Template to Determine the End Point of a Potentiometric Titration Meter Reading (pH Units) Inflection Point F002_0988AC Titrant (mL) Transparent Template Colorimetric Endpoint Determination Some titrations use color change end point detection instead of potentiometric (e.g. Antical #5 in RA-4 and free EDTA). Colorimetric endpoints should be determined using a Brinkmann 701 colorimeter, or equivalent, and optical probe at the optimal wavelength. Endpoints are best determined using a strip chart recorder and using the intersecting tangents method for determining the endpoint. See Figure 3, Colorimetric – Intersecting Tangents. Figure 3 Colorimetric – Intersecting Tangents END POINT Directions: 1. Use a straight edge to draw a line tangential to the bottom half of the curve. 2. Draw another line tangential to the top half of the curve. 3. The endpoint is measured where the lines intersect. Processing KODAK Motion Picture Films, Module 3, Analytical Procedures H24.03 3 (absorbance) Colorimetric F002_0986AC
- Page 237 and 238: Spectrophotometric Determination of
- Page 239 and 240: APPARATUS Spectrophotometer with a
- Page 241 and 242: APPENDIX B Effect of Temperature in
- Page 243 and 244: Potentiometric Determination of Sil
- Page 245 and 246: Potentiometric Determination of Sod
- Page 247 and 248: Iodometric Determination of Total S
- Page 249 and 250: Titrimetric Determination of Total
- Page 251 and 252: Table 2 Contribution of Constituent
- Page 253 and 254: Determination of Sulfite in KODAK R
- Page 255 and 256: CALCULATIONS Na2SO3 , g/L = (mL B -
- Page 257 and 258: Colorimetric Determination of Thioc
- Page 259 and 260: APPENDIX A Calibration of Spectroph
- Page 261 and 262: Analysis Order for Photographic Pro
- Page 263 and 264: Procedure for Electroplating a Silv
- Page 265 and 266: The Selection, Care, and Use of Vol
- Page 267 and 268: In observing the lowest point on th
- Page 269 and 270: 4. Graduated Cylinders and Tip-up P
- Page 271 and 272: 6. Microburets Microburets equipped
- Page 273 and 274: Table 1 Required Tolerance for Volu
- Page 275 and 276: pH Measurement of Photographic Proc
- Page 277 and 278: Temperature Equilibration All sampl
- Page 279 and 280: Low-range pH Measurements (pH 1-7)
- Page 281 and 282: Preparation of Control Buffers 1. p
- Page 283 and 284: Standardization of pH Meter - Low p
- Page 285 and 286: Reference Electrode Care/Rejuvenati
- Page 287: Potentiometric Titrations for Photo
- Page 291 and 292: Determination of Residual Thiosulfa
- Page 293 and 294: APPENDIX A Calibration Procedure Th
- Page 295 and 296: Determination of Silver in Thiosulf
- Page 297 and 298: Note: The appropriate amounts of 0.
- Page 299 and 300: The Determination of Specific Gravi
- Page 301 and 302: Instructions for Performance Checks
- Page 303 and 304: Processing KODAK Motion Picture Fil
difference corresponds to the potential of the equivalence<br />
point of the sample or standard being measured.<br />
DETERMINATION OF THE END POINT FOR<br />
POTENTIOMETRIC TITRATIONS<br />
Microprocessor Controlled Titrators<br />
Microprocessor controlled titrators are programmed to pick<br />
end points automatically using algorithms.<br />
Concentric Arcs Method<br />
One way of manually locating the endpoint of a titration<br />
curve is by using a concentric arcs template. This template is<br />
semi-rigid and transparent. A series of arcs is scribed upon it<br />
1 ⁄4 -inch apart.<br />
Locate the approximate position of the endpoint, which is<br />
in the part of the curve representing the greatest rate of<br />
potential change. Place the template on the curve on one side<br />
of the approximate endpoint, superimposing one of the arcs<br />
on the curve. Try different arcs to find the largest one that<br />
best fits the curve. Then make a dot on the graph through the<br />
small hole in the template.<br />
Place the template on the curve on the other side of the<br />
approximate endpoint and repeat the procedure. The arc that<br />
best fits this part of the curve is not necessarily the same arc<br />
that best fit the first part of the curve. Draw a straight line<br />
between the two dots. The point where the straight line<br />
intersects the curve is the end point. See Figure 2, Use of<br />
Concentric Arcs Template to Determine the End Point of a<br />
Potentiometric Titration.<br />
Figure 2 Use of Concentric Arcs Template to<br />
Determine the End Point of a Potentiometric Titration<br />
Meter Reading (pH Units)<br />
Inflection<br />
Point<br />
F002_0988AC<br />
Titrant (mL)<br />
Transparent<br />
Template<br />
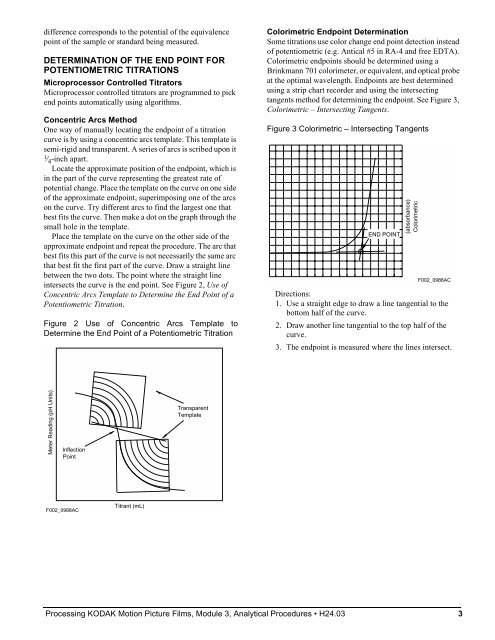
Colorimetric Endpoint Determination<br />
Some titrations use color change end point detection instead<br />
of potentiometric (e.g. Antical #5 in RA-4 and free EDTA).<br />
Colorimetric endpoints should be determined using a<br />
Brinkmann 701 colorimeter, or equivalent, and optical probe<br />
at the optimal wavelength. Endpoints are best determined<br />
using a strip chart recorder and using the intersecting<br />
tangents method for determining the endpoint. See Figure 3,<br />
Colorimetric – Intersecting Tangents.<br />
Figure 3 Colorimetric – Intersecting Tangents<br />
END POINT<br />
Directions:<br />
1. Use a straight edge to draw a line tangential to the<br />
bottom half of the curve.<br />
2. Draw another line tangential to the top half of the<br />
curve.<br />
3. The endpoint is measured where the lines intersect.<br />
<strong>Processing</strong> KODAK Motion Picture Films, Module 3, Analytical Procedures H24.03 3<br />
(absorbance)<br />
Colorimetric<br />
F002_0986AC


