Processing kodak motion picture films, module 3 analytical procedures
Processing kodak motion picture films, module 3 analytical procedures
Processing kodak motion picture films, module 3 analytical procedures

You also want an ePaper? Increase the reach of your titles
YUMPU automatically turns print PDFs into web optimized ePapers that Google loves.
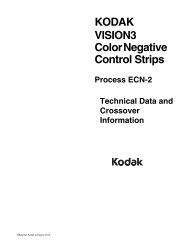
In observing the lowest point on the meniscus it<br />
is very important that the line of vision be in the<br />
same horizontal plane as the bottom of the<br />
meniscus. This is easily ascertained if the<br />
graduations on the glassware extend at least<br />
halfway around the tube. The eye is correctly<br />
positioned when both front and back portions of<br />
the graduation coincide (Figures 1 and 2). The<br />
meniscus may be seen more clearly if a small<br />
white card with a rectangular black patch is held<br />
behind the meniscus. Raise or lower the card<br />
until the bottom of the meniscus is clearly<br />
outlined (Figure 3).<br />
Figure 3 Outlining the Meniscus<br />
F002_0904AC<br />
2. Pipets<br />
Pipet specifications are established on the basis of a<br />
pipet's ability to deliver (TD) a known volume of<br />
distilled water (20°C [68°F]) within the specified<br />
tolerances. Pipets meeting the volume shown in<br />
Table 1 have been used successfully. The pipets<br />
conforming to these requirements are defined as<br />
“Class A.” However, experience has shown that some<br />
pipets marked “Class A” do not meet delivery time<br />
specifications. Other pipets having shorter delivery<br />
time than “Class A” meet “Class A” volume<br />
tolerances. Pipets meeting “Class A” volume<br />
tolerances but not meeting delivery time requirements<br />
may be used for <strong>analytical</strong> purposes as long as the<br />
analyst understands and practices the following<br />
instructions on the use of pipets:<br />
a. Cleanliness<br />
Use a clean pipet. The pipet does not have to be<br />
dry, but must be perfectly clean and free from<br />
grease so that drops of the solution will not<br />
adhere to the walls, causing the pipet to deliver<br />
less than the rated volume. Any contaminant<br />
may affect the results.<br />
b. Perfect Tip<br />
Use a pipet with a perfect tip. A pipet with a<br />
broken or chipped tip must be discarded since it<br />
will deliver a volume other than the rated<br />
volume when the tip is touched against the wall<br />
of the receiving vessel.<br />
c. Rinsing (or Seasoning)<br />
With one hand holding the pipet and the other<br />
hand holding a rubber bulb, squeeze the bulb,<br />
place it over the upper end of the pipet and<br />
release slowly. Draw a small portion of the<br />
solution into the pipet, i.e., about 20 percent of<br />
the volume of the pipet, then remove the bulb<br />
and cap the pipet with the forefinger. See<br />
Figure 4. Place the pipet in a horizontal position,<br />
and rotate it, permitting the solution to wet the<br />
walls to a point about two inches above the<br />
calibration mark. Do not permit the top of the<br />
mouthpiece to become contaminated with<br />
solution, which in turn may contaminate the<br />
bulb. Discharge the solution through the tip, and<br />
repeat the rinsing with another portion of the<br />
solution.<br />
Note: If the solution being pipeted is a<br />
standardized reagent, the reagent is drawn into<br />
the pipet from a clean beaker which was rinsed<br />
once with reagent. To prevent contamination of<br />
the reagent, the pipet should not be placed into<br />
the stock bottle.<br />
Figure 4 How to Use a Rubber Bulb for Pipeting<br />
B. Release bulb and liquid will<br />
be drawn up slowly. If suction<br />
ceases before pipet is full,<br />
remove bulb, recompress,<br />
and reapply.<br />
F002_0905GC<br />
A. Dip pipet tip into liquid.<br />
Compress rubber bulb in left<br />
hand, and slip bulb over end<br />
of pipet.<br />
C. When liquid rises above<br />
calibration mark, remove bulb<br />
and place index finger of right<br />
hand to end of pipet.<br />
<strong>Processing</strong> KODAK Motion Picture Films, Module 3, Analytical Procedures H24.03 3