Instant Reverse - Visual Paradigm
Instant Reverse - Visual Paradigm Instant Reverse - Visual Paradigm
SDE-VS User’s Guide (Part 1) Chapter 7 – Export and Import The Diagram Exporter dialog box will be displayed. You can specify which diagrams to export, and preview the exported image. After you have configured the export settings click Export to export the diagrams. Figure 7.1 - Diagram exporter Field Description Output destination Export type Diagrams Preview Anti-aliasing Auto overwrite existing files The Output destination is the directory where all the exported images are saved to. You can enter the path in the text field directly, or you can click on the ... button to browse for the directory. To select the image format of the exported image click on the pull-down box beside the Export type field and select the format you want to use. The Diagrams pane shows the diagrams in the current project. Check the checkbox beside the diagram you want to export. The number of selected diagrams is displayed at the bottom of the Diagram pane. The Preview pane also allows you to preview the exported image of the selected diagram. The Preview pane shows the preview of the exported image of the selected diagram in the Diagrams pane. You can check/uncheck the Show preview checkbox to enable/disable the preview. You can select the size of the preview image by selecting from the pull-down box beside the Preview mode field. Selecting Stretch will show the image in scaled size that fits to the preview area, while selecting Real size will show the image in its actual size. Anti-aliasing is a method which handles the staircase pixels of slanted lines and curves to make them look smoother. You can apply anti-aliasing to the exported images. To apply anti-aliasing to graphics, check the Graphics Anti-aliasing checkbox in the Anti-aliasing pane. Likewise, you can check the Text checkbox in the Anti-aliasing pane to apply anti-aliasing to text. You can check the 'Auto overwrite existing files' checkbox to allow overwriting of files in the export process. Max. Size Maximum size of exported images. If the diagram size is larger than the max. size, it will be resized. Table 7.1 7-3
SDE-VS User’s Guide (Part 1) Chapter 7 – Export and Import Slice diagrams User can slice a large diagram into pieces(number of files), as well as restrict the size of the exported diagram. 7-4 Figure 7.2 - Slice diagrams There are three slicing strategies. They are Fixed Slice, Free Slicing and Fixed Ratio. Slicing strategies Fixed Slice Free Slicing Fixed Ratio Description Fixed Slice is a simple strategy which slices exported diagram into pieces of the same size. The user specifies the number of columns and rows to slice and then the exported diagram will be sliced into specific pieces. Users can customize how to slice the exported diagram by specifying the position of vertical slices and horizontal slices. It is particularly useful to prevent a shape from being sliced into pieces. Fixed Ratio gains the benefits of Fixed Slice and Free Slicing. The width and height of pieces are the same but for the last row and column. Users can also customize the width and height of sliced pieces. Like Free Slicing, Fixed Ratio is size oriented. User modifies the size of pieces and Diagram Slicer calculates the number of row and column to slice. Exporting Diagrams to PDF format Table 7.2 You can export SDE-VS diagram to native PDF format. Since the exported PDF is of a small size, it can save a lot of space. Also, because the diagram in PDF is a vector, it is scalable. There are two different options when you export: • PDF(diagram per page) All the diagrams selected will be exported in the same PDF file. Each diagram will occupy one page. • PDF(diagram per file) Each diagram selected will be exported in one new PDF file.
- Page 137 and 138: SDE-VS User’s Guide (Part 1) Chap
- Page 139 and 140: SDE-VS User’s Guide (Part 1) Chap
- Page 141 and 142: SDE-VS User’s Guide (Part 1) Chap
- Page 143 and 144: SDE-VS User’s Guide (Part 1) Chap
- Page 145 and 146: SDE-VS User’s Guide (Part 1) Chap
- Page 147 and 148: SDE-VS User’s Guide (Part 1) Chap
- Page 149 and 150: SDE-VS User’s Guide (Part 1) Chap
- Page 151 and 152: SDE-VS User’s Guide (Part 1) Chap
- Page 153 and 154: SDE-VS User’s Guide (Part 1) Chap
- Page 155 and 156: SDE-VS User’s Guide (Part 1) Chap
- Page 157 and 158: SDE-VS User’s Guide (Part 1) Chap
- Page 159 and 160: SDE-VS User’s Guide (Part 1) Chap
- Page 161 and 162: SDE-VS User’s Guide (Part 1) Chap
- Page 163 and 164: SDE-VS User’s Guide (Part 1) Chap
- Page 165 and 166: SDE-VS User’s Guide (Part 1) Chap
- Page 167 and 168: SDE-VS User’s Guide (Part 1) Chap
- Page 169 and 170: SDE-VS User’s Guide (Part 1) Chap
- Page 171 and 172: SDE-VS User’s Guide (Part 1) Chap
- Page 173 and 174: SDE-VS User’s Guide (Part 1) Chap
- Page 175 and 176: SDE-VS User’s Guide (Part 1) Chap
- Page 177 and 178: SDE-VS User’s Guide (Part 1) Chap
- Page 179 and 180: SDE-VS User’s Guide (Part 1) Chap
- Page 181 and 182: SDE-VS User’s Guide (Part 1) Chap
- Page 183 and 184: SDE-VS User’s Guide (Part 1) Chap
- Page 185 and 186: SDE-VS User’s Guide (Part 1) Chap
- Page 187: SDE-VS User’s Guide (Part 1) Chap
- Page 191 and 192: SDE-VS User’s Guide (Part 1) Chap
- Page 193 and 194: SDE-VS User’s Guide (Part 1) Chap
- Page 195 and 196: SDE-VS User’s Guide (Part 1) Chap
- Page 197 and 198: SDE-VS User’s Guide (Part 1) Chap
- Page 199 and 200: SDE-VS User’s Guide (Part 1) Chap
- Page 201 and 202: SDE-VS User’s Guide (Part 1) 4. T
- Page 203 and 204: SDE-VS User’s Guide (Part 1) Chap
- Page 205 and 206: SDE-VS User’s Guide (Part 1) Chap
- Page 207 and 208: SDE-VS User’s Guide (Part 1) Chap
- Page 209 and 210: SDE-VS User’s Guide (Part 1) Chap
- Page 211 and 212: SDE-VS User’s Guide (Part 1) Chap
- Page 213 and 214: SDE-VS User’s Guide (Part 1) Chap
- Page 215 and 216: SDE-VS User’s Guide (Part 1) Chap
- Page 217 and 218: SDE-VS User’s Guide (Part 1) Chap
- Page 219 and 220: SDE-VS User’s Guide (Part 1) Chap
- Page 221 and 222: SDE-VS User’s Guide (Part 1) 2. S
- Page 223 and 224: SDE-VS User’s Guide (Part 1) Chap
- Page 225 and 226: SDE-VS User’s Guide (Part 1) Chap
- Page 227 and 228: SDE-VS User’s Guide (Part 1) Chap
- Page 229 and 230: SDE-VS User’s Guide (Part 1) Chap
- Page 231 and 232: SDE-VS User’s Guide (Part 1) Chap
- Page 233 and 234: SDE-VS User’s Guide (Part 1) Chap
- Page 235 and 236: SDE-VS User’s Guide (Part 1) Chap
- Page 237 and 238: SDE-VS User’s Guide (Part 1) Chap
SDE-VS User’s Guide (Part 1) Chapter 7 – Export and Import<br />
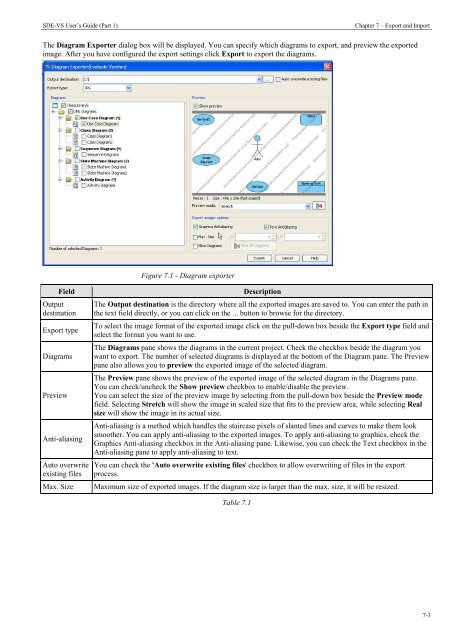
The Diagram Exporter dialog box will be displayed. You can specify which diagrams to export, and preview the exported<br />
image. After you have configured the export settings click Export to export the diagrams.<br />
Figure 7.1 - Diagram exporter<br />
Field Description<br />
Output<br />
destination<br />
Export type<br />
Diagrams<br />
Preview<br />
Anti-aliasing<br />
Auto overwrite<br />
existing files<br />
The Output destination is the directory where all the exported images are saved to. You can enter the path in<br />
the text field directly, or you can click on the ... button to browse for the directory.<br />
To select the image format of the exported image click on the pull-down box beside the Export type field and<br />
select the format you want to use.<br />
The Diagrams pane shows the diagrams in the current project. Check the checkbox beside the diagram you<br />
want to export. The number of selected diagrams is displayed at the bottom of the Diagram pane. The Preview<br />
pane also allows you to preview the exported image of the selected diagram.<br />
The Preview pane shows the preview of the exported image of the selected diagram in the Diagrams pane.<br />
You can check/uncheck the Show preview checkbox to enable/disable the preview.<br />
You can select the size of the preview image by selecting from the pull-down box beside the Preview mode<br />
field. Selecting Stretch will show the image in scaled size that fits to the preview area, while selecting Real<br />
size will show the image in its actual size.<br />
Anti-aliasing is a method which handles the staircase pixels of slanted lines and curves to make them look<br />
smoother. You can apply anti-aliasing to the exported images. To apply anti-aliasing to graphics, check the<br />
Graphics Anti-aliasing checkbox in the Anti-aliasing pane. Likewise, you can check the Text checkbox in the<br />
Anti-aliasing pane to apply anti-aliasing to text.<br />
You can check the 'Auto overwrite existing files' checkbox to allow overwriting of files in the export<br />
process.<br />
Max. Size Maximum size of exported images. If the diagram size is larger than the max. size, it will be resized.<br />
Table 7.1<br />
7-3


