QUICK REFERENCE CARD FOR SETUP - Traficon
QUICK REFERENCE CARD FOR SETUP - Traficon
QUICK REFERENCE CARD FOR SETUP - Traficon

You also want an ePaper? Increase the reach of your titles
YUMPU automatically turns print PDFs into web optimized ePapers that Google loves.
<strong>QUICK</strong> <strong>REFERENCE</strong> <strong>CARD</strong> <strong>FOR</strong> <strong>SETUP</strong><br />
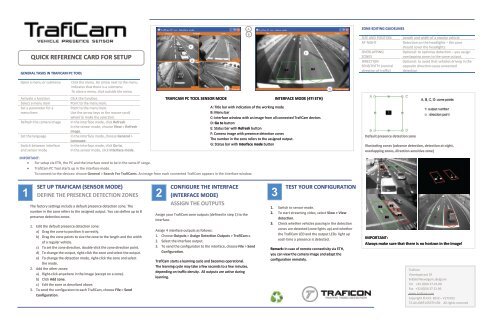
GENERAL TASKS IN TRAFICAM PC TOOL<br />
Open a menu or submenu Click the menu. An arrow next to the menu<br />
indicates that there is a submenu.<br />
To close a menu, click outside the menu.<br />
Activate a function Click the function.<br />
Select a menu item Point to the menu item.<br />
Set a parameter for a<br />
Point to the menu item.<br />
menu item<br />
Use the arrow keys or the mouse scroll<br />
wheel to make the selection.<br />
Refresh the camera image In the interface mode, click Refresh.<br />
In the sensor mode, choose View > Refresh<br />
Image.<br />
Set the language In the interface mode, choose General ><br />
Language.<br />
Switch between interface In the interface mode, click Go to.<br />
and sensor mode<br />
In the sensor mode, click Interface mode.<br />
1<br />
SET UP TRAFICAM (SENSOR MODE)<br />
DEFINE THE PRESENCE DETECTION ZONES<br />
The factory settings include a default presence detection zone. The<br />
number in the zone refers to the assigned output. You can define up to 8<br />
presence detection zones.<br />
1. Edit the default presence detection zone:<br />
a) Drag the zone to position it correctly.<br />
b) Drag the zone points to size the zone to the length and the width<br />
of a regular vehicle.<br />
c) To set the zone direction, double-click the zone direction point.<br />
d) To change the output, right-click the zone and select the output.<br />
e) To change the detection mode, right-click the zone and select<br />
the mode.<br />
2. Add the other zones:<br />
a) Right-click anywhere in the image (except on a zone).<br />
b) Click Add zone.<br />
c) Edit the zone as described above.<br />
3. To send the configuraton to each TrafiCam, choose File > Send<br />
Configuration.<br />
2<br />
TRAFICAM PC TOOL SENSOR MODE INTERFACE MODE (4TI ETH)<br />
IMPORTANT:<br />
• For setup via ETH, the PC and the interface need to be in the same IP range.<br />
• TrafiCam PC Tool starts up in the interface mode.<br />
To connect to the devices: choose General > Search For TrafiCams. An image from each connected TrafiCam appears in the interface window.<br />
C<br />
D<br />
CONFIGURE THE INTERFACE<br />
(INTERFACE MODE)<br />
ASSIGN THE OUTPUTS<br />
Assign your TrafiCam zone outputs (defined in step 1) to the<br />
interface.<br />
Assign 4 interface outputs as follows:<br />
1. Choose Outputs > Assign Detection Outputs > TrafiCam x.<br />
2. Select the interface output.<br />
3. To send the configuraton to the interface, choose File > Send<br />
Configuration.<br />
TrafiCam starts a learning cycle and becomes operational.<br />
The learning cycle may take a few seconds to a few minutes,<br />
depending on traffic density. All outputs are active during<br />
learning.<br />
E<br />
A<br />
B<br />
A: Title bar with indication of the working mode<br />
B: Menu bar<br />
C: Interface window with an image from all connected TrafiCam devices<br />
D: Go to button<br />
E: Status bar with Refresh button<br />
F: Camera image with presence detection zones<br />
The number in the zone refers to the assigned output.<br />
G: Status bar with Interface mode button<br />
3<br />
F<br />
TEST YOUR CONFIGURATION<br />
1. Switch to sensor mode.<br />
2. To start streaming video, select View > View<br />
detection.<br />
3. Check whether vehicles passing in the detection<br />
zones are detected (zone lights up) and whether<br />
the TrafiCam LED and the output LEDs light up<br />
each time a presence is detected.<br />
Remark: In case of remote connectivity via ETH,<br />
you can view the camera image and adapt the<br />
configuration remotely.<br />
G<br />
ZONE-EDITING GUIDELINES<br />
SIZE AND POSITION Length and width of a regular vehicle<br />
AT NIGHT Detection on the headlights – the zone<br />
should cover the headlights.<br />
OVERLAPPING<br />
Optional: to optimise detection – you assign<br />
ZONES<br />
overlapping zones to the same output.<br />
DIRECTION<br />
SENSITIVITY (normal<br />
direction of traffic)<br />
Default presence detection zone<br />
Optional: to avoid that vehicles driving in the<br />
opposite direction cause unwanted<br />
detection<br />
Illustrating zones (advance detection, detection at night,<br />
overlapping zones, direction-sensitive zone)<br />
IMPORTANT:<br />
Always make sure that there is no horizon in the image!<br />
<strong>Traficon</strong><br />
Vlamingstraat 19<br />
B-8560 Wevelgem, Belgium<br />
Tel +32 (0)56 37.22.00<br />
Fax +32 (0)56 37.21.96<br />
www.traficon.com<br />
Copyright © Oct. 2012 – V171012<br />
T2-ALUQRF14TIETH-EN All rights reserved
<strong>QUICK</strong> <strong>REFERENCE</strong> <strong>CARD</strong><br />
INSTALLATION with 4TI ETH or 1TI<br />
SYSTEM COMPONENTS<br />
TRAFICAM POWER CONNECTOR<br />
MOUNTING 4TI ETH 1TI<br />
ACCESSORIES<br />
System TrafiCam devices Available outputs<br />
TrafiCam / 4TI ETH Max 4 16<br />
TrafiCam / 1TI 1 4<br />
Max interconnection length between TrafiCam and interface: 300 m.<br />
TOOLS REQUIRED <strong>FOR</strong> INSTALLATION<br />
Retaining straps or bolts M8 Mount TrafiCam on the pole<br />
PSU 24 VAC, 12-24 VDC +/- 10% Power TrafiCam and interface<br />
System power consumption: max 10 W<br />
USB/A-USB/B cable Connect the interface to the PC via USB<br />
CAT5 cable Set up 4TI ETH via Ethernet and RJ45<br />
port.<br />
Cable (Power, signal or STP)<br />
Connect power<br />
Black jacket, outdoor use, UV-resistant,<br />
Ø = [4 - 9] mm, -40 °C to 75 °C, 5 wires<br />
(min. section = 0,2 mm2 (AWG24))<br />
1<br />
MOUNT TRAFICAM ON A STABLE POLE<br />
1. Fix the tube to the brackets.<br />
2. Fix TrafiCam to the pole using retaining straps or bolts M8.<br />
Put the retaining straps through the holes in the bracket.<br />
3. Position TrafiCam provisionally and fix the mounting brackets.<br />
TrafiCam is a downward looking device with the detection LED at the bottom side of<br />
the sensor.<br />
You can mount TrafiCam on a horizontal or vertical pole or on a mast arm.<br />
2<br />
CONNECT TRAFICAM TO THE INTERFACE<br />
The power connector<br />
1. Unscrew the cable holder.<br />
2. Loosen the cable gland. Take the seal out.<br />
3. Put the connection cable (5 wires) through the cable gland and the seal.<br />
4. Put the cable through the cable holder.<br />
5. Dismantle the cable (+/- 2 cm or 0,79 in) and strip the cable wires (+/- 5 mm or<br />
0,20 in).<br />
Shorten the PE wire to 1,2 cm (0,47 in) and strip it (+/- 5 mm or 0,20 in).<br />
6. Connect the cable to the power cable connector.<br />
At the TrafiCam side<br />
7. Tighten the cable holder (hand tight).<br />
8. Tighten the cable gland (hand tight).<br />
9. Remove the protective cap and mount the connector with cable on the device.<br />
Mind the slot for correct mounting.<br />
At the interface side<br />
10. Connect the cable wires to the interface connector.<br />
3<br />
MOUNT THE INTERFACE AND CONNECT TO THE<br />
CONTROLLER AND TO THE PC<br />
1. In the cabinet, click the interface on a DIN rail.<br />
2. Connect to the controller<br />
3. Connect to the PC, either locally via USB or ETH or remotely via ETH.<br />
4. Finally connect the power supply (PSU: PSU 24 VAC, 12-24 VDC +/- 10%).<br />
4<br />
OPTIMISE THE POSITION OF TRAFICAM<br />
1. Verify the position of TrafiCam by viewing its camera image using TrafiCam PC Tool.<br />
ALWAYS MAKE SURE THAT THERE IS NO HORIZON IN THE IMAGE!<br />
2. Tighten all screws after optimising the position of TrafiCam.<br />
4TI ETH<br />
4TI ETH<br />
1TI<br />
1TI