JN : 16831 PN : 10682-01-02 COUNTR Y: UK TITLE ... - Dyson
JN : 16831 PN : 10682-01-02 COUNTR Y: UK TITLE ... - Dyson
JN : 16831 PN : 10682-01-02 COUNTR Y: UK TITLE ... - Dyson

You also want an ePaper? Increase the reach of your titles
YUMPU automatically turns print PDFs into web optimized ePapers that Google loves.
<strong>16831</strong>_CAN_DCO7_OPS_WARR.qxd 30/5/07 09:44 Page 1<br />
Please read this guide carefully before use.<br />
Owner’s Manual<br />
<strong>JN</strong>: <strong>16831</strong> <strong>PN</strong>: <strong>10682</strong>-<strong>01</strong>-<strong>02</strong> <strong>COUNTR</strong>Y: <strong>UK</strong><br />
<strong>TITLE</strong>: CANADA OWNERS MANUAL (ENGLISH)<br />
PROOF No: latest DATE: 30.05.07 ARTWORKER: JT<br />
SIZE: (W) 297 mm x (H) 210 mm<br />
No of PAGES: 20 PROOF SIZE: 100 %<br />
COLOUR SPEC: CMYK CUTTER: O32 C
<strong>16831</strong>_CAN_DCO7_OPS_WARR.qxd 30/5/07 09:44 Page 2<br />
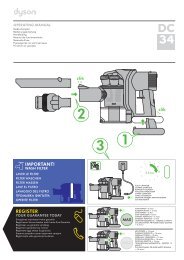
Important safety instructions<br />
IMPORTANT<br />
SAFETY<br />
INSTRUCTIONS<br />
When using an electrical<br />
appliance, basic precautions<br />
should always be followed,<br />
including the following:<br />
READ ALL INSTRUCTIONS<br />
BEFORE USING THIS<br />
VACUUM CLEANER<br />
SAVE THESE<br />
INSTRUCTIONS<br />
THIS APPLIANCE IS INTENDED<br />
FOR HOUSEHOLD USE ONLY<br />
2<br />
WARNING<br />
TO REDUCE THE RISK OF FIRE, ELECTRIC SHOCK OR INJURY:<br />
1 Do not leave plugged in. Unplug from electrical outlet when not<br />
in use and before servicing.<br />
2 Do not use outdoors or on wet surfaces or to vacuum water or other<br />
liquids – electric shock and personal injury could occur.<br />
3 Do not allow to be used as a toy. Close attention is necessary when<br />
used near children.<br />
4 You are responsible for making sure that your vacuum cleaner<br />
is not used by children or by anyone unable to operate it properly.<br />
5 Use only as described in this manual. Use only with <strong>Dyson</strong><br />
recommended or approved attachments and accessories.<br />
6 Check to ensure your electricity supply corresponds to that shown<br />
on the rating plate, which can be found on the base of the machine<br />
between the wheels. The machine must only be used as rated.<br />
7 Do not use with a damaged cord or plug. If the machine is not<br />
functioning properly, has been dropped, damaged, left outdoors,<br />
or immersed in liquid, do not use the machine and contact the<br />
<strong>Dyson</strong> Helpline on 1-877-397-6622.<br />
8 Do not pull or carry by the cord, do not use the cord as a handle,<br />
do not close a door on the cord or pull the cord around sharp edges<br />
or corners. Do not run the machine over the cord. Keep the cord<br />
away from heated surfaces and open flames.<br />
9 Do not unplug by pulling on the cord. To unplug, grasp the plug,<br />
not the cord.<br />
10 Do not handle the plug or machine with wet hands.<br />
11 Do not use the machine without the Clear binTM and the filters in place.<br />
12 Do not put any objects into openings in the machine. Do not use<br />
with any opening blocked; keep free of dust, lint, hair and anything<br />
that may reduce air flow.<br />
13 Keep hair, loose clothing, fingers, and all parts of body away from<br />
openings in the machine and moving parts such as the brushbar.<br />
14 Do not use the machine to pick up sharp hard objects, small toys,<br />
pins, paper clips etc. They may damage the machine.<br />
15 The use of an extension cord is not recommended.<br />
16 Store the machine indoors. Put the machine away after use to<br />
prevent tripping accidents, with the cord coiled safely.<br />
17 Turn off all controls before unplugging.<br />
18 Take extra care when cleaning on stairs; always work with the<br />
machine at the bottom of the stairs. Do not put the machine on<br />
chairs, tables etc, keep it on the floor.<br />
19 Do not pick up anything that is burning or smoking, such as<br />
cigarettes, matches, or hot ashes.<br />
20 Do not use to pick up flammable or combustible liquids, such as<br />
gasoline, or use in areas where they may be present.<br />
21 When vacuuming, certain carpets may generate small static charges<br />
in the Clear binTM or wand. These are not associated with the<br />
electricity supply. To minimize any effect from this, do not put your<br />
hand or insert any object into the Clear bin TM unless you have first<br />
emptied it and rinsed it out with cold water.<br />
22 Use only identical <strong>Dyson</strong> replacement parts.<br />
23 Do not carry out any maintenance or repair work other than that<br />
shown in this manual or advised by the Helpline.<br />
<strong>Dyson</strong> Helpline contact us on 1-877-397-6622
<strong>16831</strong>_CAN_DCO7_OPS_WARR.qxd 30/5/07 09:44 Page 3<br />
Owner’s Manual<br />
Please read this guide carefully<br />
before use.<br />
Important safety instructions Page 2<br />
Assembling your DCO7 4<br />
Using your DCO7 6<br />
Using the tools 8<br />
Using the accessories 10<br />
Emptying the Clear bin TM<br />
Cleaning the filter 14<br />
Where to look for blockages 16<br />
Warranty and customer care 18<br />
12<br />
www.dyson.com<br />
3<br />
Contents
<strong>16831</strong>_CAN_DCO7_OPS_WARR.qxd 30/5/07 09:44 Page 4<br />
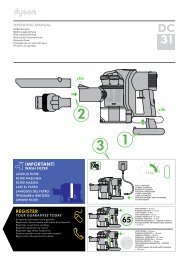
Assembling your DCO7<br />
Box contents<br />
4<br />
Wand<br />
Hose<br />
Stair tool<br />
Brush tool<br />
Crevice tool<br />
Mini turbine head<br />
Supplied with certain<br />
models only, or available<br />
as an accessory.<br />
Floor tool<br />
Supplied with certain<br />
models only, or available<br />
as an accessory.<br />
Cleaning Kit<br />
Supplied with certain<br />
models only, or available<br />
as an accessory.<br />
1 2<br />
Assembling your DCO7<br />
This machine was inspected and<br />
packaged carefully before being<br />
shipped from the factory.<br />
If you need assistance during<br />
assembly or operation, please<br />
call the <strong>Dyson</strong> Helpline on<br />
1-877-397-6622.<br />
1 Slide the hose into the<br />
guides at the back of the<br />
machine, pushing the tab<br />
securely into place.<br />
<strong>Dyson</strong> Helpline contact us on 1-877-397-6622<br />
2 Pressing the wand release<br />
button, slide the wand down<br />
inside the hose.
<strong>16831</strong>_CAN_DCO7_OPS_WARR.qxd 30/5/07 09:44 Page 5<br />
3 4 5<br />
3 Slide the wand into the top<br />
of the machine until it clicks<br />
securely into place. You may<br />
need to press firmly and<br />
should hear a ‘click’ sound.<br />
4 Push the brush and stair tools<br />
securely into the storage holes<br />
on either side of machine.<br />
Fit the crevice tool into the tool<br />
clip on the back of the wand.<br />
5 Store the cord safely by<br />
winding counter-clockwise<br />
around the cord winders and<br />
securing with the cord clip.<br />
www.dyson.com<br />
5<br />
Assembling your DCO7
<strong>16831</strong>_CAN_DCO7_OPS_WARR.qxd 30/5/07 09:44 Page 6<br />
Using your DCO7<br />
Using your DCO7<br />
WARNING<br />
• To reduce the risk of electric<br />
shock and personal injury,<br />
this appliance has a polarized<br />
plug (one blade wider than<br />
the other). This plug will fit in<br />
a polarized outlet only one<br />
way. If the plug does not fit<br />
fully in the outlet, reverse the<br />
plug. If it still does not fit,<br />
contact a qualified electrician<br />
to install the proper outlet.<br />
Do not force the plug into<br />
the outlet. Do not alter the<br />
plug in any way.<br />
CAUTION<br />
• Keep hair, loose clothing,<br />
fingers, and all parts of the<br />
body away from openings<br />
and moving parts.<br />
• This machine is fitted with<br />
a belt protection system.<br />
If any item becomes caught<br />
in the brushbar (e.g. rug<br />
fringe), you will hear a loud<br />
‘ratchet’ warning noise.<br />
To rectify, turn the machine<br />
off, disconnect from the<br />
electrical outlet and clear<br />
any obstruction (see page15),<br />
checking that the brush control<br />
is set to the correct position<br />
for the floor surface before<br />
re-starting the machine.<br />
Please note: This machine is<br />
intended for domestic use only.<br />
Fine dust such as plaster dust or<br />
flour should only be vacuumed<br />
in small amounts.<br />
6<br />
1<br />
2 3<br />
Switching on/off<br />
1 Make sure you have read<br />
and understood all safety<br />
instructions before using the<br />
machine for the first time.<br />
The wand cap should be<br />
closed when not using the<br />
tools.<br />
2 Plug into electrical outlet and<br />
press the on/off switch.<br />
<strong>Dyson</strong> Helpline contact us on 1-877-397-6622<br />
3 To start vacuuming, push the<br />
front of the cleaner head down<br />
with your foot and tilt the<br />
handle backwards.
<strong>16831</strong>_CAN_DCO7_OPS_WARR.qxd 30/5/07 09:44 Page 7<br />
Transporting your <strong>Dyson</strong><br />
To move the machine from room<br />
to room, ensure it is upright,<br />
with the cord stored on the cord<br />
winders and the wand securely<br />
in place. Tilt back on the rear<br />
wheels and push forward.<br />
Carrying your DCO7<br />
Your DCO7 should be lifted by<br />
using the carry handle.<br />
CAUTION<br />
• Do not shake the machine<br />
when carrying.<br />
• For your safety do not press<br />
the cyclone release catch<br />
when carrying your machine.<br />
1<br />
2<br />
Brush control system<br />
1 Bare floors: Use this setting to<br />
stop brushbar from turning<br />
when vacuuming delicate rugs<br />
and bare floors.<br />
2 Carpets: Use this setting so<br />
brushbar turns when<br />
vacuuming carpets.<br />
Note: the brushbar will not turn<br />
until you begin to vacuum.<br />
www.dyson.com<br />
7<br />
Using your DCO7
<strong>16831</strong>_CAN_DCO7_OPS_WARR.qxd 30/5/07 09:44 Page 8<br />
Using the tools<br />
Using the tools<br />
Choosing the right tool<br />
The tools allow you to clean<br />
surfaces above the floor and<br />
to reach hard to clean areas.<br />
Ensure the machine is in an<br />
upright position before<br />
using tools.<br />
A Brush tool – with soft bristles<br />
to dislodge dust and cobwebs.<br />
The brush head twists to make<br />
cleaning easier.<br />
B Stair tool – with velour strips<br />
to pick up hairs and an<br />
agitating edge to lift the<br />
carpet. The tool channels<br />
airflow downward for better<br />
pick-up without sticking to<br />
upholstery. The head twists<br />
to make cleaning easier.<br />
C Crevice tool – reaches deep<br />
into nooks and crannies.<br />
Ideal for cleaning along<br />
baseboards and in tight<br />
corners. The tool channels<br />
airflow downward for better<br />
pick-up without sticking.<br />
D Mini turbine head – the air<br />
powered brushbar ensures<br />
effective removal of pet hair<br />
and fibers in confined spaces<br />
such as stairs, upholstery<br />
and in the car. Supplied with<br />
certain models only, or<br />
available as an accessory for<br />
other models – contact the<br />
<strong>Dyson</strong> Helpline or<br />
www.dyson.com to order.<br />
E Floor tool – to reach under<br />
furniture. Adjustable for hard<br />
floors or carpets. Maintains<br />
perfect contact with the floor<br />
to optimize pick-up. Supplied<br />
with certain models only, or<br />
available as an accessory<br />
for other models – contact<br />
the <strong>Dyson</strong> Helpline or<br />
www.dyson.com to order.<br />
8<br />
A<br />
B<br />
C<br />
D<br />
E<br />
How to clean your tools<br />
The brush tool, stair tool and<br />
crevice tool may be washed in<br />
warm water with a detergent.<br />
Rinse and air dry thoroughly<br />
before using. You may wipe the<br />
outside of the floor tool or turbo<br />
tool/mini turbine head with a<br />
damp cloth, but do not<br />
submerge in water. Do not<br />
attempt to clean any tools when<br />
they are attached to the machine.<br />
<strong>Dyson</strong> Helpline contact us on 1-877-397-6622<br />
2<br />
1<br />
Attaching tools<br />
1 Press the quick-draw hose<br />
release to detach the hose/<br />
wand from the machine.<br />
2 Slide the wand to the end of<br />
the hose.<br />
All <strong>Dyson</strong> tools can be used<br />
in the following ways:<br />
Wand mode<br />
Slide back the wand cap and fit<br />
one of the tools directly on to the<br />
wand handle.
<strong>16831</strong>_CAN_DCO7_OPS_WARR.qxd 30/5/07 09:44 Page 9<br />
Hose mode<br />
Press the wand release button and<br />
remove the wand. Fit one of the<br />
tools directly on to the end of<br />
the hose. Use tools for confined<br />
spaces such as car cleaning.<br />
FOR YOUR SAFETY<br />
• When the hose is fully<br />
extended, grasp firmly by<br />
the hose, not the tool.<br />
Reversed wand mode<br />
Reverse the wand and click into<br />
the end of the hose, pressing<br />
the wand release button to<br />
ensure a correct fit. Fit one of<br />
the tools on to the end of the<br />
wand. Use tools for easier<br />
handling in hard to reach areas.<br />
Stair cleaning<br />
Use the hose and stair tool or<br />
turbo tool for stair cleaning. The<br />
hose will stretch all the way to<br />
the top of an average staircase<br />
so you can leave your machine<br />
at the bottom.<br />
CAUTION<br />
• To avoid personal injury and<br />
to prevent the machine from<br />
falling when cleaning stairs,<br />
always place it at the bottom<br />
of the stairs.<br />
www.dyson.com<br />
9<br />
Using the tools
<strong>16831</strong>_CAN_DCO7_OPS_WARR.qxd 30/5/07 09:44 Page 10<br />
Using the accessories<br />
Using the<br />
accessories<br />
For your safety<br />
Please read your <strong>Dyson</strong><br />
Owner’s Manual carefully,<br />
including the safety instructions,<br />
before attaching or using any<br />
of the tools.<br />
10<br />
Low reach floor tool<br />
• Low furniture<br />
1 Carpet – Press rear pedal<br />
2 Bare floors – Press front<br />
pedal<br />
<strong>Dyson</strong> Helpline contact us on 1-877-397-6622<br />
Mini turbine head<br />
• Car cleaning<br />
1 Remove soleplate<br />
2 Remove brushbars<br />
3 Replace brushbars<br />
4 Replace soleplate
<strong>16831</strong>_CAN_DCO7_OPS_WARR.qxd 30/5/07 09:44 Page 11<br />
Zorb carpet powder<br />
• Carpet cleaning<br />
1 Sprinkle Zorb onto carpet<br />
2 Ensure machine is<br />
turned off<br />
3 Work into carpet pile<br />
4 Vacuum the carpet<br />
www.dyson.com<br />
11<br />
Using the accessories
<strong>16831</strong>_CAN_DCO7_OPS_WARR.qxd 30/5/07 09:44 Page 12<br />
Emptying the clear bin TM<br />
Emptying the<br />
Clear bin TM<br />
CAUTION<br />
• Disconnect the machine from<br />
the electrical outlet before<br />
emptying the bin. Failure to<br />
do so could result in electric<br />
shock or personal injury.<br />
To ensure your machine continues<br />
to clean effectively, the Clear bin TM<br />
must be emptied when the dust<br />
reaches the MAX mark.<br />
Press the cyclone release catch<br />
with your thumb to remove the<br />
Clear bin TM assembly from the<br />
machine.<br />
12<br />
A A<br />
B<br />
Clear bin TM emptying option 1<br />
Wipe the outside of the Clear<br />
bin TM with a damp cloth.<br />
A Place the bin inside a bag,<br />
close the bag around the bin<br />
and pull the trigger to release<br />
dust. Shake or tap firmly to<br />
remove all dust from inside<br />
the fine dust collector.<br />
B Let the dust settle, then press<br />
firmly on the centre of the bin<br />
base to close before removing<br />
from the bag. Seal the bag<br />
carefully and replace the bin.<br />
<strong>Dyson</strong> Helpline contact us on 1-877-397-6622<br />
B<br />
Clear bin TM emptying option 2<br />
A Pull the trigger to release dust<br />
directly into a garbage can or<br />
wastebasket. Shake or tap<br />
firmly to remove all dust from<br />
inside the fine dust collector.<br />
Fine dust collector<br />
B Press firmly on the center of<br />
the Clear bin TM base to close.
<strong>16831</strong>_CAN_DCO7_OPS_WARR.qxd 30/5/07 09:44 Page 13<br />
A<br />
B<br />
Shroud cleaning<br />
(when necessary)<br />
To remove any build-up of lint or<br />
large dust particles on the shroud:<br />
Ensure the Clear bin TM is empty<br />
and the Clear bin TM base is open.<br />
A Press the bin release catch to<br />
remove the Clear bin. TM<br />
B Clean the shroud with a cloth<br />
or dry brush to remove the<br />
lint and dust.<br />
CAUTION<br />
• Do not use the machine<br />
without the Clear bin TM in place.<br />
C<br />
D<br />
To reassemble the Clear bin, TM<br />
place on the floor with the<br />
Clear bin TM<br />
base closed.<br />
C Holding the carry handle,<br />
put the cyclone assembly<br />
inside the Clear bin, TM line up<br />
the front and rear catches<br />
and push down to click the<br />
catches into place.<br />
D Ensure the Clear bin TM is<br />
secure before replacing on<br />
the machine.<br />
Clear bin TM cleaning<br />
(optional)<br />
• You may rinse the Clear bin TM<br />
with water. Rinse only the<br />
Clear bin TM – do not rinse the<br />
inner cyclone, shroud or cones.<br />
CAUTION<br />
• Do not use detergents.<br />
• Do not immerse any other part<br />
of the machine in water.<br />
• Ensure the Clear bin TM is<br />
completely dry before<br />
replacing.<br />
www.dyson.com<br />
13<br />
Emptying the clear bin TM
<strong>16831</strong>_CAN_DCO7_OPS_WARR.qxd 30/5/07 09:44 Page 14<br />
Cleaning the filter<br />
Cleaning the filter<br />
CAUTION<br />
• Disconnect the machine from<br />
the electrical outlet before<br />
removing filter. Failure to<br />
do so could result in electric<br />
shock or personal injury.<br />
A Pre-motor filter<br />
Rinse at least once every six<br />
months in accordance with<br />
the instructions opposite.<br />
If machine is regularly used<br />
for vacuuming very fine dust<br />
such as plaster dust or carpet<br />
fresheners, you may need to<br />
rinse more often.<br />
B Post-motor filter<br />
This is a permanent filter –<br />
it does not require rinsing<br />
or replacement.<br />
Do not remove or attempt<br />
to rinse this filter.<br />
14<br />
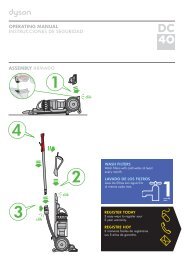
B A<br />
1<br />
2<br />
1 Press the filter release catch<br />
to remove the filter housing<br />
from the machine.<br />
2 Remove the filter from<br />
the housing.<br />
<strong>Dyson</strong> Helpline contact us on 1-877-397-6622<br />
3<br />
Only the blue foam pad and<br />
the yellow cage should be rinsed<br />
– not the filter housing.<br />
3 Submerge the filter and<br />
cage in cold water and rinse<br />
thoroughly.<br />
CAUTION<br />
• Rinse in cold water only.<br />
• Do not use detergent.<br />
• Do not put in a washing<br />
machine or dishwasher.
<strong>16831</strong>_CAN_DCO7_OPS_WARR.qxd 30/5/07 09:44 Page 15<br />
4<br />
5<br />
4 Rinse the blue foam pad and<br />
squeeze gently, repeating until<br />
the water runs clear.<br />
5 Rinse the yellow cage and tap<br />
firmly, repeating until the water<br />
runs clear.<br />
6<br />
12 hrs<br />
6 Leave in a warm place to dry<br />
for 12 hours. Make sure the<br />
filter is completely dry before<br />
replacing in the machine.<br />
CAUTION<br />
• Do not dry in an oven or<br />
microwave.<br />
• Do not dry in a clothes dryer.<br />
• Do not dry near an open flame.<br />
7<br />
7 When the blue filter pad and<br />
yellow cage are completely<br />
dry, replace in the filter housing<br />
and click back into machine,<br />
pressing points 1 and 2<br />
firmly to secure.<br />
CAUTION<br />
• Do not use the machine<br />
without the filter in place.<br />
1<br />
www.dyson.com<br />
2<br />
15<br />
Cleaning the filter
<strong>16831</strong>_CAN_DCO7_OPS_WARR.qxd 30/5/07 09:44 Page 16<br />
Where to look for blockages<br />
Where to look for<br />
blockages<br />
CAUTION<br />
• Disconnect the machine<br />
from the electrical outlet<br />
before starting to look for<br />
blockages. Failure to do so<br />
could result in electric shock<br />
or personal injury.<br />
Please note: Should any part<br />
of the machine become blocked,<br />
the motor may overheat and<br />
stop due to the thermal cut-off<br />
being triggered. Disconnect<br />
from electrical outlet and let<br />
the machine cool down for at<br />
least 30 minutes before clearing<br />
the blockage.<br />
Tools<br />
Check that the tools are clear<br />
of blockages.<br />
• Please note: Clearing<br />
blockages is not covered by<br />
your machine’s limited<br />
warranty, please call the<br />
<strong>Dyson</strong> Helpline on<br />
1-877-397-6622.<br />
16<br />
Wand<br />
Press the wand release button to<br />
remove the wand from the hose.<br />
Check inside wand for blockages.<br />
CAUTION<br />
• Beware of sharp objects<br />
when clearing blockages.<br />
<strong>Dyson</strong> Helpline contact us on 1-877-397-6622<br />
A<br />
B<br />
Hose<br />
A Press the cyclone release catch<br />
to remove the Clear bin TM<br />
assembly from the machine.<br />
B Press the hose release button<br />
from the front of machine and<br />
slide the hose out from the<br />
rear, holding the lower cord<br />
winder. Check inside the hose<br />
for blockages.
<strong>16831</strong>_CAN_DCO7_OPS_WARR.qxd 30/5/07 09:44 Page 17<br />
U-bend airway inspection<br />
• Tilt the machine forward<br />
to slide out the U-bend<br />
airway inspection.<br />
• Check inside for blockages.<br />
Airway inspection valve<br />
• Squeeze the valve release<br />
catches to remove the airway<br />
inspection valve.<br />
• Check inside for blockages.<br />
CAUTION<br />
• The ratchet noise warns that<br />
the brushbar is obstructed.<br />
Disconnect the machine from<br />
the electrical outlet before<br />
removing the obstruction.<br />
1<br />
2<br />
Brushbar<br />
Lay the machine on its front.<br />
1 Undo the colored soleplate<br />
fasteners using a coin and<br />
remove the soleplate.<br />
2 Clear the brushbar<br />
obstruction, carefully cutting<br />
away any threads with a pair<br />
of scissors.<br />
Replace the soleplate and tighten<br />
the fasteners.<br />
CAUTION<br />
• Make sure all parts have<br />
been replaced securely<br />
before using your machine.<br />
www.dyson.com<br />
17<br />
Where to look for blockages
<strong>16831</strong>_CAN_DCO7_OPS_WARR.qxd 30/5/07 09:44 Page 18<br />
Warranty and customer care<br />
<strong>Dyson</strong> customer care<br />
Limited 5 year<br />
household warranty<br />
Terms and Conditions of the<br />
<strong>Dyson</strong> 5 year limited<br />
warranty<br />
18<br />
If you have a question about your <strong>Dyson</strong> vacuum cleaner, call the<br />
<strong>Dyson</strong> Helpline at 1-877-397-6622 with your serial number and<br />
details of where/when you bought the cleaner. The serial number can<br />
be found on the base of your machine between the wheels.<br />
Most questions can be solved over the phone by one of our<br />
Helpline staff.<br />
If your cleaner needs service, call the <strong>Dyson</strong> Helpline we will discuss<br />
with you the options available for service. If your machine is under<br />
warranty, your machine will be repaired at no cost. To reach the<br />
<strong>Dyson</strong> Helpline call at 1-877-397-6622, or visit <strong>Dyson</strong> online at<br />
www.dyson.com<br />
Thank you for choosing to buy a <strong>Dyson</strong>.<br />
To help us ensure you receive prompt and efficient service, please register<br />
your purchase with us.<br />
There are two ways to do this:<br />
• You can register by completing and returning the enclosed form<br />
to us by post.<br />
• Alternatively you can register on line at www.dyson.com<br />
This will confirm your ownership of your <strong>Dyson</strong> in the event of an insurance<br />
loss, and enable us to contact you if necessary. If you have any questions<br />
about your <strong>Dyson</strong>, please call our customer helpline on 1-877-397-6622,<br />
6 days a week, or log on to our website at www.dyson.com<br />
What is covered<br />
Your <strong>Dyson</strong> vacuum cleaner is warranted<br />
against original defects in material and<br />
workmanship for a period of five years<br />
120V 60Hz 10.5A<br />
from the date of purchase, when used for<br />
private household purposes in<br />
Note your serial number for<br />
accordance with the <strong>Dyson</strong> Owner’s<br />
future reference:<br />
Manual. This warranty provides, at no<br />
cost to you, all labour and parts to place<br />
your vacuum cleaner in proper operating<br />
condition during the warranty period.<br />
This warranty is subject to the following terms:<br />
What is not covered<br />
<strong>Dyson</strong> Canada Ltd. shall not be liable for costs, damages, or injuries<br />
incurred as a result of:<br />
• Machines purchased from an unauthorized dealer.<br />
• Clearing blockages from your machine.<br />
• Use of parts not assembled in accordance with the Owner’s Manual.<br />
• Careless operation or handling, misuse and/or lack of maintenance or<br />
use not in accordance with the Owner’s Manual.<br />
• External sources such as weather.<br />
• Repairs or alterations carried out by unauthorized parties or agents.<br />
• Use of the vacuum cleaner other than for normal domestic household<br />
purposes within Canada, e.g. for commercial or rental purposes.<br />
• Use of parts and accessories other than those produced or recommended<br />
by <strong>Dyson</strong> Canada Ltd.<br />
Note your serial number for future reference:<br />
<strong>Dyson</strong> Helpline contact us on 1-877-397-6622
<strong>16831</strong>_CAN_DCO7_OPS_WARR.qxd 30/5/07 09:44 Page 19<br />
Warranty Service<br />
• Please fill out and return the Product Registration Form, or register online at www.dyson.com<br />
• Before service can take place, the terms of the warranty require that you contact the <strong>Dyson</strong> Helpline with your<br />
model name/number, serial number, date and place of purchase. Please keep your purchase receipt in a safe<br />
place to ensure you have this information. The serial number is found on the vacuum cleaner’s rating plate,<br />
which is on the base of the machine between the wheels.<br />
• All work will be carried out by <strong>Dyson</strong> Canada Ltd. or its authorized agents.<br />
• Any replaced defective parts will become the property of <strong>Dyson</strong> Canada Ltd.<br />
• The fitting of replacement parts will not extend the period of this warranty.<br />
• If your machine is not functioning properly, please call the <strong>Dyson</strong> Helpline on 1-877-397-6622. Most issues can<br />
be rectified over the telephone by our trained customer care staff. If this is not possible <strong>Dyson</strong> Canada Ltd. will<br />
arrange for your vacuum cleaner to be repaired and returned in full working order at no extra cost to yourself.<br />
Warranty Limitations and Exclusions<br />
• Any representations, warranties or conditions relating to your vacuum cleaner, express or implied, statutory or<br />
otherwise, including but not limited to warranty of merchantability or warranty of fitness for a particular purpose,<br />
are limited to the duration of this warranty. This limitation is not allowed by some provinces and so this limitation<br />
may not apply to you.<br />
• Your remedy for breach of this warranty is limited to the warranty service described above. <strong>Dyson</strong> Canada Ltd. will<br />
not be liable for any consequential damages or incidental damages you may incur in connection with your purchase<br />
and use of your vacuum cleaner. This limitation is not allowed by some provinces and so this limitation may not<br />
apply to you.<br />
• In no event shall <strong>Dyson</strong> Canada Ltd. be liable for any damages arising directly or indirectly from any tort (including<br />
negligence or gross negligence) committed by <strong>Dyson</strong> Canada Ltd. its affiliates, agents or employees, or for any<br />
breach of contract, fundamental or otherwise.<br />
• This warranty gives you specific legal rights. You may also have other rights which vary by province.<br />
Do not pull<br />
on the cord.<br />
Do not place<br />
on stairs<br />
above you.<br />
Do not put<br />
your hands<br />
near the<br />
brushbar<br />
when in use.<br />
Do not use<br />
near open<br />
flame.<br />
This product is protected by the following intellectual property rights:<br />
Patent/Patent Application numbers: CA 1,241,809; US 4,573,236; US 6,526,623; CA 2,313,177; US 6,691,849; CA 2,315,078; US 6,289,553;<br />
US 6,425,931; US 6,461,508; CA 2,351,552; US 6,572,078; CA 2,346,382; US 6,519,807; US 6,442,791; CA 2,400,404; US 10/220,039;<br />
CA 2,438,855; US 10/468,653; US10/363,918; CA 2,439,250; US10/468,676; CA 2,439, 032; US10/468,870; CA 2,438,077; US10/640,568;<br />
CA 2,442,218; US 10/474,684; CA 2,438,069; US 10/468,442; CA 2,438,079; US 10/468,304; CA 2,438,073; US 10/467,671<br />
Registered Design/Application numbers: CA 97,332; USD 475,820; CA 86192; US D427,737; CA 107215<br />
Please note: Small details may vary from those shown.<br />
Do not leave<br />
cleaner near<br />
heat sources.<br />
Do not pick<br />
up water or<br />
liquids.<br />
Do not run<br />
over the<br />
cord.<br />
www.dyson.com<br />
Do not pick<br />
up burning<br />
objects.<br />
19<br />
Warranty and customer care
<strong>16831</strong>_CAN_DCO7_OPS_WARR.qxd 30/5/07 09:44 Page 20<br />
www.dyson.com<br />
<strong>JN</strong>.<strong>16831</strong> <strong>PN</strong>.<strong>10682</strong>-<strong>01</strong>-<strong>02</strong> 30.05.07