Trio Program Guide User's Manual - Cox Communications
Trio Program Guide User's Manual - Cox Communications
Trio Program Guide User's Manual - Cox Communications

You also want an ePaper? Increase the reach of your titles
YUMPU automatically turns print PDFs into web optimized ePapers that Google loves.
<strong>Trio</strong> <strong>Program</strong> <strong>Guide</strong><br />
User’s <strong>Manual</strong><br />
Version: 2.0<br />
Updated: 2/13/2012<br />
© 1998-2013 <strong>Cox</strong> <strong>Communications</strong>, Inc.
<strong>Trio</strong> <strong>Program</strong> <strong>Guide</strong> User’s <strong>Manual</strong><br />
Copyright © 2008-2013 <strong>Cox</strong> <strong>Communications</strong>, Inc. All rights reserved.<br />
The information in this document is furnished for informational use only, is subject to change<br />
without notice, and should not be construed as a commitment by <strong>Cox</strong> <strong>Communications</strong>, Inc. <strong>Cox</strong><br />
<strong>Communications</strong>, Inc. assumes no responsibility or liability for any errors, omissions, or<br />
inaccuracies that may appear in this document, makes no warranty of any kind with respect to<br />
this publication, and expressly disclaims any all warranties of merchantability, fitness for particular<br />
purposes, and non-infringement of third party rights. This document and the software described in<br />
it are furnished under license and may only be used or copied in accordance with the terms of<br />
such license.<br />
<strong>Cox</strong> ® and <strong>Trio</strong> are trademarks of <strong>Cox</strong> <strong>Communications</strong>, Inc. that may be registered in certain<br />
jurisdictions. All other products or name brands are trademarks of their respective holders.
Table of Contents<br />
Chapter 1: Your <strong>Trio</strong> <strong>Program</strong> <strong>Guide</strong> ................................ 7<br />
A Visual Orientation to Cards ................................................................................................. 8<br />
Navigational Clues ................................................................................................................ 10<br />
About the Remote Control .................................................................................................... 15<br />
About This Book .................................................................................................................... 16<br />
Chapter 2: Getting Started ............................................... 17<br />
Watch Live Television ........................................................................................................... 18<br />
Change Channels ................................................................................................................. 18<br />
View Basic <strong>Program</strong> Information .......................................................................................... 18<br />
View Detailed <strong>Program</strong> Information ...................................................................................... 18<br />
Open the Main Menu ............................................................................................................ 18<br />
Open the Actions Menu ........................................................................................................ 19<br />
Switch Users ......................................................................................................................... 19<br />
Chapter 3: <strong>Guide</strong> ............................................................... 20<br />
Using the <strong>Guide</strong> ....................................................................................................................... 21<br />
Launch the <strong>Guide</strong> .................................................................................................................. 21<br />
Change <strong>Guide</strong> Views ............................................................................................................ 21<br />
Notes About Grid View .......................................................................................................... 22<br />
Find <strong>Program</strong>s Playing on a Specific Date and Time ........................................................... 22<br />
Use the <strong>Guide</strong> to Find Available Channels ........................................................................... 22<br />
Use the <strong>Guide</strong> to Find Available <strong>Program</strong>s ........................................................................... 23<br />
Get More Information ............................................................................................................ 23<br />
Watch a <strong>Program</strong> or Channel ............................................................................................... 23<br />
Scroll Through the <strong>Guide</strong> ...................................................................................................... 23<br />
Exit the <strong>Guide</strong> ....................................................................................................................... 24<br />
Browse Related <strong>Program</strong>s ..................................................................................................... 25<br />
Watch Another Episode ........................................................................................................ 25<br />
Browse Related Series ......................................................................................................... 26<br />
Browse Cast & Crew ............................................................................................................. 26<br />
Browse Related Genre .......................................................................................................... 27<br />
About Info Banners and Channel Banners ........................................................................... 28<br />
See Channel Banners While Watching Live Television ........................................................ 28<br />
See Info Banners While Watching Live Television ............................................................... 28<br />
Switch <strong>Program</strong>s from Info Banners ..................................................................................... 28<br />
Change Channels from Info Banners ................................................................................... 28<br />
See Info Banners While Watching On DEMAND.................................................................. 29<br />
Banner Icons ......................................................................................................................... 29<br />
Close Info Banners ............................................................................................................... 30<br />
Service Messages ................................................................................................................. 30
Chapter 4: On DEMAND .................................................... 31<br />
Using On DEMAND .................................................................................................................. 32<br />
Launch On DEMAND ............................................................................................................ 32<br />
Restrict On DEMAND ........................................................................................................... 32<br />
Browse On DEMAND ............................................................................................................ 33<br />
View Purchase and Other <strong>Program</strong> Information ................................................................... 33<br />
Watch Free On DEMAND <strong>Program</strong>s .................................................................................... 33<br />
Purchase On DEMAND <strong>Program</strong>s ........................................................................................ 34<br />
Notes on Subscription Channels .......................................................................................... 34<br />
Watch Preview ...................................................................................................................... 35<br />
Get More Information ............................................................................................................ 35<br />
Search On DEMAND ............................................................................................................ 35<br />
Browse Movie Posters .......................................................................................................... 35<br />
Use Play, Pause, Stop, Fast Forward and Rewind .............................................................. 36<br />
Use Instant Replay ................................................................................................................ 36<br />
Exit On DEMAND .................................................................................................................. 36<br />
Return to Recently Viewed <strong>Program</strong>s ................................................................................... 37<br />
Chapter 5: DVR .................................................................. 38<br />
DVRs Offered By <strong>Cox</strong>.............................................................................................................. 39<br />
About Your Dual Tuner DVR................................................................................................. 39<br />
About Your Six Tuner DVR ................................................................................................... 39<br />
A Note About Six Tuner DVR................................................................................................ 39<br />
Using the DVR ......................................................................................................................... 39<br />
Scan a Live <strong>Program</strong> ............................................................................................................ 39<br />
Use the RECORD button ..................................................................................................... 40<br />
Record <strong>Program</strong>s from the <strong>Trio</strong> <strong>Program</strong> <strong>Guide</strong> ................................................................... 41<br />
Record a <strong>Program</strong> ................................................................................................................. 41<br />
Record a Series .................................................................................................................... 43<br />
Set a <strong>Manual</strong> Recording ....................................................................................................... 44<br />
Notes About <strong>Manual</strong> Recordings .......................................................................................... 45<br />
Notes on Start & End Times ................................................................................................. 46<br />
Confirm a Recording ............................................................................................................. 46<br />
Recording Icons .................................................................................................................... 46<br />
About Recording Alerts ......................................................................................................... 46<br />
DVR List Views ........................................................................................................................ 49<br />
Watch a Recorded <strong>Program</strong> ................................................................................................. 50<br />
A Note About Folders ............................................................................................................ 51<br />
Recorded <strong>Program</strong> Icons ...................................................................................................... 51<br />
A Note About Auto-Clipping of Series Episodes ................................................................... 51<br />
Scan a Recorded <strong>Program</strong> ................................................................................................... 52<br />
Use Instant Replay ................................................................................................................ 53<br />
Delete Recorded <strong>Program</strong>s .................................................................................................. 53<br />
Get Details About a Recording ............................................................................................. 54<br />
Browse Related ..................................................................................................................... 54<br />
Manage Scheduled Recordings ............................................................................................. 55<br />
Change Recording Options for a Single <strong>Program</strong> ................................................................ 55<br />
Change Options for a <strong>Manual</strong> Recording ............................................................................. 56<br />
Cancel a Scheduled Recording ............................................................................................ 57<br />
2
Manage Series Recordings .................................................................................................... 58<br />
Change Series Recording Options ....................................................................................... 58<br />
A Note About Record To Option for Series Recordings ....................................................... 59<br />
Change Series Priority .......................................................................................................... 59<br />
A Note About Change Series Priority for Multiple Whole Home DVRs ................................ 60<br />
Cancel a Series Recording ................................................................................................... 60<br />
Delete All <strong>Program</strong>s from a Series Recording ...................................................................... 60<br />
See Your Missed Recordings ............................................................................................... 60<br />
Remote DVR Scheduling ........................................................................................................ 61<br />
Chapter 6: Whole Home DVR ........................................... 62<br />
Multiple DVR Support ............................................................................................................. 63<br />
DVR Network Status ............................................................................................................. 63<br />
Naming of DVRs ................................................................................................................... 64<br />
Setting Default DVR .............................................................................................................. 64<br />
Notes About Multiple Whole Home DVRs ............................................................................ 64<br />
Watch a Recorded <strong>Program</strong> ................................................................................................... 65<br />
Pausing Live TV on Non-DVR Receivers .............................................................................. 66<br />
Notes About Pausing Live TV on non-DVR Receivers ......................................................... 66<br />
Watching DVR Recordings on DLNA Premium Video Certified® Products ...................... 67<br />
Chapter 7: Recommendations ......................................... 68<br />
Getting to Recommendations ............................................................................................... 69<br />
Personalized Recommendations Notice ............................................................................... 70<br />
Browsing through Recommendations ................................................................................... 70<br />
On Now ................................................................................................................................. 70<br />
Later Today ........................................................................................................................... 70<br />
Next Days.............................................................................................................................. 71<br />
Recommended For You ........................................................................................................ 71<br />
Liking/Disliking <strong>Program</strong>s...................................................................................................... 71<br />
Suspend Recommendation................................................................................................... 72<br />
Chapter 8: Interactive Services........................................ 73<br />
Launch Interactive Services .................................................................................................. 74<br />
Use Phone Tools .................................................................................................................. 74<br />
See Calls You Missed ........................................................................................................... 74<br />
See Who Is Calling ............................................................................................................... 75<br />
Watch Zone Channels .......................................................................................................... 75<br />
Chapter 9: Customer Support .......................................... 77<br />
3
Access Customer Support .................................................................................................... 78<br />
Get Answers to Technical Questions .................................................................................... 78<br />
Receiver Test ........................................................................................................................ 79<br />
View the Receiver Test Report ............................................................................................. 80<br />
View the Use Agreement ...................................................................................................... 80<br />
View the <strong>Cox</strong> Privacy Policy ................................................................................................. 81<br />
Chapter 10: Search ........................................................... 82<br />
Start a Search ....................................................................................................................... 83<br />
Search for <strong>Program</strong>s ............................................................................................................. 83<br />
Notes on Using the On-Screen Keyboard. ........................................................................... 85<br />
Search for <strong>Program</strong>s up to 14 Days Ahead .......................................................................... 85<br />
Save Searches ...................................................................................................................... 86<br />
Chapter 11: Settings ......................................................... 87<br />
Users ........................................................................................................................................ 88<br />
Add New User ....................................................................................................................... 88<br />
Set Current User ................................................................................................................... 89<br />
Edit User ............................................................................................................................... 89<br />
Delete User ........................................................................................................................... 90<br />
Parental Controls and <strong>Program</strong> Ratings ............................................................................... 91<br />
Set a Parental Control PIN.................................................................................................... 91<br />
Edit Parental Control PIN ...................................................................................................... 91<br />
Set a Purchase PIN .............................................................................................................. 92<br />
Restrict Access to <strong>Program</strong>ming .......................................................................................... 92<br />
Temporarily Unlock ............................................................................................................... 92<br />
Lock Channels ...................................................................................................................... 93<br />
Lock Ratings ......................................................................................................................... 94<br />
Lock Content Advisories ....................................................................................................... 94<br />
Lock Times ............................................................................................................................ 94<br />
Block Titles ............................................................................................................................ 95<br />
Lock Recordings ................................................................................................................... 95<br />
Lock Purchases .................................................................................................................... 96<br />
Lock Services ........................................................................................................................ 97<br />
Lock Users ............................................................................................................................ 97<br />
Channels .................................................................................................................................. 98<br />
Set Favorite Channels .......................................................................................................... 98<br />
Set Skipped Channels .......................................................................................................... 99<br />
Set Power On Channel ......................................................................................................... 99<br />
<strong>Guide</strong> Options ........................................................................................................................ 100<br />
Set Default View ................................................................................................................. 100<br />
Control Search and Browse Related .................................................................................. 101<br />
Control Recommendations ................................................................................................. 101<br />
Notes About Recommendations ......................................................................................... 102<br />
Edit Banner Duration ........................................................................................................... 102<br />
Switch Keyboards ............................................................................................................... 102<br />
Add Closed Captioning ....................................................................................................... 103<br />
Set Closed Captioning Status ............................................................................................. 103<br />
4
Set Analog Service ............................................................................................................. 104<br />
Set Digital Service ............................................................................................................... 104<br />
Set Text Style ...................................................................................................................... 104<br />
Set Text Size ....................................................................................................................... 105<br />
Set Text Color ..................................................................................................................... 105<br />
Set Background Color ......................................................................................................... 105<br />
Set Background Opacity ..................................................................................................... 106<br />
Set the <strong>Guide</strong> Language ..................................................................................................... 106<br />
Set the <strong>Guide</strong> Text Size ...................................................................................................... 107<br />
Set the <strong>Guide</strong> Aspect Ratio................................................................................................. 107<br />
Audio & Video ........................................................................................................................ 108<br />
Set Volume Level ................................................................................................................ 108<br />
Set Analog Output ............................................................................................................... 108<br />
Set Digital Output ................................................................................................................ 109<br />
Set Audio Language ........................................................................................................... 109<br />
Set Dynamic Range ............................................................................................................ 110<br />
Set Video Output Format .................................................................................................... 110<br />
Timers ..................................................................................................................................... 112<br />
Set Sleep Timer .................................................................................................................. 112<br />
Set Power On ...................................................................................................................... 112<br />
Set Power Off ...................................................................................................................... 113<br />
Receivers ............................................................................................................................... 115<br />
AC Outlet............................................................................................................................. 115<br />
Front Panel Display Options ............................................................................................... 115<br />
DVR Network ...................................................................................................................... 116<br />
Change Receiver Name ...................................................................................................... 116<br />
A Note About Change Receiver Name ............................................................................... 116<br />
Change Network Status ...................................................................................................... 116<br />
View DVR Network ............................................................................................................. 118<br />
Set Default DVR .................................................................................................................. 118<br />
A Note About Set Default DVR ........................................................................................... 119<br />
Turn Pause Live TV On or Off ............................................................................................ 119<br />
A Note About Pause Live TV .............................................................................................. 119<br />
Power Manager for Energy Efficiency ................................................................................ 119<br />
Front Panel Status .............................................................................................................. 120<br />
Chapter 12: Pay-Per-View............................................... 121<br />
Purchase Pay-Per-View <strong>Program</strong>ming from the <strong>Guide</strong> ...................................................... 122<br />
PPV Countdown Timer ....................................................................................................... 123<br />
Search PPV Content ........................................................................................................... 123<br />
Cancel a PPV Purchase ..................................................................................................... 123<br />
Chapter 13: Error Messages .......................................... 124<br />
Subscription .......................................................................................................................... 124<br />
DVR ......................................................................................................................................... 125<br />
Services .................................................................................................................................. 126<br />
5
Pay-Per-View .......................................................................................................................... 126<br />
<strong>Guide</strong> ...................................................................................................................................... 128<br />
On DEMAND ........................................................................................................................... 128<br />
Interactive Services............................................................................................................... 130<br />
Receiver Test ......................................................................................................................... 131<br />
6
Chapter 1: Your <strong>Trio</strong> <strong>Program</strong> <strong>Guide</strong><br />
Welcome to your new <strong>Trio</strong> <strong>Program</strong> <strong>Guide</strong>. The consistent look and feel is designed to work<br />
specifically with High Definition televisions and the way you watch TV. New features and<br />
simplified navigation make it easier to find the programming you want when you want it – whether<br />
it’s live, On DEMAND or recorded to a DVR.<br />
The starting point for everything in the <strong>Trio</strong> <strong>Program</strong> <strong>Guide</strong> is the Main Menu, which is launched<br />
by pressing the MENU button or the LEFT or RIGHT arrow on the remote control. From there,<br />
you can browse the TV listings or On DEMAND, search for programs or change the guide’s<br />
settings.<br />
Once in the <strong>Trio</strong> <strong>Program</strong> <strong>Guide</strong>, navigating your choices – from watching a program to<br />
personalizing the settings – is incredibly consistent. It’s as simple as pressing the UP, DOWN,<br />
LEFT and RIGHT arrows. The only other remote control buttons required for seamlessly<br />
navigating all areas of the <strong>Trio</strong> <strong>Program</strong> <strong>Guide</strong> are the SELECT, A, B, C and EXIT buttons.<br />
We’ve also added a number of shortcut buttons to the remote control. The GUIDE, ON DEMAND<br />
and SETTINGS buttons take you directly to the TV listings, On DEMAND program choices and<br />
settings, respectively, without going through the Main Menu.<br />
You can also browse channel listings without leaving the show you are watching by pressing the<br />
INFO button on the remote control. An INFO Banner will appear across the bottom of the screen<br />
that lets you find out what is playing on other channels or later in the day. Simply press the UP,<br />
DOWN, LEFT and RIGHT arrows to navigate. For more information on INFO Banners, turn to<br />
Chapter 3.<br />
You can Change <strong>Guide</strong> Views with the <strong>Trio</strong> <strong>Program</strong> <strong>Guide</strong>. From within the guide, pressing the<br />
GUIDE button will switch the listings from List View to Grid View. Pressing GUIDE repeatedly will<br />
let you see Theme-based programs, HD channels, Favorite channels and eventually returns you<br />
to live television. Turn to Chapter 3 for more information on this feature.<br />
The <strong>Trio</strong> <strong>Program</strong> <strong>Guide</strong> features a Universal Search function that lets you run one search to<br />
quickly find all the programming available through TV, On DEMAND, Pay-Per-View and even<br />
items saved to your DVR, if one is connected. In addition to traditional title searches, you can<br />
search for new programs by keyword or by your favorite actors or directors. Searches can be<br />
saved and re-used to find new content as it becomes available. To learn more about using<br />
Universal Search, turn to Chapter 9.<br />
The new Browse Related feature is a powerful way to look for new programs that might interest<br />
you based on the programs you already watch. Beginning with a program, genre, actor or<br />
director, this function finds other shows and movies that fall into the same category or feature the<br />
same cast or crew members. To learn more about using Browse Related, turn to Chapter 2.<br />
To make browsing On DEMAND seem more like a trip to the video store, we have added a new<br />
feature that lets you Browse Movie Posters. With the press of a button, On DEMAND can switch<br />
from an ordinary list of available movies to a view of the posters or cover art that came with the<br />
movie’s release. See Chapter 4 for more information about On DEMAND.<br />
Each family member can personalize their TV watching—from setting a personal list of favorite<br />
channels to customizing certain features of the guide—with the new Users feature. For more<br />
information on setting user profiles and other settings, see Chapter 10.<br />
7
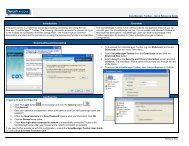
A Visual Orientation to Cards<br />
To get you to your programming faster, the new <strong>Trio</strong> <strong>Program</strong> <strong>Guide</strong> puts program information<br />
into columns, called cards. Each screen has three cards. Most cards contain a list of channels,<br />
program titles or similar information. Other cards offer information such as instruction or program<br />
summaries. Throughout this guide, we have defined cards by the kind of information it contains –<br />
channels, programs or action items – or by its position on the screen – left, center or right.<br />
In the image below, the Channels Card on the left shows available channels, the <strong>Program</strong>s Card<br />
in the center shows upcoming programs, and the Summary Card on the right gives a brief<br />
description of the highlighted show. In this image, the Channels Card is in focus. It’s a little darker<br />
and has the yellow highlight bar over channel 703.<br />
Moving from one card to the next is very simple. Use the<br />
RIGHT and LEFT arrows to move between cards. Every<br />
time you press one of these arrows, a new card will<br />
come into focus. The card will become a little darker and<br />
the yellow highlight bar will appear at the top of the list<br />
on that card.<br />
Use the UP and DOWN arrows, or PAGE UP and PAGE<br />
DOWN buttons to scroll through the information on any<br />
specific card. On most cards, the SELECT button works<br />
just like the RIGHT arrow.<br />
8
As you move through the cards, using the arrow buttons to make your choices, you will see a<br />
second screen. Notice the Summary Card has moved to the right side of the screen. The card in<br />
the center is called the Actions Card. It lets you tune to your program or perform other functions<br />
such as watch a program preview. In the image below, the Actions Card is in focus and the<br />
highlight bar is over Watch Now.<br />
9
Navigational Clues<br />
The <strong>Trio</strong> <strong>Program</strong> <strong>Guide</strong> offers a number of visual clues to help you move easily between screens<br />
and through the lists.<br />
Carats signal when there are more cards to the left or right. Pressing RIGHT arrow will reveal the<br />
next set of cards to the right until you reach the final card. Pressing the LEFT arrow will reveal the<br />
cards to the left, or the Main Menu, depending on where you are in the <strong>Guide</strong>.<br />
10
Carats are also used in long lists – such as channels or programs - to indicate that there is more<br />
information above or below. These carats only appear when the card is in focus – when the<br />
card’s color is slightly darker and the yellow highlight bar is present. Use the UP or DOWN arrows<br />
or the PAGE UP or PAGE DOWN buttons to scroll through long lists.<br />
11
Arrows in the yellow highlight bar let you know that you can move up or down in the list, and right<br />
or left between cards. Use the UP and DOWN arrows to scroll through lists and the RIGHT and<br />
LEFT arrows to move between cards.<br />
12
When an item is actionable – choosing a program or changing a setting – the right end of the<br />
yellow highlight bar will show a SEL button. Press SELECT to confirm, or UP or DOWN arrows to<br />
move to the next choice in the list. A black dot or check mark will appear at the right end of the<br />
yellow highlight bar when SELECT is pressed, indicating your choice has been registered.<br />
13
With the <strong>Trio</strong> <strong>Program</strong> <strong>Guide</strong>, you can browse, search, flag and record programs up to 14 days in<br />
the future. When looking for programs available in the future, there are several on-screen clues to<br />
help you see the day and date a program is scheduled to air.<br />
14
About the Remote Control<br />
The image below shows a <strong>Cox</strong> remote and highlights the buttons that are discussed in this guide.<br />
Your remote control may appear differently, but button functions remain the same.<br />
Though your remote may include buttons for Picture-in-Picture, the new <strong>Trio</strong> program guide does<br />
not offer this particular feature.<br />
15
About This Book<br />
This manual will help you get started using the <strong>Trio</strong> <strong>Program</strong> <strong>Guide</strong>. It includes instructions for:<br />
• Using the Remote Control<br />
• Tuning to <strong>Program</strong>s<br />
• Launching and Using the <strong>Guide</strong><br />
• Browsing Related <strong>Program</strong>s<br />
• Displaying the Info and Channel Banners<br />
• Using On Demand<br />
• Searching for <strong>Program</strong>s<br />
• Setting User Profiles<br />
• Using Parental Controls<br />
• Changing Other Settings<br />
16
Chapter 2: Getting Started<br />
This Chapter discusses ways to find channels and programs, watch live television, learn more<br />
about the program you are watching, change channels and open the Main Menu.<br />
17
Watch Live Television<br />
With your television and receiver (set top box) turned on, use the number (0-9) buttons to tune<br />
directly to a channel. Press ENTER or SELECT to go directly to the channel. Otherwise, the<br />
desired channel will tune in a second or two.<br />
Change Channels<br />
Tune to different channels by pressing the CHANNEL UP or CHANNEL DOWN button. You can<br />
also tune to different channels using the number (0-9) buttons.<br />
View Basic <strong>Program</strong> Information<br />
Press the INFO button once to see basic<br />
information about the current program. A<br />
Channel<br />
Banner will appear at the bottom of the<br />
screen with the program title, a brief<br />
description of the program, its start and end<br />
time, program rating information, channel<br />
number and time/date information. <strong>Program</strong><br />
guide symbols such as Favorite Channel,<br />
Skipped Channel, Locked <strong>Program</strong> or<br />
Purchased <strong>Program</strong> will also be displayed.<br />
View Detailed <strong>Program</strong> Information<br />
You can see extended program information<br />
by pressing the INFO button a second time.<br />
Pressing INFO a third time will return you to<br />
full-screen video viewing.<br />
Open the Main Menu<br />
The Main Menu is the starting point for using<br />
the <strong>Trio</strong> <strong>Program</strong> <strong>Guide</strong> to find programs,<br />
view On DEMAND, search for other programs<br />
that might interest you and set personal<br />
preferences. There are several ways to open<br />
the Main Menu:<br />
• Press the MENU button<br />
• Press the RIGHT arrow.<br />
• Press the LEFT arrow.<br />
Press the Info button once to see basic information<br />
about a show.<br />
Press the Info button a second time to see full<br />
details.<br />
The Main Menu appears on the left side of your<br />
screen<br />
18
Press EXIT, the MENU button again or the LEFT arrow to close the Main Menu.<br />
Open the Actions Menu<br />
While watching Live TV, the Actions Menu<br />
provides you quick access to the various<br />
actions associated with a program you are<br />
currently watching. To open the Actions<br />
Menu:<br />
• Press the SELECT button while<br />
watching Live TV in full screen<br />
mode.<br />
• Use the UP or DOWN arrow to<br />
highlight actions.<br />
Press EXIT to close the Actions Menu.<br />
Switch Users<br />
The <strong>Trio</strong> <strong>Program</strong> <strong>Guide</strong> lets each member of<br />
the household set up a personal profile that<br />
allows him or her to personalize the viewing<br />
experience. The user profile includes the<br />
name of the user, the icon for the user,<br />
Favorite Channels, preferred <strong>Guide</strong> View,<br />
preferred Keyboard, and Saved Searches. To<br />
access this personalized experience, it<br />
becomes necessary for you to switch to your<br />
own user profile as you watch television.<br />
Depending on the remote control you may<br />
have received from <strong>Cox</strong>, there are two ways<br />
to switch users.<br />
Pressing the USER button the remote control<br />
will display the current user. Pressing USER<br />
button repeatedly will switch between different<br />
users. Once you have found the user wanted<br />
to switch to, then simply stop pressing the<br />
USER button. The user displayed on the<br />
screen will be set up as the current user.<br />
If you don’t have a remote control that has a<br />
USER button, then see step by step<br />
instructions on switching users using the<br />
SETTINGS button in Chapter 10: Settings.<br />
If you don’t have any user profiles set up but<br />
wish to add them, please see Chapter 10:<br />
Settings.<br />
Pressing the SELECT button while watching TV in fullscreen<br />
mode displays the Actions menu.<br />
Pressing the USER button on the remote control<br />
displays the Current User screen.<br />
Repeatedly pressing the USER button will display<br />
different users.<br />
19
Chapter 3: <strong>Guide</strong><br />
The <strong>Trio</strong> <strong>Program</strong> <strong>Guide</strong> is simple, consistent and easy to navigate, making it easier for you to<br />
find and tune into your favorite television programs and On DEMAND entertainment. It was<br />
designed specifically for High Definition televisions, giving it an advanced look and feel.<br />
This Chapter introduces you to the <strong>Trio</strong> <strong>Program</strong> <strong>Guide</strong> and discusses different ways to find the<br />
channels and programs that interest you. This Chapter also introduces the new Browse Related<br />
function that allows you to find programs that are similar to the programs you like. Related<br />
programs may be in the same genre or share subject matter. They may also share actors and<br />
directors with your favorite shows.<br />
The main sections in this Chapter are:<br />
• Using the <strong>Guide</strong><br />
• Browse Related<br />
• INFO and Channel Banners<br />
20
Using the <strong>Guide</strong><br />
Launch the <strong>Guide</strong><br />
There are two ways to access the <strong>Guide</strong>.<br />
The first is to simply press the GUIDE button.<br />
It takes you directly to the main <strong>Guide</strong> display<br />
that shows information about available<br />
channels, programs and short program<br />
descriptions.<br />
The second way to open the <strong>Guide</strong> is through<br />
the Main Menu. To access the Main Menu,<br />
you have several choices:<br />
• Press the MENU button.<br />
• Press the RIGHT arrow button.<br />
• Press the LEFT arrow button<br />
Once the Main Menu has appeared, use the UP or DOWN arrows to move the highlight bar to<br />
<strong>Guide</strong> and press SELECT or RIGHT arrow to call up the <strong>Guide</strong>.<br />
Change <strong>Guide</strong> Views<br />
The <strong>Guide</strong> screens can display program<br />
information in several different ways: List,<br />
Grid, Theme, High Definition channels,<br />
Themes, Zone channels, and Favorite<br />
channels. With <strong>Guide</strong> Menu up, you can<br />
move through these different views by<br />
pressing GUIDE:<br />
• While watching live TV, press GUIDE<br />
once to open the <strong>Guide</strong>. Grid view is<br />
the default view, but you can<br />
personalize the display in Settings.<br />
For more information, please see<br />
Chapter 10: Settings.<br />
• Press GUIDE a second time to show<br />
Grid View.<br />
Access the guide two ways: from the Main Menu or<br />
by pressing the GUIDE button.<br />
Press GUIDE a second time to show List View. You<br />
can make this your default view. See Chapter 10 for<br />
more information. Press GUIDE additional times to<br />
call up Theme, HD, Favorite channels, and Zone<br />
channels.<br />
• Each additional time you press GUIDE, the other views will come up in order until you are<br />
returned to live TV.<br />
Pressing the LAST button will return you to the previous view, letting you navigate backwards<br />
through the different views.<br />
21
Notes About Grid View<br />
Grid View is the first view you will normally see, but you can make any of the views the first view<br />
by changing the Default <strong>Guide</strong> View in Settings.<br />
While using Grid View, the RIGHT and LEFT arrows are used to navigate through time segments.<br />
To select a program and time, you must press SELECT to move to the Action Card. Pressing the<br />
RIGHT arrow will continue to move the highlight bar through the grid.<br />
Find <strong>Program</strong>s Playing on a Specific Date and Time<br />
The <strong>Guide</strong> carries a full 14 days of programming. To check listings for a particular date and time<br />
within that window, press the B button (Set <strong>Guide</strong> Date) on your remote control. Select the date<br />
you are interested in, and then the time. Press B again to confirm. The <strong>Guide</strong> will display the<br />
programs airing on that date and time.<br />
Use the <strong>Guide</strong> to Find Available<br />
Channels<br />
In the List View, the <strong>Guide</strong> shows three<br />
information cards. The Channels Card is on<br />
the left. Navigate channels when the<br />
Channels Card is in focus. It will be slightly<br />
darker in color and includes the yellow<br />
highlight bar.<br />
• Press the UP or DOWN arrow to<br />
move the highlight bar up or down<br />
one channel.<br />
• Press the PAGE UP or PAGE DOWN<br />
button to move the highlight bar up or<br />
down one screen – as many as seven<br />
channels – in the list. (It will be six<br />
channels, if the font size preference is<br />
larger.)<br />
• Alternatively, you can jump to any channel entry in the <strong>Guide</strong>. Simply enter the channel<br />
number using the number (0-9) buttons. If you enter an invalid channel number, your<br />
highlight will move to the nearest channel available in the <strong>Guide</strong>. This is useful in<br />
situations where you don’t know the exact channel number, but you roughly know that the<br />
channel you are looking for is in 700’s range, for example.<br />
To select a channel you want to watch, press the SELECT button. Press the RIGHT arrow to<br />
browse programs, which are listed in the center card. The current program will be highlighted.<br />
To return to the Main Menu, press the LEFT arrow.<br />
The Channel Card is on the left and in focus. The<br />
focus card is always darker in color and includes<br />
the yellow highlight bar.<br />
Use the UP or DOWN arrow to find a channel and<br />
then press the RIGHT arrow to browse programs.<br />
22
Use the <strong>Guide</strong> to Find Available<br />
<strong>Program</strong>s<br />
In List View, the <strong>Program</strong>s Card is in the<br />
center. Navigate programs when the<br />
<strong>Program</strong>s Card is in focus. When in focus, it<br />
will be slightly darker in color and includes the<br />
yellow highlight bar.<br />
• Press the UP or DOWN arrow to<br />
move the highlight bar up or down<br />
one program in the list.<br />
• Press the PAGE UP or PAGE DOWN<br />
button to move the highlight bar up or<br />
down one screen – as many as seven<br />
programs – in the list.<br />
To select a program, press the RIGHT arrow or SELECT button. The display will move to the<br />
Actions Card at the same time.<br />
To return to the Channels Card, press the LEFT arrow.<br />
Get More Information<br />
In the List View, the Summary Card is on the right. It shows the program title, a brief description<br />
of the program, its start and end time, program rating information, channel number and time/date<br />
information. <strong>Program</strong> guide symbols such as Favorite Channel, Skipped Channel, locked<br />
program or purchased program are also displayed. This card cannot be selected.<br />
Watch a <strong>Program</strong> or Channel<br />
You can simply press the SELECT button on<br />
a currently airing program to start watching it<br />
immediately. For future programs, pressing<br />
the SELECT button will shift focus to the<br />
Actions Card in the center of the screen.<br />
Since the program will air in the future, then<br />
Record will be the first action you will see<br />
followed by Watch This Channel. Highlight<br />
Watch This Channel and press SELECT to<br />
tune to the channel.<br />
Scroll Through the <strong>Guide</strong><br />
In this image, the <strong>Program</strong>s Card is in focus. Use<br />
the UP and DOWN arrows to find a program. Use<br />
the RIGHT arrow or SELECT to move to the<br />
Actions Card.<br />
The Actions Card appears in the center of the<br />
screen, with the highlight bar on Watch Now. Press<br />
SELECT to watch this program.<br />
To scroll through channels or programs, press<br />
the UP or DOWN arrow to move the highlight bar up or down one item in the list.<br />
Press the PAGE UP or PAGE DOWN button to move the highlight bar up or down one screen –<br />
as many as seven channels or programs – in the list.<br />
Press and hold the PAGE UP, PAGE DOWN, UP arrow or DOWN arrow to Turbo Scroll – scroll<br />
very fast – through information in any view.<br />
23
Exit the <strong>Guide</strong><br />
There are several ways to exit the <strong>Guide</strong> and return to the most recently viewed program.<br />
• Press the EXIT or LIVE button to return to live TV.<br />
• Use the LEFT arrow to navigate back through the information cards and Main Menu.<br />
• Press CHANNEL UP or CHANNEL DOWN to tune to the next channel up or down on live<br />
television.<br />
24
Browse Related <strong>Program</strong>s<br />
Browse Related is a powerful way to look for new programs that might interest you. It lets you find<br />
upcoming episodes of a program, programs that are similar and programs that feature at least<br />
some of the same actors and director(s).<br />
The Browse Related function appears in the Actions Card. To access Browse Related, you must<br />
first select a program in the guide, as all Browse Related searches are keyed to a single program.<br />
To use this function, begin at the Actions Card:<br />
1. Use the UP or DOWN arrow to highlight Browse Related.<br />
2. Press the RIGHT arrow or SELECT button to call up the Browse Related cards.<br />
This screen shows three cards – the Browse Related Card on the left, a <strong>Program</strong>s Card in the<br />
center and a Summary Card on the right.<br />
Watch Another Episode<br />
When you arrive at the Browse Related Card,<br />
Episode List is the first item in the list and will<br />
be highlighted. To watch another Episode:<br />
1. Press the RIGHT arrow or SELECT<br />
button to move to the <strong>Program</strong>s Card.<br />
Use the UP and DOWN arrows to<br />
select an episode you are interested<br />
in watching. The Summary Card on<br />
the right describes each episode as<br />
the highlight bar moves over it.<br />
2. When you have found an episode you<br />
want to watch, press the RIGHT<br />
arrow or SELECT button to move to<br />
the Actions Card.<br />
3. Press SELECT to Watch Now.<br />
The Browse Related Card appears on the left, with<br />
Episode List highlighted. Press the RIGHT arrow to<br />
move to the <strong>Program</strong>s Card.<br />
25
Browse Related Series<br />
Begin at the Browse Related Card:<br />
1. Use the UP or DOWN arrow to move<br />
through the choices on the Browse<br />
Related Card. Place the highlight bar<br />
on Related Series.<br />
2. Press the RIGHT arrow or SELECT<br />
button to move to the <strong>Program</strong>s<br />
Card. Use the UP and DOWN arrows<br />
to select a related program. The<br />
Summary Card on the right describes<br />
each program as the highlight bar<br />
moves over it.<br />
3. When you have found a program you<br />
want to watch, press the RIGHT arrow or SELECT button to move to the Actions Card.<br />
4. Press SELECT to Watch Now.<br />
Browse Cast & Crew<br />
Begin at the Browse Related Card to select<br />
programs featuring the cast & crew:<br />
1. Use the UP or DOWN arrow to move<br />
through the choices on the Browse<br />
Related Card. Place the highlight bar<br />
on Related Cast & Crew.<br />
2. Press the RIGHT arrow or SELECT<br />
button to move to the center card,<br />
which offers several choices to help<br />
narrow your search. Use the UP and<br />
DOWN arrows to select an actor or<br />
director.<br />
3. Press the RIGHT arrow or SELECT<br />
button to move to the <strong>Program</strong>s Card. Use the UP and DOWN arrows to select a<br />
program.<br />
4. When you have found a program you want to watch, press the RIGHT arrow or SELECT<br />
button to move to the Actions Card. The Summary Card on the left describes the program<br />
you have selected.<br />
5. Press SELECT to Watch Now.<br />
The Browse Related Card appears on the left, with<br />
Related Series highlighted. Press the RIGHT arrow<br />
to move to the <strong>Program</strong>s Card.<br />
The Browse Related Card appears on the left, with<br />
Related Cast & Crew highlighted. Press the RIGHT<br />
arrow to move to the <strong>Program</strong>s Card, which shows<br />
programs featuring the same actors or directors.<br />
26
Browse Related Genre<br />
Begin at the Browse Related Card to select<br />
programs featuring the programs in the same<br />
genre:<br />
1. Use the UP or DOWN arrow to move<br />
through the choices on the Browse<br />
Related Card. Place the highlight bar<br />
on Related Genre.<br />
2. Press the RIGHT arrow or SELECT<br />
button to move to the center card,<br />
which offers several choices to help<br />
narrow your search. Use the UP and<br />
DOWN arrows to select a related<br />
program.<br />
3. Press the RIGHT arrow or SELECT button to move to the <strong>Program</strong>s Card. Use the UP<br />
and DOWN arrows to select a program.<br />
4. When you have found a program you want to watch, press the RIGHT arrow or SELECT<br />
button to move to the Actions Card. The Summary Card on the left describes the program<br />
you have selected.<br />
5. Press SELECT to Watch Now.<br />
The Browse Related Card appears on the left, with<br />
Related Genre highlighted. Press the RIGHT arrow<br />
to move to the <strong>Program</strong>s Card and browse<br />
programs in similar genres.<br />
27
About Info Banners and Channel Banners<br />
Info Banners and Channel Banners show information about the program you are currently<br />
watching. You can also browse listings and tune to different channels with Info Banners.<br />
See Channel Banners While Watching<br />
Live Television<br />
Channel Banners automatically appear at the<br />
bottom of your screen when you to tune to a<br />
channel. The Banner will show the program<br />
title, a brief description of the program, its<br />
start and end time, program rating<br />
information, channel number, and time/date<br />
information. <strong>Program</strong> guide symbols<br />
indicating Favorite Channel, Skipped<br />
Channel, locked program or purchased<br />
program may also display.<br />
See Info Banners While Watching Live<br />
Television<br />
You can call up Info Banners in the middle of<br />
a program by pressing the INFO button. While<br />
Info Banners show the same information as<br />
Channel Banners, Info Banners also allow<br />
you to view program listings while watching<br />
your program on the full screen.<br />
Press the INFO button a second time to show<br />
the complete program description.<br />
Press INFO a third time to close Info Banners.<br />
Switch <strong>Program</strong>s from Info Banners<br />
Press the RIGHT and LEFT arrows to browse<br />
programs carried by the channel shown at<br />
different times of the day. Pressing SELECT<br />
will tune to the program displayed if it is<br />
currently airing. If it is not, pressing SELECT<br />
will tune to the current program on that<br />
channel.<br />
Change Channels from Info Banners<br />
You can browse different channels using the<br />
UP and DOWN arrows. Press SELECT to<br />
tune the television to the channel displayed<br />
on the Info Banner.<br />
Channel Banners gives you a short description of<br />
the program you are watching.<br />
Info Banners feature the ability to change channels<br />
or see information about upcoming programs<br />
without leaving the program you are watching.<br />
Info or Channel Banners will occasionally display A-<br />
Watch in HD action if you subscribe to HD<br />
programming, are tuning to a SD channel, and<br />
there is a HD version of the channel currently airing<br />
the exact same episode of the program in HD<br />
format. Pressing the A button on the remote control<br />
will tune you the HD version of the program.<br />
28
See Info Banners While Watching On DEMAND<br />
Pressing the INFO button will call up an Info Banner for the On DEMAND program. The banner<br />
will show the program title, a brief description of the program, its total running time and program<br />
rating information.<br />
Press the INFO button a second time to show the complete program description.<br />
Close the Info Banner by pressing the INFO button a third time.<br />
Banner Icons<br />
There are a number of different icons you may see on an Info or Channel Banner. This table tells<br />
you what each one means.<br />
Icon Description Icon Description<br />
This channel has been selected<br />
as a Favorite.<br />
This channel has been placed on<br />
your Skipped Channels list.<br />
This program has been locked.<br />
See Parental Controls for more<br />
information.<br />
This program has been<br />
unlocked. See Parental Controls<br />
for more information.<br />
This program is available in High<br />
Definition.<br />
Television content ratings.<br />
Movie ratings.<br />
This program is currently being<br />
recorded.<br />
A series recording is scheduled<br />
for this program. The same icon<br />
is used to indicate a manual<br />
recurring recording.<br />
This program is marked as Keep<br />
Until Space Needed or Keep<br />
Until I Watch (any portion of the<br />
program).<br />
This series episode has been<br />
clipped to accommodate an<br />
episode of a higher priority<br />
series.<br />
This program is in stereo.<br />
This is a first-run program.<br />
This program is available at no<br />
cost.<br />
This program has already been<br />
purchased via On DEMAND or<br />
PPV.<br />
Pay-Per-View programming<br />
available for a fee.<br />
This program is available in<br />
Spanish via the SAP setting.<br />
This program has a reminder set.<br />
This is a live program.<br />
A single episode is scheduled to<br />
record. The same icon is used to<br />
indicate one-time-only manual<br />
recording.<br />
This program is marked as Keep<br />
Until Space Needed on the DVR.<br />
This program has been<br />
recommended based on your<br />
personal viewing history and<br />
taste.<br />
29
Close Info Banners<br />
After an Info Banner has been idle for a few seconds, it will disappear. You can also press the<br />
EXIT button to close Info Banners.<br />
Service Messages<br />
On rare occasions, an on-screen message will appear asking whether you are still watching a<br />
particular program. If you see this alert, and wish to continue watching this program, press<br />
SELECT to close it.<br />
You may also occasionally see an on-screen message saying that a channel is temporarily<br />
unavailable. Press the GUIDE button on your remote control to acknowledge the message and<br />
return to the <strong>Trio</strong> <strong>Program</strong> <strong>Guide</strong> to select another channel. You can also press LAST to return to<br />
the last channel you were watching.<br />
30
Chapter 4: On DEMAND<br />
On DEMAND gives you around-the-clock access to a vast library of program titles, including<br />
movies, television shows, premium subscription programs and music videos. Many of the titles<br />
allow free, unlimited viewing while some programs are only available for purchase or through a<br />
subscription.<br />
The On DEMAND service consists of:<br />
• Movies – Enjoy hundreds of recent releases, foreign films, classics and much more.<br />
• Events – Watch encore showings of championship boxing, wrestling, concerts, events<br />
and other favorites.<br />
• Premium Channels – Through a subscription, you will have access to premium<br />
entertainment such as HBO, Cinemax, Showtime, The Movie Channel and Starz.<br />
• Subscription Television – More subscription offerings include Anime, WWE 24/7,<br />
Howard Stern and adult channels.<br />
• FreeZone – There are more than 100 hours of free programming including your favorite<br />
cable TV, family and sports shows, concerts and music videos.<br />
This Chapter shows you how to use On DEMAND in the <strong>Trio</strong> <strong>Program</strong> <strong>Guide</strong> and discusses ways<br />
to quickly find the programs that interest you, learn more about them and watch them.<br />
31
Using On DEMAND<br />
Launch On DEMAND<br />
You can access On DEMAND three ways.<br />
• From the Main Menu.<br />
1. Press MENU or the LEFT or RIGHT arrow to call up the Main Menu.<br />
2. Use the UP or DOWN arrow to move the highlight bar to On DEMAND.<br />
3. Press the RIGHT arrow or SELECT button to launch On DEMAND.<br />
• Press the On DEMAND button.<br />
• Press 1 on number pad to tune directly to On DEMAND.<br />
Restrict On DEMAND<br />
You can limit or restrict others from purchasing or watching On DEMAND programs by enabling<br />
the Parental Control and/or Purchase PINs. For more information, see Parental Controls in<br />
Chapter 10: Settings.<br />
The first On DEMAND card, on the left, lets you<br />
begin browsing by category, such as movies or<br />
primetime television.<br />
32
Browse On DEMAND<br />
When you launch On DEMAND, the first<br />
screen has three cards. The program<br />
categories are on the left, sub-categories<br />
(such as genres or themes) are in the center,<br />
and additional sub-categories or program<br />
titles are on the right.<br />
To browse On DEMAND programming, begin with the Category Card on the left:<br />
1. Press the UP or DOWN arrow to highlight a program category and then press the RIGHT<br />
arrow or SELECT button to move to the center card.<br />
2. Use the UP or DOWN arrow to highlight a sub-category, genre or theme. Press the<br />
RIGHT arrow or SELECT button to confirm your choice and move to the next card on the<br />
right.<br />
3. When the card on the right is a <strong>Program</strong>s Card, pressing SELECT will reveal a new set of<br />
cards. <strong>Program</strong>s will be on the left, a Movie Poster in the center and a program Summary<br />
on the right. These three cards give you all the information you need to decide whether to<br />
watch the program.<br />
4. Use the UP and DOWN arrows to<br />
browse programs. When you have<br />
found a program, press the RIGHT<br />
arrow or SELECT button.<br />
5. If the programming is a series, there<br />
will be additional cards that let you<br />
choose specific episodes. Use the UP<br />
and DOWN arrows to browse<br />
programs. When you have found a<br />
program, press the RIGHT arrow or<br />
SELECT button. This brings you to<br />
the Actions Card.<br />
View Purchase and Other <strong>Program</strong><br />
Information<br />
When you press SELECT on a movie or program, the cards in view shift to the left. The Summary<br />
Card is now on the left and an Actions Card is in the center.<br />
The Summary Card gives a brief description of the program as well as other important information<br />
including the price of the rental, the date when the rental expires, the program running time and<br />
the program rating. If the program is an active rental, the Summary Card will also show the<br />
purchased icon.<br />
Watch Free On DEMAND <strong>Program</strong>s<br />
Select a general category in the card on the left,<br />
such as Movies On DEMAND, and then select a<br />
sub-category in the center card, such as New<br />
Releases.<br />
Use the UP and DOWN arrows to browse<br />
programs. The center card displays poster art for<br />
the program and the right card displays the<br />
summary of the program. When you found the<br />
program to watch, press the RIGHT arrow or<br />
SELECT button.<br />
<strong>Cox</strong> offers thousands of hours of free On DEMAND programming to watch any time of day or<br />
night. To watch a free program, begin at the Actions Card:<br />
33
1. Use the UP or DOWN arrow to highlight Watch Now.<br />
2. Press SELECT.<br />
• If Parental Controls are activated, you will be asked to enter your four-digit Parental<br />
Controls PIN.<br />
3. Press B to confirm and begin watching your program.<br />
Purchase On DEMAND <strong>Program</strong>s<br />
Many of the latest big screen movies and<br />
some hit TV shows are available On<br />
DEMAND for a rental fee. To purchase<br />
programs, begin at the Actions Card:<br />
1. Use the UP or DOWN arrow to<br />
highlight Buy Now.<br />
2. Press SELECT to purchase.<br />
• If Parental Controls are activated,<br />
you will be asked to enter your<br />
four-digit Parental Controls PIN.<br />
• If Purchase Controls are<br />
activated, you will be asked to enter your four-digit Purchase PIN.<br />
3. Press B to confirm and begin watching your program.<br />
Notes on Subscription Channels<br />
After you select your program, the Actions Card<br />
appears in the center of the screen. Select Buy<br />
Now to watch programs available for a fee.<br />
Many of cable’s most popular programming – such as HBO and other premium channels as well<br />
as Anime, Howard Stern TV and others – are only available by subscription. If you have a current<br />
subscription to one or more of these channels, all of their On DEMAND programming for that<br />
channel will be available to you, free of charge. To watch one of these programs, follow the<br />
instructions above for Watch On DEMAND <strong>Program</strong>s. If you do not have a subscription but are<br />
interested in one, call your <strong>Cox</strong> Customer Care representative.<br />
The Watch Preview option allows you to see a<br />
movie trailer, when available, or other video<br />
information about the selected program.<br />
34
Watch Preview<br />
Before purchasing On DEMAND<br />
programming, you can watch a movie trailer<br />
or short preview. This option is available on the Actions Card. Many, but not all, On DEMAND<br />
programs have previews available.<br />
To watch a preview, use the UP or DOWN arrow to move the highlight bar to Watch Preview.<br />
Press SELECT.<br />
During the preview, you can purchase the program by pressing the B button. You can stop the<br />
preview and return to the last screen by pressing the C button.<br />
Get More Information<br />
You can also get more information<br />
about an On DEMAND program before<br />
purchasing it. Use the arrow buttons to<br />
highlight See Full Details. Press<br />
SELECT to show the complete<br />
information.<br />
Press the C button or EXIT to close See<br />
Full Details. The box will close<br />
automatically after a few minutes if no<br />
action is taken.<br />
Search On DEMAND<br />
While in On DEMAND, the Search function only looks for On DEMAND programming. Press the<br />
A button, which will be visible in the bottom right corner of the screen, to start a Search. For more<br />
information, please see Chapter 9: Search.<br />
Browse Movie Posters<br />
When browsing On DEMAND movies, you can switch between List View and Posters View.<br />
To browse movie posters:<br />
1. Press B to switch from the List View to Posters View. The instruction will also appear in<br />
the bottom right corner of your screen when this option is available.<br />
2. Use the RIGHT and LEFT arrows to browse posters.<br />
The See Full Details option gives you a short description<br />
of the selected program.<br />
3. Move the highlight frame to the movie you want and press SELECT to purchase or view<br />
the movie.<br />
4. You can return to List View at any time by pressing the B button.<br />
35
Use Play, Pause, Stop, Fast Forward<br />
and Rewind<br />
Most On DEMAND programs let you skip<br />
forward and backward through the video<br />
using the play, pause, stop, rewind and<br />
fast forward buttons on the remote control.<br />
• PLAY: This button starts your<br />
program at normal speed.<br />
• PAUSE: You can pause an On<br />
DEMAND program for up to 15<br />
minutes. Pausing longer than that<br />
stops your program and reopens<br />
the On DEMAND Menu. You can<br />
resume watching your program<br />
from the Recently Viewed Menu. PAUSE toggles between the pause and play functions.<br />
• STOP: This button ends your program and reopens the On DEMAND Menu.<br />
• FAST FORWARD: This button lets you scan ahead in your program. Each successive<br />
press increases the speed until you reach the highest speed. Pressing FAST FORWARD<br />
after the highest speed returns the program to normal speed. You can resume watching<br />
at any time by pressing PLAY. If you fast forward to the program’s end, you will be<br />
returned to the On DEMAND Menu.<br />
• REWIND: This button lets you scan backwards in your program. Each successive press<br />
increases the speed until you reach the highest speed. Pressing REWIND after the<br />
highest speed returns the program to normal speed. You can resume watching at any<br />
time by pressing PLAY. If left to rewind to the beginning, the program will start playing<br />
automatically.<br />
When you press any of these buttons, a progress bar appears at the bottom of your screen. It<br />
displays the viewing time graphically as well as in hours, minutes and seconds.<br />
Fast forward and other actions may be disabled on some programs.<br />
Use Instant Replay<br />
Press the INSTANT REPLAY button – indicated by<br />
a curved arrow – to jump backward in the program<br />
seven seconds.<br />
Exit On DEMAND<br />
You can leave an On DEMAND program several ways:<br />
• Press STOP to return to the On DEMAND Menu.<br />
When skipping forward or backward through a<br />
program, this progress bar appears on the screen. It<br />
shows start time, end time and time viewed.<br />
The Instant Replay button looks like this. It is<br />
below the REWIND and Record buttons.<br />
• Press LIVE or LAST to return to the last live television channel you were watching.<br />
• Press CHANNEL UP or CHANNEL DOWN to tune to the next channel up or down on live<br />
television.<br />
36
• Enter a channel number on the keypad (0-<br />
9) to tune directly to that live television<br />
channel.<br />
• Press FAV to call up the first channel in<br />
your Favorite Channels list.<br />
Return to Recently Viewed <strong>Program</strong>s<br />
<strong>Program</strong>s you have purchased typically have a 24-<br />
48 hour rental window. You can watch these<br />
programs at any time, as many times as you like,<br />
during the rental window.<br />
There are two ways to do this. Beginning at the first On DEMAND screen, with the focus in the<br />
On DEMAND Menu on the left:<br />
1. Press B to open the Active Rental List.<br />
2. Use the UP and DOWN arrows to highlight the program you want to watch.<br />
3. Press the RIGHT arrow or SELECT button to show the Actions Card.<br />
4. Use the UP or DOWN arrow to highlight the appropriate option:<br />
• Resume restarts the program where the last viewer left off.<br />
• Watch from Beginning restarts the program from the beginning.<br />
5. Press SELECT to begin watching.<br />
The Recently Viewed List is found in the Categories<br />
Card, at the bottom of the list. You will have to scroll<br />
down a full page to find it.<br />
Alternatively, you can access the Active Rental List with the UP or DOWN arrow. Active Rental<br />
List is the last item in the Menu Card on the left. You will have to scroll down a full page to find it.<br />
Press the RIGHT arrow or SELECT button to move the highlight bar to <strong>Program</strong>s Card in the<br />
center.<br />
37
Chapter 5: DVR<br />
The Digital Video Recorder (DVR) is quickly replacing the video cassette recorder as the most<br />
popular way to record and watch television programs. In fact, DVRs are superior to VCRs in<br />
many respects. With the touch of a button, you can pause live TV, view an instant replay, rewind<br />
favorite scenes, fast forward to the next scene or play the program in slow motion. Today’s DVRs<br />
allow you to record up to two programs at once while watching a previously recorded program or<br />
record one program while watching another that is currently airing.<br />
The <strong>Trio</strong> <strong>Program</strong> <strong>Guide</strong> lets you schedule and record all your favorite individual programs or<br />
series of programs, as well as manage your library of saved programs. This Chapter shows you<br />
how to use your DVR to record programs, watch recorded programs and control live television<br />
programs with your remote control.<br />
The main sections in this Chapter are:<br />
• DVRs Offered By <strong>Cox</strong><br />
• Using the DVR<br />
• Manage Scheduled Recordings<br />
• Manage Series Recordings<br />
38
DVRs Offered By <strong>Cox</strong><br />
<strong>Cox</strong> offers two types of DVRs ̶ a dual tuner DVR, and our newest six tuner DVR. Both these<br />
DVRs give you the freedom to record and watch programs at your convenience.<br />
About Your Dual Tuner DVR<br />
The dual tuner DVR includes two channel tuners. With this DVR, you can:<br />
• Record two programs while watching one of those programs or a previously recorded<br />
program.<br />
• Begin recording an entire program that you are currently watching, up to one minute<br />
before the program ends (depending on the length of that program and available disk<br />
space on the DVR).<br />
• Record both these programs in HD or SD depending on your preference.<br />
• Switch back and forth between two programs you’re recording with the SWAP button on<br />
the remote control.<br />
About Your Six Tuner DVR<br />
The six tuner DVR includes six channel tuners. With this DVR, you can:<br />
• Record six programs simultaneously while watching one of those programs or a<br />
previously recorded program.<br />
• Record all six programs in HD or SD depending on your preference.<br />
• Switch between all active tuners with the SWAP button on the remote control.<br />
A Note About Six Tuner DVR<br />
A six tuner DVR is subject to limited availability in your market. Be sure to contact <strong>Cox</strong> Customer<br />
Service for more information on its availability and how to obtain one.<br />
Using the DVR<br />
Scan a Live <strong>Program</strong><br />
You can use the same VCR-like functionality while watching live TV because the DVR temporarily<br />
stores whatever program you are watching. You can easily pause, rewind and re-watch a favorite<br />
scene, instantly jump back seven seconds with Instant Replay, or, after pausing or rewinding live<br />
TV, fast forward to the next important scene.<br />
To do this, use the PLAY, PAUSE, REWIND, FAST FORWARD, INSTANT REPLAY and other<br />
functions described in the Using the DVR section below.<br />
39
To return to the currently airing portion of the program, press the LIVE button on your remote<br />
control. The program is still saved to temporary storage, but you will see live TV.<br />
Use the RECORD Button<br />
The <strong>Trio</strong> <strong>Program</strong> <strong>Guide</strong> gives you two options for recording a program. The first is to simply<br />
press the RECORD button on your remote control.<br />
You can do this when:<br />
• You are watching a live TV program.<br />
You will be prompted whether you want<br />
to record an individual episode, entire<br />
series, or set a manual recording.<br />
Because the DVR temporarily stores<br />
any program you are currently<br />
watching, your recording will also<br />
include any portion of the program that<br />
has aired from the time you tuned to<br />
that channel.<br />
• You are in the <strong>Trio</strong> <strong>Program</strong> <strong>Guide</strong> with<br />
a program highlighted. Recording will<br />
begin at that program’s scheduled start<br />
time, provided it is in the future. If the<br />
program is currently airing and you are<br />
tuned to that channel, recording will<br />
begin immediately and any portion of<br />
program that has been temporarily<br />
stored on the DVR will also be recorded.<br />
The RECORD button (with the red circle) on the<br />
left side of your remote lets you record programs<br />
from many places in the guide.<br />
• You are in the <strong>Trio</strong> <strong>Program</strong> <strong>Guide</strong> with a channel highlighted. The program currently<br />
airing on that channel will begin recording. If you are also tuned to that channel, the<br />
recording will include any portion of the program that has been temporarily stored on the<br />
DVR.<br />
• You are browsing programs in Info Banner, which allows you to easily navigate channels<br />
or programs and quickly schedule a recording. Recording will begin at that program’s<br />
scheduled start time, provided it is in the future. If the program is currently airing and you<br />
are tuned to that channel, recording will begin immediately and any portion of program<br />
that has been temporarily stored on the DVR will also be recorded.<br />
• The Actions Card is in focus. The program displayed in the Summary Card will begin<br />
recording. The highlight bar does not need to be on Record for this to happen.<br />
• A previously set program reminder appears. Recording will begin at that program’s<br />
scheduled start time, provided it is in the future. If the program is currently airing and you<br />
are tuned to that channel, recording will begin immediately and any portion of program<br />
that has been temporarily stored on the DVR will also be recorded.<br />
40
Record <strong>Program</strong>s from the <strong>Trio</strong> <strong>Program</strong> <strong>Guide</strong><br />
The second option allows you to record programs that you have found using the <strong>Trio</strong> <strong>Program</strong><br />
<strong>Guide</strong>. After selecting a program that you<br />
want to watch (as described in Chapter 3:<br />
<strong>Guide</strong>) you can access the Record Options<br />
Menu from the Actions Card.<br />
From the Actions Card, use the DOWN arrow<br />
to move the highlight bar to Record and<br />
press SELECT.<br />
The Record Options Menu offers up to three<br />
choices:<br />
• Record This <strong>Program</strong><br />
• Record Entire Series (displayed only<br />
if program is part of a series)<br />
• Set <strong>Manual</strong> Recording<br />
Your <strong>Cox</strong> DVR lets you record up to two programs at any given time. For more information on this<br />
topic, please see About Your Dual Tuner DVR above.<br />
Record a <strong>Program</strong><br />
The Record This <strong>Program</strong> option records a<br />
single program that is scheduled to air in the<br />
future or is currently airing.<br />
To Record This <strong>Program</strong>, begin at the Actions<br />
Card:<br />
1. Use the UP or DOWN arrow to<br />
highlight Record and then press<br />
SELECT. This will display the Record<br />
Options dialogue box.<br />
2. With Record This <strong>Program</strong><br />
highlighted, press SELECT to adjust<br />
the recording settings. A new<br />
dialogue box will appear.<br />
Record any program you found in the <strong>Trio</strong> <strong>Program</strong><br />
<strong>Guide</strong> from the Actions Card.<br />
Record This <strong>Program</strong> will record any individual<br />
program.<br />
3. Adjust the settings using the UP and DOWN arrows to highlight individual settings, the<br />
LEFT and RIGHT arrows to choose options and the B button to confirm a setting change.<br />
There are many different settings you can change.<br />
41
• Until: To keep the hard drive<br />
from filling up, which would<br />
prevent you from recording other<br />
shows, you can set programs to<br />
delete when Space Is Needed<br />
(default) or I Viewed any portion<br />
of the program. The Keep Until I<br />
Delete option permanently saves<br />
the recording on your DVR,<br />
locking up hard drive space, until<br />
you manually delete it.<br />
• Start: You can set a recording to<br />
Once you have selected a program to record, you<br />
can decide how long to keep it and whether the<br />
begin On Time (default) or in<br />
one-minute increments between<br />
1 and 5 minutes, as well as 10<br />
recording should start early or extend later.<br />
minutes, 15 minutes and 30 minutes before or after the program begins.<br />
• End: You can also set a recording to end On Time (default) or in one-minute<br />
increments between 1 and 5 minutes, as well as 10 minutes, 15 minutes, and 30<br />
minutes before or after the program concludes. Additionally, you can extend the end<br />
time of the recording by 1 hour, 2 hours, and 3 hours after the program concludes.<br />
• Record To: The latest software upgrade from <strong>Cox</strong> now supports multiple DVRs that<br />
may be added to your Whole Home DVR service. If you rent multiple DVRs for your<br />
Whole Home DVR service, then you will see the Record To option. This option will<br />
allow you to select a DVR where the recording will be scheduled. For more<br />
information on this useful service from <strong>Cox</strong>, see Chapter 9: Whole Home DVR.<br />
You can create different setting combinations for each program that you record through<br />
the <strong>Guide</strong>. <strong>Program</strong>s recorded using the RECORD button on the remote control will<br />
automatically use the default settings.<br />
4. Press B to confirm recording. A red bar icon will appear at the bottom of the Summary<br />
Card to indicate the recording is set.<br />
As an alternative, you can accept the default settings and skip the above steps by simply<br />
pressing B when Record This <strong>Program</strong> is highlighted.<br />
42
Record a Series<br />
The Record Entire Series feature ensures<br />
that you never miss an episode of your<br />
favorite series.<br />
You’ll capture every show, even if the<br />
broadcast schedule changes. You can also<br />
set the DVR to record all shows or only the<br />
first-run episodes. Other settings let you<br />
manage the available space on your DVR by<br />
selecting when to delete a recording.<br />
To Record Entire Series, begin at the Actions<br />
Card.<br />
1. Use the UP or DOWN arrow to highlight Record and then press SELECT. This will<br />
display the Record Options dialogue box.<br />
2. Use the DOWN arrow to highlight Record Entire Series and then press SELECT.<br />
3. Adjust the settings using the UP and<br />
DOWN arrows to highlight individual<br />
settings, the LEFT and RIGHT<br />
arrows to choose options and the B<br />
button to confirm a setting change.<br />
There are many different settings<br />
you can change:<br />
• Episodes: You can choose to<br />
record First Run programs<br />
(default) or First Run & Repeats.<br />
• Channels: You can decide to<br />
record programs that air on the<br />
program’s original channel<br />
(default) or any channel that<br />
carries the program.<br />
A series recording will capture every episode of a<br />
favorite program, even if the schedule changes.<br />
Series recordings offer a variety of settings so you<br />
only record the programs you want and keep them<br />
only as long as you want them.<br />
• Airtimes: You can choose between All Showings (default) or only those that run at a<br />
specific time.<br />
• Keep: This setting lets you determine whether to record All Episodes (default) or any<br />
number of episodes between 1 and 15.<br />
• Until: To keep the hard drive from filling up, which would prevent you from recording<br />
other shows, you can set programs to delete when Space Is Needed (default) or I<br />
Watch any portion of the program. The Keep Until I Delete option saves the recording<br />
on your DVR, locking up hard drive space, until you manually delete it.<br />
• Start: You can set a recording to begin On Time (default) or in one-minute<br />
increments between 1 and 5 minutes, as well as 10 minutes, 15 minutes and 30<br />
minutes before or after the program begins.<br />
• End: You can also set a recording to end On Time (default) or in one-minute<br />
increments between 1 and 5 minutes as well as 10 minutes, 15 minutes, and 30<br />
43
minutes before or after the program concludes. Additionally, you can extend the end<br />
time of the recording by 1 hour, 2 hours, and 3 hours after the program concludes.<br />
• Resolution: This option becomes available when you select Any Channel in the<br />
Channels option. If the series you wish to record is in HD format, then you would be<br />
presented with two choices ─ HD only, and SD, if available. Otherwise, you will be<br />
presented with choices ─ SD only, and HD, if available.<br />
• Record To: The latest software upgrade from <strong>Cox</strong> now supports multiple DVRs that<br />
may be added to your Whole Home DVR service. If you rent multiple DVRs for your<br />
Whole Home DVR service, then you will see the Record To option. This option will<br />
allow you to select a DVR where the recording will be scheduled. For more<br />
information on this useful service from <strong>Cox</strong>, see Chapter 9: Whole Home DVR.<br />
4. Press B to Record Entire Series. A red bar icon will appear at the bottom of the Summary<br />
Card to indicate the recording is set.<br />
As an alternative, you can accept the default settings and skip the above steps by simply<br />
pressing B when Record Entire Series is highlighted.<br />
Set a <strong>Manual</strong> Recording<br />
The Set <strong>Manual</strong> Recording option lets you<br />
schedule a single or recurring recording at a<br />
specified time. Since this is a time-based<br />
option, you have the flexibility to record<br />
portions of a program or blocks of multiple<br />
programs on a single channel.<br />
To Set a <strong>Manual</strong> Recording, begin at the<br />
Actions Card.<br />
1. Use the UP or DOWN arrow to<br />
highlight Record and then press<br />
SELECT. This will display the Record<br />
Options dialogue box.<br />
<strong>Manual</strong> recordings give you the flexibility to decide<br />
when to start or end a recording, even if is just part<br />
of a program or a block of programs. .<br />
2. Use the DOWN arrow to highlight Set <strong>Manual</strong> Recording and then press SELECT.<br />
3. Adjust the settings using the UP and DOWN arrows to highlight individual settings, the<br />
LEFT and RIGHT arrows to choose options and the B button to confirm a setting change.<br />
There are many different settings you can change:<br />
• Record: Use the LEFT and RIGHT arrows to choose between One Time Only<br />
(default) and a Recurring recording.<br />
• Channels: Use the LEFT and RIGHT arrows to select a channel.<br />
• Day: Use the LEFT and RIGHT arrows to choose a day. One Time recordings will let<br />
you select Today or a date up to one year in the future. Recurring recordings will let<br />
you select specific days of the week, Monday through Sunday, Everyday, Monday-<br />
Friday, Saturday & Sunday.<br />
44
• Start Time: Select a<br />
time to begin your<br />
recording, using the UP<br />
and DOWN arrows or<br />
number buttons on the<br />
remote to input hours<br />
and minutes. Press<br />
SELECT to confirm the<br />
correct start time.<br />
• End Time: Select a time<br />
to end your recording,<br />
using the UP and DOWN<br />
arrows or number<br />
The settings for a manual recording let you decide when to<br />
buttons on the remote to start and end a recording, and how long to keep it.<br />
input hours and minutes.<br />
Press SELECT to confirm the correct end time.<br />
• Until: To keep the hard drive from filling up, which would prevent you from recording<br />
other shows, you can set programs to delete when Space Is Needed (default) or I<br />
Watch any portion of the program. The Keep Until I Delete option permanently saves<br />
the recording on your DVR, locking up hard drive space, until you manually delete it.<br />
• Record To: The latest software upgrade from <strong>Cox</strong> now supports multiple DVRs that<br />
may be added to your Whole Home DVR service. If you rent multiple DVRs for your<br />
Whole Home DVR service, then you will see the Record To option. This option will<br />
allow you to select a DVR where the recording will be scheduled. For more<br />
information on this useful service from <strong>Cox</strong>, see Chapter 9: Whole Home DVR.<br />
4. Press B to confirm. A red bar icon will appear at the bottom of the Summary Card to<br />
indicate the recording is set.<br />
Notes About <strong>Manual</strong> Recordings<br />
In Scheduled Recordings, the title of an individual manual recording appears as “Untitled<br />
Recording” until recording starts. At the time recording begins, the program title will appear. In the<br />
event the requested recording program precisely matches the start time and end time of a<br />
specific program, the program title will appear in Scheduled Recordings.<br />
In Recorded <strong>Program</strong>s or Scheduled Recordings, the title assigned to an individual manual<br />
recording that spans multiple programs is the title of the first complete program in the block. If no<br />
program in the block is complete, the assigned title is the title of the program that takes up the<br />
greatest amount of space in the recording block.<br />
In the Series Manager, the title of a recurring manual recording appears as “Untitled Recording”<br />
unless the scheduled recording time happens to precisely match a program, in which case the<br />
program title will appear.<br />
In the event of a conflict, manual recordings have a higher priority than series recordings but have<br />
the same priority as single instance recordings. A Recording Conflict alert will appear in the event<br />
of a conflict between single recordings and manual recordings.<br />
45
Notes on Start & End Times<br />
When the highlight is on Start or End Time setting, pressing the LEFT button multiple times will<br />
cycle through options for an earlier start or end times and pressing the RIGHT button multiple<br />
times will cycle through options for the latter start and end times.<br />
Confirm a Recording<br />
There are several ways to see if a recording is properly scheduled. The table below shows the<br />
icons that you should look for to confirm that a recording is scheduled or is taking place.<br />
These icons will appear in several places:<br />
• Whenever the <strong>Program</strong>s Card is in<br />
view, an icon will appear next to the<br />
program name.<br />
• Whenever the Summary Card for a<br />
scheduled recording is in view, an<br />
icon will appear along the bottom<br />
edge of the card.<br />
• Whenever an Info Banner or Channel<br />
Banner for a scheduled recording is in<br />
view, an icon will appear next to the<br />
program name.<br />
• Whenever you attempt to record a previously scheduled recording with One-Touch<br />
Recording, an alert message will appear on screen.<br />
Recording Icons<br />
There are three different icons that will appear next to currently or scheduled recorded programs.<br />
Icon Description<br />
The program is currently being recorded.<br />
A single episode is scheduled to record. The same icon is used to indicate onetime-only<br />
manual recording.<br />
A series recording is scheduled for this program. The same icon is used to indicate<br />
a manual recurring recording.<br />
About Recording Alerts<br />
The red dot icon will tell you when a program has<br />
been scheduled for recording. In this image, the<br />
red dot is in the Summary Card on the left.<br />
From time to time, you may run into a conflict between the programs you are trying to record or<br />
watch. Generally, there are three types of conflicts – recording conflicts between overlapped<br />
schedules, tuner conflicts between too many programs and storage conflicts when too little space<br />
remains on the DVR hard disk.<br />
Here are the messages you will receive and the best ways to resolve the conflict.<br />
46
Message Resolution<br />
There is not enough space on your DVR<br />
to record this program. To free up space<br />
for future recordings, change some of<br />
your “Keep Until I Delete” recordings to<br />
“Keep Until Space Needed” or delete<br />
some of them.<br />
In 5 minutes, we will need to change your<br />
channel for scheduled recordings. To<br />
continue watching this channel, you must<br />
cancel one of the following recordings..<br />
• <strong>Program</strong> 1 (by name)<br />
• <strong>Program</strong> 2 (by name)<br />
• …<br />
• <strong>Program</strong> 6 (by name)<br />
All tuners are currently in use. In 5<br />
minutes, we will need to change your<br />
channel for a scheduled recording. To<br />
continue watching this channel, you must<br />
cancel one of the following recordings..<br />
• <strong>Program</strong> 1 (by name)<br />
• <strong>Program</strong> 2 (by name)<br />
• …<br />
• <strong>Program</strong> 6 (by name)<br />
All tuners are scheduled to record<br />
programs at this time. To record this<br />
program, you must cancel a scheduled<br />
recording or record the new program on a<br />
different DVR..<br />
• <strong>Program</strong> 1 (by name)<br />
The user tried to start a recording but there is<br />
not enough hard disk space available.<br />
Press A to acknowledge the message. Your<br />
recording will not start.<br />
Return to your recorded programs list to free<br />
up some disk space by either erasing one or<br />
more programs or changing the Keep Until<br />
setting to Keep Until Space Needed before<br />
recording the program.<br />
You can then attempt your recording again.<br />
This lets you know that all tuners are needed<br />
to record upcoming programs.<br />
You may choose to cancel one of the<br />
upcoming recordings and continue watching<br />
your current channel by moving the highlight<br />
bar to your choice and pressing SELECT.<br />
You may also continue recording without<br />
changing channels by pressing C to close the<br />
alert box.<br />
After one of your recordings finishes, you may<br />
change channels freely.<br />
This alert lets you know that all tuners are<br />
needed to record current and upcoming<br />
programs.<br />
You may choose to cancel one recording and<br />
continue watching your current channel by<br />
moving the highlight bar to your choice and<br />
pressing SELECT.<br />
You may also continue recording without<br />
changing channels by pressing C to close the<br />
alert box.<br />
After one of your recordings finishes, you may<br />
change channels freely.<br />
If you attempt to schedule a program at a time<br />
when all tuners are already scheduled to<br />
record programs, you will see this alert.<br />
You may choose to cancel the recording of one<br />
of the previously scheduled programs by<br />
moving the highlight bar to the choice and<br />
47
• <strong>Program</strong> 2 (by name)<br />
• <strong>Program</strong> 3 (by name)<br />
• …<br />
• <strong>Program</strong> 7 (by name)<br />
Some episodes of this series are<br />
conflicting with your previously scheduled<br />
recordings. We’ll do our best to record as<br />
many episodes of this series as we can.<br />
But, to record the maximum number of<br />
episodes, please change the priority of<br />
this series in the Series Manager.<br />
There are too many conflicts to schedule<br />
this recording. You must cancel other<br />
recordings. To view a list of scheduled<br />
conflicts, please select Scheduled<br />
Recordings by going to the DVR List.<br />
All tuners are currently in use. To change<br />
to a different channel, you must first<br />
cancel one of the following recordings.<br />
• <strong>Program</strong> 1 (by name)<br />
• <strong>Program</strong> 2 (by name)<br />
• …<br />
• <strong>Program</strong> 6 (by name)<br />
pressing SELECT. Press A to accept the<br />
change.<br />
You may also elect to not record the new<br />
program – the one that caused the conflict – by<br />
pressing C to close the alert box.<br />
This alert appears during the scheduling<br />
process to let you know that your new series<br />
recording conflicts with multiple episodes of a<br />
previously scheduled series recording.<br />
Press A to acknowledge the alert. Return to<br />
the Series Manager to change series priorities<br />
or do nothing if you are comfortable with the<br />
conflicts. Non-conflicting episodes of the series<br />
will be scheduled to record.<br />
You may see this alert if there are more than<br />
two schedule conflicts, most likely associated<br />
with a series recording or recording from<br />
search results.<br />
Before you can record the series or search<br />
results, you must first cancel the scheduled<br />
recordings that are causing the conflicts. You<br />
can do this from Scheduled Recordings section<br />
under DVR List.<br />
This alert occurs when you try to tune in a<br />
program at the same time all tuners are busy<br />
recording other programs. You will not be<br />
allowed to change channels until you resolve<br />
this conflict.<br />
You may choose to stop one recording and<br />
change channels by moving the highlight bar to<br />
your choice and pressing SELECT.<br />
You may also continue recording without<br />
changing channels by pressing C to close the<br />
alert box.<br />
After one of your recordings finishes, you may<br />
change channels freely.<br />
48
DVR List Views<br />
The latest software upgrade from <strong>Cox</strong> now<br />
supports multiple DVRs that may be added to<br />
your Whole Home DVR service. You can<br />
access combined or individual list of<br />
recordings stored on all DVRs from any<br />
receiver in your home network. If you rent<br />
multiple DVRs for your Whole Home DVR<br />
service, then you will have the option of<br />
switching between different DVR List views<br />
from across all DVRs in your home network.<br />
You can move through these different views<br />
by pressing the DVR LIST button:<br />
• While watching TV, press the DVR<br />
LIST button once to open the DVR<br />
List Menu. The very first view is the<br />
Combined DVR List view, which<br />
combines recorded programs,<br />
scheduled recordings, series<br />
recordings, and missed recordings in<br />
one unified view.<br />
• Press the DVR LIST button a second<br />
time to show DVR List from the first<br />
DVR in your home.<br />
• Each additional time you press the<br />
DVR LIST button, DVR List views<br />
from the remaining DVRs will come<br />
up in order until you are returned<br />
back to the combined DVR List view.<br />
Press DVR LIST the first time to bring up the<br />
Combined DVR List view. Press DVR LIST<br />
additional times to call up individual DVR List views<br />
from across all your DVRs in your Whole Home<br />
network.<br />
Individual DVR List from a specific DVR shows only<br />
the recordings stored and scheduled on that DVR.<br />
Pressing the LAST button will return you to the previous view, letting you navigate backwards<br />
through the different views.<br />
Notes About DVR List Views<br />
To enjoy Whole Home DVR, you must be a subscriber to <strong>Cox</strong>’s Whole Home DVR service. DVR<br />
rental fees may apply for any additional DVR you may choose to rent from <strong>Cox</strong>. If you are not a<br />
subscriber but would like to learn more, please contact your <strong>Cox</strong> Customer Service<br />
Representative.<br />
Change DVR List View action is displayed at the bottom of the DVR List screen only if you have<br />
multiple DVRs combined in your Whole Home network.<br />
When the view is a Combined DVR List View, then the DVR space utilization information<br />
displayed in the top right corner is for total DVR space across all DVRs in your Whole Home DVR<br />
service. When you switch to an individual DVR List view, then it shows only the DVR space<br />
utilization information from that particular DVR only.<br />
49
Watch a Recorded <strong>Program</strong><br />
You can watch a recorded program anytime you like, beginning immediately after the recording<br />
has started. There are two alternatives to accessing your library of recorded programs.<br />
The first is to simply press the DVR List button on your remote control. It will open a DVR List<br />
Menu on the left in focus and Recorded <strong>Program</strong>s highlighted. The Folders Card in the center will<br />
feature a list of your recorded programs and series while a Summary Card will appear on the<br />
right.<br />
The second is through the Main Menu.<br />
1. Press the RIGHT or LEFT arrow or the MENU button on the remote control to open the<br />
Main Menu.<br />
2. Press the DOWN arrow twice to highlight DVR List. Press the RIGHT arrow or SELECT<br />
to open the DVR List Menu.<br />
Once you have arrived at the DVR List Menu<br />
– by either option – the highlight bar will be on<br />
Recorded <strong>Program</strong>s. To watch a program:<br />
1. Press the RIGHT arrow or SELECT.<br />
The focus will move to the Folders<br />
Card in the center; the highlight bar<br />
will be on the first program in the list.<br />
Each program or series will have an<br />
icon next to it. Series recordings will<br />
have a folder icon while individual<br />
recordings will have one of two<br />
different icons – a green dot or an<br />
exclamation point. For an explanation<br />
of these three icons, see below.<br />
2. Use the UP and DOWN arrows to<br />
highlight a program or folder, then<br />
press the RIGHT arrow or SELECT. If<br />
the highlight bar is on a program, the<br />
cards will shift left and the focus will<br />
move to the Actions Card.<br />
If the highlight bar is on a folder,<br />
pressing the RIGHT arrow or<br />
SELECT will open a <strong>Program</strong>s Card<br />
on the right that lists all the episodes<br />
in that folder. Use the UP and DOWN<br />
The DVR List screen lets you browse recorded<br />
programs as well as programs scheduled to record.<br />
When browsing recorded programs, the center card<br />
lists the saved programs. The card on the right<br />
gives a summary of the program.<br />
arrows to highlight a program, and then press the RIGHT arrow or SELECT to select the<br />
program and open the Actions Card.<br />
50
3. The first available option in the<br />
Actions Card will vary. For many<br />
programs, the first action in the<br />
list will be Watch Now. Press<br />
SELECT to begin watching your<br />
show.<br />
If you have previously started<br />
watching the selected program,<br />
then the first action will be<br />
Resume and the second action<br />
will be Watch From Beginning.<br />
Use the UP or DOWN arrow to<br />
highlight your choice and then<br />
press SELECT to begin<br />
watching.<br />
A Note About Folders<br />
You may also view the contents of folders in the center card using the B button. Press B<br />
(Ungroup Titles) to open all folders and display the titles. Close the folders and Group Titles by<br />
pressing B a second time.<br />
Recorded <strong>Program</strong> Icons<br />
There are three different icons that will appear next to recorded programs.<br />
Icon Description<br />
This program is marked as Keep Until I Delete or Keep Until I Watch (any portion of<br />
the program). This recording is permanent until you manually delete it.<br />
This program is marked as Keep Until Space Needed.<br />
This is a series recording, recording from persistent searches and recurring manual<br />
recordings or individual recordings having the same program title.<br />
This series episode has been auto-clipped because a high priority series recording<br />
episode overlapped with this low priority series episode.<br />
A Note About Auto-Clipping of Series Episodes<br />
After you have selected a recorded program, the Actions<br />
card lets you begin watching it. Use the UP or DOWN<br />
arrows to select the correct action.<br />
There are times when some series episodes are not scheduled to air precisely at the top or<br />
bottom of the hour. Therefore, these episodes can overlap by only a few minutes with other<br />
scheduled recordings, thus causing a conflict. Auto-clipping function can come to the rescue to<br />
deal with such situations. If a scheduled series recording episode overlaps with other scheduled<br />
series recordings by 20% or less, DVR will automatically clip the series episode having a lower<br />
priority so that the highest priority series episode will be recorded in its entirety. The series<br />
episode of lower priority will still be recorded, although up to 20% of content may be clipped from<br />
its beginning or end to accommodate the series episodes of higher priority. This prevents from<br />
having the lower priority series episode from not getting recorded at all because it conflicted with<br />
other series episodes.<br />
51
Scan a Recorded <strong>Program</strong><br />
Watching programs recorded to a DVR offers the same ability to scan forward and backward in<br />
your program that you find in programs taped by a VCR. <strong>Program</strong>s recorded to a DVR also allow<br />
scanning at multiple speeds.<br />
The different functions are described below.<br />
• PLAY: This button starts your program at normal speed.<br />
• PAUSE: You can pause a recorded program for up to 15 minutes. Pausing longer than<br />
that stops your program and brings you back to the Recorded <strong>Program</strong>s list. You can<br />
resume watching your program from the Actions Card of that program. PAUSE also<br />
toggles between the Pause and Play functions.<br />
• STOP: This button ends your program and brings you back to Recorded <strong>Program</strong>s list.<br />
• FAST FORWARD: This button<br />
lets you scan ahead in your<br />
program at up to four different<br />
speeds. Press FAST FORWARD<br />
once to begin fast forwarding.<br />
Each successive press (up to 4<br />
presses) increases the speed.<br />
Pressing FAST FORWARD a fifth<br />
time returns the program to normal<br />
speed. You can also press PLAY<br />
to return the program to normal<br />
speed. If you fast forward to the<br />
program’s end, you will see the<br />
<strong>Program</strong> Finished dialogue box<br />
asking you if you want to delete<br />
this program from your DVR or<br />
keep it for future viewing.<br />
Whenever you scan a recorded program, this banner<br />
will appear showing the total running time and your<br />
place within the program.<br />
• REWIND: This button lets you scan backwards in your program at up to four different<br />
speeds. Press REWIND once to begin rewinding. Each successive press (up to 4<br />
presses) increases the rewind speed. Pressing REWIND a fifth time returns the program<br />
to normal forward speed, just as if you had pressed PLAY. If left to rewind to the<br />
beginning, the program will start playing automatically.<br />
• PAUSE & FAST FORWARD: Pressing PAUSE and then FAST FORWARD begins a<br />
slow motion playback of the recorded program at the slowest speed. Pressing FAST<br />
FORWARD a second time fast-forwards the program at a slightly higher but slower than<br />
normal fast forward speed. Pressing FAST FORWARD a third time fast-forwards the<br />
program at the normal fast-forward speed. You can resume watching at normal speed at<br />
any time by pressing PLAY.<br />
• PAUSE & REWIND: Pressing PAUSE and then REWIND begins a slow motion rewind of<br />
the recorded program. Slow motion rewind is available only in one speed. Pressing<br />
REWIND the second time rewinds the program at the slowest speed. Pressing REWIND<br />
a third time resumes the playback at normal speed. Additionally, you can resume<br />
watching at normal speed at any time by pressing PLAY.<br />
•<br />
52
• PAUSE & RIGHT: Pressing PAUSE and then RIGHT begins a frame by frame playback<br />
of the recorded program. You can walk through different frames of the recorded program<br />
by repeatedly pressing the RIGHT arrow button on your remote control.<br />
• PAUSE & LEFT: Pressing PAUSE and then LEFT begins a frame by frame playback of<br />
the recorded program. You can walk through different frames of the recorded program by<br />
repeatedly pressing the LEFT arrow button on your remote control.<br />
When you press any of these buttons, a progress bar appears at the bottom of your screen. It<br />
displays the viewing time graphically as well as in hours, minutes and seconds.<br />
Use Instant Replay<br />
Your DVR also allows you to review a critical scene<br />
or an outstanding play on a favorite sports program<br />
with the INSTANT REPLAY button – indicated by a<br />
curved arrow. Press this button to jump backward in<br />
the program seven seconds.<br />
Delete Recorded <strong>Program</strong>s<br />
The <strong>Trio</strong> <strong>Program</strong> <strong>Guide</strong> lets you manage<br />
the number of recordings saved to your<br />
DVR. This is particularly important as DVRs<br />
have ample, but not unlimited, storage<br />
space. A “gas gauge” in the top right corner<br />
of the DVR List Menu screen shows how<br />
much available storage space remains at<br />
any given time.<br />
There are two ways to manage the way<br />
programs are removed from the list. The first<br />
is the Until option. It allows you to decide in<br />
advance when a program will be deleted<br />
When you no longer want to keep a recording, you can<br />
based on other conditions. You can choose delete it from the Actions Card.<br />
to keep a program until storage space is<br />
needed, you watch any portion of the program or until you actively delete it.<br />
To change an Until setting, begin at the Actions Card of a program selected from the DVR<br />
Recorded <strong>Program</strong>s list:<br />
1. Use the UP or DOWN arrow to highlight Until and then press SELECT. It will open a new<br />
dialogue box.<br />
2. Use the UP or DOWN arrow to highlight the appropriate choice – Space Needed, I Delete<br />
or I Viewed – and then press SELECT.<br />
3. Press B to confirm and update your settings.<br />
The Instant Replay button looks like this. It is<br />
below the REWIND and Record buttons.<br />
The second way is to simply delete a program. To do that, begin at the Actions Card of a program<br />
selected from the DVR Recorded <strong>Program</strong>s list:<br />
1. Use the UP or DOWN arrow to highlight Delete This <strong>Program</strong> and then press SELECT.<br />
53
2. Press B to confirm.<br />
Get Details About a Recording<br />
When programs are recorded, the DVR also captures all the program information you are<br />
accustomed to seeing when using the <strong>Trio</strong> <strong>Program</strong> <strong>Guide</strong> to find live TV programs.<br />
To get more details about the programs in your DVR List, such as a full description of the<br />
program, its content ratings or length of time, select a program just as you would if you were<br />
going to watch it.<br />
When you arrive at the Actions Card:<br />
1. Use the UP or DOWN arrow to highlight See Full Details and then press SELECT. A<br />
dialogue box will appear with the program information.<br />
2. When you are finished, press C to close.<br />
Browse Related<br />
<strong>Program</strong>s recorded to your DVR can be used as a starting point for conducting Browse Related<br />
searches. This feature lets you search for upcoming episodes, related series, related programs<br />
from cast & crew, and related genre, just as described in Chapter 3: <strong>Guide</strong>.<br />
54
Manage Scheduled Recordings<br />
The <strong>Trio</strong> <strong>Program</strong> <strong>Guide</strong> lets you review and manage all your currently scheduled recordings,<br />
including changing the recording options and canceling a scheduled recording.<br />
To review your Scheduled Recordings,<br />
begin at the DVR List Menu on the left in<br />
focus.<br />
1. Use the DOWN arrow to move the<br />
highlight bar to Scheduled<br />
Recordings. All of your scheduled<br />
recordings, listed in chronological<br />
order beginning with Today, will<br />
appear in the Folders Card in the<br />
center of the screen.<br />
2. Press the RIGHT arrow or<br />
SELECT. The focus will move to<br />
the Folders Card.<br />
3. Use the UP or DOWN arrow to find a planned recording you want to review.<br />
4. Press the RIGHT arrow or SELECT. The cards will shift to the left and the focus will move<br />
to the Actions Card in the center. A Summary Card will appear on the left.<br />
Change Recording Options for a Single <strong>Program</strong><br />
You can view and revise the recording options assigned to any scheduled single program<br />
recording.<br />
At the Actions Card, Edit Recording Options<br />
will be highlighted.<br />
1. Press SELECT. A dialogue box with<br />
the recording options assigned to that<br />
program will appear.<br />
2. Adjust the settings using a<br />
combination of the UP and DOWN<br />
arrows to highlight individual settings<br />
and the SELECT button to confirm.<br />
There are several different settings<br />
you can change:<br />
Review planned recordings, change settings and<br />
cancel planned recordings from the Scheduled<br />
Recordings Menu.<br />
Edit Recording Options lets you manage single<br />
program recordings.<br />
• Until: To keep the hard drive<br />
from filling up, which would prevent you from recording other shows, you can set<br />
programs to delete when Space Is Needed or I Viewed any portion of the program.<br />
You can also choose the “I Delete” option to save a show until you manually delete it.<br />
• Start: You can set a recording to begin On Time or in one-minute increments<br />
between 1 and 5 minutes, as well as 10 minutes, 15 minutes and 30 minutes before<br />
or after the program begins.<br />
55
• End: You can set a recording to end On Time or in one-minute increments between 1<br />
and 5 minutes, as well as 10 minutes, 15 minutes, and 30 minutes before or after the<br />
program concludes. Additionally, you can extend the end time of the recording by 1<br />
hour, 2 hours, and 3 hours after the program concludes.<br />
• Record To: The latest software upgrade from <strong>Cox</strong> now supports multiple DVRs that<br />
may be added to your Whole Home DVR service. If you lease multiple DVRs for your<br />
Whole Home DVR service, then you will see the Record To option. This option will<br />
allow you to select a DVR where the recording will be scheduled. For more<br />
information on this useful service from <strong>Cox</strong>, see Chapter 9: Whole Home DVR.<br />
3. Press B to accept your changes.<br />
Change Options for a <strong>Manual</strong> Recording<br />
You can view and revise the recording options assigned to any scheduled manual recording.<br />
At the Actions Card, Edit Recording Options will be highlighted.<br />
1. Press SELECT. A dialogue box with the recording options assigned to that program will<br />
appear.<br />
2. Adjust the settings using a combination of the UP and DOWN arrows to highlight<br />
individual settings and the SELECT button to confirm. There are several different settings<br />
you can change:<br />
• Record: You can choose between One Time Only and a Recurring recording.<br />
• Channels: Use the UP and DOWN arrows to select a channel.<br />
• Day: Use the UP and DOWN arrows to choose a day. One Time recordings will let<br />
you select Today or a date up to one year in the future. Recurring recordings will let<br />
you select specific days of the week, Monday through Sunday, Everyday, Monday-<br />
Friday, Saturday & Sunday.<br />
• Start Time: Select a time to begin your recording, using the UP and DOWN arrows<br />
or number buttons on the remote to input hours and minutes. Press SELECT to<br />
confirm the correct start time.<br />
• End Time: Select a time to end your recording, using the UP and DOWN arrows or<br />
number buttons on the remote to input hours and minutes. Press SELECT to confirm<br />
the correct end time.<br />
• Until: To keep the hard drive from filling up, which would prevent you from recording<br />
other shows, you can set programs to delete when Space Is Needed (default) or I<br />
Viewed any portion of the program. The Keep Until I Delete option permanently<br />
saves the recording on your DVR until you manually delete it.<br />
• Record To: The latest software upgrade from <strong>Cox</strong> now supports multiple DVRs that<br />
may be added to your Whole Home DVR service. If you lease multiple DVRs for your<br />
Whole Home DVR service, then you will see the Record To option. This option will<br />
allow you to select a DVR where the recording will be scheduled. For more<br />
information on this useful service from <strong>Cox</strong>, see Chapter 9: Whole Home DVR.<br />
56
3. Press B to Accept Changes.<br />
Cancel a Scheduled Recording<br />
You can also cancel a Scheduled Recording.<br />
To do this, begin at the Actions Card:<br />
1. Press the DOWN arrow to highlight Cancel This Recording.<br />
2. Press SELECT. A dialogue box will appear, asking you to confirm the cancellation.<br />
3. Press B to confirm.<br />
57
Manage Series Recordings<br />
The Series Manager allows you to view and modify recording options for each of the series<br />
recordings. The changes you make to the<br />
series recording will affect each episode in<br />
the series that is scheduled to be recorded. It<br />
doesn’t affect episodes recorded prior to any<br />
changes.<br />
To manage a series recording, begin at the<br />
DVR List Menu on the left in focus.<br />
1. Use the DOWN arrow to move the<br />
highlight bar to Series Manager. All<br />
your scheduled series recordings will<br />
appear in the Folders Card in the<br />
center of the screen.<br />
2. Press the RIGHT arrow or SELECT.<br />
The focus will move to the Folders Card. Use the UP or DOWN arrow to find a series<br />
folder to review.<br />
3. Press the RIGHT arrow or SELECT. The cards will shift to the left and the focus will move<br />
to the Actions Card in the center. A Summary Card, showing details of the series<br />
recording history, will appear on the left.<br />
Change Series Recording Options<br />
You can view and revise the recording options assigned to any scheduled series recording.<br />
At the Actions Card, Edit Recording Options<br />
will be highlighted.<br />
1. Press SELECT. A dialogue box with<br />
the recording options assigned to<br />
that series will appear.<br />
2. Adjust the settings using a<br />
combination of the UP and DOWN<br />
arrows to highlight individual settings<br />
and the SELECT button to confirm.<br />
There are several different settings<br />
you can change:<br />
• Episodes: You can choose to<br />
record First Run programs or First Run & Repeats.<br />
The Series Manager lets you adjust the full range of<br />
options for series recordings.<br />
Edit Recording Options lets you manage series<br />
recordings. Use a combination of the arrow buttons<br />
and SELECT button to change the settings.<br />
• Channels: You can choose to record programs that air on the program’s original<br />
channel or any channel that carries the program.<br />
• Airtimes: You can choose between All Showings or only those that run at a specific<br />
time.<br />
58
• Keep: This setting lets you determine whether to record All Episodes or any number<br />
of episodes between 1 and 15.<br />
• Until: To keep the hard drive from filling up, which would prevent you from recording<br />
other shows, you can set programs to delete when Space Is Needed or I Watch any<br />
portion of the program. You can also choose the “I Delete” option to save all shows in<br />
the series until you manually delete the series.<br />
• Start: You can set a recording to begin On Time or in one-minute increments<br />
between 1 and 5 minutes, as well as 10 minutes, 15 minutes and 30 minutes before<br />
or after the program begins.<br />
• End: You can set a recording to end On Time or in one-minute increments between 1<br />
and 5 minutes, as well as 10 minutes, 15 minutes, and 30 minutes before or after the<br />
program concludes. Additionally, you can extend the end time of the recording by 1<br />
hour, 2 hours, and 3 hours after the program concludes.<br />
o Resolution: This option becomes available when you select Any Channel in the<br />
Channels option. If the series you wish to record is in HD format, then you would be<br />
presented with two choices ─ HD only, and SD, if available. Otherwise, you will be<br />
presented with choices ─ SD only, and HD, if available.<br />
3. Press B to accept your changes.<br />
A Note About Record To Option for Series Recordings<br />
Record To option is not available when you edit series recordings because series recordings<br />
expected to be stored on one DVR. If you still want to change the DVR for a particular series,<br />
then we recommend you to cancel the series and reschedule it on a different DVR by using the<br />
appropriate DVR in the Record To option.<br />
Change Series Priority<br />
Modify Series Priority allows you to adjust the recording priority of a series and determine which<br />
series is recorded when there is a conflict in the recording schedule.<br />
To do this, begin at the DVR List Menu of a<br />
specific DVR.<br />
1. Use the UP or DOWN arrow to<br />
highlight Series Manager.<br />
2. Press B to Modify Series Priority.<br />
3. Use the UP or DOWN arrow to<br />
highlight a series that you would like<br />
to put higher or lower in the priority<br />
list. Press SELECT. A number box will<br />
appear in the highlight bar.<br />
Series Manager also lets you modify the recording<br />
priority and determine which programs are<br />
recorded in the event of a conflict.<br />
4. Use the UP or DOWN arrow to<br />
change the priority. The number in the<br />
box will change. A lower number means the series has a higher priority. Press SELECT<br />
to confirm the change.<br />
59
You can also use the number pad on your remote control to directly enter a new priority<br />
number.<br />
5. Press B to accept all changes. The priority numbers of all series will be adjusted<br />
accordingly.<br />
A Note About Change Series Priority for Multiple Whole Home DVRs<br />
If you lease multiple DVRs for your Whole Home DVR service, then Change Series Priority option<br />
is not available when your DVR List view is Combined DVR List view. It is only available when<br />
you are on the individual DVR List view as the series recordings can only be prioritized on<br />
individual DVRs separately.<br />
Cancel a Series Recording<br />
You can cancel a scheduled Series Recording. To do this, begin at the Actions Card:<br />
1. Press the DOWN arrow to highlight Cancel Series Recording.<br />
2. Press SELECT. A dialogue box will appear, asking you to confirm the cancellation.<br />
3. Press B to confirm.<br />
Delete All <strong>Program</strong>s from a Series Recording<br />
You may want to delete series recordings you<br />
have already watched or are no longer<br />
interested in watching. This option will delete<br />
all episodes in a series. To delete single<br />
episodes, please see Delete Recorded<br />
<strong>Program</strong>s above.<br />
To do this, begin at the Actions Card:<br />
1. Press the DOWN arrow to highlight<br />
Delete Series <strong>Program</strong>s.<br />
2. Press SELECT. A dialogue box will<br />
appear, asking you to confirm the<br />
delete. This will delete all programs in<br />
the series that are currently recorded<br />
to the DVR.<br />
3. Press B to confirm.<br />
See Your Missed Recordings<br />
Delete Series <strong>Program</strong>s will delete all episodes in a<br />
series. To Delete a single episode, please see<br />
Delete Recorded <strong>Program</strong>s above.<br />
Your Missed Recordings is a log of missed recordings. By reviewing this information, you can<br />
avoid future missed recordings. The reasons include manual cancellation, the DVR hard drive is<br />
full, there was a recording conflict or there was no data in the <strong>Guide</strong>.<br />
To view your Missed Recordings, begin at the DVR List Menu on the left in focus.<br />
60
1. Use the DOWN arrow to move the<br />
highlight bar to Missed Recordings.<br />
All your failed recordings will appear<br />
in the Folders Card in the center of<br />
the screen.<br />
2. Press SELECT. The focus will move<br />
to the Folders Card. Use the UP or<br />
DOWN arrow to find a failed<br />
recording to review.<br />
3. Press SELECT. The Summary Card<br />
on the right will show the reason this<br />
recording failed.<br />
Remote DVR Scheduling<br />
Missed Recordings explains why a scheduled<br />
recording did not happen.<br />
Remote DVR Scheduling is an added feature for customers with a <strong>Cox</strong> DVR. Remote DVR<br />
Scheduling is a convenient way to record a single episode of a show on a moment’s notice.<br />
Now you can program your DVR running the <strong>Trio</strong> <strong>Program</strong> <strong>Guide</strong> from your wireless phone or<br />
from a computer.<br />
Notes on Remote Scheduling<br />
To use Remote DVR Scheduling, you must have a subscription to <strong>Cox</strong> DVR service and a valid<br />
<strong>Cox</strong> User ID. There is no additional charge to use Remote DVR Scheduling, but consult your<br />
wireless provider for charges that may apply to access the Internet on your wireless phone.<br />
61
Chapter 6: Whole Home DVR<br />
<strong>Cox</strong>’s new Whole Home DVR service lets family members watch saved programs from any<br />
television set/cable receiver combination in the house, even those that don’t have DVRs. The<br />
DVR also allows you to pause a show in one room and resume watching it in the other room. It is<br />
that easy. Up to five receivers, any combination of DVRs and non-DVR receivers can be<br />
networked together. The latest software upgrade from <strong>Cox</strong> now supports multiple DVRs for your<br />
Whole Home DVR service. You can access combined or individual list of recordings stored on all<br />
DVRs from any receiver in your home network.<br />
When your network is complete, family members can watch recorded programs at the same time<br />
from each of the televisions in the network. From the non-DVR receivers, you can play a<br />
program, replay favorite scenes or fast forward to the next important scene, delete the program<br />
when you have finished watching it, and schedule recordings, just as you would if you were using<br />
the DVR-enabled receiver. Only the DVR-enable receiver can give you VCR-like functionality –<br />
PAUSE, REWIND, etc. – while watching live TV.<br />
To enjoy Whole Home DVR, you must be a subscriber to <strong>Cox</strong>’s Whole Home DVR service. If you<br />
are not a subscriber but would like to learn more, please contact your <strong>Cox</strong> Customer Service<br />
Representative.<br />
The main sections in this Chapter are:<br />
• General information on multiple DVR support<br />
• Watching recorded programs on non-DVR receivers<br />
62
Multiple DVR Support<br />
The latest software upgrade from <strong>Cox</strong> can now support multiple DVRs that can be added to your<br />
Whole Home DVR service. Up to five receivers, any combination of DVRs and non-DVR<br />
receivers can be networked together. You can benefit from having multiple DVRs for your Whole<br />
Home DVR service in the following two main ways.<br />
• No more running out of space for your recordings. Each additional DVR you add to your<br />
Whole Home DVR service will provide you with extra space for your recordings.<br />
• No more missed recordings because you can now record two extra shows for each<br />
additional DVR you add to your Whole Home DVR service. For example, if you combine<br />
two DVRs, then you can record up to four HD programs simultaneously. If you combine<br />
three DVRs, then you can record up to six HD programs simultaneously. You may even<br />
choose to combine five DVRs to record up to ten programs simultaneously.<br />
DVR Network Status<br />
DVRs participate in the Whole Home DVR network in either a visible or an invisible status.<br />
A visible status allows the DVR to make all of<br />
its recorded programs and scheduled<br />
recordings accessible to any other DVR or<br />
non-DVR receiver in the network. Also, a<br />
visible status allows a DVR to accept<br />
recording requests from any other networked<br />
DVR or a non-DVR receiver. In other words,<br />
visible status operates both ways. At any<br />
given point in time, you must have at least one<br />
visible DVR in your home network to allow<br />
non-DVR receivers to access recordings.<br />
An invisible status allows the DVR to hide all<br />
of its recorded programs and scheduled<br />
recordings from being accessed by any other<br />
DVR or non-DVR receiver in the network.<br />
However, an invisible DVR can access the<br />
recorded programs and scheduled recordings<br />
that are currently stored on all visible DVRs in<br />
the network. In other words, invisible status<br />
operates only one way. Invisible status is<br />
beneficial in situations where you do not wish<br />
to make recordings from your personal DVR<br />
be made available to other receivers in your<br />
household, but at the same time you wish to<br />
have full access to recordings stored on other<br />
DVRs in your network.<br />
You can change the network status of DVR in the<br />
Settings Menu.<br />
You can change the network status of DVR in the<br />
Settings Menu.<br />
By default, all DVRs in your Whole Home DVR network are set as visible DVRs. If you wish to<br />
change their network status, you can do this in the Settings Menu. For more information on how<br />
to view and change the network status of DVRs, see Chapter 10: Settings.<br />
63
Naming of DVRs<br />
If you choose to get multiple DVRs for your<br />
home network, then we highly recommend<br />
that you name your DVRs. Naming allows you<br />
to identify your DVRs where you can schedule<br />
your recordings. For more information on how<br />
to name DVRs, see Chapter 10: Settings.<br />
Setting Default DVR<br />
If you choose to get multiple DVRs for your<br />
home network, we recommend you to set a<br />
default DVR for your non-DVR receiver. This<br />
allows a non-DVR receiver to use the default<br />
DVR as the default go-to DVR for its<br />
recordings. This becomes useful when you set<br />
up your recording just by pressing the<br />
RECORD button on your remote control so<br />
that you are not asked to select which DVR<br />
you wish to schedule this recording to. Also,<br />
this default DVR is used for individual, series,<br />
and manual recordings as a default Record To<br />
option, but can be easily changed by selecting<br />
a different DVR when you schedule your<br />
recordings. For more information on how to<br />
set up recordings, see Chapter 5: DVR.<br />
Notes About Multiple Whole Home<br />
DVRs<br />
You can name your receivers in the Settings Menu.<br />
You can set the default DVR from the Settings<br />
Menu.<br />
To enjoy Whole Home DVR, you must be a subscriber to <strong>Cox</strong>’s Whole Home DVR service. DVR<br />
rental fees may apply for multiple DVRs you may choose to rent from <strong>Cox</strong>. If you are not a<br />
subscriber but would like to learn more, please contact your <strong>Cox</strong> Customer Service<br />
Representative.<br />
64
Watch a Recorded <strong>Program</strong><br />
Once your network has been installed, you<br />
are ready to watch DVR-recorded<br />
entertainment. On any connected receiver,<br />
open your library of saved programs through<br />
the DVR List, just as you would on the DVRenabled<br />
receiver and television. For more<br />
information on this, see Watch a Recorded<br />
<strong>Program</strong> in Chapter 5: DVR.<br />
Recorded programs on a non-DVR receiver can be<br />
accessed in a similar manner as DVR receiver.<br />
All DVR-related functions on a non-DVR receiver can be accessed in a similar manner as DVR<br />
receiver. Please see Chapter 5: DVR for more information on how to access Scheduled<br />
Recordings, Series Manager, Missed Recordings, or how to schedule recordings.<br />
65
Pausing Live TV on Non-DVR Receivers<br />
With the latest software upgrade from <strong>Cox</strong>, you can now pause live TV on your non-DVR<br />
receiver. Once a program is paused, you can also perform fast-forward, rewind, instant replay<br />
etc. on the paused program from that point forward. Because non-DVR receivers don’t have a<br />
hard disk, pausing a program on a non-DVR receiver requires buffering that program on a DVR.<br />
This, in turn, requires a free tuner available on the DVR. This process is simple and happens<br />
automatically behind the scenes when you press the PAUSE button on your remote control.<br />
By default, this feature is turned off. When it is off, pressing the PAUSE button on the remote<br />
control displays an informative message asking you to turn it on from the Settings Menu. For<br />
more information on how to turn pause live TV on, please see Chapter 10: Settings.<br />
Once this feature has been turned on, you are all set to go. When you press pause while<br />
watching a program on your non-DVR receiver, an informative banner will display asking you to<br />
wait while the program starts buffering on the paired DVR. If the paired DVR has a tuner<br />
available, then the buffer starts immediately on the DVR and the program is paused on your non<br />
DVR receiver. You may experience up to 10 seconds delay during this process.<br />
Occasionally, when a tuner is unavailable on the DVR, you will not be able to pause live TV on<br />
your non-DVR receiver until the tuner on the DVR is freed-up. Also, the DVR tuner you may be<br />
using to pause live TV on your non-DVR may be claimed by the DVR to allow channel changes or<br />
to record programs at their scheduled airtime.<br />
Notes About Pausing Live TV on non-DVR Receivers<br />
To avoid continuous use of DVR tuners and thus monopolizing of the DVR by one or few non-<br />
DVR receivers in the Whole-Home DVR network, you can control paused live TV continuously for<br />
only a period of 3 hours. If you perform a VCR-like control function during the 3-hour period, then<br />
that time-period is reset for another 3 hours. If no VCR-like control functions are performed within<br />
the 3-hour period, then that tuner is reclaimed and is made available for recording, channel<br />
changes, or for pausing live TV purposes on other non-DVR receivers. If within a 3-hour period, if<br />
a tuner is needed for channel changes or scheduled recordings, then it is immediately reclaimed<br />
for those purposes and you will lose the ability to pause live TV until a tuner becomes available<br />
on the DVR.<br />
When you pause a program on a non-DVR receiver, you can rewind only up to the point when<br />
you paused it. Only in rare circumstances where the DVR was already tuned to the same<br />
program or has already been recording that program from its beginning, then you can rewind<br />
through the entire program.<br />
The DVR tuner used for pause live TV purposes can be reclaimed in one of the following<br />
circumstances.<br />
• You decide to tune to a different channel using your remote control’s numeric buttons,<br />
CH+- buttons, FAV button, LAST button, from <strong>Guide</strong>, INFO banner, search, browse<br />
related, recommendations etc.<br />
• DVR user decide to change channels that requires a separate tuner and all remaining<br />
tuners are currently occupied for recordings or for watching TV<br />
66
Watching DVR Recordings on DLNA Premium Video Certified®<br />
Products<br />
DLNA®, which stands for The Digital Living Network Alliance®, is a non-profit trade organization<br />
that defines standards that enable devices to share media ─ photos, video, music ─ with each<br />
other. One such standard developed by The DLNA® is a DLNA Premium Video. With the DLNA<br />
Premium Video, you can stream your recorded programs stored on your DVR to a DLNA<br />
Certified® Premium Video product such as a video game console. Every day, new devices<br />
become DLNA Certified®. Please ensure that the DLNA Certified® device you are buying<br />
supports the DLNA Premium Video in order to access and play back your DVR recordings. To<br />
learn more about DLNA Certified® products, please visit the The DLNA® website at:<br />
http://www.dlna.org/<br />
To watch DVR recordings on a DLNA Certified® product, you would need the following.<br />
1. The DLNA Certified® product that supports DLNA Premium Video standard<br />
2. Ethernet to MoCA Bridge (this product is also known as Ethernet MoCA Adapter or<br />
Ethernet over COAX Adapter)<br />
3. MoCA password from the <strong>Trio</strong> <strong>Program</strong> <strong>Guide</strong><br />
4. COAX splitter (optional)<br />
To set up your DLNA Certified® product to access DVR recordings:<br />
1. First note down the MoCA password<br />
for your Whole-Home DVR network.<br />
2. Using the wiring diagram provided by<br />
your MoCA bridge manufacturer,<br />
connect the MoCA Bridge to a Coax<br />
cable splitter or an un-used cable<br />
outlet. Also, connect the other end of<br />
the MoCA Bridge to a wired or<br />
wireless router for Internet<br />
connectivity.<br />
3. Using the instructions provided by<br />
your MoCA Bridge manufacturer,<br />
enter the MoCA password into the<br />
MoCA Bridge software to allow it to<br />
MoCA password can be accessed by going to the<br />
Receivers and DVR Network menu options from the<br />
Settings menu.<br />
join your Whole-Home DVR network. If you run into problems, call your manufacturer first<br />
and then contact <strong>Cox</strong> for any additional questions.<br />
4. Finally, connect your DLNA Certified® product to the Internet and access its video<br />
features to see if you are able to see DVR recordings. If you do not see any DVR<br />
recordings, then make sure you have followed instructions correctly from all different<br />
manufacturers.<br />
67
Chapter 7: Recommendations<br />
Today, there are thousands of program choices available on TV. These many choices can<br />
sometimes become overwhelming. To help you find programs that match your personal taste, the<br />
<strong>Trio</strong> <strong>Program</strong> <strong>Guide</strong> now includes personalized recommendations. These recommendations are<br />
based on the programs you already watch and your taste preferences for programs that you like<br />
or dislike.<br />
68
Getting to Recommendations<br />
There are three main ways to access recommendations.<br />
1. From the Main Menu: Press the COX MENU button on your remote control, highlight<br />
Recommendations, and press the<br />
RIGHT arrow or SELECT button<br />
on the remote.<br />
2. From the <strong>Guide</strong>: Press the<br />
diamond-shaped D button.<br />
3. From the On DEMAND menu:<br />
Highlight Recommended For You<br />
for On DEMAND only<br />
recommended programs.<br />
From the Main Menu, press SELECT or the RIGHT<br />
arrow to go to Recommendations.<br />
On the <strong>Guide</strong>, press the D button on your remote<br />
control to go to Recommendations.<br />
For On DEMAND only recommendations, go to<br />
Recommended For You in the On DEMAND menu.<br />
69
Personalized Recommendations Notice<br />
Each user in the household receives unique<br />
recommendations suited to one’s own taste<br />
and preferences. By default, all users in the<br />
household are opted-in to receive<br />
personalized recommendations. To inform<br />
users about their right to opt-out, a<br />
personalized recommendations notice is<br />
presented to each user when<br />
Recommendations are accessed the very first<br />
time.<br />
Browsing through Recommendations<br />
Browsing through recommendations is as<br />
easy as browsing through your <strong>Guide</strong>. Just highlight any one of the categories on the left card<br />
and program recommendations will be displayed in the center card pertaining to that category.<br />
On Now<br />
On Now displays an assortment of currently<br />
airing programs and On DEMAND programs.<br />
Only those programs that have aired 50% or<br />
less of their scheduled time are<br />
recommended. If the program has aired more<br />
than 50% of its scheduled duration, then such<br />
program is not recommended. Also, any<br />
program that will begin airing in the next 5<br />
minutes or less is recommended.<br />
Later Today<br />
Later Today includes a list of recommended<br />
programs that are scheduled to air on that<br />
day until 11:59pm. <strong>Program</strong>s airing 12:00am<br />
onwards on that midnight will be<br />
recommended in the Next Days section<br />
discussed below.<br />
Personalized Recommendations Notice appears<br />
the first time each user goes to Recommendations.<br />
On Now recommendations display currently airing<br />
programs and On DEMAND programs that you may<br />
enjoy watching.<br />
Later Today includes a list of recommended<br />
programs that will air on that day until mid-night.<br />
70
Next Days<br />
Next Days includes a list of recommended<br />
programs that will begin airing in the next 14<br />
days from 12:00am midnight onwards.<br />
Recommended For You<br />
Recommended For You contains all your On<br />
DEMAND recommendations in one place.<br />
Liking/Disliking <strong>Program</strong>s<br />
Your likes / dislikes help us find more<br />
programs that match your tastes.<br />
To Like a program, begin at the Actions Card:<br />
1. Press the DOWN arrow to highlight I<br />
Like.<br />
2. Press SELECT. The instructions in<br />
the right card will update to state that<br />
you liked the program.<br />
To Dislike a program, begin at the Actions<br />
Card:<br />
1. Press the DOWN arrow to highlight I<br />
Dislike.<br />
Next Days includes a list of recommended<br />
programs that will air in the next 2 weeks.<br />
Liking or Disliking a program helps the<br />
recommendations software to fine-tune<br />
recommendations that match your taste.<br />
2. Press SELECT. The instructions in the right card will update to state that you disliked the<br />
program.<br />
71
Suspend Recommendation<br />
Suspend Recommendation action allows you<br />
to temporarily prevent the program from being<br />
recommended (e.g., hold off that Christmas<br />
movie until the next Christmas season).<br />
To Suspend Recommendation, begin at the<br />
Actions Card:<br />
1. Press the DOWN arrow to highlight<br />
Suspend Recommendation.<br />
2. Press SELECT. The program will be<br />
removed from your recommendations<br />
list.<br />
Suspend Recommendation allows you to<br />
temporarily prevent the program from being<br />
recommended to you.<br />
72
Chapter 8: Interactive Services<br />
<strong>Cox</strong> Interactive Services delivers the latest news, information and entertainment to your<br />
television, whenever you need it. The Zone Channels feature gives you instant access to top<br />
news, sports and children’s programming in a single view. <strong>Cox</strong> Digital Telephone customers also<br />
have access to Caller ID through the TV and other useful phone tools.<br />
73
Launch Interactive Services<br />
Interactive Services is found in the Main<br />
Menu of the <strong>Cox</strong> <strong>Trio</strong> <strong>Program</strong> <strong>Guide</strong>. To<br />
open the Interactive Services Menu:<br />
1. Open the Main Menu using the<br />
MENU button on your remote<br />
control or by pressing either the<br />
RIGHT or LEFT arrow.<br />
2. Use the UP or DOWN arrow to<br />
move the highlight bar to<br />
Interactive Services.<br />
3. Press SELECT or RIGHT arrow<br />
to open the Interactive Services<br />
Menu.<br />
Use Phone Tools<br />
Turn your television into a powerful tool for managing incoming phone calls, including Caller ID to<br />
the TV, live call forwarding and checking calls you missed while you were away. <strong>Cox</strong> Digital<br />
Telephone Service with Caller ID is required to use these tools.<br />
To open the Phone Tools Menu, begin at the Interactive Services Menu on the left.<br />
Use the UP or DOWN arrow to highlight Phone Tools and press SELECT or RIGHT arrow. The<br />
focus will shift to the Phone Tools Menu in the center card, with Call Logs highlighted. The<br />
INFObar widget will be in the card on the right.<br />
See Calls You Missed<br />
To open the Call Log, begin at the Phone<br />
Tools Menu.<br />
When you launch Interactive Services you will see a<br />
screen like this. Available services are listed in the card<br />
on the left.<br />
1. Press SELECT or RIGHT arrow. A<br />
new screen will appear. The card on<br />
the left shows your home phone number or numbers, if there is more than one line to the<br />
house. The center card shows a list of callers in chronological order.<br />
2. Use the UP or DOWN arrow to highlight a telephone number and then press SELECT or<br />
RIGHT arrow.<br />
3. Use the UP or DOWN arrow to highlight a caller and then press SELECT or RIGHT<br />
arrow. Call details will appear in the card on the right.<br />
4. Use LEFT arrow or LAST to look at other missed calls or return to Phone Tools.<br />
74
See Who Is Calling<br />
With Caller ID to the TV, you can see who<br />
is calling without interrupting your<br />
television program.<br />
To adjust these settings, begin at the<br />
Phone Tools Menu in the center card.<br />
1. Use the UP or DOWN arrow to<br />
highlight TV Caller ID and press<br />
SELECT or RIGHT arrow. A new<br />
screen will appear, with a TV<br />
Caller ID Menu on the left. TV<br />
Caller ID, the first item in the list,<br />
will be highlighted.<br />
2. The default setting for Caller ID to<br />
the TV is on.<br />
3. To set the duration of the Caller ID banner, use the UP or DOWN arrow to highlight<br />
Duration and press SELECT or RIGHT arrow.<br />
4. Use the UP or DOWN arrow to highlight 5, 10, 15, 20 or 30 seconds and press SELECT<br />
or RIGHT arrow.<br />
5. Press LEFT arrow or LAST to return to the TV Caller ID Menu.<br />
6. To position the Caller ID Banner, use the UP or DOWN arrow to highlight Position and<br />
press SELECT or RIGHT arrow.<br />
7. Use the UP or DOWN arrow to highlight Bottom or Right for the banner position and<br />
press SELECT or RIGHT arrow.<br />
8. Use LEFT arrow or LAST to return to the Phone Tools Menu.<br />
Watch Zone Channels<br />
You can simultaneously view some of the<br />
most popular channels through the Zone<br />
Channels feature in Interactive Services. Zone<br />
Channels includes up to 6 channels in each of<br />
three categories - News, Sports and Kids.<br />
When you click on Zone Channels in<br />
Interactive Services, you will see live video<br />
from each channel in a category – say Sports<br />
– arranged on a single screen.<br />
To open Zone Channels, begin at the<br />
Interactive Services Menu in the card on the<br />
left.<br />
Caller ID to the TV allows you see who is calling<br />
without interrupting your program.<br />
Zone Channels lets you view live video from up to<br />
20 channels in three different categories. From this<br />
screen, you can choose one to watch in full screen.<br />
1. Use the UP or DOWN arrow to<br />
highlight Zone Channels and press SELECT or RIGHT arrow. The focus will shift to the<br />
center card.<br />
75
2. Use the UP or DOWN arrow to<br />
highlight News, Sports or Kids and<br />
press SELECT or RIGHT arrow. The<br />
selected Zone Channel will open in a<br />
new screen.<br />
3. Use the arrow buttons to highlight a<br />
channel you’re interested in to hear<br />
the audio. Channel information can be<br />
found below the video pane and in a<br />
list on the left.<br />
Zone Channels offers News, Sports and Children’s<br />
programming. Select your category in the card in<br />
the center.<br />
4. To watch a channel full screen, use<br />
the arrow buttons to navigate to and highlight the video pane and then press SELECT.<br />
Note:<br />
• Parental Controls work on this view of Zone Channels just as they would on live<br />
television.<br />
• Zone Channels may not be available in all service areas.<br />
76
Chapter 9: Customer Support<br />
The <strong>Trio</strong> <strong>Program</strong> <strong>Guide</strong> offers a number of Customer Support tools. This Chapter discusses the<br />
different support services available and how to access them.<br />
77
Access Customer Support<br />
Customer Support is found under the Main Menu. To open the Customer Support Menu:<br />
1. Open the Main Menu using the MENU button on your remote control or by pressing either<br />
the RIGHT or LEFT arrow.<br />
2. Use the UP or DOWN arrow to move the highlight bar to Customer Support. Press<br />
SELECT or RIGHT arrow to open the Customer Service Menu.<br />
Get Answers to Technical Questions<br />
The Customer Support section of the <strong>Trio</strong><br />
<strong>Program</strong> <strong>Guide</strong> includes details about your<br />
cable receiver.<br />
Occasionally, it will be necessary to look up<br />
details on your cable receiver (set top box).<br />
To do this, begin at the Technical Support<br />
Menu.<br />
1. Use the RIGHT arrow to bring the<br />
highlight to Cable Receiver in the<br />
center card.<br />
2. Press SELECT or RIGHT arrow on<br />
the Cable Receiver. A new screen will<br />
appear with the serial number of the<br />
cable receiver and other information.<br />
The Technical Support Menu includes details on<br />
your cable receiver. Highlight Technical Support<br />
and press SELECT to call up this information.<br />
3. Use LEFT arrow or LAST to return to the Technical Support Menu.<br />
78
Receiver Test<br />
If you experience issues with <strong>Trio</strong> or its Whole<br />
Home DVR service, you may be asked by the<br />
customer service representative to run the<br />
Receiver Test. The Receiver Test checks for<br />
any network or connectivity issues and<br />
reports them on the screen. <strong>Cox</strong> customer<br />
service representative will then ask you about<br />
the reference code you may see on the<br />
screen. This greatly expedites the<br />
troubleshooting process.<br />
To run the Receiver Test, begin at the<br />
Technical Support Menu.<br />
1. Use the RIGHT arrow to highlight<br />
Cable Receiver and then press<br />
DOWN arrow to highlight Run<br />
Receiver Test.<br />
2. Press SELECT to run the Receiver<br />
Test. A new screen will appear that<br />
will display the status of different tests<br />
that will be run. The Receiver Test<br />
may take up to 5 minutes to run<br />
completely.<br />
3. Once the Receiver Test is completely<br />
run, you will see three buttons<br />
displayed at the bottom. Press the B<br />
button to view the Receiver Test<br />
Report. This report displays the type<br />
of test, brief summary of the issue,<br />
and troubleshooting instructions.<br />
Press UP/DOWN or PAGE+- arrows<br />
to read information about the issues.<br />
4. Use LEFT arrow or LAST to return to<br />
the Technical Support Menu.<br />
Receiver Test is a diagnostic test that identifies any<br />
network or connectivity issues with your receiver.<br />
Highlight the Run Receiver Test and press SELECT<br />
to run this test.<br />
The Receiver Test screen displays the progress of<br />
the test.<br />
Once the Receiver Test is complete, the screen will<br />
display three buttons displayed on the screen.<br />
Pressing the B button displays the Receiver Test<br />
report.<br />
79
View the Receiver Test Report<br />
At any time, you may access the Receiver<br />
Test report that was last run. To do this, begin<br />
at the Technical Support Menu.<br />
1. Use the RIGHT arrow to highlight<br />
Cable Receiver and then press the<br />
DOWN arrow twice to highlight<br />
Receiver Test Report.<br />
2. Press SELECT to view the Receiver<br />
Test Report. A new screen will<br />
appear that will display the Receiver<br />
Test Report. This report displays the<br />
type of test, brief summary of the<br />
issue, and troubleshooting<br />
instructions.<br />
3. Press C or LEFT arrow to exit.<br />
View the Use Agreement<br />
You may review your Use Agreement with<br />
<strong>Cox</strong> at any time.<br />
To do this, begin at the Customer Support<br />
Menu.<br />
1. Use the UP or DOWN arrow to<br />
highlight Use Agreement and press<br />
SELECT or RIGHT arrow. The<br />
agreement will appear in a dialogue<br />
box.<br />
2. Use DOWN arrow to scroll through<br />
the information.<br />
3. Press C or LEFT arrow to exit.<br />
The Receiver Test Report displays the test name,<br />
brief summary of the issue, and troubleshooting<br />
steps.<br />
The Use Agreement screen includes details on your<br />
cable service agreement with <strong>Cox</strong>.<br />
80
View the <strong>Cox</strong> Privacy Policy<br />
You may review the <strong>Cox</strong> Privacy Policy<br />
at any time.<br />
To do this, begin at the Customer<br />
Support Menu.<br />
1. Use the UP or DOWN arrow to<br />
highlight Privacy and press<br />
SELECT or RIGHT arrow. The<br />
agreement will appear in a<br />
dialogue box.<br />
2. Use DOWN arrow to scroll<br />
through the information.<br />
3. Press C or LEFT arrow to exit.<br />
This screen details the <strong>Cox</strong> Privacy Policy.<br />
81
Chapter 10: Search<br />
The <strong>Trio</strong> <strong>Program</strong> <strong>Guide</strong> features a Universal Search function that lets you quickly sort through all<br />
the programming available through TV, On DEMAND, Pay-Per-View and even items saved to<br />
your DVR, if one is connected, in a single search. In addition to traditional title searches, you can<br />
search for new programs by keyword or by your favorite actors or directors. Searches can be<br />
saved and re-used to find new content as it becomes available.<br />
This Chapter includes information on using Search.<br />
82
Start a Search<br />
You can access Search in two ways:<br />
• While viewing full screen video, press Main Menu and use the UP or DOWN arrow to<br />
move the highlight bar to Search. Press the RIGHT arrow or SELECT button to launch<br />
Search.<br />
• From certain places within the <strong>Guide</strong> and On DEMAND Menu, press the A button to go<br />
directly to Search. Look for the A button in the bottom right corner of the screen for <strong>Guide</strong><br />
screens from which this feature is available.<br />
Search for <strong>Program</strong>s<br />
The Search Menu features a Search By Card<br />
on the left, a keyboard in the center and a<br />
Results Card on the right. When you first<br />
open Search, the highlight bar will be on<br />
Search By Title in the left card.<br />
1. Use the UP or DOWN arrow to<br />
highlight a Search By filter. You can<br />
search by program title, keywords or<br />
cast & crew.<br />
2. Press the RIGHT arrow or SELECT<br />
button to begin a search. Or, if the<br />
search keyboard is configured as the<br />
Remote Control keyboard (for more<br />
information, please see Chapter 10: Settings), you can begin pressing number keys to<br />
enter characters into the search box. The focus will move to the keyboard in the center<br />
card.<br />
3. If the keyboard is configured as On-<br />
Screen, use UP arrow, DOWN arrow,<br />
LEFT arrow, RIGHT arrow and<br />
SELECT to enter characters into the<br />
search box. If you are using the<br />
Remote Control keyboard, use the<br />
number (0-9) keys to enter characters<br />
into the search box. Each number<br />
represents three or four letters.<br />
4. As soon as you enter characters into<br />
the search box, results will begin to<br />
appear in the Results Card on the<br />
right. Continue typing until the<br />
program you want appears in the<br />
results box.<br />
This image shows the On Screen keyboard. The<br />
Search By option offers several search categories,<br />
such as Title, Keyword or Cast & Crew.<br />
The On-Screen keyboard, above, features<br />
individual letters, Use the arrow keys to navigate<br />
the letters and press SELECT to enter it.<br />
5. Press the RIGHT arrow. The focus and highlight bar will move to the Results Card.<br />
83
Depending on your search, you may see a<br />
folder icon next to some programs indicating<br />
that different episodes are available or that it’s<br />
a program showing at different times or on<br />
different channels. If your program has a<br />
folder icon next to it, skip to step 8.<br />
Other programs do not have a folder icon,<br />
indicating that there is only one viewing<br />
choice. If the program you want to watch does<br />
not have a folder icon next to it:<br />
6. Use the UP and DOWN arrows to<br />
move the highlight bar to the program<br />
you want. Press the RIGHT arrow or<br />
SELECT button.<br />
This will pull up three additional cards – a Summary Card on the left and an Actions Card in the<br />
center. The card on the right will offer instructions or promotional information. Watch Now in the<br />
Actions Card will be highlighted.<br />
7. Press SELECT to begin watching. If the program is not currently airing, the television will<br />
tune to that channel.<br />
To complete a search of programs that has a folder icon next to the title:<br />
8. Use the UP and DOWN arrows to move the highlight bar to the program you are<br />
interested in.<br />
9. Press the RIGHT arrow or SELECT button to continue sorting programs.<br />
This will pull up three additional cards – a<br />
Filter Card on the left, a <strong>Program</strong>s Card in the<br />
center and a Summary Card on the right. The<br />
first item, All <strong>Program</strong>s, in the Filter Card will<br />
be highlighted.<br />
10. Use the UP and DOWN arrows to<br />
move the highlight bar to different<br />
filters. For example, you can sort by<br />
On DEMAND programs, First Run<br />
programs or High Definition<br />
programs. You may also review all<br />
programs.<br />
11. Press the RIGHT arrow or SELECT<br />
button to browse program choices.<br />
The highlight bar will move to the<br />
<strong>Program</strong>s Card in the center.<br />
Some programs – such as those with multiple<br />
episodes – will have a folder icon next to the result.<br />
In this image, Lost is highlighted in the Results card<br />
on the right.<br />
When searching programs with multiple episodes,<br />
three additional cards help you complete your<br />
search. The Filters card on the left lets you sort<br />
different ways, such as by All Episodes or those<br />
that air in HD.<br />
12. Use the UP and DOWN arrows to highlight your program. Once you have found it, press<br />
the RIGHT arrow or SELECT button.<br />
84
This will pull up a final set of cards – the<br />
Summary Card on the left, the Actions Card in<br />
the center and an Information Card on the<br />
right. The highlight bar will be placed on<br />
Watch Now in the Actions Card.<br />
13. Press SELECT to begin watching.<br />
Notes on Using the On-Screen<br />
Keyboard.<br />
The <strong>Trio</strong> <strong>Program</strong> <strong>Guide</strong> offers a choice of<br />
keyboards for using Universal Search. The<br />
On-screen keyboard is the default choice.<br />
You can switch to a Remote Control keyboard<br />
that uses the number pad by changing the<br />
default settings. For more information, see<br />
Chapter 10: Settings.<br />
To use the On-screen keyboard, use the<br />
arrow keys to highlight letters and press<br />
The Remote Control keyboard, above, works like<br />
SELECT to confirm each letter. To move from the Triple Tap keyboard found on many cell<br />
the keyboard to the Results card, press the phones. See Chapter 10 for more information.<br />
RIGHT arrow several times until you reach<br />
the end of a row. Press the RIGHT arrow one more time to move to the next card.<br />
To move from the keyboard to the Search By Card on the left, press the LEFT arrow several<br />
times until you reach the first letter in the row. Press the LEFT arrow one more time to move to<br />
Search By Card.<br />
Search for <strong>Program</strong>s up to 14 Days Ahead<br />
When you have found the specific program you<br />
want to watch, use the RIGHT arrow to move to the<br />
Actions Card in the center. Press SELECT to Watch<br />
Now.<br />
Search allows you to find programs that will run up to 14 days in the future. Find and select these<br />
programs just as you would any program and then set a reminder to watch them.<br />
85
Save Searches<br />
Press the A button to save a search. Look for<br />
the A button in the bottom right corner of your<br />
screen to see when this option is available.<br />
Each time you save a search, the counter<br />
next to Saved Searches in the Search By<br />
Card will increase by one.<br />
You can access your Saved Searches<br />
anytime by returning to the Search By Card.<br />
Use the UP or DOWN arrow to highlight<br />
Saved Searches and then press SELECT.<br />
Rather than pulling up the list of items your<br />
search found last time, the search will run<br />
Press the yellow A button on your Remote Control<br />
to save a search. This option is available whenever<br />
the yellow A appears in the bottom right corner of<br />
your screen.<br />
again. The new list will include programs that were not available the last time you searched.<br />
86
Chapter 11: Settings<br />
The <strong>Trio</strong> <strong>Program</strong> <strong>Guide</strong> is designed to give every viewer a personalized television watching<br />
experience. The Settings Menu offers a variety of choices for making the <strong>Guide</strong> easier to use and<br />
adapting it for maximum enjoyment. In particular, the new Users function makes it possible for<br />
each member of the household to access an individualized set of channels and programs.<br />
You can launch the Settings Menu in two different ways. The first is to open the Main Menu using<br />
the MENU button or the LEFT or RIGHT arrow. Use the UP or DOWN arrow to highlight Settings<br />
and then press SELECT. Or, the SETTINGS shortcut button on your remote control will take you<br />
directly to the Settings Menu.<br />
This Chapter introduces the new User function and discusses other important Settings<br />
information including setting Parental Controls, selecting Favorite Channels, turning on Closed<br />
Captioning and changing other technical settings to better suit your needs.<br />
The main sections in this Chapter are:<br />
• Users<br />
• Parental Controls and <strong>Program</strong> Ratings<br />
• Channels<br />
• <strong>Guide</strong> Options<br />
• Audio & Video<br />
• Timers<br />
• Receivers<br />
87
Users<br />
The Users function lets each member of the household set up a personal profile that includes his<br />
or her Favorite Channels, preferred <strong>Guide</strong> View, preferred Keyboard, and Saved Searches. In the<br />
near future, the <strong>Trio</strong> <strong>Program</strong> <strong>Guide</strong> will be able to offer a range of other features, including<br />
recommendations for additional shows you might like but weren’t aware of and the ability to send<br />
messages to other <strong>Cox</strong> subscribers.<br />
In homes with more than one television,<br />
different users are able to enjoy their<br />
personalized settings from different<br />
televisions. The <strong>Trio</strong> <strong>Program</strong> <strong>Guide</strong> comes<br />
with a default user – called Valued Customer<br />
– that you can personalize with your Favorite<br />
Channels and other preferences.<br />
To get the most advantage from the Users<br />
function, you should begin by setting up User<br />
profiles for one or more household members.<br />
Add New User<br />
To add users, begin at the Settings Menu:<br />
1. Press the RIGHT arrow or SELECT<br />
button to move to the Users Menu in<br />
the center card.<br />
2. Use the DOWN arrow to highlight<br />
Add New User and press SELECT.<br />
This will reveal an On-screen<br />
keyboard.<br />
3. Use the keyboard to enter a<br />
username. It can be any combination<br />
of letters or numbers up to eight<br />
characters long. Press B to Continue.<br />
4. Use the arrow keys to highlight a<br />
picture. Press SELECT to confirm.<br />
The only change in the screen will be<br />
the appearance of a black dot next to<br />
the image you selected.<br />
5. Press B to Add User.<br />
6. You will automatically return to the<br />
Users Menu in the center card. Use<br />
LEFT arrow to return to the Settings<br />
Menu or press EXIT to return to live<br />
television.<br />
User profiles are the first function when you open<br />
the Settings Menu. Begin by setting up new users<br />
for family members.<br />
The first step in adding new users is entering a<br />
screen name. Use this keyboard to do it.<br />
After selecting a screen name, select an image to<br />
personalize your user.<br />
To continue personalizing a new user profile,<br />
see Channels section below. This will discuss how to set up a personalized channels list.<br />
88
Set Current User<br />
At the start of each television watching<br />
session, select a user profile to take<br />
advantage of the personalized channels list.<br />
In homes with more than one television,<br />
different users can logon to their personalized<br />
settings from different sets.<br />
To set the current user from the Settings<br />
Menu:<br />
1. Press the RIGHT arrow or SELECT<br />
button to move to the Users Menu in<br />
the center card. Set Current User is<br />
the first item in the list and will be<br />
highlighted.<br />
2. Press the RIGHT arrow or SELECT button to open the user list, which will appear in the<br />
center card.<br />
3. Use the UP or DOWN arrow to highlight your user profile and press the SELECT button.<br />
4. Use the LEFT arrow to return to the Settings Menu or press EXIT to return to live<br />
television.<br />
Edit User<br />
You can change your personalized settings at<br />
any time. To do this, begin at the Settings<br />
Card:<br />
1. Press the RIGHT arrow or SELECT<br />
button to move to the Users Menu in<br />
the center card.<br />
2. Use the UP or DOWN arrow to<br />
highlight Edit User and press the<br />
RIGHT arrow or SELECT button to<br />
show the Edit User options.<br />
3. Press the RIGHT or LEFT arrow to<br />
find the user. Press B to Continue.<br />
4. Change the user name if you like and then press B to Continue.<br />
Select a user profile each time you turn on the<br />
television to access Favorite Channels and other<br />
features.<br />
Change personalized settings using the Edit User<br />
function, which is found in the middle screen.<br />
5. Change the picture if you like and then press B to Save Changes.<br />
6. Use the LEFT arrow to return to the Settings Menu or press EXIT to return to live<br />
television.<br />
89
Delete User<br />
You are allowed to have up to eight different<br />
users in each household. Sometimes,<br />
however, you will want to remove users from<br />
the system. To do this from the Settings<br />
Menu:<br />
1. Press the RIGHT arrow or SELECT<br />
button to move to the Users Menu in<br />
the center card.<br />
2. Use the UP or DOWN arrow to<br />
highlight Delete User and press<br />
SELECT.<br />
3. Use the RIGHT and LEFT arrows to<br />
find the user profile you want to<br />
remove.<br />
4. Press B to delete the user.<br />
5. Press B to confirm.<br />
6. Use the LEFT arrow to return to the<br />
Settings Menu or press EXIT to return<br />
to live television.<br />
Use the Delete User function, found in the center<br />
screen, to remove users from the <strong>Guide</strong>.<br />
Use the LEFT and RIGHT arrows to find the user<br />
profile you want to remove. Press B twice to<br />
permanently delete the user.<br />
90
Parental Controls and <strong>Program</strong> Ratings<br />
Parental Controls let you control who watches<br />
or buys certain TV programs. By using a<br />
Parental Control PIN, you can lock programs<br />
and channels, restrict the ability to record<br />
programs and limit access to On DEMAND<br />
and Pay-Per-View programming. With a<br />
Purchase PIN, you can limit the ability of<br />
users to buy On DEMAND or PPV programs.<br />
Parental Controls must be set up for each<br />
receiver (set top box).<br />
Set a Parental Control PIN<br />
To set a Parental Controls PIN, begin at the<br />
Settings Menu:<br />
1. Use the UP or DOWN arrow to<br />
highlight Parental Controls.<br />
2. Press the RIGHT arrow or SELECT<br />
button to open Parental Controls<br />
Menu.<br />
3. Use the UP or DOWN arrow to<br />
highlight Set Parental PIN and press SELECT. A dialog box will ask you to set up a<br />
Parental Control PIN.<br />
4. Press the B button to begin the set-up process. Use the number keys (0-9) on the remote<br />
control to set a four-digit PIN. The system will then ask you to re-enter your PIN.<br />
5. Press the A button when you are finished.<br />
Most <strong>Cox</strong> systems will let you set your own pin initially while other systems will set a default<br />
Parental Control PIN for you. The first dialog box will ask you for this default PIN. To retrieve your<br />
PIN, contact your <strong>Cox</strong> Customer Care representative.<br />
If you forget your PIN numbers, you may call <strong>Cox</strong> Customer Service to reset it.<br />
Edit Parental Control PIN<br />
Parental Controls appears in the left screen when<br />
you open the Settings Menu.<br />
Use the keypad (numbers 0-9) to set your Parental<br />
Control PIN.<br />
When a Parental Control PIN is in place, the action item will change from “Set Parental PIN” to<br />
Edit Parental PIN. To change your Parental Control PIN, begin at the Parental Controls Menu in<br />
the center card:<br />
1. Use the UP or DOWN arrow to highlight Edit Parental Control PIN.<br />
2. Press the RIGHT arrow or SELECT button to open the PIN dialog box.<br />
91
3. Enter your current four-digit PIN.<br />
4. Enter your new four-digit PIN.<br />
5. Confirm your new four-digit PIN.<br />
6. Press the A button when you are finished.<br />
Set a Purchase PIN<br />
A Purchase PIN lets you control purchases from On DEMAND or Pay-Per-View. To set a<br />
Purchase PIN, begin at the Parental Control Menu in the center card:<br />
1. Use the UP or DOWN arrow to highlight Set Purchase PIN. Press the RIGHT arrow or<br />
SELECT. A dialog box will ask you to set up a Purchase PIN.<br />
2. Press the B button to begin the set-up process. Use the number keys (0-9) on the remote<br />
control to set a four-digit PIN. The system will then ask you to re-enter your PIN.<br />
3. Press the A button when you are finished.<br />
Restrict Access to <strong>Program</strong>ming<br />
The <strong>Trio</strong> <strong>Program</strong> <strong>Guide</strong> lets you restrict access to programming several different ways. Setting<br />
Locking Status is the first step is to turning on Parental Controls.<br />
Begin at the Parental Controls Menu in the center card:<br />
1. Use the UP or DOWN arrow to move<br />
the highlight bar to Parental Locks.<br />
Press the RIGHT arrow or SELECT<br />
button to edit the lock settings.<br />
A new set of cards will appear, with<br />
the highlight bar on Locking Status in<br />
the right card.<br />
2. Press SELECT to shift the focus and<br />
highlight bar to the center card.<br />
3. Use the UP or DOWN arrow to<br />
highlight On and press SELECT.<br />
Whenever there is a request to change<br />
Locking Status or any of the Parental Controls, a dialogue box will appear asking you to enter the<br />
four-digit PIN. It will only happen once, triggered by the first change request. This allows you to<br />
easily change multiple settings during any single visit to Parental Controls.<br />
4. Use the LEFT arrow to return to Locking Status.<br />
Temporarily Unlock<br />
Use the RIGHT arrow to reach the Locking Status<br />
Options card in the center of the screen. Select On<br />
to begin locking programs.<br />
Parental Controls lets you open all locked channels for a short period of time. The Temporarily<br />
Off function, found under Locking Status, opens all locks as long as the remote control is active. If<br />
the remote is inactive for five consecutive hours, then all locks are automatically restored.<br />
92
Lock Channels<br />
After turning on Parental Controls, you have a number of different ways to restrict access to<br />
<strong>Program</strong>ming, including by channel, by ratings, by content advisories and by time slot.<br />
Begin at the Parental Controls Menu in the card on the right.<br />
1. Use the UP or DOWN arrow to<br />
highlight Lock Channel. Press the<br />
RIGHT arrow or SELECT to choose<br />
this option.<br />
2. Use the UP and DOWN arrows to<br />
highlight channels that you want to<br />
block. Alternatively, you can simply<br />
enter the channel number using the<br />
number (0-9) keys. Press SELECT to<br />
lock that option.<br />
3. Use the UP or DOWN arrow to select<br />
additional ratings. Press SELECT to<br />
lock each additional rating.<br />
4. Press the LEFT arrow to return to the Parental Controls Menu or press EXIT to return to<br />
live television.<br />
Rather than lock single channels, you can lock all channels at one time and then selectively<br />
unlock the channels you want.<br />
1. Press the A button to lock all channels.<br />
2. Use the UP or DOWN arrows to choose a channel to unlock.<br />
3. Press SELECT to unlock each individual channel.<br />
Use the UP or DOWN arrow to highlight the<br />
channel and press SELECT.<br />
4. Press the LEFT arrow to return to the Parental Controls Menu or press EXIT to return to<br />
live television<br />
If, at a later date, you want to unlock all channels, return to the Parental Controls Menu. Highlight<br />
Locking Status and press SELECT. Use the arrow keys to highlight Off and then press SELECT.<br />
93
Lock Ratings<br />
To restrict access to movies and television programs that carry a certain rating, begin at the<br />
Parental Controls Menu in the card on the right.<br />
1. Use the UP or DOWN arrow to highlight Lock Ratings. Press the RIGHT arrow or<br />
SELECT button.<br />
2. Use the UP and DOWN arrows to<br />
highlight specific ratings that you<br />
want to block. Press SELECT to lock<br />
that option.<br />
3. Use the UP or DOWN arrow to select<br />
additional ratings. Press SELECT to<br />
lock each additional rating.<br />
4. Press the LEFT arrow to return to the<br />
Parental Controls Menu or press<br />
EXIT to return to live television.<br />
Lock Content Advisories<br />
To restrict access to movies and television programs that contain certain types of content, begin<br />
at the Parental Controls Menu in the card on the right.<br />
1. Use the UP or DOWN arrow to<br />
highlight Lock Content. Press the<br />
RIGHT arrow or SELECT button.<br />
2. Use the UP and DOWN arrows to<br />
highlight a content advisory that you<br />
want to block. Press SELECT to lock<br />
that option.<br />
3. Use the UP or DOWN arrow to select<br />
additional content advisories. Press<br />
SELECT to lock each additional one.<br />
4. Press the LEFT arrow to return to the<br />
Parental Controls Menu or press<br />
EXIT to return to live television.<br />
Lock Times<br />
Use the UP or DOWN arrow to highlight the rating<br />
and press SELECT.<br />
Use the UP or DOWN arrow to highlight the content<br />
advisory rating and press SELECT.<br />
To restrict access to programming that airs during certain times of day, begin at the Parental<br />
Controls Menu in the card on the right.<br />
94
1. Use the UP or DOWN arrow to<br />
highlight Lock Time. Press the RIGHT<br />
arrow or SELECT button to choose<br />
that option.<br />
2. Use the UP and DOWN arrows to<br />
highlight time schedules that you<br />
want to block. Press SELECT to lock<br />
that option.<br />
3. Use the UP or DOWN arrow to select<br />
additional time schedules. Press<br />
SELECT to lock each additional one.<br />
4. Press the LEFT arrow to return to the Parental Controls Menu or press EXIT to return to<br />
live television.<br />
Block Titles<br />
Choosing Block Titles will hide the title and<br />
description of programs that have been<br />
locked. This is useful as some titles and<br />
descriptions may include suggestive or<br />
inappropriate language.<br />
To Block Titles, begin at the Parental Controls<br />
Menu in the center card:<br />
1. Use the UP or DOWN arrow to move<br />
the highlight bar to Parental Locks.<br />
Press the RIGHT arrow or SELECT<br />
button to edit the lock settings.<br />
2. Use the UP or DOWN arrow to move the highlight bar to Block Titles. Press the RIGHT<br />
arrow or SELECT button to edit these options.<br />
3. Use the UP and DOWN arrows to choose a program rating level and press SELECT to<br />
block titles and descriptions for programs at that rating and higher. Alternatively, highlight<br />
All Locked <strong>Program</strong>s to block titles of all locked programs and press SELECT.<br />
4. Press the LEFT arrow twice to return to the Parental Controls Menu or press EXIT to<br />
return to live television.<br />
Lock Recordings<br />
Use the UP or DOWN arrow to highlight the content<br />
advisory rating and press SELECT.<br />
Use the UP or DOWN arrow to select a rating, and<br />
then press SELECT to confirm.<br />
The Lock Recordings option lets you require a Parental Control PIN to delete or cancel a<br />
recording. To turn this option on:<br />
95
From the Parental Controls Menu in the<br />
center card:<br />
1. Use the UP or DOWN arrow to<br />
highlight Parental Locks. Press the<br />
RIGHT arrow or SELECT button.<br />
2. Use the UP or DOWN arrow to<br />
highlight Lock Recordings and press<br />
SELECT.<br />
3. Use the UP or DOWN arrow to<br />
highlight Prevent Deletion and press<br />
SELECT. A checkmark will appear to<br />
confirm the selection.<br />
4. Use the UP or DOWN arrow to highlight Prevent Cancellation and press SELECT. A<br />
checkmark will appear to confirm the selection.<br />
5. Press the LEFT arrow twice to return to the Parental Controls Menu or press EXIT to<br />
return to live television<br />
Lock Purchases<br />
The Lock Purchases option lets you decide<br />
who orders On DEMAND and Pay-Per-View<br />
programming by requiring the use of the<br />
Purchase PIN. To turn this option on:<br />
From the Parental Controls Menu in the center card:<br />
1. Use the UP or DOWN arrow to highlight Parental Locks. Press the RIGHT arrow or<br />
SELECT button.<br />
2. Use the UP or DOWN arrow to highlight Lock Purchases and press SELECT.<br />
3. Use the UP or DOWN arrow to highlight Yes and press SELECT.<br />
Use the UP or DOWN arrow to select a rating, and<br />
then press SELECT to confirm.<br />
Lock Purchases is found in the center card. Press<br />
SELECT to require a Purchase PIN to buy On<br />
DEMAND and Pay-Per-View programs.<br />
4. Press the LEFT arrow twice to return to the Parental Controls Menu or press EXIT to<br />
return to live television.<br />
96
Lock Services<br />
The Lock Services option lets you control<br />
access to On DEMAND and Adult On<br />
DEMAND programming by requiring the use<br />
of the Parental Controls PIN. To turn this<br />
option on:<br />
From the Parental Controls Menu in the<br />
center card:<br />
1. Use the UP or DOWN arrow to<br />
highlight Parental Locks. Press the<br />
RIGHT arrow or SELECT button.<br />
2. Use the UP or DOWN arrow to<br />
highlight Lock Services and press SELECT.<br />
3. Use the UP or DOWN arrow to select the service you wish to lock.<br />
4. Press SELECT to lock the service.<br />
5. Press the LEFT arrow twice to return to Parental Controls or press EXIT to return to live<br />
television.<br />
Lock Users<br />
By requiring a PIN entry, Lock Users lets you<br />
prevent household members from editing or<br />
deleting users. To turn this option on:<br />
From the Parental Controls Menu:<br />
1. Use the UP or DOWN arrow to<br />
highlight Parental Locks. Press the<br />
RIGHT arrow or SELECT button.<br />
2. Use the UP or DOWN arrow to<br />
highlight Lock Users and press<br />
SELECT.<br />
Lock Services is found in the center card. Press<br />
SELECT to require the use of the Parental Controls<br />
PIN to watch On DEMAND programming.<br />
Lock Users is found in the center card. Press<br />
SELECT to prevent household members from<br />
editing or deleting users.<br />
3. Use the UP or DOWN arrow to<br />
highlight Lock Add User and press SELECT to lock the ability to add new users.<br />
4. Use the UP or DOWN arrow to highlight Lock Edit User and press SELECT to lock the<br />
ability to change user profiles.<br />
5. Use the UP or DOWN arrow to highlight Lock Delete User and press SELECT to lock the<br />
ability to delete existing users.<br />
6. Press the LEFT arrow three times to return to Settings or press EXIT to return to live<br />
television.<br />
97
Channels<br />
Channels settings allow you create personalized channel lists. It also lets you decide which<br />
channel will appear when you first turn on the television.<br />
Set Favorite Channels<br />
To set Favorite Channels for a specific user,<br />
you must first logon as that user. For more<br />
information, see Set Current User above.<br />
Otherwise, setting Favorite Channels will<br />
apply to the default user.<br />
You can view you Favorite Channels any time<br />
by pressing the FAV button.<br />
To Set Favorite Channels, begin at the<br />
Settings Menu:<br />
1. Use the UP or DOWN arrow to<br />
highlight Channels. Press the RIGHT<br />
arrow or SELECT button to move to<br />
the Channels Menu in the center card.<br />
Each User can set a personalized Favorite<br />
Channels list. Set Favorite Channels is found in the<br />
center card.<br />
2. Press the RIGHT arrow or SELECT button to open the Favorite Channels list, which will<br />
now appear in the center card.<br />
3. Use the UP and DOWN arrows to highlight a channel you want to set as a Favorite.<br />
Alternatively, you can simply enter the channel number using the number (0-9) keys.<br />
Press SELECT. A checkmark will appear next to the channel.<br />
4. Continue highlighting and selecting Favorites until you have completed your list.<br />
5. Press the LEFT arrow to return to the Channels Menu or press EXIT to return to live<br />
television.<br />
You can unselect a Favorite Channel by moving the highlight bar to that channel and pressing<br />
SELECT. The checkmark will disappear.<br />
You can select all channels as Favorite Channels by pressing the A button. You can unselect all<br />
channels by pressing the A button again.<br />
98
Set Skipped Channels<br />
Each user can remove channels from their<br />
personalized guide. Like Favorite Channels,<br />
you should first logon to your user profile.<br />
Otherwise, setting Skipped Channels will<br />
apply to the default user.<br />
You can always tune to a Skipped Channel by<br />
entering the channel number directly on the<br />
remote control.<br />
To Set Skipped Channels, begin at the<br />
Channels Menu:<br />
1. Use the DOWN arrow to highlight Set<br />
Skipped Channels. Press the RIGHT arrow or SELECT button to open the Skipped<br />
Channels list, which will appear in the center card.<br />
2. Use the UP and DOWN arrows to highlight a channel you want to skip. Alternatively, you<br />
can simply enter the channel number using the number (0-9) keys. Press SELECT. A<br />
checkmark will appear next to the channel.<br />
3. Continue highlighting and selecting channels until you have completed your Skipped<br />
Channel list.<br />
4. Press the LEFT arrow to return to the Channels Menu or press EXIT to return to live<br />
television.<br />
You can unselect a Skipped Channel by moving the highlight bar to that channel and pressing<br />
SELECT. The checkmark will disappear.<br />
Set Power On Channel<br />
The <strong>Trio</strong> <strong>Program</strong> <strong>Guide</strong> lets you decide<br />
which channel will appear each time you turn<br />
on your TV and receiver. This setting is<br />
specific to each receiver.<br />
To set the Power On Channel, begin at the<br />
Channels Menu:<br />
1. Use the DOWN arrow to highlight Set<br />
Power On Channel. Press the RIGHT<br />
arrow or SELECT button to see the<br />
Set Power On Channel list, which will<br />
appear in the center card.<br />
Like Favorite Channels, each User can set a<br />
Skipped Channels list. Set Skipped Channels is<br />
found in the center card.<br />
Use the UP or DOWN arrow to highlight the Set<br />
Power On Channel, and then press SELECT to<br />
open a channels list.<br />
2. Use the UP and DOWN arrows to<br />
highlight a channel. Alternatively, you can simply enter the channel number using the<br />
number (0-9) keys. Press SELECT to confirm.<br />
3. Press the LEFT arrow twice to return to the Settings Menu or press EXIT to return to live<br />
television.<br />
99
<strong>Guide</strong> Options<br />
The <strong>Trio</strong> <strong>Program</strong> <strong>Guide</strong> lets you change the guide’s appearance to give you a more personalized<br />
experience. Favorite Channels, Skipped<br />
Channels, Default <strong>Guide</strong> View and Keyboard<br />
Type settings are user specific. All other<br />
settings are specific to the receiver.<br />
Set Default View<br />
Set Default View allows you to change the<br />
way programs are organized, but Grid View is<br />
the first view you will normally see. You can<br />
change this default from Grid to another view.<br />
To do this, begin at the Settings Menu:<br />
1. Use the DOWN arrow to highlight<br />
<strong>Guide</strong> Options. Press the RIGHT<br />
arrow or SELECT button to move to<br />
the <strong>Guide</strong> Options Menu in the center<br />
card.<br />
2. Press the RIGHT arrow or SELECT<br />
button to see Default <strong>Guide</strong> View<br />
options, which will now appear in the<br />
center card.<br />
3. Use the UP or DOWN arrow to<br />
highlight your choice. You can<br />
choose List View (default), Grid View,<br />
Theme View, List HDTV Channels<br />
View, List Favorite Channels View<br />
and List Zone Channels View. Press<br />
SELECT.<br />
4. Press the LEFT arrow to return to the<br />
<strong>Guide</strong> Options Menu or press EXIT to return to live television.<br />
Press SELECT to open the <strong>Guide</strong> Options Options<br />
Menu, where you can pick a number of <strong>Guide</strong><br />
related settings.<br />
Press SELECT to open the <strong>Guide</strong> Options Menu,<br />
where you can pick a default <strong>Guide</strong> View among<br />
other things.<br />
100
Control Search and Browse Related<br />
This setting lets you exclude adult programming from showing up in search results and browserelated<br />
searches. This setting is specific to each receiver.<br />
To change the Search and Browse Related<br />
settings, begin at the <strong>Guide</strong> Options Menu:<br />
1. Use the UP or DOWN arrow to<br />
highlight Search and Browse Related.<br />
Press the RIGHT arrow or SELECT<br />
button to highlight Remove Adult<br />
<strong>Program</strong>s in the center card.<br />
2. Press SELECT. A checkmark will<br />
appear.<br />
3. Press the LEFT arrow to return to the<br />
<strong>Guide</strong> Options Menu.<br />
Control Recommendations<br />
This setting lets you turn on or off personalized recommendations and clear your personal<br />
viewing history.<br />
To turn on or off your personalized<br />
recommendations, begin at the <strong>Guide</strong><br />
Options:<br />
1. Use the UP or DOWN arrow to<br />
highlight Recommendations. Press<br />
the RIGHT arrow or SELECT button<br />
to display options in the left card.<br />
2. Press the Right arrow or SELECT<br />
button to bring highlight to On or Off<br />
in the center card.<br />
3. Use UP or DOWN arrow to highlight<br />
the desired option and press<br />
SELECT.<br />
To clear your personal viewing history, begin at the <strong>Guide</strong> Options:<br />
1. Use the UP or DOWN arrow to highlight Recommendations. Press the RIGHT arrow or<br />
SELECT button to display options.<br />
2. Use UP or DOWN arrow to highlight Viewing History.<br />
3. Press the Right arrow or SELECT button to bring highlight to Clear Viewing History action<br />
in the center card.<br />
4. Press SELECT to clear your personal viewing history.<br />
Search & Browse Related controls whether adult<br />
and recorded programs should be included in<br />
searches and related programs.<br />
Recommendations controls whether<br />
recommendations should be displayed or not.<br />
101
Notes About Recommendations<br />
Recommendations are made available on a per-user-basis in the household. If you have multiple<br />
user profiles set in your household, then each user will receive unique set of recommendations<br />
targeted for their tastes and preferences. To control recommendations for a particular user, you<br />
will need to switch to that user first on your <strong>Trio</strong> <strong>Program</strong> <strong>Guide</strong> before controlling the<br />
Recommendations setting. To switch users, see the Set Current User section in the user’s<br />
manual. Similarly, clearing viewing history requires you to switch to the appropriate user first<br />
before carrying out the action. Please note that clearing a viewing history provides a fresh start to<br />
your recommendations.<br />
Edit Banner Duration<br />
You can change the amount of time that Info<br />
Banners, Channel Banners and other banners<br />
are displayed. This setting is specific to each<br />
receiver.<br />
To edit Banner duration, begin at the <strong>Guide</strong><br />
Options Menu:<br />
1. Use the UP or DOWN arrow to<br />
highlight Banners. Press the RIGHT<br />
arrow or SELECT button to open<br />
Banners options, which will appear in<br />
the center card.<br />
2. Use the UP or DOWN arrow to highlight your choice. You can choose short, medium or<br />
long banners. Press SELECT.<br />
3. Press the LEFT arrow to return to the <strong>Guide</strong> Options Menu or press EXIT to return to live<br />
television.<br />
Switch Keyboards<br />
You can switch between the Remote Control<br />
keyboard and the On-Screen keyboard for<br />
entering terms into Universal Search. The<br />
Remote Control keyboard, looks like the<br />
triple-tap keyboard found on most cell phones<br />
and uses the number keys (0-9) to enter<br />
letters. The On-screen Keyboard offers single<br />
letter choices that you select with the arrow<br />
keys.<br />
To switch Keyboards, begin at the <strong>Guide</strong><br />
Options Menu:<br />
Banners controls the length of time banner<br />
information appears on-screen.<br />
To switch between the on-screen and remote<br />
control keyboards, use the Keyboard setting.<br />
1. Use the UP or DOWN arrow to<br />
highlight Keyboard. Press the RIGHT arrow or SELECT button to move to keyboard<br />
options, which will appear in the center card.<br />
102
2. Use the UP or DOWN arrow to highlight your choice. You can choose between the On-<br />
Screen Keyboard and the Remote Control Keyboard. Press SELECT.<br />
3. Press the LEFT arrow to return to the <strong>Guide</strong> Options Menu or press EXIT to return to live<br />
television.<br />
Add Closed Captioning<br />
The <strong>Trio</strong> <strong>Program</strong> <strong>Guide</strong> lets you adjust<br />
Closed Captioning settings. You can select<br />
Analog or Digital Service as well as the style,<br />
size and color of the text and background for<br />
the Digital Service. This setting is specific to<br />
each receiver.<br />
To open the Closed Captioning Menu, begin<br />
at the <strong>Guide</strong> Options Menu:<br />
1. Use the UP or DOWN arrow to<br />
highlight Closed Captioning.<br />
2. Press the RIGHT arrow or SELECT<br />
button to launch the Closed<br />
Captioning Menu. It will appear in the<br />
card on the left.<br />
Set Closed Captioning Status<br />
This setting is specific to each receiver. To<br />
turn Closed Captioning on, begin at the<br />
Closed Captioning Menu:<br />
1. With the highlight bar on Closed<br />
Captioning Status, press the RIGHT<br />
arrow or SELECT to move the<br />
highlight bar to the options in the<br />
center card.<br />
2. Use the UP or DOWN arrow to<br />
highlight On. Press SELECT.<br />
3. Press the LEFT arrow to return to the<br />
Closed Captioning Menu or press<br />
EXIT to return to live television.<br />
Closed Captioning displays the audio portion of the<br />
program as text on the screen.<br />
Closed Captioning Options appear in the card on<br />
the left. Press SELECT twice to turn Closed<br />
Captioning On.<br />
103
Set Analog Service<br />
This setting is specific to each receiver. To<br />
choose a Closed Captioning service for<br />
analog stations, begin at the Closed<br />
Captioning Menu:<br />
1. Use the DOWN arrow to highlight<br />
Analog Service. Press the RIGHT<br />
arrow or SELECT button to move to<br />
the options in the center card.<br />
2. Use the UP or DOWN arrow to<br />
highlight the appropriate option.<br />
Press SELECT to confirm your<br />
choice.<br />
3. Press the LEFT arrow to return to the Closed Captioning Menu or press EXIT to return to<br />
live television.<br />
Set Digital Service<br />
This setting is specific to each receiver. To<br />
choose a Closed Captioning service for digital<br />
stations, begin at the Closed Captioning<br />
Menu:<br />
1. Use the DOWN arrow to highlight<br />
Digital Service. Press the RIGHT<br />
arrow or SELECT button to move to<br />
the options in the center card.<br />
2. Use the UP or DOWN arrow to<br />
highlight the appropriate option.<br />
Press SELECT to confirm your<br />
choice.<br />
3. Press the LEFT arrow to return to the Closed Captioning Menu or press EXIT to return to<br />
live television.<br />
Set Text Style<br />
This setting is specific to each receiver. To<br />
change the appearance of Closed Captioning<br />
text style for digital programming, begin at the<br />
Closed Captioning Menu:<br />
1. Use the DOWN arrow to highlight<br />
Text Style. Press the RIGHT arrow or<br />
SELECT button to move to the<br />
options in the center card.<br />
2. Use the UP or DOWN arrow to<br />
highlight the appropriate option.<br />
Press SELECT to confirm your<br />
choice.<br />
Use the UP or DOWN arrow to highlight Analog<br />
Service and then press SELECT to move the<br />
highlight bar to the options list.<br />
Use the UP or DOWN arrow to highlight Digital<br />
Service and then press SELECT to move the<br />
highlight bar to the options list.<br />
Use the UP or DOWN arrow to highlight Text Style<br />
and then press SELECT to move the highlight bar<br />
to the options list.<br />
104
3. Press the LEFT arrow to return to the Closed Captioning Menu or press EXIT to return to<br />
live television.<br />
Set Text Size<br />
This setting is specific to each receiver. To change the appearance of Closed Captioning text size<br />
for digital programming, begin at the Closed Captioning Menu:<br />
1. Use the DOWN arrow to highlight Text Size. Press the RIGHT arrow or SELECT button<br />
to move to the options in the center card.<br />
2. Use the UP or DOWN arrow to highlight the appropriate option. Press SELECT to confirm<br />
your choice.<br />
3. Press the LEFT arrow to return to the Closed Captioning Menu or press EXIT to return to<br />
live television.<br />
Set Text Color<br />
This setting is specific to each receiver. To<br />
change the appearance of Closed Captioning<br />
text color for digital programming, begin at the<br />
Closed Captioning Menu:<br />
1. Use the DOWN arrow to highlight<br />
Text Color. Press the RIGHT arrow or<br />
SELECT button to move to the<br />
options in the center card.<br />
2. Use the UP or DOWN arrow to<br />
highlight the appropriate option.<br />
Press SELECT to confirm your<br />
choice.<br />
3. Press the LEFT arrow to return to the Closed Captioning Menu or press EXIT to return to<br />
live television.<br />
Set Background Color<br />
This setting is specific to each receiver. To<br />
change the color for the Closed Captioning<br />
background for digital programming, begin at<br />
the Closed Captioning Menu:<br />
1. Use the DOWN arrow to highlight<br />
Background Color. Press the RIGHT<br />
arrow or SELECT button to move to<br />
the options in the center card.<br />
2. Use the UP or DOWN arrow to<br />
highlight the appropriate option.<br />
Press SELECT to confirm your<br />
choice.<br />
Use the UP or DOWN arrow to highlight Text Color<br />
and then press SELECT to move the highlight bar<br />
to the options list.<br />
Use the UP or DOWN arrow to highlight<br />
Background Color and then press SELECT to move<br />
the highlight bar to the options list.<br />
105
3. Press the LEFT arrow to return to the Closed Captioning Menu or press EXIT to return to<br />
live television.<br />
Set Background Opacity<br />
This setting is specific to each receiver. To change the opacity for the Closed Captioning<br />
background for digital programming, begin at the Closed Captioning Menu:<br />
1. Use the DOWN arrow to highlight<br />
Background Opacity. Press the<br />
RIGHT arrow or SELECT button to<br />
move to the options in the center<br />
card.<br />
2. Use the UP or DOWN arrow to<br />
highlight the appropriate option.<br />
Press SELECT to confirm your<br />
choice.<br />
3. Press the LEFT arrow twice to return<br />
to the <strong>Guide</strong> Options Menu or press<br />
EXIT to return to live television.<br />
Set the <strong>Guide</strong> Language<br />
This setting is specific to each receiver. Begin at the <strong>Guide</strong> Options Menu:<br />
1. Use the DOWN arrow to highlight<br />
Other Settings. Press the RIGHT<br />
arrow or SELECT button to open the<br />
Other Settings Menu, which will<br />
appear in the card on the left.<br />
2. Use the UP or DOWN arrow to<br />
highlight <strong>Guide</strong> Language. Press the<br />
RIGHT arrow or SELECT button to<br />
move to the language options in the<br />
center card.<br />
3. Use the UP or DOWN arrow to<br />
highlight the appropriate option.<br />
Press SELECT.<br />
Use the UP or DOWN arrow to highlight<br />
Background Opacity and then press SELECT to<br />
move the highlight bar to the options list.<br />
<strong>Guide</strong> Language allows you change the language<br />
of your <strong>Guide</strong> from English to Spanish and vice<br />
versa.<br />
4. Press the LEFT arrow three times to return to the Settings Menu or press EXIT to return<br />
to live television.<br />
106
Set the <strong>Guide</strong> Text Size<br />
This setting is specific to each receiver. Begin at the <strong>Guide</strong> Options Menu:<br />
1. Use the DOWN arrow to highlight Other Settings. Press the RIGHT arrow or SELECT<br />
button to open the Other Settings Menu, which will appear in the card on the left.<br />
2. Use the UP or DOWN arrow to highlight <strong>Guide</strong> Text Size. Press the RIGHT arrow or<br />
SELECT button to move to the options in the center card.<br />
3. Use the UP or DOWN arrow to highlight the appropriate option. Press SELECT.<br />
4. Press the LEFT arrow to return to the Other Settings Menu or press EXIT to return to live<br />
television.<br />
Set the <strong>Guide</strong> Aspect Ratio<br />
This setting is specific to each receiver. Begin at the <strong>Guide</strong> Options Menu:<br />
1. Use the DOWN arrow to highlight Other Settings. Press the RIGHT arrow or SELECT<br />
button to open the Other Settings Menu, which will appear in the card on the left.<br />
2. Use the UP or DOWN arrow to highlight <strong>Guide</strong> Aspect Ratio. Press the RIGHT arrow or<br />
SELECT button to move to the options in the center card.<br />
3. Use the UP or DOWN arrow to highlight the appropriate option. Press SELECT.<br />
4. Press the LEFT arrow three times to return to the Settings Menu or press EXIT to return<br />
to live television.<br />
107
Audio & Video<br />
The <strong>Trio</strong> <strong>Program</strong> <strong>Guide</strong> lets you adjust the audio and video settings to provide the best sound<br />
and picture quality for your television.<br />
Set Volume Level<br />
If you use your remote control to adjust<br />
television volume, set Volume Level to<br />
Variable. If you control your television volume<br />
through a stereo or surround sound receiver,<br />
then set this control to Fixed.<br />
This setting is specific to each receiver (set<br />
top box).<br />
To do this, begin at the Settings Menu:<br />
1. Use the DOWN arrow to highlight<br />
Audio & Video. Press the RIGHT<br />
arrow or SELECT button to highlight<br />
Audio Settings in the center card.<br />
2. Press the RIGHT arrow or SELECT<br />
button to confirm Audio Settings. This<br />
will open the Audio Settings Menu,<br />
which will appear in the left card.<br />
3. Press RIGHT arrow or SELECT<br />
button to change the Volume Level<br />
options.<br />
4. Press LEFT arrow to return to the<br />
Audio Settings Menu or press EXIT to<br />
return to live television.<br />
Set Analog Output<br />
This option lets you adjust the audio output delivered to your television while watching analog<br />
television. You have three choices:<br />
• Mono: Mono sound reproduction is single channel. Mono sound has been replaced by<br />
stereo sound in most entertainment programs.<br />
• Stereo: Stereo uses two or more independent audio channels. Most television programs<br />
today are available in stereo.<br />
• Surround: Surround sound encompasses a range of techniques for enriching sound<br />
quality via additional speakers. Select this option if you have surround sound system or if<br />
your television has surround sound speakers built-in.<br />
This setting is specific to each receiver.<br />
To adjust these settings, begin at the Audio Settings Menu:<br />
Use the UP or DOWN arrow to highlight Audio and<br />
Video in the card on the left. Press SELECT to<br />
open the AV Menu.<br />
Press SELECT to change the Volume Level and<br />
shift the focus to the options in the center card.<br />
108
1. Use the UP or DOWN arrow to select Analog Output.<br />
2. Press the RIGHT arrow or SELECT button to move the highlight bar to the Analog Output<br />
options in the center card.<br />
3. Use the UP and DOWN arrow to make the appropriate choice. Press SELECT.<br />
4. Press the LEFT arrow to return to the Audio Settings Menu or press EXIT to return to live<br />
television.<br />
Set Digital Output<br />
This option lets you adjust the audio output delivered to your television while watching digital<br />
television. You have two options:<br />
• Pulse Code Modulated (PCM): This is the default format of digital output.<br />
• Dolby Digital: If you have a unit that can receive and decode Dolby Digital output, use this<br />
option.<br />
This setting is specific to each receiver.<br />
To adjust these settings, begin at the Audio Settings Menu:<br />
1. Use the UP or DOWN arrow to select Digital Output.<br />
2. Press the RIGHT arrow or SELECT button to move the highlight bar to the Digital Output<br />
options in the center card.<br />
3. Use the UP and DOWN arrow to make the appropriate choice. Press SELECT.<br />
4. Press the LEFT arrow to return to the Audio Settings Menu or press EXIT to return to live<br />
television.<br />
Set Audio Language<br />
This option turns on a secondary audio track for programs that carry the SAP signal. When SAP<br />
is available, the program description in the <strong>Guide</strong> displays an SAP icon.<br />
This setting is specific to each receiver.<br />
To adjust these settings, begin at the Audio Settings Menu:<br />
1. Use the UP or DOWN arrow to select Audio Language.<br />
2. Press the RIGHT arrow or SELECT button to move the highlight bar to the Audio<br />
Language options in the center card.<br />
3. Use the UP and DOWN arrow to make the appropriate choice. Press SELECT.<br />
4. Press the LEFT arrow to return to the Audio Settings Menu or press EXIT to return to live<br />
television.<br />
109
Set Dynamic Range<br />
This setting adjusts the audio spectrum for digital programming. Dynamic Range refers to the<br />
difference between the highest audio peaks and the lowest ones. Action movies, for instance, will<br />
use the full dynamic range while news programs will not. The Dynamic Range preference lets you<br />
control the volume of the high audio peaks. You have three choices;<br />
• Wide: Plays the entire audio dynamic range, including and highest and lowest sounds.<br />
This setting is appropriate for audio enthusiasts.<br />
• Medium: Slightly lowers the higher volumes.<br />
• Narrow: Dramatically lowers the higher volumes.<br />
This setting is specific to each receiver.<br />
To adjust these settings, begin at the Audio Settings Menu:<br />
1. Use the UP or DOWN arrow to select Dynamic Range.<br />
2. Press the RIGHT arrow or SELECT button to move the highlight bar to the Dynamic<br />
Range options in the center card.<br />
3. Use the UP and DOWN arrow to make the appropriate choice. Press SELECT.<br />
4. Press the LEFT arrow three times to return to the Settings Menu or press EXIT to return<br />
to live television.<br />
Set Video Output Format<br />
You can change the video output format to ensure you get the highest quality picture that your<br />
television can display. These settings include the picture Resolution and Available Output Format<br />
options. Please refer to the manufacturer’s information for your television to get the proper<br />
settings. The resolution options are:<br />
• 1080i Wide<br />
• 720p Wide<br />
• 480p Wide<br />
• 480p Standard<br />
• 480i Standard<br />
For Wide picture resolutions, the available format options are:<br />
• Sidebar 4:3 Pic<br />
• Stretch 4:3 Pic<br />
• Preserve 4:3 Pic – 480p<br />
• Preserve 4:3 Pic – 480i<br />
110
For Standard picture resolutions, the available format options are:<br />
• Zoom 16:9 Pic<br />
• Letterbox 16:9 Pic<br />
To adjust these settings, begin at the Settings Menu:<br />
1. Use the DOWN arrow to highlight<br />
Audio & Video. Press the RIGHT<br />
arrow or SELECT button to move to<br />
the center card.<br />
2. Use the DOWN arrow to highlight<br />
Video Output Format. Press the<br />
SELECT button to open the Video<br />
Output Format dialogue box. The<br />
highlight bar will be on Resolution.<br />
3. Use the LEFT or RIGHT arrow to<br />
scroll through the Resolution options.<br />
Once you have made your choice,<br />
press the DOWN arrow to move the<br />
highlight bar to the Available Output<br />
Format options.<br />
4. Use the LEFT or RIGHT arrow to<br />
scroll through the Available Output<br />
Format options. Once you have made<br />
your choice, press the B button to<br />
confirm these changes.<br />
5. Press the B button a second time to<br />
confirm the changes.<br />
6. Press EXIT to return to live television.<br />
Use the UP or DOWN arrow to highlight Video<br />
Output Format in the card on the left. Press<br />
SELECT.<br />
Press LEFT or RIGHT arrow to change the video<br />
resolution setting and press the B button.<br />
111
Timers<br />
Timers settings let you turn your receiver (set top box) on and off automatically. This setting is<br />
specific to each receiver.<br />
Set Sleep Timer<br />
The Sleep Timer will turn off the receiver after<br />
a pre-determined period of time, in<br />
increments from 5 to 75 minutes. This setting<br />
is specific to each receiver.<br />
To turn Sleep Timer on, begin at the Settings<br />
Menu:<br />
1. Use the UP or DOWN arrow to<br />
highlight Timers. Press the RIGHT<br />
arrow or SELECT button to open the<br />
Timers Menu in the center card.<br />
2. Press the RIGHT arrow or SELECT<br />
button to open the Sleep Timer<br />
options.<br />
3. Use the UP or DOWN arrow to select the appropriate option. The highlight bar will be on<br />
Off when you arrive at the options list.<br />
4. Press SELECT to confirm your choice.<br />
5. Press the LEFT arrow to return to the Timers Menu or press EXIT to return to live<br />
television.<br />
Set Power On<br />
Power On automatically turns the receiver on at a specific time each day. This setting is specific<br />
to each receiver.<br />
To set a Power On time, begin at the Timers Menu:<br />
1. Use the UP or DOWN arrow to highlight Power On Timer. Press the RIGHT arrow or<br />
SELECT button to open the Power On Timer Menu, which will appear in the card on the<br />
left.<br />
2. With the highlight bar on Power On Timer Status, press the RIGHT arrow or SELECT to<br />
move the highlight bar to the options in the center card.<br />
3. Use the UP or DOWN arrow to select On or Off. The highlight bar will be on Off when you<br />
arrive at the options list.<br />
4. Press SELECT to confirm your choice.<br />
Use the UP or DOWN arrow to highlight Timers and<br />
then press SELECT to move the highlight bar to the<br />
Timers options.<br />
5. Press the LEFT arrow to return to the Power On Timer Menu or press EXIT to return to<br />
live television.<br />
112
After you set Power On, you will also need to set the Power On channel, days and time. To do<br />
this, begin at the Power On Timer Menu:<br />
1. Use the UP or DOWN arrow to highlight Power On Channel. Press SELECT.<br />
2. Use the UP or DOWN arrow to select a channel. You may also choose the last channel<br />
viewed.<br />
3. Press SELECT to confirm your choice.<br />
4. Press the LEFT arrow to return to the Power On Timer Menu.<br />
5. Use the DOWN arrow to highlight Days. Press SELECT.<br />
6. Use the UP or DOWN arrow to highlight the days you want Power On to start your<br />
receiver. Press SELECT. Days are noted by date and extend 12 days into the future.<br />
7. Continue highlighting and selecting days until you have completed your list.<br />
8. Press the LEFT arrow to return to the Power On Timer Menu.<br />
9. Use the DOWN arrow to highlight Time. Press SELECT.<br />
10. Use the UP or DOWN arrow to highlight the time of day you want Power On to start your<br />
receiver. Press SELECT. Times are available in half-hour increments.<br />
11. Press the LEFT arrow twice to return to the Timers Menu or press EXIT to return to live<br />
television.<br />
Set Power Off<br />
Power Off automatically turns the receiver off at a specific time each day. This setting is specific<br />
to each receiver.<br />
To set a Power Off time, begin at the Timers Menu:<br />
1. Use the UP or DOWN arrow to highlight Power Off Timer. Press the RIGHT arrow or<br />
SELECT button to open the Power Off Timer Menu, which will appear in the card on the<br />
left.<br />
2. With the highlight bar on Power Off Timer Status, press the RIGHT arrow or SELECT to<br />
move the highlight bar to the options in the center card.<br />
3. Use the UP and DOWN arrow to select On or Off. The highlight bar will be on Off when<br />
you arrive at the options list.<br />
4. Press SELECT to confirm your choice.<br />
5. Press the LEFT arrow to return to the Power Off Timer Menu.<br />
6. After you set Power Off, you will also need to set the Power Off days and time. To do<br />
this, begin at the Power Off Timer Menu:<br />
7. Use the UP or DOWN arrow to highlight Power Off Days. Press SELECT.<br />
113
8. Use the UP or DOWN arrow to highlight the days you want Power Off to shut down your<br />
receiver. Press SELECT.<br />
9. Continue highlighting and selecting days until you have completed your list.<br />
10. Press the LEFT arrow to return to the Power Off Timer Menu.<br />
11. Use the DOWN arrow to highlight Time. Press SELECT.<br />
12. Use the UP and DOWN arrow to highlight the time you want Power Off to shut down your<br />
receiver. Press SELECT.<br />
13. Press the LEFT arrow three times to return to the Settings Menu or press EXIT to return<br />
to live television.<br />
114
Receivers<br />
Receivers let you manage settings associated with your receivers in the home as well as your<br />
Whole Home DVR service.<br />
AC Outlet<br />
Certain receivers (set top boxes) feature a<br />
convenient AC outlet on the rear panel that<br />
lets you turn both the TV and receiver off with<br />
a single press of the POWER button.<br />
To control the AC Outlet, begin at the Settings<br />
Menu:<br />
1. Use the UP or DOWN arrow to<br />
highlight Receivers. Press the RIGHT<br />
arrow or SELECT button to open the<br />
Receivers Menu in the center card.<br />
2. Use the UP or DOWN arrow to<br />
highlight AC Outlet and press<br />
SELECT or RIGHT arrow.<br />
3. Use the UP or DOWN arrow to choose Always On or On With Receiver. Press SELECT.<br />
4. Press the LEFT arrow to return to the Receivers Menu or press EXIT to return to live<br />
television.<br />
Note: The On With Receiver option will always turn the TV and receiver off at the same time.<br />
Depending on the model of your TV, however, you may need to turn on the TV and receiver<br />
separately. Also, some TV models take longer to warm up when they are plugged into the<br />
receiver’s AC outlet. In these cases, you may prefer to set AC Outlet Use to Always On or plug<br />
your television directly into a wall outlet.<br />
Front Panel Display Options<br />
You can control what information the front panel displays.<br />
To change these options, begin at the Receivers Menu:<br />
Highlight Receivers and then press SELECT to<br />
move the highlight bar to the options list in the<br />
center card.<br />
1. Use the UP or DOWN arrow to highlight Front Panel Display Options. Press the RIGHT<br />
arrow or SELECT button to open the Front Panel Display Options Menu in the center<br />
card.<br />
2. Use the UP and DOWN arrows to choose which information to display on your receiver’s<br />
front panel. Press SELECT.<br />
3. Press the LEFT arrow three times to return to the Settings Menu. Press EXIT to return to<br />
live television.<br />
115
DVR Network<br />
DVR Network allows you to manage settings<br />
related to your Whole Home DVR service.<br />
These settings include: changing receiver<br />
names, viewing DVR network, and changing<br />
network status of DVRs.<br />
Change Receiver Name<br />
Change Receiver Name allows you to provide<br />
a name for your receiver. This setting is<br />
extremely useful when you subscribe to<br />
multiple DVRs for your Whole Home DVR<br />
service. It allows you to name DVRs so that<br />
you can identify them later while scheduling<br />
recordings or while browsing through<br />
recorded programs.<br />
To Change Receiver Name, begin at the<br />
Receivers Menu:<br />
1. Press the RIGHT arrow or SELECT<br />
button to open the Receivers Menu in<br />
the center card.<br />
2. Use the DOWN arrow to highlight<br />
DVR Network and press SELECT or<br />
RIGHT arrow. A DVR Network Menu<br />
will display in the center card. With<br />
highlight on Change Receiver Name,<br />
press SELECT open up the Change<br />
Receiver Name dialog box.<br />
3. Using the<br />
UP/DOWN/LEFT/RIGHT/SELECT<br />
buttons on your remote, enter a<br />
suitable name for your DVR.<br />
4. When the name is entered, press the<br />
B button to save this new name.<br />
A Note About Change Receiver Name<br />
You must complete this process separately on<br />
each receiver in your household. If you do not<br />
change receiver names, then DVRs will be<br />
identified using names such as DVR 1, DVR 2, DVR 3 etc. and non-DVR receivers will be<br />
identified as Receiver 1, Receiver 2, Receiver 3 etc.<br />
Change Network Status<br />
Highlight Receivers and then press SELECT to<br />
move the highlight bar to the options list in the<br />
center card. Pressing RIGHT arrow or SELECT will<br />
display options pertaining to DVR Network.<br />
Pressing SELECT on Change Receiver Name<br />
allows you to provide a name for your receiver.<br />
Press UP/DOWN/LEFT/RIGHT/SELECT buttons to<br />
provide a name for the receiver.<br />
Change Network Status controls DVR’s availability in the Whole Home Network. Here is what the<br />
different statuses mean:<br />
116
A visible status allows the DVR to make all of its recorded programs and scheduled recordings<br />
accessible to any other DVR or non-DVR receiver in the network. Also, a visible status allows a<br />
DVR to accept recording requests from any other networked DVR or a non-DVR receiver. In other<br />
words, visible status operates both ways.<br />
An invisible status allows the DVR to hide all of its recorded programs and scheduled recordings<br />
from being accessed by any other DVR or non-DVR receiver in the network. However, an<br />
invisible DVR can access the recorded programs and scheduled recordings that are stored on all<br />
visible DVRs in the network. In other words, invisible status operates only one way. Invisible<br />
status is beneficial in situations where you do not wish to make recordings from your personal<br />
DVR available to other receivers in your household, but at the same time you wish to have full<br />
access to recordings stored on other DVRs in your network.<br />
By default, all DVRs in your Whole Home network are set as visible DVRs. To change network<br />
status of your DVR, begin at the Receivers Menu.<br />
1. Press the RIGHT arrow or SELECT button to open the Receivers Menu in the center<br />
card.<br />
2. Use the DOWN arrow to highlight<br />
DVR Network and press SELECT or<br />
RIGHT arrow. A DVR Network Menu<br />
will display in the center card.<br />
3. Use the DOWN arrow to highlight<br />
Change Network Status and press<br />
SELECT.<br />
4. Use the UP and DOWN arrow to<br />
make the appropriate choice. Press<br />
SELECT.<br />
5. Enter Parental Control PIN using the<br />
number (0-9) buttons on your remote.<br />
You can change the network status of DVR in the<br />
Settings Menu.<br />
6. Press the LEFT arrow three times to return to the Settings Menu or press EXIT to return<br />
to live television.<br />
Note: This setting is only available on DVRs. Also, this process may take up to 5 minutes while<br />
the DVR List updates.<br />
117
View DVR Network<br />
View DVR Network allows you to view a<br />
summary overview of all your receivers in the<br />
Whole Home DVR network. The summary<br />
includes a name of the receiver, receiver type<br />
whether HD receiver or DVR, serial number<br />
and for whether the DVR is set in visible or<br />
invisible status.<br />
To View DVR Network, begin at the Receivers<br />
Menu:<br />
1. Press the RIGHT arrow or SELECT<br />
button to open the Receivers Menu in<br />
the center card.<br />
2. Use the DOWN arrow to highlight DVR Network and press SELECT or RIGHT arrow. A<br />
DVR Network Menu will display in the center card.<br />
3. Use the DOWN arrow to highlight DVR Network and press SELECT or RIGHT arrow to<br />
open up the Menu to display a list of receivers in the center card.<br />
4. Using UP/DOWN arrows, browse through different receivers in your Whole Home DVR<br />
network. The left card will display pertinent information as you move the highlight up and<br />
down the list.<br />
Set Default DVR<br />
If you choose to get multiple DVRs for your home network, we recommend you to set a default<br />
DVR for your non-DVR receiver. This allows a non-DVR receiver to use the default DVR as the<br />
default go-to DVR for its recordings. This becomes useful when you set up your recording just by<br />
pressing the RECORD button on your remote control so that you are not asked to select which<br />
DVR you wish to schedule this recording to. Also, this default DVR is used for individual, series,<br />
and manual recordings as a default Record To option, but can be easily changed by selecting a<br />
different DVR when you schedule your recordings.<br />
To Set Default DVR, begin at the Receivers Menu:<br />
Press UP/DOWN arrows to view information about<br />
receivers in the Whole Home DVR network.<br />
1. Press the RIGHT arrow or SELECT button to open the Receivers Menu in the center<br />
card.<br />
2. Use the DOWN arrow to highlight DVR Network and press SELECT or RIGHT arrow. A<br />
DVR Network Menu will display in the center card.<br />
3. Use the DOWN arrow to highlight Set Default DVR and press SELECT to open up the<br />
Set Default DVR dialog box.<br />
4. Using LEFT/RIGHT arrows, select a DVR you wish to set as a default DVR.<br />
5. When the DVR is selected, press the B button to set this DVR as the default DVR for this<br />
receiver.<br />
118
A Note About Set Default DVR<br />
This option is only available on non-DVR receivers. If you have only one visible DVR in your<br />
Whole Home Network, then this option is grayed out.<br />
Turn Pause Live TV On or Off<br />
With the latest software upgrade from <strong>Cox</strong>,<br />
you can now pause live TV on your non-DVR<br />
receiver. Once a program is paused, you can<br />
also perform fast-forward, rewind, instant<br />
replay etc. on the program.<br />
To turn Pause Live TV On or Off, begin at the<br />
Receivers Menu:<br />
1. Press the RIGHT arrow or SELECT<br />
button to open the Receivers Menu in<br />
the center card.<br />
2. Use the DOWN arrow to highlight<br />
DVR Network and press SELECT or RIGHT arrow. A DVR Network Menu will display in<br />
the center card.<br />
3. Use the DOWN arrow to highlight Pause Live TV and press SELECT or RIGHT arrow to<br />
open up the Menu to display On or Off in the center card.<br />
4. Using UP/DOWN arrows, highlight On or Off and press SELECT to make the change.<br />
A Note About Pause Live TV<br />
The option to turn on and off pausing live TV is only available on non-DVR receivers. Pausing live<br />
TV is always available on DVR receivers.<br />
Power Manager for Energy Efficiency<br />
You can turn On or Off Pause Live TV functionality<br />
in the Settings Menu.<br />
Now, you can feel good about the<br />
environment with the <strong>Trio</strong> <strong>Program</strong> <strong>Guide</strong>.<br />
The latest <strong>Trio</strong> <strong>Program</strong> <strong>Guide</strong> includes the<br />
ability to automatically turn off your receivers<br />
after 4 hours of inactivity to conserve the<br />
energy usage in the home. If you do not use<br />
your remote control to perform any kind of<br />
activity on your receiver, then the receiver will<br />
automatically turn off after 4 hours of<br />
inactivity. A minute before a receiver turns off,<br />
it displays a warning alert that instructs you to<br />
press the SELECT button to prevent<br />
You can have your receivers turn off automatically<br />
automatic turning off of your receiver. If there after 4 hours of inactivity from the Power Manager.<br />
is nobody present to respond to the alert, then<br />
your receiver will automatically turn off after 1 minute.<br />
119
By default, your receivers will automatically turn off. To change from automatic to manual turn off,<br />
begin at the Receivers Menu:<br />
1. Press the RIGHT arrow or SELECT button to open the Receivers Menu in the center<br />
card.<br />
2. Use the DOWN arrow to highlight Power Manager and press SELECT or RIGHT arrow. A<br />
Power Manager Menu will display in the left card.<br />
3. Press the RIGHT arrow or SELECT button to highlight Receiver Power Menu options in<br />
the center card.<br />
4. Use the DOWN arrow to highlight Power Off <strong>Manual</strong>ly and press SELECT to change your<br />
receiver to power off manually.<br />
Front Panel Status<br />
Additionally, you can change the front panel display (clock) to power off when the receiver powers<br />
off for additional energy savings. You can control the front panel display to choose whether it is<br />
always on or on only when the receiver is on.<br />
To change the front panel status, begin at the Receivers Menu:<br />
1. Press the RIGHT arrow or SELECT button to open the Receivers Menu in the center<br />
card.<br />
2. Use the DOWN arrow to highlight Power Manager and press SELECT or RIGHT arrow. A<br />
Power Manager Menu will display in the left card.<br />
3. Use the DOWN arrow to highlight Front Panel Status to open its options in the center<br />
card.<br />
4. Press the RIGHT arrow or SELECT button to move the highlight bar to the options that<br />
appear in the center card.<br />
4. Use the UP and DOWN arrows to choose from the two options, Always On or On With<br />
Receiver. Press SELECT.<br />
5. Use the LEFT arrow to return to the Front Panel Status Menu.<br />
6. Press the DOWN arrow to highlight Display Options.<br />
120
Chapter 12: Pay-Per-View<br />
Pay-Per-View lets you purchase a private telecast of movies, live sporting events, sports<br />
packages and adult programming that are offered to all <strong>Cox</strong> customers at a specific time. You can<br />
purchase an event up to 14 days before it airs.<br />
PPV is different than On DEMAND, which allows users to purchase a program any time it is<br />
available and watch it immediately.<br />
This Chapter discusses how to purchase, confirm, record and cancel a PPV program.<br />
121
Purchase Pay-Per-View <strong>Program</strong>ming from the <strong>Guide</strong><br />
Currently, PPV programming is identified after choosing a program, when you arrive at the<br />
Actions Card. Rather than Watch Now, which appears on free television programs, the first action<br />
will say Buy Now.<br />
To order PPV programs, begin at the <strong>Guide</strong>:<br />
1. Use the UP and DOWN arrows or PAGE UP and PAGE DOWN buttons to find the PPV<br />
channel that interests you. PPV channels are typically grouped together in a single area<br />
of the channel list.<br />
2. Press the RIGHT arrow or the SELECT button to choose the highlighted channel. The<br />
highlight bar will move to first item in the <strong>Program</strong>s Card.<br />
3. Use the UP and DOWN arrows or PAGE UP and PAGE DOWN buttons to browse PPV<br />
programs. Press the RIGHT arrow or SELECT button to choose the highlighted program.<br />
The highlight bar will move to Buy Now on the Actions Card.<br />
4. Press SELECT to purchase the program.<br />
• If Parental Controls are activated, you will be asked to enter your four-digit Parental<br />
Controls PIN.<br />
• If Purchase Controls are activated, you will be asked to enter your four-digit Purchase<br />
PIN.<br />
5. Press the B button to confirm the purchase. Press the C button to cancel the purchase.<br />
122
PPV Countdown Timer<br />
The PPV Countdown timer provides confirmation<br />
of the program that was purchased as well as<br />
description of the program, and how many<br />
minutes are remaining to start airing the program.<br />
The timer appears at 59 minutes before the<br />
program begins and it is updated every minute<br />
until it reaches 1 minute. The timer disappears<br />
when the program begins airing.<br />
Search PPV Content<br />
The <strong>Trio</strong> <strong>Program</strong> <strong>Guide</strong> can help you find a wide<br />
variety of content from TV, On DEMAND and<br />
Pay-Per-View in a single search. For more<br />
information on Search, please see Chapter 9.<br />
Cancel a PPV Purchase<br />
You can cancel a PPV purchase through the<br />
<strong>Guide</strong> when the following two conditions are true.<br />
First, the PPV program must be purchased<br />
through the <strong>Trio</strong> <strong>Program</strong> <strong>Guide</strong>. Second,<br />
cancellation window should be open at that time.<br />
When both conditions are met, you will be able to<br />
cancel the purchase using the Cancel Purchase<br />
action.<br />
PPV Countdown timer appears for purchased<br />
programs that will begin airing in 59 minutes or<br />
less.<br />
If you purchased program by calling <strong>Cox</strong> Customer Service, then you will need to call them again<br />
to cancel a confirmed PPV purchase. Please note that once the program has begun airing and if<br />
its cancellation window has elapsed, you will not be able cancel the purchase even by calling <strong>Cox</strong><br />
Customer Service.<br />
123
Chapter 13: Error Messages<br />
Occasionally, you may receive an error message. Sometimes the fix is as simple as waiting a few<br />
minutes before trying again. Other times, you may be required to call your local <strong>Cox</strong> Customer<br />
Care representative. The table below includes the different error messages you may receive. If<br />
you are required to call <strong>Cox</strong> Customer Care, please make a note of the error code as it will help<br />
the representative identify the problem faster.<br />
Subscription<br />
Error Code Message You Should<br />
1.1.1 – DVR<br />
subscription<br />
1.1.2 – HD<br />
subscription<br />
1.1.3 – Channel<br />
subscription<br />
1.1.4 –<br />
Subscription On<br />
DEMAND<br />
1.1.5 – Adult<br />
programming<br />
disabled<br />
1.1.6 – Zone<br />
channels disabled<br />
1.1.7 – Whole-<br />
Home DVR<br />
receiver<br />
unauthorized<br />
Sorry, DVR receiver and a subscription is required.<br />
With DVR, you will never miss your favorite<br />
programs. Please contact <strong>Cox</strong> Customer Service at<br />
(866) 961-1207 for assistance. Reference 1.1.1<br />
when calling.<br />
Sorry, HD programming subscription is required to<br />
enjoy this program. Please contact <strong>Cox</strong> Customer<br />
Service to subscribe HD programming. Reference<br />
1.1.2 when calling.<br />
Sorry, subscription is required to enjoy this program.<br />
Please contact <strong>Cox</strong> Customer Service to subscribe.<br />
Reference 1.1.3 when calling.<br />
Sorry, subscription to this package is required to<br />
enjoy this program. Please contact <strong>Cox</strong> Customer<br />
Service to subscribe. Reference 1.1.4 when calling.<br />
Sorry, you are no longer authorized to watch adult<br />
programming. Please contact <strong>Cox</strong> Customer<br />
Service at (866) 961-1207 for assistance. Reference<br />
1.1.5 when calling.<br />
Sorry, you are currently not authorized to view Zone<br />
Channels. Please contact <strong>Cox</strong> Customer Service at<br />
(866) 961-1207 for assistance. Reference 1.1.6<br />
when calling.<br />
Sorry, this receiver is no longer authorized to play<br />
recorded programs from your DVR. Please contact<br />
<strong>Cox</strong> Customer Service for assistance. Reference<br />
1.1.7 when calling.<br />
Contact <strong>Cox</strong> Customer Service<br />
for assistance.<br />
Contact <strong>Cox</strong> Customer Service<br />
for assistance.<br />
Contact <strong>Cox</strong> Customer Service<br />
for assistance.<br />
Contact <strong>Cox</strong> Customer Service<br />
for assistance.<br />
Contact <strong>Cox</strong> Customer Service<br />
for assistance.<br />
Contact <strong>Cox</strong> Customer Service<br />
for assistance.<br />
Contact <strong>Cox</strong> Customer Service<br />
for assistance.<br />
124
1.1.8 – Cannot<br />
record<br />
DVR<br />
This receiver cannot schedule recordings. This<br />
feature is coming soon. Please schedule the<br />
recordings on your DVR receiver. If you do not have<br />
a DVR receiver and wish to get one, please contact<br />
<strong>Cox</strong> Customer Service at (866) 961-1207.<br />
Reference 1.1.8 when calling.<br />
Contact <strong>Cox</strong> Customer Service<br />
for assistance.<br />
Error Code Message You Should<br />
2.1.2.1 – Alert<br />
2.1.2.2 – Alert<br />
2.1.2.3 – Alert<br />
2.1.2.5 – Alert<br />
2.1.2.6 – Alert<br />
2.1.2.7 – Alert<br />
2.1.2.8 – Alert<br />
Sorry, we have experienced a problem playing back<br />
this recording. Please try again in few minutes. If the<br />
problem continues, please contact <strong>Cox</strong> Customer<br />
Service at (866) 961-1207. Reference 2.1.2.1 when<br />
calling.<br />
Sorry, we have experienced a problem playing back<br />
this recording. Please try again in few minutes. If the<br />
problem continues, please contact <strong>Cox</strong> Customer<br />
Service at (866) 961-1207. Reference 2.1.2.2 when<br />
calling.<br />
Sorry, we have experienced a problem playing back<br />
this recording. Please try again in few minutes. If the<br />
problem continues, please contact <strong>Cox</strong> Customer<br />
Service at (866) 961-1207. Reference 2.1.2.3 when<br />
calling.<br />
Sorry, we are currently experiencing some technical<br />
difficulties. If the problem continues, please contact<br />
<strong>Cox</strong> Customer Service at (866) 961-1207.<br />
Reference 2.1.2.5 when calling.<br />
Sorry, we have experienced a problem with your<br />
Whole Home DVR network. Please try again in few<br />
minutes. If the problem continues, please contact<br />
<strong>Cox</strong> Customer Service at (866) 961-1207.<br />
Reference 2.1.2.6 when calling.<br />
Sorry, we have experienced a problem playing back<br />
this recording. Please try again in few minutes. If the<br />
problem continues, please contact <strong>Cox</strong> Customer<br />
Service at (866) 961-1207. Reference 2.1.2.7 when<br />
calling.<br />
Sorry, we have experienced a problem playing back<br />
this recording. Please try again in few minutes. If the<br />
problem continues, please contact <strong>Cox</strong> Customer<br />
Service at (866) 961-1207. Reference 2.1.2.8 when<br />
calling.<br />
Contact <strong>Cox</strong> Customer Service<br />
for assistance.<br />
Contact <strong>Cox</strong> Customer Service<br />
for assistance.<br />
Contact <strong>Cox</strong> Customer Service<br />
for assistance.<br />
Contact <strong>Cox</strong> Customer Service<br />
for assistance.<br />
Contact <strong>Cox</strong> Customer Service<br />
for assistance.<br />
Contact <strong>Cox</strong> Customer Service<br />
for assistance.<br />
Contact <strong>Cox</strong> Customer Service<br />
for assistance.<br />
125
2.1.2.9 – Alert<br />
2.1.3 – <strong>Program</strong><br />
not playing<br />
Services<br />
Sorry, we have experienced a problem with your<br />
Whole Home DVR network. If the problem<br />
continues, please contact <strong>Cox</strong> Customer Service at<br />
(866) 961-1207. Reference 2.1.2.9 when calling.<br />
Sorry, we have experienced a problem with your<br />
Whole Home DVR network. Please try again in 15<br />
minutes. If the problem continues, please contact<br />
<strong>Cox</strong> Customer Service at (866) 961-1207 for<br />
assistance. Reference 2.1.3 when calling.<br />
Contact <strong>Cox</strong> Customer Service<br />
for assistance.<br />
Contact <strong>Cox</strong> Customer Service<br />
for assistance.<br />
Error Code Message You Should<br />
3.1.1 – Service<br />
unavailable<br />
3.2.1 – PIN locked<br />
3.2.2 – Purchase<br />
PIN not set<br />
3.2.3 – Parental<br />
PIN not set<br />
Pay-Per-View<br />
Sorry, there is currently no TV signal detected for<br />
this channel. The channel may be temporarily off<br />
air. Please try again later. If the problem continues,<br />
please contact <strong>Cox</strong> Customer Service at (866) 961-<br />
1207 for assistance. Reference 3.1.1 when calling.<br />
Alternatively, you can press the GUIDE button on<br />
your remote control to watch programs on other<br />
channels.<br />
Sorry, your PIN has been locked. Please contact<br />
<strong>Cox</strong> Customer Service at (866) 961-1207 for<br />
assistance. Reference 3.2.1 when calling.<br />
Sorry, we have experienced technical difficulties<br />
while setting your Purchase PIN. Please try again. If<br />
the problem continues, please contact <strong>Cox</strong><br />
Customer Service at (866) 961-1207 for assistance.<br />
Reference 3.2.2 when calling.<br />
Sorry, we have experienced technical difficulties<br />
while setting your Parental Control PIN. Please try<br />
again. If the problem continues, please contact <strong>Cox</strong><br />
Customer Service at (866) 961-1207 for assistance.<br />
Reference 3.2.3 when calling.<br />
Change channel or contact<br />
<strong>Cox</strong> Customer Service for<br />
assistance.<br />
Contact <strong>Cox</strong> Customer Service<br />
for assistance.<br />
Contact <strong>Cox</strong> Customer Service<br />
for assistance.<br />
Contact <strong>Cox</strong> Customer Service<br />
for assistance.<br />
Error Code Message You Should<br />
4.1.1004 – Not<br />
authorized<br />
Sorry, you are not authorized to purchase this<br />
program. Please contact <strong>Cox</strong> Customer Service at<br />
(866) 961-1207 for assistance. Reference 4.1.1004<br />
when calling.<br />
Contact <strong>Cox</strong> Customer Service<br />
for assistance.<br />
126
4.1.1007 – Credit<br />
limit exceeded<br />
4.1.16 – Credit not<br />
sufficient<br />
4.1.1999 – Alert<br />
4.1.2 – Blacked<br />
out<br />
4.1.3 – Purchase<br />
functionality<br />
disabled<br />
4.1.32 – <strong>Program</strong><br />
not purchasable<br />
4.1.4 - Alert<br />
4.1.5 – Heavy<br />
network traffic<br />
4.1.6 - Alert<br />
You have exceeded your maximum credit limit to<br />
purchase this program. Please contact <strong>Cox</strong><br />
Customer Service at (866) 961-1207 for<br />
assistance. Reference 4.1.1007 when calling.<br />
Sorry, you currently have insufficient credit to<br />
purchase this program. Please contact <strong>Cox</strong><br />
Customer Service at (866) 961-1207 for<br />
assistance. Reference 4.1.16 when calling.<br />
Sorry, you purchase did not go through due to<br />
some technical difficulties. If the problem<br />
continues, please contact <strong>Cox</strong> Customer Service at<br />
(866) 961-1207 for assistance. Reference 4.1.1999<br />
when calling.<br />
Sorry, his program is currently blacked out and is<br />
not available for purchasing. Please contact <strong>Cox</strong><br />
Customer Service at (866) 961-1207 for<br />
assistance. Reference 4.1.2 when calling.<br />
Sorry, your purchase functionality has been<br />
disabled. Please contact <strong>Cox</strong> Customer Service at<br />
(866) 961-1207 for assistance. Reference 4.1.3<br />
when calling.<br />
Sorry, this program has already begun airing and is<br />
not available for purchasing. Please contact <strong>Cox</strong><br />
Customer Service at (866) 961-1207 for<br />
assistance. Reference 4.1.32 when calling.<br />
Sorry, we are currently experiencing some<br />
technical difficulties. Please try again. If the<br />
problem continues, please contact <strong>Cox</strong> Customer<br />
Service at (866) 961-1207 for assistance.<br />
Reference 4.1.4 when calling.<br />
Sorry, we are currently experiencing heavy network<br />
traffic and are unable to process this request.<br />
Please try again in 15 minutes. If the problem<br />
continues, please contact <strong>Cox</strong> Customer Service at<br />
(866) 961-1207. Reference 4.1.5 when calling.<br />
Sorry, we are experiencing some technical<br />
difficulties. Please try again in 15 minutes. If the<br />
problem continues, please contact <strong>Cox</strong> Customer<br />
Service at (866) 961-1207. Reference 4.1.6 when<br />
calling.<br />
Contact <strong>Cox</strong> Customer Service<br />
for assistance.<br />
Contact <strong>Cox</strong> Customer Service<br />
for assistance.<br />
Contact <strong>Cox</strong> Customer Service<br />
for assistance.<br />
Contact <strong>Cox</strong> Customer Service<br />
for assistance.<br />
Contact <strong>Cox</strong> Customer Service<br />
for assistance.<br />
Contact <strong>Cox</strong> Customer Service<br />
for assistance.<br />
Contact <strong>Cox</strong> Customer Service<br />
for assistance.<br />
Contact <strong>Cox</strong> Customer Service<br />
for assistance.<br />
Contact <strong>Cox</strong> Customer Service<br />
for assistance.<br />
127
<strong>Guide</strong><br />
Error Code Message You Should<br />
5.1.13 - Alert<br />
6.1.1536 – Alert<br />
6.1.272 – Alert<br />
6.1.1280 - Alert<br />
6.1.768 - Alert<br />
On DEMAND<br />
Sorry, we are currently experiencing some<br />
technical difficulties. Please try again in 15<br />
minutes. If the problem continues, please contact<br />
<strong>Cox</strong> Customer Service at (866) 961-1207.<br />
Reference 5.1.13 when calling.<br />
Sorry, we are currently experiencing some<br />
technical difficulties. You can watch programming<br />
by directly tuning to the channels. If the problem<br />
continues, please contact <strong>Cox</strong> Customer Service at<br />
(866) 961-1207. Reference 6.1.1536 when calling.<br />
Sorry, we are currently experiencing some<br />
technical difficulties. You can watch programming<br />
by directly tuning to the channels. If the problem<br />
continues, please contact <strong>Cox</strong> Customer Service at<br />
(866) 961-1207. Reference 6.1.272 when calling.<br />
Sorry, we are currently experiencing some<br />
technical difficulties. You can watch programming<br />
by directly tuning to the channels. If the problem<br />
continues, please contact <strong>Cox</strong> Customer Service at<br />
(866) 961-1207. Reference 6.1.1280 when calling.<br />
Sorry, we are currently experiencing some<br />
technical difficulties. You can watch programming<br />
by directly tuning to the channels. If the problem<br />
continues, please contact <strong>Cox</strong> Customer Service at<br />
(866) 961-1207. Reference 6.1.768 when calling.<br />
Contact <strong>Cox</strong> Customer Service<br />
for assistance.<br />
Use the number buttons (0-9)<br />
on the remote control to tune<br />
directly to your channel. If the<br />
problem continues, contact<br />
<strong>Cox</strong> Customer Service.<br />
Use the number keys (0-9) on<br />
the remote control to tune<br />
directly to your channel. If the<br />
problem continues, contact<br />
<strong>Cox</strong> Customer Service.<br />
Use the number buttons (0-9)<br />
on the remote control to tune<br />
directly to your channel. If the<br />
problem continues, contact<br />
<strong>Cox</strong> Customer Service.<br />
Use the number buttons (0-9)<br />
on the remote control to tune<br />
directly to your channel. If the<br />
problem continues, contact<br />
<strong>Cox</strong> Customer Service.<br />
Error Code Message You Should<br />
7.0x9000 ─ Alert<br />
7.1.1003 ─ Alert<br />
7.1.1004 ─ Alert<br />
Sorry, there is currently a problem with this title.<br />
Please make another selection. (OEC)<br />
Sorry, we cannot process your order at this time.<br />
Please try again. If the problem continues, please<br />
contact <strong>Cox</strong> Customer Service at (866) 961-1207<br />
for assistance. Reference 7.1.1003 when calling.<br />
Sorry, your authorization to this program has just<br />
expired. Please contact <strong>Cox</strong> Customer Service at<br />
(866) 961-1207 for assistance. Reference 7.1.1004<br />
when calling.<br />
Contact <strong>Cox</strong> Customer Service<br />
for assistance.<br />
Contact <strong>Cox</strong> Customer Service<br />
for assistance.<br />
Contact <strong>Cox</strong> Customer Service<br />
for assistance.<br />
128
7.1.404 ─ Alert<br />
7.1.502 ─ Alert<br />
7.1.8309 ─ Alert<br />
7.3.8806 ─ Alert<br />
7.2.0x24 ─ Alert<br />
7.0x9000 ─ Alert<br />
7.2.0x9002 ─ Alert<br />
7.1.1003 ─ Alert<br />
7.1.1004 –<br />
Authorization<br />
expired<br />
Sorry, we are currently experiencing some<br />
technical difficulties. Please try again in 15<br />
minutes. If the problem continues, please contact<br />
<strong>Cox</strong> Customer Service at (866) 961-1207.<br />
Reference 7.1.404 when calling.<br />
Sorry, this request is taking too long to process.<br />
Please try again in 15 minutes. If the problem<br />
continues, please contact <strong>Cox</strong> Customer Service at<br />
(866) 961-1207 for assistance. Reference 7.1.502<br />
when calling.<br />
Sorry, we are currently experiencing some<br />
technical difficulties. If the problem continues,<br />
please contact <strong>Cox</strong> Customer Service at (866) 961-<br />
1207 for assistance. Reference 7.1.8309 when<br />
calling.<br />
Sorry, we are currently experiencing some<br />
technical difficulties. Please try again in 15 minutes<br />
or choose another On DEMAND program. If the<br />
problem continues, please contact <strong>Cox</strong> Customer<br />
Service at (866) 961-1207 for assistance.<br />
Reference 7.3.8806 when calling.<br />
We are sorry. We cannot complete your request.<br />
Please try again in 15 minutes. If the problem<br />
continues, please contact <strong>Cox</strong> Customer Service at<br />
(866) 961-1207 for assistance. Reference 7.2.0x24<br />
when calling.<br />
We are sorry. We are experiencing some technical<br />
difficulties with this program. Please make another<br />
selection. If the problem continues, please contact<br />
<strong>Cox</strong> Customer Service at (866) 961-1207 for<br />
assistance. Reference 7.0x9000 when calling.<br />
Sorry, we are unable to authorize your order.<br />
Please contact <strong>Cox</strong> Customer Service at (866)<br />
961-1207 for assistance. Reference 7.2.0x9002<br />
when calling.<br />
Sorry, we cannot process your order at this time.<br />
Please try again. If the problem continues, please<br />
contact <strong>Cox</strong> Customer Service at (866) 961-1207<br />
for assistance. Reference 7.1.1003 when calling.<br />
Sorry, your authorization to this program has just<br />
expired. Please contact <strong>Cox</strong> Customer Service at<br />
(866) 961-1207 for assistance. Reference 7.1.1004<br />
when calling.<br />
Wait 15 minutes and try again.<br />
If the problem continues,<br />
please contact <strong>Cox</strong> Customer<br />
Service.<br />
Wait 15 minutes and try again.<br />
If the problem continues,<br />
please contact <strong>Cox</strong> Customer<br />
Service.<br />
Contact <strong>Cox</strong> Customer Service<br />
for assistance.<br />
Wait 15 minutes and try again.<br />
If the problem continues,<br />
please contact <strong>Cox</strong> Customer<br />
Service.<br />
Wait 15 minutes and try again.<br />
If the problem continues,<br />
please contact <strong>Cox</strong> Customer<br />
Service.<br />
Try again. If the problem<br />
continues, please contact <strong>Cox</strong><br />
Customer Service.<br />
Contact <strong>Cox</strong> Customer Service<br />
for assistance.<br />
Try again. If the problem<br />
continues, please contact <strong>Cox</strong><br />
Customer Service.<br />
Contact <strong>Cox</strong> Customer Service<br />
for assistance.<br />
129
7.2.0x14 ─ Alert<br />
7.3.8001 ─ Alert<br />
OEC ─ Alert<br />
Interactive Services<br />
Sorry, we are currently experiencing some<br />
technical difficulties. Please try again in 15<br />
minutes. If the problem continues, please contact<br />
<strong>Cox</strong> Customer Service at (866) 961-1207.<br />
Reference 7.2.0x14 when calling.<br />
Sorry, we are currently experiencing some<br />
technical difficulties. Please try again in 15<br />
minutes. If the problem continues, please contact<br />
<strong>Cox</strong> Customer Service at (866) 961-1207.<br />
Reference 7.3.8001 when calling.<br />
We are experiencing difficulty with your selection.<br />
Please try again.<br />
Wait 15 minutes and try again.<br />
If the problem continues,<br />
please contact <strong>Cox</strong> Customer<br />
Service.<br />
Wait 15 minutes and try again.<br />
If the problem continues,<br />
please contact <strong>Cox</strong> Customer<br />
Service.<br />
Try again. If the problem<br />
continues, please contact <strong>Cox</strong><br />
Customer Service.<br />
Error Code Message You Should<br />
8.1.1– Alert<br />
8.1.5 – Alert<br />
8.1.6 ─ Alert<br />
Sorry, Call Log information is unavailable at this<br />
moment. If the problem continues, please contact<br />
<strong>Cox</strong> Customer Service at (866) 961-1207 for<br />
assistance. Reference 8.1.1 when calling.<br />
Sorry, we are currently experiencing some<br />
technical difficulties. Please try again in 15<br />
minutes. If the problem continues, please contact<br />
<strong>Cox</strong> Customer Service at (866) 961-1207 for<br />
assistance. Reference 8.1.5 when calling.<br />
We are sorry, TV Caller ID notifications are<br />
unavailable to you at this time. This may occur for<br />
one of the following reasons:<br />
1. you are not subscribed to <strong>Cox</strong> Digital Telephone<br />
Service,<br />
2. you are subscribed to <strong>Cox</strong> Digital Telephone<br />
Service but are not subscribed to Caller ID, or<br />
3. you are a subscriber but have Privacy Manager<br />
turned on.<br />
If you are a <strong>Cox</strong> Digital Telephone customer and<br />
have recently ordered Caller ID, please try to<br />
access Phone Tools on TV again, allowing up to 24<br />
hours for this service to become active. If the<br />
problem continues, please contact <strong>Cox</strong> Customer<br />
Service at (866) 961-1207. Reference 8.1.6 when<br />
calling.<br />
Contact <strong>Cox</strong> Customer Service<br />
for assistance.<br />
Wait 15 minutes and try again.<br />
If the problem continues,<br />
please contact <strong>Cox</strong> Customer<br />
Service.<br />
Contact <strong>Cox</strong> Customer Service<br />
for assistance.<br />
130
9.5.6 – Alert<br />
Receiver Test<br />
Sorry, we are currently experiencing some<br />
technical difficulties. Please try again in 15<br />
minutes. If the problem continues, please contact<br />
<strong>Cox</strong> Customer Service at (866) 961-1207 for<br />
assistance. Reference 9.5.6 when calling.<br />
Wait 15 minutes and try again.<br />
If the problem continues,<br />
please contact <strong>Cox</strong> Customer<br />
Service.<br />
Error Code Message You Should<br />
10.1.15 – Receiver<br />
may have<br />
intermittent<br />
problems<br />
retrieving <strong>Guide</strong><br />
data<br />
10.1.31 – Receiver<br />
may have<br />
intermittent<br />
problems<br />
retrieving <strong>Guide</strong><br />
data<br />
10.1.32 ─<br />
Receiver may<br />
have intermittent<br />
problems<br />
retrieving pay-perview<br />
program data<br />
10.1.10 – Receiver<br />
is unable to<br />
communicate with<br />
the network<br />
10.1.11 – Receiver<br />
is unable to<br />
communicate with<br />
the network<br />
10.1.12 – Receiver<br />
is unable to<br />
communicate with<br />
the network<br />
If you do not see program titles and descriptions in<br />
the <strong>Guide</strong> within 30 minutes, please contact <strong>Cox</strong><br />
Customer Service at (866) 961-1207. Reference<br />
10.1.15 when calling.<br />
If you do not see program titles and descriptions in<br />
the <strong>Guide</strong> within 30 minutes, please contact <strong>Cox</strong><br />
Customer Service at (866) 961-1207. Reference<br />
10.1.31 when calling.<br />
If you do not see pay-per-view program titles and<br />
descriptions in the <strong>Guide</strong>, please contact <strong>Cox</strong><br />
Customer Service at (866) 961-1207. Reference<br />
10.1.32 when calling.<br />
Please contact <strong>Cox</strong> Customer Service at (866)<br />
961-1207. After entering your account information<br />
in the automated menu, select the "Technical<br />
Support" option, then select "Cable TV", and finally<br />
select the "Box Reset" option. All receivers may<br />
take up to 15 minutes to reset. If the problem<br />
continues, please contact <strong>Cox</strong> Customer Service to<br />
speak with a representative. Reference 10.1.10<br />
when calling.<br />
Please contact <strong>Cox</strong> Customer Service at (866)<br />
961-1207 for assistance. Reference 10.1.11 when<br />
calling.<br />
Please contact <strong>Cox</strong> Customer Service at (866)<br />
961-1207 for assistance. Reference 10.1.12 when<br />
calling.<br />
Wait 30 minutes and see if<br />
program titles and descriptions<br />
are available in the <strong>Guide</strong>. If<br />
the problem continues, please<br />
contact <strong>Cox</strong> Customer Service.<br />
Wait 30 minutes and see if<br />
program titles and descriptions<br />
are available in the <strong>Guide</strong>. If<br />
the problem continues, please<br />
contact <strong>Cox</strong> Customer Service.<br />
Contact <strong>Cox</strong> Customer Service<br />
for assistance.<br />
Contact <strong>Cox</strong> Customer Service<br />
for assistance.<br />
Contact <strong>Cox</strong> Customer Service<br />
for assistance.<br />
Contact <strong>Cox</strong> Customer Service<br />
for assistance.<br />
131
10.1.13 – Receiver<br />
is unable to<br />
communicate with<br />
the network<br />
10.1.20 – Unable<br />
to test On<br />
DEMAND<br />
10.1.21 – Unable<br />
to test On<br />
DEMAND<br />
10.1.24 – Receiver<br />
is not enabled for<br />
Whole Home DVR<br />
10.1.25 – Receiver<br />
is not enabled for<br />
Whole Home DVR<br />
10.1.26 – Receiver<br />
is not enabled for<br />
Whole Home DVR<br />
10.1.27.1 – Non-<br />
<strong>Cox</strong> MoCA<br />
devices were<br />
detected on your<br />
home network<br />
Please contact <strong>Cox</strong> Customer Service at (866)<br />
961-1207. After entering your account information<br />
in the automated menu, select the "Technical<br />
Support" option, then select "Cable TV", and finally<br />
select the "Box Reset" option. All receivers may<br />
take up to 15 minutes to reset. If the problem<br />
continues, please contact <strong>Cox</strong> Customer Service to<br />
speak with a representative. Reference 10.1.13<br />
when calling.<br />
Please press the On DEMAND button on the<br />
remote control and select a program to play. If you<br />
are unable to play the program, please contact <strong>Cox</strong><br />
Customer Service at (866) 961-1207 for<br />
assistance. Reference 10.1.21 when calling.<br />
Please press the On DEMAND button on the<br />
remote control and select a program to play. If you<br />
are unable to play the program, please contact<br />
<strong>Cox</strong> Customer Service at (866) 961-1207 for<br />
assistance. Reference 10.1.21 when calling.<br />
Please contact <strong>Cox</strong> Customer Service at (866)<br />
961-1207 for assistance. Reference 10.1.24 when<br />
calling.<br />
Please contact <strong>Cox</strong> Customer Service at (866)<br />
961-1207. After entering your account information<br />
in the automated menu, select the "Technical<br />
Support" option, then select "Cable TV", and finally<br />
select the "Box Reset" option. All receivers may<br />
take up to 15 minutes to reset. If the problem<br />
continues, please contact <strong>Cox</strong> Customer Service to<br />
speak with a representative. Reference 10.1.25<br />
when calling.<br />
Please contact <strong>Cox</strong> Customer Service at (866)<br />
961-1207. After entering your account information<br />
in the automated menu, select the "Technical<br />
Support" option, then select "Cable TV", and finally<br />
select the "Box Reset" option. All receivers may<br />
take up to 15 minutes to reset. If the problem<br />
continues, please contact <strong>Cox</strong> Customer Service to<br />
speak with a representative. Reference 10.1.26<br />
when calling.<br />
Please disconnect any MoCA devices not provided<br />
by <strong>Cox</strong> and run the receiver test again. If the<br />
problem continues, please contact <strong>Cox</strong> Customer<br />
Service at (866) 961-1207. Reference 10.1.27.1<br />
when calling.<br />
Contact <strong>Cox</strong> Customer Service<br />
for assistance.<br />
Play an On DEMAND<br />
program. If the problem<br />
continues, please contact <strong>Cox</strong><br />
Customer Service.<br />
Play an On DEMAND<br />
program. If the problem<br />
continues, please contact <strong>Cox</strong><br />
Customer Service.<br />
Contact <strong>Cox</strong> Customer Service<br />
for assistance.<br />
Contact <strong>Cox</strong> Customer Service<br />
for assistance.<br />
Contact <strong>Cox</strong> Customer Service<br />
for assistance.<br />
Please disconnect any MoCA<br />
devices not provided by <strong>Cox</strong><br />
and run the receiver test again.<br />
If the problem continues,<br />
contact <strong>Cox</strong> Customer Service.<br />
132
10.1.27.2 – Test<br />
has detected<br />
fewer receivers<br />
than the actual<br />
number of<br />
authorized<br />
receivers on your<br />
home network<br />
10.1.28 –<br />
Problems with<br />
your Whole Home<br />
DVR network<br />
10.1.29 – Unable<br />
to test On<br />
DEMAND<br />
10.1.30 – Problem<br />
detected<br />
10.1.5 – Problem<br />
detected<br />
10.1.6.1 –<br />
Possible problem<br />
detected<br />
10.1.6.2 –<br />
Problem detected<br />
10.1.6.3 –<br />
Possible problem<br />
detected<br />
10.1.6.4 –<br />
Possible problem<br />
detected<br />
10.1.7.1 –<br />
Problem detected<br />
10.1.7.2 –<br />
Possible problem<br />
detected<br />
Please ensure that all receivers are connected to a<br />
cable outlet and are powered on. If the problem<br />
continues, please contact <strong>Cox</strong> Customer Service at<br />
(866) 961-1207. Reference 10.1.27.2 when calling.<br />
Please contact <strong>Cox</strong> Customer Service at (866)<br />
961-1207 for assistance. Reference 10.1.28 when<br />
calling.<br />
Please contact <strong>Cox</strong> Customer Service at (866)<br />
961-1207 for assistance. Reference 10.1.29 when<br />
calling.<br />
Please contact <strong>Cox</strong> Customer Service at (866)<br />
961-1207 for assistance. Reference 10.1.30 when<br />
calling.<br />
Please contact <strong>Cox</strong> Customer Service at (866)<br />
961-1207 for assistance. Reference 10.1.5 when<br />
calling.<br />
If you have problems with your TV service, please<br />
contact <strong>Cox</strong> Customer Service at (866) 961-1207<br />
for assistance. Reference 10.1.6.1 when calling.<br />
Please contact <strong>Cox</strong> Customer Service at (866)<br />
961-1207 for assistance. Reference 10.1.6.2 when<br />
calling.<br />
If you have problems with your TV service, please<br />
contact <strong>Cox</strong> Customer Service at (866) 961-1207<br />
for assistance. Reference 10.1.6.3 when calling.<br />
If you have problems with your TV service, please<br />
contact <strong>Cox</strong> Customer Service at (866) 961-1207<br />
for assistance. Reference 10.1.6.4 when calling.<br />
Your receiver may not have been properly<br />
connected to a cable outlet. Please connect the<br />
receiver to the cable outlet and run the receiver test<br />
again. If problem continues, please contact <strong>Cox</strong><br />
Customer Service at (866) 961-1207. Reference<br />
10.1.7.1 when calling.<br />
If you have problems with your TV service, please<br />
contact <strong>Cox</strong> Customer Service at (866) 961-1207<br />
for assistance. Reference 10.1.7.2 when calling.<br />
Please ensure that all<br />
receivers are connected to a<br />
cable outlet and are powered<br />
on. If the problem continues,<br />
contact <strong>Cox</strong> Customer Service.<br />
Contact <strong>Cox</strong> Customer Service<br />
for assistance.<br />
Contact <strong>Cox</strong> Customer Service<br />
for assistance.<br />
Contact <strong>Cox</strong> Customer Service<br />
for assistance.<br />
Contact <strong>Cox</strong> Customer Service<br />
for assistance.<br />
Contact <strong>Cox</strong> Customer Service<br />
for assistance.<br />
Contact <strong>Cox</strong> Customer Service<br />
for assistance.<br />
Contact <strong>Cox</strong> Customer Service<br />
for assistance.<br />
Contact <strong>Cox</strong> Customer Service<br />
for assistance.<br />
Please connect the receiver to<br />
the cable outlet and run the<br />
receiver test again.<br />
Contact <strong>Cox</strong> Customer Service<br />
for assistance.<br />
133
10.1.7.3 –<br />
Possible problem<br />
detected<br />
10.1.8 – Problem<br />
detected<br />
10.1.9 – Problem<br />
detected<br />
If you have problems with your TV service, please<br />
contact <strong>Cox</strong> Customer Service at (866) 961-1207<br />
for assistance. Reference 10.1.7.3 when calling.<br />
Please contact <strong>Cox</strong> Customer Service at (866)<br />
961-1207 for assistance. Reference 10.1.8 when<br />
calling.<br />
Please contact <strong>Cox</strong> Customer Service at (866)<br />
961-1207 for assistance. Reference 10.1.9 when<br />
calling.<br />
Contact <strong>Cox</strong> Customer Service<br />
for assistance.<br />
Contact <strong>Cox</strong> Customer Service<br />
for assistance.<br />
Contact <strong>Cox</strong> Customer Service<br />
for assistance.<br />
134
Index<br />
AC outlet, 115<br />
Analog Output, 108<br />
Analog Service, 104<br />
Audio Language, 109<br />
Background Color, 105<br />
Background Opacity, 106<br />
Block Titles, 95<br />
Browse Cast & Crew, 26<br />
Browse Movie Posters. See On DEMAND<br />
Browse On DEMAND. See On DEMAND<br />
Browse Related, 7, 20, 25, 26, 27, 54, 101<br />
Call Log, 74<br />
Caller ID to the TV, 74, 75<br />
Cancel a Series Recording, 60<br />
Cancel Recordings, 57<br />
Change Recording Options, 55<br />
Channel Banner, 18<br />
Channel Banners, 28<br />
Closed Captioning, 103<br />
Confirm Recordings, 46<br />
<strong>Cox</strong> Customer Care, 34, 91, 124<br />
<strong>Cox</strong> Privacy Policy, 81<br />
Current User. See Users<br />
Customer Support, 78<br />
Default View, 100<br />
Delete Recordings, 53<br />
Delete Series Recordings, 60<br />
Delete User. See Users<br />
Digital Output, 109<br />
Digital Service, 103, 104<br />
Digital Video Recorder, 38<br />
Dynamic Range, 110<br />
Edit Banners. See Info Banners, Channel<br />
Banners<br />
Edit Recording Options, 55<br />
Edit Recording Options (series), 58<br />
Edit User. See Users<br />
Exit On DEMAND. See On DEMAND<br />
Favorite Channels, 37, 87, 88, 98, 99, 100<br />
Get More Information, 23<br />
Grid View, 7, 21, 22, 49, 100<br />
<strong>Guide</strong> Display, 87, 100, 101, 102, 103, 106,<br />
107<br />
<strong>Guide</strong> Language, 106, 107<br />
<strong>Guide</strong> Text Size, 107<br />
<strong>Guide</strong> Views, 7, 21<br />
Info Banners, 28, 29, 30, 102<br />
INFO button, 7, 18, 28, 29<br />
Instant Replay, 36, 53<br />
Interactive Services, 74<br />
live call forwarding, 74<br />
Lock <strong>Program</strong>s, 92<br />
Lock Purchases, 95, 96<br />
Lock Services, 97<br />
Lock Users. See Users<br />
Main Menu, 7, 17, 18, 19, 21, 22, 24, 32, 83,<br />
87<br />
<strong>Manual</strong> Recordings, 39, 44, 45, 46, 56<br />
Multi-Room DVR, 62<br />
New User. See Users<br />
On DEMAND, 7, 18, 20, 29, 31, 32, 33, 34,<br />
35, 36, 52, 82, 84, 91, 92, 96, 97, 121,<br />
123<br />
On-Screen Keyboard, 85<br />
Parental Control PIN. See Parental Contols<br />
Parental Controls, 16, 32, 34, 87, 91, 92, 93,<br />
94, 95, 96, 97, 122<br />
Pay-Per-View, 7, 82, 91, 92, 96, 121, 122,<br />
123<br />
Phone Tools, 74<br />
Power Off, 113<br />
Power On, 99, 112<br />
<strong>Program</strong> Ratings, 87, 91<br />
Purchase On DEMAND. See On DEMAND<br />
Purchase Pay-Per-View. See Pay-Per-View<br />
Purchase PIN, 34, 91, 92, 96, 122<br />
Recently Viewed <strong>Program</strong>s. See On<br />
DEMAND<br />
Recording Alerts, 46<br />
Recording programs, 40, 41<br />
Remote Control keyboard, 85, 102<br />
Review Scheduled Recordings, 55<br />
Save Searches, 86<br />
Scan Live <strong>Program</strong>s, 39<br />
Scan Recorded <strong>Program</strong>s, 52<br />
Scroll, 23<br />
Search, 7, 35, 82, 83, 85, 86, 101, 102, 123<br />
Search On DEMAND. See Search, See On<br />
DEMAND<br />
Search PPV Content. See Search, Pay-Per-<br />
View<br />
See Full Details, 35<br />
serial number, 78<br />
Series Manager, 58<br />
Series Priority, 59<br />
Set <strong>Guide</strong> Time, 22<br />
Skipped Channels, 99, 100<br />
Subscription Channels, 34<br />
Subtitles, 87<br />
Text Color, 105<br />
Text Size, 105<br />
Text Style, 104<br />
Timer, 87, 112, 113, 114<br />
Turbo Scroll, 23, See Scroll<br />
Universal Search. See Search<br />
Use Agreement, 80<br />
Users, 87, 88, 89, 90, 97<br />
Volume, 108<br />
135
Watch a <strong>Program</strong>, 23<br />
Watch Another Episode. See Browse<br />
Related<br />
Watch Preview, 35<br />
Watch Recorded <strong>Program</strong>s, 49, 50<br />
Zone Channels, 75<br />
136