C O R T E LCO 27 4 0
C O R T E LCO 27 4 0
C O R T E LCO 27 4 0

Create successful ePaper yourself
Turn your PDF publications into a flip-book with our unique Google optimized e-Paper software.
CORTE<strong>LCO</strong> <strong>27</strong>40 Four-Line Telephone /<br />
Caller ID / Type II Set Instruction Manual<br />
1
2<br />
Table of Contents<br />
Why VoiceManager SM with Cortelco Phones? ........................................................ 2<br />
Cortelco <strong>27</strong>40 Telephone Set Main Features ......................................................... 3<br />
Telephone Set Part Identification ............................................................................. 4<br />
Quick Setup — Multi-Phone Configuration ............................................................. 5<br />
Station Number Assignment .................................................................................... 5<br />
Station Name Assignment ........................................................................................ 6<br />
Line Configuration/Type ........................................................................................... 7<br />
Ringer Configuration/Ring Timing........................................................................... 8<br />
Distinctive Ring .......................................................................................................... 9<br />
System Privacy .......................................................................................................... 10<br />
Placing an Intercom Call ......................................................................................... 10<br />
Features and Buttons ............................................................................................... 11<br />
Conference Button .................................................................................................. 12<br />
Page Button .............................................................................................................. 13<br />
Flash/Mute Buttons .................................................................................................. 14<br />
Speaker/Redial Buttons ........................................................................................... 15<br />
Hold Button .............................................................................................................. 16<br />
Call Transfers ............................................................................................................ 17<br />
Headset ..................................................................................................................... 18<br />
Memory Settings ...................................................................................................... 18<br />
VoiceManager — Most Frequently Used Features ................................................ 20<br />
VoiceManager — Feature Descriptions .................................................................. 21<br />
Voice Portal ............................................................................................................... 22<br />
Voice Mail.................................................................................................................. 22<br />
Appendix A — Menu Tree ........................................................................................ 23<br />
Memory Setting — Time/Date Set — Advanced Setting Options ........................ 25<br />
Appendix B — Batteries ........................................................................................... 26<br />
Appendix C — Troubleshooting Guide .................................................................. <strong>27</strong>
Cortelco <strong>27</strong>40 / Four-line Telephone / Caller ID / Type II Set<br />
Why VoiceManager SM with Cortelco Phones?<br />
• Total cost of ownership savings with Cox<br />
• Total flexibility to meet your business needs<br />
• One vendor to call to support voice and equipment needs<br />
• Cox Business VoiceManager has more features than most phone systems<br />
• VoiceManager features are NETWORK-BASED<br />
- Can be accessed from anywhere (Voice Portal and My Account control)<br />
- Most features can be controlled from the sets with * /# codes<br />
- Customer benefits from feature upgrades on VoiceManager Platform<br />
- Our strongest feature solutions are:<br />
- Business Continuity<br />
- Personal Mobility<br />
3
4<br />
Cortelco <strong>27</strong>40 Telephone Set Main Features<br />
• Caller ID with Call Waiting Display<br />
• Internal Phone Book Memory<br />
• Hold/Redial/Mute<br />
• Voice Mail Indication<br />
• Paging<br />
• Intercom<br />
• Programmable Distinctive Ring<br />
• Toll Restriction<br />
• Speakerphone<br />
• Headset Jack<br />
• Five Memory Locations<br />
• Conference
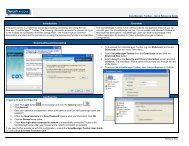
<strong>27</strong>40 Telephone Set Part Identification<br />
1 Memory Buttons<br />
2 Menu Button<br />
3 Delete Button<br />
4 Multi-Angle LCD<br />
5 Message Lamp<br />
6 Review Up/Down Button<br />
7 Select Button<br />
8 Calls Button<br />
9 Directory/Logo Strip<br />
10 Line Buttons<br />
11 Intercom Button<br />
12 2.5 mm Headset Jack<br />
13 Page Button<br />
14 Conference Button<br />
15 Transfer Button<br />
16 Flash Button (use to<br />
access VoiceManagerSM Transfer/Hold/Music on<br />
Hold Features<br />
17 Mute Button<br />
18 Headset Button<br />
19 Redial Button<br />
20 Hold Button<br />
21 Dial Button<br />
22 Volume Up Button<br />
23 Speaker Button<br />
24 Volume Down Button<br />
25 Speaker<br />
26 Handset Jack<br />
<strong>27</strong> Handset<br />
5
6<br />
Quick Setup — Multi-Phone Configuration<br />
• Up to sixteen (16) Cortelco <strong>27</strong>40 sets can be multi-phone configured.<br />
Line 1 MUST be common on all phones.<br />
• Multi-Phone Line Configuration: Remaining three lines can be common,<br />
private or unconnected.<br />
• Connect telephones to wall jacks with provided twisted pair, four-wire<br />
modular line cords: one modular cord for Lines 1 and 2 and a second<br />
for Lines 3 and 4.<br />
• The Cortelco <strong>27</strong>40 four-line phone will perform best when using the<br />
VoiceManager Complete Feature package.<br />
• Install three AAA batteries.<br />
Quick Setup<br />
When setting up a Cortelco <strong>27</strong>40, here are the features you may need<br />
to program.<br />
Station Number Assignment<br />
Each station (telephone) must be assigned a unique station ID number.<br />
The <strong>27</strong>40 telephones WILL NOT function correctly until a station number is<br />
assigned. Line 1 must be common to all phones for station naming to work<br />
properly. To assign a number to a station:<br />
• Press MENU. The display will read “Phone Setting.”<br />
• Press the soft key under ENTER. The display will show the currently assigned<br />
station number.<br />
• Press the soft key under CHANGE repeatedly, until the desired station is<br />
displayed. The choices are Station #01 through Station #16.<br />
• Press MENU to exit.<br />
• NOTE: One phone in the system must be set as Station #01 in order for all<br />
the system features to function. Certain features can only be programmed<br />
at Station 01 and will only function at Station 01.
Station Name Assignment<br />
You may give a name to each of your telephones. During intercom calls, the<br />
name that is assigned to the station will show with the extension number.<br />
Please note that it may take up to 24 hours for all stations to be updated with a<br />
name change. Station names MUST be assigned at Station 01.<br />
To Assign a Name to a Station<br />
• Press MENU. The display will read “Phone Setting.”<br />
• Press soft key under ENTER.<br />
• Press the Down Arrow repeatedly until the display reads “Station Naming.”<br />
• Press soft key under ENTER. The display will show the currently stored name<br />
for Station #01, or indicate “No Name” if no name has yet been given to<br />
Station #01.<br />
• Press soft key under CHANGE if you wish to store a new name for Station #01,<br />
or press DOWN ARROW repeatedly until you see the station number that you<br />
want to name.<br />
• Press soft key under CHANGE.<br />
• Use the dial-pad numbers to enter the name for the desired station. Names<br />
may contain up to 16 characters.<br />
• Press soft key under CHANGE if you wish to store a new name for Station #01,<br />
or press DOWN ARROW repeatedly until you see the station number that you<br />
want to name.<br />
• Press soft key under CHANGE.<br />
• Use the dial-pad numbers to enter the name for the desired station. Names<br />
may contain up to 16 character.<br />
• Press the soft key under SAVE.<br />
• Repeat these steps for any additional stations you wish to name. The<br />
following table shows which dial-pad numbers to press for letters and special<br />
characters. Press the DOWN ARROW button below the display to leave an<br />
empty space. Press the DELETE button to make corrections.<br />
0 . ,<br />
1 , - ‘ & . ( ) 1<br />
2 a b c 2 A B C<br />
3 d e f 3 D E F<br />
4 g h i 4 G H I<br />
5 j k l 5 J K L<br />
6 m n o 6 M N O<br />
7 p q r s 7 P Q R S<br />
8 t u v 8 T U V<br />
9 w x y z 9 W X Y Z<br />
* *<br />
# #<br />
7
8<br />
Line Configuration/Type<br />
While Line 1 must be shared at all stations, Lines 2, 3 or 4 may be unconnected,<br />
common, or may be connected to private lines.<br />
Common Lines Shared<br />
This is the factory setting for all lines. This setting assumes that the phone<br />
number is connected to the same telephone line position at all stations.<br />
Private<br />
Use this setting at any telephone line position that is connected to a different<br />
telephone number than the corresponding line at the other stations. For<br />
example, you may connect your private telephone number to Line 4 at your<br />
station instead of connecting your station to the common Line 4. In this<br />
example, you would set Line 4 at your station as PRIVATE.<br />
Unconnected<br />
Use this setting at any telephone that may not have all lines physically connected.<br />
How to Adjust the Line Configuration Type<br />
• Press MENU. The display will read “Phone Setting.”<br />
• Press soft key under ENTER.<br />
• Press the DOWN ARROW repeatedly until the display reads<br />
“Line Connections.”<br />
• Press soft key under ENTER. The display will show the line connection<br />
setting for Line 2.<br />
• Press the soft key under CHANGE repeatedly, until the desired line<br />
connection setting for Line 2 is displayed. The choices are:<br />
- L2: Common (Factory Setting)<br />
- L2: Private<br />
- L2: Unconnected<br />
• Press the soft key under NEXT to see the current setting for Line 3.<br />
• Repeat above steps to change for the other lines.<br />
• Press MENU to exit.
Ringer Configuration<br />
The ringers for each outside line are controlled individually at each telephone.<br />
There are three possible settings for each line ringer:<br />
Ringer On<br />
• The line will ring normally.<br />
Delayed Ring<br />
• The line will start ringing after the first 20 seconds. This is useful if all<br />
phones are answered at a central location.<br />
Ringer Off<br />
• The line will not ring. In all these cases, the line indicators will flash to signal<br />
an incoming call.<br />
• You can always answer a ringing line, whether or not it is ringing audibly at<br />
your telephone by pressing the flashing line button.<br />
Ring Timing<br />
• Press MENU. The display will read “Phone Setting.”<br />
• Press soft key under ENTER.<br />
• Press the DOWN ARROW repeatedly until “Ringer Settings” appears<br />
in the display<br />
• Press soft key under ENTER. The display will show the current ringer setting<br />
for Line 1.<br />
• Press the soft key under CHANGE repeatedly until the desired ringer setting<br />
for Line 1 is displayed. The choices are:<br />
- L1 Ringer: ON (factory setting)<br />
- L1 Ringer: DELAY<br />
- L1 Ringer: OFF<br />
• Press the soft key under DOWN ARROW to see the current ringer<br />
setting for line<br />
• Repeat above steps to change the ringer setting for Lines 2 to 4.<br />
• Press MENU to exit.<br />
9
10<br />
Distinctive Ring<br />
All lines are initially set to ring with ring sound number one. Each outside line<br />
may be assigned one of seven other distinctive ringer tones. This can be used<br />
to easily identify a ringing phone.<br />
Assigning Distinctive Ring to One or More Numbers<br />
• Press MENU. The display will read “Phone Setting.”<br />
• Press the DOWN ARROW repeatedly until “Distinctive Ring” appears<br />
in the display.<br />
• Press soft key under ENTER. The display will show the distinctive ring setting<br />
for Line 1.<br />
• Press the soft key under CHANGE repeatedly, until the desired distinctive ring<br />
setting for Line 1 is displayed.<br />
• Press the DOWN ARROW to see the current setting for Line 2, and repeat<br />
above steps to change the settings for Lines 2 to 4.<br />
• Press MENU to exit.<br />
Note: When a Distinctive Ring setting is displayed, it may be heard by pressing<br />
the soft key under CHANGE.<br />
Automatic Line Selection<br />
The <strong>27</strong>40 set will automatically select an outside line or the intercom line<br />
whenever the handset is lifted or the SPEAKER button is pressed. To choose<br />
which line will be automatically selected:<br />
• Press MENU. The display will read “Phone Setting.”<br />
• Press the soft key under ENTER.<br />
• Press the DOWN ARROW repeatedly until Auto Seize appears in the display.<br />
The display will show the current auto seize setting.<br />
• Press the soft key under CHANGE repeatedly until the desired setting is<br />
displayed. The choices are: L1, L2, L3, L4 or INTCM.<br />
• Press MENU to exit.<br />
Note: An incoming call will be selected automatically when the handset is lifted<br />
or the SPEAKER or HEADSET button is pressed regardless of the automatic line<br />
selection choice. To select a non-ringing line, the desired LINE button must be<br />
pressed before lifting the handset. If the chosen line is in use, the telephone<br />
will automatically select the next available line.
System Privacy<br />
Call Privacy prevents stations from joining existing calls. Call privacy can be<br />
released during a call by pressing the CONFERENCE button. The default<br />
setting for Call Privacy is ON. Call Privacy is set at Station #01 for the entire<br />
system. This choice does not appear on any phone except Station #01. Call<br />
Privacy only applies to outside calls. Intercom calls always have Call Privacy.<br />
To Change the Privacy Setting at Station #01<br />
• Press MENU. The display will read “Phone Setting.”<br />
• Press the DOWN ARROW repeatedly until “Advanced Setting” appears<br />
in the display.<br />
• Press the soft key under ENTER.<br />
• Press DOWN ARROW repeatedly until “System Privacy” appears in the display.<br />
• Press the soft key under ENTER. The display will show the current Call<br />
Privacy setting.<br />
• Press the soft key under CHANGE to toggle the privacy setting between<br />
Y and N.<br />
• Press MENU to exit.<br />
Note: It may take five minutes or more for this change to be made in all phones<br />
in the system.<br />
Intercom Call<br />
Placing an Intercom Call<br />
1. Press Intercom button.<br />
2. Dial station number (example: 01).<br />
3. Intercom call will be placed to the station dialed.<br />
Placing a Group Intercom Call<br />
1. Press Intercom button.<br />
2. Press Conference button two times.<br />
3. Group Intercom call will be placed.<br />
11
12<br />
Features and Buttons<br />
Intercom: Call other phones by dialing their station number. Intercom calls can<br />
be answered “hands-free” via speakerphone.<br />
Paging: Page one or all users through the speaker in their telephones.<br />
Transfer: Answer a call and transfer it to any phone in the system.<br />
Flash: Use to transfer calls inside or outside of phones in the system, place<br />
calls on hold, or access music on hold (or use VoiceManager Personal Call<br />
Manager Feature).<br />
Phone Status: See at a glance which phone lines are in use.<br />
Up to 4 Lines: Access four phone lines at the touch of a button. Place a call on<br />
hold and switch to another line.<br />
Three-Way Conference: Press Flash to put first caller on hold, dial second<br />
number then press Flash to connect all three parties.<br />
Large Backlit LCD: Shows number dialed, clock, calendar, extension in use<br />
indication and full caller ID information.<br />
Call Timer: Every call is automatically timed in minutes and seconds.<br />
Headset Jack: 2.5mm headset jack/Plantronics headset suggested.<br />
Redial: Redial five most recent calls; view the date, time and duration.<br />
Do Not Disturb (DND): Silences ringers and prevents intercom calls. Also<br />
available through VoiceManger Personal Call Manager.<br />
Toll Restriction: Restricts specific numbers and prevents unauthorized calls.<br />
Also available through VoiceManger Personal Call Manager.<br />
Call Privacy On/Off: Prevents others from joining or listening to your call.<br />
Auto Line Selection: Automatically select a given line for outbound calls.<br />
Memory Dialing: 40 personal directory dial numbers. Also available through<br />
VoiceManger Personal Call Manager.<br />
Nonvolatile Memory: All memory numbers and feature settings are retained<br />
even with no electrical power or battery.<br />
Adjustable Volume: Separate controls for handset, speakerphone and<br />
headset.<br />
Caller ID: All four lines show caller ID from service provider.<br />
Caller ID on Call Waiting: All four lines show caller ID from service provider<br />
on a call waiting.<br />
Caller ID List: Caller ID information from last 50 calls automatically stored and<br />
dialed with one touch.<br />
Message Waiting Indication (MWI): Missed calls/messages in mailbox.<br />
Supports service Stutter dial tone.<br />
Private Line: Certain lines can appear only on certain phones.<br />
Distinctive Ring: Assign a unique ring sound to your phone.<br />
Additional Features: Battery backup, dual line status indicators, flash, hold,<br />
mute, ringer control, pre-dialing, wall mountable, hearing aid compatible.
Conference Button<br />
The <strong>27</strong>40 allows Conference calls with two other parties. These may be either<br />
two outside lines or one outside line and one intercom line. Conference is also<br />
available through VoiceManager Personal Call Manager.<br />
Outside Calls<br />
• Make or answer a call.<br />
• Press HOLD.<br />
• Make or answer a call on another line.<br />
• When the second call is connected, press the CONFERENCE button.<br />
The lines are immediately conferenced.<br />
• Hang up to end the conference call. To disconnect one of the conference.<br />
parties, press the LINE button for the other party.<br />
Outside Call with Intercom Station<br />
• Place an intercom call to the desired station. The outside call is automatically<br />
placed on hold.<br />
• After the person at the other station answers, press the CONFERENCE button<br />
to create a conference call.<br />
• Hang up to end the conference call. The person at the other station may<br />
remain connected to the outside line.<br />
• If the system Call Privacy is OFF, another intercom station may join a call<br />
by pressing the appropriate LINE button.<br />
• Pressing HOLD during a conference call will place both lines on hold.<br />
The conference call can be re-established by first pressing one of the<br />
LINE buttons and then pressing CONFERENCE.<br />
Note: This feature only works between U<strong>27</strong>40 — four-line phones.<br />
13
14<br />
Page Button<br />
Paging allows announcements to be made to other <strong>27</strong>40 stations in the system.<br />
The speakerphone is automatically activated when making a page. Pages can<br />
be made using the speakerphone or the handset.<br />
Single Page<br />
• Press PAGE.<br />
• Dial the two-digit station number of the station to be paged.<br />
• After the paging tone sounds, speak toward the telephone or lift the handset<br />
and make the announcement.<br />
All Page<br />
The All Page feature enables announcements to be made through all of the<br />
other <strong>27</strong>40 stations. When an All Page is made, a double paging alert tone will<br />
sound followed by the page. All Page will not be heard at stations in use or<br />
stations set to DO NOT DISTURB or Page Block. To perform an All Page:<br />
• Press PAGE twice.<br />
• After the paging tone sounds, speak toward the telephone or lift<br />
the handset and make the announcement.<br />
Blocking Pages<br />
• Press MENU. The display will read “Phone Setting.”<br />
• Press soft key under ENTER.<br />
• Press the DOWN ARROW repeatedly until “Intercom Prefs” appears<br />
in the display.<br />
• Press soft key under ENTER.<br />
• Press DOWN ARROW repeatedly until “Pages: Allowed” appears in the display.<br />
• Press the soft key under CHANGE to select between Pages ALLOWED and<br />
Pages BLOCKED.<br />
• Press MENU to exit.
Page Button (cont’d.)<br />
Answering Pages<br />
Single Page A page directed to a particular station may be answered only at<br />
that station. To answer a page, lift the handset, press SPEAKER or HEADSET<br />
or press the flashing INTERCOM button. This will create a private intercom<br />
conversation.<br />
All Page An All Page may be answered from any phone in the system, even<br />
one that is busy on an outside line, has DO NOT DISTURB set or has blocked<br />
pages. Press the flashing INTERCOM button to answer an All Page. This will<br />
create a private intercom conversation.<br />
Flash Button<br />
Flash<br />
Press FLASH button to provide a line break to access services such as Three-<br />
Way Calling, Call Waiting, or VoiceManager features such as music on hold and<br />
call transfer.<br />
Steps to Use with Call Waiting Service:<br />
1. While having a conversation, another party calls and you hear a tone.<br />
2. Press FLASH once and release. The first conversation is placed on hold and<br />
the second call can be answered.<br />
3. Press FLASH again and release. You may speak to the first caller again and<br />
the second call is placed on hold.<br />
Mute Button<br />
The Mute feature disables the telephone microphone so the <strong>27</strong>20 set user<br />
cannot be heard by the distant party. The Mute feature works with both the<br />
handset and the speakerphone. It silences only the <strong>27</strong>40 user. The distant party<br />
can still be heard.<br />
To activate this feature, press MUTE. The MUTE indicator will light. Then to<br />
cancel this feature, press MUTE again and the MUTE indicator will turn off.<br />
Mute is also cancelled by hanging up, selecting another line or switching from<br />
speakerphone to handset during a call.<br />
15
16<br />
Speaker Button<br />
Making and Answering Calls<br />
When the handset is lifted, the <strong>27</strong>40 will automatically select a line based on<br />
the automatic line selection setting. The <strong>27</strong>40 will automatically select a ringing<br />
line if the handset is lifted during ringing.<br />
To use the speakerphone to make or answer a call or a page, press the<br />
SPEAKER button instead of lifting the handset. This will select the line in the<br />
same manner as the handset described above. To override the automatic<br />
line selection. Press the desired LINE button instead of pressing the SPEAKER<br />
button. The <strong>27</strong>40 will then be connected to that line on the speakerphone.<br />
To switch from handset to speaker during a call, press the SPEAKER button<br />
and hang up the handset. To switch to handset from speaker, lift the handset.<br />
Note that whenever the SPEAKER indicator is on, the handset may be hung up<br />
without disconnecting the call.<br />
Redial Button<br />
To Redial the Last Number Dialed<br />
• Go off-hook by lifting the handset, pressing SPEAKER, pressing HEADSET or<br />
by pressing the desired LINE button.<br />
• Press REDIAL.<br />
To Redial Any of the Last Five Numbers Dialed<br />
The Redial feature enables viewing or redialing of any of the last five telephone<br />
numbers dialed. This also shows the time, date and duration of each call.<br />
• With the phone on-hook and idle, press REDIAL. The display will show the<br />
last number dialed, the time and date of the call, and its duration.<br />
• Press the right arrow button under the display repeatedly to scroll through<br />
a list of the last five numbers dialed along with the time, date and duration.<br />
• Go off-hook at any time to dial the displayed number.
Hold Button<br />
Placing a Call on Hold<br />
To place an outside call on HOLD, press HOLD. To take the call off hold, press<br />
the line button of the line on hold. While a caller is on hold, the handset can be<br />
hung up without disconnecting the call.<br />
When a call is on hold, it can be removed from hold by any telephone<br />
connected to that line simply by accessing the line. If a call remains on hold<br />
after two minutes, your <strong>27</strong>40 set will alert you.<br />
Note: Intercom calls CANNOT be put on HOLD.<br />
Note: To activate VoiceManager music on hold, use the FLASH button.<br />
Making a Call on Another Line<br />
To make a call on a second line while having a conversation, press HOLD to<br />
place your first call on hold and then press another LINE button. A call may now<br />
be made on the second line. Press the first LINE button to return to the first call.<br />
This will disconnect the second call.<br />
To keep the second call, it must be placed on hold before returning to the first<br />
call. This can be done multiple times during a call.<br />
Answering a Call on Another Line<br />
If there is an active call on one line and a call comes in on another line, the<br />
incoming line lamp will flash and the <strong>27</strong>40 will sound a double ring every 15<br />
seconds. If the incoming line is set to ringer off, the double ring will not sound.<br />
The incoming call may be answered by pressing the flashing LINE button. This<br />
will disconnect the original call unless it is placed on HOLD.<br />
17
18<br />
Call Transfers<br />
Attended Transfer<br />
• Place an intercom call to the desired station. The outside call is automatically<br />
placed on hold.<br />
• When the intercom party answers, announce that a call is being transferred<br />
• Press the TRANSFER button to complete the transfer. Press the LINE button<br />
to return to the outside call and abort the transfer.<br />
“Cold” Transfer – (transfer a call without announcing to the recipient)<br />
1. Answer call.<br />
2. Ask caller to hold.<br />
3. Press “FLASH.”<br />
4. Once you have a second dial tone, dial second number.<br />
5. Wait for receiving handset to ring.<br />
6. Hang up.<br />
7. Call is transferred.<br />
“Warm” Transfer – (transfer a call, announcing caller before transferring)<br />
1. Answer call.<br />
2. Ask caller to hold.<br />
3. Press “FLASH.”<br />
4. Once you have a second dial tone, dial second number.<br />
5. Wait for receiving party to answer call.<br />
6. Announce to receiver that you are transferring a call.<br />
7. Hang up.<br />
8. Call is transferred.
Headset<br />
The <strong>27</strong>40 is equipped with a 2.5mm headset jack and a built-in headset<br />
amplifier, along with a dedicated HEADSET button.<br />
To use this feature, plug a telephone headset into the headset jack. There is<br />
no need to buy a headset with a separate amplifier. The headset can be used<br />
to make or answer an outside call, an intercom call or a page. Simply press<br />
HEADSET instead of lifting the handset.<br />
To make a headset call on a particular line, press the desired line button to<br />
connect to that line on the speakerphone. Then, press HEADSET to toggle to<br />
the headset. Press HEADSET again to hang up. Plantronics wireless or wired<br />
headset is recommended.<br />
Memory Settings<br />
Memory Features<br />
The <strong>27</strong>40 can store up to 45 numbers in its memory. Five numbers can be<br />
stored into one-button Memory Locations, which are dialed by pressing a<br />
memory button. Forty numbers can be stored into personal Directory locations,<br />
which are dialed by pressing “#” followed by the arrow buttons.<br />
Storing a Hyphen into Memory<br />
To store a hyphen into memory while saving a number into memory, press<br />
PAGE. Each press of PAGE will insert a hyphen. Hyphens are only for ease of<br />
reading. They make no difference in dialing.<br />
Storing a Flash into Memory<br />
To store a flash while saving a number into memory, press FLASH. These can<br />
be used to access features from a PBX. Each press of FLASH will insert a 600-<br />
millisecond (or other default time) flash. These will be shown as an “f” in the<br />
display.<br />
Storing One of the Last Five Numbers into Memory<br />
To store a dialed number into memory, press REDIAL. You may then press UP<br />
or DOWN key to scroll through the last five numbers dialed. Press the Memory<br />
Location key or the Directory key (#) and press YES to save or NO to cancel<br />
when the desired number is displayed.<br />
19
20<br />
Memory Settings (cont’d.)<br />
Storing a Caller ID into Memory<br />
To store a caller ID number into memory, press CALLS. Then press the UP and<br />
DOWN key to select a Caller ID number to save. Press the Memory Location<br />
key or the Directory key (#) and press YES to save or NO to cancel when the<br />
desired number is displayed.<br />
To Store Caller ID Calls<br />
• Press MENU. The display will read “Phone Setting.”<br />
• Press the soft key under ENTER.<br />
• Press Down Arrow repeatedly until “Caller ID Store” appears in the display<br />
and then press the soft key under ENTER.<br />
• Press CHANGE to change the setting for Line 1.<br />
• Press DOWN ARROW to view and change the settings for Lines 2-4.<br />
To Store a Memory Dial Number<br />
• Press MENU. The display will read “Phone Setting.”<br />
• Press DOWN ARROW until “Memory Setting” appears in the display.<br />
• Press the soft key under ENTER. The display will read “Select Location.”<br />
• Press the Memory button where the number is to be stored. The display<br />
will show the currently stored number or indicate “Empty Location.”<br />
• Press the soft key under ENTER to store a new number.<br />
• Dial the desired telephone number, up to 32 digits.<br />
• Press the soft key SAVE.<br />
• The <strong>27</strong>40 can store up to five numbers that can be dialed automatically<br />
with the press of a memory button.<br />
To Store a Personal Directory Dial Number<br />
• Press MENU. The display will read “Phone Setting.”<br />
• Press DOWN ARROW until “Memory Setting” appears in the display.<br />
• Press the soft key under ENTER. The display will read “Select Location.”<br />
• Press #. The display will read “Empty Location” or indicate that the personal<br />
directory is full.<br />
• Press the soft key under ENTER to store a new number.<br />
• To change a number, press DOWN ARROW repeatedly until the desired entry<br />
is displayed then press CHANGE.<br />
• Dial desired telephone number.<br />
• Press the soft key under NEXT. The display will show the currently stored<br />
name or indicate “No Name.”
Memory Settings (cont’d.)<br />
• Press the soft key under ENTER to store a new name. Use the dial pad and<br />
the soft keys to enter a name.<br />
• Press the soft key under SAVE.<br />
VoiceManager SM<br />
— Most Frequently Used Features<br />
Feature Access Codes list the star codes for services that you have. To<br />
activate a service, hit the “*” key and the number followed by the “#” key.<br />
Some require additional information such as a phone number, but you are<br />
prompted for that information.<br />
You cannot change your feature access code.<br />
*72 Call Forwarding Always Activation<br />
*73 Call Forwarding Always Deactivation<br />
*90 Call Forwarding Busy Activation<br />
*91 Call Forwarding Busy Deactivation<br />
*92 Call Forwarding No Answer Activation<br />
*93 Call Forwarding No Answer Deactivation<br />
*67 Calling Line ID Delivery Blocking per Call<br />
*31 Calling Line ID Delivery Blocking – Persistent Activation<br />
#31 Calling Line ID Delivery Blocking – Persistent Deactivation<br />
*65 Calling Line ID Delivery per Call<br />
*69 Call Return<br />
*43 Call Waiting Persistent Activation<br />
#43 Call Waiting Persistent Deactivation<br />
*70 Cancel Call Waiting<br />
*57 Customer Originated Trace<br />
*78 Do Not Disturb Activation<br />
*79 Do Not Disturb Deactivation<br />
*22 Flash Call Hold<br />
*66 Last Number Redial<br />
*68 Call Park<br />
*88 Call Park Retrieve<br />
*98 Call Pickup<br />
21
22<br />
VoiceManager SM<br />
— Feature Descriptions<br />
Call Forward Activation:<br />
1. Lift telephone handset. Press the assigned code (ex. *72).<br />
2. Enter phone number to which calls will be forwarded.<br />
3. Replace telephone handset. The Call Forwarding Always service is on.<br />
Call Forward Deactivation:<br />
1. Lift telephone handset. Press the assigned code (ex. *73).<br />
2. Replace telephone handset. The Call Forwarding Always service is off.<br />
For Call Forward Always, Busy and No Answer, use above.<br />
Call Forwarding No Answer Activation: (*92)<br />
Route incoming calls to another number or voice mail whenever you are<br />
unable to answer your extension.<br />
Call Forwarding No Answer Deactivation: (*93)<br />
Call Pickup: (*98)<br />
Allows a user to answer any ringing extension within their group from their own<br />
phone. The group administrator defines group member.<br />
Call Park: (*68)<br />
Allows a user to hold a call and retrieve it from any extension within the group.<br />
Call Park Retrieve: (*88)<br />
Allows a user to retrieve a call parked from any extension.<br />
Do Not Disturb Activation: (*78)<br />
All incoming calls are referred to a message that says, “The number you have<br />
dialed is not taking calls at this time.” Callers are provided an option to go to<br />
voice mail.<br />
Do Not Disturb Deactivation (*79)
Voice Portal<br />
Access the VoiceManager Voice Portal from any phone. The Voice Portal allows<br />
you to make changes to your call forwarding and initiate outbound calls that<br />
appear to originate from your office.<br />
First Time Setup<br />
1. Initial setup must be done from your VoiceManager telephone line.<br />
2. Dial 9999# to reach the Voice Portal from your office.<br />
3. When prompted, set up your pass code and record your name.<br />
4. Follow the prompts to set up call forwarding, change your status manager<br />
or initiate a call.<br />
Voice Mail<br />
Your initial setup must be done from your Cox telephone line. If you have<br />
Caller ID block on your line, you will need to press * 6 7 prior to dialing<br />
the number to disable this feature for the initial setup call.<br />
Initial Setup<br />
1. From your office phone associated with voice mail, dial the Cox Business<br />
voice mail access number for your area.<br />
2. Follow the prompts. When prompted for your password, enter your<br />
temporary password, which is “269266” or “COXCOM”.<br />
3. After entering your temporary password, you will hear a greeting “Welcome<br />
to your mailbox...”. Follow the prompts for a step-by-step tutorial to<br />
personalize your voice mail box and create a new password.<br />
Creating Your Password<br />
Once you begin the tutorial, you will be prompted to create your own<br />
password. Your password can be between four to seven digits in length.<br />
Try to create a new password that is easy to remember, but not easily<br />
guessed by others.<br />
Take these steps to avoid unauthorized users from entering your mailbox.<br />
1. Avoid using repetitive numbers (4444, 99999) or sequential numbers<br />
(12345, 2468).<br />
2. Avoid using the last four digits of your phone number.<br />
3. Change your password regularly.<br />
23
24<br />
Appendix A — Menu Tree<br />
Menu Option Submenu Default Available Options/Comment<br />
Station # None<br />
Do Not Disturb N Y (Yes)/N (No)<br />
Ringer Settings L1 Ringer On On/Delay/Off<br />
L2 Ringer On On/Delay/Off<br />
L3 Ringer On On/Delay/Off<br />
L4 Ringer On On/Delay/Off<br />
Off Hook Ring Y Y (Yes)/N (No)<br />
Intercom Pref Intcm Handsfree Ring/Voice/Handsfree<br />
Pages Allowed Allowed/Blocked<br />
Line Type L2 Common Common/Private/Unconnected<br />
L3 Common Common/Private/Unconnected<br />
L4 Common Common/Private/Unconnected<br />
Auto Seize L1 L1/L2/L3/L4/Intcm<br />
Distinctive Ring L1: Ring Sound # 1 1, 2, 3, 4, 5, 6, 7, 8<br />
L2: Ring Sound # 1 1, 2, 3, 4, 5, 6, 7, 8<br />
L3: Ring Sound # 1 1, 2, 3, 4, 5, 6, 7, 8<br />
L4: Ring Sound # 1 1, 2, 3, 4, 5, 6, 7, 8<br />
Area Codes Home Code None Three Digits<br />
Local Code 1 None Three Digits<br />
Local Code 2 None Three Digits<br />
Local Code 3 None Three Digits<br />
Local Code 4 None Three Digits<br />
Local Code 5 None Three Digits<br />
Local Code 6 None Three Digits<br />
1 Plus 7 Code 1 None Three Digits<br />
1 Plus 7 Code 2 None Three Digits<br />
1 Plus 7 Code 3 None Three Digits<br />
1 Plus 7 Code 4 None Three Digits<br />
1 Plus 7 Code 5 None Three Digits
Appendix A — Menu Tree<br />
Menu Option Submenu Default Available Options/Comment<br />
1 Plus 7 code 6 None Three Digits<br />
Telco VMWI VMWI: Line Line 1 Line 1, Line 2, Line 3, Line 4, Off<br />
VMWI: Type FSK FSK/Stutter<br />
Caller ID Store L1 CID Store On On/Off<br />
L2 CID Store On On/Off<br />
L3 CID Store On On/Off<br />
L4 CID Store On On/Off<br />
Toll Restriction Set Restriction 1 Enter 1234 to access programming<br />
Set Restriction 2<br />
Set Restriction 3<br />
Set Restriction 4<br />
Set Restriction 5<br />
Set Allowed 1<br />
Set Allowed 2<br />
Set Allowed 3<br />
Set Allowed 4<br />
Set Allowed 5<br />
Line Restriction L1 Normal/Restricted<br />
Line Restriction L2 Normal/Restricted<br />
Line Restriction L3 Normal/Restricted<br />
Line Restriction L4 Normal/Restricted<br />
Station Naming Set at Station 01 for each<br />
of 16 Stations<br />
Hold Remind Off Off/30s/1 min/2 min<br />
Centrex Prefix Prefix Up to Seven Digits<br />
Message Lamp RESTE<br />
CIDCW High Sens High Sens/Off/Low Sens<br />
End of List EXIT<br />
25
26<br />
Memory Setting — Time/Date Set — Advanced Setting Options<br />
Memory Setting Menu<br />
Menu Option Submenu Default Available Options/Comment<br />
Select Location Empty Location After M1, M2, M3, M4 or M5<br />
is pressed<br />
Directory After # is pressed<br />
Time/Date Set<br />
Menu Option Submenu Default Available Options/Comment<br />
Time: (13:44)/(HH:MM)<br />
AM/PM: AM/PM<br />
Date: (01/01/00)/(MM/DD/YY)<br />
Advanced Setting Option<br />
Menu Option Submenu Default Available Options/Comment<br />
Erase Memory Memory Dial<br />
Erase Settings<br />
Erase Toll Rest Enter Code: (01/01/00)/(MM/DD/YY)<br />
Headset Type Hst: 2.5mm 2.5mm/Handset<br />
Flash Time: 600mms 600ms/1s/100ms/300ms<br />
Hold Drop 30 min 30 min/5 min/15 min<br />
Hold Release Off Off/On<br />
Station # Normal Normal/Locked<br />
Loop Detect 48V 48V/24V/12V/Off<br />
Tone/Pulse Tone Tone/Pulse<br />
System Privacy Y Y (Yes)/N (No) This option only at<br />
Station 01
Appendix B — Batteries<br />
The <strong>27</strong>40 uses AC power from a standard wall outlet. As long as the telephone<br />
is connected to a wall outlet, it will operate using the AC power. The <strong>27</strong>40 uses<br />
three AAA batteries for backup power. These batteries fit into a compartment<br />
on the base of the telephone.<br />
The phone display has a battery symbol on the upper right whenever the<br />
batteries are low and need replacing or when no batteries are installed.<br />
Battery Replacement<br />
a. Make sure the AC cord is attached to the telephone and to a working<br />
electrical outlet.<br />
b. Turn the telephone over.<br />
c. Remove the desk pedestal/wall mount bracket if attached.<br />
d. Remove battery door cover by using the tip of a ballpoint pen, paper clip,<br />
or similar object to release the battery door tab.<br />
e. Remove the old batteries.<br />
f. Insert three new AAA size alkaline batteries. Note that we recommend<br />
ONLY alkaline batteries.<br />
g. Close the battery cover.<br />
Power Failure Operation<br />
If AC power is disconnected or there is a power failure, the <strong>27</strong>40 switches<br />
to battery operation for approximately two hours. When the power is<br />
restored, the telephone automatically switches back to AC power and<br />
resumes normal operation.<br />
If the batteries are missing or low on power when AC power is lost, the<br />
telephone will not function. However, all feature settings ard memory<br />
numbers will be maintained.<br />
Note: It is recommended to always have at least one standard telephone<br />
connected so communicaitons can be maintained during a power failure.<br />
<strong>27</strong>
28<br />
Appendix C — Troubleshooting Guide<br />
Problem Solution<br />
No Display or Lamps Make sure that the power transformer is plugged into an<br />
electric socket not controlled by a wall switch.<br />
No Dial Tone Check all line connections. If possible, check your jack wiring<br />
by testing a non-system telephone at the jack in question. If a<br />
standard telephone does not work, then the local telephone<br />
company lines or your house wiring may be causing the<br />
problem.<br />
The LEDs are Flashing<br />
and the Display reads<br />
“Station #??”<br />
There is no dial tone<br />
on the handset, but the<br />
speakerphone works.<br />
The intercom does not work.<br />
or<br />
The telephone does not<br />
allow the status of other<br />
telephones.<br />
or<br />
There is a delay in getting<br />
dial tone.<br />
or<br />
The telephone remains on<br />
hold after the call is picked<br />
up at another station.<br />
Crosstalk or other<br />
interference.<br />
The line LED flashes when<br />
a call comes in, but the<br />
telephone does not ring.<br />
The telephone does not<br />
operate during a power<br />
outage.<br />
The battery icon stays lit in<br />
display.<br />
You cannot join a telephone<br />
call already in progress.<br />
The telephone line status<br />
indications stay lit, even<br />
though the line is not in use.<br />
Press soft key “Change” to assign this telephone a station<br />
number.<br />
Replace the handset from another <strong>27</strong>40 telephone. If this<br />
solves the problem, then contact Technical Support for<br />
assistance.<br />
The problem may be with your installation. Make sure that the<br />
lines are installed correctly and that Line 1 is common on all<br />
system telephones.<br />
The cause of this problem may be from outside interference.<br />
Disconnect Line 1 at the cable terminal. If this solves the<br />
problem, then the interference is coming from the telephone<br />
company.<br />
This problem may also be caused by DSL microfilters. Never<br />
connect a line that has a DSL circuit on Line 1.<br />
The problem may be caused by one defective telephone.<br />
Disconnect one instrument at a time to determine if a<br />
particular telephone is causing the problem.<br />
The most common cause of crosstalk is the use of flat cable.<br />
Be sure to use supplied line cords. You must use twisted-pair<br />
line cords.<br />
Make sure that the ringer is on and that “Do Not Disturb” is<br />
off.<br />
Make sure that fresh AAA batteries are installed in base.<br />
Make sure that fresh AAA batteries are installed in base.<br />
The Call Privacy feature prevents another <strong>27</strong>40 or <strong>27</strong>50 from<br />
interrupting a call in progress. If you don’t want Call Privacy in<br />
your system, then go into system programming on Station 01<br />
and turn it off.<br />
If this line is not connected, then program it as unconnected.<br />
If this line is connected and you have dial tone, then adjust<br />
loop voltage detector setting.
30<br />
coxbusiness.com<br />
Please refer to the Cortelco Owner’s Instruction Manual that came with your<br />
phone for Important Safety Instructions, FCC Information, Telephone Repair<br />
and Limited Warranty Information.<br />
Service and features not available in all areas. Some features may incur local usage charges in certain markets.<br />
Long distance rates will vary. Telephone modem equipment required. Modem uses electrical power to operate<br />
and has backup battery power provided by Cox if electricity is interrupted. Telephone service including access<br />
to e911 services will not be available during an extended power outage or if modem is moved or inoperable. All<br />
rights reserved.