Everything You Need To Know About Cox Business Internet Service.
Everything You Need To Know About Cox Business Internet Service.
Everything You Need To Know About Cox Business Internet Service.

Create successful ePaper yourself
Turn your PDF publications into a flip-book with our unique Google optimized e-Paper software.
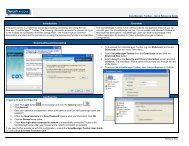
STEP 3<br />
Select the General tab of <strong>Internet</strong> Protocol<br />
(TCP/IP) Properties window.<br />
Please continue on to Step 4 for either Static IP<br />
setup or Dynamic IP setup.<br />
Static IP Setup Instructions<br />
In this section you will need your specific Subnet Mask, Default Gateway,<br />
Primary/Preferred DNS Server, and Secondary/Alternate DNS server information<br />
included in the Account Information sheet, provided in your Welcome Kit. Please be<br />
sure to enter the addresses exactly as they appear in your documentation.<br />
STEP 4-Static<br />
Under <strong>Internet</strong> Protocol (TCP/IP) Properties<br />
screen under General tab, select the following:<br />
• Select Use the following IP address.<br />
• Type in the static IP address assigned to<br />
you in the IP Address field.<br />
• Type in your Subnet Mask and gateway<br />
listed on your Account Information sheet.<br />
• In Default gateway, type in your gateway<br />
address from your Account Information<br />
sheet.<br />
STEP 5-Static<br />
Next, select Use the following DNS server addresses. In the Preferred DNS server and<br />
Alternate DNS server fields, type in the DNS server addresses listed on the Account<br />
Information sheet (DNS addresses can be found on p. 34).<br />
STEP 6-Static<br />
Click on OK and then OK/Close, and that’s it.<br />
7