Everything You Need To Know About Cox Business Internet Service.
Everything You Need To Know About Cox Business Internet Service. Everything You Need To Know About Cox Business Internet Service.
COX BUSINESS EMAIL CUSTOMER CONTROL PANEL FOR ADMINISTRATORS Cox Business Email Customer Control Panel is a special feature for Cox Business Internet users that enables the administrator to manage a company’s Email accounts at his or her convenience. The features and functionality of your Email boxes remain unaffected while allowing the administrator to: • Manage existing Email boxes. • Allocate total storage unequally across existing Email boxes. • Add additional Email addresses. • Send an Email request to purchase more Email boxes and storage. • Send Email requesting assistance. The following pages will walk you through several of the Control Panel features. If you need to set up your company’s Email administrator or have any questions, please contact us at support@coxmail.com. Your customer care representative will contact you within 48 hours. To begin first go to http://control.coxmail.com. ASSIGNING EMAILBOXES To set up new Emailbox accounts simply follow these instructions. STEP 1 Go to the User Management page. Here you will find a listing of existing Emailbox users and notation of how many available e-mailboxes you currently have. If there are e-mailboxes available, clicking that notation will take you to the New Emailbox page. 58
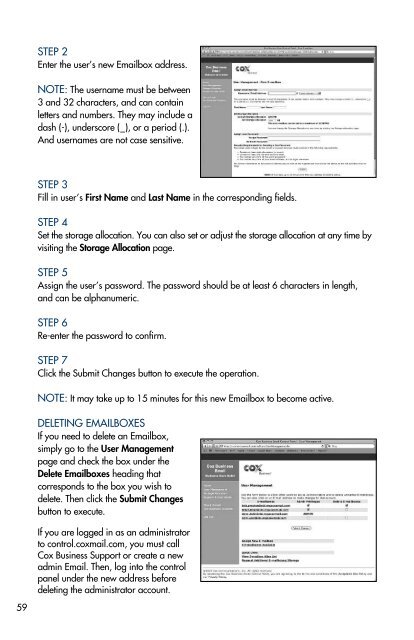
59 STEP 2 Enter the user’s new Emailbox address. NOTE: The username must be between 3 and 32 characters, and can contain letters and numbers. They may include a dash (-), underscore (_), or a period (.). And usernames are not case sensitive. STEP 3 Fill in user’s First Name and Last Name in the corresponding fields. STEP 4 Set the storage allocation. You can also set or adjust the storage allocation at any time by visiting the Storage Allocation page. STEP 5 Assign the user’s password. The password should be at least 6 characters in length, and can be alphanumeric. STEP 6 Re-enter the password to confirm. STEP 7 Click the Submit Changes button to execute the operation. NOTE: It may take up to 15 minutes for this new Emailbox to become active. DELETING EMAILBOXES If you need to delete an Emailbox, simply go to the User Management page and check the box under the Delete Emailboxes heading that corresponds to the box you wish to delete. Then click the Submit Changes button to execute. If you are logged in as an administrator to control.coxmail.com, you must call Cox Business Support or create a new admin Email. Then, log into the control panel under the new address before deleting the administrator account.
- Page 8 and 9: 8 Dynamic IP Setup Instructions STE
- Page 10 and 11: 10 WINDOWS VISTA SETUP AND CONFIGU
- Page 12 and 13: 12 Dynamic IP Setup Instructions ST
- Page 14 and 15: 14 WINDOWS 7 SETUP AND CONFIGURATIO
- Page 16 and 17: 16 STEP 6-Dynamic From the IP Setti
- Page 18 and 19: 18 STEP 3 In the drop down for Show
- Page 20 and 21: 20 SETTING UP AND USING COX BUSINES
- Page 22 and 23: 22 NOTE: Cox Business Email will lo
- Page 24 and 25: 24 STEP 3 Scroll to the password se
- Page 26 and 27: 26 STEP 3 Enter the Incoming Server
- Page 28 and 29: 28 STEP 2 From the General Email Pr
- Page 30 and 31: 30 STEP 5 Select additional desired
- Page 32 and 33: 32 MAIL FORWARDING STEP 1 From the
- Page 34 and 35: 34 STEP 5 Click the Close. GROUPS G
- Page 36 and 37: 36 STEP 3 Matching contact informat
- Page 38 and 39: 38 COX BUSINESS EMAIL SPAMBLOCKER (
- Page 40 and 41: 40 CONFIGURING COX BUSINESS EMAIL O
- Page 42 and 43: 42 STEP 6 On the Advanced tab, sele
- Page 44 and 45: 44 STEP 7 Under the Advanced tab, c
- Page 46 and 47: 46 STEP 7 Click on Next. STEP 8 Cli
- Page 48 and 49: 48 STEP 7 Enter the Account name an
- Page 50 and 51: 50 SETTING UP MAIL IN MICROSOFT WIN
- Page 52 and 53: 52 STEP 12 • On the Advanced tab,
- Page 54 and 55: 54 IMAP Configuration Instructions
- Page 56 and 57: 56 STEP 7 On the Accounts tab, sele
- Page 60 and 61: NOTE: If the user is also designate
- Page 62: TECHNICAL SUPPORT AND TROUBLESHOOTI
59<br />
STEP 2<br />
Enter the user’s new Emailbox address.<br />
NOTE: The username must be between<br />
3 and 32 characters, and can contain<br />
letters and numbers. They may include a<br />
dash (-), underscore (_), or a period (.).<br />
And usernames are not case sensitive.<br />
STEP 3<br />
Fill in user’s First Name and Last Name in the corresponding fields.<br />
STEP 4<br />
Set the storage allocation. <strong>You</strong> can also set or adjust the storage allocation at any time by<br />
visiting the Storage Allocation page.<br />
STEP 5<br />
Assign the user’s password. The password should be at least 6 characters in length,<br />
and can be alphanumeric.<br />
STEP 6<br />
Re-enter the password to confirm.<br />
STEP 7<br />
Click the Submit Changes button to execute the operation.<br />
NOTE: It may take up to 15 minutes for this new Emailbox to become active.<br />
DELETING EMAILBOXES<br />
If you need to delete an Emailbox,<br />
simply go to the User Management<br />
page and check the box under the<br />
Delete Emailboxes heading that<br />
corresponds to the box you wish to<br />
delete. Then click the Submit Changes<br />
button to execute.<br />
If you are logged in as an administrator<br />
to control.coxmail.com, you must call<br />
<strong>Cox</strong> <strong>Business</strong> Support or create a new<br />
admin Email. Then, log into the control<br />
panel under the new address before<br />
deleting the administrator account.


