

the Smart Oven™ - Breville
the Smart Oven™ - Breville
the Smart Oven™ - Breville

Create successful ePaper yourself
Turn your PDF publications into a flip-book with our unique Google optimized e-Paper software.
OPERATING yOUR BREVILLE SMART OVEN - WARM<br />
WARM FUNCTION<br />
Elements<br />
Top and bottom heating elements cycle on<br />
and off to regulate <strong>the</strong> correct temperature.<br />
The top middle element is off.<br />
Recommended Rack Position<br />
Bottom rack height position.<br />
Optional Settings<br />
CONVECTION button<br />
TEMPERATURE CONVERSION button<br />
The WARM function maintains hot foods at<br />
<strong>the</strong> recommended temperature to prevent<br />
bacterial growth (70°C or above).<br />
1. Insert <strong>the</strong> wire rack into <strong>the</strong> bottom rack<br />
height position. The wire rack should be<br />
positioned so <strong>the</strong> spokes face upwards.<br />
2. Place food on <strong>the</strong> <strong>Breville</strong> enamel baking<br />
pan or in an oven-proof dish, <strong>the</strong>n place<br />
on <strong>the</strong> centre of <strong>the</strong> wire rack so air flows<br />
around <strong>the</strong> sides of <strong>the</strong> food.<br />
NOTE<br />
Caution should be exercised when<br />
using pans and dishes constructed of<br />
materials o<strong>the</strong>r than metal. If using<br />
ceramic or glass pans or dishes it is<br />
important that <strong>the</strong>y are oven safe to<br />
prevent cracking.<br />
NOTE<br />
Extreme caution should be exercised<br />
when using lids in <strong>the</strong> oven, as<br />
pressure build up in a covered pan<br />
or dish may cause hot ingredients to<br />
expel or <strong>the</strong> dish to crack.<br />
3. Close <strong>the</strong> oven door.<br />
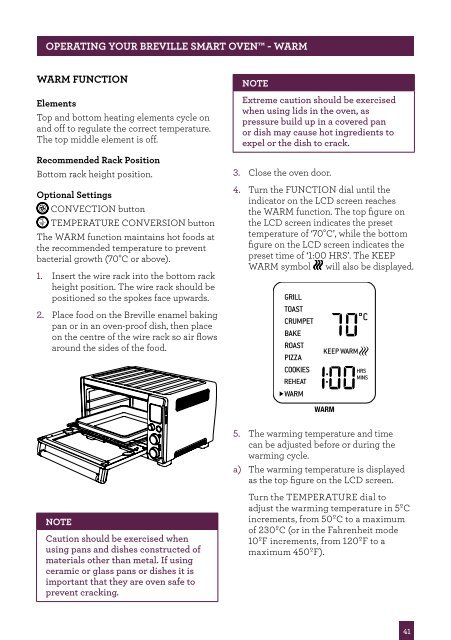
4. Turn <strong>the</strong> FUNCTION dial until <strong>the</strong><br />
indicator on <strong>the</strong> LCD screen reaches<br />
<strong>the</strong> WARM function. The top figure on<br />
<strong>the</strong> LCD screen indicates <strong>the</strong> preset<br />
temperature of ‘70°C’, while <strong>the</strong> bottom<br />
figure on <strong>the</strong> LCD screen indicates <strong>the</strong><br />
preset time of ‘1:00 HRS’. The KEEP<br />
WARM symbol will also be displayed.<br />
WARM<br />
5. The warming temperature and time<br />
can be adjusted before or during <strong>the</strong><br />
warming cycle.<br />
a) The warming temperature is displayed<br />
as <strong>the</strong> top figure on <strong>the</strong> LCD screen.<br />
Turn <strong>the</strong> TEMPERATURE dial to<br />
adjust <strong>the</strong> warming temperature in 5ºC<br />
increments, from 50ºC to a maximum<br />
of 230ºC (or in <strong>the</strong> Fahrenheit mode<br />
10ºF increments, from 120ºF to a<br />
maximum 450ºF).<br />
41


