

Undermount user manual.pdf - St George Appliances
Undermount user manual.pdf - St George Appliances
Undermount user manual.pdf - St George Appliances

Create successful ePaper yourself
Turn your PDF publications into a flip-book with our unique Google optimized e-Paper software.
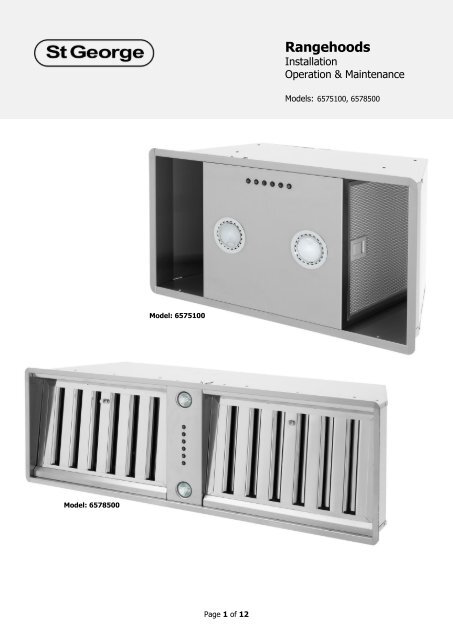
Model: 6578500<br />
Model: 6575100<br />
Page 1 of 12<br />
Rangehoods: Installation, Operation & Care<br />
Rangehoods<br />
Models: 6575100, 6578500<br />
Installation<br />
Operation & Maintenance<br />
Models: 6575100, 6578500
Safety Precautions<br />
Page 2 of 12<br />
Rangehoods: Installation, Operation & Care<br />
Models: 6575100, 6578500<br />
This rangehood has been designed to be ceiling-mounted above a cooking hob. It can work either<br />
by ducting system (discharging exhaust to the outside air) or by Recirculation (where exhaust<br />
vapours are returned to the kitchen). Before starting the installation, consideration should be given<br />
to how the installation is to be carried out, ensuring<br />
Adequate space and clearances above the cooktop.<br />
Position of flueing.<br />
Availability of earthed power.<br />
The mechanical strength of supporting structures.<br />
The installation work must be undertaken by a qualified and competent person in conformity to<br />
the rules concerning the evacuation of contaminated air. The manufacturer does not accept any<br />
liability for any damage or injury caused by improper installation. Exhaust air must not be<br />
discharged into a flue which is used for exhausting fumes from appliances burning gas or other<br />
fuels. This does not apply to rangehoods installed to only discharge the air back into the room.<br />
Before connecting to the mains supply ensure that the mains voltage corresponds with the voltage<br />
on the rangehood’s rating plate. For cooker hoods featuring an earth wire, make sure the electric<br />
plant of your house is correctly earthed. When installed, the hood must be positioned at least<br />
65cm above the hotplate.<br />
Never leave frying pans unattended during use as overheated fat and oil may catch fire.<br />
Before carrying out any kind of maintenance or cleaning, disconnect the hood from the<br />
mains supply.<br />
The appliance is not intended for use by young children or infirm persons without<br />
supervision.<br />
Young children should be supervised to ensure that they do not play with the appliance.<br />
There shall be adequate ventilation of the room when the rangehood is used at the same<br />
time as appliances burning gas or other fuels. (this does not apply to rangehoods<br />
constructed to only discharge the air back into the room)<br />
The appliance is fitted with removable filters. Ensure the filters are removed and<br />
thoroughly cleaned at least once every two months in accordance with these instructions.<br />
There is a fire risk if cleaning is not carried out in accordance with the instructions.<br />
Do not flambé under the rangehood.<br />
Local regulations concerning the discharge of air must be fulfilled.<br />
When using a gas cooktop never leave the burners uncovered while the hood is in use.<br />
Switch off the gas before removing the pan. This not only saves energy but avoids a<br />
potentially dangerous concentration of heat.<br />
Always ensure the rangehood is kept at the correct fan speed to prevent flames licking<br />
around the bottom of the pan.
Installation<br />
Page 3 of 12<br />
Rangehoods: Installation, Operation & Care<br />
Models: 6575100, 6578500<br />
Before installing the appliance, in order not to damage the appliance itself, the metal grease<br />
filter should be removed. The filter can be removed by pushing the special filter handle<br />
toward the back side of the cooker hood and turning it downwards so as to unfasten it from<br />
its slot.<br />
Model: 6578500 – Grease Filter<br />
Mounting the Rangehood<br />
Prepare the Cabinet<br />
Using the diagram and dimensions shown here, proceed to make a cut-out on the bottom of<br />
the cabinet in order to hold the appliance in place.<br />
Prepare a power supply within the enclosure.<br />
If the appliance is going to be used to recirculate the air, an aperture will need to be made<br />
at top of the enclosure so that the air that is received can also be expelled.<br />
If the appliance is going to be used to duct out the air, a hole will need to be made in the<br />
location that the ducting pipe is intended to run through.<br />
Model: 6578500 - Cut out<br />
Model: 6575100 – Grease Filter<br />
Model: 6575100 – Cut out
Insert the Rangehood<br />
The Rangehood comes equipped with a set of<br />
spring mounted stoppers on its sides. These<br />
stoppers can have their depth adjusted, and should<br />
be set so that when the Rangehood is pushed into<br />
place, the stoppers spring into the top side of the<br />
cabinet board, firmly holding the appliance in. A<br />
clicking sound will be heard when done correctly.<br />
Insert the Screws<br />
Page 4 of 12<br />
Rangehoods: Installation, Operation & Care<br />
Models: 6575100, 6578500<br />
Once the Rangehood is holding itself in place, insert the four fixing screws to finally lock to<br />
appliance in. At this stage, all fine adjustments should be made to be sure the Rangehood<br />
will sit where it is intended to.<br />
Model: 6575100 – Fixing Screws<br />
Model: 6578500 – Fixing Screws
Ducted Installation<br />
<strong>St</strong> <strong>George</strong> always recommends installing the<br />
Rangehood in a fully ducted configuration.<br />
Carbon filters are not needed for ducted<br />
installations.<br />
Cut a hole of the appropriate diameter in the ceiling<br />
or wall. Connect the air outlet of the Rangehood to<br />
the outside air outlet using flexible or rigid ducting<br />
and suitable hose pipes (not provided). 150mm<br />
diameter piping can be connected directly; 120mm<br />
diameter piping can be connected using the adaptor<br />
provided. Minimise the number of bends and elbows<br />
to maximise the efficiency of the appliance.<br />
Recirculating Installation<br />
Page 5 of 12<br />
Rangehoods: Installation, Operation & Care<br />
Models: 6575100, 6578500<br />
Where it is not possible to duct the exhaust fumes to the outside air, the unit can be<br />
installed to redirect the filtered vapours back into the kitchen. For this purpose you will need<br />
a recirculation adaptor kit containing a diverter and necessary fasteners. A length of rigid<br />
ducting may be required here.<br />
150mm diameter piping can be connected directly; 120mm diameter piping can be<br />
connected using the adaptor provided.<br />
<strong>St</strong> <strong>George</strong> recommends using activated carbon filters for all recirculated rangehood<br />
installations.<br />
Electrical connection<br />
The hood is equipped with a plug. This can be connected to a nearby power socket. The<br />
power socket must be adequately earthed.<br />
All electrical work must be done by a licensed electrician.<br />
Warning: Before connecting the<br />
flexible exhausting pipe to the<br />
Rangehood, make sure the stop<br />
valve, which is on the air outlet of<br />
the motor, can swing freely.
Finishing Off<br />
Replace Grease Filters<br />
Page 6 of 12<br />
Rangehoods: Installation, Operation & Care<br />
Models: 6575100, 6578500<br />
You will need to ensure the filters are properly in place before finalising and testing<br />
installation.<br />
Carbon Filters<br />
This section relates to rangehoods installed for recirculation only. <strong>St</strong> <strong>George</strong> have activated<br />
charcoal filters available to further clean the cooking vapours before being recirculated back<br />
into the kitchen. If these are required by the consumer, you can order them directly from <strong>St</strong><br />
<strong>George</strong>. Instructions on fitting the filters are included with the filter packaging.<br />
Before Leaving<br />
Check The Following<br />
All filters are put back in place.<br />
The overhead lights work as expected. If not, replace with identical 40W bulbs.<br />
Check that motor, fan and speed controls all operate correctly. If not, check wiring<br />
and installation.<br />
Check all screws connections are firm and the unit is secured into the wall.
Operation<br />
To Turn on the Light<br />
Turn the light on<br />
using the button<br />
marked with a light<br />
symbol.<br />
To Operate the Extraction Fan<br />
01<br />
2<br />
3<br />
4<br />
Select one of four speeds from the numbered<br />
buttons.<br />
On / Off Setting. This button is combined with<br />
the low speed button, and is marked 01<br />
Low speed, low noise. Use for simmering.<br />
Medium setting. Use for normal cooking.<br />
High speed, higher noise. Used for frying, or<br />
cooking food with strong odours, or when<br />
several hotplates are used simultaneously.<br />
To Operate the Timer<br />
Press the timer button<br />
whilst the Rangehood is<br />
Operating to have it automatically switch<br />
itself off after 10 minutes. The light in the speed button will flash<br />
to indicate the timer has been activated.<br />
Page 7 of 12<br />
Rangehoods: Installation, Operation & Care<br />
Models: 6575100, 6578500
Basic Maintenance<br />
Cleaning the Outer Surfaces<br />
Use a damp cloth and mild liquid household cleaner.<br />
Page 8 of 12<br />
Rangehoods: Installation, Operation & Care<br />
Models: 6575100, 6578500<br />
Do not use abrasive cleaners or scourers as these will damage the surface. Commercial<br />
stainless steel cleaning products are available for more difficult staining.<br />
Cleaning the Metal Filters<br />
After approximately 30 hours of usage, the push button control panel will signal the<br />
saturation of the grease filter. Pressing the timer button will reset the count. The metal<br />
filters in this rangehood are dishwasher safe. You should clean the metal filters at least every<br />
two months for normal usage. More frequent cleaning may be necessary for higher levels of<br />
usage.<br />
BEFORE YOU START: UNPLUG THE APPLIANCE<br />
There are two styles of inlet filter on these models. Both are removed by pulling the lever on<br />
the edge of the filters and lifting them out of the slots which hold them. Wash the filters in a<br />
dishwasher, or by hand using household dishwashing liquid.<br />
Allow filters to dry thoroughly before replacing them.<br />
When replacing, ensure the filters are put back in their correct position, as shown below.<br />
Model: 6575100 – Grease Filter<br />
Model: 6578500 – Grease Filter
Replacing the Carbon Filters<br />
Page 9 of 12<br />
Rangehoods: Installation, Operation & Care<br />
Models: 6575100, 6578500<br />
If the Rangehood is used in its recirculating configuration, it will be equipped with charcoal<br />
filters to further clean cooking oils and odours from the exhaust. These filters need to be<br />
replaced approximately every 2 months of normal usage. These filters can be removed by<br />
first removing the grease filter, and then by pulling the special plastic tongue until it is<br />
unfastened from its slot. Reinserting the filters can be done by operating in the opposite<br />
way.<br />
These filters cannot be washed. Once they are spent, they must be replaced. Failure to do so<br />
can create a fire hazard in extreme cases. Contact your retailer or <strong>St</strong> <strong>George</strong> <strong>Appliances</strong><br />
directly for replacement filters.<br />
Cleaning the Drip Tray<br />
This stage of cleaning is only applicable to the<br />
6578500 model.<br />
After having removed the grease filters and carbon<br />
filters, the drip tray can also be cleaned. The tray<br />
should be supported with one hand whilst the other<br />
hand loosens the three fasteners. The tray will then<br />
slide out from the Rangehood to be emptied. Care<br />
should be taken not to spill the contents of the tray<br />
in the removal process.
Changing the Light Bulb<br />
BEFORE YOU START: UNPLUG THE APPLIANCE.<br />
Page 10 of 12<br />
Rangehoods: Installation, Operation & Care<br />
Models: 6575100, 6578500<br />
There are a number of different models in this range, each requiring a slightly different method of<br />
accessing the light bulb. In each case, however, the old bulb must be replaced with an identical<br />
40W bulb.<br />
Some models require that you prise the bulb<br />
outwards with a soft sharp object such as a tooth<br />
pick. Do not use metal objects as these may cause<br />
chipping of the bulb glass.<br />
Replace the bulb by ensuring the two pins locate<br />
into the sockets in the rangehood.<br />
Other models have a smooth metal ring holding a<br />
glass disk, which covers the bulb. Using a soft sharp<br />
object such as a tooth pick, remove the metal ring.<br />
Replace the bulb by ensuring the two pins locate<br />
into the sockets in the rangehood.<br />
Replace the glass disk and metal ring by ensuring<br />
the three lugs on the ring sit properly into the<br />
sockets. Some models have the light bulb held into<br />
place by a curved, toothed wire. You will need to<br />
find the small gap in the wire, and pull one end of<br />
the wire to remove it.<br />
The globe can now be accessed and replaced.
- Motor: 1000 m 3 /hour<br />
o Aluminium die-cast motor housing<br />
- Power Consumption: 300W<br />
- Pressure: 480 Pa<br />
- Noise Level: 62 dBA<br />
- Lighting: 2 x 20 W Halogen Lamps<br />
- Control Panel: 4 Speed push-button<br />
+ timer + light switch<br />
- Grease Filter: Anodised Aluminium<br />
- <strong>St</strong>ainless <strong>St</strong>eel: AISI 430<br />
Technical Data<br />
Model 6575100<br />
Page 11 of 12<br />
Rangehoods: Installation, Operation & Care<br />
Models: 6575100, 6578500
- Motor: 1300 m 3 /hour<br />
- Power Consumption: 340W<br />
- Pressure: 470 Pa<br />
- Noise Level: 52 dBA<br />
- Lighting: 2 x 20 W Dichroic Lamps<br />
- Control Panel: 4 Speed push-button<br />
+ timer + light switch<br />
- Grease Filter: <strong>St</strong>ainless <strong>St</strong>eel<br />
- <strong>St</strong>ainless <strong>St</strong>eel: AISI 430<br />
REV: 090630<br />
Technical Data<br />
Model 6578500<br />
Page 12 of 12<br />
Rangehoods: Installation, Operation & Care<br />
Models: 6575100, 6578500<br />
© <strong>St</strong> <strong>George</strong> <strong>Appliances</strong><br />
3-5 Birmingham Ave Chester Hill NSW 2162<br />
Ph 1300-305-366<br />
www.sga.com.au


