M3-LED Manual - OpticsPlanet.com
M3-LED Manual - OpticsPlanet.com
M3-LED Manual - OpticsPlanet.com

You also want an ePaper? Increase the reach of your titles
YUMPU automatically turns print PDFs into web optimized ePapers that Google loves.
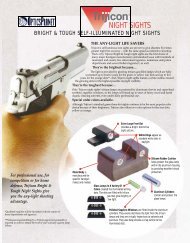
1. With your “cleared and safe” firearm in your left or right hand, hold the <strong>M3</strong>-<br />
<strong>LED</strong> in the opposite hand with the light bulb facing in the direction of the<br />
muzzle of the firearm, away from your body and in a safe direction.<br />
2. Bring the <strong>M3</strong>-<strong>LED</strong> up and toward the firearm, aligning the grooves of the <strong>M3</strong>-<br />
<strong>LED</strong> and the grooves on the firearm; slide the <strong>M3</strong>-<strong>LED</strong> straight back until the<br />
latch engages into the locking slot located between the grooves of the<br />
firearm. There will be an audible “click” when the <strong>M3</strong>-<strong>LED</strong> is secured.<br />
3. To check for positive engagement of the <strong>M3</strong>-<strong>LED</strong> to the firearm, attempt to<br />
slide the <strong>M3</strong>-<strong>LED</strong> forward. You should not be able to move the <strong>M3</strong>-<strong>LED</strong><br />
forward without disengaging the lock.<br />
4. The <strong>M3</strong>-<strong>LED</strong> is now mounted.<br />
MOUNTING (continued)<br />
7