
Create successful ePaper yourself
Turn your PDF publications into a flip-book with our unique Google optimized e-Paper software.
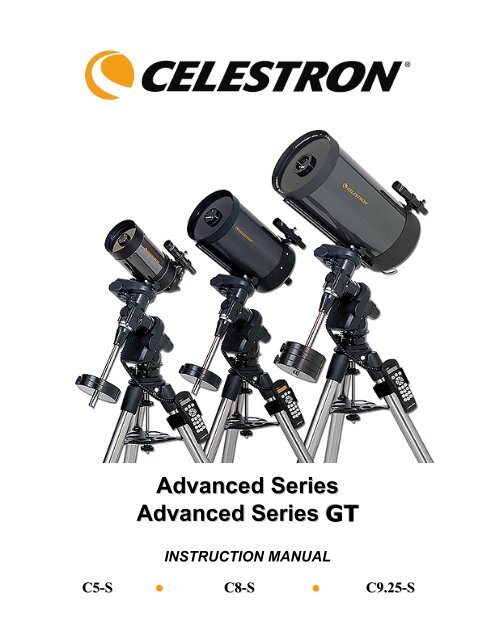
Advanced Series<br />
Advanced Series GT<br />
INSTRUCTION MANUAL<br />
C5-S ● C8-S ● <strong>C9.25</strong>-S
INTRODUCTION ....................................................................................................................................................................................................4<br />
Warning.................................................................................................................................................................................................................4<br />
ASSEMBLY..............................................................................................................................................................................................................7<br />
Setting up the Tripod .............................................................................................................................................................................................7<br />
Attaching the Equatorial Mount.............................................................................................................................................................................8<br />
Attaching the Center Leg Brace.............................................................................................................................................................................8<br />
Installing the Counterweight Bar ...........................................................................................................................................................................8<br />
Installing the Counterweight..................................................................................................................................................................................9<br />
Attaching the Hand Control Holder .......................................................................................................................................................................9<br />
Attaching the Slow Motion Knobs.........................................................................................................................................................................9<br />
Attaching the Optical Tube to the Mount.............................................................................................................................................................10<br />
Attaching the Visual Back ...................................................................................................................................................................................10<br />
Installing the Star Diagonal..................................................................................................................................................................................11<br />
Installing the Eyepiece.........................................................................................................................................................................................11<br />
Installing the Finderscope....................................................................................................................................................................................11<br />
Removing the Lens Cap.......................................................................................................................................................................................12<br />
Moving the Telescope <strong>Manual</strong>ly..........................................................................................................................................................................13<br />
Balancing The Mount in R.A...............................................................................................................................................................................13<br />
Balancing The Mount in DEC .............................................................................................................................................................................14<br />
Adjusting the Mount............................................................................................................................................................................................14<br />
Adjusting the Mount in Altitude.......................................................................................................................................................................... 14<br />
Adjusting the Mount in Azimuth......................................................................................................................................................................... 15<br />
Attaching the Declination Cable (For GT Models Only) .....................................................................................................................................15<br />
Powering the Telescope .......................................................................................................................................................................................15<br />
HAND CONTROL .................................................................................................................................................................................................16<br />
Hand Control Operation...................................................................................................................................................................................... 17<br />
Alignment Procedures..........................................................................................................................................................................................18<br />
Startup Procedure.................................................................................................................................................................................................18<br />
Auto Align...........................................................................................................................................................................................................19<br />
Auto Three-Star Align .........................................................................................................................................................................................19<br />
Quick-Align.........................................................................................................................................................................................................20<br />
Last Alignment ....................................................................................................................................................................................................20<br />
Re-Alignment ......................................................................................................................................................................................................20<br />
Object Catalog .....................................................................................................................................................................................................21<br />
Selecting an Object ............................................................................................................................................................................................. 21<br />
Slewing to an Object ........................................................................................................................................................................................... 21<br />
Finding Planets.................................................................................................................................................................................................... 21<br />
Tour Mode .......................................................................................................................................................................................................... 22<br />
Constellation Tour............................................................................................................................................................................................... 22<br />
Direction Buttons ................................................................................................................................................................................................ 22<br />
Rate Button ......................................................................................................................................................................................................... 22<br />
Setup Procedures .................................................................................................................................................................................................23<br />
Tracking Mode...........................................................................................................................................................................................23<br />
Tracking Rate.............................................................................................................................................................................................23<br />
Date/Time ..................................................................................................................................................................................................23<br />
User Defined Objects.................................................................................................................................................................................23<br />
Get RA/DEC..............................................................................................................................................................................................24<br />
Goto R.A/Dec ............................................................................................................................................................................................24<br />
Identify.......................................................................................................................................................................................................24<br />
Precise GoTo....................................................................................................................................................................................................... 25<br />
Scope Setup Features .......................................................................................................................................................................................... 25<br />
Setup Time-Site .........................................................................................................................................................................................25<br />
Anti-backlash.............................................................................................................................................................................................25<br />
Filter Limits ...............................................................................................................................................................................................25<br />
Direction Buttons.......................................................................................................................................................................................26<br />
Goto Approach...........................................................................................................................................................................................26<br />
Autoguide Rates.........................................................................................................................................................................................26<br />
Azimuth Limits..........................................................................................................................................................................................26<br />
East/West Filtering.....................................................................................................................................................................................27<br />
Utility Features.................................................................................................................................................................................................... 27<br />
Calibrate Goto............................................................................................................................................................................................27<br />
Home Position............................................................................................................................................................................................27<br />
Polar Align.................................................................................................................................................................................................27<br />
Light Control..............................................................................................................................................................................................28<br />
Factory Settings .........................................................................................................................................................................................28<br />
Version.......................................................................................................................................................................................................28<br />
2
Get Alt-Az .................................................................................................................................................................................................28<br />
Goto Alt-Az ...............................................................................................................................................................................................28<br />
Hibernate....................................................................................................................................................................................................28<br />
Turn On/Off GPS.......................................................................................................................................................................................28<br />
TELESCOPE BASICS...........................................................................................................................................................................................30<br />
Image Orientation ............................................................................................................................................................................................... 30<br />
Focusing.............................................................................................................................................................................................................. 31<br />
Aligning the Finderscope .................................................................................................................................................................................... 31<br />
Calculating Magnification................................................................................................................................................................................... 31<br />
Determining Field of View.................................................................................................................................................................................. 32<br />
General Observing Hints..................................................................................................................................................................................... 32<br />
ASTRONOMY BASICS.........................................................................................................................................................................................33<br />
The Celestial Coordinate System ........................................................................................................................................................................ 33<br />
Motion of the Stars.............................................................................................................................................................................................. 34<br />
Finding the North Celestial Pole ......................................................................................................................................................................... 36<br />
Declination Drift Method of Polar Alignment..................................................................................................................................................... 37<br />
CELESTIAL OBSERVING...................................................................................................................................................................................38<br />
Observing the Moon............................................................................................................................................................................................ 38<br />
Lunar Observing Hints........................................................................................................................................................................................ 38<br />
Observing the Planets.......................................................................................................................................................................................... 38<br />
Observing the Sun............................................................................................................................................................................................... 38<br />
Solar Observing Hints......................................................................................................................................................................................... 39<br />
Observing Deep Sky Objects .............................................................................................................................................................................. 39<br />
Seeing Conditions ............................................................................................................................................................................................... 39<br />
Transparency....................................................................................................................................................................................................... 39<br />
Sky Illumination.................................................................................................................................................................................................. 39<br />
Seeing ................................................................................................................................................................................................................. 39<br />
ASTROPHOTOGRAPHY.....................................................................................................................................................................................41<br />
Short Exposure Prime Focus Photography.......................................................................................................................................................... 41<br />
Eyepiece Projection............................................................................................................................................................................................. 42<br />
Long Exposure Prime Focus Photography .......................................................................................................................................................... 43<br />
Terrestrial Photography....................................................................................................................................................................................... 45<br />
Metering.............................................................................................................................................................................................................. 45<br />
Reducing Vibration............................................................................................................................................................................................. 45<br />
CCD Imaging...................................................................................................................................................................................................... 45<br />
Auto Guiding ...................................................................................................................................................................................................... 46<br />
TELESCOPE MAINTENANCE ...........................................................................................................................................................................47<br />
Care and Cleaning of the Optics.......................................................................................................................................................................... 47<br />
Collimation ......................................................................................................................................................................................................... 47<br />
OPTIONAL ACCESSORIES...............................................................................................................................................................................49<br />
APPENDIX A – TECHNICAL SPECIFICATIONS .........................................................................................................................................52<br />
APPENDIX B – GLOSSARY OF TERMS .........................................................................................................................................................53<br />
APPENDIX C – LONGITUDES AND LATITUDES ..........................................................................................................................................56<br />
APPENDIX D – RS-232 CONNECTION..............................................................................................................................................................61<br />
APPENDIX E – TIME ZONE MAP .....................................................................................................................................................................63<br />
SKY MAPS..............................................................................................................................................................................................................65<br />
3
Congratulations on your purchase of the <strong>Celestron</strong> Advanced Series telescope (AST)! The Advanced Series of telescopes come in<br />
standard (non-computerized) and computerized GT models. The Advanced Series is made of the highest quality materials to<br />
ensure stability and durability. All this adds up to a telescope that gives you a lifetime of pleasure with a minimal amount of<br />
maintenance. Furthermore, your <strong>Celestron</strong> telescope is versatile — it will grow as your interest grows.<br />
The Advanced GT Series ushers in the next generation of computer automated telescopes. The <strong>Celestron</strong> Advanced GT<br />
series continues in this proud tradition combining large aperture optics with the sophistication and ease of use of<br />
our computerized GoTo mount.<br />
If you are new to astronomy, you may wish to start off by using the built-in Sky Tour feature, which commands the telescopes to<br />
find the most interesting objects in the sky and automatically slews to each one. Or if you are an experienced amateur, you will<br />
appreciate the comprehensive database of over 40,000 objects, including customized lists of all the best deep-sky objects, bright<br />
double stars and variable stars. No matter at what level you are starting out, the Advanced Series telescopes will unfold for you<br />
and your friends all the wonders of the Universe.<br />
Some of the many standard features of the Advanced GT include:<br />
Fully enclosed optical encoders for position location.<br />
Ergonomically designed mount that disassembles into compact and portable pieces.<br />
Database filter limits for creating custom object lists.<br />
Storage for programmable user defined objects; and<br />
Many other high performance features!<br />
The AST’s deluxe features combine with <strong>Celestron</strong>’s legendary Schmidt-Cassegrain optical system to give amateur astronomers<br />
the most sophisticated and easy to use telescopes available on the market today.<br />
Take time to read through this manual before embarking on your journey through the Universe. It may take a few observing<br />
sessions to become familiar with your telescope, so you should keep this manual handy until you have fully mastered your<br />
telescope’s operation. The Advanced GT hand control has built-in instructions to guide you through all the alignment procedures<br />
needed to have the telescope up and running in minutes. Use this manual in conjunction with the on-screen instructions provided<br />
by the hand control. The manual gives detailed information regarding each step as well as needed reference material and helpful<br />
hints guaranteed to make your observing experience as simple and pleasurable as possible.<br />
Your telescope is designed to give you years of fun and rewarding observations. However, there are a few things to consider<br />
before using your telescope that will ensure your safety and protect your equipment.<br />
Warning<br />
Y Never look directly at the sun with the naked eye or with a telescope (unless you have the<br />
proper solar filter). Permanent and irreversible eye damage may result.<br />
Y Never use your telescope to project an image of the sun onto any surface. Internal heat build-up can damage the telescope<br />
and any accessories attached to it.<br />
Y Never use an eyepiece solar filter or a Herschel wedge. Internal heat build-up inside the telescope can cause these devices to<br />
crack or break, allowing unfiltered sunlight to pass through to the eye.<br />
Never leave the telescope unsupervised, either when children are present or adults who may not be familiar with the correct<br />
operating procedures of your telescope.<br />
4
ASSE<br />
12<br />
11<br />
10<br />
9<br />
8<br />
Figure 2.1 – Advanced Series<br />
(Advanced C8-S Shown)<br />
1 Optical Tube 7 Tripod<br />
2 Finderscope 8 Counterweight(s)<br />
3 Finderscope Bracket 9 Counterweight Bar<br />
4 Equatorial Mount 10 Declination Setting Circle<br />
5 Latitude Adjustment Scale 11 Dovetail Mounting Bar<br />
6 Tripod Center Leg Brace/Accessory Tray 12 Schmidt Corrector Lens<br />
5<br />
5<br />
1<br />
2<br />
3<br />
4<br />
6<br />
7
C<br />
D<br />
B<br />
A<br />
Figure 2.2 – Advanced Series GT<br />
(Advanced C8-<strong>SGT</strong> Shown)<br />
15<br />
14<br />
12<br />
11<br />
10<br />
1 Optical Tube 9 Counterweight Bar<br />
2 Finderscope 10 Declination Setting Circle<br />
3 Finderscope Bracket 11 Dovetail Mounting Bar<br />
4 Equatorial Mount 12 Schmidt Corrector Lens<br />
5 Latitude Adjustment Scale 13 Hand Control<br />
6 Tripod Center Leg Brace/Accessory Tray 14 R.A. Motor Drive / Control Panel<br />
7 Tripod 15 Declination Motor Drive<br />
8 Counterweight(s)<br />
CONTROL PANEL C Autoguider Port<br />
A Hand Control Port D 12v Input Jack<br />
B DEC Motor Port E On/Off Switch<br />
9<br />
8<br />
6<br />
E<br />
7<br />
1<br />
2<br />
3<br />
4<br />
5<br />
13<br />
6
This section covers the assembly instructions for your <strong>Celestron</strong> Advanced Series Telescope (AST). Your AST<br />
telescope should be set up indoor the first time so that it is easy to identify the various parts and familiarize yourself<br />
with the correct assembly procedure before attempting it outdoor.<br />
#11071 / 11072 #11025 / 11026 #11045 / 11046<br />
C5-S C8-S <strong>C9.25</strong>-S<br />
Diameter 127mm (5") Schmidt-Cassegrain 203mm (8") Schmidt-Cassegrain 235mm (9.25") Schmidt-Cassegrain<br />
Focal Length 1250mm F/10 2032mm F/10 2350mm F/10<br />
Eyepiece 25mm - 1.25" (50x) 25mm - 1.25" (81x) 25mm - 1.25" (94x)<br />
Finderscope 6x30 6x30 6x30<br />
Diagonal 90° - 1.25" 90° - 1.25" 90° - 1.25"<br />
Mount CG-5 Equatorial CG-5 Equatorial CG-5 Equatorial<br />
Tripod 2" Stainless Steel 2" Stainless Steel 2" Stainless Steel<br />
Software The Sky L1 The Sky L1 The Sky L1<br />
Counterweights 1-11lb 1-11lb 2-11lb<br />
The <strong>Celestron</strong> Advanced Series telescopes are shipped in two boxes (three boxes for GT models). In separate boxes<br />
are the following:<br />
• Optical Tube Assembly and Standard Accessories<br />
• Equatorial Mount, Tripod, Hand Control, Counterweight(s) and Counterweight Bar (equatorial mount with<br />
motors comes in separate box for GT models)<br />
Remove all the pieces from their respective boxes and place on a flat, clear work area. A large floor space is ideal.<br />
When setting up your <strong>Celestron</strong> telescope you must start with the tripod and work up from there. These instructions<br />
are laid out in the order each task must be performed.<br />
Setting up the Tripod<br />
The CG-5 tripod comes with an all metal center leg brace / accessory tray to give rock solid support to the mount.<br />
The tripod comes fully assembled with a metal plate, called the tripod head, that holds the legs together at the top.<br />
In addition, there is a central rod that extends down from the tripod head that attaches the equatorial mount to the<br />
tripod. To set up the tripod:<br />
1. Stand the tripod upright and pull the tripod legs apart until each leg is fully extended. The tripod will now stand by<br />
itself. Once the tripod is set up, you can adjust the height at which it stands.<br />
2. Loosen the lever on the leg clamp so that the tripod leg can be adjusted.<br />
3. Slide the center portion of the tripod leg away from the tripod head until it is at the desired height.<br />
4. Tighten the levers on each leg clamp to hold the legs in place.<br />
7
Attaching the Equatorial Mount<br />
The equatorial mount allows you to tilt the telescope’s axis of<br />
rotation so that you can track the stars as they move across the<br />
sky. The CG-5 mount is a German equatorial mount that<br />
attaches to the tripod head. On one side of the tripod head there<br />
is a metal alignment peg for aligning the mount. This side of<br />
the tripod will face north when setting up for an astronomical<br />
observing session. To attach the equatorial head:<br />
1. Locate the azimuth adjustment screws on the equatorial mount.<br />
2. Retract the screws so they no longer extend into the azimuth<br />
housing on the mount. Do NOT remove the screws since<br />
they are needed later for polar alignment.<br />
3. Hold the equatorial mount over the tripod head so that the<br />
azimuth housing is above the metal peg.<br />
4. Place the equatorial mount on the tripod head so that the two<br />
are flush.<br />
5. Tighten the knob (attached to the central rod) on the underside<br />
of the tripod head to hold the equatorial mount firmly in place.<br />
Attaching the Center Leg Brace<br />
1. Slide the accessory tray over the central rod so that each arm of the tray is pushing against the inside of the tripod<br />
legs.<br />
2. Thread the accessory tray knob on to the central rod and tighten.<br />
Installing the Counterweight Bar<br />
To properly balance the telescope, the mount comes<br />
with a counterweight bar and at least one<br />
counterweight (depending on model). To install the<br />
counterweight bar:<br />
1. Locate the opening in the equatorial mount on the<br />
DEC axis<br />
2. Thread the counterweight bar into the opening until<br />
tight.<br />
3. Tighten the counterweight bar lock nut fully for added<br />
support.<br />
Once the bar is securely in place you are ready to attach the<br />
counterweight.<br />
Since the fully assembled telescope can be quite heavy, position the mount so that the polar axis is pointing<br />
towards north before the tube assembly and counterweights are attached. This will make the polar alignment<br />
procedure much easier.<br />
8<br />
Equatorial<br />
Mount<br />
Tripod<br />
Head<br />
Figure 2-4<br />
Figure 2-3<br />
Azimuth<br />
Alignment Screws<br />
Alignment<br />
Peg<br />
Mounting<br />
Knob<br />
Mounting Knob<br />
Central Rod<br />
Accessory Tray<br />
Accessory<br />
Figure 2-3<br />
Tray Knob
Installing the Counterweight<br />
Depending on which AST telescope you have, you will receive either one or two counterweights. To install the<br />
counterweight(s):<br />
1. Orient the mount so that the counterweight bar points toward the<br />
ground .<br />
2. Remove the counterweight safety screw on the end of the<br />
counterweight bar (i.e., opposite the end that attaches to the mount).<br />
3. Loosen the locking screw on the side of the counterweight.<br />
4. Slide the counterweight onto the shaft (see Figure 2-5).<br />
5. Tighten the locking screw on the side of the weight to hold the<br />
counterweight in place.<br />
6. Replace the counterweight safety screw.<br />
Attaching the Hand Control Holder<br />
(Advanced GT Models Only)<br />
The Advanced GT telescope models come with a hand control<br />
holder to place the computerized hand control. The hand control<br />
holder comes in two pieces: the leg clamp that snaps around the<br />
tripod leg and the holder which attaches to the leg clamp. To<br />
attach the hand control holder:<br />
1. Place the leg clamp up against one of the tripod legs and<br />
press firmly until the clamp wraps around the leg.<br />
2. Slide the back of the hand control holder downward into<br />
the channel on the front of the legs clamp (see Fig 2-6)<br />
until it snaps into place.<br />
Attaching the Slow Motion Knobs<br />
(For Non-GT Models Only)<br />
The Advanced Series (non-GT models) comes with two slow motion control knobs that allows you to make fine<br />
pointing adjustments to the telescope in both R.A.<br />
and Declination. To install the knobs:<br />
1. Locate the hard plastic shell under the R.A. shafts.<br />
2. Remove either of the two oval tabs by pulling<br />
tightly.<br />
3. Line up the flat area on the inner portion of the R.A.<br />
slow motion knob with the flat area on the R.A.<br />
shaft (see Fig 2-7).<br />
4. Slide the R.A. slow motion knob onto the R.A.<br />
shaft.<br />
9<br />
Locking Screw<br />
Counterweight<br />
Safety Screw<br />
Counterweight<br />
Bar<br />
Figure 2-7<br />
Figure 2-5<br />
Figure 2-6<br />
Hand Control<br />
Holder<br />
Leg Clamp
The knob is a tension fit, so sliding it on holds it in place. As mentioned above, there are two R.A. shafts, one on<br />
either side of the mount. It makes no difference which shaft you use since both work the same. Use whichever one<br />
you find more convenient. If, after a few observing sessions, you find the R.A. slow motion knob is more accessible<br />
from the other side, pull firmly to remove the knob, then install it on the opposite side.<br />
5. The DEC slow motion knob attaches in the same manner as the R.A. knob. The shaft that the DEC slow motion<br />
knob fits over is toward the top of the mount, just below the telescope mounting platform. Once again, you have<br />
two shafts to choose from. Use the shaft that is pointing toward the ground. This makes it easy to reach while<br />
looking through the telescope, something which is quite important when you are observing.<br />
Advanced<br />
GT Users!<br />
Attaching the Optical Tube to the Mount<br />
The telescope attaches to the mount via a dovetail slide bar which is mounted along the bottom of the<br />
telescope tube. Before you attach the optical tube, make sure<br />
that the declination and right ascension clutch knobs are tight.<br />
This will ensure that the mount does not move suddenly while<br />
attaching the telescope. To mount the telescope tube:<br />
In order for the GT computerized mount to function properly,<br />
before installing the optical tube, the mounting platform must be<br />
positioned so that the Declination Index Marks are aligned (see Fig<br />
2-8).<br />
1. Loosen the mounting screw on the side of the telescope mounting<br />
platform. This allows you to slide the dovetail bar onto the mount.<br />
2 Slide the dovetail bar on the telescope tube into the mounting platform of the<br />
Figure 2-8<br />
mount. Slide the telescope so that the back of the dovetail bar is close to the back of the mounting platform.<br />
3 Tighten the mounting screw on the side of the mounting platform to hold the telescope in place.<br />
Now that the optical tube is securely in place, the visual accessories can now be attached to the telescope.<br />
Dovetail Bar<br />
Attaching the Visual Back<br />
The visual back is the accessory that allows you to attach all visual accessories to the telescope. The Advanced<br />
Series optical tubes come with the visual back installed. If it is not already on the tube it can be attached as follows:<br />
1. Remove the rubber cover on the rear cell.<br />
Figure 2-9<br />
2. Place the knurled slip ring on the visual back over the threads on the rear cell (Fig 2-10).<br />
10<br />
Telescope<br />
Mounting Screw<br />
Declination<br />
Index Marks
3. Hold the visual back with the set screw in a convenient position and rotate the knurled slip ring clockwise until tight.<br />
Once this is done, you are ready to attach other accessories, such as eyepieces, diagonal prisms, etc.<br />
If you want to remove the visual back, rotate the slip ring counterclockwise until it is free of the rear cell.<br />
Installing the Star Diagonal<br />
The star diagonal is a prism that diverts the light at a right angle to the light path of the telescope. This allows you<br />
to observe in positions that are physically more comfortable than if<br />
you looked straight through. To attach the star diagonal onto the<br />
Eyepiece<br />
optical tube:<br />
1. Turn the set screw on the visual back until its tip no longer extends<br />
into (i.e., obstructs) the inner diameter of the visual back.<br />
2. Slide the chrome portion of the star diagonal into the visual back.<br />
3. Tighten the set screw on the visual back to hold the star diagonal in<br />
place.<br />
If you wish to change the orientation of the star diagonal, loosen the<br />
set screw on the visual back until the star diagonal rotates freely.<br />
Rotate the diagonal to the desired position and tighten the set screw.<br />
Installing the Eyepiece<br />
The eyepiece, or ocular, is an optical element that magnifies the image focused by the telescope. The eyepiece fits<br />
into either the visual back directly or the star diagonal. To install an eyepiece:<br />
1. Loosen the set screw on the star diagonal until the tip no longer extends into the inner diameter of the<br />
eyepiece end of the diagonal.<br />
2. Slide the chrome portion of the eyepiece into the star diagonal.<br />
3. Tighten the set screw on the star diagonal to hold the eyepiece in place.<br />
To remove the eyepiece, loosen the set screw on the star diagonal and slide the eyepiece out. You can replace it<br />
with another eyepiece (purchased separately).<br />
Eyepieces are commonly referred to by focal length and barrel diameter. The focal length of each eyepiece is<br />
printed on the eyepiece barrel. The longer the focal length (i.e., the larger the number) the lower the eyepiece power<br />
and the shorter the focal length (i.e., the smaller the number) the higher the magnification. Generally, you will use<br />
low-to-moderate power when viewing. For more information on how to determine power, see the section on<br />
“Calculating Magnification.”<br />
Installing the Finderscope<br />
The AST telescopes come with a 6x30 finderscope used to help you locate and center objects in the main field of<br />
your telescope. To accomplish this, the finder has a built-in cross-hair reticle that shows the optical center of the<br />
finderscope.<br />
Start by removing the finder and hardware from the plastic wrapper. Included are the following:<br />
11<br />
Star Diagonal<br />
Visual Back<br />
Figure 2-10
Finderscope<br />
Finder Bracket<br />
Rubber O-ring<br />
Three Nylon Tipped Thumbscrews (10-24x1/2")<br />
Two Phillips Head Screws (8-32x1/2")<br />
To install the finderscope:<br />
1. Attach the bracket to the optical tube. To do this,<br />
place the curved portion of the bracket with the<br />
slot over the two holes in the rear cell. The<br />
bracket should be oriented so that the rings that<br />
hold the finder are over the telescope tube, not the<br />
rear cell (see Fig 2-11). Start threading the<br />
screws in by hand and tighten fully with an Allen<br />
wrench.<br />
2. Partially thread-in the three nylon-tipped<br />
thumbscrews that hold the finder in place inside<br />
the bracket. Tighten the screws until the nylon<br />
heads are flush with the inner diameter of the<br />
bracket ring. Do NOT thread them in completely<br />
or they will interfere with the placement of the<br />
finder. (Having the screws in place when the finder is installed<br />
will be easier than trying to insert the screws after the finder has<br />
been installed.)<br />
3. Slide the rubber O-ring over the back of the finder (it will NOT fit over the objective end of the<br />
finder). It may need to be stretched a little. Once on the main body of the finder, slide it up about one<br />
inch from the end of the finder.<br />
4. Rotate the finder until one cross hair is parallel to the R.A. axis and the other is parallel to the DEC<br />
axis.<br />
5. Slide the eyepiece end of the finder into the front of the bracket.<br />
6. Slightly tighten the three nylon tipped thumbscrews on the front ring of the bracket to hold the finder<br />
in place.<br />
7. Once on, push the finder back until the O-ring is snug inside the back ring of the finder bracket.<br />
8. Hand tighten the three nylon tipped thumbscrews until snug.<br />
Removing the Lens Cap<br />
The C5-S and <strong>C9.25</strong>-S have aluminum lens caps that slide on and off of the front of the telescope. The C8-S lens<br />
cap utilizes a bayonet-type locking mechanism to hold it in place. To remove the lens cap, hold the cover firmly and<br />
rotate the outer edge 1/2” counterclockwise and pull off.<br />
12<br />
Finderscope<br />
Figure 2-11<br />
Nylon<br />
Adjustment<br />
Screw<br />
Finder Bracket<br />
Rear Cell
Moving the Telescope <strong>Manual</strong>ly<br />
In order to properly balance your telescope, you will need to move your telescope manually at various portions of<br />
the sky to observe different objects. To make rough adjustments, loosen the R.A. and DEC clutch knobs slightly<br />
and move the telescope in the desired direction.<br />
Both the R.A. and DEC axis have lock levers to clutch down each axis of the telescope. To loosen the clutches on<br />
the telescope, rotate the lock levers counterclockwise.<br />
Balancing The Mount in R.A.<br />
To eliminate undue stress on the mount, the telescope should be properly balanced around the polar axis. Proper<br />
balancing is crucial for accurate tracking. To balance the mount:<br />
1. Verify that the telescope is securely attached to the<br />
telescope mounting platform.<br />
2. Loosen the R.A. lock lever and position the telescope off<br />
to one side of the mount. The counterweight bar will<br />
extend horizontally on the opposite side of the mount.<br />
3. Release the telescope — GRADUALLY — to see which<br />
way the telescope “rolls.”<br />
4. Loosen the set screws on the side of the counterweight so it<br />
can be moved the length of the counterweight bar.<br />
5. Move the counterweight to a point where it balances the<br />
telescope (i.e., the telescope remains stationary when the<br />
R.A. clutch knobs are loose).<br />
6. Tighten the screw on the counterweight to hold it in place.<br />
While the above instructions describe a perfect balance arrangement, there should be a SLIGHT imbalance to ensure<br />
the best possible tracking. When the scope is on the west side of the mount the counterweight should be slightly<br />
imbalanced to the counterweight bar side. And when the tube is on the east side of the mount there should be a<br />
slight imbalance toward the telescope side. This is done so that the worm gear is pushing against a slight load. The<br />
amount of the imbalance is very slight. When taking astrophotographs, this balance process can be done for the<br />
specific area at which the telescope is pointing to further optimize tracking accuracy.<br />
Figure 2-13<br />
13<br />
Figure 2-12<br />
Declination<br />
Lock Lever<br />
R.A. Lock Lever
Balancing The Mount in DEC<br />
Although the telescope does not track in declination, the telescope should also be balanced in this axis to prevent<br />
any sudden motions when the DEC lock lever is loose. To balance the telescope in DEC:<br />
1. Loosen the R.A. clutch lock lever and rotate the telescope so that it is on one side of the mount (i.e., as<br />
described in the previous section on “Balancing the Mount in R.A.”).<br />
2. Tighten the R.A. lock lever to hold the telescope in place.<br />
3. Loosen the DEC clutch lock lever and rotate the telescope until the tube is parallel to the ground.<br />
4. Release the tube — GRADUALLY — to see which way it rotates around the declination axis. DO<br />
NOT LET GO OF THE TELESCOPE TUBE COMPLETELY!<br />
5. Slightly loosen the knobs that holds the telescope to the mounting platform and slide the telescope<br />
either forward or backward until it remains stationary when the DEC clutch is loose. Do NOT let go of<br />
the telescope tube while the knob on the mounting platform is loose. It may be necessary to rotate the<br />
telescope so that the counterweight bar is pointing down before loosening the mounting platform<br />
screw.<br />
6. Tighten the knobs on the telescope mounting platform to hold the telescope in place.<br />
Like R.A. balance, these are general balance instructions and will reduce undue stress on the mount. When taking<br />
astrophotographs, this balance process should be done for the specific area at which the telescope is pointing.<br />
Adjusting the Mount<br />
In order for a motor drive to track accurately, the telescope’s axis of rotation must be parallel to the Earth’s axis of<br />
rotation, a process known as polar alignment. Polar alignment is achieved NOT by moving the telescope in R.A. or<br />
DEC, but by adjusting the mount vertically, which is called altitude, and horizontally, which is called azimuth. This<br />
section simply covers the correct movement of the telescope during the polar alignment process. The actual process<br />
of polar alignment, that is making the telescope’s axis of rotation parallel to the Earth’s, is described later in this<br />
manual in the section on “Polar Alignment.”<br />
Adjusting the Mount in Altitude<br />
To increase the latitude of the polar axis, tighten the rear latitude adjustment screw and loosen the front screw (if<br />
necessary).<br />
To decrease the latitude of the polar axis, tighten the front (under<br />
the counterweight bar) latitude adjustment screw and loosen the<br />
rear screw (if necessary).<br />
The latitude adjustment on the CG-5 mount has a range from<br />
approximately 30° going up to 60°.<br />
It is best to always make final adjustments in altitude by moving<br />
the mount against gravity (i.e. using the rear latitude adjustment<br />
screw to raise the mount). To do this you should loosen both<br />
latitude adjustment screws and manually push the front of the<br />
mount down as far as it will go. Then tighten the rear adjustment<br />
screw to raise the mount to the desired latitude.<br />
14<br />
Figure 2-14<br />
Rear Latitude<br />
Adjustment<br />
Screw<br />
Front Latitude<br />
Adjustment Screw<br />
Azimuth<br />
Adjustment<br />
Knobs
For Advanced GT users, it may be helpful to remove the front latitude adjustment screw completely. This will allow<br />
the mount to reach lower latitudes without the screw coming into contact with the R.A. motor assembly. To remove<br />
the latitude screw, first use the rear screw to raise the mount head all the way up. Then remove the front latitude<br />
screw completely. Now you should be able to manually move the mount head all the way to its lowest latitude. Now,<br />
using only the rear screw, raise the mount to your desired latitude.<br />
Adjusting the Mount in Azimuth<br />
For rough adjustments in azimuth, simply pick up the telescope and tripod and move it. For fine adjustments in<br />
azimuth:<br />
1. Turn the azimuth adjustment knobs located on either side of the azimuth housing (see Fig 2-14). While standing<br />
behind the telescope, the knobs are on the front of the mount.<br />
Turning the right adjustment knob clockwise moves the mount toward the right.<br />
Turning the left adjustment knob clockwise moves the mount to the left.<br />
Both screws push off of the peg on the tripod head, which means you may have to loosen one screw while tightening<br />
the other. The screw that holds the equatorial mount to the tripod may have to be loosened slightly.<br />
Keep in mind that adjusting the mount is done during the polar alignment process only. Once polar aligned, the<br />
mount must NOT be moved. Pointing the telescope is done by moving the mount in right ascension and declination,<br />
as described earlier in this manual.<br />
Attaching the Declination Cable (For GT Models Only)<br />
The Advanced Series mount comes with a declination cable that connects from the R.A. motor drive electronic panel<br />
to the Dec motor drive. To attach the motor cable:<br />
• Locate the Declination cable and plug<br />
one end of the cable into the port on<br />
the electronics panel labeled DEC<br />
Port and plug the other end of the<br />
cable into the port located on the<br />
declination motor drive (see Fig 2-15).<br />
Powering the Telescope<br />
The Advanced GT can be powered by the supplied<br />
car battery adapter or optional 12v AC adapter. Use<br />
only adapters supplied by <strong>Celestron</strong>. Using any<br />
other adapter may damage the electronics or cause<br />
the telescope not to operate properly, and will void<br />
your manufacturer's warranty.<br />
1. To power the telescope with the car battery<br />
adapter (or 12v AC adapter), simply plug<br />
the round post into the 12v outlet on the<br />
electronic panel and plug the other end into your cars cigarette<br />
Figure 2-15<br />
lighter outlet or portable power supply (see Optional<br />
Accessories). Note: to prevent the power cord from being accidentally pulled out, wrap the power cord<br />
around the strain relief located below the power switch.<br />
2. Turn on the power to the telescope by flipping the switch, located on the electronics panel, to the "On"<br />
position.<br />
15<br />
R.A. Locking<br />
Clamp<br />
DEC Locking<br />
Clamp<br />
Declination Cable<br />
Input Port<br />
Declination Cable<br />
Output Port<br />
12v Power Input<br />
On/Off Switch
The Advanced Series GT, computerized version of each telescope has a hand controller designed to give you instant<br />
access to all the functions that your telescope has to offer. With automatic slewing to over 40,000 objects, and<br />
common sense menu descriptions, even a beginner can master its variety of features in just a few observing sessions.<br />
Below is a brief description of the individual components of the computerized hand controller:<br />
1. Liquid Crystal Display (LCD) Window: Has a dual-line, 16 character display screen that is backlit for<br />
comfortable viewing of telescope information and scrolling text.<br />
2. Align: Instructs the telescope to use a selected star or object as an alignment position.<br />
3. Direction Keys: Allows complete control of the telescope in any direction. Use the direction keys to move<br />
the telescope to the initial alignment stars or for centering objects in the eyepiece.<br />
1<br />
2<br />
3<br />
4<br />
5<br />
6<br />
Figure 3-1<br />
The Advanced GT Hand Control<br />
16<br />
7<br />
8<br />
9<br />
10<br />
11<br />
12
4. Catalog Keys: The Advanced Series has keys on the hand control to allow direct access to each of the<br />
catalogs in its database. The hand control contains the following catalogs in its database:<br />
Messier – Complete list of all Messier objects.<br />
NGC – Complete list of all the deep-sky objects in the Revised New General Catalog.<br />
Caldwell – A combination of the best NGC and IC objects.<br />
Planets - All 8 planets in our Solar System plus the Moon.<br />
Stars – A compiled list of the brightest stars from the SAO catalog.<br />
List – For quick access, all of the best and most popular objects in the Advanced GT database have<br />
been broken down into lists based on their type and/or common name:<br />
Named Stars Common name listing of the brightest stars in the<br />
sky.<br />
Named Objects Alphabetical listing of over 50 of the most popular<br />
deep sky objects.<br />
Double Stars Numeric-alphabetical listing of the most visually<br />
stunning double, triple and quadruple stars in the<br />
sky.<br />
Variable Stars Select list of the brightest variable stars with the<br />
shortest period of changing magnitude.<br />
Asterisms A unique list of some of the most recognizable star<br />
patterns in the sky.<br />
CCD Objects A custom list of many interesting galaxy pairs, trios<br />
and clusters that are well suited for CCD imaging<br />
with the Advanced GT telescope.<br />
IC Objects A complete list of all the Index Catalog deep-sky<br />
objects.<br />
Abell Objects A custom list of the Abell Catalog deep-sky<br />
galaxies.<br />
Constellation A complete list of all 88 constellations.<br />
5. Info: Displays coordinates and useful information about objects selected from the Advanced GT database.<br />
6. Tour: Activates the tour mode, which seeks out all the best objects for the current date and time, and<br />
automatically slews the telescope to those objects.<br />
7. Enter: Pressing Enter allows you to select any of the Advanced GT functions and accept entered<br />
parameters.<br />
8. Undo: Undo will take you out of the current menu and display the previous level of the menu path. Press<br />
Undo repeatedly to get back to a main menu or use it to erase data entered by mistake.<br />
9. Menu: Displays the many setup and utilities functions such as tracking rates and user defined objects and<br />
many others.<br />
10. Scroll Keys: Used to scroll up and down within any of the menu lists. A double-arrow will appear on the<br />
right side of the LCD when there are sub-menus below the displayed menu. Using these keys will scroll<br />
through those sub-menus.<br />
11. Rate: Instantly changes the rate of speed of the motors when the direction buttons are pressed.<br />
12. RS-232 Jack: Allows you to interface with a computer and control the telescope remotely.<br />
Hand Control Operation<br />
This section describes the basic hand control procedures needed to operate the GT Series Telescopes. These<br />
procedures are grouped into three categories: Alignment, Setup and Utilities. The alignment section deals with the<br />
initial telescope alignment as well as finding objects in the sky; the setup section discusses changing parameters<br />
such as tracking mode and tracking rate; finally, the last section reviews all of the utilities functions such as<br />
calibrating your mount, polar alignment and backlash compensation.<br />
17
Alignment Procedures<br />
In order for the telescope to accurately point to objects in the sky, it must first be aligned to three known positions<br />
(stars) in the sky. With this information, the telescope can create a model of the sky, which it uses to locate any<br />
object with known coordinates. There are many ways to align your telescope with the sky depending on what<br />
information the user is able to provide: Auto Align allows the telescope to select three stars and uses the entered<br />
time/location information to align the telescope; Auto Three Star Align involves the same process as Auto Align,<br />
however it allows the user to select which star to use to align the telescope. Quick-Align will ask you to input all the<br />
same information as you would for the Auto Align procedure. However, instead of slewing to the alignment stars<br />
for centering and alignment, the telescope bypasses this step and simply models the sky based on the information<br />
given. Finally, Last Alignment restores your last saved star alignment and switch position. Last Alignment also<br />
serves as a good safeguard in case the telescope should lose power.<br />
Startup Procedure<br />
Before any of the described alignments are performed, the telescope mount needs to be positioned so that the index<br />
marks are aligned on both the right ascension and declination axes (see Fig 2-8).<br />
First index its switch position so that each axis has an equal amount of<br />
travel to move in either direction. Once the index position has been set,<br />
the hand control will display the last entered date and time information<br />
stored in the hand control. Once the telescope is powered on:<br />
1. Press ENTER begin the alignment process.<br />
2. The hand control will ask the user to set the mount to its index<br />
position. Move the telescope mount, either manually or with<br />
the hand control, so that the index marked in both R.A. and<br />
Dec are aligned (see Fig 2-8). Press Enter to continue.<br />
3. The hand control will then display the last entered local time,<br />
date, time zone, longitude and latitude.<br />
• Use the Up/Down keys (10) to view the current<br />
parameters.<br />
• Press ENTER to accept the current parameters.<br />
• Press UNDO to enter current date and time<br />
information into the hand control. The following<br />
information will be displayed:<br />
Time - Enter the current local time for your area. You can<br />
enter either the local time (i.e. 08:00), or you can enter<br />
military time (i.e. 20:00 ).<br />
• Select PM or AM. If military time was entered,<br />
the hand control will bypass this step.<br />
• Choose between Standard time or Daylight<br />
Savings time. Use the Up and Down scroll buttons<br />
(10) to toggle between options.<br />
• Select the time zone that you are observing from. Again, use the Up and Down buttons (10) to<br />
scroll through the choices. Refer to Time Zone map in Appendix for more information.<br />
Date - Enter the month, day and year of your observing session.<br />
• Finally, you must enter the longitude and latitude of the location of your observing site. Use<br />
the table in Appendix C to locate the closest longitude and latitude for your current observing<br />
location and enter those numbers when asked in the hand control, pressing ENTER after each<br />
entry. Remember to select "West" for longitudes in North America and "North" for latitudes in<br />
the North Hemisphere. For international cities, the correct hemisphere is indicated in the<br />
Appendix listings.<br />
18<br />
Mount Calibration<br />
After an Auto Align is successfully<br />
completed, the hand control will<br />
display the message, Calibrating...<br />
This automatic calibration routine is<br />
necessary to calculate and<br />
compensates for "cone" error<br />
inherent in all German equatorial<br />
mounts. Cone error is the<br />
inaccuracy that results from the<br />
optical tube not being exactly<br />
perpendicular to the mounts<br />
declination axis as well as various<br />
other inaccuracies such as backlash<br />
in the mounts gears. The telescope<br />
is able to automatically determine<br />
the cone error value by always using<br />
alignment stars on both sides of the<br />
Meridian (see Figure 3-2).<br />
Mechanical errors can be reduced<br />
further by always centering<br />
alignment stars using the up and<br />
right arrow buttons as described in<br />
the Pointing Accuracy box below.
4. Select one of the four alignment methods as described below.<br />
Note: If incorrect information is entered into the hand control, the UNDO button acts like a back space button<br />
allowing the user to re-enter the correct data.<br />
Auto Align<br />
Auto Align allows the telescope to automatically choose three stars<br />
(two on one side of the Meridian, and one on the opposite side) on<br />
which to align itself. To Auto Align your telescope:<br />
1. Select Auto Align from the alignment choices given. Based<br />
on the date and time information entered, the telescope will<br />
automatically select and go to a bright star that is above the<br />
horizon.<br />
• If for some reason the chosen star is not visible<br />
(perhaps behind a tree or building) press UNDO to<br />
automatically select the next bright star from the<br />
database star list.<br />
2. Once the telescope is finished slewing to your first<br />
alignment star, the display will ask you to use the arrow<br />
buttons to align the selected star with the crosshairs in the<br />
center of the finderscope. Once centered in the finder,<br />
press ENTER.<br />
3. The display will then instruct you to center the star in the<br />
field of view of the eyepiece. When the star is centered,<br />
press ALIGN to accept this star as your first alignment<br />
star.<br />
4. After the first alignment star has been entered the telescope will automatically select a second alignment<br />
star on the same side of the Meridian and have you repeat this procedure for that star.<br />
5. For the third alignment star, the telescope will select a bright star on the opposite side of the Meridian and<br />
slew to it. Once again center the star in the crosshairs of the finderscope and then center the star in the<br />
eyepiece, pressing ENTER when complete.<br />
When the telescope has been aligned on all three stars the display will read Alignment Successful, and you are<br />
now ready to find your first object.<br />
Auto Three-Star Align<br />
Auto Three-Star Alignment works much the same way as Auto Align, however<br />
instead of automatically slewing to the alignment stars, the user is allowed to<br />
select the alignment stars from a list. To use Auto Three-Star Align:<br />
1. Select Auto Three Star Align from the alignment choices given.<br />
2. The hand control will display a recommended alignment star to<br />
begin.<br />
• Press UNDO to display the next recommended star on the same<br />
side of the Meridian, or<br />
• Press the UP and DOWN arrows keys to scroll through the<br />
compete list of available alignment stars to choose from.<br />
3. Once the desired alignment star is displayed on the hand control<br />
press ENTER to slew the telescope to the star.<br />
19<br />
Figure 3-2<br />
The Meridian is an imaginary line in the sky<br />
that starts at the North celestial pole and<br />
ends at the South celestial pole and passes<br />
through the zenith. If you are facing South,<br />
the meridian starts from your Southern<br />
horizon and passes directly overhead to the<br />
North celestial pole.<br />
Pointing Accuracy<br />
For the best possible<br />
pointing accuracy, always<br />
center the alignment stars<br />
using the up arrow button<br />
and the right arrow button.<br />
Approaching from this<br />
direction when looking<br />
through the eyepiece will<br />
eliminate much of the<br />
backlash between the<br />
gears and assures the<br />
most accurate alignment<br />
possible.
4. As with the Auto Align procedure, you will be asked to center the star in the crosshairs of the<br />
finderscope and then center the star in the eyepiece, pressing ENTER when complete.<br />
NOTE: Although the telescope allows the user to select the alignment stars, for best all-sky pointing accuracy it is still necessary<br />
to select two alignment stars on one side of the Meridian and the third star on the opposite side of the Meridian. For this reason,<br />
the hand control will only display stars that are on the same side of the Meridian for the first two alignment stars, then will only<br />
display stars on the opposite side of the Meridian for the third alignment star.<br />
Quick-Align<br />
Quick-Align uses all the date and time information entered at startup to align the telescope. However, instead of slewing to the<br />
alignment stars for centering and alignment, the telescope bypasses this step and simply models the sky based on the information<br />
given. This will allow you to roughly slew to the coordinates of bright objects like the moon and planets and gives the telescope<br />
the information needed to track objects in any part of the sky (depending on accuracy of polar alignment). Quick-Align is not<br />
meant to be used to accurately locate small or faint deep-sky objects or to track objects accurately for photography.<br />
To use Quick-Align, simply select Quick Align from the alignment options and press ENTER. The telescope will automatically<br />
use the entered date/time parameters to align itself with the sky and display Alignment Successful.<br />
NOTE: Once a Quick-Align has been done, you can use the Re-alignment feature (see below) to improve your<br />
telescopes pointing accuracy.<br />
Last Alignment<br />
The Last Alignment method will automatically recall the last stored index positions to continue using the alignment<br />
that was saved when the telescope was last powered down. This is a useful feature should your telescope<br />
accidentally lose power or be powered down.<br />
NOTE: Just like with Quick-Align, you can use the Re-alignment feature (see below) to improve your telescopes<br />
pointing accuracy after using the Last Alignment method. To maintain a more accurate alignment over a series of<br />
observing sessions, use the Hibernate feature described later in this chapter.<br />
Re-Alignment<br />
The Advanced Series telescopes have a re-alignment feature which allows you to replace any of the original<br />
alignment stars with a new star or celestial object. This can be useful in several situations:<br />
• If you are observing over a period of a few hours, you may notice that your original two alignment<br />
stars have drifted towards the west considerably. (Remember that the stars are moving at a rate of 15º<br />
every hour). Aligning on a new star that is in the eastern part of the sky will improve your pointing<br />
accuracy, especially on objects in that part of the sky.<br />
• If you have aligned your telescope using the Quick-Align method, you can use re-align to align on<br />
actual objects in the sky. This will improve the pointing accuracy of your telescope without having to<br />
re-enter addition information.<br />
To replace an existing alignment star with a new alignment star:<br />
1. Select the desired star (or object) from the database and slew to it.<br />
2. Carefully center the object in the eyepiece.<br />
3. Once centered, press the UNDO button until you are at the main menu.<br />
4. With Advanced GT displayed, press the ALIGN key on the hand control.<br />
5. The display will then ask you which alignment star you want to replace. Use the UP and Down scroll keys<br />
to select the alignment star to be replaced. It is usually best to replace the star closest to the new object.<br />
This will space out your alignment stars across the sky.<br />
6. Press ALIGN to make the change.<br />
20
Helpful<br />
Hint<br />
Object Catalog<br />
Selecting an Object<br />
Now that the telescope is properly aligned, you can choose an object from any of the catalogs in the telescope's<br />
extensive database. The hand control has a key (4) designated for each of the catalogs in its database. There are two<br />
ways to select objects from the database: scrolling through the named object lists and entering object numbers.<br />
Pressing the LIST key on the hand control will access all objects in the database that have common names or<br />
types. Each list is broken down into the following categories: Named Stars, Named Object, Double Stars,<br />
Variable Stars, Asterisms and CCD Objects. Selecting any one of these catalogs will display a numericalphabetical<br />
listing of the objects under that list. Pressing the Up and Down keys (10) allows you to scroll<br />
through the catalog to the desired object.<br />
When scrolling through a long list of objects, holding down either the Up or Down key will allow you to scroll<br />
through the catalog more rapidly by only displaying every fifth catalog object.<br />
Pressing any of the other catalog keys (M, CALD, NGC, or STAR) will display a blinking cursor below the name of<br />
the catalog chosen. Use the numeric key pad to enter the number of any object within these standardized catalogs.<br />
For example, to find the Orion Nebula, press the "M" key and enter "042".<br />
Slewing to an Object<br />
Once the desired object is displayed on the hand control screen, choose from the following options:<br />
• Press the INFO Key. This will give you useful information about the selected object such as R.A.<br />
and declination, magnitude size and text information for many of the most popular objects.<br />
• Press the ENTER Key. This will automatically slew the telescope to the coordinates of the object.<br />
Caution: Never slew the telescope when someone is looking into the eyepiece. The telescope can move at fast slew speeds<br />
and may hit an observer in the eye.<br />
Object information can be obtained without having to do a star alignment. After the telescope is powered on,<br />
pressing any of the catalog keys allows you to scroll through object lists or enter catalog numbers and view the<br />
information about the object as described above.<br />
Finding Planets<br />
Your telescope can locate all 8 of our solar systems planets plus the Moon. However, the hand control will only<br />
display the solar system objects that are above the horizon (or within its filter limits). To locate the planets, press the<br />
PLANET key on the hand control. The hand control will display all solar system objects that are above the horizon:<br />
• Use the Up and Down keys to select the planet that you wish to observe.<br />
• Press INFO to access information on the displayed planet.<br />
• Press ENTER to slew to the displayed planet.<br />
21
Tour Mode<br />
The Advanced Series telescopes include a tour feature which automatically allows the user to choose from a list of<br />
interesting objects based on the date and time in which you are observing. The automatic tour will display only those<br />
objects that are within your set filter limits (see Filter Limits in the Setup Procedures section of the manual). To<br />
activate the Tour mode, press the TOUR key (6) on the hand control. The hand control will display the best objects<br />
to observe that are currently in the sky.<br />
• To see information and data about the displayed object, press the INFO key.<br />
• To slew to the object displayed, press ENTER.<br />
• To see the next tour object, press the Up key.<br />
Constellation Tour<br />
In addition to the Tour Mode, your telescope has a Constellation Tour that allows the user to take a tour of all the<br />
best objects in each of the 88 constellations. Selecting Constellation from the LIST menu will display all the<br />
constellation names that are above the user defined horizon (filter limits). Once a constellation is selected, you can<br />
choose from any of the database object catalogs to produce a list of all the available objects in that constellation.<br />
• To see information and data about the displayed object, press the INFO key.<br />
• To slew to the object displayed, press ENTER.<br />
• To see the next tour object, press the Up key.<br />
Direction Buttons<br />
The hand control has four direction buttons (3) in the center of the hand control which control the telescope's motion<br />
in altitude (up and down) and azimuth (left and right). The telescope can be controlled at nine different speed rates.<br />
Rate Button<br />
Pressing the RATE key (11) allows you to instantly change the speed rate of the motors from high speed slew rate to<br />
precise guiding rate or anywhere in between. Each rate corresponds to a number on the hand controller key pad.<br />
The number 9 is the fastest rate (3º per second, depending on power source) and is used for slewing between objects<br />
and locating alignment stars. The number 1 on the hand control is the slowest rate (.5x sidereal) and can be used for<br />
accurate centering of objects in the eyepiece and photographic guiding. To change the speed rate of the motors:<br />
• Press the RATE key on the hand control. The LCD will display the current speed rate.<br />
• Press the number on the hand control that corresponds to the desired speed. The number will<br />
appear in the upper-right corner of the LCD display to indicate that the rate has been changed.<br />
The hand control has a "double button" feature that allows you to instantly speed up the motors without having to<br />
choose a speed rate. To use this feature, simply press the arrow button that corresponds to the direction that you<br />
want to move the telescope. While holding that button down, press the opposite directional button. This will<br />
increase the slew rate to the maximum slew rate.<br />
The direction that a star moves in the eyepiece when a direction is pressed will change depending on which side of<br />
the Meridian the telescope tube is positioned. In order to change the direction of the arrow buttons, see Scope Setup<br />
Features later in this section.<br />
22
Setup Procedures<br />
1 = .5x 6 = 64x<br />
2 = 1x (sidereal) 7 = .5º / sec<br />
3 = 4x 8 = 2º / sec<br />
4 = 8x<br />
5 = 16x<br />
9 = 3º / sec<br />
Nine available slew speeds<br />
The Advanced GT contains many user defined setup functions designed to give the user control over the telescope's<br />
many advanced features. All of the setup and utility features can be accessed by pressing the MENU key and<br />
scrolling through the options:<br />
Tracking Mode This allows you to change the way the telescope tracks depending on the type of mount<br />
being used to support the telescope. The telescope has three different tracking modes:<br />
EQ North Used to track the sky when the telescope is polar aligned in the<br />
Northern Hemisphere.<br />
EQ South Used to track the sky when the telescope is polar aligned in the<br />
Southern Hemisphere.<br />
Off When using the telescope for terrestrial (land) observation, the<br />
tracking can be turned off so that the telescope never moves.<br />
Tracking Rate In addition to being able to move the telescope with the hand control buttons, your<br />
telescope will continually track a celestial object as it moves across the night sky. The<br />
tracking rate can be changed depending on what type of object is being observed:<br />
Sidereal This rate compensates for the rotation of the Earth by moving the<br />
telescope at the same rate as the rotation of the Earth, but in the<br />
opposite direction. When the telescope is polar aligned, this can<br />
be accomplished by moving the telescope in right ascension only.<br />
Lunar Used for tracking the moon when observing the lunar landscape.<br />
Solar Used for tracking the Sun when solar observing with the proper<br />
filter.<br />
View Time-Site - Displays the current time and longitude/latitude downloaded from the optional CN-16 GPS<br />
receiver. It will also display other relevant time-site information like time zone, daylight saving and local sidereal<br />
time. Local sidereal time (LST) is useful for knowing the right ascension of celestial objects that are located on the<br />
Meridian at that time. View Time-Site will always display the last saved time and location entered while it is linking<br />
with the GPS. Once current information has been received, it will update the displayed information. If GPS is<br />
switched off or not present, the hand control will only display the last saved time and location.<br />
User Defined Objects - Your telescope can store up to 400 different user defined objects in its memory. The<br />
objects can be daytime land objects or an interesting celestial object that you discover<br />
that is not included in the regular database. There are several ways to save an object to<br />
memory depending on what type of object it is:<br />
23
Helpful<br />
Hint<br />
GoTo Object: To go to any of the user defined objects stored in the database, scroll down to either<br />
GoTo Sky Obj or Goto Land Obj and enter the number of the object you wish to<br />
select and press ENTER. The telescope will automatically retrieve and display the<br />
coordinates before slewing to the object.<br />
Save Sky Object: Your telescope stores celestial objects to its database by saving its right ascension and<br />
declination in the sky. This way the same object can be found each time the telescope is<br />
aligned. Once a desired object is centered in the eyepiece, simply scroll to the "Save<br />
Sky Obj" command and press ENTER. The display will ask you to enter a number<br />
between 1-200 to identify the object. Press ENTER again to save this object to the<br />
database.<br />
Enter R.A. - Dec: You can also store a specific set of coordinates for an object just by entering the R.A.<br />
and declination for that object. Scroll to the "Enter RA-DEC " command and press<br />
ENTER. The display will then ask you to enter first the R.A. and then the declination of<br />
the desired object.<br />
Save Land Object: The telescope can also be used as a spotting scope on terrestrial objects. Fixed land<br />
objects can be stored by saving their altitude and azimuth relative to the location of the<br />
telescope at the time of observing. Since these objects are relative to the location of the<br />
telescope, they are only valid for that exact location. To save land objects, once again<br />
center the desired object in the eyepiece. Scroll down to the "Save Land Obj"<br />
command and press ENTER. The display will ask you to enter a number between 1-200<br />
to identify the object. Press ENTER again to save this object to the database.<br />
To replace the contents of any of the user defined objects, simply save a new object using one of the existing<br />
identification numbers; the telescope will replace the previous user defined object with the current one.<br />
Get RA/DEC - Displays the right ascension and declination for the current position of the telescope.<br />
Goto R.A/ Dec - Allows you to input a specific R.A. and declination and slew to it.<br />
To store a set of coordinates (R.A./Dec) permanently into the database, save it as a User Defined Object as described<br />
above.<br />
Identify<br />
Identify Mode will search any of the telescope's database catalogs or lists and display the name and offset distances<br />
to the nearest matching objects. This feature can serve two purposes. First, it can be used to identify an unknown<br />
object in the field of view of your eyepiece. Additionally, Identify Mode can be used to find other celestial objects<br />
that are close to the objects you are currently observing. For example, if your telescope is pointed at the brightest<br />
star in the constellation Lyra, choosing Identify and then searching the Named Star catalog will no doubt return the<br />
star Vega as the star you are observing. However, by selecting Identify and searching by the Named Object or<br />
Messier catalogs, the hand control will let you know that the Ring Nebula (M57) is approximately 6° from your<br />
current position. Searching the Double Star catalog will reveal that Epsilon Lyrae is only 1° away from Vega. To<br />
use the Identify feature:<br />
• Press the Menu button and select the Identify option.<br />
• Use the Up/Down scroll keys to select the catalog that you would like to search.<br />
• Press ENTER to begin the search.<br />
Note: Some of the databases contain thousands of objects, and can therefore take several minutes to return the<br />
closest objects.<br />
24
Precise GoTo<br />
The Advanced Series telescopes have a precise goto function that can assist in finding extremely faint objects and<br />
centering objects closer to the center of the field of view for astrophotography and CCD imaging. Precise Goto<br />
automatically searches out the closest bright star to the desired object and asks the user to carefully center it in the<br />
eyepiece. The hand control then calculates the small difference between its goto position and its centered position.<br />
Using this offset, the telescope will then slew to the desired object with enhanced accuracy. To use Precise Goto:<br />
1. Press the MENU button and use the Up/Down keys to select Precise Goto.<br />
• Choose Database to select the object that you want to observe from any of<br />
the database catalogs listed or;<br />
• Choose RA/DEC to enter a set of celestial coordinates that you wish to slew<br />
to.<br />
2. Once the desired object is selected, the hand control will search out and display<br />
the closest bright star to your desired object. Press ENTER to slew to the bright<br />
alignment star.<br />
3. Use the direction buttons to carefully center the alignment star in the eyepiece.<br />
4. Press ENTER to slew to the desired object.<br />
Scope Setup Features<br />
Setup Time-Site - Allows the user to customize the telescope's display by changing<br />
time and location parameters (such as time zone and daylight savings).<br />
Anti-backlash – All mechanical gears have a certain amount of backlash or play<br />
between the gears. This play is evident by how long it takes for a star to move in the<br />
eyepiece when the hand control arrow buttons are pressed (especially when changing<br />
directions). The Advanced GT's anti-backlash features allows the user to compensate for<br />
backlash by inputting a value which quickly rewinds the motors just enough to eliminate<br />
the play between gears. The amount of compensation needed depends on the slewing<br />
rate selected; the slower the slewing rate the longer it will take for the star to appear to<br />
move in the eyepiece. There are two values for each axis, positive and negative. Positive<br />
is the amount of compensation applied when you press the button, in order to get the<br />
gears moving quickly without a long pause. Negative is the amount of compensation applied when you release the<br />
button, winding the motors back in the other direction to resume tracking. Normally both values should be the same.<br />
You will need to experiment with different values (from 0-99); a value between 20 and 50 is usually best for most<br />
visual observing, whereas a higher value may be necessary for photographic guiding.<br />
To set the anti-backlash value, scroll down to the anti-backlash option and press ENTER. While viewing an object<br />
in the eyepiece, observe the responsiveness of each of the four arrow buttons. Note which directions you see a pause<br />
in the star movement after the button has been pressed. Working one axis at a time, adjust the backlash settings<br />
high enough to cause immediate movement without resulting in a pronounced jump when pressing or releasing the<br />
button. Now, enter the same values for both positive and negative directions. If you notice a jump when releasing<br />
the button, but setting the values lower results in a pause when pressing the button, go with the higher value for<br />
positive, but use a lower value for negative. The telescope will remember these values and use them each time it is<br />
turned on until they are changed.<br />
Filter Limits – When an alignment is complete, the telescope automatically knows which celestial objects are<br />
above the horizon. As a result, when scrolling through the database lists (or selecting the Tour function), the hand<br />
control will display only those objects that are known to be above the horizon when you are observing. You can<br />
customize the object database by selecting altitude limits that are appropriate for your location and situation. For<br />
example, if you are observing from a mountainous location where the horizon is partially obscured, you can set your<br />
25<br />
SCOPE SETUP<br />
SETUP TIME-SITE<br />
ANTI-BACKLASH<br />
AZM POSITIVE<br />
AZM NEGATIVE<br />
ALT POSITIVE<br />
ALT NEGATIVE<br />
FILTER LIMITS<br />
ALTMAX IN LIST<br />
ALTMIN IN LIST<br />
DIRECTION BUTTONS<br />
AZM BUTTONS<br />
ALT BUTTONS<br />
GOTO APPROACH<br />
AZM APPROACH<br />
ALT APPROACH<br />
AUTOGUIDE RATES<br />
AZM RATE<br />
ALT RATE<br />
AZIMUTH LIMITS<br />
AZM MIN LIMIT<br />
AZM MAX LIMIT<br />
E/W FILTERING<br />
FILTERING ON<br />
FILTERING OFF
Observing<br />
Tip!<br />
Helpful<br />
Hint!<br />
minimum altitude limit to read +20º. This will make sure that the hand control only displays objects that are higher<br />
in altitude than 20º.<br />
If you want to explore the entire object database, set the maximum altitude limit to 90º and the minimum limit to –<br />
90º. This will display every object in the database lists regardless of whether it is visible in the sky from your<br />
location.<br />
Direction Buttons –The direction a star appears to move in the eyepiece changes depending on which side of the<br />
Meridian the telescope tube is on. This can create confusion especially when guiding on a star when doing<br />
astrophotography. To compensate for this, the direction of the drive control keys can be changed. To reverse the<br />
button logic of the hand control, press the MENU button and select Direction Buttons from the Utilities menu. Use<br />
the Up/Down arrow keys (10) to select either the azimuth (right ascension) or altitude (declination) button direction<br />
and press ENTER. Select either positive or negative for both axes and press ENTER to save. Setting the azimuth<br />
button direction to positive will move the telescope in the same direction that the telescope tracks (i.e. towards the<br />
west). Setting the altitude buttons to positive will move the telescope counterclockwise along the DEC axis.<br />
Goto Approach - lets the user define the direction that the telescope will approach when slewing to an object.<br />
This allows the user the ability to minimize the affects of backlash when slewing from object to object. Just like<br />
with Direction Buttons, setting GoTo Approach to positive will make the telescope approach an object from the<br />
same direction as tracking (west) for azimuth and counterclockwise in declination. Declination Goto approach will<br />
only apply while the telescope tube is on one side of the Meridian. Once the tube passes over to the other side of the<br />
Meridian, the Goto approach will need to be reversed.<br />
To change the Goto approach direction, simply choose Goto Approach from the Scope Setup menu, select either<br />
Altitude or Azimuth approach, choose positive or negative and press ENTER.<br />
In order to minimize the affect of gear backlash on pointing accuracy, the settings for Button Direction should<br />
ideally match the settings for GoTo Approach. By default,<br />
using the up and right direction buttons to center alignment<br />
stars will automatically eliminate much of the backlash in<br />
the gears. If you change the Goto approach of your<br />
telescope it is not necessary to change the Button Direction<br />
as well. Simply take notice of the direction the telescope<br />
moves when completing it final goto approach. If the<br />
telescope approaches its alignment star from the west<br />
(negative azimuth) and clockwise (negative altitude) then<br />
make sure that the buttons used to center the alignment<br />
stars also move the telescope in the same directions.<br />
Autoguide Rate – Allows the user to set an autoguide<br />
rate as a percentage of sidereal rate. This is helpful when<br />
calibrating your telescope to a CCD autoguider for long<br />
exposure photography.<br />
Azimuth Limits - Sets the limits that the telescope can<br />
slew in azimuth (R.A.) The slew limits are set to 0º to<br />
180º; with zero being the position of the telescope when the<br />
counterweight bar is extended out towards the west and 180º<br />
being the position when the counterweight bar is extended out<br />
toward the east (see Fig 3-3). However, the slew limits can<br />
be customized depending on your needs. For example, if you are using CCD imaging equipment that has cables<br />
that are not long enough to move with the telescope as it slews across the sky, you can adjust the azimuth slew limit<br />
on the side of the mount that is restricted by the cables. Using the example above, the user could slew the telescope<br />
in R.A. (azimuth) until it reaches the point that the cables are extended to their maximum. Then by displaying the<br />
26<br />
Fig 3-3 – Azimuth Slew Limits- This<br />
figure shows the full range of motion<br />
for the R.A. (azimuth) axis
telescopes azimuth in this position (by looking at Get Alt-Az under the Utilities menu) you can determine the<br />
telescopes azimuth at its most extended position. Enter this azimuth reading for either the maximum or minimum<br />
azimuth slew limit to ensure that the telescope will not slew beyond this point.<br />
Warning: In order for the telescope to be able to slew to a star from the direction that minimizes the amount of<br />
backlash in the gears, it may be necessary for the telescope to slew beyond the specified slew limit in order to<br />
approach the star from the correct direction. This can limit your ability to slew to an object by as much as 6º from<br />
the azimuth slew limit set in the hand control. If this proves to be a problem, the direction that the telescope takes<br />
to center an object can be changed. To change the telescopes slewing direction, see Goto Approach under the Scope<br />
Setup menu. In order to guaranty that the telescope will have a full range of motion in R.A. (azimuth), set the<br />
azimuth slew limits to 354 and 186. This will allow the mount to slew without regard to the slew limits.<br />
East/West (E/W) Filtering - In order to ensure the best possible full sky pointing accuracy, the Advanced series<br />
telescopes automatically filters and chooses its initial alignment stars so that the first two alignment stars are located<br />
on one side of the Meridian and the third star is on the opposite side of the Meridian. East/West Filtering allows you<br />
to turn off this automatic filtering feature, allowing the hand control to display all of its alignment stars when doing<br />
a Auto Three Star Align, without regard to the Meridian.<br />
Utility Features<br />
Scrolling through the MENU (9) options will also provide access to several advanced utility functions within the<br />
Advanced Series telescopes such as; Calibrate Goto, Polar Alignment, Hibernate as well as many others.<br />
Calibrate Goto - Goto Calibration is a useful tool when attaching heavy visual or photographic accessories to the<br />
telescope. Goto Calibration calculates the amount of distance and time it takes for the<br />
mount to complete its final slow goto when slewing to an object. Changing the UTILITIES<br />
balance of the telescope can prolong the time it takes to complete the final slew. Goto<br />
Calibration takes into account any slight imbalances and changes the final goto<br />
distance to compensate.<br />
CALIBRATE GOTO<br />
Home Position – The telescopes "home" position is a user-definable position that is<br />
used to store the telescope when not in use. The home position is useful when storing<br />
the telescope in a permanent observatory facility. By default the Home position is the<br />
same as the index position used when aligning the mount. To set the Home position<br />
for your mount simply use the arrow buttons on the hand control to move the<br />
telescope mount to the desired position. Select the Set option and press Enter.<br />
Polar Align- The Advanced GT has a polar alignment function that will help you<br />
polar align your telescope for increased tracking precision and astrophotography.<br />
After performing an Auto Alignment, the telescope will slew to where Polaris should<br />
be. By using the equatorial head to center Polaris in the eyepiece, the mount will then<br />
be pointed towards the actual North Celestial Pole. Once Polar Align is complete,<br />
you must re-align your telescope again using any of the alignment methods described<br />
earlier. To polar align the mount in the Northern Hemisphere:<br />
1. With the telescope set up and roughly positioned towards Polaris, align the<br />
mount using the Auto Align or Auto Three Star method.<br />
2. Select Polar Align from the Utilities menu and press Enter.<br />
Based on your current alignment, the telescope will slew to where it thinks Polaris<br />
should be. Use the equatorial head latitude and azimuth adjustments to place Polaris in the center of the eyepiece.<br />
Do not use the direction buttons to position Polaris. Once Polaris is centered in the eyepiece press ENTER; the<br />
polar axis should then be pointed towards the North Celestial Pole.<br />
27<br />
HOME POSTION<br />
GOTO<br />
SET<br />
POLAR ALIGN<br />
LIGHT CONTROL<br />
KEYPAD OFF<br />
KEYPAD ON<br />
DISPLAY OFF<br />
DISPLAY ON<br />
FACTORY SETTING<br />
PRESS UNDO<br />
PRESS "0"<br />
VERSION<br />
GET ALT-AZ<br />
GOTO ATL-AZ<br />
HIBERNATE<br />
TURN ON/OFF GPS
Helpful<br />
Hint<br />
Light Control – This feature allows you to turn off both the red key pad light and LCD display for daytime use to<br />
conserve power and to help preserve your night vision.<br />
Factory Settings – Returns the Advanced GT hand control to its original factory settings. Parameters such as<br />
backlash compensation values, initial date and time, longitude/latitude along with slew and filter limits will be reset.<br />
However, stored parameters such as user defined objects will remain saved even when Factory Settings is selected.<br />
The hand control will ask you to press the "0" key before returning to the factory default setting.<br />
Version - Selecting this option will allow you to see the current version number of the hand control, motor control<br />
and GPS software (if using optional CN-16 GPS accessory). The first set of numbers indicate the hand control<br />
software version. For the motor control, the hand control will display two sets of numbers; the first numbers are for<br />
azimuth and the second set are for altitude. On the second line of the LCD, the GPS and serial bus versions are<br />
displayed.<br />
Get Alt-Az - Displays the relative altitude and azimuth for the current position of the telescope.<br />
Goto Alt-Az - Allows you to enter a specific altitude and azimuth position and slew to it.<br />
Hibernate - Hibernate allows the telescope to be completely powered down and still retain its alignment when<br />
turned back on. This not only saves power, but is ideal for those that have their telescopes permanently mounted or<br />
leave their telescope in one location for long periods of time. To place your telescope in Hibernate mode:<br />
1. Select Hibernate from the Utility Menu.<br />
2. Move the telescope to a desire position and press ENTER.<br />
3. Power off the telescope. Remember to never move your telescope manually while in Hibernate mode.<br />
Once the telescope is powered on again the display will read Wake Up. After pressing Enter you have the option of<br />
scrolling through the time/site information to confirm the current setting. Press ENTER to wake up the telescope.<br />
Pressing UNDO at the Wake Up screen allows you to explore many of the features of the hand control without<br />
waking the telescope up from hibernate mode. To wake up the telescope after UNDO has been pressed, select<br />
Hibernate from the Utility menu and press ENTER. Do not use the direction buttons to move the telescope while in<br />
hibernate mode.<br />
Turn On/Off GPS - If using your Advanced GT telescope with the optional CN-16 GPS accessory (see Optional<br />
Accessories section of the manual), you will need to turn the GPS on the first time you use the accessory. . If you<br />
want to use the telescope's database to find the coordinates of a celestial object for a future or past dates you would<br />
need to turn the GPS off in order to manually enter a time other than the present.<br />
28
MENU<br />
TRACKING<br />
MODE<br />
EQ NORTH<br />
EQ SOUTH<br />
OFF<br />
RATE<br />
SIDEREAL<br />
SOLAR<br />
LUNAR<br />
VIEW TIME-SITE<br />
SCOPE SETUP<br />
SETUP TIME-SITE<br />
ANTI-BACKLASH<br />
FILTER LIMITS<br />
DIRECTION BUTTONS<br />
GOTO APPROACH<br />
AUTOGUIDE RATE<br />
AZIMUTH LIMITS<br />
EAST/WEST FILTERING<br />
UTILITIES<br />
CALIBRATE GOTO<br />
HOME POSITION<br />
POLAR ALIGN<br />
LIGHT CONTROL<br />
FACTORY SETTING<br />
VERSION<br />
GET ALT-AZ<br />
GOTO ALT-AZ<br />
HIBERNATE<br />
TURN ON/OFF GPS<br />
USER OBJECTS<br />
GOTO SKY OBJ<br />
SAVE SKY OBJ<br />
ENTER RA & DEC<br />
SAVE LAND OBJ<br />
GOTO LAND OBJ<br />
GET RA-DEC<br />
GOTO RA-DEC<br />
IDENTIFY<br />
SELECT CATALOG<br />
PRECISE GOTO<br />
GOTO TYPE<br />
ADVANCED GT<br />
ALIGNMENT<br />
START-UP PROCUDURE<br />
SET TO INDEX<br />
ENTER TIME<br />
DLS/ST<br />
TIME ZONE<br />
ENTER DATE- MM/DD/YY<br />
ENTER LONG/LAT<br />
AUTO ALIGN<br />
CENTER STAR 1<br />
CENTER STAR 3<br />
AUTO THREE-STAR ALIGN<br />
29<br />
CENTER STAR 2<br />
SELECT STAR 1<br />
CENTER STAR 1<br />
SELECT STAR 2<br />
CENTER STAR 2<br />
SELECT STAR 3<br />
CENTER STAR 3<br />
LAST ALIGNMENT<br />
QUICK-ALIGN<br />
LIST<br />
NAMED STAR<br />
NAMED OBJECT<br />
ASTERISM<br />
TOUR<br />
VARIABLE STAR<br />
DOUBLE STAR<br />
CCD OBJECTS<br />
ABELL<br />
IC CATALOG<br />
CALDWELL<br />
MESSIER<br />
NGC<br />
SAO<br />
SOLAR SYSTEM<br />
CONSTELLATION
A telescope is an instrument that collects and focuses light. The nature of the optical design determines how the light is focused.<br />
Some telescopes, known as refractors, use lenses. Other telescopes, known as reflectors, use mirrors. The Schmidt-Cassegrain<br />
optical system (or Schmidt-Cass for short) uses a combination of mirrors and lenses and is referred to as a compound or<br />
catadioptric telescope. This unique design offers large-diameter optics while maintaining very short tube lengths, making them<br />
extremely portable. The Schmidt-Cassegrain system consists of a zero power corrector plate, a spherical primary mirror, and a<br />
secondary mirror. Once light rays enter the optical system, they travel the length of the optical tube three times.<br />
The optics of the Advenced Series Schmidt-Cassegrain telescopes have Starbright coatings - enhanced multi-layer coatings on<br />
the primary and secondary mirrors for increased reflectivity and a fully coated corrector for the finest anti-reflection<br />
characteristics.<br />
Inside the optical tube, a black tube extends out from the center hole in the primary mirror. This is the primary baffle tube and it<br />
prevents stray light from passing through to the eyepiece or camera.<br />
Image Orientation<br />
Actual image orientation as seen<br />
with the unaided eye<br />
Figure 4-1<br />
A cutaway view of the light path of the Schmidt-Cassegrain optical design<br />
The image orientation changes depending on how the eyepiece is inserted into the telescope. When using the star diagonal, the<br />
image is right-side-up, but reversed from left-to-right (i.e., mirror image). If inserting the eyepiece directly into the visual back<br />
(i.e., without the star diagonal), the image is upside-down and reversed from left-to-right (i.e., inverted). This is normal for the<br />
Schmidt-Cassegrain design.<br />
Reversed from left to right, as<br />
viewed with a Star Diagonal<br />
Figure 4-2<br />
30<br />
Inverted image, as viewed with<br />
the eyepiece directly in telescope
Focusing<br />
The Schmidt-Cassegrain focusing mechanism controls the primary mirror which is mounted<br />
on a ring that slides back and forth on the primary baffle tube. The focusing knob, which<br />
moves the primary mirror, is on the rear cell of the telescope just below the star diagonal and<br />
eyepiece. Turn the focusing knob until the image is sharp. If the knob will not turn, it has<br />
reached the end of its travel on the focusing mechanism. Turn the knob in the opposite<br />
direction until the image is sharp. Once an image is in focus, turn the knob clockwise to<br />
focus on a closer object and counterclockwise for a more distant object. A single turn of the<br />
focusing knob moves the primary mirror only slightly. Therefore, it will take many turns<br />
(about 30) to go from close focus (approximately 60 feet) to infinity.<br />
For astronomical viewing, out of focus star images are very diffuse, making them difficult to<br />
see. If you turn the focus knob too quickly, you can go right through focus without seeing<br />
the image. To avoid this problem, your first astronomical target should be a bright object<br />
(like the Moon or a planet) so that the image is visible even when out of focus. Critical<br />
focusing is best accomplished when the focusing knob is turned in such a manner that the<br />
mirror moves against the pull of gravity. In doing so, any mirror shift is minimized. For<br />
astronomical observing, both visually and photographically, this is done by turning the focus<br />
knob counterclockwise.<br />
31<br />
Figure 4-3<br />
The emblem on the end of<br />
the focus knob shows the<br />
correct rotational direction<br />
for focusing your telescope.<br />
NOTE: Before turning the focus knob, remember to lossen to two mirror locking knobs located on the rear cell of the<br />
telescope. These knobs connect a screw to the primary mirror mounting plate and prevent the mirror from moving when<br />
locked down. These screws should be locked down when transporting the telescope.<br />
Aligning the Finderscope<br />
Accurate alignment of the finder makes it easy to find objects with the telescope, especially celestial objects. To<br />
make aligning the finder as easy as possible, this procedure should be done in the daytime when it is easy to find<br />
and identify objects. The finderscope has a spring-loaded adjustment screw that puts pressure on the finderscope<br />
while the remaining screws are used to adjust the finder horizontally and vertically. To align the finder:<br />
1 Choose a target that is in excess of one mile away. This eliminates any possible parallax effect between the<br />
telescope and finder.<br />
2 Release the altitude and azimuth clamps and point the telescope at your target.<br />
3 Center your target in the main optics of the telescope. You may have to move the telescope slightly to center it.<br />
4 Adjust the screw on the finder bracket that is on the right (when looking through the finder) until the crosshairs are<br />
centered horizontally on the target seen through the telescope.<br />
5 Adjust the screw on the top of the finder bracket until the crosshairs are centered vertically on the target seen<br />
through the telescope.<br />
Image orientation through the finder is inverted (i.e., upside down and backwards left-to-right). This is normal for<br />
any finder that is used straight-through. Because of this, it may take a few minutes to familiarize yourself with the<br />
directional change each screw makes on the finder.<br />
Calculating Magnification<br />
You can change the power of your telescope just by changing the eyepiece (ocular). To determine the magnification of your<br />
telescope, simply divide the focal length of the telescope by the focal length of the eyepiece used. In equation format, the<br />
formula looks like this:<br />
Focal Length of Telescope (mm)<br />
Magnification = ⎯⎯⎯⎯⎯⎯⎯⎯⎯⎯⎯⎯⎯⎯<br />
Focal Length of Eyepiece (mm)
Let’s say, for example, you are using the 40mm Plossl eyepiece. To determine the magnification you simply divide the focal<br />
length of your telescope (the C8-S for example has a focal length of 2032mm) by the focal length of the eyepiece, 40mm.<br />
Dividing 2032 by 40 yields a magnification of 51 power.<br />
Although the power is variable, each instrument under average skies has a limit to the highest useful magnification. The general<br />
rule is that 60 power can be used for every inch of aperture. For example, the C8-S is 8 inches in diameter. Multiplying 8 by 60<br />
gives a maximum useful magnification of 480 power. Although this is the maximum useful magnification, most observing is<br />
done in the range of 20 to 35 power for every inch of aperture which is 160 to 280 times for the C8-S telescope.<br />
Determining Field of View<br />
Determining the field of view is important if you want to get an idea of the angular size of the object you are observing. To<br />
calculate the actual field of view, divide the apparent field of the eyepiece (supplied by the eyepiece manufacturer) by the<br />
magnification. In equation format, the formula looks like this:<br />
Apparent Field of Eyepiece<br />
True Field = ⎯⎯⎯⎯⎯⎯⎯⎯⎯⎯⎯⎯⎯<br />
Magnification<br />
As you can see, before determining the field of view, you must calculate the magnification. Using the example in the previous<br />
section, we can determine the field of view using the same 40mm eyepiece. The 40mm Plossl eyepiece has an apparent field of<br />
view of 46°. Divide the 46° by the magnification, which is 51 power. This yields an actual field of .9°, or nearly a full degree.<br />
To convert degrees to feet at 1,000 yards, which is more useful for terrestrial observing, simply multiply by 52.5. Continuing<br />
with our example, multiply the angular field .9° by 52.5. This produces a linear field width of 47 feet at a distance of one<br />
thousand yards. The apparent field of each eyepiece that <strong>Celestron</strong> manufactures is found in the <strong>Celestron</strong> Accessory Catalog<br />
(#93685).<br />
General Observing Hints<br />
When working with any optical instrument, there are a few things to remember to ensure you get the best possible image.<br />
• Never look through window glass. Glass found in household windows is optically imperfect, and as a result, may vary in<br />
thickness from one part of a window to the next. This inconsistency can and will affect the ability to focus your telescope.<br />
In most cases you will not be able to achieve a truly sharp image, while in some cases, you may actually see a double image.<br />
• Never look across or over objects that are producing heat waves. This includes asphalt parking lots on hot summer days or<br />
building rooftops.<br />
• Hazy skies, fog, and mist can also make it difficult to focus when viewing terrestrially. The amount of detail seen under<br />
these conditions is greatly reduced. Also, when photographing under these conditions, the processed film may come out a<br />
little grainier than normal with lower contrast and underexposed.<br />
• If you wear corrective lenses (specifically glasses), you may want to remove them when observing with an eyepiece<br />
attached to the telescope. When using a camera, however, you should always wear corrective lenses to ensure the sharpest<br />
possible focus. If you have astigmatism, corrective lenses must be worn at all times.<br />
32
Up to this point, this manual covered the assembly and basic operation of your telescope. However, to understand your<br />
telescope more thoroughly, you need to know a little about the night sky. This section deals with observational<br />
astronomy in general and includes information on the night sky and polar alignment.<br />
The Celestial Coordinate System<br />
To help find objects in the sky, astronomers use a celestial coordinate system that is similar to our geographical<br />
coordinate system here on Earth. The celestial coordinate system has poles, lines of longitude and latitude, and an<br />
equator. For the most part, these remain fixed against the background stars.<br />
The celestial equator runs 360 degrees around the Earth and separates the northern celestial hemisphere from the<br />
southern. Like the Earth's equator, it bears a reading of zero degrees. On Earth this would be latitude. However, in the<br />
sky this is referred to as declination, or DEC for short. Lines of declination are named for their angular distance above<br />
and below the celestial equator. The lines are broken down into degrees, minutes of arc, and seconds of arc.<br />
Declination readings south of the equator carry a minus sign (-) in front of the coordinate and those north of the<br />
celestial equator are either blank (i.e., no designation) or preceded by a plus sign (+).<br />
The celestial equivalent of longitude is called Right Ascension, or R.A. for short. Like the Earth's lines of longitude,<br />
they run from pole to pole and are evenly spaced 15 degrees apart. Although the longitude lines are separated by an<br />
angular distance, they are also a measure of time. Each line of longitude is one hour apart from the next. Since the<br />
Earth rotates once every 24 hours, there are 24 lines total. As a result, the R.A. coordinates are marked off in units of<br />
time. It begins with an arbitrary point in the constellation of Pisces designated as 0 hours, 0 minutes, 0 seconds. All<br />
other points are designated by how far (i.e., how long) they lag behind this coordinate after it passes overhead moving<br />
toward the west.<br />
Figure 5-1<br />
The celestial sphere seen from the outside showing R.A. and DEC.<br />
33
Motion of the Stars<br />
The daily motion of the Sun across the sky is familiar to even the most casual observer. This daily trek is not the Sun<br />
moving as early astronomers thought, but the result of the Earth's rotation. The Earth's rotation also causes the stars to<br />
do the same, scribing out a large circle as the Earth completes one rotation. The size of the circular path a star follows<br />
depends on where it is in the sky. Stars near the celestial equator form the largest circles rising in the east and setting in<br />
the west. Moving toward the north celestial pole, the point around which the stars in the northern hemisphere appear to<br />
rotate, these circles become smaller. Stars in the mid-celestial latitudes rise in the northeast and set in the northwest.<br />
Stars at high celestial latitudes are always above the horizon, and are said to be circumpolar because they never rise and<br />
never set. You will never see the stars complete one circle because the sunlight during the day washes out the starlight.<br />
However, part of this circular motion of stars in this region of the sky can be seen by setting up a camera on a tripod<br />
and opening the shutter for a couple hours. The processed film will reveal semicircles that revolve around the pole.<br />
(This description of stellar motions also applies to the southern hemisphere except all stars south of the celestial equator<br />
move around the south celestial pole.)<br />
Figure 5-2<br />
All stars appear to rotate around the celestial poles. However, the appearance of this motion<br />
varies depending on where you are looking in the sky. Near the north celestial pole the stars<br />
scribe out recognizable circles centered on the pole (1). Stars near the celestial equator also<br />
follow circular paths around the pole. But, the complete path is interrupted by the horizon.<br />
These appear to rise in the east and set in the west (2). Looking toward the opposite pole, stars<br />
curve or arc in the opposite direction scribing a circle around the opposite pole (3).<br />
34
Latitude Scales<br />
The easiest way to polar align a telescope is with a latitude scale. Unlike other methods that require you to<br />
find the celestial pole by identifying certain stars near it, this method works off of a known constant to<br />
determine how high the polar axis should be pointed. The Advanced Series mount can be adjusted from 30<br />
to 60 degrees (see figure 5-3).<br />
35<br />
The constant, mentioned above, is a relationship<br />
between your latitude and the angular distance the<br />
celestial pole is above the northern (or southern)<br />
horizon; The angular distance from the northern<br />
horizon to the north celestial pole is always equal<br />
to your latitude. To illustrate this, imagine that<br />
you are standing on the north pole, latitude +90°.<br />
The north celestial pole, which has a declination<br />
of +90°, would be directly overhead (i.e., 90<br />
above the horizon). Now, let’s say that you move<br />
one degree south — your latitude is now +89° and<br />
the celestial pole is no longer directly overhead.<br />
It has moved one degree closer toward the<br />
northern horizon. This means the pole is now 89°<br />
above the northern horizon. If you move one degree further south, the same thing happens again. You<br />
would have to travel 70 miles north or south to change your latitude by one degree. As you can see from<br />
this example, the distance from the northern horizon to the celestial pole is always equal to your latitude.<br />
If you are observing from Los Angeles, which has a latitude of 34°, then the celestial pole is 34° above the<br />
northern horizon. All a latitude scale does then is to point the polar axis of the telescope at the right<br />
elevation above the northern (or southern) horizon. To align your telescope:<br />
1. Make sure the polar axis of the mount is pointing due north. Use a landmark that you know faces north.<br />
2. Level the tripod. There is a bubble level built into the mount for this purpose.<br />
NOTE: Leveling the tripod is only necessary if using this method of polar alignment. Perfect polar<br />
alignment is still possible using other methods described later in this manual without leveling the tripod.<br />
3. Adjust the mount in altitude until the latitude indicator points to your latitude. Moving the mount affects<br />
the angle the polar axis is pointing. For specific information on adjusting the equatorial mount, please see<br />
the section “Adjusting the Mount.”<br />
This method can be done in daylight, thus eliminating the need to fumble around in the dark. Although this<br />
method does NOT put you directly on the pole, it will limit the number of corrections you will make when<br />
tracking an object. It will also be accurate enough for short exposure prime focus planetary photography (a<br />
couple of seconds) and short exposure piggyback astrophotography (a couple of minutes).<br />
Pointing at Polaris<br />
Figure 5-3<br />
Latitude<br />
Scale<br />
This method utilizes Polaris as a guidepost to the celestial pole. Since Polaris is less than a degree from the<br />
celestial pole, you can simply point the polar axis of your telescope at Polaris. Although this is by no<br />
means perfect alignment, it does get you within one degree. Unlike the previous method, this must be done<br />
in the dark when Polaris is visible.<br />
1. Set the telescope up so that the polar axis is pointing north.<br />
2. Loosen the DEC clutch knob and move the telescope so that the tube is parallel to the polar axis. When<br />
this is done, the declination setting circle will read +90°. If the declination setting circle is not aligned,<br />
move the telescope so that the tube is parallel to the polar axis.<br />
3. Adjust the mount in altitude and/or azimuth until Polaris is in the field of view of the finder.
4. Center Polaris in the field of the telescope using the fine adjustment controls on the mount.<br />
Remember, while Polar aligning, do NOT move the telescope in R.A. or DEC. You do not want to<br />
move the telescope itself, but the polar axis. The telescope is used simply to see where the polar axis<br />
is pointing.<br />
Like the previous method, this gets you close to the pole but not directly on it. The following methods help<br />
improve your accuracy for more serious observations and photography.<br />
Finding the North Celestial Pole<br />
In each hemisphere, there is a point in the sky around which all the other stars appear to rotate. These points are called<br />
the celestial poles and are named for the hemisphere in which they reside. For example, in the northern hemisphere all<br />
stars move around the north celestial pole. When the telescope's polar axis is pointed at the celestial pole, it is parallel<br />
to the Earth's rotational axis.<br />
Many methods of polar alignment require that you know how to find the celestial pole by<br />
identifying stars in the area. For those in the northern hemisphere, finding the celestial pole is<br />
not too difficult. Fortunately, we have a naked eye star less than a degree away. This star,<br />
Polaris, is the end star in the handle of the Little Dipper. Since the Little Dipper (technically<br />
called Ursa Minor) is not one of the brightest constellations in the sky, it may be difficult to<br />
locate from urban areas. If this is the case, use the two end stars in the bowl of the Big Dipper<br />
(the pointer stars). Draw an imaginary line through them toward the Little Dipper. They point<br />
to Polaris (see Figure 5-5). The position of the Big Dipper changes during the year and<br />
throughout the course of the night (see Figure 5-4). When the Big Dipper is low in the sky (i.e.,<br />
near the horizon), it may be difficult to locate. During these times, look for Cassiopeia (see<br />
Figure 5-5). Observers in the southern hemisphere are not as fortunate as those in the northern<br />
hemisphere. The stars around the south celestial pole are not nearly as bright as those around<br />
the north. The closest star that is relatively bright is Sigma Octantis. This star is just within<br />
naked eye limit (magnitude 5.5) and lies about 59 arc minutes from the pole.<br />
Definition Figure 5-4 The position of the<br />
The north celestial pole is the point in the northern hemisphere around which all stars<br />
appear to rotate. The counterpart in the southern hemisphere is referred to as the<br />
south celestial pole.<br />
Figure 5-5<br />
The two stars in the front of the bowl of the Big Dipper point to Polaris which is less<br />
than one degree from the true (north) celestial pole. Cassiopeia, the “W” shaped<br />
constellation, is on the opposite side of the pole from the Big Dipper. The North<br />
Celestial Pole (N.C.P.) is marked by the “+” sign.<br />
36<br />
Big Dipper changes<br />
throughout the year and the<br />
night.
Declination Drift Method of Polar Alignment<br />
This method of polar alignment allows you to get the most accurate alignment on the celestial pole and is<br />
required if you want to do long exposure deep-sky astrophotography through the telescope. The<br />
declination drift method requires that you monitor the drift of selected stars. The drift of each star tells you<br />
how far away the polar axis is pointing from the true celestial pole and in what direction. Although<br />
declination drift is simple and straight-forward, it requires a great deal of time and patience to complete<br />
when first attempted. The declination drift method should be done after any one of the previously<br />
mentioned methods has been completed.<br />
To perform the declination drift method you need to choose two bright stars. One should be near the<br />
eastern horizon and one due south near the meridian. Both stars should be near the celestial equator (i.e., 0°<br />
declination). You will monitor the drift of each star one at a time and in declination only. While<br />
monitoring a star on the meridian, any misalignment in the east-west direction is revealed. While<br />
monitoring a star near the east/west horizon, any misalignment in the north-south direction is revealed. It is<br />
helpful to have an illuminated reticle eyepiece to help you recognize any drift. For very close alignment, a<br />
Barlow lens is also recommended since it increases the magnification and reveals any drift faster. When<br />
looking due south, insert the diagonal so the eyepiece points straight up. Insert the cross hair eyepiece and<br />
align the cross hairs so that one is parallel to the declination axis and the other is parallel to the right<br />
ascension axis. Move your telescope manually in R.A. and DEC to check parallelism.<br />
First, choose your star near where the celestial equator and the meridian meet. The star should be<br />
approximately within 1/2 an hour of the meridian and within five degrees of the celestial equator. Center<br />
the star in the field of your telescope and monitor the drift in declination.<br />
• If the star drifts south, the polar axis is too far east.<br />
• If the star drifts north, the polar axis is too far west.<br />
Make the appropriate adjustments to the polar axis to eliminate any drift. Once you have eliminated all the<br />
drift, move to the star near the eastern horizon. The star should be 20 degrees above the horizon and within<br />
five degrees of the celestial equator.<br />
• If the star drifts south, the polar axis is too low.<br />
• If the star drifts north, the polar axis is too high.<br />
Again, make the appropriate adjustments to the polar axis to eliminate any drift. Unfortunately, the latter<br />
adjustments interact with the prior adjustments ever so slightly. So, repeat the process again to improve the<br />
accuracy checking both axes for minimal drift. Once the drift has been eliminated, the telescope is very<br />
accurately aligned. You can now do prime focus deep-sky astrophotography for long periods.<br />
NOTE: If the eastern horizon is blocked, you may choose a star near the western horizon, but you must<br />
reverse the polar high/low error directions. Also, if using this method in the southern hemisphere,<br />
the direction of drift is reversed for both R.A. and DEC.<br />
37
With your telescope set up, you are ready to use it for observing. This section covers visual observing hints for both<br />
solar system and deep sky objects as well as general observing conditions which will affect your ability to observe.<br />
Observing the Moon<br />
Lunar Observing Hints<br />
Often, it is tempting to look at the Moon when it is full. At this time,<br />
the face we see is fully illuminated and its light can be overpowering.<br />
In addition, little or no contrast can be seen during this phase.<br />
One of the best times to observe the Moon is during its partial phases<br />
(around the time of first or third quarter). Long shadows reveal a great<br />
amount of detail on the lunar surface. At low power you will be able to<br />
see most of the lunar disk at one time. The optional Reducer/Corrector<br />
lens allows for breath-taking views of the entire lunar disk when used<br />
with a low power eyepiece. Change to higher power (magnification) to<br />
focus in on a smaller area. Choose the lunar tracking rate from the<br />
hand control's MENU tracking rate options to keep the moon centered<br />
in the eyepiece even at high magnifications.<br />
To increase contrast and bring out detail on the lunar surface, use filters. A yellow filter works well at improving<br />
contrast while a neutral density or polarizing filter will reduce overall surface brightness and glare.<br />
Observing the Planets<br />
Other fascinating targets include the five naked eye planets. You can<br />
see Venus go through its lunar-like phases. Mars can reveal a host of<br />
surface detail and one, if not both, of its polar caps. You will be able to<br />
see the cloud belts of Jupiter and the great Red Spot (if it is visible at<br />
the time you are observing). In addition, you will also be able to see the<br />
moons of Jupiter as they orbit the giant planet. Saturn, with its beautiful<br />
rings, is easily visible at moderate power.<br />
Planetary Observing Hints<br />
• Remember that atmospheric conditions are usually the<br />
limiting factor on how much planetary detail will be visible.<br />
So, avoid observing the planets when they are low on the<br />
horizon or when they are directly over a source of radiating<br />
heat, such as a rooftop or chimney. See the "Seeing Conditions" section later in this section.<br />
• To increase contrast and bring out detail on the planetary surface, try using <strong>Celestron</strong> eyepiece filters.<br />
Observing the Sun<br />
Although overlooked by many amateur astronomers, solar observation is both rewarding and fun. However, because<br />
the Sun is so bright, special precautions must be taken when observing our star so as not to damage your eyes or your<br />
telescope.<br />
38
Never project an image of the Sun through the telescope. Because of the folded optical design, tremendous heat buildup<br />
will result inside the optical tube. This can damage the telescope and/or any accessories attached to the telescope.<br />
For safe solar viewing, use a solar filter that reduces the intensity of the Sun's light, making it safe to view. With a<br />
filter you can see sunspots as they move across the solar disk and faculae, which are bright patches seen near the Sun's<br />
edge.<br />
Solar Observing Hints<br />
• The best time to observe the Sun is in the early morning or late afternoon when the air is cooler.<br />
• To center the Sun without looking into the eyepiece, watch the shadow of the telescope tube until it forms a<br />
circular shadow.<br />
• To ensure accurate tracking, be sure to select the solar tracking rate.<br />
Observing Deep Sky Objects<br />
Deep-sky objects are simply those objects outside the boundaries of our solar system. They include star clusters,<br />
planetary nebulae, diffuse nebulae, double stars and other galaxies outside our own Milky Way. Most deep-sky objects<br />
have a large angular size. Therefore, low-to-moderate power is all you need to see them. Visually, they are too faint to<br />
reveal any of the color seen in long exposure photographs. Instead, they appear black and white. And, because of their<br />
low surface brightness, they should be observed from a dark-sky location. Light pollution around large urban areas<br />
washes out most nebulae making them difficult, if not impossible, to observe. Light Pollution Reduction filters help<br />
reduce the background sky brightness, thus increasing contrast.<br />
Seeing Conditions<br />
Viewing conditions affect what you can see through your telescope during an observing session. Conditions include<br />
transparency, sky illumination, and seeing. Understanding viewing conditions and the effect they have on observing<br />
will help you get the most out of your telescope.<br />
Transparency<br />
Transparency is the clarity of the atmosphere which is affected by clouds, moisture, and other airborne particles. Thick<br />
cumulus clouds are completely opaque while cirrus can be thin, allowing the light from the brightest stars through.<br />
Hazy skies absorb more light than clear skies making fainter objects harder to see and reducing contrast on brighter<br />
objects. Aerosols ejected into the upper atmosphere from volcanic eruptions also affect transparency. Ideal conditions<br />
are when the night sky is inky black.<br />
Sky Illumination<br />
General sky brightening caused by the Moon, aurorae, natural airglow, and light pollution greatly affect transparency.<br />
While not a problem for the brighter stars and planets, bright skies reduce the contrast of extended nebulae making<br />
them difficult, if not impossible, to see. To maximize your observing, limit deep sky viewing to moonless nights far<br />
from the light polluted skies found around major urban areas. LPR filters enhance deep sky viewing from light<br />
polluted areas by blocking unwanted light while transmitting light from certain deep sky objects. You can, on the other<br />
hand, observe planets and stars from light polluted areas or when the Moon is out.<br />
Seeing<br />
Seeing conditions refers to the stability of the atmosphere and directly affects the amount of fine detail seen in extended<br />
objects. The air in our atmosphere acts as a lens which bends and distorts incoming light rays. The amount of bending<br />
depends on air density. Varying temperature layers have different densities and, therefore, bend light differently. Light<br />
39
ays from the same object arrive slightly displaced creating an imperfect or smeared image. These atmospheric<br />
disturbances vary from time-to-time and place-to-place. The size of the air parcels compared to your aperture<br />
determines the "seeing" quality. Under good seeing conditions, fine detail is visible on the brighter planets like Jupiter<br />
and Mars, and stars are pinpoint images. Under poor seeing conditions, images are blurred and stars appear as blobs.<br />
The conditions described here apply to both visual and photographic observations.<br />
Figure 6-1<br />
Seeing conditions directly affect image quality. These drawings represent a<br />
point source (i.e., star) under bad seeing conditions (left) to excellent conditions<br />
(right). Most often, seeing conditions produce images that lie some where<br />
between these two extremes.<br />
40
After looking at the night sky for a while you may want to try photographing it. Several forms of celestial<br />
photography are possible with your telescope, including short exposure prime focus, eyepiece projection,<br />
long exposure deep sky, terrestrial and even CCD imaging. Each of these is discussed in moderate detail<br />
with enough information to get you started. Topics include the accessories required and some simple<br />
techniques. More information is available in some of the publications listed at the end of this manual.<br />
In addition to the specific accessories required for each type of celestial photography, there is the need for a camera -<br />
but not just any camera. The camera does not have to have many of the features offered on today's state-of-the-art<br />
equipment. For example, you don't need auto focus capability or mirror lock up. Here are the mandatory features a<br />
camera needs for celestial photography. First, a “B” setting which allows for time exposures. This excludes point and<br />
shoot cameras and limits the selection to SLR cameras, the most common type of 35mm camera on the market today.<br />
Second, the “B” or manual setting should NOT run off the battery. Many new electronic cameras use the battery to<br />
keep the shutter open during time exposures. Once the batteries are drained, usually after a few minutes, the shutter<br />
closes, whether you were finished with the exposure or not. Look for a camera that has a manual shutter when<br />
operating in the time exposure mode. Olympus, Nikon, Minolta, Pentax, Canon and others have made such camera<br />
bodies.<br />
The camera must have interchangeable lenses so you can attach it to the telescope and so you can use a variety of<br />
lenses for piggyback photography. If you can't find a new camera, you can purchase a used camera body that is not<br />
100-percent functional. The light meter, for example, does not have to be operational since you will be determining the<br />
exposure length manually.<br />
You also need a cable release with a locking function to hold the shutter open while you do other things. Mechanical<br />
and air release models are available.<br />
Short Exposure Prime Focus Photography<br />
Short exposure prime focus photography is the best way to begin recording celestial objects. It is done with the camera<br />
attached to the telescope without an eyepiece or camera lens in place. To attach your camera you need the <strong>Celestron</strong> T-<br />
Adapter (#93633-A) and a T-Ring for your specific camera (i.e., Minolta, Nikon, Pentax, etc.). The T-Ring replaces<br />
the 35mm SLR camera's normal lens. Prime focus photography allows you to capture the majority of the lunar disk or<br />
solar disk. To attach your camera to your telescope.<br />
1. Remove all visual accessories.<br />
2. Thread the T-Ring onto the T-Adapter.<br />
3. Mount your camera body onto the T-Ring the same as you would any other lens.<br />
4. Thread the T-Adapter onto the back of the telescope while holding the camera in the desired orientation (either<br />
vertical or horizontal).<br />
With your camera attached to the telescope, you are ready for prime focus photography. Start with an easy object like<br />
the Moon. Here's how to do it:<br />
1. Load your camera with film that has a moderate-to-fast speed (i.e., ISO rating). Faster films are more desirable<br />
when the Moon is a crescent. When the Moon is near full, and at its brightest, slower films are more desirable.<br />
Here are some film recommendations:<br />
• T-Max 100<br />
41
• T-Max 400<br />
• Any 100 to 400 ISO color slide film<br />
• Fuji Super HG 400<br />
• Ektar 25 or 100<br />
2. Center the Moon in the field of your telescope.<br />
3. Focus the telescope by turning the focus knob until the image is sharp.<br />
4. Set the shutter speed to the appropriate setting (see table below).<br />
5. Trip the shutter using a cable release.<br />
6. Advance the film and repeat the process.<br />
Lunar Phase ISO 50 ISO 100 ISO 200 ISO 400<br />
Crescent 1/2 1/4 1/8 1/15<br />
Quarter 1/15 1/30 1/60 1/125<br />
Full 1/30 1/60 1/125 1/250<br />
The exposure times listed in table 7-1 should be used as a starting point. Always make exposures that are longer and<br />
shorter than the recommended time. Also, take a few photos at each shutter speed. This will ensure that you will get a<br />
good photo.<br />
• If using black and white film, try a yellow filter to reduce the light intensity and to increase contrast.<br />
• Keep accurate records of your exposures. This information is useful if you want to repeat your results or<br />
if you want to submit some of your photos to various astronomy magazines for possible publication!<br />
• This technique is also used for photographing the Sun with the proper solar filter.<br />
Eyepiece Projection<br />
Table 7-1<br />
Above is a listing of recommended exposure times when photographing the Moon at the<br />
prime focus of your telescope.<br />
This form of celestial photography is designed for objects with small angular sizes, primarily the Moon and planets.<br />
Planets, although physically quite large, appear small in angular size because of their great distances. Moderate to high<br />
magnification is, therefore, required to make the image large enough to see any detail. Unfortunately, the<br />
camera/telescope combination alone does not provide enough magnification to produce a usable image size on film. In<br />
order to get the image large enough, you must attach your camera to the telescope with the eyepiece in place. To do so,<br />
you need two additional accessories; a deluxe tele-extender (#93643), which attaches to the visual back, and a T-ring<br />
for your particular camera make (i.e., Minolta, Nikon, Pentax, etc.).<br />
Because of the high magnifications during eyepiece projection, the field of view<br />
is quite small which makes it difficult to find and center objects. To make the<br />
job a little easier, align the finder as accurately as possible. This allows you to<br />
get the object in the telescope's field based on the finder's view alone.<br />
Another problem introduced by the high magnification is vibration. Simply<br />
tripping the shutter ⎯ even with a cable release ⎯ produces enough vibration to<br />
smear the image. To get around this, use the camera's self-timer if the exposure<br />
time is less than one second ⎯ a common occurrence when photographing the<br />
Moon. For exposures over one second, use the "hat trick." This technique<br />
incorporates a hand-held black card placed over the aperture of the telescope to<br />
42<br />
Figure 7-1 - Accessories for<br />
Projection Photography
act as a shutter. The card prevents light from entering the telescope while the shutter is released. Once the shutter has<br />
been released and the vibration has diminished (a few seconds), move the black card out of the way to expose the film.<br />
After the exposure is complete, place the card over the front of the telescope and close the shutter. Advance the film<br />
and you're ready for your next shot. Keep in mind that the card should be held a few inches in front of the telescope,<br />
and not touching it. It is easier if you use two people for this process; one to release the camera shutter and one to hold<br />
the card. Here's the process for making the exposure.<br />
1. Find and center the desired target in the viewfinder of your camera.<br />
2. Turn the focus knob until the image is as sharp as possible.<br />
3. Place the black card over the front of the telescope.<br />
4. Release the shutter using a cable release.<br />
5. Wait for the vibration caused by releasing the shutter to diminish. Also, wait for a moment of good seeing.<br />
6. Remove the black card from in front of the telescope for the duration of the exposure (see accompanying table).<br />
7. Replace the black card over the front of the telescope.<br />
8. Close the camera's shutter.<br />
Advance the film and you are ready for your next exposure. Don't forget to take photos of varying duration and keep<br />
accurate records of what you have done. Record the date, telescope, exposure duration, eyepiece, f/ratio, film, and<br />
some comments on the seeing conditions.<br />
The following table lists exposures for eyepiece projection with a 10mm eyepiece. All exposure times are listed in<br />
seconds or fractions of a second.<br />
Planet ISO 50 ISO 100 ISO 200 ISO 400<br />
Moon 4 2 1 1/2<br />
Mercury 16 8 4 2<br />
Venus 1/2 1/4 1/8 1/15<br />
Mars 16 8 4 2<br />
Jupiter 8 4 2 1<br />
Saturn 16 8 4 2<br />
The exposure times listed here should be used as a starting point. Always make exposures that are longer and shorter<br />
than the recommended time. Also, take a few photos at each shutter speed. This will ensure that you get a good photo.<br />
It is not uncommon to go through an entire roll of 36 exposures and have only one good shot.<br />
NOTE: Don't expect to record more detail than you can see visually in the eyepiece at the time you are photographing.<br />
Once you have mastered the technique, experiment with different films, different focal length eyepieces, and even<br />
different filters.<br />
Long Exposure Prime Focus Photography<br />
Table 7-2<br />
Recommended exposure time for photographing planets.<br />
This is the last form of celestial photography to be attempted after others have been mastered. It is intended primarily<br />
for deep sky objects, that is objects outside our solar system which includes star clusters, nebulae, and galaxies. While<br />
it may seem that high magnification is required for these objects, just the opposite is true. Most of these objects cover<br />
large angular areas and fit nicely into the prime focus field of your telescope. The brightness of these objects, however,<br />
requires long exposure times and, as a result, are rather difficult.<br />
43
There are several techniques for this type of photography, and the one chosen will determine the standard accessories<br />
needed. The best method for long exposure deep sky astrophotography is with an off-axis guider. This device allows<br />
you to photograph and guide through the telescope simultaneously. <strong>Celestron</strong> offers a very special and advanced offaxis<br />
guider, called the Radial Guider (#94176). In addition, you will need a T-Ring to attach your camera to the Radial<br />
Guider.<br />
Other equipment needs include a guiding eyepiece. Unlike other forms of astrophotography which allows for fairly<br />
loose guiding, prime focus requires meticulous guiding for long periods. To accomplish this you need a guiding ocular<br />
with an illuminated reticle to monitor your guide star. For this purpose, <strong>Celestron</strong> offers the Micro Guide Eyepiece<br />
(#94171) Here is a brief summary of the technique.<br />
1. Polar align the telescope. For more information on polar aligning, see the Polar Alignment section earlier in the<br />
manual.<br />
2. Remove all visual accessories.<br />
3. Thread the Radial Guider onto your telescope.<br />
4. Thread the T-Ring onto the Radial Guider.<br />
5. Mount your camera body onto the T-Ring the same as you would any other lens.<br />
6. Set the shutter speed to the "B" setting.<br />
7. Focus the telescope on a star.<br />
8. Center your subject in the field of your camera.<br />
9. Find a suitable guide star in the telescope field. This can be the most time consuming process.<br />
10. Open the shutter using a cable release.<br />
11. Monitor your guide star for the duration of the exposure using the buttons on the hand controller to make the<br />
needed corrections.<br />
12. Close the camera's shutter.<br />
When getting started, use fast films to record as much detail in the shortest possible time. Here are proven<br />
recommendations:<br />
• Ektar 1000 (color print)<br />
• Konica 3200 (color print)<br />
• Fujichrome 1600D (color slide)<br />
• 3M 1000 (color slide)<br />
• Scotchchrome 400<br />
• T-Max 3200 (black and white print)<br />
• T-Max 400 (black and white print)<br />
As you perfect your technique, try specialized films, that is films that are designed or specially treated for celestial<br />
photography. Here are some popular choices:<br />
• Ektar 125 (color print)<br />
• Fujichrome 100D (color slide)<br />
• Tech Pan, gas hypered (black and white print)<br />
• T-Max 400 (black and white print)<br />
44
There is no exposure determination table to help you get started. The best way to determine exposure length is look at<br />
previously published photos to see what film/exposure combinations were used. Or take unguided sample photos of<br />
various parts of the sky while the drive is running. Always take exposures of various lengths to determine the best<br />
exposure time.<br />
Terrestrial Photography<br />
Your telescope makes an excellent telephoto lens for terrestrial (land) photography. Terrestrial photography is best<br />
done will the telescope in Alt-Az configuration and the tracking drive turned off. To turn the tracking drive off, press<br />
the MENU (9) button on the hand control and scroll down to the Tracking Mode sub menu. Use the Up and Down<br />
scroll keys (10) to select the Off option and press ENTER. This will turn the tracking motors off, so that objects will<br />
remain in your camera's field of view.<br />
Metering<br />
The Advanced Series telescope has a fixed aperture and, as a result, fixed f/ratios. To properly expose your subjects<br />
photographically, you need to set your shutter speed accordingly. Most 35mm SLR cameras offer through-the-lens<br />
metering which lets you know if your picture is under or overexposed. Adjustments for proper exposures are made by<br />
changing the shutter speed. Consult your camera manual for specific information on metering and changing shutter<br />
speeds.<br />
Reducing Vibration<br />
Releasing the shutter manually can cause vibrations, producing blurred photos. To reduce vibration when tripping the<br />
shutter, use a cable release. A cable release keeps your hands clear of the camera and lens, thus eliminating the<br />
possibility of introducing vibration. Mechanical shutter releases can be used, though air-type releases are best.<br />
Blurry pictures can also result from shutter speeds that are too slow. To prevent this, use films that produce shutter<br />
speeds greater than 1/250 of a second when hand-holding the lens. If the lens is mounted on a tripod, the exposure<br />
length is virtually unlimited.<br />
Another way to reduce vibration is with the Vibration Suppression Pads (#93503). These pads rest between the<br />
ground and tripod feet. They reduce the vibration amplitude and vibration time.<br />
CCD Imaging<br />
Advanced GT telescope's versatility allows it to be used in many different f-number configurations for<br />
CCD imaging. It can be used at f/6.3 (with the optional Reducer/Corrector), f/10, and f/20 (with the<br />
optional 2x Barlow) making it the most versatile imaging system available today. This makes the system<br />
ideal for imaging deep-sky objects as well as planetary detail.<br />
The key factors for good CCD imaging are; exposure time, field-of-view, image size, and pixel resolution.<br />
As the F/# goes down (or gets faster), the exposure times needed decreases, the field-of-view-increases, but<br />
the image scale of the object gets smaller. What is the difference between f/6.3 and f/10? F/6.3 has about<br />
2/3 the focal length of f/10. That makes the exposure time needed about 2.5 times shorter than at f/10, the<br />
field of view 50% larger compared to that of f/10. (see Table below)<br />
45
Auto Guiding<br />
Focal<br />
Length &<br />
Speed<br />
Telescope<br />
Model<br />
Standard<br />
Cassegrain f/10<br />
46<br />
With<br />
Reducer/Corrector<br />
f/6.3<br />
C5-S 49" (1250mm) 31" (788mm)<br />
C8-S 80" (2032mm) 50.4" (1280mm)<br />
<strong>C9.25</strong>-S 93" (2350mm) 58" (1481mm)<br />
C5-S 13 x 10 (arc<br />
min)<br />
20.5 x 15.7 (arc min)<br />
ST 237<br />
F.O.V.*<br />
C8-S 8 x 6.1 (arc<br />
min)<br />
12.6 x 9.7 (arc min)<br />
<strong>C9.25</strong>-S 6.9 x 5.3 (arc<br />
min)<br />
11 x 8.4 (arc min)<br />
* Field of view calculated using SBIG ST 237 CCD camera with 4.7mm x 3.6mm<br />
chip.<br />
Table 7-3<br />
The Advanced GT telescope has a designated auto guiding port for use with a CCD autoguider. The<br />
diagram below may be useful when connecting the CCD camera cable to the telescope and calibrating the<br />
autoguider. Note that the four outputs are active-low, with internal pull-ups and are capable of sinking 25<br />
mA DC.
While your telescope requires little maintenance, there are a few things to remember that will ensure your telescope performs at<br />
its best.<br />
Care and Cleaning of the Optics<br />
Occasionally, dust and/or moisture may build up on the corrector plate of your telescope. Special care should be taken when<br />
cleaning any instrument so as not to damage the optics.<br />
If dust has built up on the corrector plate, remove it with a brush (made of camel’s hair) or a can of pressurized air. Spray at an<br />
angle to the lens for approximately two to four seconds. Then, use an optical cleaning solution and white tissue paper to remove<br />
any remaining debris. Apply the solution to the tissue and then apply the tissue paper to the lens. Low pressure strokes should<br />
go from the center of the corrector to the outer portion. Do NOT rub in circles!<br />
You can use a commercially made lens cleaner or mix your own. A good cleaning solution is isopropyl alcohol mixed with<br />
distilled water. The solution should be 60% isopropyl alcohol and 40% distilled water. Or, liquid dish soap diluted with water (a<br />
couple of drops per one quart of water) can be used.<br />
Occasionally, you may experience dew build-up on the corrector plate of your telescope during an observing session. If you want<br />
to continue observing, the dew must be removed, either with a hair dryer (on low setting) or by pointing the telescope at the<br />
ground until the dew has evaporated.<br />
If moisture condenses on the inside of the corrector, remove the accessories from the rear cell of the telescope. Place the<br />
telescope in a dust-free environment and point it down. This will remove the moisture from the telescope tube.<br />
To minimize the need to clean your telescope, replace all lens covers once you have finished using it. Since the rear cell is NOT<br />
sealed, the cover should be placed over the opening when not in use. This will prevent contaminants from entering the optical<br />
tube.<br />
Internal adjustments and cleaning should be done only by the <strong>Celestron</strong> repair department. If your telescope is in need of internal<br />
cleaning, please call the factory for a return authorization number and price quote.<br />
Collimation<br />
The optical performance of your telescope is directly related to its collimation, that is the alignment of its optical system. Your<br />
telescope was collimated at the factory after it was completely assembled. However, if<br />
the telescope is dropped or jarred severely during transport, it may have to be<br />
collimated. The only optical element that may need to be adjusted, or is possible, is the<br />
tilt of the secondary mirror.<br />
Figure 8-1<br />
The three collimation screws are located<br />
on the front of the secondary mirror<br />
housing.<br />
To check the collimation of your telescope you will need a light source. A bright star<br />
near the zenith is ideal since there is a minimal amount of atmospheric distortion. Make<br />
sure that tracking is on so that you won’t have to manually track the star. Or, if you do<br />
not want to power up your telescope, you can use Polaris. Its position relative to the<br />
celestial pole means that it moves very little thus eliminating the need to manually track<br />
it.<br />
Before you begin the collimation process, be sure that your telescope is in thermal<br />
equilibrium with the surroundings. Allow 45 minutes for the telescope to reach<br />
equilibrium if you move it between large temperature extremes.<br />
To verify collimation, view a star near the zenith. Use a medium to high power ocular<br />
— 12mm to 6mm focal length. It is important to center a star in the center of the field to<br />
judge collimation. Slowly cross in and out of focus and judge the symmetry of the star.<br />
If you see a systematic skewing of the star to one side, then re-collimation is needed.<br />
47
Figure 8-2 -- Even though the star pattern appears the same on both sides of focus, they are asymmetric. The<br />
dark obstruction is skewed off to the left side of the diffraction pattern indicating poor collimation.<br />
To accomplish this, you need to tighten the secondary collimation screw(s) that move the star across the field toward the<br />
direction of the skewed light. These screws are located in the secondary mirror holder (see figure 8-1). Make only small 1/6 to<br />
1/8 adjustments to the collimation screws and re-center the star by moving the scope before making any improvements or before<br />
making further adjustments.<br />
To make collimation a simple procedure, follow these easy steps:<br />
1. While looking through a medium to high power eyepiece, de-focus a bright star until a ring pattern with a dark shadow<br />
appears (see figure 8-2). Center the de-focused star and notice in which direction the central shadow is skewed.<br />
2. Place your finger along the edge of the front cell of the telescope (be careful not to touch the corrector plate), pointing<br />
towards the collimation screws. The shadow of your finger should be visible when looking into the eyepiece. Rotate<br />
your finger around the tube edge until its shadow is seen closest to the narrowest portion of the rings (i.e. the same<br />
direction in which the central shadow is skewed).<br />
3. Locate the collimation screw closest to where your finger is positioned. This will be the collimation screw you will<br />
need to adjust first. (If your finger is positioned exactly between two of the collimation screws, then you will need to<br />
adjust the screw opposite where your finger is located).<br />
4. Use the hand control buttons to move the de-focused star image to the edge of the field of view, in the same direction<br />
that the central obstruction of the star image is skewed.<br />
5. While looking through the eyepiece, use an Allen wrench to turn the collimation screw you located in step 2 and 3.<br />
Usually a tenth of a turn is enough to notice a change in collimation. If the star image moves out of the field of view in<br />
the direction that the central shadow is skewed, than you are turning the collimation<br />
screw the wrong way. Turn the screw in the opposite direction, so that the star image is<br />
moving towards the center of the field of view.<br />
Figure 8-3<br />
A collimated telescope<br />
should appear<br />
symmetrical with the<br />
central obstruction<br />
centered in the star's<br />
diffraction pattern.<br />
6. If while turning you notice that the screws get very loose, then simply tighten the other<br />
two screws by the same amount. Conversely, if the collimation screw gets too tight,<br />
then loosen the other two screws by the same amount.<br />
7. Once the star image is in the center of the field of view, check to see if the rings are<br />
concentric. If the central obstruction is still skewed in the same direction, then continue<br />
turning the screw(s) in the same direction. If you find that the ring pattern is skewed in<br />
a different direction, than simply repeat steps 2 through 6 as described above for the new<br />
direction.<br />
Perfect collimation will yield a star image very symmetrical just inside and outside of focus. In<br />
addition, perfect collimation delivers the optimal optical performance specifications that your<br />
telescope is built to achieve.<br />
If seeing (i.e., air steadiness) is turbulent, collimation is difficult to judge. Wait until a better night if it is turbulent or aim to a<br />
steadier part of the sky. A steadier part of the sky is judged by steady versus twinkling stars.<br />
48
You will find that additional accessories enhance your viewing pleasure and expand the usefulness of your<br />
telescope. For ease of reference, all the accessories are listed in alphabetical order.<br />
Adapter AC (#18773) - Allow DC (battery powered) telescopes to be converted for use with 120 volt AC power.<br />
Auxiliary Port Accessory (#93965) – This accessory plugs into the auxiliary port of the telescopes control panel to<br />
provide additional ports for accessories like the CN-16 GPS as well as a PC programming port.<br />
Barlow Lens - A Barlow lens is a negative lens that increases the focal length of a telescope. Used with any eyepiece, it<br />
doubles the magnification of that eyepiece. <strong>Celestron</strong> offers two Barlow lens in the 1-1/4" size. The 2x Ultima Barlow<br />
(#93506) is a compact triplet design that is fully multicoated for maximum light transmission and parfocal when used with<br />
the Ultima eyepieces. The OMNI Barlow (#93326) is a compact achromatic Barlow lens that is under three inches long and<br />
weighs only 4 oz. It works very well with all <strong>Celestron</strong> eyepieces.<br />
Erect Image Diagonal (#94112-A) - This accessory is an Amici prism arrangement that allows you to look into the<br />
telescope at a 45° angle with images that are oriented properly (upright and correct from left-to-right). It is useful for<br />
daytime, terrestrial viewing.<br />
Eyepieces - Like telescopes, eyepieces come in a variety of designs. Each design has its own advantages and<br />
disadvantages. For the 1-1/4" barrel diameter there are four different eyepiece designs available.<br />
• OMNI Plössl - Plössl eyepieces have a 4-element lens designed for low-to-high power observing. The Plössls offer<br />
razor sharp views across the entire field, even at the edges! In the 1-1/4" barrel diameter, they are available in the<br />
following focal lengths: 4mm, 6mm, 9mm, 12.5mm, 15mm, 20mm, 25mm, 32mm and<br />
40mm.<br />
• X-Cel - This 6 element design allows each X-Cel Eyepiece to have 20mm of eye relief, 55°<br />
field of view and more than 25mm of lens aperture (even with the 2.3mm). In order to<br />
maintain razor sharp, color corrected images across its 55° field of view, extra-low dispersion<br />
glass is used for the most highly curved optical elements. The excellent refractive properties<br />
of these high grade optical elements, make the X-Cel line especially well suited for high<br />
magnification planetary viewing where sharp, color-free views are most appreciated. X-Cel<br />
eyepiece come in the following focal lengths: 2.3mm, 5mm, 8mm, 10mm, 12.5mm, 18mm,<br />
21mm, 25mm.<br />
Ultima - Ultima is our 5-element, wide field eyepiece design. In the 1-1/4" barrel diameter,<br />
they are available in the following focal lengths: 5mm, 7.5mm, 10mm, 12.5mm, 18mm,<br />
30mm, 35mm, and 42mm. These eyepieces are all parfocal. The 35mm Ultima gives the<br />
widest possible field of view with a 1-1/4" diagonal.<br />
Axiom – As an extension of the Ultima line, a new wide angle series is offered – called the Axiom series. All units are<br />
seven element designs and feature a 70º extra wide field of view (except the 50mm). All are fully multicoated and<br />
contain all the features of the Ultimas.<br />
Filters Sets, Eyepiece - <strong>Celestron</strong> offers four convenient filter sets, which contain four different filters per set. Not only<br />
are these highly useful filter combinations, but they also offer an economical way to add versatility to your filter collection.<br />
Series 1 – #94119-10<br />
Orange, Light Blue, ND13%T, Polarizing (#s 21, 80A, #15, Polarizing)<br />
49
Series 2 – #94119-20<br />
Deep Yellow, Red, Light Green, ND25% T (#s 12, 25, 56, 96ND-25)<br />
Series 3 – #94119-30<br />
Light Red, Blue, Green, ND50% T (#s 23A, 38A, 58, 96ND-50)<br />
Series 4 – #94119-40<br />
Yellow, Deep Yellow, Violet, Pale Blue (#s 8, 47, 82A, ND96-13)<br />
Flashlight, Night Vision - (#93588) - <strong>Celestron</strong>’s premium model for astronomy, using two red LED's to preserve night<br />
vision better than red filters or other devices. Brightness is adjustable. Operates on a single 9 volt battery (included).<br />
CN16 GPS Accessory (#93963) - Plug in this 16-channel GPS module into your telescopes drive base port to link up and<br />
automatically download information from one of many global positioning satellites. Controlled with the computerized hand<br />
control, the CN-16 will greatly improve the accuracy of your star alignments.<br />
CN16 GPS Bracket (#93964) – Support your CN-16 GPS accessory with this bracket and strap combination that securely<br />
wraps around any of the tripod legs and holds the GPS module in place .<br />
Light Pollution Reduction (LPR) Filters - These filters are designed to enhance your views of deep sky astronomical<br />
objects when viewed from urban areas. LPR Filters selectively reduce the transmission of certain wavelengths of light,<br />
specifically those produced by artificial lights. This includes mercury and high and low pressure sodium vapor lights. In<br />
addition, they also block unwanted natural light (sky glow) caused by neutral oxygen emission in our atmosphere. <strong>Celestron</strong><br />
offers a model for 1-1/4" eyepieces (#94126A) and a model that attaches to the rear cell ahead of the star diagonal and visual<br />
back (#94127A).<br />
Micro Guide Eyepiece (#94171) - This multipurpose 12.5mm illuminated reticle can be used for<br />
guiding deep-sky astrophotos, measuring position angles, angular separations, and more. The<br />
laser etched reticle provides razor sharp lines and the variable brightness illuminator is<br />
completely cordless. The micro guide eyepiece produces 163 power with the C8-S and 188<br />
power with the <strong>C9.25</strong>-S.<br />
Moon Filter (#94119-A) - <strong>Celestron</strong>’s Moon Filter is an economical eyepiece filter for reducing<br />
the brightness of the moon and improving contrast, so greater detail can be observed on the lunar<br />
surface. The clear aperture is 21mm and the transmission is about 18%.<br />
Motor Drive, Single Axis (#93518) — This motor drive is a single axis (R.A.), DC motor drive. It is powered by four Dcell<br />
batteries (not included). 2x and 4x sidereal speeds are available through the included hand controller. For noncomputerized<br />
Advanced Series Mounts.<br />
Motor Drive, Dual Axis (#93523) - This dual axis motor drive, with drive corrector capabilities, are designed for<br />
<strong>Celestron</strong>'s Advanced CG-5 mounts. They precisely control the telescope's tracking speed during long, timed exposures of<br />
celestial objects, producing the best possible image sharpness. Four speeds are available—1x (sidereal), 2x for guiding, 4x,<br />
and 8x for centering. These precision, state-of-the-art DC motor drives operate from 4 D-cell batteries (not included). The<br />
hand controller module is very compact and fits easily in the palm of your hand. Motors for both axes are included, along<br />
with brackets, clutches and hardware. For non-computerized Advanced Series Mounts.<br />
Polarizing Filter Set (#93608) - The polarizing filter set limits the transmission of light to a specific plane, thus increasing<br />
contrast between various objects. This is used primarily for terrestrial, lunar and planetary observing.<br />
Polar Axis Finderscope (#94220) – This useful accessory speeds accurate polar alignment by providing a means of<br />
visually aligning your German equatorial mount with Polaris and true north. As a result, you can spend more time observing<br />
and less time setting up. The finderscope has an easy to use cross hair reticle.<br />
PowerTank (#18774) – 12v 7Amp hour rechargeable power supply. Comes with<br />
two 12v output cigarette outlets, built-in red flash light , Halogen emergency<br />
spotlight. Switchable 110v/220v AC adapter and cigarette lighter adapter included.<br />
50
Radial Guider (#94176) - The <strong>Celestron</strong> Radial Guider ® is specifically designed for use<br />
in prime focus, deep sky astrophotography and takes the place of the T-Adapter. This<br />
device allows you to photograph and guide simultaneously through the optical tube<br />
assembly of your telescope. This type of guiding produces the best results since what you<br />
see through the guiding eyepiece is exactly reproduced on the processed film. The Radial<br />
Guider is a “T”-shaped assembly that attaches to the rear cell of the telescope. As light<br />
from the telescope enters the guider, most passes straight through to the camera. A small<br />
portion, however, is diverted by a prism at an adjustable angle up to the guiding eyepiece.<br />
This guider has two features not found on other off-axis guiders; first, the prism and<br />
eyepiece housing rotate independently of the camera orientation making the acquisition of<br />
a guide star quite easy. Second, the prism angle is tunable allowing you to look at guide stars on-axis. This accessory works<br />
especially well with the Reducer/Corrector.<br />
Reducer/Corrector (#94175) - This lens reduces the focal length of the telescope by 37%, making your C8-S a<br />
1280mm f/6.3 instrument. In addition, this unique lens also corrects inherent<br />
aberrations to produce crisp images all the way across the field when used visually. When<br />
used photographically, there is some vignetting that produces a 26mm circular image on<br />
the processed film. It also increases the field of view significantly and is ideal for widefield,<br />
deep-space viewing. It is also perfect for beginning prime focus, long-exposure<br />
astro photography when used with the radial guider. It makes guiding easier and<br />
exposures much shorter.<br />
RS-232 Cable (#93920) – Allows your Advanced Series telescope to be controlled using<br />
a laptop computer or PC. Once connected, the telescope can be controlled using popular<br />
astronomy software programs.<br />
Sky Maps (#93722) - <strong>Celestron</strong> Sky Maps are the ideal teaching guide for learning the night sky. You wouldn’t set off on a<br />
road trip without a road map, and you don’t need to try to navigate the night sky without a map either. Even if you already<br />
know your way around the major constellations, these maps can help you locate all kinds of fascinating objects.<br />
Skylight Filter (#93621) - The Skylight Filter is used on the <strong>Celestron</strong> telescope as a dust seal. The filter threads onto the<br />
rear cell of your telescope. All other accessories, both visual and photographic (with the exception of Barlow lenses), thread<br />
onto the skylight filter. The light loss caused by this filter is minimal.<br />
Solar Filter - The Baader AstroSolar® filter is a safe and durable filter that covers the front opening of the telescope. View<br />
sunspots and other solar features using this double-sided metal coated filter for uniform density and good color balance<br />
across the entire field. The Sun offers constant changes and will keep your observing interesting and fun. <strong>Celestron</strong> offers<br />
filters for the C5-S (#94139) and C8-S (#94162).<br />
T-Adapter (#93633-A) - T-Adapter (with additional T-Ring) allows you to attach your SLR camera to the rear cell of your<br />
<strong>Celestron</strong> telescope. This turns your telescope into a high power telephoto lens perfect for terrestrial photography and<br />
short exposure lunar and filtered solar photography.<br />
T-Ring - The T-Ring couples your 35mm SLR camera body to the T-Adapter, radial guider, or tele-extender. This<br />
accessory is mandatory if you want to do photography through the telescope. Each camera make (i.e., Minolta, Nikon,<br />
Pentax, etc.) has its own unique mount and therefore, its own T-Ring. <strong>Celestron</strong> has 8 different models for 35mm cameras.<br />
Tele-Extender, Deluxe (#93643) - The tele-extender is a hollow tube that allows you to attach a camera to the telescope<br />
when the eyepiece is installed. This accessory is used for eyepiece projection photography which allows you to capture very<br />
high power views of the Sun, Moon, and planets on film. The tele-extender fits over the eyepiece onto the visual back. This<br />
tele-extender works with eyepieces that have large housings, like the <strong>Celestron</strong> Ultima series.<br />
A full description of all <strong>Celestron</strong> accessories can be found in the <strong>Celestron</strong> Accessory Catalog (#93685)<br />
51
Appendix A – Technical Specifications<br />
Advanced Series 11071/11072 11025/11026 11045/11046<br />
C5-S C8-S <strong>C9.25</strong>-S<br />
Specifications:<br />
Optical Design 127mm(5") Schmidt-Cassegrain 203mm (8") Schmidt-Cassegrain 235mm (9.25") Schmidt-Cassegrain<br />
Focal Length 1250mm F/10 2032mm F/10 2350mm F/10<br />
Finderscope 6x30 6x30 6x30<br />
Mount CG-5 Equatorial CG-5 Equatorial CG-5 Equatorial<br />
Eyepiece 25mm Plossl (50x) 25mm Plossl (81x) 25mm Plossl (94x)<br />
Star Diagonal 1.25" 1.25" 1.25"<br />
Accessory tray Yes Yes Yes<br />
Tripod 2" Stainless Steel 2" Stainless Steel 2" Stainless Steel<br />
Technical Specs<br />
Highest Useful Magnication 300x 480x 555x<br />
Lowest Useful Magnification 18x 29x 34x<br />
Limiting Stellar Magnitude 13 14 14.4<br />
Resolution: Rayleigh 1.1arc seconds .68 arc seconds .59 arc seconds<br />
Dawes Limit .91 arc seconds .57 arc seconds .49 arc seconds<br />
Photographic Resolution 200 line/mm 200 line/mm 200 line/mm<br />
Light Gathering Power 329x unaided eye 843x unaided eye 1127x unaided eye<br />
Field of View: standard eyepiece 1º .64º .55º<br />
Linear FOV (@1000 yds) 52.5 ft. 33.6 ft. 29 ft.<br />
Optical Coatings - Standard Starbright Coating Starbright Coating Starbright Coating<br />
Secondary Mirror Obstruction 1.75" 2.7" 3.35"<br />
by Area 12% 11% 13%<br />
by Diameter 35% 34% 36%<br />
Optical tube length 14 inches 17 inches 22 inches<br />
Telescope Weight 48 lbs 54.5 lbs 73 lbs<br />
Advanced GT<br />
Additional Specifications<br />
Hand Control Double line, 16 character Liquid Crystal Display; 19 fiber optic backlit LED buttons<br />
Motor: Type DC Servo motors with encoders, both axes<br />
Max Slew Speed 3º/second<br />
Software Precision 24bit, 0.08 arcsec calculation<br />
Hand Control Ports RS-232 communication port on hand control<br />
Motor Ports Aux Port, Autoguide Ports<br />
Tracking Rates Sidereal, Solar and Lunar<br />
Tracking Modes EQ North & EQ South<br />
Alignment Procedures AutoAlign, 3-Star Alignment, Quick Align, Last Align<br />
40,000+ objects, 400 user defined programmable objects.<br />
Database<br />
Enhanced information on over 200 objects<br />
Complete Revised NGC Catalog 7,840<br />
Complete Messier Catalog 110<br />
Complete IC Catalog 5,386<br />
Complete Caldwell 109<br />
Abell Galaxies 2,712<br />
Solar System objects 9<br />
Famous Asterisms 20<br />
Selected CCD Imaging Objects 25<br />
Selected SAO Stars 29,500<br />
Total Object Database 45,492<br />
52
Appendix B - Glossary of Terms<br />
A-<br />
Absolute magnitude The apparent magnitude that a star would have if it were observed from a standard distance of 10<br />
parsecs, or 32.6 light-years. The absolute magnitude of the Sun is 4.8. at a distance of 10 parsecs, it<br />
would just be visible on Earth on a clear moonless night away from surface light.<br />
Airy disk The apparent size of a star's disk produced even by a perfect optical system. Since the star can never<br />
be focused perfectly, 84 per cent of the light will concentrate into a single disk, and 16 per cent into<br />
a system of surrounding rings.<br />
Alt-Azimuth Mounting A telescope mounting using two independent rotation axis allowing movement of the instrument in<br />
Altitude and Azimuth.<br />
Altitude In astronomy, the altitude of a celestial object is its Angular Distance above or below the celestial<br />
horizon.<br />
Aperture the diameter of a telescope's primary lens or mirror; the larger the aperture, the greater the<br />
telescope's light-gathering power.<br />
Apparent Magnitude A measure of the relative brightness of a star or other celestial object as perceived by an observer on<br />
Earth.<br />
Arcminute A unit of angular size equal to 1/60 of a degree.<br />
Arcsecond A unit of angular size equal to 1/3,600 of a degree (or 1/60 of an arcminute).<br />
Asterism A small unofficial grouping of stars in the night sky.<br />
Asteroid A small, rocky body that orbits a star.<br />
Astrology The pseudoscientific belief that the positions of stars and planets exert an influence on human<br />
affairs; astrology has nothing in common with astronomy.<br />
Astronomical unit (AU) The distance between the Earth and the Sun. It is equal to 149,597,900 km., usually rounded off to<br />
150,000,000 km.<br />
Aurora The emission of light when charged particles from the solar wind slams into and excites atoms and<br />
molecules in a planet's upper atmosphere.<br />
Azimuth The angular distance of an object eastwards along the horizon, measured from due north, between<br />
the astronomical meridian (the vertical line passing through the center of the sky and the north and<br />
south points on the horizon) and the vertical line containing the celestial body whose position is to<br />
be measured. .<br />
B -<br />
Binary Stars Binary (Double) stars are pairs of stars that, because of their mutual gravitational attraction, orbit<br />
around a common Center of Mass. If a group of three or more stars revolve around one another, it<br />
is called a multiple system. It is believed that approximately 50 percent of all stars belong to binary<br />
or multiple systems. Systems with individual components that can be seen separately by a telescope<br />
are called visual binaries or visual multiples. The nearest "star" to our solar system, Alpha Centauri,<br />
is actually our nearest example of a multiple star system, it consists of three stars, two very similar<br />
to our Sun and one dim, small, red star orbiting around one another.<br />
C -<br />
Celestial Equator The projection of the Earth's equator on to the celestial sphere. It divides the sky into two equal<br />
hemispheres.<br />
Celestial pole The imaginary projection of Earth's rotational axis north or south pole onto the celestial sphere.<br />
Celestial Sphere An imaginary sphere surrounding the Earth, concentric with the Earth's center.<br />
Collimation The act of putting a telescope's optics into perfect alignment.<br />
D -<br />
Declination (DEC) The angular distance of a celestial body north or south of the celestial equator. It may be said to<br />
correspond to latitude on the surface of the Earth.<br />
E -<br />
Ecliptic The projection of the Earth's orbit on to the celestial sphere. It may also be defined as "the apparent<br />
yearly path of the Sun against the stars".<br />
Equatorial mount A telescope mounting in which the instrument is set upon an axis which is parallel to the axis of the<br />
Earth; the angle of the axis must be equal to the observer's latitude.<br />
F -<br />
Focal length The distance between a lens (or mirror) and the point at which the image of an object at infinity is<br />
brought to focus. The focal length divided by the aperture of the mirror or lens is termed the focal<br />
ratio.<br />
53
J -<br />
Jovian Planets Any of the four gas giant planets that are at a greater distance form the sun than the terrestrial<br />
planets.<br />
K -<br />
Kuiper Belt A region beyond the orbit of Neptune extending to about 1000 AU which is a source of many short<br />
period comets.<br />
L -<br />
Light-Year (LY) A light-year is the distance light traverses in a vacuum in one year at the speed of 299,792 km/ sec.<br />
With 31,557,600 seconds in a year, the light-year equals a distance of 9.46 X 1 trillion km (5.87 X 1<br />
trillion mi).<br />
M -<br />
Magnitude Magnitude is a measure of the brightness of a celestial body. The brightest stars are assigned<br />
magnitude 1 and those increasingly fainter from 2 down to magnitude 5. The faintest star that can be<br />
seen without a telescope is about magnitude 6. Each magnitude step corresponds to a ratio of 2.5 in<br />
brightness. Thus a star of magnitude 1 is 2.5 times brighter than a star of magnitude 2, and 100 times<br />
brighter than a magnitude 5 star. The brightest star, Sirius, has an apparent magnitude of -1.6, the<br />
full moon is -12.7, and the Sun's brightness, expressed on a magnitude scale, is -26.78. The zero<br />
point of the apparent magnitude scale is arbitrary.<br />
Meridian A reference line in the sky that starts at the North celestial pole and ends at the South celestial pole<br />
and passes through the zenith. If you are facing South, the meridian starts from your Southern<br />
horizon and passes directly overhead to the North celestial pole.<br />
Messier A French astronomer in the late 1700’s who was primarily looking for comets. Comets are hazy<br />
diffuse objects and so Messier cataloged objects that were not comets to help his search. This<br />
catalog became the Messier Catalog, M1 through M110.<br />
N -<br />
Nebula Interstellar cloud of gas and dust. Also refers to any celestial object that has a cloudy appearance.<br />
North Celestial Pole The point in the Northern hemisphere around which all the stars appear to rotate. This is caused by<br />
the fact that the Earth is rotating on an axis that passes through the North and South celestial poles.<br />
The star Polaris lies less than a degree from this point and is therefore referred to as the "Pole Star".<br />
Nova Although Latin for "new" it denotes a star that suddenly becomes explosively bright at the end of its<br />
life cycle.<br />
O -<br />
Open Cluster One of the groupings of stars that are concentrated along the plane of the Milky Way. Most have an<br />
asymmetrical appearance and are loosely assembled. They contain from a dozen to many hundreds<br />
of stars.<br />
P -<br />
Parallax Parallax is the difference in the apparent position of an object against a background when viewed by<br />
an observer from two different locations. These positions and the actual position of the object form a<br />
triangle from which the apex angle (the parallax) and the distance of the object can be determined if<br />
the length of the baseline between the observing positions is known and the angular direction of the<br />
object from each position at the ends of the baseline has been measured. The traditional method in<br />
astronomy of determining the distance to a celestial object is to measure its parallax.<br />
Parfocal Refers to a group of eyepieces that all require the same distance from the focal plane of the<br />
telescope to be in focus. This means when you focus one parfocal eyepiece all the other parfocal<br />
eyepieces, in a particular line of eyepieces, will be in focus.<br />
Parsec The distance at which a star would show parallax of one second of arc. It is equal to 3.26 light-years,<br />
206,265 astronomical units, or 30,8000,000,000,000 km. (Apart from the Sun, no star lies within<br />
one parsec of us.)<br />
Point Source An object which cannot be resolved into an image because it to too far away or too small is<br />
considered a point source. A planet is far away but it can be resolved as a disk. Most stars cannot<br />
be resolved as disks, they are too far away.<br />
R -<br />
Reflector A telescope in which the light is collected by means of a mirror.<br />
Resolution The minimum detectable angle an optical system can detect. Because of diffraction, there is a limit<br />
to the minimum angle, resolution. The larger the aperture, the better the resolution.<br />
Right Ascension: (RA) The angular distance of a celestial object measured in hours, minutes, and seconds along the<br />
Celestial Equator eastward from the Vernal Equinox.<br />
S -<br />
Schmidt Telescope Rated the most important advance in optics in 200 years, the Schmidt telescope combines the best<br />
features of the refractor and reflector for photographic purposes. It was invented in 1930 by<br />
Bernhard Voldemar Schmidt (1879-1935).<br />
Sidereal Rate This is the angular speed at which the Earth is rotating. Telescope tracking motors drive the<br />
54
telescope at this rate. The rate is 15 arc seconds per second or 15 degrees per hour.<br />
T -<br />
Terminator The boundary line between the light and dark portion of the moon or a planet.<br />
U -<br />
Universe The totality of astronomical things, events, relations and energies capable of being described<br />
objectively.<br />
V -<br />
Variable Star A star whose brightness varies over time due to either inherent properties of the star or something<br />
eclipsing or obscuring the brightness of the star.<br />
W -<br />
Waning Moon The period of the moon's cycle between full and new, when its illuminated portion is decreasing.<br />
Waxing Moon<br />
Z -<br />
The period of the moon's cycle between new and full, when its illuminated portion is increasing.<br />
Zenith The point on the Celestial Sphere directly above the observer.<br />
Zodiac The zodiac is the portion of the Celestial Sphere that lies within 8 degrees on either side of the<br />
Ecliptic. The apparent paths of the Sun, the Moon, and the planets, with the exception of some<br />
portions of the path of Pluto, lie within this band. Twelve divisions, or signs, each 30 degrees in<br />
width, comprise the zodiac. These signs coincided with the zodiacal constellations about 2,000 years<br />
ago. Because of the Precession of the Earth's axis, the Vernal Equinox has moved westward by<br />
about 30 degrees since that time; the signs have moved with it and thus no longer coincide with the<br />
constellations.<br />
55
APPENDIX C<br />
LONGITUDES AND<br />
LATITUDES<br />
LONGITUDE LATITUDE<br />
degrees min degrees min<br />
ALABAMA<br />
Anniston 85 51 33 34.8<br />
Auburn 85 26.4 32 40.2<br />
Birmingham 86 45 33 34.2<br />
Centreville 87 15 32 54<br />
Dothan 85 27 31 19.2<br />
Fort Rucker 85 43.2 31 16.8<br />
Gadsden 86 5.4 33 58.2<br />
Huntsville 86 46.2 34 39<br />
Maxwell AFB 86 22.2 32 22.8<br />
Mobile 88 15 30 40.8<br />
Mobile Aeros 88 4.2 30 37.8<br />
Montgomery 86 2.4 32 18<br />
Muscle Shoal 87 37.2 34 45<br />
Selma 86 59.4 32 20.4<br />
Troy 86 1.2 31 52.2<br />
Tuscaloosa<br />
ALASKA<br />
87 37.2 33 13.8<br />
Anchorage 149 51 61 13.2<br />
Barrow 156 46.8 71 18<br />
Fairbanks 147 52.2 64 49.2<br />
Haines Hrbor 135 25.8 59 13.8<br />
Homer 151 3 59 37.8<br />
Juneau 134 34.8 58 22.2<br />
Ketchikan 131 4.2 55 21<br />
Kodiak 152 3 57 45<br />
Nome 165 25.8 64 30<br />
Sitka 135 21 57 4.2<br />
Sitkinak 154 1.2 56 52.8<br />
Skagway 135 31.8 59 45<br />
Valdez<br />
ARIZONA<br />
146 21 61 7.8<br />
Davis-M AFB 110 52.8 32 10.2<br />
Deer Valley 112 4.8 33 40.8<br />
Douglas 109 3.6 31 27<br />
Falcon Fld 111 43.8 33 28.2<br />
Flagstaff 111 40.2 35 7.8<br />
Fort Huachuc 110 21 31 36<br />
Gila Bend 113 10.2 33 33<br />
Goodyear 112 22.8 33 25.2<br />
GrandCanyon 112 9 35 57<br />
Kingman 113 57 35 16.2<br />
Luke 112 22.8 33 31.8<br />
Page 111 27 36 55.8<br />
Payson 111 19.8 34 13.8<br />
Phoenix 112 1.2 33 25.8<br />
Prescott 112 25.8 34 39<br />
Safford Awrs 109 40.8 32 49.2<br />
Scottsdale 111 55.2 33 37.2<br />
Show Low 110 0 34 16.2<br />
Tucson 110 55.8 32 7.2<br />
Williams AFB 111 40.2 33 18<br />
Winslow 110 43.8 35 1.2<br />
Yuma 115 0 33 6<br />
Yuma Mcas 114 37.2 32 39<br />
Yuma Prv Gd<br />
ARKANSAS<br />
114 2.4 32 51<br />
Blytheville 89 57 35 58.2<br />
Camden 92 2.4 33 31.2<br />
El Dorado 92 4.8 33 13.2<br />
Fayetteville 94 10.2 36 0<br />
Ft Smith 94 22.2 35 19.8<br />
Harrison 93 9 36 16.2<br />
Hot Springs 93 0.6 34 28.8<br />
Jonesboro 90 39 35 49.8<br />
Little Rock 92 22.8 35 13.2<br />
Pine Bluff 91 55.8 34 10.2<br />
Springdale 94 7.8 36 10.8<br />
Texarkana 94 0 33 27<br />
Walnut Ridge<br />
CALIFORNIA<br />
90 55.8 36 7.8<br />
Alameda 122 19.2 37 46.8<br />
Alturas 120 31.8 41 28.8<br />
Arcata 124 0.6 40 58.8<br />
Bakersfield 119 3 35 25.8<br />
Beale AFB 121 27 39 7.8<br />
Beaumont 116 57 33 55.8<br />
Bicycle Lk 116 37.2 35 16.8<br />
Big Bear 116 40.8 34 16.2<br />
Bishop 118 3.6 37 36<br />
Blue Canyon 120 4.2 39 16.8<br />
LONGITUDE LATITUDE<br />
degrees min degrees min<br />
Blythe 114 43.2 33 37.2<br />
Burbank 118 22.2 34 12<br />
Campo 116 28.2 32 37.2<br />
Carlsbad 117 16.8 33 7.8<br />
Castle AFB 120 34.2 37 22.8<br />
Chico 121 51 39 46.8<br />
China Lake 117 40.8 35 40.8<br />
Chino 117 37.8 33 58.2<br />
Concord 122 3 37 58.8<br />
Crescent Cty 124 13.8 41 46.8<br />
Daggett 116 46.8 34 52.2<br />
Edwards AFB 117 52.8 34 54<br />
El Centro 115 40.8 32 49.2<br />
El Monte 118 1.8 34 4.8<br />
El Toro 117 43.8 33 40.2<br />
Eureka 124 16.8 41 19.8<br />
Fort Hunter 121 19.2 36 0<br />
Fort Ord 121 46.2 36 40.8<br />
Fresno 119 43.2 36 46.2<br />
Fullerton 117 58.2 33 52.2<br />
George AFB 117 22.8 34 34.8<br />
Hawthorne 118 19.8 33 55.2<br />
Hayward 122 7.2 37 39<br />
Imperial 115 34.2 32 49.8<br />
Imperial Bch 117 7.2 32 34.2<br />
La Verne 117 46.8 34 6<br />
Lake Tahoe 120 0 38 54<br />
Lancaster 118 13.2 34 43.8<br />
Livermore 121 49.2 37 42<br />
Long Beach 118 9 33 49.2<br />
Los Alamitos 118 3 33 46.8<br />
Los Angeles 118 2.4 33 55.8<br />
Mammoth 118 55.2 37 37.8<br />
March AFB 117 16.2 33 52.8<br />
Marysville 121 34.2 39 6<br />
Mather AFB 121 1.8 38 34.2<br />
Mcclellan 121 2.4 38 40.2<br />
Merced 120 31.2 37 16.8<br />
Miramar NAS 117 9 32 52.2<br />
Modesto 120 57 37 37.8<br />
Moffet 122 3 37 25.2<br />
Mojave 118 9 35 3<br />
Montague 122 31.8 41 43.8<br />
Monterey 121 51 36 34.8<br />
Mount Shasta 122 19.2 41 19.2<br />
Mount Wilson 118 4.2 34 13.8<br />
Napa 122 16.8 38 13.2<br />
Needles 114 37.2 34 46.2<br />
North Is 117 1.2 32 42<br />
Norton AFB 117 13.8 34 6<br />
Oakland 122 13.2 37 43.8<br />
Ontario Intl 117 37.2 34 3<br />
Oxnard 119 1.2 34 12<br />
Palm Springs 116 3 33 49.8<br />
Palmdale 118 7.8 35 3<br />
Palo Alto 122 7.2 37 28.2<br />
Paso Robles 120 37.8 35 40.2<br />
Pillaro Pt 122 49.8 37 49.8<br />
Point Mugu 119 7.2 34 7.2<br />
Pt Arena 124 13.2 39 34.8<br />
Pt Arguello 121 7.2 34 57<br />
Pt Piedras 121 16.8 35 40.2<br />
Red Bluff 122 15 40 9<br />
Redding 122 1.8 40 30<br />
Riverside 117 27 33 57<br />
Sacramento 121 3 38 31.2<br />
Salinas 121 3.6 36 40.2<br />
San Carlos 122 15 37 31.2<br />
San<br />
Clemente<br />
117 37.2 33 25.2<br />
San Diego 117 7.8 32 49.2<br />
San<br />
Francisco<br />
122 22.8 37 37.2<br />
San Jose 121 55.2 37 22.2<br />
San Luis Obi 120 39 35 13.8<br />
San Mateo 117 34.8 33 22.8<br />
San Miguel 120 2.4 34 1.8<br />
Sandburg 118 43.8 34 45<br />
Santa Ana 117 52.8 33 40.2<br />
Santa Barb 119 49.8 34 25.8<br />
Santa Maria 120 27 34 54<br />
Santa Monica 118 27 34 1.2<br />
Santa Rosa 122 49.2 38 31.2<br />
56<br />
LONGITUDE LATITUDE<br />
degrees min degrees min<br />
Shelter Cove 124 4.2 40 1.8<br />
Siskiyou 122 28.2 41 46.8<br />
Stockton 121 15 37 54<br />
Superior Val 117 0.6 35 19.8<br />
Susanville 120 57 40 37.8<br />
Thermal 116 10.2 33 37.8<br />
Torrance 118 19.8 33 48<br />
Travis AFB 121 55.8 38 16.2<br />
Tahoe 120 7.8 39 19.2<br />
Tustin Mcas 117 49.8 33 42<br />
Ukiah 123 1.2 39 7.8<br />
Van Nuys 118 28.8 34 13.2<br />
Vandenberg 120 57 35 12<br />
Visalia<br />
COLORADO<br />
119 2.4 36 19.2<br />
Air Force A 105 21 39 31.2<br />
Akron 103 13.2 40 10.2<br />
Alamosa 105 52.2 37 27<br />
Aspen 106 52.2 39 13.2<br />
Brmfield/Jef 105 7.2 39 54<br />
Buckley 104 45 39 43.2<br />
Colo Sprgs 104 43.2 38 49.2<br />
Cortez 108 37.8 37 18<br />
Craig-Moffat 107 31.8 40 30<br />
Denver 104 52.2 39 45<br />
Durango 107 45 37 9<br />
Eagle 106 55.2 39 39<br />
Englewood 104 49.8 39 34.2<br />
Fort Carson 104 46.2 38 40.8<br />
Fraser 105 3 39 34.2<br />
Ft Col/Lovel 105 1.2 40 27<br />
Ft Collins 105 4.8 40 34.8<br />
Grand Jct 108 31.8 39 7.2<br />
Greeley-Wld 104 37.8 40 25.8<br />
Gunnison 106 55.8 38 33<br />
La Junta 103 31.2 38 3<br />
Lamar 102 3.6 38 7.2<br />
Leadville 106 1.8 39 15<br />
Limon 103 4.2 39 10.8<br />
Montrose 107 52.8 38 30<br />
Pueblo 104 31.2 38 16.8<br />
Rifle 107 4.8 39 31.8<br />
Salida 106 3 38 31.8<br />
Trinidad 104 19.8 37 15<br />
Winter Park 105 52.2 40 0<br />
CONNECTICUT<br />
Bridgeport 73 7.8 41 10.2<br />
Danbury 73 28.8 41 22.2<br />
Groton 72 3 41 19.8<br />
Hartford 72 39 41 43.8<br />
New Haven 72 40.2 41 13.2<br />
New London 72 4.8 41 18<br />
Windsor Loc<br />
DELAWARE<br />
72 40.8 41 55.8<br />
Dover 75 28.2 39 7.8<br />
Wilmington<br />
D.C. WASH<br />
75 3.6 39 40.2<br />
Washington<br />
FLORIDA<br />
77 27.6 38 57<br />
Apalachicola 85 1.8 29 43.8<br />
Astor NAS 81 34.2 29 7.2<br />
Avon Park G 81 33 28 4.8<br />
Cape<br />
Canaveral<br />
80 33 28 28.2<br />
Cecil 81 52.8 30 13.2<br />
Crestview 86 31.2 30 46.8<br />
Cross City 83 0.6 29 37.2<br />
Daytona Bch 81 3 29 10.8<br />
Duke Fld 86 31.2 30 39<br />
Eglin AFB 86 31.8 30 28.8<br />
Egmont Key 82 46.2 27 36<br />
Fort Myers 81 52.2 26 34.8<br />
Ft Lauderdale 80 9 26 4.2<br />
Ft Myers 81 52.2 26 39<br />
Gainesville 82 16.2 29 40.8<br />
Homestead 80 22.8 25 28.8<br />
Hurlburt Fld 86 40.8 30 25.8<br />
Jacksonville 81 40.8 30 13.8<br />
Key West 81 45 24 33<br />
Lakeland 81 57 28 1.8<br />
Macdill AFB 82 31.2 27 51<br />
Marianna 85 10.8 30 50.4<br />
Mayport NAS 81 25.2 30 24
LONGITUDE LATITUDE<br />
degrees min degrees min<br />
Melbourne 80 37.8 28 6<br />
Miami 80 16.8 25 49.2<br />
Naples 81 4.8 26 7.8<br />
Nasa Shuttle 80 40.8 28 37.2<br />
Orlando 81 19.2 28 25.8<br />
Panama City 85 40.8 30 12<br />
Patrick AFB 80 3.6 28 13.8<br />
Pensacola 87 19.2 30 21<br />
Ruskin 82 3.6 27 58.2<br />
Saint Peters 82 40.8 27 55.2<br />
Sanford 81 15 28 46.8<br />
Sarasota 82 33 27 24<br />
Tallahassee 84 22.2 30 22.8<br />
Tampa Intl 82 31.8 27 58.2<br />
Titusville 80 4.8 28 31.2<br />
Tyndall AFB 85 34.8 30 4.2<br />
Vero Beach 80 25.2 27 39<br />
West Palm<br />
Beach<br />
80 7.2 26 40.8<br />
Whiting Fld<br />
GEORGIA<br />
87 1.2 30 43.2<br />
Albany 84 10.8 31 31.8<br />
Alma 82 31.2 31 31.8<br />
Athens 83 19.2 33 57<br />
Atlanta 84 25.2 33 39<br />
Augusta/Bush 81 58.2 33 22.2<br />
Brunswick 81 22.8 31 9<br />
Columbus 84 55.8 32 31.2<br />
Dobbins AFB 84 31.2 33 55.2<br />
Fort Benning 85 0 32 19.8<br />
Ft Stewart 81 34.2 31 52.8<br />
Hunter Aaf 81 9 32 1.2<br />
La Grange 85 4.2 33 0.6<br />
Macon/Lewis 83 39 32 42<br />
Moody AFB 83 1.2 30 58.2<br />
Robins AFB 83 3.6 32 37.8<br />
Rome/Russell 85 10.2 34 21<br />
Valdosta 83 16.8 30 46.8<br />
Waycross<br />
HAWAII<br />
82 2.4 31 15<br />
Barbers Pt 158 7.2 21 31.8<br />
Barking San 160 1.8 22 3<br />
Fr Frigate 166 28.2 24 27<br />
Hilo 155 4.2 19 43.2<br />
Honolulu Int 157 55.8 21 21<br />
Kahului Maui 156 25.8 20 54<br />
Kaneohe Mca 158 16.8 21 45<br />
Kilauea Pt 159 40.2 22 22.8<br />
Lanai-Lanai 156 57 20 48<br />
Lihue-Kauai 159 21 21 58.8<br />
Maui 156 49.8 20 58.2<br />
Molokai 157 0.6 21 9<br />
Upolo Pt Ln 156 28.2 20 25.2<br />
Waimea-<br />
Koha<br />
IDAHO<br />
156 7.2 20 0<br />
Boise 116 13.2 43 34.2<br />
Burley 113 46.2 42 31.8<br />
Challis 114 13.2 44 31.2<br />
Coeur<br />
d'Alene<br />
116 49.2 47 46.2<br />
Elk City 115 25.8 45 49.2<br />
Gooding 115 10.2 43 0<br />
Grangeville 116 7.8 45 55.2<br />
Idaho Falls 112 4.2 43 31.2<br />
Lewiston 117 1.2 46 22.8<br />
Malad City 112 19.2 42 10.2<br />
Malta 113 22.2 42 18<br />
Mccall 116 0.6 44 52.8<br />
Mullan 115 4.8 47 28.2<br />
Pocatello 112 3.6 42 55.2<br />
Salmon 113 5.4 45 10.8<br />
Soda Springs 111 34.8 42 39<br />
Sun Valley 114 1.8 43 30<br />
Twin Falls<br />
ILLINOIS<br />
114 28.8 42 28.8<br />
Alton 90 3 38 52.8<br />
Aurora 88 19.2 41 46.2<br />
Bistate Park 90 9 38 34.2<br />
Bloomington 88 55.8 40 28.8<br />
Bradford 89 3.6 41 9.6<br />
Cairo 89 13.2 37 4.2<br />
Carbondale 89 15 37 46.8<br />
Centralia 89 5.4 38 30.6<br />
Champaign 88 16.8 40 1.8<br />
Chicago 87 39 41 54<br />
Danville 87 3.6 40 12<br />
DeKalb 88 43.2 41 55.8<br />
Decatur 88 52.2 39 49.8<br />
Du Page 88 15 41 55.2<br />
Galesburg 90 25.8 40 55.8<br />
LONGITUDE LATITUDE<br />
degrees min degrees min<br />
Glenview<br />
NAS<br />
87 49.2 42 4.8<br />
Kankakee 87 51 41 4.2<br />
Macomb 90 39.6 40 31.2<br />
Marion 89 0 37 45<br />
Marseilles 88 40.8 41 22.2<br />
Mattoon 88 16.8 39 28.8<br />
Moline/Quad 90 31.2 41 27<br />
Mount<br />
Vernon<br />
88 51.6 38 19.2<br />
Peoria 89 40.8 40 40.2<br />
Quincy 91 1.2 39 55.8<br />
Rockford 89 0.6 42 12<br />
Salem 88 57.6 38 37.8<br />
Scott AFB 89 51 38 33<br />
Springfield 89 40.2 39 51<br />
Sterling 89 40.2 41 44.4<br />
Taylorville 89 19.8 39 31.8<br />
Vandalia<br />
INDIANA<br />
89 10.2 38 59.4<br />
Bakalar 86 3 39 22.8<br />
Bloomington 86 37.2 39 7.8<br />
Elkhart 86 0 41 43.2<br />
Evansville 87 31.8 38 3<br />
Fort Wayne 85 1.2 41 0<br />
Gary 87 25.2 41 37.2<br />
Grissom AFB 86 9 40 39<br />
Indianapolis 86 16.2 39 43.8<br />
Muncie 85 22.8 40 13.8<br />
South Bend 86 19.2 41 42<br />
Terre Haute 87 1.8 39 27<br />
W Lafayette<br />
IOWA<br />
86 55.8 40 25.2<br />
Burlington 91 7.2 40 46.8<br />
Cedar Rapids 91 4.2 41 52.8<br />
Des Moines 93 39 41 31.8<br />
Dubuque 90 4.2 42 24<br />
Estherville 94 45 43 24<br />
Fort Dodge 94 10.8 42 33<br />
Lamoni 93 55.8 40 37.2<br />
Mason City 93 19.8 43 9<br />
Ottumwa 92 27 41 6<br />
Sioux City 96 22.8 42 24<br />
Spencer 95 9 43 10.2<br />
Waterloo Mun<br />
KANSAS<br />
92 2.4 42 33<br />
Chanute 95 28.8 37 40.2<br />
Col. J Jabar 97 13.2 37 45<br />
Concordia 97 39 39 33<br />
Dodge City 99 58.2 37 46.2<br />
Elkhart 101 52.8 37 0<br />
Emporia 96 1.2 38 19.8<br />
Ft Leavnwrth 94 55.2 39 22.2<br />
Ft Riley 96 46.2 39 3<br />
Garden City 100 43.2 37 55.8<br />
Goodland 101 4.2 39 22.2<br />
Hays 99 16.2 38 51<br />
Hill City 99 49.8 39 22.8<br />
Hutchinson 97 52.2 38 4.2<br />
Johnson Cnty 94 52.8 38 49.2<br />
Liberal 100 58.2 37 3<br />
Manhatten 96 40.2 39 9<br />
Mcconnell Af 97 16.2 37 37.2<br />
Medicine Ldg 98 34.8 37 18<br />
Olathe 94 5.4 38 51<br />
Russell 98 49.2 38 52.2<br />
Salina 97 39 38 48<br />
Topeka 95 37.2 39 4.2<br />
Topeka/Forbe 95 40.2 38 57<br />
Wichita<br />
KENTUCKY<br />
97 25.8 37 39<br />
Bowling Gren 86 25.8 36 58.2<br />
Ft Campbell 87 3 36 40.2<br />
Ft Knox 85 58.2 37 54<br />
Jackson 83 19.2 37 36<br />
Lexington 85 0 38 3<br />
London 84 4.2 37 4.8<br />
Louisville 85 40.2 38 13.8<br />
Owensboro 87 10.2 37 45<br />
Paducah 88 46.2 37 4.2<br />
Pikeville<br />
LOUISIANA<br />
82 31.2 37 28.8<br />
Alexandria 92 1.8 31 22.8<br />
Barksdale 93 40.2 32 30<br />
Baton Rouge 91 9 30 31.8<br />
Boothville 89 40.2 29 33<br />
Cameron Heli 93 1.8 29 46.8<br />
Claiborne R 92 57 31 13.2<br />
England AFB 92 33 31 19.8<br />
Eugene Is. 91 46.8 28 28.2<br />
Fort Polk 93 1.2 31 3<br />
57<br />
LONGITUDE LATITUDE<br />
degrees min degrees min<br />
Grand Isle 90 4.2 29 10.8<br />
High Island 94 2.4 28 7.8<br />
Houma 90 39 29 34.2<br />
Intercoastal 92 7.2 29 43.8<br />
Lafayette 92 0 30 12<br />
Lake Charles 93 13.2 30 7.2<br />
Lk Palourde 91 0.6 29 42<br />
Missippi Can 89 3 28 46.8<br />
Monroe 92 3 32 31.2<br />
Morgan City 91 1.2 29 42<br />
New Iberia 91 52.8 30 1.8<br />
New Orleans 90 15 29 58.8<br />
S Marsh Isl 91 58.8 28 18<br />
Shreveport 93 45 32 31.2<br />
Slidel<br />
MAINE<br />
89 49.2 30 21<br />
Augusta 69 4.8 44 19.2<br />
Bangor 68 49.2 44 48<br />
Bar Harbor 68 22.2 44 27<br />
Brunswick 69 55.8 43 52.8<br />
Caribou Mun 68 1.2 46 52.2<br />
Greenville 69 33 45 27<br />
Houlton 67 46.8 46 7.8<br />
Loring AFB 67 52.8 46 57<br />
Portland 70 19.2 43 39<br />
Presque Isle 68 3 46 40.8<br />
Rockland 69 7.2 44 4.2<br />
Rumford<br />
MARYLAND<br />
70 52.8 44 52.8<br />
Andrews AFB 76 52.2 38 49.2<br />
Baltimore 76 40.2 39 10.8<br />
Fort Meade 76 46.2 39 4.8<br />
Hagerstown 77 43.2 39 42<br />
Ocean City 75 7.8 38 33<br />
Patuxent 76 2.4 38 16.8<br />
Phillips 76 10.2 39 28.2<br />
Salisbury<br />
MASSACHUSETTS<br />
75 3 38 19.8<br />
Bedford 71 16.8 42 28.2<br />
Beverly 70 55.2 42 34.8<br />
Boston 71 1.8 42 22.2<br />
Cape Cod 70 3 41 46.8<br />
Chatham 69 58.2 41 40.2<br />
Fort Devens 71 3.6 42 34.2<br />
Hyannis 70 16.8 41 40.2<br />
Lawrence 71 7.2 42 43.2<br />
Marthas Vine 70 37.2 41 24<br />
Nantucket 70 4.2 41 15<br />
New Bedford 70 58.2 41 40.8<br />
Norwood 71 10.8 42 10.8<br />
Otis ANGB 70 31.2 41 39<br />
Pittsfield 73 10.8 42 15.6<br />
S Weymouth 70 55.8 42 9<br />
Westfield 72 43.2 42 10.2<br />
Westover 72 31.8 42 12<br />
Worcester<br />
MICHIGAN<br />
71 52.2 42 16.2<br />
Alpena 83 34.2 45 4.2<br />
Ann Arbor 83 45 42 13.2<br />
Battle Creek 85 13.8 42 18<br />
Benton<br />
Harbor<br />
86 25.8 42 7.8<br />
Chippewa 84 28.2 46 15<br />
Coopersville 85 57 43 4.2<br />
Copper Harb 87 51 47 28.2<br />
Detroit 83 1.2 42 25.2<br />
Escanaba 87 4.8 45 43.8<br />
Flint/Bishop 83 45 42 58.2<br />
Grand Rapids 85 31.2 42 52.8<br />
Hancock 88 3 47 10.2<br />
Harbor Beach 82 31.8 43 49.8<br />
Houghton<br />
Lake<br />
84 40.8 44 22.2<br />
Iron Mtn 88 7.2 45 49.2<br />
Ironwood 90 7.8 46 31.8<br />
Jackson 84 28.2 42 16.2<br />
Kalamazoo 85 33 42 13.8<br />
Lansing 84 3.6 42 46.2<br />
Manistee 86 15 44 16.2<br />
Marquette 87 57 46 52.8<br />
Menominee 87 37.8 45 7.2<br />
Muskegon 86 15 43 10.2<br />
Pellston 84 4.8 45 34.2<br />
Pontiac 83 25.2 42 40.2<br />
Saginaw 84 4.8 43 31.8<br />
Sault Ste M 84 22.2 46 28.2<br />
Sawyer AFB 87 2.4 46 21<br />
Selfridge 82 49.8 42 37.2<br />
Seul Choix 85 55.2 45 55.2<br />
Traverse Cty 85 34.8 44 43.8
LONGITUDE LATITUDE<br />
degrees min degrees min<br />
Wurtsmith 83 2.4 44 27<br />
Ypsilanti<br />
MINNESOTA<br />
83 31.8 42 13.8<br />
Albert Lea 93 22.2 43 40.8<br />
Alexandria 95 22.8 45 52.2<br />
Bemidji Muni 94 55.8 47 30<br />
Brainerd-Crw 94 7.8 46 24<br />
Detroit Laks 95 52.8 46 49.2<br />
Duluth 92 10.8 46 49.8<br />
Ely 91 49.2 47 54<br />
Fairmont 94 25.2 43 39<br />
Fergus Falls 96 4.2 46 18<br />
Grand Rapids 93 31.2 47 13.2<br />
Hibbing 92 51 47 22.8<br />
Intl Falls 93 22.8 48 34.2<br />
Litchfield 94 31.2 45 7.8<br />
Mankato 93 55.2 44 13.2<br />
Marshall Arpt 95 49.2 44 27<br />
Minneapolis 93 28.2 44 49.8<br />
Park Rapids 95 4.2 46 54<br />
Pequot Lake 94 19.2 46 36<br />
Rochester 92 3 43 55.2<br />
Saint Paul 93 3 44 55.8<br />
St Cloud 94 4.2 45 33<br />
Thief River 96 10.8 48 4.2<br />
Tofte 90 49.8 47 34.8<br />
Warroad 95 21 48 55.8<br />
Worthington<br />
MISSISSIPPI<br />
95 34.8 43 39<br />
Columbus<br />
AFB<br />
88 27 33 39<br />
Golden Trian 88 34.8 33 27<br />
Greenville 90 58.8 33 28.8<br />
Greenwood 90 4.8 33 30<br />
Gulfport 89 4.2 30 24<br />
Hattiesburg 89 19.8 31 28.2<br />
Jackson 90 4.8 32 19.2<br />
Keesler AFB 88 55.2 30 25.2<br />
Laurel 89 10.2 31 40.2<br />
Mccomb 90 28.2 31 10.8<br />
Meridian NAS 88 34.2 32 33<br />
Meridian/Key 88 45 32 19.8<br />
Natchez 91 15 31 37.2<br />
Oxford 89 32.4 34 23.4<br />
Tupelo<br />
MISSOURI<br />
88 46.2 34 16.2<br />
Columbia 92 13.2 38 49.2<br />
Cape<br />
Girardeau<br />
89 34.8 37 13.8<br />
Ft Leonard 92 7.8 37 45<br />
Jefferson City 92 10.2 38 36<br />
Joplin 94 3 37 10.2<br />
Kansas City 94 43.2 39 19.2<br />
Kirksville 92 33 40 6<br />
Monett 94 21 37 19.8<br />
Muskogee 95 21.6 35 39.6<br />
Poplar Bluff 90 28.2 36 46.2<br />
Richards-Geb 94 33 38 51<br />
Spickard 93 43.2 40 15<br />
Springfield 93 22.8 37 13.8<br />
St Joseph 95 31.8 40 16.8<br />
St Louis 90 22.2 38 45<br />
Vichy/Rolla 91 46.2 38 7.8<br />
West Plains 92 25.2 37 13.2<br />
Whiteman<br />
AFB<br />
MONTANA<br />
93 33 38 43.8<br />
Billings 108 31.8 45 48<br />
Bozeman 111 9 45 46.8<br />
Broadus 105 40.2 45 40.2<br />
Butte 112 3 45 57<br />
Cut Bank 112 22.2 48 36<br />
Dillon 112 33 45 15<br />
Drummond 113 9 46 40.2<br />
Glasgow 106 37.2 48 13.2<br />
Glendive 104 4.8 47 7.8<br />
Great Falls 111 22.2 47 28.8<br />
Harlowton 109 49.8 46 25.8<br />
Havre 109 46.2 48 33<br />
Helena 112 0 46 36<br />
Jordan 106 55.8 47 19.8<br />
Kalispell 114 16.2 48 18<br />
Lewiston 109 27 47 3<br />
Livingston 110 25.8 45 42<br />
Malmstrom 111 10.8 47 30<br />
Miles City 105 52.2 46 25.8<br />
Missoula 114 4.8 46 55.2<br />
Monida 112 19.2 44 34.2<br />
Sidney 104 10.8 47 43.2<br />
W Yellowston 111 0.6 44 39<br />
LONGITUDE LATITUDE<br />
degrees min degrees min<br />
NEBRASKA<br />
Ainsworth 99 58.8 42 34.8<br />
Alliance 102 4.8 42 3<br />
Beatrice 96 45 40 19.2<br />
Broken Bow 99 39 41 25.8<br />
Burwell 99 9 41 46.8<br />
Chadron 103 4.8 42 49.8<br />
Columbus 97 21 41 27<br />
Cozad 100 0 40 52.2<br />
Falls City 95 34.8 40 4.2<br />
Grand Island 98 19.2 40 58.2<br />
Hastings 98 25.8 40 36<br />
Imperial 101 23.4 40 19.8<br />
Kearney 99 0 40 43.8<br />
Lincoln Muni 96 45 40 51<br />
Mccook 100 34.8 40 13.2<br />
Mullen 101 3 42 3<br />
Norfolk 97 25.8 41 58.8<br />
North Omaha 96 1.2 41 22.2<br />
North Platte 100 40.8 41 7.8<br />
O'neill 98 40.8 42 28.2<br />
Offutt AFB 95 55.2 41 7.2<br />
Omaha 95 5.4 41 18<br />
Ord/Sharp 98 57 41 37.2<br />
Scottsbluff 103 3.6 41 52.2<br />
Sidney Muni 102 58.8 41 6<br />
Valentine<br />
NEVADA<br />
100 33 42 52.2<br />
Austin 117 7.8 39 49.8<br />
Battle Mtn 116 52.2 40 37.2<br />
Caliente 114 31.2 37 37.2<br />
Elko 115 46.8 40 49.8<br />
Ely/Yelland 114 51 39 16.8<br />
Eureka 115 58.2 39 30<br />
Fallon NAS 118 4.2 39 25.2<br />
Hawthorne 118 37.8 38 33<br />
Ind Sprng Rn 115 34.2 36 31.8<br />
Las Vegas 115 10.2 36 4.8<br />
Lovelock 118 55.2 40 6<br />
Mercury 116 1.2 36 37.2<br />
Nellis AFB 115 1.8 36 13.8<br />
Owyhee 116 10.2 42 34.8<br />
Reno 119 46.8 39 30<br />
Tonopah 117 4.8 38 4.2<br />
Wildhorse 116 15 41 19.8<br />
Winnemucca 117 4.8 40 54<br />
Yucca Flat<br />
NEW HAMPSHIRE<br />
116 4.8 37 34.8<br />
Berlin 71 10.8 44 34.8<br />
Concord 71 3 43 12<br />
Jaffrey 72 0 42 48<br />
Keene 72 16.2 42 54<br />
Laconia 71 25.8 43 34.2<br />
Lebanon 72 1.8 43 37.8<br />
Manchester 71 25.8 42 55.8<br />
Mt Washingtn 71 1.8 44 16.2<br />
Nashua 71 31.2 42 46.8<br />
Pease AFB 70 49.2 43 4.8<br />
Wolfeboro<br />
NEW JERSEY<br />
71 22.8 44 0<br />
Atlantic CtIy 74 34.2 39 27<br />
Barnegat Ls 74 16.8 40 16.8<br />
Fairfield 74 16.8 40 52.2<br />
Lakehurst 74 21 40 1.8<br />
Mcguire AFB 74 3.6 40 1.2<br />
Millville 75 4.2 39 22.2<br />
Morristown 74 25.2 40 48<br />
Newark Intl 74 10.2 40 42<br />
Teterboro 74 3 40 51<br />
Trenton<br />
NEW MEXICO<br />
74 49.2 40 16.8<br />
Albuquerque 106 3.6 35 3<br />
Cannon 103 19.2 34 22.8<br />
Carlsbad 104 16.2 32 19.8<br />
Clayton Arpt 103 9 36 27<br />
Corona 105 40.8 34 6<br />
Deming 107 4.2 32 15<br />
Farmington 108 13.8 36 45<br />
Gallup/Clark 108 46.8 35 31.2<br />
Grants 107 5.4 35 10.2<br />
Hobbs 103 1.2 32 40.8<br />
Holloman<br />
AFB<br />
106 0.6 32 51<br />
Las Cruces 106 46.2 32 18<br />
Las Vegas 105 9 35 39<br />
Los Alamos 106 16.8 35 52.8<br />
Moriarity 106 3 34 58.8<br />
Northrup Str 106 2.4 32 54<br />
Raton 104 3 36 44.4<br />
Roswell 104 31.8 33 18<br />
58<br />
LONGITUDE LATITUDE<br />
degrees min degrees min<br />
Santa Fe 106 4.8 35 37.2<br />
Silver City 108 10.2 32 37.8<br />
Socorro 106 5.4 34 4.2<br />
Taos 105 34.2 36 25.2<br />
Truth Or Con 107 16.2 33 13.8<br />
Tucumcari 103 3.6 35 10.8<br />
White Sands<br />
NEW YORK<br />
106 2.4 32 37.8<br />
Albany 73 4.8 42 45<br />
Ambrose 74 22.2 40 45<br />
Binghamton 75 58.8 42 13.2<br />
Buffalo 78 43.8 42 55.8<br />
Dansville 78 1.2 42 58.2<br />
Elmira 76 5.4 42 10.2<br />
Farmingdale 73 25.8 40 43.8<br />
Fort Drum 75 43.8 44 3<br />
Glens Falls 73 37.2 43 21<br />
Griffiss AFB 75 2.4 43 13.8<br />
Islip 73 0.6 40 46.8<br />
Ithaca 76 28.2 42 28.8<br />
Jamestown 79 15 42 9<br />
Massena 74 51 44 55.8<br />
Monticello 74 4.8 41 42<br />
New York 73 58.8 40 46.2<br />
Newburgh 74 0.6 41 30<br />
Niagara Fall 78 57 43 6<br />
Ogdensburg 75 2.4 44 40.8<br />
Oneonta 75 7.2 42 52.2<br />
Plattsburgh 73 28.2 44 39<br />
Rochester 77 40.2 43 7.2<br />
Saranac Lk 74 1.2 44 22.8<br />
Schenectady 73 55.8 42 51<br />
Syracuse 76 7.2 43 7.2<br />
Utica 75 22.8 43 9<br />
Watertown 76 1.2 44 0<br />
Westhampton 72 37.8 40 51<br />
White Plains 73 43.2 41 4.2<br />
NORTH CAROLINA<br />
Asheville 82 33 35 25.8<br />
Cape Hattera 75 33 35 16.2<br />
Charlotte 80 55.8 35 13.2<br />
Cherry Point 76 52.8 34 54<br />
Dare Co Gr 76 3 36 7.8<br />
Diamond Sho 75 3 35 15<br />
Elizabeth 76 10.8 36 16.2<br />
Fayetteville 78 52.8 35 0<br />
Fort Bragg 78 55.8 35 7.8<br />
Greensboro 79 57 36 4.8<br />
Hickory 81 22.8 35 45<br />
Hot Springs 82 49.2 35 54<br />
Jacksonville 77 37.2 34 49.2<br />
Kinston 77 37.8 35 19.2<br />
Mackall Aaf 79 3 35 1.8<br />
Manteo Arpt 75 40.8 35 55.2<br />
New Bern 77 3 35 4.8<br />
New River 77 25.8 34 42<br />
Pope AFB 79 1.2 35 10.2<br />
Raleigh-Durh 78 46.8 35 52.2<br />
Rocky Mt 77 52.8 35 51<br />
Southern Pin 79 23.4 35 14.4<br />
Wilmington 77 55.2 34 16.2<br />
Winston-<br />
Salem<br />
NORTH DAKOTA<br />
80 13.8 36 7.8<br />
Bismarck 100 45 46 46.2<br />
Devil's Lake 98 5.4 48 7.2<br />
Dickenson 102 4.8 46 46.8<br />
Fargo 96 4.8 46 54<br />
Grand Forks 97 10.8 47 57<br />
Jamestown 98 40.8 46 55.2<br />
Lidgerwood 97 9 46 6<br />
Minot 101 16.8 48 16.2<br />
Roseglen 101 49.8 47 45<br />
Williston<br />
OHIO<br />
103 37.8 48 10.8<br />
Athens 82 13.8 39 12.6<br />
Canton 81 25.8 40 55.2<br />
Cincinnati 84 40.2 39 3<br />
Cleveland 81 40.8 41 31.2<br />
Columbus 82 52.8 40 0<br />
Dayton 84 1.2 39 54<br />
Findlay 83 40.2 41 1.2<br />
Mansfield 82 31.2 40 49.2<br />
Rickenbacker 82 55.8 39 49.2<br />
Toledo 83 4.8 41 36<br />
Willoughby 81 2.4 41 37.8<br />
Youngstown 80 40.2 41 16.2<br />
Zanesville 81 5.4 39 57
LONGITUDE LATITUDE<br />
degrees min degrees min<br />
OKLAHOMA<br />
Altus AFB 99 16.2 34 40.2<br />
Ardmore 97 1.2 34 18<br />
Bartlesville 96 0 36 45<br />
Clinton 99 1.2 35 21<br />
Enid 97 4.8 36 22.8<br />
Fort Sill 98 2.4 34 39<br />
Gage 99 46.2 36 18<br />
Hobart 99 3 35 0<br />
Lawton 98 25.2 34 34.2<br />
Mcalester 95 46.8 34 52.8<br />
Norman 97 28.2 35 13.8<br />
Oklahoma 97 3.6 35 24<br />
Page 94 37.2 34 40.8<br />
Ponca City 97 0.6 36 43.8<br />
Stillwater 97 5.4 36 9.6<br />
Tinker AFB 97 22.8 35 25.2<br />
Tulsa 95 5.4 36 12<br />
Vance AFB<br />
OREGON<br />
97 55.2 36 19.8<br />
Astoria 123 52.8 46 9<br />
Aurora 122 45 45 15<br />
Baker 117 49.2 44 49.8<br />
Brookings 124 28.2 42 4.8<br />
Burns Arpt 118 57 43 36<br />
Cape Blanco 124 57 43 22.8<br />
Cascade 121 52.8 45 40.8<br />
Corvallis 123 16.8 44 30<br />
Eugene 123 13.2 44 7.2<br />
Hillsboro 122 57 45 31.8<br />
Klamath Fall 121 43.8 42 9<br />
La Grande 118 0 45 16.8<br />
Lake View 120 21 42 10.8<br />
Meacham 118 2.4 45 30<br />
Medford 122 52.2 42 22.2<br />
Newport 124 3 44 37.8<br />
North Bend 124 15 43 25.2<br />
Ontario 117 1.2 44 1.2<br />
Pendleton 118 51 45 40.8<br />
Portland 122 3.6 45 36<br />
Redmond 121 9 44 16.2<br />
Roseburg 123 22.2 43 13.8<br />
Salem 123 0 44 55.2<br />
Sexton 123 22.2 42 37.2<br />
The Dalles 121 9 45 37.2<br />
Troutdale<br />
PENNSYLVANIA<br />
122 2.4 45 33<br />
Allentown 75 25.8 40 39<br />
Altoona 78 19.2 40 18<br />
Beaver Falls 80 19.8 40 45<br />
Blairsville 79 5.4 40 16.2<br />
Bradford 78 37.8 41 48<br />
Dubois 78 5.4 41 10.8<br />
Erie 80 10.8 42 4.8<br />
Franklin 79 52.2 41 22.8<br />
Harrisburg 76 51 40 13.2<br />
Johnstown 78 49.8 40 19.2<br />
Lancaster 76 1.8 40 7.8<br />
Latrobe 79 2.4 40 16.8<br />
Middletown 76 46.2 40 12<br />
Muir 76 34.2 40 25.8<br />
Nth Philadel 75 1.2 40 4.8<br />
Philadelphia 75 15 39 52.8<br />
Philipsburg 78 7.8 41 28.2<br />
Pittsburgh 79 55.8 40 21<br />
Reading 75 58.2 40 22.8<br />
Site R 77 25.8 39 43.8<br />
State Colleg 77 49.8 40 51<br />
Wilkes-Barre 75 43.8 41 19.8<br />
Williamsport 76 55.2 41 15<br />
Willow Grove<br />
RHODE ISLAND<br />
75 9 40 12<br />
Block Island 71 34.8 41 10.2<br />
Nth Kingston 71 25.2 41 36<br />
Providence 71 25.8 41 43.8<br />
SOUTH CAROLINA<br />
Anderson 82 43.2 34 30<br />
Beaufort 80 43.2 32 28.8<br />
Charleston 80 1.8 32 54<br />
Columbia 81 7.2 33 57<br />
Florence 79 43.2 34 10.8<br />
Greenville 82 21 34 51<br />
Mcentire 80 4.8 33 55.2<br />
LONGITUDE LATITUDE<br />
degrees min degrees min<br />
Myrtle Beach 78 55.8 33 40.8<br />
Shaw AFB 80 28.2 33 58.2<br />
Spartanburg 81 57.6 34 55.2<br />
SOUTH DAKOTA<br />
Aberdeen 98 25.8 45 27<br />
Brookings 96 4.8 44 18<br />
Chamberlain 99 19.2 43 48<br />
Custer 103 3.6 43 46.2<br />
Ellsworth 103 0.6 44 9<br />
Huron 98 13.2 44 22.8<br />
Lemmon 102 10.2 45 55.8<br />
Mitchell 98 1.8 43 46.2<br />
Mobridge 100 25.8 45 31.8<br />
Philip 101 3.6 44 3<br />
Pierre 100 16.8 44 22.8<br />
Rapid City 103 4.2 44 3<br />
Redig 103 19.2 45 9.6<br />
Sioux Falls 96 43.8 43 34.8<br />
Watertown 97 9 44 55.2<br />
Yankton 97 22.8 42 55.2<br />
TENNESSEE<br />
Bristol 82 2.4 36 28.8<br />
Chattanooga 85 1.2 35 1.8<br />
Clarksville 87 25.2 36 37.2<br />
Crossville 85 4.8 35 57<br />
Dyersburg 89 2.4 36 1.2<br />
Jackson 88 55.2 35 36<br />
Knoxville 83 58.8 35 49.2<br />
Memphis Intl 90 0 35 3<br />
Monteagle 85 30.6 35 9<br />
Nashville 86 40.8 36 7.2<br />
Smyrna 86 3 36 0<br />
TEXAS<br />
Abilene 99 40.8 32 25.2<br />
Alice 98 1.8 27 43.8<br />
Amarillo 101 4.2 35 13.8<br />
Austin 97 4.2 30 18<br />
Bergstrom Af 97 40.8 30 12<br />
Big Sky 101 28.8 32 23.4<br />
Big Spring 101 27 32 18<br />
Brownsville 97 25.8 25 54<br />
Brownwood 98 57.6 31 47.4<br />
Carswell AFB 97 25.8 32 46.8<br />
Chase NAS 97 40.2 28 22.2<br />
Childress 100 16.8 34 25.8<br />
College Stn 96 22.2 30 34.8<br />
Corpus Chrst 97 3 27 46.2<br />
Cotulla 99 13.2 28 27<br />
Dalhart 102 33 36 1.2<br />
Dallas/FW 97 1.8 32 54<br />
Del Rio 100 55.2 29 22.2<br />
Dyess AFB 99 51 32 25.8<br />
El Paso 106 2.4 31 48<br />
Ellington Af 95 10.2 29 37.2<br />
Fort Worth 97 21 32 49.2<br />
Ft Hood Aaf 97 43.2 31 9<br />
Galveston 94 52.2 29 16.2<br />
Gray AFB 97 49.8 31 4.2<br />
Greenville 96 4.2 33 4.2<br />
Guadalupe 104 4.8 31 49.8<br />
Harlingen 97 40.2 26 13.8<br />
Hondo 99 10.2 29 21<br />
Houston 95 21 29 58.2<br />
Junction 99 46.2 30 30<br />
Kelly AFB 98 34.8 29 22.8<br />
Kerrville 99 4.8 29 58.8<br />
Killeen 97 40.8 31 4.8<br />
Kingsville 97 49.2 27 30<br />
Laredo Intl 99 28.2 27 31.8<br />
Laughlin AFB 100 46.8 29 22.2<br />
Longview 94 43.2 32 22.8<br />
Lubbock 101 49.2 33 39<br />
Lufkin 94 45 31 13.8<br />
Marfa 104 1.2 30 22.2<br />
Mcallen 98 13.8 26 10.8<br />
Midland 102 10.8 31 57<br />
Mineral Wlls 98 4.2 32 46.8<br />
Palacios 96 15 28 43.2<br />
Paris/Cox 95 27 33 37.8<br />
Plainview 101 42.6 34 10.2<br />
Port Arthur 94 1.2 30 34.8<br />
Reese AFB 102 3 33 36<br />
Rockport 97 1.8 28 4.8<br />
59<br />
LONGITUDE LATITUDE<br />
degrees min degrees min<br />
San Angelo 100 3 31 22.2<br />
San Antonio 98 28.2 29 31.8<br />
Sanderson 102 25.2 30 10.2<br />
South Brazos 95 52.2 28 1.8<br />
Stephenville 98 10.8 32 13.2<br />
Temple 97 25.2 31 9<br />
Tyler/Pounds 95 2.4 32 22.2<br />
Victoria 96 55.2 28 51<br />
Wichita Flls 98 3 33 58.8<br />
Wink<br />
UTAH<br />
103 1.2 31 46.8<br />
Blanding 109 46.8 38 1.8<br />
Bullfrog Mar 110 4.2 37 30<br />
Cedar City 113 0.6 37 42<br />
Delta 112 34.8 39 19.8<br />
Eagle Range 113 4.2 41 3<br />
Green River 110 9 39 0<br />
Hanksville 110 43.2 38 22.2<br />
Hill AFB 111 58.2 41 7.2<br />
Logan 111 51 41 46.8<br />
Milford 113 1.8 38 43.2<br />
Moab 109 45 38 46.2<br />
Ogden 112 1.2 41 10.8<br />
Price/Carbon 110 45 39 37.2<br />
Provo 111 43.2 40 13.2<br />
Roosevelt 110 37.8 40 30<br />
Saint George 113 3.6 37 4.8<br />
Salt Lake Ct 111 58.2 40 46.8<br />
Tooele 112 1.2 40 10.2<br />
Vernal 109 31.2 40 27<br />
Wendover<br />
VERMONT<br />
114 3 41 13.2<br />
Burlington 73 9 44 28.2<br />
Montpelier 72 34.2 44 12<br />
Newport 72 19.8 45 33<br />
Rutland 73 57 43 31.8<br />
St Johnsbury 72 1.2 44 25.2<br />
Wilmington<br />
VIRGINIA<br />
72 52.8 42 52.8<br />
Charlottes 78 27 38 7.8<br />
Chesapeake 76 1.2 37 30<br />
Danville 79 19.8 36 34.2<br />
Fort Belvoir 77 10.8 38 43.2<br />
Fort Eustis 76 37.2 37 7.8<br />
Hot Springs 79 49.2 37 57<br />
Langley AFB 76 22.2 37 4.8<br />
Lynchburg 79 1.2 37 19.8<br />
Newport<br />
News<br />
76 3 37 7.8<br />
Norfolk NAS 76 16.8 36 55.8<br />
Norfolk Rgnl 76 1.2 36 54<br />
Oceana NAS 76 1.8 36 49.2<br />
Quantico Mca 77 1.8 38 30<br />
Richmond 77 19.8 37 30<br />
Roanoke<br />
Muni<br />
79 58.2 37 19.2<br />
Staunton 78 51 38 16.2<br />
Volens 78 58.8 36 57<br />
Wallops Sta<br />
WASHINGTON<br />
75 28.8 37 51<br />
Bellingham 122 31.8 48 48<br />
Bremerton 122 46.2 47 28.8<br />
Burlington 122 19.8 48 30<br />
Colville 118 28.2 48 52.8<br />
Ephrata 119 31.2 47 19.2<br />
Everet/Paine 122 16.8 47 55.2<br />
Fairchild 117 39 47 37.2<br />
Fort Lewis 122 34.8 47 4.8<br />
Hanford 119 3.6 46 34.2<br />
Hoquiam 123 58.2 46 58.2<br />
Mcchord AFB 122 28.8 47 9<br />
Moses Lake 119 19.2 47 12<br />
Oak Harbor 122 40.8 48 15<br />
Olympia 122 5.4 46 58.2<br />
Omak 119 31.8 48 25.2<br />
Pasco 119 7.2 46 16.2<br />
Port Angeles 123 3 48 7.2<br />
Pullman 117 7.2 46 45<br />
Quillayute 124 33 47 57<br />
Renton 122 13.2 47 30<br />
Seattle 122 1.8 47 27<br />
Shelton 123 9 47 15<br />
Spokane 117 31.8 47 37.8<br />
Tacoma 122 34.8 47 16.2<br />
Toledo 122 4.8 46 28.8
LONGITUDE LATITUDE<br />
degrees min degrees min<br />
Walla Walla 118 16.8 46 6<br />
Wenatchee 120 1.2 47 24<br />
Whidbey Is 122 39 48 21<br />
Yakima 120 31.8 46 34.2<br />
WEST VIRGINIA<br />
Beckley 81 7.2 37 46.8<br />
Bluefield 81 13.2 37 18<br />
Charleston 81 3.6 38 22.2<br />
Clarksburg 80 13.8 39 16.8<br />
Elkins 79 51 38 52.8<br />
Huntington 82 33 38 22.2<br />
Lewisburg 80 2.4 37 52.2<br />
Martinsburg 77 58.8 39 24<br />
Morgantown 79 55.2 39 39<br />
Parkersburg 81 25.8 39 21<br />
Wheeling 80 39 40 10.8<br />
Wh Sulphur 80 1.2 37 27.6<br />
CANADA<br />
LONGITUDE LATITUDE<br />
degrees<br />
WISCONSIN<br />
min degrees min<br />
Appleton 88 31.2 44 15<br />
Eau Claire 91 28.8 44 52.2<br />
Green Bay 88 7.8 44 28.8<br />
Janesville 89 1.8 42 37.2<br />
La Crosse 91 15 43 52.2<br />
Lone Rock 90 10.8 43 12<br />
Madison 89 19.8 43 7.8<br />
Manitowac 87 40.2 44 7.8<br />
Milwaukee 87 5.4 42 57<br />
Mosinee 89 40.2 44 46.8<br />
Neenah 88 31.8 44 13.2<br />
Oshkosh 88 34.2 44 0<br />
Rhinelander 89 27 45 37.8<br />
Rice Lake 91 43.2 45 28.8<br />
Volk Fld 90 16.2 43 55.8<br />
Wausau 89 37.2 44 55.2<br />
60<br />
LONGITUDE LATITUDE<br />
degrees min degrees min<br />
WYOMING<br />
Big Piney 110 0.6 42 34.2<br />
Casper 106 28.2 42 55.2<br />
Cheyenne 104 49.2 41 9<br />
Cody 109 1.2 44 31.2<br />
Douglas 105 22.8 42 45<br />
Evanston 111 0 41 19.8<br />
Gillette 105 31.8 44 21<br />
Jackson 110 43.8 43 36<br />
Lander 108 43.8 42 49.2<br />
Laramie 105 40.8 41 19.2<br />
Moorcroft 104 48.6 44 21<br />
Rawlins 107 1.2 41 48<br />
Riverton 108 27 43 3<br />
Rock Springs 109 4.2 41 36<br />
Sheridan 106 58.2 44 46.2<br />
Worland 107 58.2 43 58.2<br />
Yellowstone 110 25.2 44 33<br />
CITY PROVINCE LONGITUDE LATITUDE CITY COUNTRY LONGITUDE LATITUDE<br />
Calgary Alberta 114 7 51 14<br />
Churchill Newfoundland 94 0 58 45<br />
Coppermine Northwest Terr. 115 21 67 49<br />
Edmonton Alberta 113 25 53 34<br />
Frederickton New Brunswick 66 40 45 57<br />
Ft Mcpherson Northwest Terr 134 50 67 29<br />
Goose Bay Newfoundland 60 20 53 15<br />
Halifax Nova Scotia 63 34 44 39<br />
Hazelton BC 127 38 55 15<br />
Kenora Ontario 94 29 49 47<br />
Labrador City Labrador 66 52 52 56<br />
Montreal Quebec 73 39 45 32<br />
Mt. Logan Yukon 140 24 60 34<br />
Nakina Yukon 132 48 59 12<br />
Ottawa Ontario 75 45 45 18<br />
Peace River Alberta 117 18 56 15<br />
Pr. Edward Isl Nova Scotia 63 9 46 14<br />
Quebec Quebec 71 15 46 50<br />
Regina Saskatchewan 104 38 50 30<br />
Saskatoon Saskatchewan 101 32 52 10<br />
St. Johns Newfoundland 52 43 47 34<br />
Toronto Ontario 79 23 43 39<br />
Vancouver BC 123 7 49 16<br />
Victoria BC 123 20 48 26<br />
Whitehorse Yukon 135 3 60 43<br />
Winnipeg Manitoba 97 9 49 53<br />
INTERNATIONAL<br />
Aberdeen Scotland 2 9 w 57 9 n<br />
Adelaide Australia 138 36 e 34 55 s<br />
Amsterdam Holland 4 53 e 52 22 n<br />
Ankara Turkey 32 55 e 39 55 n<br />
Asunción Paraguay 57 40 w 25 15 s<br />
Athens Greece 23 43 e 37 58 n<br />
Auckland New Zealand 174 45 e 36 52 s<br />
Bangkok Thailand 100 30 e 13 45 n<br />
Barcelona Spain 2 9 e 41 23 n<br />
Belém Brazil 48 29 w 1 28 s<br />
Belfast Northern Ireland 5 56 w 54 37 n<br />
Belgrade Yugoslavia 20 32 e 44 52 n<br />
Berlin Germany 13 25 e 52 30 n<br />
Birmingham England 1 55 w 52 25 n<br />
Bombay India 72 48 e 19 0 n<br />
Bordeaux France 0 31 w 44 50 n<br />
Bremen Germany 8 49 e 53 5 n<br />
Brisbane Australia 153 8 e 27 29 s<br />
Bristol England 2 35 w 51 28 n<br />
Brussels Belgium 4 22 e 50 52 n<br />
Bucharest Romania 26 7 e 44 25 n<br />
Budapest Hungary 19 5 e 47 30 n<br />
Buenos Aires Argentina 58 22 w 34 35 s<br />
Cairo Egypt 31 21 e 30 2 n<br />
Canton China 113 15 e 23 7 n<br />
Cape Town South Africa 18 22 e 33 55 s<br />
Caracas Venezuela 67 2 w 10 28 n<br />
Chihuahua Mexico 106 5 w 28 37 n<br />
Chongqing China 106 34 e 29 46 n<br />
Copenhagen Denmark 12 34 e 55 40 n<br />
Córdoba Argentina 64 10 w 31 28 s<br />
Darwin Australia 130 51 e 12 28 s<br />
Dublin Ireland 6 15 w 53 20 n<br />
Durban South Africa 30 53 e 29 53 s<br />
Edinburgh Scotland 3 10 w 55 55 n<br />
Frankfurt Germany 8 41 e 50 7 n<br />
Georgetown Guyana 58 15 w 6 45 n<br />
Glasgow Scotland 4 15 w 55 50 n<br />
Guatemala City Guatemala 90 31 w 14 37 n<br />
Guayaquil Ecuador 79 56 w 2 10 s<br />
Hamburg Germany 10 2 e 53 33 n<br />
Hammerfest Norway 23 38 e 70 38 n<br />
Havana Cuba 82 23 w 23 8 n<br />
Helsinki Finland 25 0 e 60 10 n<br />
Hobart Tasmania 147 19 e 42 52 s<br />
Iquique Chile 70 7 w 20 10 s<br />
Irkutsk Russia 104 20 e 52 30 n<br />
Jakarta Indonesia 106 48 e 6 16 s<br />
Johannesburg South Africa 28 4 e 26 12 s<br />
Kingston Jamaica 76 49 w 17 59 n<br />
La Paz Bolivia 68 22 w 16 27 s<br />
Leeds England 1 30 w 53 45 n<br />
Lima Peru 77 2 w 12 0 s<br />
Liverpool England 3 0 w 53 25 n<br />
London England 0 5 w 51 32 n<br />
Lyons France 4 50 e 45 45 n<br />
Madrid Spain 3 42 w 40 26 n<br />
Manchester England 2 15 w 53 30 n<br />
Manila Phillipines 120 57 e 14 35 n<br />
Marseilles France 5 20 e 43 20 n<br />
Mazatlán Mexico 106 25 w 23 12 n<br />
Mecca Saudi Arabia 39 45 e 21 29 n<br />
Melbourne Australia 144 58 e 37 47 s<br />
Mexico City Mexico 99 7 w 19 26 n<br />
Milan Italy 9 10 e 45 27 n<br />
Montevideo Uruguay 56 10 w 34 53 s<br />
Moscow Russia 37 36 e 55 45 n<br />
Munich Germany 11 35 e 48 8 n<br />
Nagasaki Japan 129 57 e 32 48 n<br />
Nagoya Japan 136 56 e 35 7 n<br />
Nairobi Kenya 36 55 e 1 25 s<br />
Nanjing China 118 53 e 32 3 n<br />
Naples Italy 14 15 e 40 50 n<br />
Newcastle England 1 37 w 54 58 n<br />
Odessa Ukraine 30 48 e 46 27 n<br />
Osaka Japan 135 30 e 34 32 n<br />
Oslo Norway 10 42 e 59 57 n<br />
Panama City Panama 79 32 w 8 58 n<br />
Paramaribo Surinam 55 15 w 5 45 n<br />
Paris France 2 20 e 48 48 n<br />
Beijing China 116 25 e 39 55 n<br />
Perth Australia 115 52 e 31 57 s<br />
Plymouth England 4 5 w 50 25 n<br />
Rio de Janeiro Brazil 43 12 w 22 57 s<br />
Rome Italy 12 27 e 41 54 n<br />
Salvador Brazil 38 27 w 12 56 s<br />
Santiago Chile 70 45 w 33 28 s<br />
St. Petersburg Russia 30 18 e 59 56 n<br />
Sao Paulo Brazil 46 31 w 23 31 s<br />
Shanghai China 121 28 e 31 10 n<br />
Sofia Bulgaria 23 20 e 42 40 n<br />
Stockholm Sweden 18 3 e 59 17 n<br />
Sydney Australia 151 0 e 34 0 s<br />
Tananarive Madagascar 47 33 e 18 50 s<br />
Teheran Iran 51 45 e 35 45 n<br />
Tokyo Japan 139 45 e 35 40 n<br />
Tripoli Libya 13 12 e 32 57 n<br />
Venice Italy 12 20 e 45 26 n<br />
Veracruz Mexico 96 10 w 19 10 n<br />
Vienna Austria 16 20 e 48 14 n<br />
Warsaw Poland 21 0 e 52 14 n<br />
Wellington New Zealand 174 47 e 41 17 s<br />
Zürich Switzerland 8 31 e 47 21 n
Appendix D - RS-232 Connection<br />
You can control your telescope with a computer via the RS-232 port on the computerized hand control and using an<br />
optional RS-232 cable (#93920). Once connected, the telescope can be controlled using popular astronomy software<br />
programs.<br />
Communication Protocol:<br />
The Advanced GT communicates at 9600 bits/sec, No parity and a stop bit. All angles are communicated with 16 bit<br />
angle and communicated using ASCII hexadecimal.<br />
Description PC Command ASCII Hand Control Response Notes<br />
Echo Kx X# Useful to check communication<br />
Goto Azm-Alt B12AB, 4000 # 10 characters sent. B=Command,<br />
12AB=Azm, comma, 4000=Alt. If<br />
command conflicts with slew limits,<br />
there will be no action.<br />
Goto Ra-Dec R34AB, 12CE # Scope must be aligned. If<br />
command conflicts with slew limits,<br />
there will be no action.<br />
Get Azm-Alt Z 12AB, 4000# 10 characters returned,<br />
12AB=Azm, comma, 4000=Alt, #<br />
Get RA-Dec E 34AB, 12CE# Scope must be aligned<br />
Cancel Goto M #<br />
Is Goto in Progress L 0# or 1# 0=No, 1=Yes; "0" is ASCII<br />
character zero<br />
Is Alignment Complete<br />
Commands below<br />
available on version 1.6<br />
or later<br />
J 0# or 1# 0=No, 1=Yes<br />
HC version V 22 Two bytes representing V2.2<br />
Stop/Start Tracking Tx<br />
x = 0 (Tracking off)<br />
x = 1 (Alt-Az on)<br />
x = 2 (EQ-N)<br />
x = 3 (EQ-S)<br />
# Alt-Az tracking requires alignment<br />
32-bit goto RA-Dec r34AB0500,12CE0500 #<br />
32-bit get RA-Dec<br />
Commands below<br />
available on version 2.2<br />
or later<br />
e 34AB0500,12CE0500# The last two characters will always<br />
be zero.<br />
32-bit goto Azm-Alt b34AB0500,12CE0500 #<br />
32-bit get Azm-Alt z 34AB0500,12CE0500# The last two characters will always<br />
be zero.<br />
The cable required to interface to the telescope<br />
has an RS-232 male plug at one end and a 4-4<br />
telephone jack at the other end. The wiring is<br />
as follows:<br />
61
Additional RS232 Commands<br />
Send Any Track Rate Through RS232 To The Hand Control<br />
1. Multiply the desired tracking rate (arcseconds/second) by 4. Example: if the desired trackrate is 150<br />
arcseconds/second, then TRACKRATE = 600<br />
2. Separate TRACKRATE into two bytes, such that (TRACKRATE = TrackRateHigh*256 +<br />
rackRateLow). Example: TrackRateHigh = 2 TrackRateLow = 88<br />
3. To send a tracking rate, send the following 8 bytes:<br />
a. Positive Azm tracking: 80, 3, 16, 6, TrackRateHigh, TrackRateLow, 0, 0<br />
b. Negative Azm tracking:80, 3, 16, 7, TrackRateHigh, TrackRateLow, 0, 0<br />
c. Positive Alt tracking: 80, 3, 17, 6, TrackRateHigh, TrackRateLow, 0, 0<br />
d. Negative Alt tracking: 80, 3, 17, 7, TrackRateHigh, TrackRateLow, 0, 0<br />
4. The number 35 is returned from the handcontrol<br />
Send A Slow-Goto Command Through RS232 To The Hand Control<br />
(note: Only valid for motorcontrol version 4.1 or greater)<br />
1. Convert the angle position to a 24bit number. Example: if the desired position is 220°, then<br />
POSITION_24BIT = (220/360)*2 24 = 10,252,743<br />
2. Separate POSITION_24BIT into three bytes such that (POSITION_24BIT = PosHigh*65536 +<br />
PosMed*256 + PosLow). Exampe: PosHigh = 156, PosMed = 113, PosLow = 199<br />
3. Send the following 8 bytes:<br />
a. Azm Slow Goto: 80, 4, 16, 23, PosHigh, PosMed, PosLow, 0<br />
b. Alt Slow Goto: 80, 4, 17, 23, PosHigh, PosMed, PosLow, 0<br />
4. The number 35 is returned from the handcontrol<br />
Reset The Position Of Azm Or Alt<br />
1. Convert the angle position to a 24bit number, same as Slow-Goto example.<br />
2. Send the following 8 bytes:<br />
a. Azm Set Position: 80, 4, 16, 4, PosHigh, PosMed, PosLow, 0<br />
b. Alt Set Position: 80, 4, 17, 4, PosHigh, PosMed, PosLow, 0<br />
3. The number 35 is returned from the handcontrol<br />
4. Note: If using Motorcontrol version less than 4.1, then send:<br />
a. Azm Set Position: 80, 3, 16, 4, PosHigh, PosMed, PosLow, 0<br />
b. Alt Set Position: 80, 3, 17, 4, PosHigh, PosMed, PosLow, 0<br />
62
APPENDIX E – MAPS OF TIME ZONES<br />
63
CELESTRON TWO YEAR WARRANTY<br />
A. <strong>Celestron</strong> warrants this telescope to be free from defects in materials and workmanship for two years. <strong>Celestron</strong> will repair or<br />
replace such product or part thereof which, upon inspection by <strong>Celestron</strong>, is found to be defective in materials or workmanship.<br />
As a condition to the obligation of <strong>Celestron</strong> to repair or replace such product, the product must be returned to <strong>Celestron</strong><br />
together with proof-of-purchase satisfactory to <strong>Celestron</strong>.<br />
B. The Proper Return Authorization Number must be obtained from <strong>Celestron</strong> in advance of return. Call <strong>Celestron</strong> at (310) 328-<br />
9560 to receive the number to be displayed on the outside of your shipping container.<br />
All returns must be accompanied by a written statement setting forth the name, address, and daytime telephone number of the<br />
owner, together with a brief description of any claimed defects. Parts or product for which replacement is made shall become<br />
the property of <strong>Celestron</strong>.<br />
The customer shall be responsible for all costs of transportation and insurance, both to and from the factory of<br />
<strong>Celestron</strong>, and shall be required to prepay such costs.<br />
<strong>Celestron</strong> shall use reasonable efforts to repair or replace any telescope covered by this warranty within thirty days of receipt. In<br />
the event repair or replacement shall require more than thirty days, <strong>Celestron</strong> shall notify the customer accordingly. <strong>Celestron</strong><br />
reserves the right to replace any product which has been discontinued from its product line with a new product of comparable<br />
value and function.<br />
This warranty shall be void and of no force of effect in the event a covered product has been modified in design or<br />
function, or subjected to abuse, misuse, mishandling or unauthorized repair. Further, product malfunction or<br />
deterioration due to normal wear is not covered by this warranty.<br />
CELESTRON DISCLAIMS ANY WARRANTIES, EXPRESS OR IMPLIED, WHETHER OF MERCHANTABILITY OF<br />
FITNESS FOR A PARTICULAR USE, EXCEPT AS EXPRESSLY SET FORTH HEREIN.<br />
THE SOLE OBLIGATION OF CELESTRON UNDER THIS LIMITED WARRANTY SHALL BE TO REPAIR OR<br />
REPLACE THE COVERED PRODUCT, IN ACCORDANCE WITH THE TERMS SET FORTH HEREIN. CELESTRON<br />
EXPRESSLY DISCLAIMS ANY LOST PROFITS, GENERAL, SPECIAL, INDIRECT OR CONSEQUENTIAL DAMAGES<br />
WHICH MAY RESULT FROM BREACH OF ANY WARRANTY, OR ARISING OUT OF THE USE OR INABILITY TO<br />
USE ANY CELESTRON PRODUCT. ANY WARRANTIES WHICH ARE IMPLIED AND WHICH CANNOT BE<br />
DISCLAIMED SHALL BE LIMITED IN DURATION TO A TERM OF TWO YEARS FROM THE DATE OF ORIGINAL<br />
RETAIL PURCHASE.<br />
Some states do not allow the exclusion or limitation of incidental or consequential damages or limitation on how long an implied<br />
warranty lasts, so the above limitations and exclusions may not apply to you.<br />
This warranty gives you specific legal rights, and you may also have other rights which vary from state to state.<br />
<strong>Celestron</strong> reserves the right to modify or discontinue, without prior notice to you, any model or style telescope.<br />
If warranty problems arise, or if you need assistance in using your telescope contact:<br />
This warranty supersedes all other product warranties.<br />
<strong>Celestron</strong><br />
Customer Service Department<br />
2835 Columbia Street<br />
Torrance, CA 90503 U.S.A.<br />
Tel. (310) 328-9560<br />
Fax. (310) 212-5835<br />
Monday-Friday 8AM-4PM PST<br />
NOTE: This warranty is valid to U.S.A. and Canadian customers who have purchased this product from an Authorized<br />
<strong>Celestron</strong> Dealer in the U.S.A. or Canada. Warranty outside the U.S.A. and Canada is valid only to customers who purchased<br />
from a <strong>Celestron</strong> Distributor or Authorized <strong>Celestron</strong> Dealer in the specific country and please contact them for any<br />
warranty service.
<strong>Celestron</strong><br />
2835 Columbia Street<br />
Torrance, CA 90503 U.S.A.<br />
Tel. (310) 328-9560<br />
Fax. (310) 212-5835<br />
Web site at http//www.celestron.com<br />
Copyright 2003 <strong>Celestron</strong><br />
All rights reserved.<br />
(Products or instructions may change<br />
without notice or obligation.)<br />
Item # 11025-INST<br />
$10.00<br />
08-03