CCNP TSHOOT 6.0 - Cisco Learning Home
CCNP TSHOOT 6.0 - Cisco Learning Home
CCNP TSHOOT 6.0 - Cisco Learning Home

You also want an ePaper? Increase the reach of your titles
YUMPU automatically turns print PDFs into web optimized ePapers that Google loves.
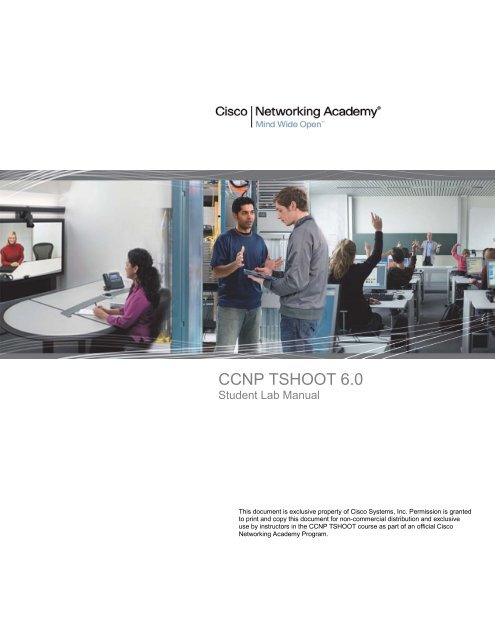
<strong>CCNP</strong> <strong>TSHOOT</strong> <strong>6.0</strong><br />
Student Lab Manual<br />
This document is exclusive property of <strong>Cisco</strong> Systems, Inc. Permission is granted<br />
to print and copy this document for non-commercial distribution and exclusive<br />
use by instructors in the <strong>CCNP</strong> <strong>TSHOOT</strong> course as part of an official <strong>Cisco</strong><br />
Networking Academy Program.
<strong>CCNP</strong>v6 <strong>TSHOOT</strong><br />
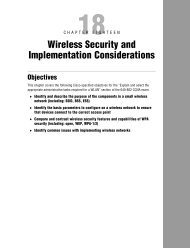
Chapter 3 Lab 3-1, Assembling Maintenance and<br />
Troubleshooting Tools<br />
Physical Topology<br />
All contents are Copyright © 1992–2010 <strong>Cisco</strong> Systems, Inc. All rights reserved. This document is <strong>Cisco</strong> Public Information. Page 1 of 38
<strong>CCNP</strong>v6 <strong>TSHOOT</strong><br />
Objectives<br />
• Assign responsibility for a device or set of devices to team members (optional).<br />
• Load the baseline configuration for all devices in the topology.<br />
• Use available tools to document key device configuration parameters, such as the interfaces in use,<br />
IP addressing, routing protocols, VLANs, logging mechanisms, and security measures.<br />
• Document the physical topology to support future troubleshooting tasks.<br />
• Document the logical topology to support future troubleshooting tasks.<br />
Background<br />
You have been employed as a network engineering consultant by a company that has made a recent<br />
acquisition. The documentation for the acquired company’s network is incomplete and outdated, so you need<br />
to inventory their network architecture both logically and physically, per company documentation standards.<br />
This will help you learn about the design and implementation of their network and ensure that you have<br />
access to up-to-date and accurate network documentation to reference during future troubleshooting<br />
procedures.<br />
In this lab, you survey the baseline <strong>TSHOOT</strong> network. No problems are introduced in this lab. This network<br />
will evolve over time as changes and enhancements are made. You will analyze and document the current<br />
topology and device configuration parameters to develop familiarity with the baseline configurations and<br />
network connections. You will review and fill out the provided documentation as you evaluate the network.<br />
You will assess and assemble tools that can be used for future maintenance and troubleshooting tasks.<br />
Note: This lab uses <strong>Cisco</strong> 1841 routers with <strong>Cisco</strong> IOS Release 12.4(24)T and the Advanced IP Services<br />
image c1841-advipservicesk9-mz.124-24.T.bin. The switches are <strong>Cisco</strong> WS-C2960-24TT-L with the <strong>Cisco</strong><br />
IOS image c2960-lanbasek9-mz.122-46.SE.bin and Catalyst 3560-24PS with the <strong>Cisco</strong> IOS image c3560advipservicesk9-mz.122-46.SE.bin.<br />
Other routers (such as 2801 and 2811), switches (such as 2950 or 3550),<br />
and <strong>Cisco</strong> IOS Software versions can be used if they have comparable capabilities and features. Depending<br />
on the router or switch model and <strong>Cisco</strong> IOS Software version, the commands available and output produced<br />
might vary from what is shown in this lab.<br />
Required Resources<br />
• 3 routers (<strong>Cisco</strong> 1841 with <strong>Cisco</strong> IOS Release 12.4(24)T1 Advanced IP Service or comparable)<br />
• 1 switch (<strong>Cisco</strong> 2960 with the <strong>Cisco</strong> IOS Release 12.2(46)SE C2960-LANBASEK9-M image or<br />
comparable)<br />
• 2 switches (<strong>Cisco</strong> 3560 with the <strong>Cisco</strong> IOS Release 12.2(46)SE C3560-advipservicesK9-mz image or<br />
comparable)<br />
• SRV1 (PC with static IP address): Windows XP, Vista, or Windows Server with RADIUS, TFTP, and<br />
syslog servers, plus an SSH client (PuTTY or comparable) and WireShark software<br />
• PC-B (DHCP client): Windows XP or Vista (with SSH client and WireShark software)<br />
• PC-C (DHCP client): Windows XP or Vista (with SSH client and WireShark software)<br />
• Serial and Ethernet cables, as shown in the topology<br />
• Rollover cables to configure the routers and switches via the console<br />
All contents are Copyright © 1992–2010 <strong>Cisco</strong> Systems, Inc. All rights reserved. This document is <strong>Cisco</strong> Public Information. Page 2 of 38
<strong>CCNP</strong>v6 <strong>TSHOOT</strong><br />
Task 1: Assign Responsibility for Each Device (optional)<br />
Step 1: Review the lab topology together with your team members.<br />
Step 2: Assign responsibility for each device to a team member.<br />
a. The team member who has primary responsibility for a device is in control of the console of that<br />
device and changes to the device. No other team member should access the console, make changes<br />
to the device, or execute disruptive actions, such as reloading or debugging, without permission from<br />
the responsible team member.<br />
b. All team members can access all devices via Telnet or SSH for nondisruptive diagnostic action<br />
without permission of the responsible team member. Responsibilities can be reassigned during later<br />
labs if necessary.<br />
c. If working in teams, you can document responsibilities in the Device Responsibilities table.<br />
Device Responsibilities Table<br />
Device Description Responsible Team Member<br />
R1 Core Router 1<br />
R2 ISP Router<br />
R3 Core Router 2<br />
ALS1 Access Layer Switch 1<br />
DLS1 Distribution Layer Switch 1<br />
DLS2 Distribution Layer Switch 2<br />
SRV1 TFTP, syslog<br />
PC-B User PC<br />
PC-C User PC<br />
Task 2: Load the Baseline Device Configuration Files<br />
Use the following procedure on each device in the network to load the baseline configuration. The procedure<br />
shown here is for a switch, but it is very similar to that of a router.<br />
Note: The configs for this lab include ip host name ip-addr entries for all devices. This can be helpful in<br />
accessing devices using Telnet with this lab. The ip host entries are only provided in Lab 3-1 as the device IP<br />
addresses will change in subsequent labs.<br />
Step 1: Verify the existence and location of the lab configuration files.<br />
The lab configuration files for the course should be in flash under the tshoot directory for a given device. Use the<br />
show flash command to verify the presence of this directory. You can also verify the contents of the directory<br />
using the cd and dir commands. If the directory and files are not present, contact your instructor.<br />
All contents are Copyright © 1992–2010 <strong>Cisco</strong> Systems, Inc. All rights reserved. This document is <strong>Cisco</strong> Public Information. Page 3 of 38
<strong>CCNP</strong>v6 <strong>TSHOOT</strong><br />
Note: When the show flash command is used on a switch, it lists the directories and files at the root directory<br />
but not the files within the directories. The following example uses the cd and dir commands on switch ALS1.<br />
ALS1#show flash:<br />
Directory of flash:/<br />
3 -rwx 916 Mar 1 1993 00:00:29 +00:00 vlan.dat<br />
619 -rwx 6582 Mar 1 1993 00:10:09 +00:00 config.text<br />
6 drwx 192 Oct 9 2009 13:00:50 +00:00 c2960-lanbasek9-mz.122-46.SE.bin<br />
622 drwx 128 Oct 9 2009 13:03:05 +00:00 tshoot<br />
ALS1#cd tshoot<br />
ALS1#dir<br />
Directory of flash:/tshoot/<br />
623 -rwx 6582 Oct 9 2009 13:03:05 +00:00 Lab31-ALS1-Base-Cfg.txt<br />
624 -rwx 6578 Oct 9 2009 12:32:48 +00:00 Lab41-ALS1-TT-A-Cfg.txt<br />
<br />
Alternatively, you can see the contents of the directory by specifying its name<br />
using the dir command. For example:<br />
ALS1#dir flash:/tshoot<br />
Directory of flash:/tshoot/<br />
5 -rwx 6515 Oct 9 2009 14:39:42 +00:00 Lab31-ALS1-Base-Cfg.txt<br />
Note: When the show flash command is used on a router, it lists the directories and the files within them. The<br />
following example uses only the show flash command on router R1. The tshoot directory and its contents are<br />
listed.<br />
R1#show flash:<br />
-#- --length-- -----date/time------ path<br />
1 38266988 Sep 24 2009 17:47:14 c1841-advipservicesk9-mz.124-24.T1.bin<br />
2 0 Oct 09 2009 12:32:06 tshoot<br />
3 2288 Oct 09 2009 12:32:48 tshoot/Lab31-R1-Base-Cfg.txt<br />
<br />
Step 2: Erase the startup config from NVRAM.<br />
ALS1#erase startup-config<br />
Erasing the nvram filesystem will remove all configuration files! Continue?<br />
[confirm]<br />
[OK]<br />
Erase of nvram: complete<br />
Step 3: Delete the VLAN database from flash (switches only).<br />
ALS1#delete vlan.dat<br />
Delete flash:vlan.dat? [confirm]<br />
All contents are Copyright © 1992–2010 <strong>Cisco</strong> Systems, Inc. All rights reserved. This document is <strong>Cisco</strong> Public Information. Page 4 of 38
<strong>CCNP</strong>v6 <strong>TSHOOT</strong><br />
Step 4: Reload the device, but do not save the system configuration if prompted.<br />
ALS1#reload<br />
System configuration has been modified. Save? [yes/no]: no<br />
Proceed with reload? [confirm]<br />
*Oct 1 00:29:28.704: %SYS-5-RELOAD: Reload requested by console. Reload<br />
Reason: Reload command.<br />
Step 5: When the device restarts, do not enter the initial configuration dialog, but terminate<br />
autoinstall if prompted.<br />
Press RETURN to get started!<br />
--- System Configuration Dialog ---<br />
Would you like to enter the initial configuration dialog? [yes/no]: no<br />
Would you like to terminate autoinstall? [yes]: Enter<br />
Step 6: Copy the specified lab device configuration file from flash to the running config.<br />
Switch>enable<br />
Switch#copy flash:/tshoot/Lab31-ALS1-Base-Cfg.txt running-config<br />
Destination filename [running-config]? Enter<br />
ALS1#<br />
Note: Although it is possible to copy the file to the startup config and reload the device, the RSA keys for SSH<br />
cannot be generated from the startup config.<br />
Step 7: Copy the running config to the startup config.<br />
Depending on the IOS version, AUTOSAVE may automatically save a copy of the running config to<br />
NVRAM for startup.<br />
Note: AUTOSAVE does not copy the line con and vty configurations from the running config to the<br />
startup config. To ensure that the startup configuration is complete, you must copy manually.<br />
ALS1#copy running-config startup-config<br />
Building configuration...<br />
[OK]<br />
Note: If the device is rebooted at this point, you can log in with the username admin and the password<br />
adminpa55. To access privileged EXEC mode, use the enable password of ciscoenpa55.<br />
Step 8: Repeat Steps 1 through 7 for the other devices in the network.<br />
Step 9: Configure the PCs.<br />
a. Configure SRV1 with the static IP address 10.1.50.1/24 and the default gateway 10.1.50.254.<br />
b. Configure PC-B and PC-C as DHCP clients.<br />
All contents are Copyright © 1992–2010 <strong>Cisco</strong> Systems, Inc. All rights reserved. This document is <strong>Cisco</strong> Public Information. Page 5 of 38
<strong>CCNP</strong>v6 <strong>TSHOOT</strong><br />
Step 10: Test basic network connectivity between devices.<br />
a. Ping from PC-B to SRV1 at 10.1.50.1. Were the pings successful? ______________________<br />
b. Ping from ALS1 to R2 at loopback 10.1.202.1. Were the pings successful? ________________<br />
Note: If the pings are not successful, contact your instructor.<br />
Task 3: Analyze and Document the Physical Lab Topology<br />
Note: At this time, only examine and document the physical connections. Documenting the logical topology, such<br />
as subnets, IP addresses, and routing protocols, is addressed in Task 4 of this lab.<br />
Step 1: Review the physical topology diagram on page 1 of the lab.<br />
Step 2: Use <strong>Cisco</strong> Discovery Protocol and show commands to verify the Layer 1 and Layer 2<br />
connections of the lab topology.<br />
a. Use the show cdp command to discover the interfaces associated with the physical connections. Fill<br />
in the correct device and interface designators in the following Device Links table and label them on<br />
the physical topology diagram on the first page of the lab.<br />
b. Review the configurations of the devices for using Layer 1 and Layer 2 features, such as trunks and<br />
EtherChannels. Fill in the information in the Device Links table and add it to the diagram. If a link is<br />
accounted for from one device to another, it is not necessary to repeat the entry from the other<br />
device. The first entry for ALS1, interface Fa0/1 is filled in as an example.<br />
Which other commands could you use to identify Layer 1 and Layer 2 characteristics?<br />
Device Links Table<br />
From Device Interface To Device Interface Layer 1 and 2 Features<br />
and Protocols Used<br />
ALS1 Fa0/1 DLS1 Fa0/1 EtherChannel Po1,<br />
802.1Q<br />
All contents are Copyright © 1992–2010 <strong>Cisco</strong> Systems, Inc. All rights reserved. This document is <strong>Cisco</strong> Public Information. Page 6 of 38
<strong>CCNP</strong>v6 <strong>TSHOOT</strong><br />
From Device Interface To Device Interface Layer 1 and 2 Features<br />
and Protocols Used<br />
c. Verify that all physical links shown in the diagram are operational. Which commands did you use?<br />
Step 3: Map the VLANs used in the lab to the devices in the diagram.<br />
Fill in the VLAN Definition table and label the physical topology diagram with the VLANs used for this topology.<br />
Identify all host devices that are members of each VLAN. The first entry for VLAN 10 is filled in as an example.<br />
VLAN Definition Table<br />
VLAN # Name Description VLAN Members<br />
10 OFFICE Office VLAN ALS1, DLS1, DLS2, PC-B<br />
Step 4: Analyze spanning tree for the Layer 2 switched domain.<br />
a. Analyze the spanning tree characteristics of the Layer 2 switched portion of the network. Which type<br />
of spanning-tree mode is implemented?<br />
b. Which switch is the root switch for each VLAN, and what are the configured spanning-tree priorities?<br />
c. What is the resulting spanning-tree topology for VLANs that have client devices connected?<br />
d. Which commands did you use to analyze the spanning-tree characteristics?<br />
Step 5: Diagram the spanning tree for VLAN 10.<br />
a. Label the STP role, port status, and direction for each port channel used in the physical topology<br />
diagram below.<br />
All contents are Copyright © 1992–2010 <strong>Cisco</strong> Systems, Inc. All rights reserved. This document is <strong>Cisco</strong> Public Information. Page 7 of 38
<strong>CCNP</strong>v6 <strong>TSHOOT</strong><br />
b. If working as a team, discuss your findings with your teammates to ensure that all team members<br />
understand the physical and data link aspects of the network design.<br />
Student Notes<br />
Use this space to make any additional notes regarding the physical configuration and the commands used.<br />
_______________________________________________________________________________<br />
_______________________________________________________________________________<br />
_______________________________________________________________________________<br />
_______________________________________________________________________________<br />
_______________________________________________________________________________<br />
Task 4: Analyze and Document the Logical Lab Topology<br />
Step 1: Review the logical lab diagram and the subnets.<br />
Review the IP subnets in the Subnet table for the VLANs and WAN links that are used in the lab network.<br />
Router interface designations from the physical topology diagram are provided.<br />
All contents are Copyright © 1992–2010 <strong>Cisco</strong> Systems, Inc. All rights reserved. This document is <strong>Cisco</strong> Public Information. Page 8 of 38
<strong>CCNP</strong>v6 <strong>TSHOOT</strong><br />
All contents are Copyright © 1992–2010 <strong>Cisco</strong> Systems, Inc. All rights reserved. This document is <strong>Cisco</strong> Public Information. Page 9 of 38
<strong>CCNP</strong>v6 <strong>TSHOOT</strong><br />
Subnet Table<br />
Description Subnet Prefix Devices<br />
VLANs<br />
Office VLAN 10 10.1.10.0 /24 PC-B<br />
Voice VLAN 20 10.1.20.0 /24 N/A<br />
Guest VLAN 30 10.1.30.0 /24 PC-C<br />
Servers VLAN 50 10.1.50.0 /24 SRV1<br />
Management VLAN 10.1.100.0 /24 ALS1, DLS1, DLS2<br />
WAN Links<br />
DLS1 – R1 10.1.2.0 /30 DLS1 and R1 FE link<br />
DLS2 – R3 10.1.2.12 /30 DLS2 and R3 FE link<br />
R1 – R2 10.1.1.0 /30 R1 and R2 serial link<br />
R2 – R3 10.1.1.4 /30 R2 and R3 serial link<br />
Step 2: Map the subnet scheme to the logical diagram.<br />
In the previous step, the subnets were documented in the Subnet table. Now document the host portion<br />
of the addresses. To document the host part, research the routing tables and interface IP addresses of all<br />
the devices. Document the management VLAN and interface addresses in the IP Address table and on<br />
the logical topology diagram. Use only the number of the last octet for IP addresses in the diagram. The<br />
device names and interfaces are listed to help identify the IP addresses. The entry for ALS1 VLAN 100 is<br />
shown as an example. If an interface is not in use, indicate this in the Additional Information column.<br />
Account for all interfaces on the routers.<br />
IP Address Table<br />
Device<br />
Name<br />
Abbreviation<br />
Interface<br />
Network Address<br />
and Prefix<br />
ALS1 Vlan 100 10.1.100.1/24 SVI<br />
DLS1 Vlan 100<br />
DLS1 Fa0/5<br />
DLS2 Vlan 100<br />
DLS2 Fa0/5<br />
R1 Fa0/0<br />
R1 Fa0/1<br />
R1 S0/0/0<br />
R1 S0/0/1<br />
R1 Loopback 0<br />
R2 Fa0/0<br />
R2 Fa0/1<br />
R2 S0/0/0<br />
R2 S0/0/1<br />
R2 Loopback 0<br />
Additional Information<br />
All contents are Copyright © 1992–2010 <strong>Cisco</strong> Systems, Inc. All rights reserved. This document is <strong>Cisco</strong> Public Information. Page 10 of 38
<strong>CCNP</strong>v6 <strong>TSHOOT</strong><br />
R3 Fa0/0<br />
R3 Fa0/1<br />
R3 S0/0/0<br />
R3 S0/0/1<br />
R3 Loopback 0<br />
SRV1 NIC<br />
PC-B NIC<br />
PC-C NIC<br />
Step 3: Analyze and document control plane logical configuration features.<br />
Notes<br />
Analyze the configurations of the devices for control plane features such as routing protocols, First Hop<br />
Redundancy Protocols (FHRPs), dynamic host configuration protocol (DHCP), and network address<br />
translation (NAT). Review, document, and discuss the following aspects of the logical network<br />
configuration.<br />
a. Is dynamic or static routing being used? _______ If dynamic, which routing protocol? _______<br />
b. Are FHRPs in use, such as the Hot Standby Router Protocol (HSRP), Virtual Router Redundancy<br />
Protocol (VRRP), or Gateway Load Balancing Protocol (GLBP)? _____ If yes, which one? ______<br />
c. What is the active router for all relevant VLANs?<br />
d. From the PC-B command prompt, issue the tracert command to router R2 loopback 0 at<br />
10.1.202.1. What path did the packets take?<br />
e. Are any access lists used to filter traffic on the network? ________ If yes, describe their function.<br />
f. Is DHCP in use? ____ If yes, which DHCP server is used and for which VLANs present in the logical<br />
topology diagram? ________________________<br />
g. If working as a team, discuss your findings with your teammates to ensure that all team members<br />
understand the high-level design of the network.<br />
Use this space to make any additional notes regarding the logical configuration and the commands used.<br />
_______________________________________________________________________________<br />
_______________________________________________________________________________<br />
_______________________________________________________________________________<br />
_______________________________________________________________________________<br />
_______________________________________________________________________________<br />
_______________________________________________________________________________<br />
All contents are Copyright © 1992–2010 <strong>Cisco</strong> Systems, Inc. All rights reserved. This document is <strong>Cisco</strong> Public Information. Page 11 of 38
<strong>CCNP</strong>v6 <strong>TSHOOT</strong><br />
Task 5: Identify Troubleshooting and Maintenance Tools<br />
Step 1: Analyze device configurations for troubleshooting and maintenance features.<br />
Analyze the configurations of the devices for services that support troubleshooting and maintenance, such as<br />
syslog, Simple Network Management Protocol (SNMP), and other network management features.<br />
Step 2: Document the troubleshooting and maintenance features.<br />
Notes<br />
a. Document the troubleshooting and maintenance applications or tools in use with the network devices<br />
in the Troubleshooting and Maintenance Tools table. An entry for system logging is provided as an<br />
example.<br />
Troubleshooting and Maintenance Tools Table<br />
Configured Feature Devices Target Server Target Tool or Application<br />
System message logging<br />
All SRV1<br />
Syslog server<br />
b. If working as a team, discuss your findings with your teammates to ensure that all team members<br />
know which maintenance and troubleshooting tools are available in the network.<br />
Use this space to make any additional notes regarding troubleshooting and maintenance applications or tools.<br />
_______________________________________________________________________________<br />
_______________________________________________________________________________<br />
_______________________________________________________________________________<br />
_______________________________________________________________________________<br />
_______________________________________________________________________________<br />
_______________________________________________________________________________<br />
Task 6: Identify the Security Measures Implemented<br />
Step 1: Analyze device configurations for security-related features.<br />
Analyze the configurations of your assigned devices for configuration options that help support a more<br />
secure network implementation, such as password security, login authentication, secure remote<br />
management, switch trunk and access port security, and VLANs. Record your entries in the Security<br />
Features table. An entry for password security is provided as an example.<br />
All contents are Copyright © 1992–2010 <strong>Cisco</strong> Systems, Inc. All rights reserved. This document is <strong>Cisco</strong> Public Information. Page 12 of 38
<strong>CCNP</strong>v6 <strong>TSHOOT</strong><br />
Notes<br />
Security Features Table<br />
Security Feature Configured Implementation Method or Commands<br />
Password security Enable secret, password encryption<br />
Use this space to make any additional notes regarding security measures.<br />
_______________________________________________________________________________<br />
_______________________________________________________________________________<br />
_______________________________________________________________________________<br />
_______________________________________________________________________________<br />
_______________________________________________________________________________<br />
_______________________________________________________________________________<br />
Note: Reference configurations for all devices are provided at the end of the lab. These are not the full show<br />
running-config output. Only the nondefault commands used to configure the devices are included (along<br />
with no shutdown on interfaces).<br />
Lab Debrief Notes<br />
Use this space to make notes of the key learning points that you picked up during the lab debrief discussions with<br />
your instructor. This can include alternate solutions, methods, and processes, procedure and communication<br />
improvements, as well as key commands and tools.<br />
Note: This is your primary opportunity to document a baseline of the lab network before starting the<br />
troubleshooting exercises. During the debrief session, ask your instructor for clarification of any aspects of the<br />
network design and configurations that are unclear to you.<br />
_______________________________________________________________________________<br />
_______________________________________________________________________________<br />
_______________________________________________________________________________<br />
_______________________________________________________________________________<br />
_______________________________________________________________________________<br />
_______________________________________________________________________________<br />
_______________________________________________________________________________<br />
All contents are Copyright © 1992–2010 <strong>Cisco</strong> Systems, Inc. All rights reserved. This document is <strong>Cisco</strong> Public Information. Page 13 of 38
<strong>CCNP</strong>v6 <strong>TSHOOT</strong><br />
Router Interface Summary Table<br />
Router Model Ethernet Interface<br />
#1<br />
1700 Fast Ethernet 0<br />
(FA0)<br />
1800 Fast Ethernet 0/0<br />
(FA0/0)<br />
2600 Fast Ethernet 0/0<br />
(FA0/0)<br />
2800 Fast Ethernet 0/0<br />
(FA0/0)<br />
Router Interface Summary<br />
Ethernet Interface<br />
#2<br />
Fast Ethernet 1<br />
(FA1)<br />
Fast Ethernet 0/1<br />
(FA0/1)<br />
Fast Ethernet 0/1<br />
(FA0/1)<br />
Fast Ethernet 0/1<br />
(FA0/1)<br />
Serial Interface<br />
#1<br />
Serial Interface<br />
#2<br />
Serial 0 (S0) Serial 1 (S1)<br />
Serial 0/0/0<br />
(S0/0/0)<br />
Serial 0/0/1<br />
(S0/0/1)<br />
Serial 0/0 (S0/0) Serial 0/1 (S0/1)<br />
Serial 0/0/0<br />
(S0/0/0)<br />
Serial 0/0/1<br />
(S0/0/1)<br />
Note: To find out how the router is configured, look at the interfaces to identify the type of router<br />
and how many interfaces the router has. Rather than try to list all the combinations of<br />
configurations for each router class, this table includes identifiers for the possible combinations of<br />
Ethernet and serial interfaces in the device. The table does not include any other type of interface,<br />
even though a specific router might contain one. An example of this is an ISDN BRI interface. The<br />
string in parenthesis is the legal abbreviation that can be used in <strong>Cisco</strong> IOS commands to<br />
represent the interface.<br />
Device Configurations<br />
Switch ALS1<br />
!Lab 3-1 Switch ALS1 Baseline Config<br />
!<br />
hostname ALS1<br />
!<br />
service timestamps debug datetime msec<br />
service timestamps log datetime msec<br />
service password-encryption<br />
!<br />
logging buffered 16384<br />
enable secret ciscoenpa55<br />
!<br />
username admin secret adminpa55<br />
!<br />
banner motd $*** Lab 3-1 Switch ALS1 Baseline Config ***$<br />
!<br />
no ip domain lookup<br />
!<br />
aaa new-model<br />
aaa authentication login default local<br />
aaa authentication login CONSOLE none<br />
aaa authorization exec default local<br />
!<br />
system mtu routing 1500<br />
!<br />
vtp domain <strong>TSHOOT</strong><br />
vtp mode transparent<br />
!<br />
ip subnet-zero<br />
ip domain-name tshoot.net<br />
All contents are Copyright © 1992–2010 <strong>Cisco</strong> Systems, Inc. All rights reserved. This document is <strong>Cisco</strong> Public Information. Page 14 of 38
<strong>CCNP</strong>v6 <strong>TSHOOT</strong><br />
ip host R1 10.1.2.2 10.1.1.1 10.1.201.1<br />
ip host R2 10.1.1.2 10.1.1.6 10.1.202.1<br />
ip host R3 10.1.1.5 10.1.2.14 10.1.203.1<br />
ip host ALS1 10.1.100.1<br />
ip host DLS1 10.1.100.252 10.1.2.1<br />
ip host DLS2 10.1.100.253 10.1.2.13<br />
!<br />
crypto key zeroize rsa<br />
crypto key generate rsa general-keys modulus 1024<br />
!<br />
archive<br />
log config<br />
logging size 50<br />
notify syslog<br />
hidekeys<br />
path tftp://10.1.50.1/$h-archive-config<br />
write-memory<br />
file prompt quiet<br />
spanning-tree mode rapid-pvst<br />
spanning-tree portfast default<br />
!<br />
interface Vlan1<br />
no ip address<br />
shutdown<br />
!<br />
vlan 10<br />
name OFFICE<br />
!<br />
vlan 20<br />
name VOICE<br />
!<br />
vlan 30<br />
name GUEST<br />
!<br />
vlan 100<br />
name MGMT<br />
!<br />
vlan 900<br />
name NATIVE<br />
!<br />
vlan 999<br />
name UNUSED<br />
!<br />
ip telnet source-interface Vlan100<br />
ip ssh source-interface Vlan100<br />
!<br />
interface Port-channel1<br />
description Channel to DLS1<br />
no shutdown<br />
!<br />
interface Port-channel2<br />
description Channel to DLS2<br />
no shutdown<br />
!<br />
interface FastEthernet0/1<br />
description Channel to DLS1<br />
switchport trunk native vlan 900<br />
All contents are Copyright © 1992–2010 <strong>Cisco</strong> Systems, Inc. All rights reserved. This document is <strong>Cisco</strong> Public Information. Page 15 of 38
<strong>CCNP</strong>v6 <strong>TSHOOT</strong><br />
switchport trunk allowed vlan 10,20,30,100<br />
switchport mode trunk<br />
switchport nonegotiate<br />
channel-group 1 mode on<br />
no shutdown<br />
!<br />
interface FastEthernet0/2<br />
description Channel to DLS1<br />
switchport trunk native vlan 900<br />
switchport trunk allowed vlan 10,20,30,100<br />
switchport mode trunk<br />
switchport nonegotiate<br />
channel-group 1 mode on<br />
no shutdown<br />
!<br />
interface FastEthernet0/3<br />
description Channel to DLS2<br />
switchport trunk native vlan 900<br />
switchport trunk allowed vlan 10,20,30,100<br />
switchport mode trunk<br />
switchport nonegotiate<br />
channel-group 2 mode on<br />
no shutdown<br />
!<br />
interface FastEthernet0/4<br />
description Channel to DLS2<br />
switchport trunk native vlan 900<br />
switchport trunk allowed vlan 10,20,30,100<br />
switchport mode trunk<br />
switchport nonegotiate<br />
channel-group 2 mode on<br />
no shutdown<br />
!<br />
interface FastEthernet0/5<br />
description Unused<br />
switchport access vlan 999<br />
switchport mode access<br />
switchport nonegotiate<br />
shutdown<br />
!<br />
interface FastEthernet0/6<br />
description Unused<br />
switchport access vlan 999<br />
switchport mode access<br />
switchport nonegotiate<br />
shutdown<br />
interface FastEthernet0/7<br />
description Unused<br />
switchport access vlan 999<br />
switchport mode access<br />
switchport nonegotiate<br />
shutdown<br />
!<br />
interface FastEthernet0/8<br />
description Unused<br />
switchport access vlan 999<br />
switchport mode access<br />
All contents are Copyright © 1992–2010 <strong>Cisco</strong> Systems, Inc. All rights reserved. This document is <strong>Cisco</strong> Public Information. Page 16 of 38
<strong>CCNP</strong>v6 <strong>TSHOOT</strong><br />
switchport nonegotiate<br />
shutdown<br />
!<br />
interface FastEthernet0/9<br />
description Unused<br />
switchport access vlan 999<br />
switchport mode access<br />
switchport nonegotiate<br />
shutdown<br />
!<br />
interface FastEthernet0/10<br />
description Unused<br />
switchport access vlan 999<br />
switchport mode access<br />
switchport nonegotiate<br />
shutdown<br />
!<br />
interface FastEthernet0/11<br />
description Unused<br />
switchport access vlan 999<br />
switchport mode access<br />
switchport nonegotiate<br />
shutdown<br />
!<br />
interface FastEthernet0/12<br />
description Unused<br />
switchport access vlan 999<br />
switchport mode access<br />
switchport nonegotiate<br />
shutdown<br />
!<br />
interface FastEthernet0/13<br />
description Unused<br />
switchport access vlan 999<br />
switchport mode access<br />
switchport nonegotiate<br />
shutdown<br />
!<br />
interface FastEthernet0/14<br />
description Unused<br />
switchport access vlan 999<br />
switchport mode access<br />
switchport nonegotiate<br />
shutdown<br />
!<br />
interface FastEthernet0/15<br />
description Unused<br />
switchport access vlan 999<br />
switchport mode access<br />
switchport nonegotiate<br />
shutdown<br />
!<br />
interface FastEthernet0/16<br />
description Unused<br />
switchport access vlan 999<br />
switchport mode access<br />
switchport nonegotiate<br />
shutdown<br />
All contents are Copyright © 1992–2010 <strong>Cisco</strong> Systems, Inc. All rights reserved. This document is <strong>Cisco</strong> Public Information. Page 17 of 38
<strong>CCNP</strong>v6 <strong>TSHOOT</strong><br />
!<br />
interface FastEthernet0/17<br />
description Unused<br />
switchport access vlan 999<br />
switchport mode access<br />
switchport nonegotiate<br />
shutdown<br />
!<br />
interface FastEthernet0/18<br />
description To PC-B<br />
switchport access vlan 10<br />
switchport mode access<br />
switchport voice vlan 20<br />
spanning-tree portfast<br />
switchport port-security<br />
switchport port-security maximum 2<br />
switchport port-security violation shutdown<br />
switchport port-security mac-address sticky<br />
no shut<br />
!<br />
interface FastEthernet0/19<br />
description Unused<br />
switchport access vlan 999<br />
switchport mode access<br />
switchport nonegotiate<br />
shutdown<br />
!<br />
interface FastEthernet0/20<br />
description Unused<br />
switchport access vlan 999<br />
switchport mode access<br />
switchport nonegotiate<br />
shutdown<br />
!<br />
interface FastEthernet0/21<br />
description Unused<br />
switchport access vlan 999<br />
switchport mode access<br />
switchport nonegotiate<br />
shutdown<br />
!<br />
interface FastEthernet0/22<br />
description Unused<br />
switchport access vlan 999<br />
switchport mode access<br />
switchport nonegotiate<br />
shutdown<br />
!<br />
interface FastEthernet0/23<br />
description Unused<br />
switchport access vlan 999<br />
switchport mode access<br />
switchport nonegotiate<br />
shutdown<br />
!<br />
interface FastEthernet0/24<br />
description Unused<br />
switchport access vlan 999<br />
All contents are Copyright © 1992–2010 <strong>Cisco</strong> Systems, Inc. All rights reserved. This document is <strong>Cisco</strong> Public Information. Page 18 of 38
<strong>CCNP</strong>v6 <strong>TSHOOT</strong><br />
switchport mode access<br />
switchport nonegotiate<br />
shutdown<br />
!<br />
interface gigabitethernet0/1<br />
description Unused<br />
switchport access vlan 999<br />
switchport mode access<br />
switchport nonegotiate<br />
shutdown<br />
!<br />
interface gigabitethernet0/2<br />
description Unused<br />
switchport access vlan 999<br />
switchport mode access<br />
switchport nonegotiate<br />
shutdown<br />
!<br />
interface Vlan100<br />
ip address 10.1.100.1 255.255.255.0<br />
no shutdown<br />
!<br />
ip default-gateway 10.1.100.254<br />
!<br />
ip http server<br />
ip http secure-server<br />
!<br />
logging source-interface Vlan100<br />
logging 10.1.50.1<br />
!<br />
snmp-server community cisco RO<br />
snmp-server community san-fran RW<br />
snmp-server trap-source Vlan100<br />
snmp-server location <strong>TSHOOT</strong> Lab Facility<br />
snmp-server contact support@tshoot.net<br />
snmp-server host 10.1.50.1 version 2c cisco<br />
snmp-server enable traps vtp<br />
snmp-server enable traps vlancreate<br />
snmp-server enable traps vlandelete<br />
snmp-server enable traps port-security<br />
snmp-server enable traps vlan-membership<br />
!<br />
line con 0<br />
exec-timeout 60 0<br />
login authentication CONSOLE<br />
logging synchronous<br />
line vty 0 4<br />
exec-timeout 60 0<br />
transport input telnet ssh<br />
line vty 5 15<br />
no transport input<br />
!<br />
ntp source Vlan100<br />
ntp server 10.1.202.1<br />
end<br />
All contents are Copyright © 1992–2010 <strong>Cisco</strong> Systems, Inc. All rights reserved. This document is <strong>Cisco</strong> Public Information. Page 19 of 38
<strong>CCNP</strong>v6 <strong>TSHOOT</strong><br />
Switch DLS1<br />
!Lab 3-1 Switch DLS1 Baseline Config<br />
!<br />
hostname DLS1<br />
!<br />
service timestamps debug datetime msec<br />
service timestamps log datetime msec<br />
service password-encryption<br />
!<br />
logging buffered 16384<br />
enable secret ciscoenpa55<br />
!<br />
username admin secret adminpa55<br />
banner motd $*** Lab 3-1 Switch DLS1 Baseline Config ***$<br />
!<br />
no ip domain lookup<br />
!<br />
aaa new-model<br />
aaa authentication login default local<br />
aaa authentication login CONSOLE none<br />
aaa authorization exec default local<br />
!<br />
system mtu routing 1500<br />
!<br />
vtp domain <strong>TSHOOT</strong><br />
vtp mode transparent<br />
!<br />
ip subnet-zero<br />
ip routing<br />
!<br />
ip domain-name tshoot.net<br />
ip host R1 10.1.2.2 10.1.1.1 10.1.201.1<br />
ip host R2 10.1.1.2 10.1.1.6 10.1.202.1<br />
ip host R3 10.1.1.5 10.1.2.14 10.1.203.1<br />
ip host ALS1 10.1.100.1<br />
ip host DLS1 10.1.100.252 10.1.2.1<br />
ip host DLS2 10.1.100.253 10.1.2.13<br />
!<br />
ip dhcp excluded-address 10.1.10.252 10.1.10.254<br />
ip dhcp excluded-address 10.1.20.252 10.1.20.254<br />
ip dhcp excluded-address 10.1.30.252 10.1.30.254<br />
!<br />
ip dhcp pool OFFICE<br />
network 10.1.10.0 255.255.255.0<br />
default-router 10.1.10.254<br />
domain-name tshoot.net<br />
!<br />
ip dhcp pool VOICE<br />
network 10.1.20.0 255.255.255.0<br />
default-router 10.1.20.254<br />
domain-name tshoot.net<br />
!<br />
ip dhcp pool GUEST<br />
network 10.1.30.0 255.255.255.0<br />
default-router 10.1.30.254<br />
domain-name tshoot.net<br />
All contents are Copyright © 1992–2010 <strong>Cisco</strong> Systems, Inc. All rights reserved. This document is <strong>Cisco</strong> Public Information. Page 20 of 38
<strong>CCNP</strong>v6 <strong>TSHOOT</strong><br />
!<br />
crypto key zeroize rsa<br />
crypto key generate rsa general-keys modulus 1024<br />
!<br />
errdisable recovery cause bpduguard<br />
!<br />
archive<br />
log config<br />
logging size 50<br />
notify syslog<br />
hidekeys<br />
path tftp://10.1.50.1/$h-archive-config<br />
write-memory<br />
file prompt quiet<br />
!<br />
spanning-tree mode rapid-pvst<br />
!<br />
spanning-tree vlan 10,30,100 priority 24576<br />
spanning-tree vlan 20,50 priority 28672<br />
!<br />
vlan 10<br />
name OFFICE<br />
!<br />
vlan 20<br />
name VOICE<br />
!<br />
vlan 30<br />
name GUEST<br />
!<br />
vlan 50<br />
name SERVERS<br />
!<br />
vlan 100<br />
name MGMT<br />
!<br />
vlan 900<br />
name NATIVE<br />
!<br />
vlan 999<br />
name UNUSED<br />
!<br />
ip telnet source-interface Vlan100<br />
ip ssh source-interface Vlan100<br />
!<br />
interface Port-channel1<br />
description Channel to ALS1<br />
no shut<br />
!<br />
interface Port-channel10<br />
description Channel to DLS2<br />
no shut<br />
!<br />
interface FastEthernet0/1<br />
description Channel to ALS1<br />
switchport trunk encapsulation dot1q<br />
switchport trunk native vlan 900<br />
switchport trunk allowed vlan 10,20,30,100<br />
switchport mode trunk<br />
All contents are Copyright © 1992–2010 <strong>Cisco</strong> Systems, Inc. All rights reserved. This document is <strong>Cisco</strong> Public Information. Page 21 of 38
<strong>CCNP</strong>v6 <strong>TSHOOT</strong><br />
switchport nonegotiate<br />
channel-group 1 mode on<br />
no shut<br />
!<br />
interface FastEthernet0/2<br />
description Channel to ALS1<br />
switchport trunk encapsulation dot1q<br />
switchport trunk native vlan 900<br />
switchport trunk allowed vlan 10,20,30,100<br />
switchport mode trunk<br />
switchport nonegotiate<br />
channel-group 1 mode on<br />
no shut<br />
!<br />
interface FastEthernet0/3<br />
description Channel to DLS2<br />
switchport trunk encapsulation dot1q<br />
switchport trunk native vlan 900<br />
switchport trunk allowed vlan 10,20,30,50,100<br />
switchport mode trunk<br />
switchport nonegotiate<br />
channel-group 10 mode on<br />
no shut<br />
!<br />
interface FastEthernet0/4<br />
description Channel to DLS2<br />
switchport trunk encapsulation dot1q<br />
switchport trunk native vlan 900<br />
switchport trunk allowed vlan 10,20,30,50,100<br />
switchport mode trunk<br />
switchport nonegotiate<br />
channel-group 10 mode on<br />
no shut<br />
!<br />
interface FastEthernet0/5<br />
description FE to R1<br />
no switchport<br />
ip address 10.1.2.1 255.255.255.252<br />
speed 100<br />
duplex full<br />
spanning-tree bpduguard enable<br />
no shut<br />
!<br />
interface FastEthernet0/6<br />
description FE to SRV1<br />
switchport access vlan 50<br />
switchport mode access<br />
switchport nonegotiate<br />
spanning-tree portfast<br />
no shut<br />
!<br />
interface FastEthernet0/7<br />
description Unused<br />
switchport access vlan 999<br />
switchport mode access<br />
switchport nonegotiate<br />
shutdown<br />
!<br />
All contents are Copyright © 1992–2010 <strong>Cisco</strong> Systems, Inc. All rights reserved. This document is <strong>Cisco</strong> Public Information. Page 22 of 38
<strong>CCNP</strong>v6 <strong>TSHOOT</strong><br />
interface FastEthernet0/8<br />
description Unused<br />
switchport access vlan 999<br />
switchport mode access<br />
switchport nonegotiate<br />
shutdown<br />
!<br />
interface FastEthernet0/9<br />
description Unused<br />
switchport access vlan 999<br />
switchport mode access<br />
switchport nonegotiate<br />
shutdown<br />
!<br />
interface FastEthernet0/10<br />
description Unused<br />
switchport access vlan 999<br />
switchport mode access<br />
switchport nonegotiate<br />
shutdown<br />
!<br />
interface FastEthernet0/11<br />
description Unused<br />
switchport access vlan 999<br />
switchport mode access<br />
switchport nonegotiate<br />
shutdown<br />
!<br />
interface FastEthernet0/12<br />
description Unused<br />
switchport access vlan 999<br />
switchport mode access<br />
switchport nonegotiate<br />
shutdown<br />
!<br />
interface FastEthernet0/13<br />
description Unused<br />
switchport access vlan 999<br />
switchport mode access<br />
switchport nonegotiate<br />
shutdown<br />
!<br />
interface FastEthernet0/14<br />
description Unused<br />
switchport access vlan 999<br />
switchport mode access<br />
switchport nonegotiate<br />
shutdown<br />
!<br />
interface FastEthernet0/15<br />
description Unused<br />
switchport access vlan 999<br />
switchport mode access<br />
switchport nonegotiate<br />
shutdown<br />
!<br />
interface FastEthernet0/16<br />
description Unused<br />
All contents are Copyright © 1992–2010 <strong>Cisco</strong> Systems, Inc. All rights reserved. This document is <strong>Cisco</strong> Public Information. Page 23 of 38
<strong>CCNP</strong>v6 <strong>TSHOOT</strong><br />
switchport access vlan 999<br />
switchport mode access<br />
switchport nonegotiate<br />
shutdown<br />
!<br />
interface FastEthernet0/17<br />
description Unused<br />
switchport access vlan 999<br />
switchport mode access<br />
switchport nonegotiate<br />
shutdown<br />
!<br />
interface FastEthernet0/18<br />
description Unused<br />
switchport access vlan 999<br />
switchport mode access<br />
switchport nonegotiate<br />
shutdown<br />
!<br />
interface FastEthernet0/19<br />
description Unused<br />
switchport access vlan 999<br />
switchport mode access<br />
switchport nonegotiate<br />
shutdown<br />
!<br />
interface FastEthernet0/20<br />
description Unused<br />
switchport access vlan 999<br />
switchport mode access<br />
switchport nonegotiate<br />
shutdown<br />
!<br />
interface FastEthernet0/21<br />
description Unused<br />
switchport access vlan 999<br />
switchport mode access<br />
switchport nonegotiate<br />
shutdown<br />
!<br />
interface FastEthernet0/22<br />
description Unused<br />
switchport access vlan 999<br />
switchport mode access<br />
switchport nonegotiate<br />
shutdown<br />
!<br />
interface FastEthernet0/23<br />
description Unused<br />
switchport access vlan 999<br />
switchport mode access<br />
switchport nonegotiate<br />
shutdown<br />
!<br />
interface FastEthernet0/24<br />
description Unused<br />
switchport access vlan 999<br />
switchport mode access<br />
All contents are Copyright © 1992–2010 <strong>Cisco</strong> Systems, Inc. All rights reserved. This document is <strong>Cisco</strong> Public Information. Page 24 of 38
<strong>CCNP</strong>v6 <strong>TSHOOT</strong><br />
switchport nonegotiate<br />
shutdown<br />
!<br />
interface gigabitethernet0/1<br />
description Unused<br />
switchport access vlan 999<br />
switchport mode access<br />
switchport nonegotiate<br />
shutdown<br />
!<br />
interface gigabitethernet0/2<br />
description Unused<br />
switchport access vlan 999<br />
switchport mode access<br />
switchport nonegotiate<br />
shutdown<br />
!<br />
interface Vlan1<br />
no ip address<br />
shutdown<br />
interface Vlan10<br />
ip address 10.1.10.252 255.255.255.0<br />
standby 10 ip 10.1.10.254<br />
standby 10 priority 110<br />
standby 10 preempt<br />
!<br />
interface Vlan20<br />
ip address 10.1.20.252 255.255.255.0<br />
standby 20 ip 10.1.20.254<br />
standby 20 preempt<br />
!<br />
interface Vlan30<br />
ip address 10.1.30.252 255.255.255.0<br />
standby 30 ip 10.1.30.254<br />
standby 30 priority 110<br />
standby 30 preempt<br />
!<br />
interface Vlan50<br />
ip address 10.1.50.252 255.255.255.0<br />
standby 50 ip 10.1.50.254<br />
standby 50 preempt<br />
!<br />
interface Vlan100<br />
ip address 10.1.100.252 255.255.255.0<br />
standby 100 ip 10.1.100.254<br />
standby 100 priority 110<br />
standby 100 preempt<br />
!<br />
router eigrp 1<br />
passive-interface default<br />
no passive-interface Fa0/5<br />
no auto-summary<br />
network 10.1.0.0 0.0.255.255<br />
!<br />
ip classless<br />
ip http server<br />
ip http secure-server<br />
All contents are Copyright © 1992–2010 <strong>Cisco</strong> Systems, Inc. All rights reserved. This document is <strong>Cisco</strong> Public Information. Page 25 of 38
<strong>CCNP</strong>v6 <strong>TSHOOT</strong><br />
!<br />
logging source-interface Vlan100<br />
logging 10.1.50.1<br />
!<br />
snmp-server community cisco RO<br />
snmp-server community san-fran RW<br />
snmp-server trap-source Vlan100<br />
snmp-server location <strong>TSHOOT</strong> Lab Facility<br />
snmp-server contact support@tshoot.net<br />
snmp-server host 10.1.50.1 version 2c cisco<br />
snmp-server enable traps eigrp<br />
snmp-server enable traps vtp<br />
snmp-server enable traps vlancreate<br />
snmp-server enable traps vlandelete<br />
snmp-server enable traps port-security<br />
snmp-server enable traps config<br />
snmp-server enable traps hsrp<br />
snmp-server enable traps vlan-membership<br />
snmp-server enable traps errdisable<br />
!<br />
line con 0<br />
exec-timeout 60 0<br />
login authentication CONSOLE<br />
logging synchronous<br />
line vty 0 4<br />
exec-timeout 60 0<br />
transport input telnet ssh<br />
line vty 5 15<br />
no transport input<br />
!<br />
ntp source Vlan100<br />
ntp server 10.1.202.1<br />
end<br />
Switch DLS2<br />
!Lab 3-1 Switch DLS2 Baseline Config<br />
!<br />
hostname DLS2<br />
!<br />
service timestamps debug datetime msec<br />
service timestamps log datetime<br />
service password-encryption<br />
!<br />
logging buffered 16384<br />
enable secret ciscoenpa55<br />
!<br />
username admin secret adminpa55<br />
!<br />
banner motd $*** Lab 3-1 Switch DLS2 Baseline Config ***$<br />
!<br />
no ip domain lookup<br />
!<br />
aaa new-model<br />
aaa authentication login default local<br />
aaa authentication login CONSOLE none<br />
aaa authorization exec default local<br />
!<br />
All contents are Copyright © 1992–2010 <strong>Cisco</strong> Systems, Inc. All rights reserved. This document is <strong>Cisco</strong> Public Information. Page 26 of 38
<strong>CCNP</strong>v6 <strong>TSHOOT</strong><br />
system mtu routing 1500<br />
!<br />
vtp domain <strong>TSHOOT</strong><br />
vtp mode transparent<br />
!<br />
ip subnet-zero<br />
ip routing<br />
ip domain-name tshoot.net<br />
ip host R1 10.1.2.2 10.1.1.1 10.1.201.1<br />
ip host R2 10.1.1.2 10.1.1.6 10.1.202.1<br />
ip host R3 10.1.1.5 10.1.2.14 10.1.203.1<br />
ip host ALS1 10.1.100.1<br />
ip host DLS1 10.1.100.252 10.1.2.1<br />
ip host DLS2 10.1.100.253 10.1.2.13<br />
!<br />
crypto key zeroize rsa<br />
crypto key generate rsa general-keys modulus 1024<br />
!<br />
errdisable recovery cause bpduguard<br />
!<br />
archive<br />
log config<br />
logging size 50<br />
notify syslog<br />
hidekeys<br />
path tftp://10.1.50.1/$h-archive-config<br />
write-memory<br />
file prompt quiet<br />
!<br />
spanning-tree mode rapid-pvst<br />
!<br />
spanning-tree vlan 10,30,100 priority 28672<br />
spanning-tree vlan 20,50 priority 24576<br />
vlan 10<br />
name OFFICE<br />
!<br />
vlan 20<br />
name VOICE<br />
!<br />
vlan 30<br />
name GUEST<br />
!<br />
vlan 50<br />
name SERVERS<br />
!<br />
vlan 100<br />
name MGMT<br />
!<br />
vlan 900<br />
name NATIVE<br />
!<br />
vlan 999<br />
name UNUSED<br />
!<br />
ip telnet source-interface Vlan100<br />
ip ssh source-interface Vlan100<br />
!<br />
All contents are Copyright © 1992–2010 <strong>Cisco</strong> Systems, Inc. All rights reserved. This document is <strong>Cisco</strong> Public Information. Page 27 of 38
<strong>CCNP</strong>v6 <strong>TSHOOT</strong><br />
interface Port-channel2<br />
description Channel to ALS1<br />
no shut<br />
interface Port-channel10<br />
description Channel to DLS1<br />
no shut<br />
!<br />
interface FastEthernet0/1<br />
description Channel to ALS1<br />
switchport trunk encapsulation dot1q<br />
switchport trunk native vlan 900<br />
switchport trunk allowed vlan 10,20,30,100<br />
switchport mode trunk<br />
switchport nonegotiate<br />
channel-group 2 mode on<br />
no shut<br />
!<br />
interface FastEthernet0/2<br />
description Channel to ALS1<br />
switchport trunk encapsulation dot1q<br />
switchport trunk native vlan 900<br />
switchport trunk allowed vlan 10,20,30,100<br />
switchport mode trunk<br />
switchport nonegotiate<br />
channel-group 2 mode on<br />
no shut<br />
!<br />
interface FastEthernet0/3<br />
description Channel to DLS1<br />
switchport trunk encapsulation dot1q<br />
switchport trunk native vlan 900<br />
switchport trunk allowed vlan 10,20,30,50,100<br />
switchport mode trunk<br />
switchport nonegotiate<br />
channel-group 10 mode on<br />
no shut<br />
!<br />
interface FastEthernet0/4<br />
description Channel to DLS1<br />
switchport trunk encapsulation dot1q<br />
switchport trunk native vlan 900<br />
switchport trunk allowed vlan 10,20,30,50,100<br />
switchport mode trunk<br />
switchport nonegotiate<br />
channel-group 10 mode on<br />
no shut<br />
!<br />
interface FastEthernet0/5<br />
description FE to R3<br />
no switchport<br />
ip address 10.1.2.13 255.255.255.252<br />
speed 100<br />
duplex full<br />
spanning-tree bpduguard enable<br />
no shut<br />
!<br />
interface FastEthernet0/6<br />
All contents are Copyright © 1992–2010 <strong>Cisco</strong> Systems, Inc. All rights reserved. This document is <strong>Cisco</strong> Public Information. Page 28 of 38
<strong>CCNP</strong>v6 <strong>TSHOOT</strong><br />
description Unused<br />
switchport access vlan 999<br />
switchport mode access<br />
switchport nonegotiate<br />
shutdown<br />
!<br />
interface FastEthernet0/7<br />
description Unused<br />
switchport access vlan 999<br />
switchport mode access<br />
switchport nonegotiate<br />
shutdown<br />
!<br />
interface FastEthernet0/8<br />
description Unused<br />
switchport access vlan 999<br />
switchport mode access<br />
switchport nonegotiate<br />
shutdown<br />
!<br />
interface FastEthernet0/9<br />
description Unused<br />
switchport access vlan 999<br />
switchport mode access<br />
switchport nonegotiate<br />
shutdown<br />
!<br />
interface FastEthernet0/10<br />
description Unused<br />
switchport access vlan 999<br />
switchport mode access<br />
switchport nonegotiate<br />
shutdown<br />
!<br />
interface FastEthernet0/11<br />
description Unused<br />
switchport access vlan 999<br />
switchport mode access<br />
switchport nonegotiate<br />
shutdown<br />
!<br />
interface FastEthernet0/12<br />
description Unused<br />
switchport access vlan 999<br />
switchport mode access<br />
switchport nonegotiate<br />
shutdown<br />
!<br />
interface FastEthernet0/13<br />
description Unused<br />
switchport access vlan 999<br />
switchport mode access<br />
switchport nonegotiate<br />
shutdown<br />
!<br />
interface FastEthernet0/14<br />
description Unused<br />
switchport access vlan 999<br />
All contents are Copyright © 1992–2010 <strong>Cisco</strong> Systems, Inc. All rights reserved. This document is <strong>Cisco</strong> Public Information. Page 29 of 38
<strong>CCNP</strong>v6 <strong>TSHOOT</strong><br />
switchport mode access<br />
switchport nonegotiate<br />
shutdown<br />
!<br />
interface FastEthernet0/15<br />
description Unused<br />
switchport access vlan 999<br />
switchport mode access<br />
switchport nonegotiate<br />
shutdown<br />
!<br />
interface FastEthernet0/16<br />
description Unused<br />
switchport access vlan 999<br />
switchport mode access<br />
switchport nonegotiate<br />
shutdown<br />
!<br />
interface FastEthernet0/17<br />
description Unused<br />
switchport access vlan 999<br />
switchport mode access<br />
switchport nonegotiate<br />
shutdown<br />
!<br />
interface FastEthernet0/18<br />
description FE to PC-C<br />
switchport access vlan 30<br />
switchport mode access<br />
switchport nonegotiate<br />
spanning-tree portfast<br />
no shutdown<br />
!<br />
interface FastEthernet0/19<br />
description Unused<br />
switchport access vlan 999<br />
switchport mode access<br />
switchport nonegotiate<br />
shutdown<br />
!<br />
interface FastEthernet0/20<br />
description Unused<br />
switchport access vlan 999<br />
switchport mode access<br />
switchport nonegotiate<br />
shutdown<br />
!<br />
interface FastEthernet0/21<br />
description Unused<br />
switchport access vlan 999<br />
switchport mode access<br />
switchport nonegotiate<br />
shutdown<br />
!<br />
interface FastEthernet0/22<br />
description Unused<br />
switchport access vlan 999<br />
switchport mode access<br />
All contents are Copyright © 1992–2010 <strong>Cisco</strong> Systems, Inc. All rights reserved. This document is <strong>Cisco</strong> Public Information. Page 30 of 38
<strong>CCNP</strong>v6 <strong>TSHOOT</strong><br />
switchport nonegotiate<br />
shutdown<br />
!<br />
interface FastEthernet0/23<br />
description Unused<br />
switchport access vlan 999<br />
switchport mode access<br />
switchport nonegotiate<br />
shutdown<br />
!<br />
interface FastEthernet0/24<br />
description Unused<br />
switchport access vlan 999<br />
switchport mode access<br />
switchport nonegotiate<br />
shutdown<br />
!<br />
interface GigabitEthernet0/1<br />
description Unused<br />
switchport access vlan 999<br />
switchport mode access<br />
switchport nonegotiate<br />
shutdown<br />
!<br />
interface GigabitEthernet0/2<br />
description Unused<br />
switchport access vlan 999<br />
switchport mode access<br />
switchport nonegotiate<br />
shutdown<br />
!<br />
interface Vlan1<br />
no ip address<br />
shutdown<br />
!<br />
interface Vlan10<br />
ip address 10.1.10.253 255.255.255.0<br />
standby 10 ip 10.1.10.254<br />
standby 10 preempt<br />
!<br />
interface Vlan20<br />
ip address 10.1.20.253 255.255.255.0<br />
standby 20 ip 10.1.20.254<br />
standby 20 priority 110<br />
standby 20 preempt<br />
!<br />
interface Vlan30<br />
ip address 10.1.30.253 255.255.255.0<br />
standby 30 ip 10.1.30.254<br />
standby 30 preempt<br />
!<br />
interface Vlan50<br />
ip address 10.1.50.253 255.255.255.0<br />
standby 50 ip 10.1.50.254<br />
standby 50 priority 110<br />
standby 50 preempt<br />
!<br />
interface Vlan100<br />
All contents are Copyright © 1992–2010 <strong>Cisco</strong> Systems, Inc. All rights reserved. This document is <strong>Cisco</strong> Public Information. Page 31 of 38
<strong>CCNP</strong>v6 <strong>TSHOOT</strong><br />
ip address 10.1.100.253 255.255.255.0<br />
standby 100 ip 10.1.100.254<br />
standby 100 preempt<br />
!<br />
!<br />
router eigrp 1<br />
passive-interface default<br />
no passive-interface Fa0/5<br />
no auto-summary<br />
network 10.1.0.0 0.0.255.255<br />
!<br />
ip classless<br />
ip http server<br />
ip http secure-server<br />
!<br />
!<br />
logging source-interface Vlan100<br />
logging 10.1.50.1<br />
!<br />
snmp-server community cisco RO<br />
snmp-server community san-fran RW<br />
snmp-server trap-source Vlan100<br />
snmp-server location <strong>TSHOOT</strong> Lab Facility<br />
snmp-server contact support@tshoot.net<br />
snmp-server enable traps eigrp<br />
snmp-server enable traps vtp<br />
snmp-server enable traps vlancreate<br />
snmp-server enable traps vlandelete<br />
snmp-server enable traps port-security<br />
snmp-server enable traps hsrp<br />
snmp-server enable traps vlan-membership<br />
snmp-server enable traps errdisable<br />
snmp-server host 10.1.50.1 version 2c cisco<br />
!<br />
line con 0<br />
exec-timeout 60 0<br />
login authentication CONSOLE<br />
logging synchronous<br />
line vty 0 4<br />
exec-timeout 60 0<br />
transport input telnet ssh<br />
line vty 5 15<br />
no transport input<br />
!<br />
ntp source Vlan100<br />
ntp server 10.1.202.1<br />
end<br />
Router R1<br />
!Lab 3-1 Router R1 Baseline Config<br />
!<br />
hostname R1<br />
!<br />
service timestamps debug datetime msec<br />
service timestamps log datetime msec<br />
service password-encryption<br />
!<br />
All contents are Copyright © 1992–2010 <strong>Cisco</strong> Systems, Inc. All rights reserved. This document is <strong>Cisco</strong> Public Information. Page 32 of 38
<strong>CCNP</strong>v6 <strong>TSHOOT</strong><br />
logging buffered 16384 debugging<br />
enable secret ciscoenpa55<br />
!<br />
username admin secret adminpa55<br />
!<br />
banner motd $*** Lab 3-1 Router R1 Baseline Config ***$<br />
!<br />
no ip domain lookup<br />
!<br />
aaa new-model<br />
aaa authentication login default local<br />
aaa authentication login CONSOLE none<br />
aaa authorization exec default local<br />
!<br />
ip domain name tshoot.net<br />
ip host R1 10.1.2.2 10.1.1.1 10.1.201.1<br />
ip host R2 10.1.1.2 10.1.1.6 10.1.202.1<br />
ip host R3 10.1.1.5 10.1.2.14 10.1.203.1<br />
ip host ALS1 10.1.100.1<br />
ip host DLS1 10.1.100.252 10.1.2.1<br />
ip host DLS2 10.1.100.253 10.1.2.13<br />
!<br />
crypto key zeroize rsa<br />
crypto key generate rsa general-keys modulus 1024<br />
!<br />
file prompt quiet<br />
archive<br />
log config<br />
logging size 50<br />
notify syslog<br />
hidekeys<br />
path tftp://10.1.50.1/$h-archive-config<br />
write-memory<br />
!<br />
ip telnet source-interface Loopback0<br />
ip ssh source-interface Loopback0<br />
!<br />
interface Loopback0<br />
ip address 10.1.201.1 255.255.255.255<br />
!<br />
interface FastEthernet0/0<br />
no ip address<br />
shutdown<br />
!<br />
interface FastEthernet0/1<br />
description FE to DLS1<br />
ip address 10.1.2.2 255.255.255.252<br />
ip flow ingress<br />
speed 100<br />
full-duplex<br />
no shutdown<br />
!<br />
interface Serial0/0/0<br />
description WAN link to R2 - 128k leased line<br />
ip address 10.1.1.1 255.255.255.252<br />
ip flow ingress<br />
encapsulation ppp<br />
clock rate 128000<br />
All contents are Copyright © 1992–2010 <strong>Cisco</strong> Systems, Inc. All rights reserved. This document is <strong>Cisco</strong> Public Information. Page 33 of 38
<strong>CCNP</strong>v6 <strong>TSHOOT</strong><br />
no shutdown<br />
!<br />
interface Serial0/0/1<br />
description WAN link to R3 (not used)<br />
no ip address<br />
shutdown<br />
!<br />
router eigrp 1<br />
passive-interface default<br />
no passive-interface FastEthernet0/1<br />
no passive-interface Serial0/0/0<br />
network 10.1.1.0 0.0.0.3<br />
network 10.1.2.0 0.0.0.3<br />
network 10.1.201.1 0.0.0.0<br />
no auto-summary<br />
!<br />
ip http server<br />
no ip http secure-server<br />
!<br />
ip flow-export source Loopback0<br />
ip flow-export version 5<br />
ip flow-export destination 10.1.50.1 9996<br />
!<br />
logging source-interface Loopback0<br />
logging 10.1.50.1<br />
!<br />
snmp-server community cisco RO<br />
snmp-server community san-fran RW<br />
snmp-server trap-source Loopback0<br />
snmp-server location <strong>TSHOOT</strong> Lab Facility<br />
snmp-server contact support@tshoot.net<br />
snmp-server enable traps eigrp<br />
snmp-server enable traps flash insertion removal<br />
snmp-server enable traps config<br />
snmp-server enable traps cpu threshold<br />
snmp-server host 10.1.50.1 version 2c cisco<br />
!<br />
line con 0<br />
exec-timeout 60 0<br />
login authentication CONSOLE<br />
logging synchronous<br />
line vty 0 4<br />
exec-timeout 60 0<br />
transport input telnet ssh<br />
!<br />
ntp source Loopback0<br />
ntp update-calendar<br />
ntp server 10.1.202.1<br />
end<br />
Router R2<br />
!Lab 3-1 Router R2 Baseline Config<br />
!<br />
service timestamps debug datetime msec<br />
service timestamps log datetime msec<br />
service password-encryption<br />
!<br />
All contents are Copyright © 1992–2010 <strong>Cisco</strong> Systems, Inc. All rights reserved. This document is <strong>Cisco</strong> Public Information. Page 34 of 38
<strong>CCNP</strong>v6 <strong>TSHOOT</strong><br />
Hostname R2<br />
!<br />
logging buffered 16384 debugging<br />
enable secret ciscoenpa55<br />
!<br />
username admin secret adminpa55<br />
!<br />
banner motd $*** Lab 3-1 Router R2 Baseline Config ***$<br />
!<br />
no ip domain lookup<br />
ip host R1 10.1.2.2 10.1.1.1 10.1.201.1<br />
ip host R2 10.1.1.2 10.1.1.6 10.1.202.1<br />
ip host R3 10.1.1.5 10.1.2.14 10.1.203.1<br />
ip host ALS1 10.1.100.1<br />
ip host DLS1 10.1.100.252 10.1.2.1<br />
ip host DLS2 10.1.100.253 10.1.2.13<br />
!<br />
aaa new-model<br />
aaa authentication login default local<br />
aaa authentication login CONSOLE none<br />
aaa authorization exec default local<br />
!<br />
ip domain name tshoot.net<br />
!<br />
crypto key zeroize rsa<br />
crypto key generate rsa general-keys modulus 1024<br />
!<br />
file prompt quiet<br />
archive<br />
log config<br />
logging size 50<br />
notify syslog<br />
hidekeys<br />
path tftp://10.1.50.1/$h-archive-config<br />
write-memory<br />
!<br />
!<br />
ip telnet source-interface Loopback0<br />
ip ssh source-interface Loopback0<br />
!<br />
interface Loopback0<br />
ip address 10.1.202.1 255.255.255.255<br />
!<br />
interface FastEthernet0/0<br />
no ip address<br />
shutdown<br />
!<br />
interface FastEthernet0/1<br />
description optional connection for PC-C w/ static address<br />
no ip addr<br />
shutdown<br />
!<br />
interface Serial0/0/0<br />
description WAN link to R1 - 128k leased line<br />
ip address 10.1.1.2 255.255.255.252<br />
encapsulation ppp<br />
no shutdown<br />
All contents are Copyright © 1992–2010 <strong>Cisco</strong> Systems, Inc. All rights reserved. This document is <strong>Cisco</strong> Public Information. Page 35 of 38
<strong>CCNP</strong>v6 <strong>TSHOOT</strong><br />
!<br />
interface Serial0/0/1<br />
description WAN link to R3 - 128k leased line<br />
ip address 10.1.1.6 255.255.255.252<br />
clock rate 128000<br />
encapsulation ppp<br />
no shutdown<br />
!<br />
router eigrp 1<br />
passive-interface default<br />
no passive-interface Serial0/0/0<br />
no passive-interface Serial0/0/1<br />
network 10.1.1.0 0.0.0.3<br />
network 10.1.1.4 0.0.0.3<br />
network 10.1.202.1 0.0.0.0<br />
no auto-summary<br />
!<br />
ip http server<br />
no ip http secure-server<br />
!<br />
logging source-interface Loopback0<br />
logging 10.1.50.1<br />
snmp-server community cisco RO<br />
snmp-server community san-fran RW<br />
snmp-server trap-source Loopback0<br />
snmp-server location <strong>TSHOOT</strong> Lab Facility<br />
snmp-server contact support@tshoot.net<br />
snmp-server enable traps eigrp<br />
snmp-server enable traps flash insertion removal<br />
snmp-server enable traps config<br />
snmp-server enable traps cpu threshold<br />
snmp-server host 10.1.50.1 version 2c cisco<br />
!<br />
line con 0<br />
exec-timeout 60 0<br />
login authentication CONSOLE<br />
logging synchronous<br />
line vty 0 4<br />
exec-timeout 60 0<br />
transport input telnet ssh<br />
!<br />
ntp master 3<br />
end<br />
Router R3<br />
!Lab 3-1 Router R3 Baseline Config<br />
!<br />
service timestamps debug datetime msec<br />
service timestamps log datetime msec<br />
service password-encryption<br />
!<br />
hostname R3<br />
!<br />
!<br />
logging buffered 16384 debugging<br />
enable secret ciscoenpa55<br />
!<br />
All contents are Copyright © 1992–2010 <strong>Cisco</strong> Systems, Inc. All rights reserved. This document is <strong>Cisco</strong> Public Information. Page 36 of 38
<strong>CCNP</strong>v6 <strong>TSHOOT</strong><br />
username admin secret adminpa55<br />
!<br />
banner motd $*** Lab 3-1 Router R3 Baseline Config ***$<br />
!<br />
aaa new-model<br />
aaa authentication login default local<br />
aaa authentication login CONSOLE none<br />
aaa authorization exec default local<br />
!<br />
no ip domain lookup<br />
ip domain-name tshoot.net<br />
ip host R1 10.1.2.2 10.1.1.1 10.1.201.1<br />
ip host R2 10.1.1.2 10.1.1.6 10.1.202.1<br />
ip host R3 10.1.1.5 10.1.2.14 10.1.203.1<br />
ip host ALS1 10.1.100.1<br />
ip host DLS1 10.1.100.252 10.1.2.1<br />
ip host DLS2 10.1.100.253 10.1.2.13<br />
!<br />
crypto key zeroize rsa<br />
crypto key generate rsa general-keys modulus 1024<br />
!<br />
file prompt quiet<br />
archive<br />
log config<br />
logging size 50<br />
notify syslog<br />
hidekeys<br />
path tftp://10.1.50.1/$h-archive-config<br />
write-memory<br />
!<br />
ip telnet source-interface Loopback0<br />
ip ssh source-interface Loopback0<br />
!<br />
interface Loopback0<br />
ip address 10.1.203.1 255.255.255.255<br />
!<br />
interface FastEthernet0/0<br />
no ip address<br />
shutdown<br />
interface FastEthernet0/1<br />
description FE to DLS2<br />
ip address 10.1.2.14 255.255.255.252<br />
ip flow ingress<br />
speed 100<br />
full-duplex<br />
no shutdown<br />
!<br />
interface Serial0/0/0<br />
description WAN link to R1 - (Not used)<br />
no ip address<br />
clock rate 128000<br />
encapsulation ppp<br />
shutdown<br />
!<br />
interface Serial0/0/1<br />
description WAN link to R2 - 128k leased line<br />
ip address 10.1.1.5 255.255.255.252<br />
All contents are Copyright © 1992–2010 <strong>Cisco</strong> Systems, Inc. All rights reserved. This document is <strong>Cisco</strong> Public Information. Page 37 of 38
<strong>CCNP</strong>v6 <strong>TSHOOT</strong><br />
ip flow ingress<br />
encapsulation ppp<br />
no shutdown<br />
!<br />
router eigrp 1<br />
passive-interface default<br />
no passive-interface FastEthernet0/1<br />
no passive-interface Serial0/0/1<br />
network 10.1.1.4 0.0.0.3<br />
network 10.1.2.12 0.0.0.3<br />
network 10.1.203.1 0.0.0.0<br />
no auto-summary<br />
!<br />
ip http server<br />
no ip http secure-server<br />
!<br />
ip flow-export source Loopback0<br />
ip flow-export version 5<br />
ip flow-export destination 10.1.50.1 9996<br />
!<br />
logging source-interface Loopback0<br />
logging 10.1.50.1<br />
!<br />
snmp-server community cisco RO<br />
snmp-server community san-fran RW<br />
snmp-server trap-source Loopback0<br />
snmp-server location <strong>TSHOOT</strong> Lab Facility<br />
snmp-server contact support@tshoot.net<br />
snmp-server enable traps eigrp<br />
snmp-server enable traps flash insertion removal<br />
snmp-server enable traps config<br />
snmp-server enable traps cpu threshold<br />
snmp-server host 10.1.50.1 version 2c cisco<br />
!<br />
line con 0<br />
exec-timeout 60 0<br />
login authentication CONSOLE<br />
logging synchronous<br />
line vty 0 4<br />
exec-timeout 60 0<br />
transport input telnet ssh<br />
!<br />
ntp source Loopback0<br />
ntp update-calendar<br />
ntp server 10.1.202.1<br />
end<br />
All contents are Copyright © 1992–2010 <strong>Cisco</strong> Systems, Inc. All rights reserved. This document is <strong>Cisco</strong> Public Information. Page 38 of 38
<strong>CCNP</strong>v6 <strong>TSHOOT</strong><br />
Chapter 4 Lab 4-1, Layer 2 Connectivity and Spanning Tree<br />
Physical Topology<br />
All contents are Copyright © 1992–2010 <strong>Cisco</strong> Systems, Inc. All rights reserved. This document is <strong>Cisco</strong> Public Information. Page 1 of 24
Logical Topology<br />
Objectives<br />
Background<br />
• Load the device configuration files for each trouble ticket.<br />
• Diagnose and resolve Layer 2 connectivity problems.<br />
• Diagnose and resolve spanning-tree problems.<br />
• Document the troubleshooting progress, configuration changes, and problem resolution.<br />
User computers, servers, and printers all connect to the access layer of the hierarchical model. With hundreds<br />
or thousands of hosts attached, access devices such as Layer 2 switches are a common source of<br />
networking issues. Physical and data-link problems at the access layer can include hardware, cabling, VLAN<br />
assignment, spanning tree, trunking protocol, or port security issues.<br />
In this lab, you will troubleshoot various Layer 2 problems. For each task or trouble ticket, the scenario and<br />
symptoms are described. While troubleshooting, you will discover the cause of the problem, correct it, and<br />
then document the process and results.<br />
Physical and Logical Topology Diagrams<br />
The physical and logical topologies, including interface designations and IP addresses, are provided to assist<br />
the troubleshooting effort.<br />
All contents are Copyright © 1992–2010 <strong>Cisco</strong> Systems, Inc. All rights reserved. This document is <strong>Cisco</strong> Public Information. Page 2 of 24
<strong>CCNP</strong>v6 <strong>TSHOOT</strong><br />
Lab Structure<br />
This lab is divided into two main sections.<br />
Section 1—Trouble Tickets and Troubleshooting Logs<br />
This section includes multiple tasks. Each task is associated with a trouble ticket (TT) and introduces one or<br />
more errors on one or more devices. If time is a consideration, each task or trouble ticket can be performed<br />
independently.<br />
Section 2—Troubleshooting Reference Information<br />
This section provides general Layer 2 troubleshooting information that can be applied to any of the trouble<br />
tickets in this lab. Sample troubleshooting flows are provided, along with examples of useful commands and<br />
output. If time permits, it is recommended that you read through Section 2 prior to starting on the trouble<br />
tickets.<br />
Note: This lab uses <strong>Cisco</strong> 1841 routers with <strong>Cisco</strong> IOS Release 12.4(24)T1 and the advanced IP image<br />
c1841-advipservicesk9-mz.124-24.T1.bin. The switches are <strong>Cisco</strong> WS-C2960-24TT-L with the <strong>Cisco</strong> IOS<br />
image c2960-lanbasek9-mz.122-46.SE.bin and Catalyst 3560-24PS with the <strong>Cisco</strong> IOS image c3560advipservicesk9-mz.122-46.SE.bin.<br />
Other routers (such as 2801 and 2811), switches (such as 2950 or 3550),<br />
and <strong>Cisco</strong> IOS Software versions can be used if they have comparable capabilities and features. Depending<br />
on the router or switch model and <strong>Cisco</strong> IOS Software version, the commands available and output produced<br />
might vary from what is shown in this lab.<br />
Note: Any changes made to the baseline configurations or topology (other than errors introduced) are noted<br />
in the trouble ticket so that you are aware of them prior to beginning the troubleshooting process.<br />
Required Resources<br />
• 3 routers (<strong>Cisco</strong> 1841 with <strong>Cisco</strong> IOS Release 12.4(24)T1 Advanced IP Service or comparable)<br />
• 1 switch (<strong>Cisco</strong> 2960 with the <strong>Cisco</strong> IOS Release 12.2(46)SE C2960-LANBASEK9-M image or<br />
comparable)<br />
• 2 switches (<strong>Cisco</strong> 3560 with the <strong>Cisco</strong> IOS Release 12.2(46)SE C3560-advipservicesK9-mz image or<br />
comparable)<br />
• SRV1 (Windows PC with a static IP address) with TFTP and syslog servers, plus an SSH client<br />
(PuTTY or comparable) and WireShark software<br />
• PC-B (Windows PC—DHCP client) with PuTTY and WireShark software<br />
• PC-C (Windows PC—DHCP client) with PuTTY and WireShark software<br />
• Serial and Ethernet cables<br />
All contents are Copyright © 1992–2010 <strong>Cisco</strong> Systems, Inc. All rights reserved. This document is <strong>Cisco</strong> Public Information. Page 3 of 24
<strong>CCNP</strong>v6 <strong>TSHOOT</strong><br />
Section 1—Trouble Tickets and Troubleshooting Logs<br />
Task 1: Trouble Ticket Lab 4-1 TT-A<br />
Step 1: Review trouble ticket Lab 4-1 TT-A.<br />
Late yesterday afternoon, access switch ALS1 failed, and you discovered that the power supply was not working.<br />
A junior colleague was tasked with replacing ALS1 with a comparable switch.<br />
When you arrived this morning, you asked him how things went. He told you that he had stayed late trying to<br />
reconfigure ALS1, but was not entirely successful. Users on VLAN 10 have started to complain that they cannot<br />
get access to the network server SRV1, and you are unable to use Telnet to connect to ALS1 from SRV1. In<br />
addition, syslog messages from ALS1 are not being received on SRV1.<br />
Your task is to diagnose the issues and restore switch ALS1 as a fully functional access switch on the network.<br />
Step 2: Load the device trouble ticket configuration files for TT-A.<br />
Using the procedure described in Lab 3-1, verify that the lab configuration files are present in flash. Load the<br />
configuration files indicated in the Device Configuration File table.<br />
Note: The following device access methods are in effect after loading the configuration files:<br />
• Console access requires no username or password.<br />
• Telnet and SSH require username admin and password adminpa55.<br />
• The enable password is ciscoenpa55.<br />
Device Configuration File Table<br />
Device Name File to Load Notes<br />
ALS1 Lab41-ALS1-TT-A-Cfg.txt<br />
DLS1 Lab41-DLS1-TT-A-Cfg.txt<br />
DLS2 Lab41-DLS2-TT-A-Cfg.txt<br />
R1 Lab41-R1-TT-A-Cfg.txt<br />
R2 Lab41-R2-TT-A-Cfg.txt<br />
R3 Lab41-R3-TT-A-Cfg.txt<br />
SRV1 N/A Static IP: 10.1.50.1<br />
Default gateway: 10.1.50.254<br />
PC-B N/A DHCP (release and renew after loading device<br />
configurations)<br />
PC-C N/A DHCP (release and renew after loading device<br />
configurations)<br />
Step 3: Configure SRV1 and start the syslog and TFTP servers.<br />
Ensure that SRV1 has static IP address 10.1.50.1 and default gateway 10.1.50.254.<br />
Start the syslog server on SRV1, which is the syslog server for the entire network. When the network is properly<br />
configured, all devices send syslog messages to SRV1.<br />
Start the TFTP server on SRV1, which is the archive server for the entire network. When the network is properly<br />
configured, all devices send archives of their running configurations to this server whenever the running config is<br />
All contents are Copyright © 1992–2010 <strong>Cisco</strong> Systems, Inc. All rights reserved. This document is <strong>Cisco</strong> Public Information. Page 4 of 24
<strong>CCNP</strong>v6 <strong>TSHOOT</strong><br />
copied to the startup config. Ensure that the default TFTP directory on SRV1 is set to the directory where you<br />
want to store the archives.<br />
Step 4: Release and renew the DHCP leases on PC-B and PC-C.<br />
Ensure that PC-B and PC-C are configured as DHCP clients.<br />
After loading all TT-A device configuration files, issue the ipconfig /release and ipconfig /renew commands on<br />
PC-B and PC-C.<br />
Note: Problems introduced into the network by the trouble ticket might prevent one or both of these PCs from<br />
acquiring an IP address. Do not assign either PC a static address.<br />
Step 5: Outline the troubleshooting approach and validation steps.<br />
Use this space to identify your troubleshooting approach and the key steps to verify that the problem is resolved.<br />
Troubleshooting approaches to select from include the follow-the-path, spot-the-differences, bottom-up, top-down,<br />
divide-and-conquer, shoot-from-the-hip, and move-the-problem methods.<br />
Note: In addition to a specific approach, you can use the generic troubleshooting process described in the<br />
course, which can be found at the beginning of Section 2 of this lab.<br />
_______________________________________________________________________________<br />
_______________________________________________________________________________<br />
_______________________________________________________________________________<br />
_______________________________________________________________________________<br />
_______________________________________________________________________________<br />
_______________________________________________________________________________<br />
Step 6: Record the troubleshooting process and configuration changes.<br />
Note: Section 2 of this lab includes sample troubleshooting flows, useful commands, and examples of output.<br />
Use this log to document your actions and results during the troubleshooting process. List the commands you<br />
used to gather information and, as you progress, record your thoughts as to what you think the problem might be<br />
and what actions you will take to correct the problems.<br />
Device Actions and Results<br />
All contents are Copyright © 1992–2010 <strong>Cisco</strong> Systems, Inc. All rights reserved. This document is <strong>Cisco</strong> Public Information. Page 5 of 24
<strong>CCNP</strong>v6 <strong>TSHOOT</strong><br />
Device Actions and Results<br />
Step 7: Document trouble ticket debrief notes.<br />
Use this space to make notes of the key learning points that you picked up during the discussion of this trouble<br />
ticket with your instructor. The notes can include problems encountered, solutions applied, useful commands<br />
employed, alternate solutions, methods, and processes, and procedure and communication improvements.<br />
_______________________________________________________________________________<br />
_______________________________________________________________________________<br />
_______________________________________________________________________________<br />
_______________________________________________________________________________<br />
_______________________________________________________________________________<br />
_______________________________________________________________________________<br />
_______________________________________________________________________________<br />
All contents are Copyright © 1992–2010 <strong>Cisco</strong> Systems, Inc. All rights reserved. This document is <strong>Cisco</strong> Public Information. Page 6 of 24
<strong>CCNP</strong>v6 <strong>TSHOOT</strong><br />
Task 2: Trouble Ticket Lab 4-1 TT-B<br />
Step 1: Review trouble ticket Lab 4-1 TT-B.<br />
After an equipment failure, a network technician was asked to configure bundled Ethernet links between the ALS1<br />
access switch and the two distribution layer switches in the network (DLS1 and DLS2). Shortly after the changes<br />
were made, users on ALS1 were unable to access the Internet (simulated by Lo0 on R2). You have been asked<br />
to look into the problem and have determined that you are able to ping the Internet from SRV1.<br />
Your task is to diagnose the issues, allow hosts on ALS1 to connect to the Internet via DLS1 or DLS2, and verify<br />
that the switching environment redundant paths are functional.<br />
Note: To simulate an Internet connection, you can ping the R2 Lo0 address at 10.1.202.1. Alternately, you can<br />
use the PC browser to connect to 10.1.202.1. You will then be prompted for a login to the router management<br />
GUI by R2. Enter the username admin and enable password ciscoenpa55.<br />
Step 2: Load the device trouble ticket configuration files for TT-B.<br />
Using the procedure described in Lab 3-1, verify that the lab configuration files are present in flash. Load the<br />
configuration files indicated in the Device Configuration File table.<br />
Note: See Task 1, Step 2 for device access methods, usernames, and passwords after the configuration files<br />
have been loaded.<br />
Device Configuration File Table<br />
Device Name File to Load Notes<br />
ALS1 Lab41-ALS1-TT-B-Cfg.txt<br />
DLS1 Lab41-DLS1-TT-B-Cfg.txt<br />
DLS2 Lab41-DLS2-TT-B-Cfg.txt<br />
R1 Lab41-R1-TT-B-Cfg.txt<br />
R2 Lab41-R2-TT-B-Cfg.txt<br />
R3 Lab41-R3-TT-B-Cfg.txt<br />
SRV1 N/A Static IP: 10.1.50.1<br />
Default gateway: 10.1.50.254<br />
PC-B N/A DHCP (release and renew after loading device<br />
configurations)<br />
PC-C N/A DHCP (release and renew after loading device<br />
configurations)<br />
Step 3: Configure SRV1 and start the syslog and TFTP servers as described in Task 1.<br />
Step 4: Reboot PC-B and PC-C or release and renew the DHCP lease as described in Task 1.<br />
Step 5: Outline the troubleshooting approach and validation steps.<br />
Use this space to identify your troubleshooting approach and the key steps to verify that the problem is resolved. .<br />
Troubleshooting approaches to select from include the follow-the-path, spot-the-differences, bottom-up, top-down,<br />
divide-and-conquer, shoot-from-the-hip, and move-the-problem methods.<br />
All contents are Copyright © 1992–2010 <strong>Cisco</strong> Systems, Inc. All rights reserved. This document is <strong>Cisco</strong> Public Information. Page 7 of 24
<strong>CCNP</strong>v6 <strong>TSHOOT</strong><br />
Note: In addition to a specific approach, you can use the generic troubleshooting process described at the<br />
beginning of Section 2 of this lab.<br />
_______________________________________________________________________________<br />
_______________________________________________________________________________<br />
_______________________________________________________________________________<br />
_______________________________________________________________________________<br />
_______________________________________________________________________________<br />
Step 6: Record the troubleshooting process and configuration changes.<br />
Note: Section 2 of this lab includes sample troubleshooting flows, useful commands, and examples of output.<br />
Use this log to document your actions and results during the troubleshooting process. List the commands you<br />
used to gather information. As you progress, record what you think the problem might be and what actions you<br />
will take to correct the problem.<br />
Device Actions and Results<br />
All contents are Copyright © 1992–2010 <strong>Cisco</strong> Systems, Inc. All rights reserved. This document is <strong>Cisco</strong> Public Information. Page 8 of 24
<strong>CCNP</strong>v6 <strong>TSHOOT</strong><br />
Device Actions and Results<br />
Step 7: Document trouble ticket debrief notes.<br />
Use this space to make notes of the key learning points that you picked up during the discussion of this trouble<br />
ticket with your instructor. The notes can include problems encountered, solutions applied, useful commands<br />
employed, alternate solutions, methods and processes, and procedure and communication improvements.<br />
_______________________________________________________________________________<br />
_______________________________________________________________________________<br />
_______________________________________________________________________________<br />
_______________________________________________________________________________<br />
_______________________________________________________________________________<br />
_______________________________________________________________________________<br />
_______________________________________________________________________________<br />
Task 3: Trouble Ticket Lab 4-1 TT-C<br />
Step 1: Review trouble ticket Lab 4-1 TT-C.<br />
This morning, the help desk received a call from an external consultant that needed access to the SRV1 guest<br />
account (simulated by ping). Her PC, PC-C, was plugged into one of the outlets that is patched to the guest VLAN<br />
on switch DLS2. However, she has not been able to get an IP address and cannot get onto the network.<br />
Your task is to diagnose and solve this problem, making sure that the consultant gets access to SRV1.<br />
Step 2: Load the device trouble ticket configuration files for TT-C.<br />
Using the procedure described in Lab 3-1, verify that the lab configuration files are present in flash. Load the<br />
configuration files indicated in the Device Configuration File table.<br />
Note: See Task 1, Step 2 for device access methods, usernames, and passwords after you have loaded the<br />
configuration files.<br />
Device Configuration File Table<br />
Device Name File to Load Notes<br />
ALS1 Lab41-ALS1-TT-C-Cfg.txt<br />
DLS1 Lab41-DLS1-TT-C-Cfg.txt<br />
DLS2 Lab41-DLS2-TT-C-Cfg.txt<br />
R1 Lab41-R1-TT-C-Cfg.txt<br />
R2 Lab41-R2-TT-C-Cfg.txt<br />
R3 Lab41-R3-TT-C-Cfg.txt<br />
SRV1 N/A Static IP: 10.1.50.1<br />
All contents are Copyright © 1992–2010 <strong>Cisco</strong> Systems, Inc. All rights reserved. This document is <strong>Cisco</strong> Public Information. Page 9 of 24
<strong>CCNP</strong>v6 <strong>TSHOOT</strong><br />
Default gateway: 10.1.50.254<br />
PC-B N/A DHCP (release and renew after loading the device<br />
configurations)<br />
PC-C N/A DHCP (release and renew after loading the device<br />
configurations)<br />
Step 3: Configure SRV1 and start the syslog and TFTP servers, as described in Task 1.<br />
Step 4: Reboot PC-B and PC-C or release and renew the DHCP lease, as described in Task 1.<br />
Step 5: Outline the troubleshooting approach and validation steps.<br />
Use this space to identify your troubleshooting approach and the key steps to verify that the problem is resolved. .<br />
Troubleshooting approaches to select from include the follow-the-path, spot-the-differences, bottom-up, top-down,<br />
divide-and-conquer, shoot-from-the-hip, and move-the-problem methods.<br />
Note: In addition to a specific approach, you can use the generic troubleshooting process described at the<br />
beginning of Section 2 of this lab.<br />
_______________________________________________________________________________<br />
_______________________________________________________________________________<br />
_______________________________________________________________________________<br />
_______________________________________________________________________________<br />
_______________________________________________________________________________<br />
_______________________________________________________________________________<br />
Step 6: Record the troubleshooting process and configuration changes.<br />
Note: Section 2 of this lab includes sample troubleshooting flows, useful commands, and examples of output.<br />
Use this log to document your actions and results during the troubleshooting process. List the commands you<br />
used to gather information. As you progress, record your thoughts as to what you think the problem might be and<br />
which actions you take to correct the problem.<br />
Device Actions and Results<br />
All contents are Copyright © 1992–2010 <strong>Cisco</strong> Systems, Inc. All rights reserved. This document is <strong>Cisco</strong> Public Information. Page 10 of 24
<strong>CCNP</strong>v6 <strong>TSHOOT</strong><br />
Device Actions and Results<br />
Step 7: Document trouble ticket debrief notes.<br />
Use this space to make notes of the key learning points that you picked up during the discussion of this trouble<br />
ticket with your instructor. The notes can include problems encountered, solutions applied, useful commands<br />
employed, alternate solutions and methods, and procedure and communication improvements.<br />
_______________________________________________________________________________<br />
_______________________________________________________________________________<br />
_______________________________________________________________________________<br />
_______________________________________________________________________________<br />
_______________________________________________________________________________<br />
_______________________________________________________________________________<br />
_______________________________________________________________________________<br />
All contents are Copyright © 1992–2010 <strong>Cisco</strong> Systems, Inc. All rights reserved. This document is <strong>Cisco</strong> Public Information. Page 11 of 24
<strong>CCNP</strong>v6 <strong>TSHOOT</strong><br />
Section 2—Troubleshooting Reference Information<br />
General Troubleshooting Process<br />
As a general guideline, you can use the following general troubleshooting process described in the course:<br />
1. Define the problem (symptoms).<br />
2. Gather information.<br />
3. Analyze the information.<br />
4. Propose a hypothesis (possible cause).<br />
5. Test the hypothesis.<br />
6. Eliminate or accept the hypothesis.<br />
7. Solve the problem.<br />
8. Document the problem.<br />
Command Summary<br />
The table lists useful commands for this lab. The sample output is shown on following pages.<br />
Command Key Information Displayed<br />
clear arp-cache Clears ARP entries and resets aging.<br />
show arp Displays the IP address, MAC address, and interface.<br />
show interfaces status Displays link status, speed, duplex, trunk or VLAN<br />
membership, and interface descriptions.<br />
show cdp neighbors (detail) Displays device ID and type and confirms that a link is<br />
operational at the data link layer in both directions,<br />
including the sending and receiving ports. The detail<br />
option gives the remote device IP address.<br />
show spanning-tree vlan vlan# Displays all essential parameters that affect the topology,<br />
such as root port, designated ports, port state, and port<br />
type, as well as the spanning-tree mode implemented.<br />
show spanning-tree<br />
inconsistentports<br />
Displays a more detailed description of the type of port<br />
inconsistency and what might be causing it.<br />
show spanning-tree summary Displays the spanning-tree mode and the VLANs for which<br />
this switch is the root bridge. VLANs are listed along with<br />
the number of ports in various STP states.<br />
show mac address-table address<br />
mac-addr<br />
show mac-address-table interface<br />
intf-id<br />
Displays the MAC address and interface entry in the table<br />
for the specified host.<br />
Displays all MAC addresses that were learned on the<br />
specified port.<br />
show vlan brief Displays an overview of all existing VLANs and the ports<br />
All contents are Copyright © 1992–2010 <strong>Cisco</strong> Systems, Inc. All rights reserved. This document is <strong>Cisco</strong> Public Information. Page 12 of 24
<strong>CCNP</strong>v6 <strong>TSHOOT</strong><br />
within them. Trunk ports are not listed.<br />
show vlan id vlan# Displays whether the VLAN exists and, if so, which ports<br />
are assigned to it. Includes trunk ports on which the VLAN<br />
is allowed.<br />
show interfaces type/# Displays interface status, IP address/prefix, load, duplex,<br />
speed and packet statistics and errors.<br />
show interfaces trunk Displays all trunk ports, the operational status, trunk<br />
encapsulation, and native VLAN, as well as the list of<br />
allowed VLANs, active VLANs, and the VLANs in Spanning<br />
Tree Forwarding state for the trunk.<br />
show interfaces type/#<br />
switchport<br />
Checks all VLAN-related parameters for a specific interface<br />
(access ports and trunk ports).<br />
show etherchannel summary Displays port channels, the member ports, and flags<br />
indicating status.<br />
Lab 4-1 Sample Troubleshooting Flows<br />
The figure illustrates an example of a method that you could follow to diagnose and resolve Layer 2 problems.<br />
Sample Layer 2 Troubleshooting Flow<br />
No L3<br />
connectivity<br />
between<br />
adjacent<br />
devices<br />
Verify through<br />
connection testing<br />
(ping) and ARP<br />
cache checks<br />
Determine<br />
and verify L2<br />
path<br />
between<br />
devices<br />
Analyze packet<br />
captures<br />
Track frames<br />
and device<br />
MAC<br />
addresses<br />
along L2<br />
path<br />
Investigate<br />
links where<br />
path seems<br />
broken<br />
© 2009 <strong>Cisco</strong> Systems, Inc. All rights reserved. <strong>TSHOOT</strong> v1.0—15<br />
Usually, you start troubleshooting the Layer 2 connectivity between devices because you have discovered that<br />
there is no Layer 3 connectivity between two adjacent Layer 2 hosts, such as two hosts in the same VLAN or a<br />
host and its default gateway. The following are typical symptoms that could lead you to start examining Layer 2<br />
connectivity:<br />
• Failing pings between adjacent devices. (This can also be caused by a host-based firewall that is<br />
blocking pings.)<br />
All contents are Copyright © 1992–2010 <strong>Cisco</strong> Systems, Inc. All rights reserved. This document is <strong>Cisco</strong> Public Information. Page 13 of 24
<strong>CCNP</strong>v6 <strong>TSHOOT</strong><br />
• Address Resolution Protocol (ARP) failures. After clearing the ARP cache and triggering a connection<br />
attempt (for instance, by using ping), ARP entries show up as incomplete or are missing.<br />
• Packets are not being received, which is shown by using a packet sniffer on the receiving host.<br />
Confirm or Deny Layer 3 Connectivity<br />
DLS1#ping 10.1.2.2<br />
Type escape sequence to abort.<br />
Sending 5, 100-byte ICMP Echos to 10.1.2.2, timeout is 2 seconds:<br />
.....<br />
Success rate is 0 percent (0/5)<br />
DLS1#clear arp-cache<br />
DLS1#show arp<br />
Protocol Address Age (min) Hardware Addr Type Interface<br />
Internet 10.1.10.1 0 0007.e963.ce53 ARPA Vlan10<br />
Internet 10.1.2.1 - 0017.5a5b.b442 ARPA FastEthernet0/5<br />
Internet 10.1.50.1 0 0007.e963.ce53 ARPA Vlan50<br />
Internet 10.1.100.1 0 001b.0c6d.8f41 ARPA Vlan100<br />
Internet 10.1.100.254 - 0000.0c07.ac64 ARPA Vlan100<br />
Internet 10.1.100.253 0 0017.5a53.a3c1 ARPA Vlan100<br />
Internet 10.1.100.252 - 0017.5a5b.b441 ARPA Vlan100<br />
Internet 10.1.50.252 - 0017.5a5b.b446 ARPA Vlan50<br />
Internet 10.1.50.254 - 0000.0c07.ac32 ARPA Vlan50<br />
Internet 10.1.20.252 - 0017.5a5b.b444 ARPA Vlan20<br />
Internet 10.1.30.252 - 0017.5a5b.b445 ARPA Vlan30<br />
Internet 10.1.10.252 - 0017.5a5b.b443 ARPA Vlan10<br />
The most relevant fields in the output are the IP address, hardware address, and interface fields, because these<br />
give you the essential information that you are usually looking for when you issue the show arp command.<br />
The age field is also relevant. By default, ARP entries are cached for four hours. To make sure that you are<br />
looking at current information, you can use the clear arp-cache command to flush existing entries from the<br />
cache.<br />
If there is a “-” in the age field instead of a number, this entry is local to the switch. These entries represent locally<br />
configured IP and MAC addresses, and the switch will respond to ARP requests for these entries.<br />
All contents are Copyright © 1992–2010 <strong>Cisco</strong> Systems, Inc. All rights reserved. This document is <strong>Cisco</strong> Public Information. Page 14 of 24
<strong>CCNP</strong>v6 <strong>TSHOOT</strong><br />
Sample Layer 2 Troubleshooting Flow<br />
No L3<br />
connectivity<br />
between<br />
adjacent<br />
devices<br />
Determine<br />
expected L2 path<br />
based on<br />
documentation and<br />
baselines<br />
Determine<br />
and verify L2<br />
path<br />
between<br />
devices<br />
Verify port status<br />
and CDP to<br />
determine<br />
operational L2 links<br />
Track frames<br />
and device<br />
MAC<br />
addresses<br />
along L2<br />
path<br />
Analyze spanning<br />
tree to determine<br />
L2 path<br />
Investigate<br />
links where<br />
path seems<br />
broken<br />
© 2009 <strong>Cisco</strong> Systems, Inc. All rights reserved. <strong>TSHOOT</strong> v1.0—17<br />
If you have determined that the problem is most likely a Layer 2 or Layer 1 problem, you want to reduce the scope<br />
of the potential failures. You can diagnose Layer 2 problems with the following common troubleshooting method:<br />
• Determine the Layer 2 path. Based on documentation, baselines, and knowledge of your network in<br />
general, the first step is to determine the path that you would expect frames to follow between the<br />
affected hosts. Determining the expected traffic path beforehand helps you in two ways: It gives you a<br />
starting point for gathering information about what is actually happening on the network, and it makes<br />
it easier to spot abnormal behavior. The second step in determining the Layer 2 path is to follow the<br />
expected path and verify that the links on the expected path are actually up and forwarding traffic. If<br />
the actual traffic path is different from your expected path, this step might give you clues about the<br />
particular links or protocols that are failing and the cause of these failures.<br />
• Track the flow of traffic across the Layer 2 path. By following the expected Layer 2 path and verifying<br />
that frames actually flow along that path, you can likely find the spot where the connectivity is failing.<br />
• When you have found the spot where the connectivity is failing, examine the link or links where the<br />
path is broken. Now you can apply targeted troubleshooting commands to find the root cause of the<br />
problem. Even if you cannot find the underlying cause of the problem yourself, by reducing the scope<br />
of the problem, you have a better-defined problem that can be escalated to the next level of support.<br />
Although there are many different approaches to troubleshooting Layer 2 problems, the elements mentioned<br />
above will most likely be part of any methodical approach. These elements are not necessarily executed in the<br />
presented order. Determining the expected path and verifying the actual path often go hand-in-hand.<br />
To determine the traffic path between the affected hosts, you can combine knowledge from the following sources:<br />
• Documentation and baselines: Documentation that was written during design and implementation<br />
usually contains information about the intended traffic paths between the hosts. If the documentation<br />
does not provide this information, you can usually reconstruct the expected flow of traffic by analyzing<br />
network diagrams and configurations.<br />
• Link status across the path: A very straightforward check after you have determined the expected<br />
path of the traffic is to verify that all ports and links in the path are operational.<br />
All contents are Copyright © 1992–2010 <strong>Cisco</strong> Systems, Inc. All rights reserved. This document is <strong>Cisco</strong> Public Information. Page 15 of 24
<strong>CCNP</strong>v6 <strong>TSHOOT</strong><br />
• Spanning-tree topology: In Layer 2 networks that have a level of redundancy built into the topology,<br />
analyze the operation of Spanning Tree Protocol (STP) to determine which of the available links will<br />
be used.<br />
Verify Link Status<br />
DLS1#show interfaces status<br />
Port Name Status Vlan Duplex Speed Type<br />
Fa0/1 Channel to ALS1 connected trunk a-full a-100 10/100BaseTX<br />
Fa0/2 Channel to ALS1 connected trunk a-full a-100 10/100BaseTX<br />
Fa0/3 Channel to DLS2 connected trunk a-full a-100 10/100BaseTX<br />
Fa0/4 Channel to DLS2 connected trunk a-full a-100 10/100BaseTX<br />
Fa0/5 FE to R1 notconnect routed full 100 10/100BaseTX<br />
Fa0/6 FE to SRV1 connected 50 a-full a-100 10/100BaseTX<br />
Fa0/7 Unused disabled 999 auto auto 10/100BaseTX<br />
<br />
Fa0/24 Unused disabled 999 auto auto 10/100BaseTX<br />
Gi0/1 Unused disabled 999 auto auto Not Present<br />
Gi0/2 Unused disabled 999 auto auto Not Present<br />
Po1 Channel to ALS1 connected trunk a-full a-100<br />
Po10 Channel to DLS2 connected trunk a-full a-100<br />
To determine link status on switches, the show interfaces status command is useful because it gives a<br />
brief overview of all the interfaces on the switch as well as contains important elements, such as link status,<br />
speed, duplex, trunk or VLAN membership, and interface descriptions. If the link is up, the Status field shows<br />
“connected.” If it is down up, “notconnect” is in the Status field. If the link has been administratively shut down, the<br />
status is “disabled.”<br />
DLS1#show cdp neighbors<br />
Capability Codes: R - Router, T - Trans Bridge, B - Source Route Bridge<br />
S - Switch, H - Host, I - IGMP, r - Repeater, P - Phone<br />
Device ID Local Intrfce Holdtme Capability Platform Port ID<br />
R1.tshoot.net Fas 0/5 151 R S I 1841 Fas 0/1<br />
ALS1.tshoot.net Fas 0/2 153 S I WS-C2960- Fas 0/2<br />
ALS1.tshoot.net Fas 0/1 153 S I WS-C2960- Fas 0/1<br />
DLS2.tshoot.net Fas 0/4 172 R S I WS-C3560- Fas 0/4<br />
DLS2.tshoot.net Fas 0/3 172 R S I WS-C3560- Fas 0/3<br />
If the <strong>Cisco</strong> Discovery Protocol is enabled between the switches and routers, you can use the show cdp<br />
neighbor command to confirm that a link is operational at the data link layer in both directions. Also, it is<br />
essential in uncovering cabling problems because it records both the sending and receiving ports, as can be seen<br />
in the output above.<br />
Analyze Spanning Tree<br />
ALS1#show spanning-tree vlan 10<br />
VLAN0010<br />
Spanning tree enabled protocol rstp<br />
Root ID Priority 24586<br />
Address 0017.5a5b.b400<br />
Cost 12<br />
Port 56 (Port-channel1)<br />
Hello Time 2 sec Max Age 20 sec Forward Delay 15 sec<br />
Bridge ID Priority 32778 (priority 32768 sys-id-ext 10)<br />
Address 001b.0c6d.8f00<br />
All contents are Copyright © 1992–2010 <strong>Cisco</strong> Systems, Inc. All rights reserved. This document is <strong>Cisco</strong> Public Information. Page 16 of 24
<strong>CCNP</strong>v6 <strong>TSHOOT</strong><br />
Hello Time 2 sec Max Age 20 sec Forward Delay 15 sec<br />
Aging Time 300<br />
Interface Role Sts Cost Prio.Nbr Type<br />
------------------- ---- --- --------- -------- --------------------------------<br />
Fa0/18 Desg FWD 19 128.18 P2p Edge<br />
Po1 Root FWD 12 128.56 P2p<br />
Po2 Altn BLK 12 128.64 P2p<br />
To analyze the spanning-tree topology and the consequences that STP has for the Layer 2 path, the show<br />
spanning-tree vlan vlan-id command is a good starting point. It lists all essential parameters that affect<br />
the topology, such as the root port, designated ports, port state, and port type.<br />
Typical values for the port status field are BLK (blocking) and FWD (forwarding). You might also see LIS or LTN<br />
(listening), and LRN (learning) while STP is converging.<br />
The states LBK (loopback), DWN (down), or BKN (broken) typically indicate problems. If the value is BKN, the<br />
Type field indicates what is causing the broken status. Possible values are ROOT_Inc, LOOP_Inc, PVID_Inc,<br />
TYPE_Inc, or PVST_Inc. To get a more detailed description of the type of inconsistency and what might be<br />
causing it, you can examine the output of the show spanning-tree inconsistentports command.<br />
Interface Type and information includes:<br />
• P2p or Shr to indicate the link type (typically based on duplex status – P2p is full-duplex and Shr is<br />
half-duplex or shared Ethernet).<br />
• Edge for edge (PortFast) ports.<br />
• Bound for boundary ports when this switch is running 802.1s (MST) and the other switch is running a<br />
different spanning-tree variety. The output also indicates which other type of STP was detected on<br />
the port.<br />
• Peer for peer ports when this switch is running Per VLAN Spanning Tree Plus (PVST+) or Per VLAN<br />
Rapid Spanning Tree Plus (PVRST+) and the other switch is running a different standard variety of<br />
STP (802.1D or 802.1s MST).<br />
All contents are Copyright © 1992–2010 <strong>Cisco</strong> Systems, Inc. All rights reserved. This document is <strong>Cisco</strong> Public Information. Page 17 of 24
<strong>CCNP</strong>v6 <strong>TSHOOT</strong><br />
Sample Layer 2 Troubleshooting Flow<br />
No L3<br />
connectivity<br />
between<br />
adjacent<br />
devices<br />
Determine<br />
and verify L2<br />
path<br />
between<br />
devices<br />
Analyze traffic<br />
statistics and<br />
counters<br />
Track frames<br />
and device<br />
MAC<br />
addresses<br />
along L2<br />
path<br />
Analyze MAC<br />
address tables<br />
Investigate<br />
links where<br />
path seems<br />
broken<br />
Analyze packet<br />
captures<br />
© 2009 <strong>Cisco</strong> Systems, Inc. All rights reserved. <strong>TSHOOT</strong> v1.0—21<br />
After you have determined the Layer 2 path between the two affected hosts, you can start tracking the traffic<br />
between the hosts as it is being switched along the path. The most direct approach to tracking the traffic is to<br />
capture packets at set points along the path by using a packet sniffer. Tracking packets in real time is a fairly<br />
intensive procedure, and technical limitations might restrict the links where traffic captures could be collected.<br />
However, it is the most definitive proof that traffic is or is not flowing along specific paths and links. A less laborintensive<br />
method is to track the flow of traffic by analyzing MAC address tables or traffic statistics. These methods<br />
are less direct, because you are not looking at the actual traffic itself but at traces left by the passing of frames.<br />
In a network that has not yet gone into production, packet statistics can help you see where traffic is flowing. On<br />
live networks, the test traffic that you are generating will be lost against the background of the live traffic patterns<br />
in most cases. However, if the switches that you are using have the capability to track packet statistics for access<br />
lists, you might be able to write an access list that matches the specific traffic that you are interested in and isolate<br />
the traffic statistics for that type of traffic.<br />
A method of tracing traffic that can be used under all circumstances is analyzing the process of MAC address<br />
learning along the Layer 2 path. When a switch receives a frame on a particular port and for a particular VLAN, it<br />
records the source MAC address of that frame together with the port and VLAN in the MAC address table.<br />
Therefore, if the MAC address of the source host is recorded in a switch but not on the next switch in the path, it<br />
indicates a communication problem between these switches for the VLAN concerned, and the link between these<br />
switches should be examined.<br />
Analyze MAC Address Tables<br />
DLS1#show mac address-table<br />
Mac Address Table<br />
-------------------------------------------<br />
Vlan Mac Address Type Ports<br />
---- ----------- -------- -----<br />
<br />
50 0000.0c07.ac32 STATIC CPU<br />
50 0007.e963.ce53 DYNAMIC Fa0/6<br />
All contents are Copyright © 1992–2010 <strong>Cisco</strong> Systems, Inc. All rights reserved. This document is <strong>Cisco</strong> Public Information. Page 18 of 24
<strong>CCNP</strong>v6 <strong>TSHOOT</strong><br />
50 0017.5a53.a385 DYNAMIC Po10<br />
50 0017.5a53.a3c6 DYNAMIC Po10<br />
10 0000.0c07.ac0a DYNAMIC Po10<br />
10 000b.db04.a5cd DYNAMIC Po1<br />
20 0000.0c07.ac14 DYNAMIC Po10<br />
20 0017.5a53.a385 DYNAMIC Po10<br />
30 0000.0c07.ac1e DYNAMIC Po10<br />
100 0000.0c07.ac64 STATIC CPU<br />
100 0017.5a53.a3c1 DYNAMIC Po10<br />
100 001b.0c6d.8f41 DYNAMIC Po1<br />
Total Mac Addresses for this criterion: 32<br />
DLS1#show mac address-table address 0000.0c07.ac0a<br />
Mac Address Table<br />
-------------------------------------------<br />
Vlan Mac Address Type Ports<br />
---- ----------- -------- -----<br />
10 0000.0c07.ac0a DYNAMIC Po10<br />
Total Mac Addresses for this criterion: 1<br />
You can use the show mac-address-table command to check the content of the MAC address table.<br />
Because this table usually contains hundreds to thousands of entries, you can narrow the results to find what you<br />
are looking for by using command options.<br />
If you are looking for the MAC address of a specific host, use the show mac-address-table address macaddress<br />
option.<br />
Another useful option is show mac-address-table interface intf-id, which shows which MAC<br />
addresses were learned on a specific port.<br />
Sample Layer 2 Troubleshooting Flow<br />
No L3<br />
connectivity<br />
between<br />
adjacent<br />
devices<br />
Determine<br />
and verify L2<br />
path<br />
between<br />
devices<br />
Investigate and<br />
verify VLAN<br />
existence<br />
Track frames<br />
and device<br />
MAC<br />
addresses<br />
along L2<br />
path<br />
Investigate and<br />
verify trunk and<br />
access port<br />
operation<br />
Investigate<br />
links where<br />
path seems<br />
broken<br />
Investigate and<br />
verify<br />
Etherchannel<br />
operation<br />
© 2009 <strong>Cisco</strong> Systems, Inc. All rights reserved. <strong>TSHOOT</strong> v1.0—23<br />
All contents are Copyright © 1992–2010 <strong>Cisco</strong> Systems, Inc. All rights reserved. This document is <strong>Cisco</strong> Public Information. Page 19 of 24
<strong>CCNP</strong>v6 <strong>TSHOOT</strong><br />
After you have found the spot in the Layer 2 path where one switch is learning the source MAC address and the<br />
next switch is not, examine the link between those two switches carefully.<br />
When trying to determine what could cause the MAC address not to be learned on the next switch, consider the<br />
following questions:<br />
• Does the VLAN exist on the next switch?<br />
• Is there an operational trunk between the two switches?<br />
• Is the VLAN allowed on the trunk between the switches?<br />
• If an EtherChannel is between the switches, is the EtherChannel fully operational?<br />
Verify VLAN Existence<br />
ALS1#show vlan brief<br />
VLAN Name Status Ports<br />
---- ------------------------ --------- -------------------------------<br />
1 default active<br />
10 OFFICE active Fa0/18<br />
20 VOICE active Fa0/18<br />
30 GUEST active<br />
100 MGMT active<br />
900 NATIVE active<br />
999 UNUSED active Fa0/5, Fa0/6, Fa0/7, Fa0/8<br />
Fa0/9, Fa0/10, Fa0/11, Fa0/12<br />
Fa0/13, Fa0/14, Fa0/15, Fa0/16<br />
Fa0/17, Fa0/19, Fa0/20, Fa0/21<br />
Fa0/22, Fa0/23, Fa0/24, Gi0/1<br />
Gi0/2<br />
1002 fddi-default act/unsup<br />
1003 token-ring-default act/unsup<br />
1004 fddinet-default act/unsup<br />
1005 trnet-default act/unsup<br />
To get a quick overview of all existing VLANs, use the show vlan brief command. However, this command<br />
does not list the trunk ports. For instance, in the sample output above, trunk ports F0/1, F0/2, F0/3, and F0/4 are<br />
not listed. FastEthernet 0/18 is listed as the only port in VLANs 10 and 20.<br />
ALS1#show vlan id 10<br />
VLAN Name Status Ports<br />
---- -------------------------------- --------- -------------------------------<br />
10 OFFICE active Fa0/18, Po1, Po2<br />
VLAN Type SAID MTU Parent RingNo BridgeNo Stp BrdgMode Trans1 Trans2<br />
---- ----- ---------- ----- ------ ------ -------- ---- -------- ------ ------<br />
10 enet 100010 1500 - - - - - 0 0<br />
To verify the existence of a particular VLAN on a switch, use the show vlan id vlan-id command. This<br />
command shows you whether the VLAN exists and which ports are assigned to it. This command includes trunk<br />
ports that the VLAN is allowed on. For the same VLAN 10 that was referenced in the previous output, you now<br />
see interface port channel 1 and port channel 2 listed as ports that are associated with VLAN 10.<br />
Verify Trunk Operation<br />
ALS1#show interfaces trunk<br />
All contents are Copyright © 1992–2010 <strong>Cisco</strong> Systems, Inc. All rights reserved. This document is <strong>Cisco</strong> Public Information. Page 20 of 24
<strong>CCNP</strong>v6 <strong>TSHOOT</strong><br />
Port Mode Encapsulation Status Native vlan<br />
Po1 on 802.1q trunking 900<br />
Po2 on 802.1q trunking 900<br />
Port Vlans allowed on trunk<br />
Po1 10,20,30,100<br />
Po2 10,20,30,100<br />
Port Vlans allowed and active in management domain<br />
Po1 10,20,30,100<br />
Po2 10,20,30,100<br />
Port Vlans in spanning tree forwarding state and not pruned<br />
Po1 10,30,100<br />
Po2 20<br />
The easiest way to get an overview of trunk operation is by using the show interface trunk command. Not<br />
only does it list trunk status, trunk encapsulation, and the native VLAN, but it also lists the allowed VLANs, active<br />
VLANs, and VLANs in Spanning Tree Forwarding state for the trunk. The last list can be very helpful in<br />
determining whether frames for a particular VLAN will be forwarded on a trunk.<br />
For instance, in the example, you can see that both interface port channel 1 and port channel 2 allow VLANs 10,<br />
20, 30, and 100, but VLANs 10, 30, and 100 are forwarded on port channel 1, while VLAN 20 is forwarded on port<br />
channel 2.<br />
Verify VLAN Port Status<br />
ALS1#show interfaces fastEthernet 0/18 switchport<br />
Name: Fa0/18<br />
Switchport: Enabled<br />
Administrative Mode: static access<br />
Operational Mode: static access<br />
Administrative Trunking Encapsulation: dot1q<br />
Operational Trunking Encapsulation: native<br />
Negotiation of Trunking: Off<br />
Access Mode VLAN: 10 (OFFICE)<br />
Trunking Native Mode VLAN: 1 (default)<br />
Administrative Native VLAN tagging: enabled<br />
Voice VLAN: 20 (VOICE)<br />
Administrative private-vlan host-association: none<br />
Administrative private-vlan mapping: none<br />
Administrative private-vlan trunk native VLAN: none<br />
Administrative private-vlan trunk Native VLAN tagging: enabled<br />
Administrative private-vlan trunk encapsulation: dot1q<br />
Administrative private-vlan trunk normal VLANs: none<br />
Administrative private-vlan trunk associations: none<br />
Administrative private-vlan trunk mappings: none<br />
<br />
To check all VLAN-related parameters for a specific interface, use the show interface intf-id<br />
switchport command. This command applies to access ports as well as trunk ports. For instance, in the<br />
example output, the port is configured as a static access port in VLAN 10, and VLAN 20 is assigned to the port as<br />
a voice VLAN.<br />
Verify EtherChannel Operation<br />
All contents are Copyright © 1992–2010 <strong>Cisco</strong> Systems, Inc. All rights reserved. This document is <strong>Cisco</strong> Public Information. Page 21 of 24
<strong>CCNP</strong>v6 <strong>TSHOOT</strong><br />
ALS1#show etherchannel summary<br />
Flags: D - down P - bundled in port-channel<br />
I - stand-alone s - suspended<br />
H - Hot-standby (LACP only)<br />
R - Layer3 S - Layer2<br />
U - in use f - failed to allocate aggregator<br />
M - not in use, minimum links not met<br />
u - unsuitable for bundling<br />
w - waiting to be aggregated<br />
d - default port<br />
Number of channel-groups in use: 2<br />
Number of aggregators: 2<br />
Group Port-channel Protocol Ports<br />
------+-------------+-----------+---------------------------------------<br />
1 Po1(SU) - Fa0/1(P) Fa0/2(P)<br />
2 Po2(SU) - Fa0/3(P) Fa0/4(P)<br />
When an EtherChannel is configured between the switches and you suspect that EtherChannel operation could<br />
be causing the communication failure between the switches, you can verify this by using the show<br />
etherchannel summary command. Although the command output is fairly self-explanatory, the typical things<br />
to look for is the lowercase “s” flag, which indicates that a physical interface is suspended because of<br />
incompatibility with the other ports in the channel or the uppercase “D” flag, which indicates that an interface<br />
(physical or port channel) is down.<br />
All contents are Copyright © 1992–2010 <strong>Cisco</strong> Systems, Inc. All rights reserved. This document is <strong>Cisco</strong> Public Information. Page 22 of 24
<strong>CCNP</strong>v6 <strong>TSHOOT</strong><br />
Reflection Questions<br />
1. Which lab trouble tickets did you have the most difficulty with?<br />
__________________________________________________________________________________________<br />
__________________________________________________________________________________________<br />
__________________________________________________________________________________________<br />
2. Would you change anything about the process that you used now that you see the resolution of the problem?<br />
__________________________________________________________________________________________<br />
__________________________________________________________________________________________<br />
__________________________________________________________________________________________<br />
3. Which commands did you find most useful in diagnosing Layer 1 and Layer 2 issues? Add these to your<br />
toolbox for future use. Which commands did you find least useful?<br />
__________________________________________________________________________________________<br />
__________________________________________________________________________________________<br />
__________________________________________________________________________________________<br />
All contents are Copyright © 1992–2010 <strong>Cisco</strong> Systems, Inc. All rights reserved. This document is <strong>Cisco</strong> Public Information. Page 23 of 24
<strong>CCNP</strong>v6 <strong>TSHOOT</strong><br />
Lab 4-1: References<br />
If you need more information on the commands and their options, refer to the following references:<br />
• Command References for <strong>Cisco</strong> Catalyst LAN Switches<br />
Go to http://www.cisco.com/en/US/products/hw/switches/index.html. Then select Campus LAN and the<br />
product family that you are working with. The Command References are under the “Reference Guides”<br />
section.<br />
• Virtual LANs and VLAN Trunking Protocol Troubleshooting Tech Notes<br />
www.cisco.com/en/US/tech/tk389/tk689/tsd_technology_support_troubleshooting_technotes_list.html<br />
• Spanning Tree Protocol Troubleshooting Tech Notes<br />
www.cisco.com/en/US/tech/tk389/tk621/tsd_technology_support_troubleshooting_technotes_list.html<br />
• EtherChannel Troubleshooting Tech Notes<br />
www.cisco.com/en/US/tech/tk389/tk213/tsd_technology_support_troubleshooting_technotes_list.html<br />
Router Interface Summary Table<br />
Router Model Ethernet Interface<br />
#1<br />
1700 Fast Ethernet 0<br />
(FA0)<br />
1800 Fast Ethernet 0/0<br />
(FA0/0)<br />
2600 Fast Ethernet 0/0<br />
(FA0/0)<br />
2800 Fast Ethernet 0/0<br />
(FA0/0)<br />
Router Interface Summary<br />
Ethernet Interface<br />
#2<br />
Fast Ethernet 1<br />
(FA1)<br />
Fast Ethernet 0/1<br />
(FA0/1)<br />
Fast Ethernet 0/1<br />
(FA0/1)<br />
Fast Ethernet 0/1<br />
(FA0/1)<br />
Serial Interface<br />
#1<br />
Serial Interface<br />
#2<br />
Serial 0 (S0) Serial 1 (S1)<br />
Serial 0/0/0<br />
(S0/0/0)<br />
Serial 0/0/1<br />
(S0/0/1)<br />
Serial 0/0 (S0/0) Serial 0/1 (S0/1)<br />
Serial 0/0/0<br />
(S0/0/0)<br />
Serial 0/0/1<br />
(S0/0/1)<br />
Note: To find out how the router is configured, look at the interfaces to identify the type of router<br />
and how many interfaces the router has. Rather than try to list all the combinations of<br />
configurations for each router class, this table includes identifiers for the possible combinations of<br />
Ethernet and serial interfaces in the device. The table does not include any other type of interface,<br />
even though a specific router might contain one. An example of this is an ISDN BRI interface. The<br />
string in parenthesis is the legal abbreviation that can be used in <strong>Cisco</strong> IOS commands to<br />
represent the interface.<br />
All contents are Copyright © 1992–2010 <strong>Cisco</strong> Systems, Inc. All rights reserved. This document is <strong>Cisco</strong> Public Information. Page 24 of 24
<strong>CCNP</strong>v6 <strong>TSHOOT</strong><br />
Chapter 4 Lab 4-2, Layer 3 Switching and First-Hop Redundancy<br />
Physical Topology<br />
All contents are Copyright © 1992–2010 <strong>Cisco</strong> Systems, Inc. All rights reserved. This document is <strong>Cisco</strong> Public Information. Page 1 of 26
<strong>CCNP</strong>v6 <strong>TSHOOT</strong><br />
Logical Topology<br />
Objectives<br />
Background<br />
• Load the trouble ticket device configuration files for each trouble ticket.<br />
• Diagnose and resolve problems related to switch virtual interfaces and multilayer switching.<br />
• Diagnose and resolve problems related to First Hop Redundancy Protocols.<br />
• Document troubleshooting progress, configuration changes, and problem resolution.<br />
Multilayer (Layer 3) switches have the capability to act as switches and routers when using switch virtual<br />
interfaces (SVIs), routed interfaces, and routing protocols. Layer 3 switches allow you to create SVIs or logical<br />
interfaces that represent a VLAN. They can also support routed physical interfaces. These versatile switches<br />
are frequently used as part of the LAN switch fabric and can be configured with a First Hop Redundancy<br />
Protocol (FHRP). Two or more Layer 3 switches (or routers) can provide redundant paths to the network edge<br />
for local hosts. A host is configured with a virtual default gateway address. If one of the gateways goes down,<br />
the other can take over for the client without the client’s knowledge. Examples of FHRPs discussed in this<br />
course are Hot Standby Router Protocol (HSRP), Virtual Router Redundancy Protocol (VRRP), and Gateway<br />
Load Balancing Protocol (GLBP).<br />
In this lab, you will troubleshoot problems related to Layer 3 switching and FHRPs, such as HSRP, including<br />
HSRP authentication. For each task or trouble ticket, the scenario and problem symptom is described. While<br />
All contents are Copyright © 1992–2010 <strong>Cisco</strong> Systems, Inc. All rights reserved. This document is <strong>Cisco</strong> Public Information. Page 2 of 26
<strong>CCNP</strong>v6 <strong>TSHOOT</strong><br />
troubleshooting, you will discover the cause of the problem, correct it, and then document the process and<br />
results.<br />
Physical and Logical Topology Diagrams<br />
The physical and logical topologies, including interface designations and IP addresses, are provided to assist<br />
the troubleshooting effort.<br />
Lab Structure<br />
This lab is divided into two main sections.<br />
Section 1—Trouble Tickets and Troubleshooting Logs<br />
This section includes multiple tasks. Each task is associated with a trouble ticket (TT) and introduces one or<br />
more errors on one or more devices. If time is a consideration, each task or trouble ticket can be performed<br />
independently.<br />
Section 2—Troubleshooting Reference Information<br />
This section provides general Layer 2 troubleshooting information that can be applied to any trouble ticket in<br />
this lab. Sample troubleshooting flows are provided, along with examples of useful commands and output. If<br />
time permits, it is recommended that you read through Section 2 prior to starting on the trouble tickets.<br />
This lab uses <strong>Cisco</strong> 1841 routers with <strong>Cisco</strong> IOS Release 12.4(24)T1 and the advanced IP image c1841advipservicesk9-mz.124-24.T1.bin.<br />
The switches are <strong>Cisco</strong> WS-C2960-24TT-L with the <strong>Cisco</strong> IOS image<br />
c2960-lanbasek9-mz.122-46.SE.bin and Catalyst 3560-24PS with the <strong>Cisco</strong> IOS image c3560advipservicesk9-mz.122-46.SE.bin.<br />
Other routers (such as 2801 and 2811), switches (such as 2950 or 3550),<br />
and <strong>Cisco</strong> IOS Software versions can be used if they have comparable capabilities and features. Depending<br />
on the router or switch model and <strong>Cisco</strong> IOS Software version, the commands available and output produced<br />
might vary from what is shown in this lab.<br />
Note: Any changes made to the baseline configurations or topology (other than errors introduced) are noted<br />
in the trouble ticket so that you are aware of them prior to beginning the troubleshooting process.<br />
Required Resources<br />
• 3 routers (<strong>Cisco</strong> 1841 with <strong>Cisco</strong> IOS Release 12.4(24)T1 Advanced IP Service or comparable)<br />
• 1 switch (<strong>Cisco</strong> 2960 with the <strong>Cisco</strong> IOS Release 12.2(46)SE C2960-LANBASEK9-M image or<br />
comparable)<br />
• 2 switches (<strong>Cisco</strong> 3560 with the <strong>Cisco</strong> IOS Release 12.2(46)SE C3560-advipservicesK9-mz image or<br />
comparable)<br />
• SRV1 (Windows PC with a static IP address) with TFTP and syslog servers plus an SSH client<br />
(PuTTY or comparable) and WireShark software.<br />
• PC-B (Windows PC—DHCP client) with PuTTY and WireShark software available<br />
• PC-C (Windows PC—DHCP client) with PuTTY and WireShark software available<br />
• Serial and Ethernet cables<br />
All contents are Copyright © 1992–2010 <strong>Cisco</strong> Systems, Inc. All rights reserved. This document is <strong>Cisco</strong> Public Information. Page 3 of 26
<strong>CCNP</strong>v6 <strong>TSHOOT</strong><br />
Section 1—Trouble Tickets and Troubleshooting Logs<br />
Task 1: Trouble Ticket Lab 4-2 TT-A<br />
Step 1: Review trouble ticket Lab 4-2 TT-A.<br />
Upon arriving at the office this morning, you find the following ticket in the system:<br />
Switch ALS1 has been showing CRC errors on a group of eight ports for several days. It was suspected that<br />
hardware was the cause. During yesterday evening’s maintenance window, the switch was replaced with a similar<br />
switch from the lab. After this replacement, clients could connect, and no errors were shown on the ports.<br />
However, making a backup of the ALS1 configuration to server SRV1 did not work, and no syslog messages from<br />
ALS1 are being received by SRV1. The switch is not reachable via Telnet or SSH from server SRV1. There was<br />
no time for further research yesterday so, because there is no impact to users, it was decided to leave the switch<br />
and pick up this issue the next day.<br />
Your task is to diagnose the issue and restore connectivity between switch ALS1 and server SRV1. After<br />
resolving the problem, make a backup of the configuration to server SRV1.<br />
Step 2: Load the device trouble ticket configuration files for TT-A.<br />
Using the procedure described in Lab 3-1, verify that the lab configuration files are present in flash. Load the<br />
proper configuration files indicated in the Device Configuration File table.<br />
Note: The following device access methods are in effect after loading the configuration files:<br />
• Console access requires no username or password.<br />
• Telnet and SSH require the username admin and password adminpa55.<br />
• The enable password is ciscoenpa55.<br />
Device Configuration File Table<br />
Device Name File to Load Notes<br />
ALS1 Lab42-ALS1-TT-A-Cfg.txt<br />
DLS1 Lab42-DLS1-TT-A-Cfg.txt<br />
DLS2 Lab42-DLS2-TT-A-Cfg.txt<br />
R1 Lab42-R1-TT-A-Cfg.txt<br />
R2 Lab42-R2-TT-A-Cfg.txt<br />
R3 Lab42-R3-TT-A-Cfg.txt<br />
SRV1 N/A Static IP: 10.1.50.1<br />
Default gateway: 10.1.50.254<br />
PC-B N/A DHCP (release and renew after loading device<br />
configurations)<br />
PC-C N/A DHCP (release and renew after loading device<br />
configurations)<br />
All contents are Copyright © 1992–2010 <strong>Cisco</strong> Systems, Inc. All rights reserved. This document is <strong>Cisco</strong> Public Information. Page 4 of 26
<strong>CCNP</strong>v6 <strong>TSHOOT</strong><br />
Step 3: Configure SRV1 and start the syslog and TFTP servers.<br />
a. Ensure that SRV1 has the static IP address 10.1.50.1 and default gateway 10.1.50.254.<br />
b. Start the syslog server on SRV1, which is the syslog server for the entire network. When the network<br />
is properly configured, all devices send syslog messages to SRV1.<br />
c. Start the TFTP server on SRV1, which is the archive server for the entire network. When the network<br />
is properly configured, all devices send archives of their running configurations to this server<br />
whenever the running config is copied to the startup config. Ensure that the default TFTP directory on<br />
SRV1 is set to the directory where you want to store the archives.<br />
Step 4: Release and renew the DHCP leases on PC-B and PC-C.<br />
a. Ensure that PC-B and PC-C are configured as DHCP clients.<br />
b. After loading all TT-A device configuration files, issue the ipconfig /release and ipconfig /renew<br />
commands on PC-B and PC-C. You might need to repeat this process after the TT problems have<br />
been resolved.<br />
Note: Problems introduced into the network by the trouble ticket might prevent one or both of the PCs<br />
from acquiring an IP address. Do not assign either PC a static address.<br />
Step 5: Outline the troubleshooting approach and validation steps.<br />
Use this space to identify the troubleshooting approach that you plan to take and the key steps involved to verify<br />
that the problem is resolved. Troubleshooting approaches to select from include the follow-the-path, spot-thedifferences,<br />
bottom-up, top-down, divide-and-conquer, shoot-from-the-hip, and move-the-problem methods.<br />
Note: In addition to a specific approach, you can use the generic troubleshooting process described at the<br />
beginning of Section 2 of this lab.<br />
_______________________________________________________________________________<br />
_______________________________________________________________________________<br />
_______________________________________________________________________________<br />
_______________________________________________________________________________<br />
_______________________________________________________________________________<br />
_______________________________________________________________________________<br />
Step 6: Record the troubleshooting process and configuration changes.<br />
Note: Section 2 of this lab includes sample troubleshooting flows, useful commands, and examples of output.<br />
Use this log to document your actions and results during the troubleshooting process. List the commands you<br />
used to gather information. As you progress, record your thoughts as to what you think the problem might be and<br />
which actions you take to correct the problem.<br />
All contents are Copyright © 1992–2010 <strong>Cisco</strong> Systems, Inc. All rights reserved. This document is <strong>Cisco</strong> Public Information. Page 5 of 26
<strong>CCNP</strong>v6 <strong>TSHOOT</strong><br />
Device Actions and Results<br />
Step 7: Document trouble ticket debrief notes.<br />
Use this space to make notes of the key learning points that you picked up during the discussion of this trouble<br />
ticket with your instructor. The notes can include problems encountered, solutions applied, useful commands<br />
employed, alternate solutions, methods and processes, and procedure and communication improvements.<br />
_______________________________________________________________________________<br />
_______________________________________________________________________________<br />
_______________________________________________________________________________<br />
_______________________________________________________________________________<br />
_______________________________________________________________________________<br />
_______________________________________________________________________________<br />
_______________________________________________________________________________<br />
All contents are Copyright © 1992–2010 <strong>Cisco</strong> Systems, Inc. All rights reserved. This document is <strong>Cisco</strong> Public Information. Page 6 of 26
<strong>CCNP</strong>v6 <strong>TSHOOT</strong><br />
Task 2: Trouble Ticket Lab 4-2 TT-B<br />
Step 1: Review trouble ticket Lab 4-2 TT-B.<br />
During last Friday’s maintenance window, a series of failover tests at headquarters and the branch offices were<br />
executed. It was discovered during a reboot of switch DLS1 that connectivity between clients in OFFICE VLAN 10<br />
and the Internet was lost. After router DLS1 came back online, the clients regained connectivity. This was not the<br />
expected behavior, because the network provides gateway first-hop redundancy for clients in the OFFICE VLAN<br />
to ensure correct failover during outages.<br />
If one of the HSRP switches fails, the hosts on the OFFICE VLAN should still be able to access the Internet (by<br />
pinging R2 Lo0 10.1.202.1 during the outage).<br />
Step 2: Load the device trouble ticket configuration files for TT-B.<br />
Using the procedure described in Lab 3-1, verify that the lab configuration files are present in flash. Load the<br />
proper configuration files indicated in the Device Configuration File table.<br />
Note: See Task 1, Step 2 for device access methods, usernames, and passwords after the configuration files<br />
have been loaded.<br />
Note: You can test the simulated Internet access by opening a browser and entering the IP address of the R2 Lo0<br />
interface 10.1.202.1. You will be prompted for a username and password. You can gain access to the router GUI<br />
management interface by entering username admin and the enable password ciscoenpa55.<br />
Device Configuration File Table<br />
Device Name File to Load Notes<br />
ALS1 Lab42-ALS1-TT-B-Cfg.txt<br />
DLS1 Lab42-DLS1-TT-B-Cfg.txt<br />
DLS2 Lab42-DLS2-TT-B-Cfg.txt<br />
R1 Lab42-R1-TT-B-Cfg.txt<br />
R2 Lab42-R2-TT-B-Cfg.txt<br />
R3 Lab42-R3-TT-B-Cfg.txt<br />
SRV1 N/A Static IP: 10.1.50.1<br />
Default gateway: 10.1.50.254<br />
PC-B N/A DHCP (release and renew after loading device<br />
configurations)<br />
PC-C N/A DHCP (release and renew after loading device<br />
configurations)<br />
Step 3: Configure SRV1 and start the syslog and TFTP servers, as described in Task 1.<br />
Step 4: Release and renew the DHCP leases on PC-B and PC-C, as described in Task 1.<br />
Step 5: Outline the troubleshooting approach and validation steps.<br />
Use this space to identify the troubleshooting approach that you plan to take and the key steps involved to verify<br />
that the problem is resolved. Troubleshooting approaches to select from include the follow-the-path, spot-thedifferences,<br />
bottom-up, top-down, divide-and-conquer, shoot-from-the-hip, and move-the-problem methods.<br />
All contents are Copyright © 1992–2010 <strong>Cisco</strong> Systems, Inc. All rights reserved. This document is <strong>Cisco</strong> Public Information. Page 7 of 26
<strong>CCNP</strong>v6 <strong>TSHOOT</strong><br />
Note: In addition to a specific approach, you can use the generic troubleshooting process described at the<br />
beginning of Section 2 of this lab.<br />
_______________________________________________________________________________<br />
_______________________________________________________________________________<br />
_______________________________________________________________________________<br />
_______________________________________________________________________________<br />
_______________________________________________________________________________<br />
Step 6: Record the troubleshooting process and configuration changes.<br />
Note: Section 2 of this lab includes sample troubleshooting flows, useful commands, and examples of output.<br />
Use this log to document your actions and results during the troubleshooting process. List the commands you<br />
used to gather information. As you progress, record your thoughts as to what you think the problem might be and<br />
which actions you take to correct the problem.<br />
Device Actions and Results<br />
All contents are Copyright © 1992–2010 <strong>Cisco</strong> Systems, Inc. All rights reserved. This document is <strong>Cisco</strong> Public Information. Page 8 of 26
<strong>CCNP</strong>v6 <strong>TSHOOT</strong><br />
Step 7: Document trouble ticket debrief notes.<br />
Use this space to make notes of the key learning points that you picked up during the discussion of this trouble<br />
ticket with your instructor. The notes can include problems encountered, solutions applied, and useful commands<br />
employed. It can also include alternate solutions, methods, and procedures and communication improvements.<br />
_______________________________________________________________________________<br />
_______________________________________________________________________________<br />
_______________________________________________________________________________<br />
_______________________________________________________________________________<br />
_______________________________________________________________________________<br />
_______________________________________________________________________________<br />
_______________________________________________________________________________<br />
Task 3: Trouble Ticket Lab 4-2 TT-C<br />
Step 1: Review trouble ticket Lab 4-2 TT-C.<br />
Your company has decided to use Message Digest 5 (MD5)-based authentication between the HSRP routers. A<br />
colleague of yours was asked to test the authentication using VLAN 100 MGMT (to avoid impact on end users)<br />
between DLS1 and DLS2. He started to configure the test late this afternoon but then left on vacation. Your task<br />
is to review and verify the implementation of HSRP authentication in VLAN 100 and fix any issues that remain.<br />
Step 2: Load the device trouble ticket configuration files for TT-C.<br />
Using the procedure described in Lab 3-1, verify that the lab configuration files are present in flash. Load the<br />
configuration files indicated in the Device Configuration File table.<br />
Note: See Task 1, Step 2 for device access methods, usernames, and passwords after you have loaded the<br />
configuration files.<br />
Device Configuration File Table<br />
Device Name File to Load Notes<br />
ALS1 Lab42-ALS1-TT-C-Cfg.txt<br />
DLS1 Lab42-DLS1-TT-C-Cfg.txt<br />
DLS2 Lab42-DLS2-TT-C-Cfg.txt<br />
R1 Lab42-R1-TT-C-Cfg.txt<br />
R2 Lab42-R2-TT-C-Cfg.txt<br />
R3 Lab42-R3-TT-C-Cfg.txt<br />
SRV1 N/A Static IP: 10.1.50.1<br />
Default gateway: 10.1.50.254<br />
PC-B N/A DHCP<br />
PC-C N/A DHCP<br />
All contents are Copyright © 1992–2010 <strong>Cisco</strong> Systems, Inc. All rights reserved. This document is <strong>Cisco</strong> Public Information. Page 9 of 26
<strong>CCNP</strong>v6 <strong>TSHOOT</strong><br />
Step 3: Configure SRV1 and start the syslog and TFTP servers, as described in Task 1.<br />
Step 4: Release and renew the DHCP leases on PC-B and PC-C, as described in Task 1.<br />
Step 5: Outline the troubleshooting approach and validation steps.<br />
Use this space to identify the troubleshooting approach you plan to take and the key steps to verify that the<br />
problem is resolved. Troubleshooting approaches to select from include the follow-the-path, spot-the-differences,<br />
bottom-up, top-down, divide-and-conquer, shoot-from-the-hip, and move-the-problem methods.<br />
Note: In addition to a specific approach, you can use the generic troubleshooting process described at the<br />
beginning of Section 2 of this lab.<br />
_______________________________________________________________________________<br />
_______________________________________________________________________________<br />
_______________________________________________________________________________<br />
_______________________________________________________________________________<br />
_______________________________________________________________________________<br />
_______________________________________________________________________________<br />
Step 6: Record the troubleshooting process and configuration changes.<br />
Note: Section 2 of this lab includes sample troubleshooting flows, useful commands, and examples of output.<br />
Use this log to document your actions and results during the troubleshooting process. List the commands you<br />
used to gather information. As you progress, record your thoughts as to what you think the problem might be and<br />
which actions you take to correct the problem.<br />
Note: You might need to issue the ipconfig /release and ipconfig /renew commands on DHCP clients after the<br />
network device problems are resolved.<br />
Device Actions and Results<br />
All contents are Copyright © 1992–2010 <strong>Cisco</strong> Systems, Inc. All rights reserved. This document is <strong>Cisco</strong> Public Information. Page 10 of 26
<strong>CCNP</strong>v6 <strong>TSHOOT</strong><br />
Device Actions and Results<br />
Step 7: Document trouble ticket debrief notes.<br />
Use this space to make notes of the key learning points that you picked up during the discussion of this trouble<br />
ticket with your instructor. The notes can include the problems encountered, solutions applied, and useful<br />
commands employed. It could also include alternate solutions, methods, and procedures and communication<br />
improvements.<br />
_______________________________________________________________________________<br />
_______________________________________________________________________________<br />
_______________________________________________________________________________<br />
_______________________________________________________________________________<br />
_______________________________________________________________________________<br />
_______________________________________________________________________________<br />
_______________________________________________________________________________<br />
All contents are Copyright © 1992–2010 <strong>Cisco</strong> Systems, Inc. All rights reserved. This document is <strong>Cisco</strong> Public Information. Page 11 of 26
<strong>CCNP</strong>v6 <strong>TSHOOT</strong><br />
Section 2—Troubleshooting Reference Information<br />
General Troubleshooting Process<br />
As a general guideline, you can use the following general troubleshooting process described in the course:<br />
1. Define the problem (symptoms).<br />
2. Gather information.<br />
3. Analyze the information.<br />
4. Propose a hypothesis (possible cause).<br />
5. Test the hypothesis.<br />
6. Eliminate or accept the hypothesis.<br />
7. Solve the problem.<br />
8. Document the problem.<br />
Commands Summary<br />
The table lists useful commands. The sample output is shown on the following pages.<br />
Command Key Information Displayed<br />
show spanning-tree vlan vlan#<br />
show vlan brief<br />
show vlan id vlan#<br />
Displays all essential parameters that affect the topology, such<br />
as the root port, designated ports, port state, and port type, as<br />
well as the spanning-tree mode being implemented.<br />
Displays a quick overview of all existing VLANs and the ports<br />
within them. Trunk ports are not listed.<br />
Displays whether the VLAN exists and which ports are<br />
assigned to it. Includes the trunk ports on which the VLAN is<br />
allowed.<br />
show interfaces vlan vlan# Displays the SVI status, IP address, and statistics.<br />
show ip route ip-addr<br />
show ip arp ip-addr<br />
show interfaces type/# | include<br />
bia<br />
show ip cef ip-addr detail<br />
show adjacency int-type/# detail<br />
show platform forward<br />
Displays the routing table information for a particular destination<br />
address.<br />
Displays the ARP table information for an IP address, including<br />
age, hardware address, and interface.<br />
Displays the MAC address of an interface on one output line.<br />
Displays the next hop and interface used for a particular<br />
destination address from the <strong>Cisco</strong> Express Forwarding table.<br />
Displays the information contained in the adjacency table for a<br />
next-hop IP address or interface.<br />
Displays the hardware ternary content addressable memory<br />
(TCAM) information and exact forwarding behavior for a Layer<br />
2 or Layer 3 switched frame.<br />
All contents are Copyright © 1992–2010 <strong>Cisco</strong> Systems, Inc. All rights reserved. This document is <strong>Cisco</strong> Public Information. Page 12 of 26
<strong>CCNP</strong>v6 <strong>TSHOOT</strong><br />
show standby vlan vlan# brief<br />
debug standby packets<br />
Lab 4-2 Sample Troubleshooting Flows<br />
Troubleshooting Multilayer Switching<br />
Note: Specific to the Catalyst 3560 and 3750 series of<br />
switches.<br />
Verify active and standby roles and IP addresses for a<br />
particular VLAN for HSRP routers.<br />
Displays real-time messages exchanged between HSRP<br />
routers.<br />
The figure illustrates an example of a method that you could follow to diagnose and resolve problems related to<br />
multilayer switching.<br />
Sample Multilayer Switching<br />
Troubleshooting Flow<br />
Locate failing<br />
Layer 3 hop<br />
Verify Layer 3 path<br />
using traceroute<br />
and ping<br />
Verify<br />
ingress<br />
Layer 3<br />
interface<br />
Analyze sniffer<br />
traces<br />
Check<br />
control plane<br />
data<br />
structures<br />
Check<br />
packet<br />
switching<br />
data<br />
structures<br />
© 2009 <strong>Cisco</strong> Systems, Inc. All rights reserved. <strong>TSHOOT</strong> v1.0—29<br />
What is multilayer switching? In essence, a multilayer switch is a switch that is capable of switching Ethernet<br />
frames based on information in the Layer 2 and Layer 3 headers. Troubleshooting Layer 2 switching was covered<br />
in the previous lab exercise. This troubleshooting flow focuses on troubleshooting the process of switching<br />
Ethernet frames based on Layer 3 information.<br />
Under which kind of circumstances do you start troubleshooting the multilayer switching process?<br />
Troubleshooting multilayer switching is just one of the steps in the bigger picture of troubleshooting network<br />
connectivity along a Layer 3 path. After you have determined—by using tools like traceroute or ping or through<br />
analysis of packet captures—that a particular hop in the Layer 3 path seems to be the point where packets start to<br />
get dropped and that hop is a multilayer switch, or when you are troubleshooting performance problems and you<br />
want to find the exact physical links on which packets travel, then start tracing and verifying the Layer 3<br />
forwarding behavior of the multilayer switch that you suspect to be the cause of the problem.<br />
All contents are Copyright © 1992–2010 <strong>Cisco</strong> Systems, Inc. All rights reserved. This document is <strong>Cisco</strong> Public Information. Page 13 of 26
<strong>CCNP</strong>v6 <strong>TSHOOT</strong><br />
Sample Multilayer Switching<br />
Troubleshooting Flow<br />
Locate failing<br />
Layer 3 hop<br />
Verify interface<br />
status of the SVI or<br />
routed port<br />
Verify<br />
ingress<br />
Layer 3<br />
interface<br />
Verify VLAN<br />
existence in case<br />
the ingress<br />
interface is an SVI<br />
Check<br />
control plane<br />
data<br />
structures<br />
Verify spanning<br />
tree state in case<br />
the ingress<br />
interface is an SVI<br />
Check<br />
packet<br />
switching<br />
data<br />
structures<br />
© 2009 <strong>Cisco</strong> Systems, Inc. All rights reserved. <strong>TSHOOT</strong> v1.0—30<br />
Layer 3 packet switching generally consists of three major steps:<br />
1. Receive the packet on a Layer 3 interface. This interface can either be a routed port or an SVI.<br />
2. Perform a lookup in the hardware packet-switching data structures. Multilayer switches store packetforwarding<br />
information in special TCAM data structures. The information contained in these data<br />
structures is compiled from the <strong>Cisco</strong> Express Forwarding data structures in the main memory of the<br />
route processor. These data structures are, in turn, derived from control plane tables, such as the routing<br />
table and the ARP cache.<br />
3. Rewrite the frame and switch it to the outbound interface based on the information found in the TCAM.<br />
Consequently, a straightforward approach to troubleshooting a Layer3 switching problem is to verify the<br />
components that are involved in this process. First, verify the ingress Layer 3 interface, then the control plane<br />
data structures and, subsequently, the packet-forwarding data structures. (Alternatively, you can perform these<br />
steps in the reverse order.)<br />
If the ingress interface is a routed port, the first step in this process is simple because the Layer 3 and Layer 2<br />
ports are identical. Verifying the physical interface status and the configured IP address and subnet mask for that<br />
interface is sufficient to determine the status of the Layer 3 ingress interface. However, if the ingress interface is<br />
an SVI, its status is not directly related to any particular physical interface.<br />
Verify SVI Status (Missing VLAN)<br />
DLS1#show vlan id 100<br />
VLAN id 100 not found in current VLAN database<br />
DLS1#show interfaces vlan 100<br />
Vlan100 is down, line protocol is down<br />
Hardware is EtherSVI, address is 0017.5a5b.b441 (bia 0017.5a5b.b441)<br />
Internet address is 10.1.100.252/24<br />
<br />
All contents are Copyright © 1992–2010 <strong>Cisco</strong> Systems, Inc. All rights reserved. This document is <strong>Cisco</strong> Public Information. Page 14 of 26
<strong>CCNP</strong>v6 <strong>TSHOOT</strong><br />
A VLAN interface or SVI is up if there is at least one interface in the spanning-tree forwarding state for that VLAN.<br />
This implies that if an SVI is down, you should verify VLAN existence, VLAN port assignments, and the spanningtree<br />
state for the SVI.<br />
In the output above, you can see that a missing VLAN results in a VLAN interface that is in state “down, line<br />
protocol is down.”<br />
Verify SVI Status (VLAN with No Port Assigned)<br />
DLS1#show vlan id 100<br />
VLAN Name Status Ports<br />
---- -------------------------------- --------- -------------------------------<br />
100 MGMT active<br />
VLAN Type SAID MTU Parent RingNo BridgeNo Stp BrdgMode Trans1 Trans2<br />
---- ----- ---------- ----- ------ ------ -------- ---- -------- ------ ------<br />
100 enet 100100 1500 - - - - - 0 0<br />
DLS1#show interfaces vlan 100<br />
Vlan100 is up, line protocol is down<br />
Hardware is EtherSVI, address is 0017.5a5b.b441 (bia 0017.5a5b.b441)<br />
Internet address is 10.1.100.252/24<br />
<br />
When the VLAN exists but no ports are assigned to that VLAN, the status of the SVI changes to “up, line protocol<br />
is down.”<br />
Verify SVI Status (VLAN with No Port in Spanning-Tree Forwarding State)<br />
DLS1#show spanning-tree vlan 100<br />
<br />
Interface Role Sts Cost Prio.Nbr Type<br />
------------------- ---- --- --------- -------- --------------------------------<br />
Po1 Desg LRN 12 128.56 P2p<br />
Po10 Desg LRN 12 128.128 P2p<br />
DLS1#show interfaces vlan 100<br />
Vlan100 is up, line protocol is down<br />
Hardware is EtherSVI, address is 0017.5a5b.b441 (bia 0017.5a5b.b441)<br />
Internet address is 10.1.100.252/24<br />
<br />
Finally, if ports are assigned to the VLAN and at least one of these physical ports (trunk or access port) is up, one<br />
more condition needs to be met: The spanning-tree state for at least one of the ports needs to be forwarding.<br />
Under normal circumstances, if there is at least one interface assigned to a VLAN, an interface is in spanning-tree<br />
forwarding state. Either the switch is the root for the VLAN and all the ports assigned to the VLAN are designated<br />
ports and therefore forwarding, or the switch is not the root and it has a root port that is in forwarding state.<br />
As a result, when you are troubleshooting a multilayer switching problem and you find that the ingress interface is<br />
an SVI and it is down, there is an underlying Layer 2 problem for that VLAN and you need to initiate a Layer 2<br />
troubleshooting process.<br />
All contents are Copyright © 1992–2010 <strong>Cisco</strong> Systems, Inc. All rights reserved. This document is <strong>Cisco</strong> Public Information. Page 15 of 26
<strong>CCNP</strong>v6 <strong>TSHOOT</strong><br />
Sample Multilayer Switching<br />
Troubleshooting Flow<br />
Locate failing<br />
Layer 3 hop<br />
Verify<br />
ingress<br />
Layer 3<br />
interface<br />
Check<br />
control plane<br />
data<br />
structures<br />
Verify routing table<br />
and ARP cache<br />
Check<br />
packet<br />
switching<br />
data<br />
structures<br />
© 2009 <strong>Cisco</strong> Systems, Inc. All rights reserved. <strong>TSHOOT</strong> v1.0—34<br />
Verify the Routing Table and ARP Cache<br />
The next step in this process is to verify that the control plane information that is necessary to forward the packets<br />
is present. The two control plane data structures that are relevant to multilayer switching are the routing table and<br />
the ARP cache.<br />
In this sample troubleshooting flow, the multilayer switching data structures for an Internet Control Message<br />
Protocol (ICMP) echo request traveling from source IP address 10.1.50.1 to destination IP address 10.1.202.1 is<br />
verified by using various show commands.<br />
DLS1#show ip route 10.1.202.1<br />
Routing entry for 10.1.202.1/32<br />
Known via "eigrp 1", distance 90, metric 2300416, type internal<br />
Redistributing via eigrp 1<br />
Last update from 10.1.2.2 on FastEthernet0/5, 02:41:16 ago<br />
Routing Descriptor Blocks:<br />
* 10.1.2.2, from 10.1.2.2, 02:41:16 ago, via FastEthernet0/5<br />
Route metric is 2300416, traffic share count is 1<br />
Total delay is 25100 microseconds, minimum bandwidth is 1544 Kbit<br />
Reliability 255/255, minimum MTU 1500 bytes<br />
Loading 1/255, Hops 2<br />
DLS1#show ip arp 10.1.2.2<br />
Protocol Address Age (min) Hardware Addr Type Interface<br />
Internet 10.1.2.2 162 001b.530d.60b1 ARPA FastEthernet0/5<br />
DLS1#show interfaces FastEthernet 0/5 | include bia<br />
Hardware is Fast Ethernet, address is 0017.5a5b.b442 (bia 0017.5a5b.b442)<br />
In the output, you can see that a route is found in the routing table for the destination IP address 10.1.202.1, and<br />
the next hop and outbound interface for packets with that destination are listed.<br />
If the routing table does not contain an entry (specific prefix or default route) for the destination, the problem is not<br />
a packet-switching problem but a routing problem, and you should initiate a process to troubleshoot the routing<br />
operation on the control plane.<br />
All contents are Copyright © 1992–2010 <strong>Cisco</strong> Systems, Inc. All rights reserved. This document is <strong>Cisco</strong> Public Information. Page 16 of 26
<strong>CCNP</strong>v6 <strong>TSHOOT</strong><br />
The ARP cache provides the destination MAC address for the next hop. If an ARP entry for the destination is<br />
missing or listed as incomplete, either the next hop listed in the route is not valid, or there is a Layer 2 problem<br />
between the multilayer switch and the next hop. In both cases, the problem is not really a multilayer switching<br />
problem, and you should investigate the routing operation on the control plane and the Layer 2 connectivity to the<br />
next hop first.<br />
The final element that the router needs to rewrite a frame and switch it out is the source MAC address of the<br />
frame, which corresponds to the MAC address of the outbound Layer 3 interface.<br />
Sample Multilayer Switching<br />
Troubleshooting Flow<br />
Locate failing<br />
Layer 3 hop<br />
Verify<br />
ingress<br />
Layer 3<br />
interface<br />
Check<br />
control plane<br />
data<br />
structures<br />
Verify CEF FIB and<br />
adjacency table<br />
Check<br />
packet<br />
switching<br />
data<br />
structures<br />
Verify TCAM<br />
forwarding<br />
information<br />
© 2009 <strong>Cisco</strong> Systems, Inc. All rights reserved. <strong>TSHOOT</strong> v1.0—36<br />
When the control plane data structures have been verified, the next step in the multilayer switching<br />
troubleshooting process is to verify the data structures in software and hardware that are used to forward packets.<br />
All recent Layer 3 switches use the <strong>Cisco</strong> Express Forwarding technology as the foundation for the multilayer<br />
switching process. The switches combine the information from the control plane data structure, such as the<br />
routing table and the ARP cache, into two different data structures: the Forwarding Information Base (FIB) and the<br />
adjacency table. These two data structures are stored in the main memory of the route processor. They are only<br />
used to forward packets that are not handled in hardware.<br />
However, based on the information in the FIB and adjacency table, the hardware TCAM is populated, and the<br />
resulting TCAM information is what is eventually used to forward frames in hardware.<br />
To verify the correct operation of the multilayer switching process, first verify that the control plane information is<br />
accurately reflected in the software FIB and adjacency table. Next, verify that the information from the FIB and<br />
adjacency table is correctly compiled into the TCAM.<br />
Verify the FIB and Adjacency Table<br />
DLS2#show ip cef 10.1.202.1<br />
10.1.202.1/32<br />
nexthop 10.1.2.14 FastEthernet0/5<br />
DLS2#show adjacency fastEthernet 0/5 detail<br />
Protocol Interface Address<br />
IP FastEthernet0/5 10.1.2.14(19)<br />
0 packets, 0 bytes<br />
All contents are Copyright © 1992–2010 <strong>Cisco</strong> Systems, Inc. All rights reserved. This document is <strong>Cisco</strong> Public Information. Page 17 of 26
<strong>CCNP</strong>v6 <strong>TSHOOT</strong><br />
epoch 0<br />
sourced in sev-epoch 0<br />
Encap length 14<br />
001B530D6029 00175A53A3C2 0800<br />
L2 destination address byte offset 0<br />
L2 destination address byte length 6<br />
Link-type after encap: ip<br />
ARP<br />
The show ip cef command can be used in a similar way as the show ip route command. When you specify<br />
a destination IP address as an option to the command, it lists the entry in the <strong>Cisco</strong> Express Forwarding FIB that<br />
matches that IP address. It also shows the next-hop IP address and egress interface, which serve as a pointer to<br />
the adjacency table.<br />
The show adjacency command can be used to display the information contained in the adjacency table. The<br />
next-hop IP address or interface can be specified to select specific adjacencies. Adding the detail keyword to<br />
the command shows the frame rewrite information for packets that are switched through that adjacency. The<br />
frame rewrite information lists the complete Ethernet header. For the example in the output, this consists of the<br />
destination MAC address 001B.530D.6029 (which is the same MAC address that was listed as the MAC address<br />
of next hop 10.1.2.14 in the ARP cache), followed by the source MAC address 0017.5A53.A3C2 (which equals<br />
the MAC address of the egress interface F0/5), and finally, the Ethertype 0x0800 (which indicates that the<br />
protocol contained in the Ethernet frame is IP version 4).<br />
The information displayed in these show commands should accurately reflect the information in the routing table<br />
and ARP cache.<br />
Verify the Hardware TCAM Information<br />
DLS2#show platform forward fa0/3 vlan 50 0017.5a5b.b405 0017.5a53.a385 ip 10.1.50.1<br />
10.1.202.1 icmp 8 0<br />
Ingress:<br />
Global Port Number: 129, lpn: 4 Asic Number: 0<br />
Source Vlan Id: Real 50, Mapped 5. L2EncapType 0, L3EncapType 0<br />
<br />
Egress: Asic 0, switch 1<br />
CPU queues: 7 14.<br />
Source Vlan Id: Real 50, Mapped 5. L2EncapType 0, L3EncapType 0<br />
portMap 0x1000, non-SPAN portMap 0x1000<br />
<br />
Port Vlan SrcMac DstMac Cos Dscpv<br />
Fa0/5 1006 0017.5a53.a385 0017.5a53.a3c2<br />
Note: The show platform forward command shown in the above output is specific to the Catalyst 3560 and<br />
3750 series of switches. Consult the documentation for the platform that you are working with to find similar<br />
commands to examine the content of the hardware forwarding data structures for the platform.<br />
The show platform forward command consults the hardware TCAM information and displays the exact<br />
forwarding behavior for a Layer 2 or Layer 3 switched frame.<br />
This command displays the exact forwarding behavior for a packet, taking into account all features that affect<br />
packet forwarding, including <strong>Cisco</strong> Express Forwarding load balancing, EtherChannel load balancing, and packet<br />
filtering using access control lists. Therefore, you must specify the exact content of all the relevant fields in the<br />
header of the packet.<br />
In the example command output above, the following fields are specified:<br />
All contents are Copyright © 1992–2010 <strong>Cisco</strong> Systems, Inc. All rights reserved. This document is <strong>Cisco</strong> Public Information. Page 18 of 26
<strong>CCNP</strong>v6 <strong>TSHOOT</strong><br />
• Ingress interface: In the example interface, FastEthernet 0/3 is specified as the ingress interface for<br />
the packet.<br />
• Ingress VLAN: It is not necessary to specify this parameter if the port is an access port. For trunk<br />
ports, you must specify the VLAN that the frame is tagged with when it enters the ingress interface.<br />
VLAN 50 is specified as the ingress VLAN.<br />
• Source MAC address: The source MAC address of the frame when it enters the switch needs to be<br />
specified. In the example, the address is 0017.5A5B.B405. This is the MAC address of the egress<br />
interface of the previous hop (DLS1 Fa0/3 MAC).<br />
• Destination MAC address: The destination MAC address of the frame when it enters the switch<br />
needs to be specified. In the example, the address is 0017.5A53.A385 (DLS2 Fa0/3 MAC). For a<br />
Layer 3 switched packet, this address is the MAC address of the ingress Layer 3 interface (routed<br />
port or SVI).<br />
• Protocol: This is not necessary for Layer 2 switched frames. For Layer 3 switching, the Layer 3<br />
protocol that is used and the major fields in that protocol’s header must be specified. In the example,<br />
IP is listed as the protocol.<br />
• Source IP address: When IP is specified as the Layer 3 protocol, the source IP address of the<br />
packet must be specified. In the example, it is 10.1.50.1.<br />
• Destination IP address: When IP is specified as the Layer 3 protocol, the destination IP address of<br />
the packet must be specified. In the example, it is 10.1.202.1.<br />
• IP protocol: When IP is specified as the Layer 3 protocol, the protocol in the IP header, for example,<br />
TCP, UDP, or ICMP, must be specified. In the example, ICMP is specified because the example<br />
represents an ICMP echo request packet.<br />
• ICMP type and code: When ICMP is specified as the protocol, the ICMP type and code values must<br />
be specified. When TCP or UDP is specified as the protocol, additional header fields that are<br />
appropriate for those protocols, such as source and destination port numbers, must be specified. In<br />
the example, ICMP type 8 and code 0 are specified to represent an echo request packet.<br />
This command is very powerful because it shows you exactly how frames will be forwarded based on all features<br />
that affect forwarding behavior, such as load balancing, EtherChannel, and access control lists. Also, if a frame is<br />
dropped instead of forwarded, the command lists the reason why the frame is dropped.<br />
What should you do if somewhere in this chain of verifying the control plane, you find an inconsistency between<br />
the software and hardware packet-forwarding data structures?<br />
The process of building the FIB and adjacency table from the routing table and ARP cache, and subsequently<br />
populating the TCAM based on the FIB and adjacency table, is internal to the <strong>Cisco</strong> IOS software and not<br />
configurable. Whenever you find an instance where the information in these data structures is not consistent,<br />
open a case with the <strong>Cisco</strong> Technical Assistance Center (provided that you have a valid support contract for your<br />
device) to investigate and resolve the issue. As a workaround, you can try to clear the control plane data<br />
structures, such as the routing table and the ARP cache, for the particular entries that you are troubleshooting.<br />
This triggers both the control plane and the packet-forwarding data structures to be repopulated for those entries<br />
and, in certain cases, this might resolve the inconsistencies. However, this is only a workaround, not a real<br />
solution, because it only addresses the symptoms of the problem and not the underlying cause.<br />
All contents are Copyright © 1992–2010 <strong>Cisco</strong> Systems, Inc. All rights reserved. This document is <strong>Cisco</strong> Public Information. Page 19 of 26
<strong>CCNP</strong>v6 <strong>TSHOOT</strong><br />
Troubleshooting First Hop Redundancy Protocols<br />
The figure illustrates an example of a method that you could follow to diagnose and resolve problems related to<br />
FHRPs, such as HSRP, VRRP, and GLBP.<br />
Sample First Hop Redundancy<br />
Troubleshooting Flow<br />
Determine if<br />
outages are<br />
caused by<br />
FHRP or<br />
other<br />
protocols<br />
If failover testing is<br />
possible, ping<br />
virtual and real IP<br />
addresses during<br />
failover<br />
Determine if<br />
FHRP<br />
addresses<br />
are used by<br />
hosts<br />
Investigate<br />
FHRP<br />
router-toroutercommunication<br />
Investigate<br />
FHRP role<br />
selection<br />
© 2009 <strong>Cisco</strong> Systems, Inc. All rights reserved. <strong>TSHOOT</strong> v1.0—39<br />
The most common reason to start troubleshooting FHRP behavior is because during an outage or a test, network<br />
connectivity is lost for longer than expected when a redundant device or link is temporarily disabled. In<br />
redundantly configured IP networks, a number of different protocols usually need to reconverge to recover from a<br />
failure. The FHRP that is used is just one of the protocols that could be the cause of the loss of connectivity.<br />
Other protocols that need to converge as well—and could be the cause of the problem—are routing protocols and<br />
Spanning Tree Protocol (STP).<br />
So how do you determine if the FHRP is the problem?<br />
If you have the opportunity to execute failover tests (for instance, during a scheduled maintenance window), a<br />
good way to determine if the problem is caused by the FHRP or by another protocol is by sending multiple<br />
continuous pings from a client that is using the virtual router as its default gateway. Ping to the virtual and real IP<br />
addresses of the routers that participate in the FHRP, and ping to an IP address of a host that is one or more<br />
router hops removed from the client. Observe and compare the behavior of the pings while you force a failover by<br />
disabling a device or a link.<br />
Based on the observed differences between the ping responses, you can draw conclusions about the likelihood<br />
that the problem is related to the FHRP or to any other protocols that are involved in the convergence. Here are a<br />
few examples:<br />
• If you observe that the pings to the real IP address of the redundant router and the virtual IP address<br />
of the FHRP both fail at the same time and resume at the same time when you disable the primary<br />
router, assume that the problem is not related to the FHRP (because the FHRP does not affect the<br />
pings to the real IP address). The most likely cause in this scenario is the Layer 2 convergence for<br />
the VLAN, so you should start a Layer 2 troubleshooting procedure.<br />
• If you observe that the pings to the real IP address of the redundant router do not suffer any packet<br />
loss, but pings to the virtual IP address fail, this strongly suggests that there is a problem with the<br />
FHRP.<br />
All contents are Copyright © 1992–2010 <strong>Cisco</strong> Systems, Inc. All rights reserved. This document is <strong>Cisco</strong> Public Information. Page 20 of 26
<strong>CCNP</strong>v6 <strong>TSHOOT</strong><br />
• If you observe that the pings to the real IP address of the redundant router and to the virtual IP<br />
address do not suffer packet loss, but the ping to the host further out in the network fails, this might<br />
indicate an issue with the routing protocol. Alternatively, it could indicate that the client is using the<br />
primary router address as its default gateway rather than the virtual IP address.<br />
There are too many possible scenarios, combinations of ping results, and conclusions to list, but important clues<br />
can be gained in any scenario by comparing the differences between several pings during a failover.<br />
If you have to troubleshoot without the opportunity to force failover for testing purposes, you might need to<br />
assume that the FHRP is the cause of the problem and carefully verify its implementation and operation, even if<br />
you cannot determine beforehand if this might be the cause of the problem.<br />
Sample First Hop Redundancy<br />
Troubleshooting Flow<br />
Determine if<br />
outages are<br />
caused by<br />
FHRP or<br />
other<br />
protocols<br />
Determine if<br />
FHRP<br />
addresses<br />
are used by<br />
hosts<br />
Verify default<br />
gateway<br />
configuration and<br />
ARP cache on the<br />
host<br />
Investigate<br />
FHRP<br />
router-toroutercommunication<br />
Investigate<br />
FHRP role<br />
selection<br />
© 2009 <strong>Cisco</strong> Systems, Inc. All rights reserved. <strong>TSHOOT</strong> v1.0—40<br />
Before starting to troubleshoot the FHRP itself, verify if the client is correctly using the virtual IP address and MAC<br />
address of the FHRP as its default gateway. This involves verifying the default gateway configuration (whether<br />
statically configured or learned via DHCP) and the ARP cache on the client to verify that both the virtual IP<br />
address and the virtual MAC address on the client match the expected values for the FHRP that is in use.<br />
All contents are Copyright © 1992–2010 <strong>Cisco</strong> Systems, Inc. All rights reserved. This document is <strong>Cisco</strong> Public Information. Page 21 of 26
<strong>CCNP</strong>v6 <strong>TSHOOT</strong><br />
Sample First Hop Redundancy<br />
Troubleshooting Flow<br />
Determine if<br />
outages are<br />
caused by<br />
FHRP or<br />
other<br />
protocols<br />
Determine if<br />
FHRP<br />
addresses<br />
are used by<br />
hosts<br />
Verify Layer 3<br />
connectivity<br />
between routers<br />
Investigate<br />
FHRP<br />
router-toroutercommunication<br />
Investigate<br />
FHRP role<br />
selection<br />
Verify reception of<br />
FHRP messages<br />
© 2009 <strong>Cisco</strong> Systems, Inc. All rights reserved. <strong>TSHOOT</strong> v1.0—41<br />
Many problems with FHRPs are caused by underlying problems in the Layer 3 connectivity between the routers.<br />
Therefore, a good next-step in the troubleshooting process is to verify that there is Layer 3 connectivity between<br />
all routers that are participating in the FHRP. Ping from each of the participating routers to the IP addresses of the<br />
other participating routers. If one of these pings fail, start a troubleshooting process to diagnose and resolve the<br />
Layer 3 connectivity issues between the routers before further investigating the FHRP.<br />
When you have confirmed that there is Layer 3 connectivity between the participating routers in general, you must<br />
verify the proper transmission and reception of FHRP packets. To limit potential disruption, always use show<br />
commands to gather information before using debug commands.<br />
Verify Reception of FHRP Messages<br />
DLS1#show standby vlan 100 brief<br />
P indicates configured to preempt.<br />
|<br />
Interface Grp Pri P State Active Standby Virtual IP<br />
Vl100 100 110 P Active local 10.1.100.253 10.1.100.254<br />
DLS2#show standby vlan 100 brief<br />
P indicates configured to preempt.<br />
|<br />
Interface Grp Pri P State Active Standby Virtual IP<br />
Vl100 100 100 P Standby 10.1.100.252 local 10.1.100.254<br />
This example shows how to confirm proper transmission and reception of HSRP messages. For GLBP or VRRP,<br />
the procedure is similar, although the command output is slightly different.<br />
To confirm the proper reception of HSRP messages on all routers in the group, verify that all routers list an active<br />
and a standby router and that these roles are listed in a consistent way across all the routers. The show<br />
standby brief command is concise and still shows the most relevant information. As you can see in the<br />
example, switch DLS2 lists the IP address of switch DLS1 as the active router. As the standby router, it lists<br />
“local” to indicate that it considers itself to be the standby router. On switch DLS1, the situation is the opposite:<br />
The address of switch DLS2 is listed as the standby address, while the active router is listed as local. While you<br />
are verifying these roles, this is also a good opportunity to confirm that both the standby group number and the<br />
All contents are Copyright © 1992–2010 <strong>Cisco</strong> Systems, Inc. All rights reserved. This document is <strong>Cisco</strong> Public Information. Page 22 of 26
<strong>CCNP</strong>v6 <strong>TSHOOT</strong><br />
virtual IP address are configured in a consistent manner. Misconfiguration of these parameters is a common<br />
cause of HSRP problems.<br />
DLS1#debug standby packets<br />
DLS1#show logging | include Grp 100<br />
Oct 26 15:29:00.049: HSRP: Vl100 Grp 100 Hello in 10.1.100.253 Standby pri 100<br />
vIP 10.1.100.254<br />
Oct 26 15:29:01.659: HSRP: Vl100 Grp 100 Hello out 10.1.100.252 Active pri 110<br />
vIP 10.1.100.254<br />
Note: If you used Telnet, you cannot see the debug messages without using the terminal monitor command.<br />
If you find inconsistencies in the output of the show standby brief commands, such as a missing standby<br />
router on one of the routers or multiple routers claiming the active or standby role for a group, this strongly<br />
suggests that there is a problem with the reception or interpretation of the HSRP messages on the routers. A<br />
debug command can now be used to investigate the transmission and reception of HSRP messages to gather<br />
more clues about the failure.<br />
Before enabling a debug, first verify that the CPU of the device is not running at such high levels that adding the<br />
load of a debug would risk overloading the CPU. Secondly, it is always good to have a fallback plan to stop the<br />
debug when it unexpectedly starts to affect the performance of the device. For instance, you could open a second<br />
connection to the device and before you enable the debug in your primary session, type the undebug all<br />
command in the secondary session, but do not confirm it by pressing the Enter key yet. Another fallback scenario<br />
is to schedule a timed reload within a short time by using the reload in command. If you lose your connection to<br />
the device as a result of your debug, you can be assured that it will reload shortly and you will be able to<br />
reconnect to it. And finally, you should always refer to your organization’s policies before executing any<br />
commands on a device that put the operation of the network at risk.<br />
The debug standby packets command displays all HSRP packets sent or received by the device. This can<br />
quickly generate a lot of output, especially if you have configured many different HSRP groups or if you have<br />
tuned the hello timer to be shorter than the default value of three seconds. To make it easier to select the packets<br />
that you are interested in, you could use the technique shown in the example above. Instead of logging the debug<br />
output to the console or virtual terminal session, you can capture the output in a buffer in the device’s RAM and<br />
then display the buffer’s content by using the show logging command. The output of the command can then be<br />
filtered by using a regular expression to select the HSRP group that you are interested in.<br />
In the example above, the output reveals that hellos are sent by this router and received from the other router.<br />
Just like the show commands in the previous output examples, execute the debug command on both routers to<br />
spot possible differences in behavior between the devices.<br />
Do not forget to disable the debug by using the no debug command after you have gathered the information that<br />
you were interested in.<br />
If these debugs reveal that HSRP protocol packets are not properly received on any router, check if access lists<br />
are blocking the packets. Given that you have already verified the Layer 3 connectivity between the devices, this<br />
problem should be on a higher layer.<br />
All contents are Copyright © 1992–2010 <strong>Cisco</strong> Systems, Inc. All rights reserved. This document is <strong>Cisco</strong> Public Information. Page 23 of 26
<strong>CCNP</strong>v6 <strong>TSHOOT</strong><br />
Sample First Hop Redundancy<br />
Troubleshooting Flow<br />
Determine if<br />
outages are<br />
caused by<br />
FHRP or<br />
other<br />
protocols<br />
Determine if<br />
FHRP<br />
addresses<br />
are used by<br />
hosts<br />
Investigate<br />
FHRP<br />
router-toroutercommunication<br />
Verify<br />
authentication<br />
Investigate<br />
FHRP role<br />
selection<br />
Verify priorities,<br />
preemption and<br />
tracking<br />
© 2009 <strong>Cisco</strong> Systems, Inc. All rights reserved. <strong>TSHOOT</strong> v1.0—44<br />
After you have established that FHRP messages are sent and received properly on all routers and still the FHRP<br />
does not perform as expected, the problem must be related to the role selection and transferring roles between<br />
routers during failover. You might need to verify two potential problem areas.<br />
If the FHRP is using authentication and there is a mismatch between the authentication parameters, the devices<br />
will not accept each other’s messages as valid when they are received. A typical symptom is that more than one<br />
router considers itself to be the active router for a group.<br />
For all FHRPs, role selection is influenced by two parameters: priority and preemption. Tracking objects such as<br />
interfaces and routes can further alter these priorities. If an unexpected router is selected for the primary role at<br />
any point in the process, carefully analyze the priorities configured on the different devices and how they are<br />
affected by potential tracking options. However, to properly determine how properties behave during a failover,<br />
you must be able to force a failover, which means that you might need to postpone this type of testing until a<br />
regularly scheduled maintenance interval.<br />
All contents are Copyright © 1992–2010 <strong>Cisco</strong> Systems, Inc. All rights reserved. This document is <strong>Cisco</strong> Public Information. Page 24 of 26
<strong>CCNP</strong>v6 <strong>TSHOOT</strong><br />
Reflection Questions<br />
1. Which lab trouble tickets did you have the most difficulty with?<br />
__________________________________________________________________________________________<br />
__________________________________________________________________________________________<br />
__________________________________________________________________________________________<br />
2. For the trouble tickets that you had difficulty with, would you change anything about the process that you used<br />
now that you see the resolution of the problem?<br />
__________________________________________________________________________________________<br />
__________________________________________________________________________________________<br />
__________________________________________________________________________________________<br />
3. Which commands did you find most useful in diagnosing Layer 3 and HSRP issues? Add these to your toolbox<br />
for future use. Which commands did you find least useful?<br />
__________________________________________________________________________________________<br />
__________________________________________________________________________________________<br />
__________________________________________________________________________________________<br />
All contents are Copyright © 1992–2010 <strong>Cisco</strong> Systems, Inc. All rights reserved. This document is <strong>Cisco</strong> Public Information. Page 25 of 26
<strong>CCNP</strong>v6 <strong>TSHOOT</strong><br />
References<br />
If you need more information on the commands and their options, see the following references:<br />
• Command References for <strong>Cisco</strong> Catalyst LAN Switches<br />
Go to http://www.cisco.com/en/US/products/hw/switches/index.html. Then select product category<br />
(Campus LAN) and the model you are working with (for example 3560-E). The Command References for<br />
various IOS releases are under the “Reference Guides” section.<br />
• Virtual LANs and VLAN Trunking Protocol Troubleshooting Tech Notes<br />
www.cisco.com/en/US/tech/tk389/tk689/tsd_technology_support_troubleshooting_technotes_list.html<br />
• Layer 3 Switching and Forwarding Troubleshooting Tech Notes<br />
www.cisco.com/en/US/tech/tk389/tk815/tsd_technology_support_troubleshooting_technotes_list.html<br />
Router Interface Summary Table<br />
Router Model Ethernet Interface<br />
#1<br />
1700 Fast Ethernet 0<br />
(FA0)<br />
1800 Fast Ethernet 0/0<br />
(FA0/0)<br />
2600 Fast Ethernet 0/0<br />
(FA0/0)<br />
2800 Fast Ethernet 0/0<br />
(FA0/0)<br />
Router Interface Summary<br />
Ethernet Interface<br />
#2<br />
Fast Ethernet 1<br />
(FA1)<br />
Fast Ethernet 0/1<br />
(FA0/1)<br />
Fast Ethernet 0/1<br />
(FA0/1)<br />
Fast Ethernet 0/1<br />
(FA0/1)<br />
Serial Interface<br />
#1<br />
Serial Interface<br />
#2<br />
Serial 0 (S0) Serial 1 (S1)<br />
Serial 0/0/0<br />
(S0/0/0)<br />
Serial 0/0/1<br />
(S0/0/1)<br />
Serial 0/0 (S0/0) Serial 0/1 (S0/1)<br />
Serial 0/0/0<br />
(S0/0/0)<br />
Serial 0/0/1<br />
(S0/0/1)<br />
Note: To find out how the router is configured, look at the interfaces to identify the type of router<br />
and how many interfaces the router has. Rather than try to list all the combinations of<br />
configurations for each router class, this table includes identifiers for the possible combinations of<br />
Ethernet and serial interfaces in the device. The table does not include any other type of interface,<br />
even though a specific router might contain one. An example of this is an ISDN BRI interface. The<br />
string in parenthesis is the legal abbreviation that can be used in <strong>Cisco</strong> IOS commands to<br />
represent the interface.<br />
All contents are Copyright © 1992–2010 <strong>Cisco</strong> Systems, Inc. All rights reserved. This document is <strong>Cisco</strong> Public Information. Page 26 of 26
<strong>CCNP</strong>v6 <strong>TSHOOT</strong><br />
Chapter 5 Lab 5-1, Layer 3 Connectivity and EIGRP<br />
Physical Topology<br />
All contents are Copyright © 1992–2010 <strong>Cisco</strong> Systems, Inc. All rights reserved. This document is <strong>Cisco</strong> Public Information. Page 1 of 32
<strong>CCNP</strong>v6 <strong>TSHOOT</strong><br />
Logical Topology<br />
Objectives<br />
Background<br />
• Load the trouble ticket device configuration files for each trouble ticket.<br />
• Diagnose and resolve problems related to network layer connectivity.<br />
• Diagnose and resolve problems related to EIGRP.<br />
• Document troubleshooting progress, configuration changes, and problem resolution.<br />
Because of the complexity of modern networks, Layer 3 routing issues are quite common and can also be<br />
difficult to troubleshoot. One of the most widely used enterprise routing protocols is Enhanced Interior<br />
Gateway Routing Protocol (EIGRP). It is a <strong>Cisco</strong> proprietary distance vector, classless routing protocol that<br />
was released in 1992 with <strong>Cisco</strong> IOS Release 9.21. EIGRP has features that are not commonly found in other<br />
distance vector routing protocols, such as the following:<br />
• Reliable Transport Protocol (RTP)<br />
• Bounded updates<br />
• Diffusing Update Algorithm (DUAL)<br />
All contents are Copyright © 1992–2010 <strong>Cisco</strong> Systems, Inc. All rights reserved. This document is <strong>Cisco</strong> Public Information. Page 2 of 32
<strong>CCNP</strong>v6 <strong>TSHOOT</strong><br />
• Establishing adjacencies<br />
• Neighbor and topology tables<br />
In this lab, you will troubleshoot problems related to Layer 3 connectivity and routing problems related to<br />
EIGRP.<br />
For each task or trouble ticket, the trouble scenario and problem symptom are described. While<br />
troubleshooting, you will discover the cause of the problem, correct it, and then document the process and<br />
results.<br />
Physical and Logical Topology Diagrams<br />
The physical and logical topologies, including the interface designations and IP addresses, are provided to<br />
assist the troubleshooting effort.<br />
Lab Structure<br />
This lab is divided into two main sections.<br />
Section 1—Trouble Tickets and Troubleshooting Logs<br />
This section includes multiple tasks. Each task is associated with a trouble ticket (TT) and introduces one or<br />
more errors on one or more devices. If time is a consideration, each task or trouble ticket can be performed<br />
independently.<br />
Section 2—Troubleshooting Reference Information<br />
This section provides general Layer 3 and EIGRP troubleshooting information that can be applied to any<br />
trouble ticket in this lab. Sample troubleshooting flows are provided, along with examples of useful commands<br />
and output. If time permits, it is recommended that you read through Section 2 prior to starting on the trouble<br />
tickets.<br />
Note: This lab uses <strong>Cisco</strong> 1841 routers with <strong>Cisco</strong> IOS Release 12.4(24)T1 and the Advanced IP Services<br />
image c1841-advipservicesk9-mz.124-24.T1.bin. The switches are <strong>Cisco</strong> WS-C2960-24TT-L with the <strong>Cisco</strong><br />
IOS image c2960-lanbasek9-mz.122-46.SE.bin and Catalyst 3560-24PS with the <strong>Cisco</strong> IOS image c3560advipservicesk9-mz.122-46.SE.bin.<br />
Other routers (such as 2801 and 2811), switches (such as 2950 or 3550),<br />
and <strong>Cisco</strong> IOS Software versions can be used if they have comparable capabilities and features. Depending<br />
on the router or switch model and <strong>Cisco</strong> IOS Software version, the commands available and output produced<br />
might vary from what is shown in this lab.<br />
Required Resources<br />
• 3 routers (<strong>Cisco</strong> 1841 with <strong>Cisco</strong> IOS Release 12.4(24)T1 Advanced IP Service or comparable)<br />
• 1 switch (<strong>Cisco</strong> 2960 with the <strong>Cisco</strong> IOS Release 12.2(46)SE C2960-LANBASEK9-M image or<br />
comparable)<br />
• 2 switches (<strong>Cisco</strong> 3560 with the <strong>Cisco</strong> IOS Release 12.2(46)SE C3560-advipservicesk9-mz image or<br />
comparable)<br />
• SRV1 (Windows PC with a static IP address) with TFTP and syslog servers, plus an SSH client<br />
(PuTTY or comparable) and WireShark software<br />
• PC-B (Windows PC—DHCP client) with PuTTY and WireShark software<br />
• PC-C (Windows PC—DHCP client) with PuTTY and WireShark software<br />
• Serial and Ethernet cables<br />
All contents are Copyright © 1992–2010 <strong>Cisco</strong> Systems, Inc. All rights reserved. This document is <strong>Cisco</strong> Public Information. Page 3 of 32
<strong>CCNP</strong>v6 <strong>TSHOOT</strong><br />
Section 1—Trouble Tickets and Troubleshooting Logs<br />
Task 1: Trouble Ticket Lab 5-1 TT-A<br />
Step 1: Review trouble ticket Lab 5-1 TT-A.<br />
Your company is interested in implementing an IP-based closed circuit television (CCTV) solution. Currently,<br />
different solutions and vendors are being evaluated. One of the vendors has offered to implement a pilot to show<br />
the capabilities of their solution. To keep the traffic associated with the CCTV solution separate from the regular<br />
network traffic, it will be implemented using a new VLAN (VLAN 70 corresponding to subnet 10.1.70.0/24). There<br />
must be communication between the test server (PC-C) and the office users on the LAN. In addition, branch<br />
workers on the R2 LAN (simulated by Lo0) must be able to access the internal CCTV server.<br />
The vendor will come in tomorrow to install the client and server software. The network team has been asked to<br />
make sure that the new VLAN has been implemented and that there is IP connectivity between the local test<br />
client (PC-B) and the CCTV test server (PC-C) in the CCTV VLAN. You must also verify that there is connectivity<br />
between the remote test client (Lo0 on R2) and the CCTV test server. The test server requires a static IP address.<br />
One of your colleagues implemented the static address yesterday afternoon, but did not have time to test the<br />
implementation.<br />
You have the following tasks:<br />
• Configure the CCTV test server (PC-C).<br />
• Verify the CCTV VLAN device configurations for the pilot.<br />
• Ensure that the local and remote test clients can communicate with the CCTV test server before the<br />
vendor arrives to implement the CCTV pilot.<br />
• Verify Hot Standby Router Protocol (HSRP) redundancy for CCTV VLAN 70.<br />
Step 2: Load the device trouble ticket configuration files for TT-A.<br />
Using the procedure described in Lab 3-1, verify that the lab configuration files are present in flash. Load the<br />
configuration files indicated in the Device Configuration File table.<br />
Note: The following device access methods are in effect after loading the configuration files:<br />
• Console access requires no username or password.<br />
• Telnet and SSH require username admin and password adminpa55.<br />
• The enable password is ciscoenpa55.<br />
Device Configuration File Table<br />
Device Name File to Load Notes<br />
ALS1 Lab51-ALS1-TT-A-Cfg.txt<br />
DLS1 Lab51-DLS1-TT-A-Cfg.txt<br />
DLS2 Lab51-DLS2-TT-A-Cfg.txt<br />
R1 Lab51-R1-TT-A-Cfg.txt<br />
R2 Lab51-R2-TT-A-Cfg.txt<br />
R3 Lab51-R3-TT-A-Cfg.txt<br />
SRV1 N/A Static IP: 10.1.50.1<br />
Default gateway: 10.1.50.254<br />
PC-B N/A DHCP (test CCTV client)<br />
PC-C N/A Static (test CCTV server)<br />
All contents are Copyright © 1992–2010 <strong>Cisco</strong> Systems, Inc. All rights reserved. This document is <strong>Cisco</strong> Public Information. Page 4 of 32
<strong>CCNP</strong>v6 <strong>TSHOOT</strong><br />
Step 3: Configure the CCTV server IP address.<br />
Configure the test server PC-C with a static IP address in the CCTV test VLAN subnet 10.1.70.0/24. According to<br />
the test plan, the default gateway should be the last usable IP address in the subnet.<br />
Note: After this TT is completed, restore PC-C to its status as a DHCP client in VLAN 30.<br />
Step 4: Release and renew the DHCP lease on PC-B.<br />
Ensure that PC-B is configured as a DHCP client in the OFFICE VLAN.<br />
After loading all TT-A device configuration files, issue the ipconfig /release and ipconfig /renew commands on<br />
PC-B.<br />
Step 5: Outline the troubleshooting approach and validation steps.<br />
Use this space to identify your troubleshooting approach and the key steps to verify that the problem is resolved.<br />
Troubleshooting approaches to select from include: follow-the-path, spot-the-differences, bottom-up, top-down,<br />
divide-and-conquer, shoot-from-the-hip, and move-the-problem.<br />
Note: In addition to a specific approach, you can use the generic troubleshooting process described at the<br />
beginning of Section 2 of this lab.<br />
_______________________________________________________________________________<br />
_______________________________________________________________________________<br />
_______________________________________________________________________________<br />
_______________________________________________________________________________<br />
_______________________________________________________________________________<br />
Step 6: Record the troubleshooting process and configuration changes.<br />
Note: Section 2 of this lab includes sample troubleshooting flows, useful commands, and examples of output.<br />
Use this log to document your actions and results during the troubleshooting process. List the commands you<br />
used to gather information. As you progress, record what you think the problem might be and which actions you<br />
will take to correct the problem.<br />
Device Actions and Results<br />
All contents are Copyright © 1992–2010 <strong>Cisco</strong> Systems, Inc. All rights reserved. This document is <strong>Cisco</strong> Public Information. Page 5 of 32
<strong>CCNP</strong>v6 <strong>TSHOOT</strong><br />
Device Actions and Results<br />
Step 7: Document trouble ticket debrief notes.<br />
Use this space to make notes of the key learning points that you picked up during the discussion of this trouble<br />
ticket with your instructor. The notes can include problems encountered, solutions applied, useful commands<br />
employed, alternate solutions, methods and processes, and procedure and communication improvements.<br />
_______________________________________________________________________________<br />
_______________________________________________________________________________<br />
_______________________________________________________________________________<br />
_______________________________________________________________________________<br />
_______________________________________________________________________________<br />
_______________________________________________________________________________<br />
_______________________________________________________________________________<br />
Task 2: Trouble Ticket Lab 5-1 TT-B<br />
Step 1: Review trouble ticket Lab 5-1 TT-B.<br />
You receive an emergency call and are told that a short circuit caused a small fire in the server room. Routers R1<br />
and R3, which were mounted in the same rack, were damaged. Luckily, you had two comparable spare routers in<br />
storage. When you arrive at the office, two of your colleagues have already installed the replacement routers,<br />
cabled them, and tried to restore the routers by cutting and pasting the configurations from the console. However,<br />
the routers are not operational when you come in.<br />
You receive a call from the network administrator at the branch office (LAN simulated by R2 Lo0) asking about the<br />
loss of the WAN. His users cannot access server SRV1 at the central site. He has started to troubleshoot. You tell<br />
him what happened and ask him not to do anything until you have resolved the problem at the central site.<br />
Your task is to check the configuration of routers R1 and R3 and restore the configurations as necessary to regain<br />
connectivity between the branch office and the central site across the WAN.<br />
Step 2: Load the device trouble ticket configuration files for TT-B.<br />
Using the procedure described in Lab 3-1, verify that the lab configuration files are present in flash. Load the<br />
configuration files indicated in the Device Configuration File table.<br />
Note: See Task 1, Step 2 for device access methods, usernames, and passwords after the configuration files<br />
have been loaded.<br />
All contents are Copyright © 1992–2010 <strong>Cisco</strong> Systems, Inc. All rights reserved. This document is <strong>Cisco</strong> Public Information. Page 6 of 32
<strong>CCNP</strong>v6 <strong>TSHOOT</strong><br />
Device Configuration File Table<br />
Device Name File to Load Notes<br />
ALS1 Lab51-ALS1-TT-B-Cfg.txt<br />
DLS1 Lab51-DLS1-TT-B-Cfg.txt<br />
DLS2 Lab51-DLS2-TT-B-Cfg.txt<br />
R1 Lab51-R1-TT-B-Cfg.txt<br />
R2 Lab51-R2-TT-B-Cfg.txt<br />
R3 Lab51-R3-TT-B-Cfg.txt<br />
SRV1 N/A Static IP: 10.1.50.1<br />
Default gateway: 10.1.50.254<br />
PC-B N/A DHCP (release and renew after loading device<br />
configurations)<br />
PC-C N/A DHCP (release and renew after loading device<br />
configurations)<br />
Step 3: Configure SRV1 and start the syslog and TFTP servers, as described in Task 1.<br />
Step 4: Release and renew the DHCP leases on PC-B and PC-C, as described in Task 1.<br />
Step 5: Outline the troubleshooting approach and validation steps.<br />
Use this space to identify your troubleshooting approach and the key steps to verify that the problem is resolved.<br />
Troubleshooting approaches to select from include: follow-the-path, spot-the-differences, bottom-up, top-down,<br />
divide-and-conquer, shoot-from-the-hip, and move-the-problem.<br />
Note: In addition to a specific approach, you can use the generic troubleshooting process described at the<br />
beginning of Section 2 of this lab.<br />
_______________________________________________________________________________<br />
_______________________________________________________________________________<br />
_______________________________________________________________________________<br />
_______________________________________________________________________________<br />
_______________________________________________________________________________<br />
Step 6: Record the troubleshooting process and configuration changes.<br />
Note: Section 2 of this lab includes sample troubleshooting flows, useful commands, and examples of output.<br />
Use this log to document your actions and results during the troubleshooting process. List the commands you<br />
used to gather information. As you progress, record what you think the problem might be and which actions you<br />
will take to correct the problem.<br />
Device Actions and Results<br />
All contents are Copyright © 1992–2010 <strong>Cisco</strong> Systems, Inc. All rights reserved. This document is <strong>Cisco</strong> Public Information. Page 7 of 32
<strong>CCNP</strong>v6 <strong>TSHOOT</strong><br />
Device Actions and Results<br />
Step 7: Document trouble ticket debrief notes.<br />
Use this space to make notes of the key learning points that you picked up during the discussion of this trouble<br />
ticket with your instructor. The notes can include problems encountered, solutions applied, useful commands<br />
employed, alternate solutions, methods and procedure, and procedure and communication improvements.<br />
_______________________________________________________________________________<br />
_______________________________________________________________________________<br />
_______________________________________________________________________________<br />
_______________________________________________________________________________<br />
_______________________________________________________________________________<br />
_______________________________________________________________________________<br />
_______________________________________________________________________________<br />
Task 3: Trouble Ticket Lab 5-1 TT-C<br />
Step 1: Review trouble ticket Lab 5-1 TT-C.<br />
A user on VLAN 10 (PC-B) called the help desk this morning because she does not have Internet access. When<br />
she tried to open a website (simulated by another Loopback Lo1 on R2 with address 209.165.200.225/30), she<br />
received an error message from her browser saying that it cannot display the web page. She can reach the<br />
internal server SRV1 without any problems.<br />
One of your colleagues was working with the ISP to make some changes to the routing model used to access the<br />
ISP and the Internet. The ISP does not run EIGRP on its router. The colleague has called in sick today, but made<br />
some notes in the log about the ISP not running EIGRP on its router and not wanting R2 to attempt to establish<br />
an EIGRP neighbor relationship.<br />
All contents are Copyright © 1992–2010 <strong>Cisco</strong> Systems, Inc. All rights reserved. This document is <strong>Cisco</strong> Public Information. Page 8 of 32
<strong>CCNP</strong>v6 <strong>TSHOOT</strong><br />
Your task is to diagnose and solve this problem and make sure that the user regains connectivity to the Internet.<br />
Step 2: Load the device trouble ticket configuration files for TT-C.<br />
Using the procedure described in Lab 3-1, verify that the lab configuration files are present in flash. Load the<br />
proper configuration files indicated in the Device Configuration File table.<br />
Note: See Task 1, Step 2 for device access methods, usernames, and passwords after the configuration files<br />
have been loaded.<br />
Device Configuration File Table<br />
Device Name File to Load Notes<br />
ALS1 Lab51-ALS1-TT-C-Cfg.txt<br />
DLS1 Lab51-DLS1-TT-C-Cfg.txt<br />
DLS2 Lab51-DLS2-TT-C-Cfg.txt<br />
R1 Lab51-R1-TT-C-Cfg.txt<br />
R2 Lab51-R2-TT-C-Cfg.txt<br />
R3 Lab51-R3-TT-C-Cfg.txt<br />
SRV1 N/A Static IP: 10.1.50.1<br />
Default gateway: 10.1.50.254<br />
PC-B N/A DHCP<br />
PC-C N/A DHCP<br />
Step 3: Configure SRV1 and start the syslog and TFTP servers, as described in Task 1.<br />
Step 4: Release and renew the DHCP leases on PC-B and PC-C, as described in Task 1.<br />
Step 5: Outline the troubleshooting approach and validation steps.<br />
Use this space to identify your troubleshooting approach and the key steps to verify that the problem is resolved.<br />
Troubleshooting approaches to select from include: follow-the-path, spot-the-differences, bottom-up, top-down,<br />
divide-and-conquer, shoot-from-the-hip, and move-the-problem.<br />
Note: In addition to a specific approach, you can use the generic troubleshooting process described at the<br />
beginning of Section 2 of this lab.<br />
_______________________________________________________________________________<br />
_______________________________________________________________________________<br />
_______________________________________________________________________________<br />
_______________________________________________________________________________<br />
_______________________________________________________________________________<br />
_______________________________________________________________________________<br />
All contents are Copyright © 1992–2010 <strong>Cisco</strong> Systems, Inc. All rights reserved. This document is <strong>Cisco</strong> Public Information. Page 9 of 32
<strong>CCNP</strong>v6 <strong>TSHOOT</strong><br />
Step 6: Record the troubleshooting process and configuration changes.<br />
Note: Section 2 of this lab includes sample troubleshooting flows, useful commands, and examples of output.<br />
Use this log to document your actions and results during the troubleshooting process. List the commands you<br />
used to gather information. As you progress, record what you think the problem might be and which actions you<br />
will take to correct the problems.<br />
Device Actions and Results<br />
Step 7: Document trouble ticket debrief notes.<br />
Use this space to make notes of the key learning points that you picked up during the discussion of this trouble<br />
ticket with your instructor. The notes can include problems encountered, solutions applied, useful commands<br />
employed, alternate solutions and methods, and procedure and communication improvements.<br />
_______________________________________________________________________________<br />
_______________________________________________________________________________<br />
_______________________________________________________________________________<br />
_______________________________________________________________________________<br />
_______________________________________________________________________________<br />
_______________________________________________________________________________<br />
_______________________________________________________________________________<br />
All contents are Copyright © 1992–2010 <strong>Cisco</strong> Systems, Inc. All rights reserved. This document is <strong>Cisco</strong> Public Information. Page 10 of 32
<strong>CCNP</strong>v6 <strong>TSHOOT</strong><br />
Task 4: Trouble Ticket Lab 5-1 TT-D<br />
Step 1: Review trouble ticket Lab 5-1 TT-D.<br />
A contract worker called the help desk to report that he could not access the ISP email server (simulated by Lo0<br />
on R2). He was working at a PC that is attached to a port in the GUEST VLAN (PC-C). You checked with the ISP<br />
and discovered that they had an unplanned outage, and the WAN link from R2 to R3 had gone down temporarily.<br />
Users in the OFFICE VLAN did not experience any loss of connectivity to the email server during the WAN link<br />
outage. Your expectation, if one of the WAN links went down, was that users in the GUEST VLAN would still be<br />
able to reach the server because of the redundancy in the network design.<br />
Your colleague will replicate this scenario during the maintenance window this evening. You have agreed to help<br />
her diagnose the problem and propose a plan that can account for an outage in one of the WAN links to R2 so<br />
that guest users do not lose connectivity to the ISP mail server.<br />
Your plan is to simulate the R3-to-R2 WAN link going down. You do not have administrative control over ISP<br />
router R2. You will test connectivity, determine the cause of the problem, and recommend which configuration<br />
changes to the devices could correct the issue.<br />
Step 2: Load the device trouble ticket configuration files for TT-D.<br />
Using the procedure described in Lab 3-1, verify that the lab configuration files are present in flash. Load the<br />
proper configuration files indicated in the Device Configuration File table.<br />
Note: See Task 1, Step 2 for device access methods, usernames, and passwords after the configuration files<br />
have been loaded.<br />
Device Configuration File Table<br />
Device Name File to Load Notes<br />
ALS1 Lab51-ALS1-TT-D-Cfg.txt<br />
DLS1 Lab51-DLS1-TT-D-Cfg.txt<br />
DLS2 Lab51-DLS2-TT-D-Cfg.txt<br />
R1 Lab51-R1-TT-D-Cfg.txt<br />
R2 Lab51-R2-TT-D-Cfg.txt<br />
R3 Lab51-R3-TT-D-Cfg.txt<br />
SRV1 N/A Static IP: 10.1.50.1<br />
Default gateway: 10.1.50.254<br />
PC-B N/A DHCP<br />
PC-C N/A DHCP<br />
Step 3: Configure SRV1 and start the syslog and TFTP servers, as described in Task 1.<br />
Step 4: Release and renew the DHCP leases on PC-B and PC-C, as described in Task 1.<br />
Step 5: Outline the troubleshooting approach and validation steps.<br />
Use this space to identify your troubleshooting approach and the key steps to verify that the problem is resolved.<br />
Troubleshooting approaches to select from include: follow-the-path, spot-the-differences, bottom-up, top-down,<br />
divide-and-conquer, shoot-from-the-hip, and move-the-problem.<br />
All contents are Copyright © 1992–2010 <strong>Cisco</strong> Systems, Inc. All rights reserved. This document is <strong>Cisco</strong> Public Information. Page 11 of 32
<strong>CCNP</strong>v6 <strong>TSHOOT</strong><br />
Note: In addition to a specific approach, you can use the generic troubleshooting process described at the<br />
beginning of Section 2 of this lab.<br />
_______________________________________________________________________________<br />
_______________________________________________________________________________<br />
_______________________________________________________________________________<br />
_______________________________________________________________________________<br />
_______________________________________________________________________________<br />
_______________________________________________________________________________<br />
Step 6: Record the troubleshooting process and configuration changes.<br />
Note: Section 2 of this lab includes sample troubleshooting flows, useful commands, and examples of output.<br />
Use this log to document your actions and results during the troubleshooting process. List the commands you<br />
used to gather information. As you progress, record what you think the problem might be and which actions you<br />
will take to correct the problems.<br />
Device Actions and Results<br />
All contents are Copyright © 1992–2010 <strong>Cisco</strong> Systems, Inc. All rights reserved. This document is <strong>Cisco</strong> Public Information. Page 12 of 32
<strong>CCNP</strong>v6 <strong>TSHOOT</strong><br />
Step 7: Document trouble ticket debrief notes.<br />
Use this space to make notes of the key learning points that you picked up during the discussion of this trouble<br />
ticket with your instructor. The notes can include problems encountered, solutions applied, useful commands<br />
employed, alternate solutions and methods, and procedure and communication improvements.<br />
_______________________________________________________________________________<br />
_______________________________________________________________________________<br />
_______________________________________________________________________________<br />
_______________________________________________________________________________<br />
_______________________________________________________________________________<br />
Task 5: Trouble Ticket Lab 5-1 TT-E<br />
Step 1: Review trouble ticket Lab 5-1 TT-E.<br />
A tech support intern on VLAN 30 (PC-C) called the help desk this Monday morning to report problems accessing<br />
certain areas of the network. It appears that the routers, R1, R2, and R3, are either down or unreachable.<br />
Your company is in the process of testing various security measures to protect the network. Over the weekend,<br />
your IT staff worked on a project to secure EIGRP by implementing MD5 authentication. The staff was instructed<br />
to test the configuration over the weekend and reverse the implementation in the event that there were<br />
connectivity problems.<br />
Your task is to ensure that the R1, R2 and R3 routers are online and reachable.<br />
Step 2: Load the device trouble ticket configuration files for TT-E.<br />
Using the procedure described in Lab 3-1, verify that the lab configuration files are present in flash. Load the<br />
proper configuration files indicated in the Device Configuration File table.<br />
Note: See Task 1, Step 2 for device access methods, usernames, and passwords after the configuration files<br />
have been loaded.<br />
Device Configuration File Table<br />
Device Name File to Load Notes<br />
ALS1 Lab51-ALS1-TT-E-Cfg.txt<br />
DLS1 Lab51-DLS1-TT-E-Cfg.txt<br />
DLS2 Lab51-DLS2-TT-E-Cfg.txt<br />
R1 Lab51-R1-TT-E-Cfg.txt<br />
R2 Lab51-R2-TT-E-Cfg.txt<br />
R3 Lab51-R3-TT-E-Cfg.txt<br />
SRV1 N/A Static IP: 10.1.50.1<br />
Default gateway: 10.1.50.254<br />
PC-B N/A DHCP<br />
PC-C N/A DHCP<br />
All contents are Copyright © 1992–2010 <strong>Cisco</strong> Systems, Inc. All rights reserved. This document is <strong>Cisco</strong> Public Information. Page 13 of 32
<strong>CCNP</strong>v6 <strong>TSHOOT</strong><br />
Step 3: Configure SRV1 and start the syslog and TFTP servers, as described in Task 1.<br />
Step 4: Release and renew the DHCP leases on PC-B and PC-C, as described in Task 1.<br />
Step 5: Outline the troubleshooting approach and validation steps.<br />
Use this space to identify your troubleshooting approach and the key steps to verify that the problem is resolved.<br />
Troubleshooting approaches to select from include: follow-the-path, spot-the-differences, bottom-up, top-down,<br />
divide-and-conquer, shoot-from-the-hip, and move-the-problem.<br />
Note: In addition to a specific approach, you can use the generic troubleshooting process described at the<br />
beginning of Section 2 of this lab.<br />
_______________________________________________________________________________<br />
_______________________________________________________________________________<br />
_______________________________________________________________________________<br />
_______________________________________________________________________________<br />
_______________________________________________________________________________<br />
_______________________________________________________________________________<br />
Step 6: Record the troubleshooting process and configuration changes.<br />
Note: Section 2 of this lab includes sample troubleshooting flows, useful commands, and examples of output.<br />
Use this log to document your actions and results during the troubleshooting process. List the commands you<br />
used to gather information. As you progress, record what you think the problem might be and which actions you<br />
will take to correct the problems.<br />
Device Actions and Results<br />
All contents are Copyright © 1992–2010 <strong>Cisco</strong> Systems, Inc. All rights reserved. This document is <strong>Cisco</strong> Public Information. Page 14 of 32
<strong>CCNP</strong>v6 <strong>TSHOOT</strong><br />
Step 7: Document trouble ticket debrief notes.<br />
Use this space to make notes of the key learning points that you picked up during the discussion of this trouble<br />
ticket with your instructor. The notes can include problems encountered, solutions applied, useful commands<br />
employed, alternate solutions and methods, and procedure and communication improvements.<br />
_______________________________________________________________________________<br />
_______________________________________________________________________________<br />
_______________________________________________________________________________<br />
_______________________________________________________________________________<br />
_______________________________________________________________________________<br />
_______________________________________________________________________________<br />
All contents are Copyright © 1992–2010 <strong>Cisco</strong> Systems, Inc. All rights reserved. This document is <strong>Cisco</strong> Public Information. Page 15 of 32
<strong>CCNP</strong>v6 <strong>TSHOOT</strong><br />
Section 2 – Troubleshooting Reference Information<br />
General Troubleshooting Process<br />
As a general guideline, you can use the following general troubleshooting process described in the course:<br />
1. Define the problem (symptoms).<br />
2. Gather information.<br />
3. Analyze the information.<br />
4. Propose a hypothesis (possible cause).<br />
5. Test the hypothesis.<br />
6. Eliminate or accept the hypothesis.<br />
7. Solve the problem.<br />
8. Document the problem.<br />
Command Summary<br />
The table lists useful commands for this lab. Sample output is shown on the following pages.<br />
Command Key Information Displayed<br />
show spanning-tree vlan vlan#<br />
show vlan brief<br />
show vlan id vlan#<br />
show ip interface vlan vlan#<br />
show ip route ip-addr<br />
show ip cef ip-addr detail<br />
show ip cef exact-route src-ipaddr<br />
dest-ip-addr<br />
show adjacency int-type/# detail<br />
show standby vlan vlan# brief<br />
Displays all essential parameters that affect the topology,<br />
such as the root port, designated ports, port state, and port<br />
type, as well as the spanning-tree mode being<br />
implemented.<br />
Displays a quick overview of all existing VLANs and the<br />
ports within them. Trunk ports are not listed.<br />
Displays whether the VLAN exists and which ports are<br />
assigned to it. Includes the trunk ports on which the VLAN<br />
is allowed.<br />
Displays the SVI status, IP address, statistics, and IP <strong>Cisco</strong><br />
Express Forwarding (CEF) information.<br />
Displays the routing table information for a particular<br />
destination address.<br />
Displays the next hop and interface used for a particular<br />
destination address from the CEF table.<br />
Displays the next hop and interface used for a particular<br />
destination address from the CEF table.<br />
Displays information contained in the adjacency table for a<br />
next-hop IP address or interface.<br />
Verify active and standby roles and IP addresses for a<br />
particular VLAN for HSRP routers.<br />
All contents are Copyright © 1992–2010 <strong>Cisco</strong> Systems, Inc. All rights reserved. This document is <strong>Cisco</strong> Public Information. Page 16 of 32
<strong>CCNP</strong>v6 <strong>TSHOOT</strong><br />
show standby brief<br />
show ip eigrp interfaces<br />
show ip eigrp neighbors<br />
show ip eigrp topology ip-addr<br />
net-mask<br />
debug eigrp packets<br />
debug ip eigrp as# neighbor ip-addr<br />
debug ip eigrp<br />
Lab 5-1 Sample Troubleshooting Flows<br />
Verify active and standby roles and IP addresses for all<br />
VLANs on an HSRP router.<br />
Displays interfaces that are participating in the EIGRP<br />
routing process. An interface does not need to be<br />
operational to be listed in the output.<br />
Displays the EIGRP neighbor table to verify that all<br />
expected neighbor relationships are operational.<br />
Displays the EIGRP topology, which contains all routes<br />
that were received from all neighbors for a particular prefix.<br />
Displays real-time messages exchanged between EIGRP<br />
routers. Caution: Produces large amounts of output.<br />
Displays real-time messages exchanged for a particular<br />
neighbor.<br />
Displays the processing of routing events by the router.<br />
Caution: Produces large amounts of output.<br />
Troubleshooting IP Connectivity<br />
The figure illustrates an example of a method that you could follow to diagnose and resolve problems related to IP<br />
connectivity.<br />
Sample Layer 3 Troubleshooting Flow<br />
No end-toend<br />
Layer 3<br />
connectivity<br />
Verify through ping<br />
and traceroute<br />
Track Layer<br />
3 path<br />
between<br />
devices<br />
Analyze packet<br />
captures<br />
Investigate<br />
points where<br />
routes are<br />
missing<br />
Investigate<br />
points where<br />
packets are<br />
dropped<br />
© 2009 <strong>Cisco</strong> Systems, Inc. All rights reserved. <strong>TSHOOT</strong> v1.0—46<br />
All contents are Copyright © 1992–2010 <strong>Cisco</strong> Systems, Inc. All rights reserved. This document is <strong>Cisco</strong> Public Information. Page 17 of 32
<strong>CCNP</strong>v6 <strong>TSHOOT</strong><br />
Layer 3 is a common starting point for many troubleshooting procedures. An often applied method is the divideand-conquer<br />
approach. When a user reports a problem concerning connectivity to a certain service or application<br />
running on a server, a good first step is to determine if there is end-to-end IP connectivity between the client and<br />
the server. If this is the case, you can focus on the higher layers of the Open Systems Interconnection (OSI)<br />
reference model.<br />
End-to-end IP connectivity can be confirmed or denied by using the ping or traceroute commands. Almost<br />
every operating system supports these commands in some form, but the syntax might be slightly different for<br />
different operating systems.<br />
A prerequisite to using this method is that the appropriate Internet Control Message Protocol (ICMP) messages<br />
are allowed on the network and not blocked by any firewalls, including host-based firewalls on the destination<br />
host. If you cannot use ping and traceroute effectively, you might have to resort to analyzing traffic captures of the<br />
actual traffic flows to determine if packets can be sent at the network layer between the affected hosts.<br />
Using the Correct Source Address<br />
R2#ping 10.1.50.1 source Lo0<br />
Type escape sequence to abort.<br />
Sending 5, 100-byte ICMP Echos to 10.1.50.1, timeout is 2 seconds:<br />
Packet sent with a source address of 10.1.202.1<br />
!!!!!<br />
Success rate is 100 percent (5/5), round-trip min/avg/max = 16/20/32 ms<br />
R2#traceroute 10.1.50.1 source Lo0<br />
Type escape sequence to abort.<br />
Tracing the route to 10.1.50.1<br />
1 10.1.1.1 16 msec 16 msec 8 msec<br />
2 10.1.2.1 8 msec 16 msec 12 msec<br />
3 10.1.50.1 12 msec 12 msec 8 msec<br />
Be aware that a successful ping or traceroute response is dependent on two things: the availability of a route to<br />
the destination and a route back to the source. Especially when running tests from the first-hop router in the path,<br />
make sure to specify the source address of the ping or traceroute. If you do not specify the source address, the<br />
router uses the IP address of the egress interface as the source for the packets. Using an address from a different<br />
source subnet than the client might lead you to reach wrong conclusions if the problem concerns the return path<br />
for the packets.<br />
All contents are Copyright © 1992–2010 <strong>Cisco</strong> Systems, Inc. All rights reserved. This document is <strong>Cisco</strong> Public Information. Page 18 of 32
<strong>CCNP</strong>v6 <strong>TSHOOT</strong><br />
Sample Layer 3 Troubleshooting Flow<br />
No end-toend<br />
Layer 3<br />
connectivity<br />
Verify routing<br />
tables and FIBs<br />
Track Layer<br />
3 path<br />
between<br />
devices<br />
Investigate<br />
points where<br />
routes are<br />
missing<br />
Determine<br />
downstream<br />
connectivity using<br />
ping and traceroute<br />
Investigate<br />
points where<br />
packets are<br />
dropped<br />
© 2009 <strong>Cisco</strong> Systems, Inc. All rights reserved. <strong>TSHOOT</strong> v1.0—48<br />
If you have determined that there is a problem with the end-to-end IP connectivity between the affected hosts, you<br />
want to reduce the scope of the problem and isolate the points in the path between the hosts where the<br />
connectivity is lost.<br />
A commonly used method is to track the path of the packets. You can use the following method to diagnose endto-end<br />
IP connectivity problems:<br />
• Determine the Layer 3 path. Based on documentation, baselines, and knowledge of your network in<br />
general, the first step is to determine the path that you would expect packets to follow between the<br />
affected hosts. Determining the expected traffic path beforehand helps in two ways. It provides a<br />
starting point for gathering information about what is happening on the network, and it makes it easier<br />
to spot abnormal behavior. The second step in determining the Layer 3 path is to follow the expected<br />
path and verify that the links on the path are up and forwarding traffic. If the actual traffic path is<br />
different from your expected path, this step might provide clues about which links or protocols are<br />
failing and the cause of these failures.<br />
• To track the path of the packets between the hosts, first track the path that is being used according to<br />
the control plane information. Start at the client and verify the IP address, subnet mask, and default<br />
gateway. Then go to the router that is listed as the default gateway and check which route is used for<br />
the destination IP address. Determine the next-hop router based on the information in the routing<br />
table. Connect to the next-hop router and repeat this procedure until you arrive at the router that is<br />
directly connected to the destination host. Then repeat the process for the route back from the<br />
destination to the source.<br />
• If the router has no route in the table for the destination network, you must diagnose the process that<br />
is the source of the routing information on this router, such as the routing protocol or static routes.<br />
• If you have verified that the routing information is present on the complete path from the source to the<br />
destination and from the destination back to the source but connectivity is failing, you must track the<br />
path again, but now determine at which point packets are being dropped. The likely causes for<br />
dropped packets are Layer 1 problems, Layer 2 problems, or Layer 3 to Layer 2 mapping problems.<br />
When you have determined the point where the packets are dropped, use the specific troubleshooting<br />
methods appropriate for the Layer 2 technology that is used on the egress interface.<br />
These steps do not necessarily have to be taken in the order presented here. Often different aspects of this<br />
generic procedure are combined, and shortcuts can be taken based on the result. For instance, determining<br />
proper packet forwarding is often done in parallel with determining the routes by using ping to verify the<br />
All contents are Copyright © 1992–2010 <strong>Cisco</strong> Systems, Inc. All rights reserved. This document is <strong>Cisco</strong> Public Information. Page 19 of 32
<strong>CCNP</strong>v6 <strong>TSHOOT</strong><br />
reachability of the next-hop derived from the route or using ping and traceroute to the final destination from<br />
intermediate routers in the path.<br />
If you find that a ping is successful from a particular point in the path, you know that routes to the destination must<br />
be available on all the downstream routers. You can then use traceroute to determine the path to the destination,<br />
instead of connecting to each router in the path. However, this method has a hidden assumption: Packets<br />
traveling to the same destination use the same path, regardless of their source. This is not necessarily the case in<br />
a redundant network with equal-cost paths to a certain destination. The source address is typically used as part of<br />
the load-balancing algorithm that determines the path used when equal-cost paths are available. It is important to<br />
determine the exact path for the actual source and destination IP address pair that is affected, especially in cases<br />
where control plane information is available in both directions but packets are dropped.<br />
Verify the Routing Table<br />
R2#show ip route 10.1.10.1<br />
Routing entry for 10.1.10.0/24<br />
Known via "eigrp 1", distance 90, metric 2172672, type internal<br />
Redistributing via eigrp 1<br />
Last update from 10.1.1.5 on Serial0/0/1, 02:05:21 ago<br />
Routing Descriptor Blocks:<br />
10.1.1.5, from 10.1.1.5, 02:05:21 ago, via Serial0/0/1<br />
Route metric is 2172672, traffic share count is 1<br />
Total delay is 20110 microseconds, minimum bandwidth is 1544 Kbit<br />
Reliability 255/255, minimum MTU 1500 bytes<br />
Loading 1/255, Hops 2<br />
* 10.1.1.1, from 10.1.1.1, 02:05:21 ago, via Serial0/0/0<br />
Route metric is 2172672, traffic share count is 1<br />
Total delay is 20110 microseconds, minimum bandwidth is 1544 Kbit<br />
Reliability 255/255, minimum MTU 1500 bytes<br />
Loading 1/255, Hops 2<br />
When you are troubleshooting IP connectivity to a specific destination IP address, you can use the show ip<br />
route ip-address command to determine the best prefix match for the IP address, the egress interface, and,<br />
for multipoint interfaces, the next-hop IP address. If multiple equal-cost paths are present, as can be seen in the<br />
example above, each entry is listed.<br />
The routing source is also listed, such as directly connected, static, or the routing protocol. Additional control<br />
plane parameters that are associated with the route source, such as the administrative distance, routing protocol<br />
metrics, source router, and route age, are also displayed. To interpret these parameters, more detailed<br />
knowledge of the specific routing protocol is required. More detailed information can often be gathered from that<br />
specific protocol’s data structures.<br />
This command never displays the default route 0.0.0.0/0 as a match, even if it is the longest prefix match for a<br />
packet. Therefore, if this command displays the message “% Network not in table,” you cannot conclude that<br />
packets will be dropped, so you need to verify if a default route is present by using the show ip route<br />
0.0.0.0 0.0.0.0 command.<br />
Verify the <strong>Cisco</strong> Express Forwarding Information Base<br />
R2#show ip cef 10.1.10.1<br />
10.1.10.0/24<br />
nexthop 10.1.1.1 Serial0/0/0<br />
nexthop 10.1.1.5 Serial0/0/1<br />
To see the best match for a specific IP address in the Forwarding Information Base (FIB), use the show ip cef<br />
ip-address command. This command lists the same forwarding information as the show ip route command<br />
but without the associated control plane information, such as routing protocol metrics, administrative distance,<br />
and so on. This command displays the default route 0.0.0.0/0 if it is the best match for the destination IP address.<br />
If the routing table for a route contains multiple entries, these same entries will also be present in the FIB.<br />
All contents are Copyright © 1992–2010 <strong>Cisco</strong> Systems, Inc. All rights reserved. This document is <strong>Cisco</strong> Public Information. Page 20 of 32
<strong>CCNP</strong>v6 <strong>TSHOOT</strong><br />
DLS1#show ip cef exact-route 10.1.10.1 10.1.202.1<br />
10.1.10.1 -> 10.1.202.1 => IP adj out of FastEthernet0/5, addr 10.1.2.2<br />
R2#show ip cef exact-route 10.1.202.1 10.1.50.1<br />
10.1.202.1 -> 10.1.50.1 => IP adj out of Serial0/0/0<br />
When you are tracing the packet flow between two specific hosts and the routing table and the FIB lists multiple<br />
entries (because there are multiple equal-cost paths), you must determine which entry is used to forward the<br />
packets associated with the specific source and destination IP address pair that you are troubleshooting. You can<br />
use the show ip cef exact-route command in these situations to determine the specific egress interface<br />
and next-hop IP address for the specific IP address pair.<br />
On multilayer switches, instead of consulting the FIB that is stored in the main memory of the switch, you must<br />
consult the forwarding information stored in the hardware ternary content addressable memory (TCAM), because<br />
packet forwarding is handled by the TCAM, not the <strong>Cisco</strong> Express Forwarding FIB.<br />
Although the FIB is used to compile the information that is loaded into the TCAM, the load-balancing algorithms<br />
that are used are different and do not necessarily yield the same result.<br />
To learn more about the commands that can be used to verify the Layer 3 forwarding information contained in the<br />
TCAM, see the multilayer switching sections of the <strong>TSHOOT</strong> Student Guide and this Lab Guide.<br />
Sample Layer 3 Troubleshooting Flow<br />
No end-toend<br />
Layer 3<br />
connectivity<br />
Track Layer<br />
3 path<br />
between<br />
devices<br />
Investigate<br />
configured egress<br />
interface and nexthop<br />
for static<br />
routes<br />
Investigate<br />
points where<br />
routes are<br />
missing<br />
Investigate<br />
points where<br />
packets are<br />
dropped<br />
Investigate routing<br />
protocol for<br />
dynamic routes<br />
© 2009 <strong>Cisco</strong> Systems, Inc. All rights reserved. <strong>TSHOOT</strong> v1.0—52<br />
After you have found a point in the network where no route is present in the routing table for the destination IP<br />
address (or when analyzing the return path for the source IP address) of the session, you need to investigate<br />
what caused that route not to be installed in the routing table.<br />
To correctly diagnose why a particular route is missing from the routing table, you first need to consult your<br />
documentation and baselines to find out what is the expected routing source. Is static routing or a routing protocol<br />
used on this router?<br />
If a static route has been configured but it is not listed in the routing table, verify the status of the associated<br />
egress interface. If the egress interface for a static route is down, the route will not be installed in the routing table.<br />
If the route is not configured with an egress interface but with a next-hop IP address, the same rule applies. The<br />
router executes a recursive routing table lookup on the next hop for the static route. If no matching route and<br />
All contents are Copyright © 1992–2010 <strong>Cisco</strong> Systems, Inc. All rights reserved. This document is <strong>Cisco</strong> Public Information. Page 21 of 32
<strong>CCNP</strong>v6 <strong>TSHOOT</strong><br />
associated egress interface can be found for the configured next-hop IP address of the static route, the route is<br />
not installed in the routing table. If a match is found for the next-hop IP address, the static route is installed.<br />
For dynamic routing protocols, you must initiate a troubleshooting process that is appropriate for that specific<br />
protocol and try to determine why the route was not learned on this router or, if it was learned, why it is not used.<br />
Sample Layer 3 Troubleshooting Flow<br />
No end-toend<br />
Layer 3<br />
connectivity<br />
Track Layer<br />
3 path<br />
between<br />
devices<br />
Investigate<br />
points where<br />
routes are<br />
missing<br />
Verify adjacency<br />
table and Layer 3<br />
to Layer 2 mapping<br />
Investigate<br />
points where<br />
packets are<br />
dropped<br />
Troubleshoot<br />
Layer 2 protocol<br />
© 2009 <strong>Cisco</strong> Systems, Inc. All rights reserved. <strong>TSHOOT</strong> v1.0—53<br />
If you have verified the presence of correct routing information along the paths in both directions but you find that<br />
packets are dropped at a certain hop in the path, you must diagnose the packet-forwarding process.<br />
If a route is present in the routing table (and the FIB if <strong>Cisco</strong> Express Forwarding is used) but packets are not<br />
forwarded correctly, verify if a correct mapping between the IP next hop and the Layer 2 protocol is used on the<br />
egress interface. If the router cannot find all the necessary Layer 2 information to construct a frame to<br />
encapsulate a packet, it is dropped, even if the routing information is present in the routing table.<br />
The exact command to verify the Layer 3-to-Layer 2 protocol mapping is dependent on the Layer 2 technology<br />
used on the egress interface. Examples are the show ip arp command for Ethernet networks and the show<br />
frame-relay map command for Frame Relay.<br />
For more information about the exact command syntax, research the Layer 2 technology used in the configuration<br />
guides and command references on http://www.cisco.com.<br />
If you find incorrect mappings, or if you find the mappings to be correct but frames are not forwarded correctly,<br />
initiate a Layer 2 troubleshooting procedure for the Layer 2 technology that is being used.<br />
Verify the Adjacency Table<br />
DLS1#show adjacency fa0/5 detail<br />
Protocol Interface Address<br />
IP FastEthernet0/5 10.1.2.2(15)<br />
0 packets, 0 bytes<br />
epoch 0<br />
sourced in sev-epoch 0<br />
Encap length 14<br />
001B530D60B100175A5BB4420800<br />
L2 destination address byte offset 0<br />
All contents are Copyright © 1992–2010 <strong>Cisco</strong> Systems, Inc. All rights reserved. This document is <strong>Cisco</strong> Public Information. Page 22 of 32
<strong>CCNP</strong>v6 <strong>TSHOOT</strong><br />
L2 destination address byte length 6<br />
Link-type after encap: ip<br />
ARP<br />
Regardless of the Layer 2 technology, if <strong>Cisco</strong> Express Forwarding is used as the Layer 3 forwarding method, you<br />
can verify the availability of Layer 2 forwarding information using the show adjacency int-type/# detail<br />
command.<br />
As can be seen in the example above, this command lists the Layer 2 frame header that is used to encapsulate<br />
packets transmitted via the listed adjacency. In this example, the frame header is<br />
001B530D60B100175A5BB4420800, which is dissected as follows:<br />
• 001B530D60B1 – This is the destination MAC address of the frame, which corresponds to the MAC<br />
address of the next hop 10.1.2.2.<br />
• 00175A5BB442 – This is the source MAC address of the frame, which corresponds to the MAC<br />
address of interface FastEthernet 0/5.<br />
• 0800 – This is the Ethernet type field, which indicates that the frame contains an IP packet, because<br />
Ethernet type value 0x800 is registered as the value for IP.<br />
If you are troubleshooting a Layer 3 forwarding problem and the IP next hop and interface listed in the routing<br />
table are not present in the adjacency table, there is a problem with the Layer 3-to-Layer 2 mapping mechanisms.<br />
If a Layer 2 frame header is listed in the adjacency table but the frames are not forwarded correctly across the<br />
Layer 2 medium, you must troubleshoot the underlying Layer 2 technology. The information contained in the<br />
header can be useful information when you start the Layer 2 troubleshooting process.<br />
Troubleshooting EIGRP<br />
The figure illustrates a method for diagnosing and resolving problems related to EIGRP.<br />
Sample EIGRP Troubleshooting Flow<br />
Layer 3<br />
problem<br />
caused by<br />
routing<br />
protocol<br />
failure<br />
Verify routing table<br />
and FIB<br />
Verify<br />
neighbor<br />
availability<br />
Verify route<br />
availability<br />
Verify route<br />
selection<br />
© 2009 <strong>Cisco</strong> Systems, Inc. All rights reserved. <strong>TSHOOT</strong> v1.0—55<br />
All contents are Copyright © 1992–2010 <strong>Cisco</strong> Systems, Inc. All rights reserved. This document is <strong>Cisco</strong> Public Information. Page 23 of 32
<strong>CCNP</strong>v6 <strong>TSHOOT</strong><br />
The usual trigger to start investigating routing protocol operation is when you are troubleshooting IP connectivity<br />
to a particular destination and you find that the route to the destination network is missing from the routing table of<br />
one of the routers or that a different route than expected was selected to forward the packets to that destination.<br />
To install a route into the routing table, each router that uses a routing protocol goes through several stages:<br />
• Discover neighbors and establish a neighbor relationship.<br />
• Exchange routing information with neighbors and store the received information in protocol specific<br />
data structures.<br />
• Select the best route from the available routes and install it in the routing table.<br />
Errors during any of these stages can cause routing information to be missing or incorrect routing information to<br />
be installed in the routing table.<br />
The exact processes that take place, the data structures that are used, and the commands to gather information<br />
about these processes and data structures are protocol-specific, but the generic troubleshooting principles are<br />
similar for all routing protocols.<br />
The order to perform the different stages is not important as long as a structured approach is used.<br />
Sample EIGRP Troubleshooting Flow<br />
Layer 3<br />
problem<br />
caused by<br />
routing<br />
protocol<br />
failure<br />
Verify EIGRP<br />
interface table<br />
Verify<br />
neighbor<br />
availability<br />
Verify EIGRP<br />
neighbor table<br />
Verify route<br />
availability<br />
Debug EIGRP<br />
packet exchange<br />
Verify route<br />
selection<br />
© 2009 <strong>Cisco</strong> Systems, Inc. All rights reserved. <strong>TSHOOT</strong> v1.0—56<br />
EIGRP discovers and maintains neighbor relationships by using hello packets. Neighbors that are discovered are<br />
registered in the EIGRP neighbor table and remain in the neighbor table as long as hello packets are received. A<br />
neighbor is removed from the table when its hold time expires or when the interface on which the neighbor is<br />
registered goes down. The default EIGRP hello timer is 5 seconds for these interfaces:<br />
• High-speed multipoint interfaces, such as Ethernet interfaces<br />
• Point-to-point interfaces, such as the following:<br />
— Serial interfaces running PPP or High-Level Data Link Control (HDLC)<br />
— Point-to-point Frame Relay subinterfaces<br />
— Point-to-point ATM subinterfaces<br />
All contents are Copyright © 1992–2010 <strong>Cisco</strong> Systems, Inc. All rights reserved. This document is <strong>Cisco</strong> Public Information. Page 24 of 32
<strong>CCNP</strong>v6 <strong>TSHOOT</strong><br />
The default hold time for these interfaces is 15 seconds. Each router advertises hello and hold timers that it uses<br />
in its hellos. Although it is recommended that the timers are changed in a consistent manner on all routers if they<br />
need to be tuned, they do not need to match between two routers to allow them to become neighbors.<br />
Verify the EIGRP Interfaces<br />
R1#show ip eigrp interfaces<br />
IP-EIGRP interfaces for process 1<br />
Xmit Queue Mean Pacing Time Multicast Pending<br />
Interface Peers Un/Reliable SRTT Un/Reliable Flow Timer Routes<br />
Se0/0/0 1 0/0 19 0/15 99 0<br />
Fa0/1 1 0/0 8 0/1 50 0<br />
Neighbors can only be discovered on an interface that is operational and has been activated for EIGRP<br />
processing. An interface is activated for EIGRP packet processing if the IP address of the interface is covered by<br />
one of the network statements in the router eigrp configuration and the interface is not configured as a<br />
passive interface. Use the show ip eigrp interfaces command to display the EIGRP interfaces. An<br />
interface does not need to be operational to be listed in the output. The operational status of the interface must be<br />
verified separately using the show interfaces, show interface status, or show ip interfaces<br />
brief command.<br />
If an interface is not listed in the output of the show ip eigrp interfaces command as expected, verify the<br />
network and passive-interface commands under the router eigrp configuration.<br />
Verify the EIGRP Neighbor Table<br />
R1#show ip eigrp neighbors<br />
IP-EIGRP neighbors for process 1<br />
H Address Interface Hold Uptime SRTT RTO Q Seq<br />
(sec) (ms) Cnt Num<br />
0 10.1.2.1 Fa0/1 13 04:50:36 8 200 0 12<br />
1 10.1.1.2 Se0/0/0 10 04:07:52 19 200 0 36<br />
To verify that all expected neighbor relationships are operational, display the EIGRP neighbor table using the<br />
show ip eigrp neighbors command.<br />
For troubleshooting purposes, the two most relevant columns in this output are Hold, which lists the number of<br />
seconds before a neighbor expires from the table, and Uptime, which lists how long this neighbor has been<br />
operational since it was last discovered. These two items can give you a good indication of the stability of the<br />
neighbor relationship. The uptime tells you for how long the neighbor relationship has been successfully<br />
maintained, while displaying the hold time several times in a row can tell you if hellos are being received in a<br />
timely fashion. Based on the default 5 second hello and 15 second hold time, the value in this column should be<br />
between 15 and 10 seconds, because it counts down and is reset to the hold time whenever a hello is received<br />
from the neighbor.<br />
If the uptime of a neighbor is shorter than expected, verify the console or syslog logs for interface-related events<br />
or EIGRP neighbor-related events, such as the following (these are default message – not the result of debug):<br />
Nov 2 06:25:01 EST: %LINEPROTO-5-UPDOWN: Line protocol on Interface<br />
FastEthernet0/1, changed state to down<br />
Nov 2 06:25:02 EST: %LINK-3-UPDOWN: Interface FastEthernet0/1, changed state to<br />
down<br />
Nov 2 06:25:02 EST: %DUAL-5-NBRCHANGE: EIGRP-IPv4:(1) 1: Neighbor 10.1.2.1<br />
(FastEthernet0/1) is down: interface down<br />
Nov 2 06:25:14 EST: %DUAL-5-NBRCHANGE: EIGRP-IPv4:(1) 1: Neighbor 10.1.2.1<br />
(FastEthernet0/1) is up: new adjacency<br />
Nov 2 06:25:16 EST: %LINK-3-UPDOWN: Interface FastEthernet0/1, changed state to up<br />
Nov 2 06:25:17 EST: %LINEPROTO-5-UPDOWN: Line protocol on Interface<br />
FastEthernet0/1, changed state to up<br />
All contents are Copyright © 1992–2010 <strong>Cisco</strong> Systems, Inc. All rights reserved. This document is <strong>Cisco</strong> Public Information. Page 25 of 32
<strong>CCNP</strong>v6 <strong>TSHOOT</strong><br />
Specifically, the %DUAL-5-NBRCHANGE messages are very useful in troubleshooting because they indicate why<br />
the neighbor was lost. In this case, it was caused by the interface going down.<br />
Debug EIGRP Packet Exchange<br />
If an expected neighbor is not listed in the neighbor table on a specific interface, and you have confirmed that the<br />
interface is operational and is listed in the interface table, use the debug eigrp packets command to display<br />
the transmission and reception of EIGRP packets in real time. This command can potentially generate a large<br />
amount of output, so be cautious about using it.<br />
You can limit the output by specifying the packet type (update, request, query, reply, hello, ipxsap, probe, ack,<br />
stub, siaquery, or siareply). You can also add other conditions using the debug ip eigrp as-number<br />
command, such as limiting the output to a specific neighbor or network.<br />
To further reduce the impact of the command, disable logging to the console and log to buffers in the router<br />
instead. You can then display the contents of the log buffer using the show logging command. The following<br />
example shows you how to use this technique:<br />
R1#configure terminal<br />
Enter configuration commands, one per line. End with CNTL/Z.<br />
R1(config)#no logging console<br />
R1(config)#logging buffered 16384<br />
R1(config)#^Z<br />
R1#debug eigrp packets<br />
EIGRP Packets debugging is on<br />
(UPDATE, REQUEST, QUERY, REPLY, HELLO, IPXSAP, PROBE, ACK, STUB, SIAQUERY,<br />
SIAREPLY)<br />
R1#debug ip eigrp 1 neighbor 10.1.2.1<br />
IP Neighbor target enabled on AS 1 for 10.1.2.1<br />
IP-EIGRP Neighbor Target Events debugging is on<br />
R1#clear logging<br />
Clear logging buffer [confirm]<br />
R1#show logging<br />
Syslog logging: enabled (1 messages dropped, 108 messages rate-limited,<br />
0 flushes, 0 overruns, xml disabled, filtering disabled)<br />
Console logging: disabled<br />
Monitor logging: level debugging, 0 messages logged, xml disabled,<br />
filtering disabled<br />
Buffer logging: level debugging, 13924 messages logged, xml disabled,<br />
filtering disabled<br />
Logging Exception size (4096 bytes)<br />
Count and timestamp logging messages: disabled<br />
No active filter modules.<br />
Trap logging: level informational, 242 message lines logged<br />
Logging to 10.1.50.1(global) (udp port 514, audit disabled, link up), 242<br />
message lines logged, xml disabled,<br />
filtering disabled<br />
Log Buffer (16384 bytes):<br />
Nov 2 07:40:38.177 PDT: EIGRP: Received HELLO on FastEthernet0/1 nbr 10.1.2.1<br />
All contents are Copyright © 1992–2010 <strong>Cisco</strong> Systems, Inc. All rights reserved. This document is <strong>Cisco</strong> Public Information. Page 26 of 32
<strong>CCNP</strong>v6 <strong>TSHOOT</strong><br />
Nov 2 07:40:38.177 PDT: AS 1, Flags 0x0, Seq 0/0 idbQ 0/0 iidbQ un/rely 0/0 peerQ<br />
un/rely 0/0<br />
Nov 2 07:40:42.517 PDT: EIGRP: Received HELLO on FastEthernet0/1 nbr 10.1.2.1<br />
Nov 2 07:40:42.517 PDT: AS 1, Flags 0x0, Seq 0/0 idbQ 0/0 iidbQ un/rely 0/0 peerQ<br />
un/rely 0/0<br />
Nov 2 07:40:47.237 PDT: EIGRP: Received HELLO on FastEthernet0/1 nbr 10.1.2.1<br />
Nov 2 07:40:47.237 PDT: AS 1, Flags 0x0, Seq 0/0 idbQ 0/0 iidbQ un/rely 0/0 peerQ<br />
un/rely 0/0<br />
Sample EIGRP Troubleshooting Flow<br />
Layer 3<br />
problem<br />
caused by<br />
routing<br />
protocol<br />
failure<br />
Verify<br />
neighbor<br />
availability<br />
Verify EIGRP<br />
topology table<br />
Verify route<br />
availability<br />
Verify route<br />
selection<br />
Debug EIGRP<br />
route exchange<br />
© 2009 <strong>Cisco</strong> Systems, Inc. All rights reserved. <strong>TSHOOT</strong> v1.0—60<br />
After you have verified that neighbor relationships have been established as expected, verify that the route for the<br />
destination network that you are troubleshooting has been received correctly from all appropriate neighbors.<br />
EIGRP stores all routes that it receives from its neighbors in its topology table and then selects the best route<br />
from these routes to be installed in the routing table.<br />
By investigating the available routes to the destination network in the topology table, you can see if all options that<br />
you expected were learned and if they have the correct associated metrics.<br />
If routes are missing from the topology table, you might need to debug the EIGRP route exchange process to see<br />
if they were not received or if they were not entered into the topology table.<br />
Verify the EIGRP Topology Table<br />
R2#show ip eigrp topology 10.1.50.0 255.255.255.0<br />
IP-EIGRP (AS 1): Topology entry for 10.1.50.0/24<br />
State is Passive, Query origin flag is 1, 2 Successor(s), FD is 2172672<br />
Routing Descriptor Blocks:<br />
10.1.1.1 (Serial0/0/0), from 10.1.1.1, Send flag is 0x0<br />
Composite metric is (2172672/28416), Route is Internal<br />
Vector metric:<br />
Minimum bandwidth is 1544 Kbit<br />
Total delay is 20110 microseconds<br />
Reliability is 255/255<br />
Load is 1/255<br />
Minimum MTU is 1500<br />
All contents are Copyright © 1992–2010 <strong>Cisco</strong> Systems, Inc. All rights reserved. This document is <strong>Cisco</strong> Public Information. Page 27 of 32
<strong>CCNP</strong>v6 <strong>TSHOOT</strong><br />
Hop count is 2<br />
10.1.1.5 (Serial0/0/1), from 10.1.1.5, Send flag is 0x0<br />
Composite metric is (2172672/28416), Route is Internal<br />
Vector metric:<br />
Minimum bandwidth is 1544 Kbit<br />
Total delay is 20110 microseconds<br />
Reliability is 255/255<br />
Load is 1/255<br />
Minimum MTU is 1500<br />
Hop count is 2<br />
The EIGRP topology table contains all routes that were received from all neighbors.<br />
For each particular prefix, there might be the following three types of entries:<br />
• Successors – These are the entries selected from the topology table as the best routes and installed<br />
in the routing table. For a router to be a successor, it must provide the lowest total metric (its<br />
advertised distance plus the metric of the link towards it) among all the routes in the topology table for<br />
that prefix. Also, the advertised distance to the prefix by that router must be strictly lower than the<br />
feasible distance (FD). Secondly, it will only be marked as a successor if it was actually installed in<br />
the routing table. If a competing route for that prefix, such as a static route, was installed in the<br />
routing table instead because it had a better administrative distance, the EIGRP route will not be<br />
marked as a successor.<br />
• Feasible successors – These routers have a metric that is higher than the current lowest total metric<br />
for the prefix but still meet the feasibility condition. The feasibility condition is met if the advertised<br />
distance of the route is lower than the FD. This means that the route is considered a backup route<br />
and can be used immediately if the best route is lost, without needing to confirm its feasibility as a<br />
backup route through a query and reply process.<br />
• Possible successors – These routers do not meet the feasibility condition. They are potential<br />
backup routes, but if the best route is lost, a query and reply process is necessary to confirm that they<br />
are valid and loop-free.<br />
As an example, the content of the EIGRP topology table for network 10.1.50.0/24 is listed below and comments<br />
are interspersed with the output to help interpret the entries.<br />
R2#show ip eigrp topology 10.1.50.0 255.255.255.0<br />
IP-EIGRP (AS 1): Topology entry for 10.1.50.0/24<br />
State is Passive, Query origin flag is 1, 2 Successor(s), FD is 2172672<br />
There are two successors for this prefix, and the FD is 2172672. This entry is the first successor, because its<br />
distance of 2172672 (the first number between the parentheses) towards the 10.1.50.0/24 network through<br />
10.1.1.5 is also equal to the FD of 2172672.<br />
Routing Descriptor Blocks:<br />
10.1.1.1 (Serial0/0/0), from 10.1.1.1, Send flag is 0x0<br />
Composite metric is (2172672/28416), Route is Internal<br />
Vector metric:<br />
Minimum bandwidth is 1544 Kbit<br />
Total delay is 20110 microseconds<br />
Reliability is 255/255<br />
Load is 1/255<br />
Minimum MTU is 1500<br />
Hop count is 2<br />
This entry is the second successor, because its distance of 28416 is also equal to the FD of 28416.<br />
10.1.1.5 (Serial0/0/0), from 10.1.1.5, Send flag is 0x0<br />
Composite metric is (2172672/28416), Route is Internal<br />
Vector metric:<br />
Minimum bandwidth is 1544 Kbit<br />
All contents are Copyright © 1992–2010 <strong>Cisco</strong> Systems, Inc. All rights reserved. This document is <strong>Cisco</strong> Public Information. Page 28 of 32
<strong>CCNP</strong>v6 <strong>TSHOOT</strong><br />
Total delay is 20110 microseconds<br />
Reliability is 255/255<br />
Load is 1/255<br />
Minimum MTU is 1500<br />
Hop count is 2<br />
Verify the EIGRP Topology Table<br />
R2#debug ip eigrp<br />
IP-EIGRP Route Events debugging is on<br />
R2#debug ip eigrp 1 neighbor 10.1.1.1<br />
IP Neighbor target enabled on AS 1 for 10.1.1.1<br />
IP-EIGRP Neighbor Target Events debugging is on<br />
R2#clear ip eigrp neighbors 10.1.1.1<br />
R2#<br />
Nov 2 17:18:50.945: %DUAL-5-NBRCHANGE: IP-EIGRP(0) 1: Neighbor 10.1.1.2 (Serial<br />
0/0/0) is down: Interface Goodbye received<br />
Nov 2 17:18:55.085: %DUAL-5-NBRCHANGE: IP-EIGRP(0) 1: Neighbor 10.1.1.2 (Serial<br />
0/0/0) is up: new adjacency<br />
If you find expected route entries to be missing from the topology table, consider using the debug ip eigrp<br />
command to display the processing of routing events by the router. However, this command can produce a large<br />
number of messages and, as a result, has a high risk of disrupting the router’s operation. Do not use this<br />
command unless guided by the <strong>Cisco</strong> TAC or in a nonoperational network, such as a lab network that you have<br />
built to reproduce a problem.<br />
Like the debug eigrp packets command, you can limit the impact of this command by logging to buffers<br />
instead of the console and by limiting the output to specific neighbors or routes. Even then, extreme care should<br />
be taken.<br />
Sample EIGRP Troubleshooting Flow<br />
Layer 3<br />
problem<br />
caused by<br />
routing<br />
protocol<br />
failure<br />
Verify<br />
neighbor<br />
availability<br />
Verify route<br />
availability<br />
Verify route<br />
selection<br />
Compare routing<br />
table and topology<br />
table<br />
© 2009 <strong>Cisco</strong> Systems, Inc. All rights reserved. <strong>TSHOOT</strong> v1.0—63<br />
All contents are Copyright © 1992–2010 <strong>Cisco</strong> Systems, Inc. All rights reserved. This document is <strong>Cisco</strong> Public Information. Page 29 of 32
<strong>CCNP</strong>v6 <strong>TSHOOT</strong><br />
If you find that an EIGRP route for a specific destination network is available in the topology table, but a different<br />
route is present in the routing table, compare the value of the administrative distance of the route in the routing<br />
table to the value of the EIGRP route (which is 90 for internal routes and 170 for external routes, by default). If the<br />
distance of the EIGRP route is higher than the distance of the competing route, it will not be installed in the<br />
routing table.<br />
All contents are Copyright © 1992–2010 <strong>Cisco</strong> Systems, Inc. All rights reserved. This document is <strong>Cisco</strong> Public Information. Page 30 of 32
<strong>CCNP</strong>v6 <strong>TSHOOT</strong><br />
Reflection Questions<br />
1. Which lab trouble tickets did you have the most difficulty with?<br />
__________________________________________________________________________________________<br />
__________________________________________________________________________________________<br />
__________________________________________________________________________________________<br />
2. For any of the trouble tickets, would you change anything about the process that you used now that you see<br />
the resolution of the problem?<br />
__________________________________________________________________________________________<br />
__________________________________________________________________________________________<br />
__________________________________________________________________________________________<br />
3. Which commands did you find most useful in diagnosing Layer 3 and EIGRP issues? Add these to your toolbox<br />
for future use. Which commands did you find least useful?<br />
__________________________________________________________________________________________<br />
__________________________________________________________________________________________<br />
__________________________________________________________________________________________<br />
All contents are Copyright © 1992–2010 <strong>Cisco</strong> Systems, Inc. All rights reserved. This document is <strong>Cisco</strong> Public Information. Page 31 of 32
<strong>CCNP</strong>v6 <strong>TSHOOT</strong><br />
References<br />
If you need more information on the commands and their options, see the following references:<br />
• IP Routing Protocol Command Reference<br />
http://www.cisco.com/cisco/web/support/index.html<br />
• <strong>Cisco</strong> IOS IP Switching Command Reference<br />
http://www.cisco.com/en/US/docs/ios/ipswitch/command/reference/isw_book.html<br />
• Enhanced Interior Gateway Routing Protocol Troubleshooting Tech Notes<br />
http://www.cisco.com/en/US/tech/tk365/tsd_technology_support_troubleshooting_technotes_list.ht<br />
ml#anchor3<br />
Router Interface Summary Table<br />
Router Model Ethernet Interface<br />
#1<br />
1700 Fast Ethernet 0<br />
(FA0)<br />
1800 Fast Ethernet 0/0<br />
(FA0/0)<br />
2600 Fast Ethernet 0/0<br />
(FA0/0)<br />
2800 Fast Ethernet 0/0<br />
(FA0/0)<br />
Router Interface Summary<br />
Ethernet Interface<br />
#2<br />
Fast Ethernet 1<br />
(FA1)<br />
Fast Ethernet 0/1<br />
(FA0/1)<br />
Fast Ethernet 0/1<br />
(FA0/1)<br />
Fast Ethernet 0/1<br />
(FA0/1)<br />
Serial Interface<br />
#1<br />
Serial Interface<br />
#2<br />
Serial 0 (S0) Serial 1 (S1)<br />
Serial 0/0/0<br />
(S0/0/0)<br />
Serial 0/0/1<br />
(S0/0/1)<br />
Serial 0/0 (S0/0) Serial 0/1 (S0/1)<br />
Serial 0/0/0<br />
(S0/0/0)<br />
Serial 0/0/1<br />
(S0/0/1)<br />
Note: To find out how the router is configured, look at the interfaces to identify the type of router<br />
and how many interfaces the router has. Rather than try to list all the combinations of<br />
configurations for each router class, this table includes identifiers for the possible combinations of<br />
Ethernet and serial interfaces in the device. The table does not include any other type of interface,<br />
even though a specific router might contain one. An example of this is an ISDN BRI interface. The<br />
string in parenthesis is the legal abbreviation that can be used in <strong>Cisco</strong> IOS commands to<br />
represent the interface.<br />
All contents are Copyright © 1992–2010 <strong>Cisco</strong> Systems, Inc. All rights reserved. This document is <strong>Cisco</strong> Public Information. Page 32 of 32
<strong>CCNP</strong>v6 <strong>TSHOOT</strong><br />
Chapter 5 Lab 5-2, OSPF and Route Redistribution<br />
Physical Topology (Baseline)<br />
All contents are Copyright © 1992–2010 <strong>Cisco</strong> Systems, Inc. All rights reserved. This document is <strong>Cisco</strong> Public Information. Page 1 of 39
<strong>CCNP</strong>v6 <strong>TSHOOT</strong><br />
Logical Topology (Baseline)<br />
Objectives<br />
• Load the trouble ticket device configuration files for each trouble ticket.<br />
• Diagnose and resolve problems related to the OSPF routing protocol.<br />
• Diagnose and resolve problems related to route redistribution.<br />
• Document troubleshooting progress, configuration changes, and problem resolution.<br />
Background<br />
In this lab, you troubleshoot various problems related to the Open Shortest Path First (OSPF) routing protocol<br />
and route redistribution between routing protocols. For each task or trouble ticket, the trouble scenario and<br />
problem symptom are described. While troubleshooting, you will discover the cause of the problem, correct it,<br />
and then document the process and results.<br />
Migrating from EIGRP to OSPF<br />
Your company has decided to migrate from using Enhanced Interior Gateway Protocol (EIGRP) to OSPF as<br />
the routing protocol. This migration will be executed in two phases.<br />
The engineering team planned and designed the migration, but the support team must support the new<br />
network, so they are involved in migrating the branch during Phase 2.<br />
All contents are Copyright © 1992–2010 <strong>Cisco</strong> Systems, Inc. All rights reserved. This document is <strong>Cisco</strong> Public Information. Page 2 of 39
<strong>CCNP</strong>v6 <strong>TSHOOT</strong><br />
Phase 1—The headquarters central site campus is migrated to OSPF as well as one of the branch offices<br />
(simulated by Lo0 on R3). EIGRP is still used on the WAN toward the R2 branch office. On router R1,<br />
redistribution is configured between OSPF and EIGRP to ensure connectivity between headquarters and the<br />
branch office connected to R2.<br />
Phase 2—The R2 branch office (simulated by Lo0 on R2) is converted from EIGRP to OSPF, and all branch<br />
offices are migrated so that OSPF is used in the entire network. Each branch site is in a separate area that is<br />
configured as totally stubby.<br />
Today is Saturday, and the engineering team has been busy implementing OSPF and removing EIGRP at the<br />
headquarters site. Although you have not taken part in the actual implementation, some of the senior<br />
engineers in the support team are on standby to assist during the verification and troubleshooting phase.<br />
Together with the engineering team, you will have to make the decision on Sunday to either accept the<br />
implementation or, if major issues are uncovered that would threaten the stability of the network, roll back to<br />
the original configurations.<br />
OSPF Network Design<br />
Phases 1 and 2 of the OSPF design are depicted in the following figures. Backbone area 0 contains the<br />
FastEthernet interfaces on core Layer 3 switches DLS1 and DLS2 as well as those on routers R1 and R3. Area 0<br />
also includes VLAN 200 and the corresponding SVI, which have been added to these two switches so that they<br />
can form an OSPF neighbor relationship and exchange routes. The headquarters campus access VLANs 10, 20,<br />
30, and 50 and management VLAN 100 are in OSPF area 1. The R2 stub network is in area 2, and the R3 stub<br />
network is in area 3.<br />
All contents are Copyright © 1992–2010 <strong>Cisco</strong> Systems, Inc. All rights reserved. This document is <strong>Cisco</strong> Public Information. Page 3 of 39
<strong>CCNP</strong>v6 <strong>TSHOOT</strong><br />
Phase 1 OSPF Network Design<br />
All contents are Copyright © 1992–2010 <strong>Cisco</strong> Systems, Inc. All rights reserved. This document is <strong>Cisco</strong> Public Information. Page 4 of 39
<strong>CCNP</strong>v6 <strong>TSHOOT</strong><br />
Phase 2 OSPF Network Design<br />
Test Plan<br />
To test the branch connectivity using redistribution between EIGRP and OSPF and the eventual conversion to<br />
only OSPF, branch routers R2 and R3 have been specifically prepared for both of these scenarios. Router R2<br />
functions as the default gateway for the R2 LAN, while router R3 is the default gateway for the R3 LAN.<br />
Router R2 runs EIGRP as usual. This allows testing the redistribution of EIGRP from the R2 branch office<br />
LAN (simulated by R2 Lo0) to OSPF area 0 and redistribution of OSPF into EIGRP using router R1 as an<br />
Autonomous System Border Router (ASBR). Router R3 is configured to run OSPF as an Area Border Router<br />
(ABR) between area 0 and area 3. The R3 branch office client is simulated by R3 Lo0).<br />
At the end of Phase 1, when the network is fully converged, all OSPF routers should have EIGRP routes in<br />
their routing tables and EIGRP router R2 should have all OSPF routes in its routing table.<br />
All contents are Copyright © 1992–2010 <strong>Cisco</strong> Systems, Inc. All rights reserved. This document is <strong>Cisco</strong> Public Information. Page 5 of 39
<strong>CCNP</strong>v6 <strong>TSHOOT</strong><br />
After the completion of Phase 2, all routers except R2 should have OSPF routes. Router R2 is totally stubby<br />
and should only have a default route to R1.<br />
Note: Trouble ticket TT-A is related to the verification and acceptance of Phase 1 of the OSPF migration.<br />
Trouble tickets TT-B, C and D are related to the verification and acceptance of Phase 2 of the OSPF<br />
migration. Any interfaces that have been shut down on routers R2 and R3 should remain shut down for the<br />
duration of this lab exercise.<br />
Physical and Logical Topology Diagrams<br />
The physical and logical topologies for the existing EIGRP-based network are provided to assist the<br />
troubleshooting effort.<br />
Lab Structure<br />
This lab is divided into two main sections.<br />
Section 1—Trouble Tickets and Troubleshooting Logs<br />
This section includes multiple tasks. Each task is associated with a trouble ticket (TT) and introduces one or<br />
more errors on one or more devices. If time is a consideration, each task or trouble ticket can be performed<br />
independently.<br />
Section 2—Troubleshooting Reference Information<br />
This section provides OSPF and route redistribution troubleshooting information that can be applied to any<br />
trouble ticket in this lab. Sample troubleshooting flows are provided, along with examples of useful commands<br />
and output. If time permits, it is recommended that you read through Section 2 prior to starting on the trouble<br />
tickets.<br />
This lab uses <strong>Cisco</strong> 1841 routers with <strong>Cisco</strong> IOS Release 12.4(24)T1 and the advanced IP image c1841advipservicesk9-mz.124-24.T1.bin.<br />
The switches are <strong>Cisco</strong> WS-C2960-24TT-L with the <strong>Cisco</strong> IOS image<br />
c2960-lanbasek9-mz.122-46.SE.bin and Catalyst 3560-24PS with the <strong>Cisco</strong> IOS image c3560advipservicesk9-mz.122-46.SE.bin.<br />
Other routers (such as 2801 and 2811), switches (such as 2950 or 3550),<br />
and <strong>Cisco</strong> IOS Software versions can be used if they have comparable capabilities and features. Depending<br />
on the router or switch model and <strong>Cisco</strong> IOS Software version, the commands available and output produced<br />
might vary from what is shown in this lab.<br />
Note: Any changes made to the baseline configurations or topology (other than errors introduced) are noted<br />
in the trouble ticket so that you are aware of them prior to beginning the troubleshooting process.<br />
Required Resources<br />
• 3 routers (<strong>Cisco</strong> 1841 with the <strong>Cisco</strong> IOS Release 12.4(24)T1 Advanced IP Service or comparable)<br />
• 1 switch (<strong>Cisco</strong> 2960 with the <strong>Cisco</strong> IOS Release 12.2(46)SE C2960-LANBASEK9-M image or<br />
comparable)<br />
• 2 switches (<strong>Cisco</strong> 3560 with the <strong>Cisco</strong> IOS Release 12.2(46)SE C3560-LANBASEK9-M image or<br />
comparable)<br />
• SRV1 (Windows PC with static IP address) with TFTP and syslog servers plus an SSH client (PuTTY<br />
or comparable) and WireShark software<br />
• PC-B (Windows PC - DHCP client) with PuTTY and WireShark software<br />
• PC-C (Windows PC - DHCP client) with PuTTY and WireShark software<br />
• Serial and Ethernet cables<br />
All contents are Copyright © 1992–2010 <strong>Cisco</strong> Systems, Inc. All rights reserved. This document is <strong>Cisco</strong> Public Information. Page 6 of 39
<strong>CCNP</strong>v6 <strong>TSHOOT</strong><br />
Section 1—Trouble Tickets and Troubleshooting Logs<br />
Task 1: Trouble Ticket Lab 5-2 TT-A<br />
Step 1: Review trouble ticket Lab 5-2 TT-A.<br />
After the completion of Phase 1—implementation of OSPF in the headquarters portion of the network and the<br />
redistribution between EIGRP and OSPF—the connectivity from the office LAN on the R2 branch router to server<br />
SRV1 at headquarters is tested. A ping from the R2 LAN client (sourced by Lo0 on R2) to server SRV1 fails.<br />
Your task is to diagnose this problem and, if possible, resolve it. Connectivity from the R2 LAN to server SRV1 is<br />
mandatory to consider this phase of the migration successful.<br />
Step 2: Load the device trouble ticket configuration files for TT-A.<br />
Using the procedure described in Lab 3-1, verify that the lab configuration files are present in flash. Load the<br />
proper configuration files as indicated in the Device Configuration File table.<br />
Note: The following device access methods are in effect after loading the configuration files:<br />
• Console access requires no username or password.<br />
• Telnet and SSH require username admin and password adminpa55.<br />
• The enable password is ciscoenpa55.<br />
Device Configuration File Table<br />
Device Name File to Load Notes<br />
ALS1 Lab52-ALS1-TT-A-Cfg.txt<br />
DLS1 Lab52-DLS1-TT-A-Cfg.txt<br />
DLS2 Lab52-DLS2-TT-A-Cfg.txt<br />
R1 Lab52-R1-TT-A-Cfg.txt<br />
R2 Lab52-R2-TT-A-Cfg.txt<br />
R3 Lab52-R3-TT-A-Cfg.txt<br />
SRV1 N/A Static IP: 10.1.50.1<br />
Default gateway: 10.1.50.254<br />
PC-B N/A DHCP<br />
PC-C N/A DHCP<br />
Step 3: Configure SRV1 and start the syslog and TFTP servers.<br />
Step 4: Release and renew the DHCP lease on PC-B.<br />
Ensure that PC-B is configured as a DHCP client in the OFFICE VLAN.<br />
After loading all TT-A device configuration files, issue the ipconfig /release and ipconfig /renew commands on<br />
PC-B.<br />
Step 5: Outline the troubleshooting approach and validation steps.<br />
Use this space to identify your troubleshooting approach and the key steps to verify that the problem is resolved.<br />
Troubleshooting approaches to select from include: follow-the-path, spot-the-differences, bottom-up, top-down,<br />
divide-and-conquer, shoot-from-the-hip, and move-the-problem.<br />
All contents are Copyright © 1992–2010 <strong>Cisco</strong> Systems, Inc. All rights reserved. This document is <strong>Cisco</strong> Public Information. Page 7 of 39
<strong>CCNP</strong>v6 <strong>TSHOOT</strong><br />
Note: In addition to a specific approach, you can use the generic troubleshooting process described at the<br />
beginning of Section 2 of this lab.<br />
_______________________________________________________________________________<br />
_______________________________________________________________________________<br />
_______________________________________________________________________________<br />
_______________________________________________________________________________<br />
_______________________________________________________________________________<br />
_______________________________________________________________________________<br />
Step 6: Record the troubleshooting process and configuration changes.<br />
Note: Section 2 of this lab includes sample troubleshooting flows, useful commands, and examples of output.<br />
Use this log to document your actions and results during the troubleshooting process. List the commands you<br />
used to gather information. As you progress, record what you think the problem might be and which actions you<br />
will take to correct the problem.<br />
Device Actions and Results<br />
All contents are Copyright © 1992–2010 <strong>Cisco</strong> Systems, Inc. All rights reserved. This document is <strong>Cisco</strong> Public Information. Page 8 of 39
<strong>CCNP</strong>v6 <strong>TSHOOT</strong><br />
Step 7: Document trouble ticket debrief notes.<br />
Use this space to make notes of the key learning points that you picked up during the discussion of this trouble<br />
ticket with your instructor. The notes can include problems encountered, solutions applied, useful commands<br />
employed, alternate solutions and methods, and procedure and communication improvements.<br />
_______________________________________________________________________________<br />
_______________________________________________________________________________<br />
_______________________________________________________________________________<br />
_______________________________________________________________________________<br />
_______________________________________________________________________________<br />
_______________________________________________________________________________<br />
_______________________________________________________________________________<br />
Task 2: Trouble Ticket Lab 5-2 TT-B<br />
Step 1: Review trouble ticket Lab 5-2 TT-B.<br />
Phase 2 has been completed and all routers have been converted to OSPF. The connectivity from a branch office<br />
client on the R2 LAN (simulated by R2 Lo0) to server SRV1 at the central site is tested. A ping from the client on<br />
the R2 LAN (using source interface Lo0) to server SRV1 fails. The connectivity problem is not limited to SRV1. An<br />
attempt to connect to other headquarters servers also fails. Your task is to diagnose this problem and, if possible,<br />
resolve it. Connectivity from the branch client to server SRV1 is mandatory for this phase of the migration to be<br />
considered successful.<br />
Note: Refer back to the implementation and test plan to review the requirements for Phase 2.<br />
Step 2: Load the device trouble ticket configuration files for TT-B.<br />
Using the procedure described in Lab 3-1, verify that the lab configuration files are present in flash. Load the<br />
proper configuration files as indicated in the Device Configuration File table.<br />
Note: See Task 1, Step 2 for device access methods, usernames, and passwords after the configuration files<br />
have been loaded.<br />
Device Configuration File Table<br />
Device Name File to Load Notes<br />
ALS1 Lab51-ALS1-TT-B-Cfg.txt<br />
DLS1 Lab51-DLS1-TT-B-Cfg.txt<br />
DLS2 Lab51-DLS2-TT-B-Cfg.txt<br />
R1 Lab51-R1-TT-B-Cfg.txt<br />
R2 Lab51-R2-TT-B-Cfg.txt<br />
R3 Lab51-R3-TT-B-Cfg.txt<br />
SRV1 N/A Static IP: 10.1.50.1<br />
Default gateway: 10.1.50.254<br />
PC-B N/A DHCP (release and renew after loading device<br />
configurations)<br />
PC-C N/A DHCP (release and renew after loading device<br />
configurations)<br />
All contents are Copyright © 1992–2010 <strong>Cisco</strong> Systems, Inc. All rights reserved. This document is <strong>Cisco</strong> Public Information. Page 9 of 39
<strong>CCNP</strong>v6 <strong>TSHOOT</strong><br />
Step 3: Configure SRV1 and start the syslog and TFTP servers.<br />
Step 4: Release and renew the DHCP leases on PC-B and PC-C, as described in Task 1.<br />
Step 5: Outline the troubleshooting approach and validation steps.<br />
Use this space to identify your troubleshooting approach and the key steps to verify that the problem is resolved.<br />
Troubleshooting approaches to select from include: follow-the-path, spot-the-differences, bottom-up, top-down,<br />
divide-and-conquer, shoot-from-the-hip, and move-the-problem.<br />
Note: In addition to a specific approach, you can use the generic troubleshooting process described at the<br />
beginning of Section 2 of this lab.<br />
_______________________________________________________________________________<br />
_______________________________________________________________________________<br />
_______________________________________________________________________________<br />
_______________________________________________________________________________<br />
_______________________________________________________________________________<br />
Step 6: Record the troubleshooting process and configuration changes.<br />
Note: Section 2 of this lab includes sample troubleshooting flows, useful commands, and examples of output.<br />
Use this log to document your actions and results during the troubleshooting process. List the commands you<br />
used to gather information. As you progress, record what you think the problem might be and which actions you<br />
will take to correct the problem.<br />
Device Actions and Results<br />
All contents are Copyright © 1992–2010 <strong>Cisco</strong> Systems, Inc. All rights reserved. This document is <strong>Cisco</strong> Public Information. Page 10 of 39
<strong>CCNP</strong>v6 <strong>TSHOOT</strong><br />
Device Actions and Results<br />
Step 7: Document trouble ticket debrief notes.<br />
Use this space to make notes of the key learning points that you picked up during the discussion of this trouble<br />
ticket with your instructor. The notes can include problems encountered, solutions applied, useful commands<br />
employed, alternate solutions and methods, and procedure and communication improvements.<br />
_______________________________________________________________________________<br />
_______________________________________________________________________________<br />
_______________________________________________________________________________<br />
_______________________________________________________________________________<br />
_______________________________________________________________________________<br />
_______________________________________________________________________________<br />
_______________________________________________________________________________<br />
Task 3: Trouble Ticket Lab 5-2 TT-C<br />
Step 1: Review trouble ticket Lab 5-2 TT-C.<br />
After implementing OSPF, connectivity from the branch office on R3 (simulated by Lo0) to SRV1 is not working. A<br />
ping from PC-B to server SRV1 succeeds, but pings from R3 Lo0 to SRV1 fail.<br />
Your task is to diagnose this problem and, if possible, resolve it. Connectivity from R3 branch office clients to<br />
server SRV1 is mandatory for this phase of the migration to be considered successful.<br />
Step 2: Load the device trouble ticket configuration files for TT-C.<br />
Using the procedure described in Lab 3-1, verify that the lab configuration files are present in flash. Load the<br />
proper configuration files as indicated in the Device Configuration File table.<br />
Note: See Task 1, Step 2 for device access methods, usernames, and passwords after the configuration files<br />
have been loaded.<br />
Device Configuration File Table<br />
Device Name File to Load Notes<br />
ALS1 Lab51-ALS1-TT-C-Cfg.txt<br />
DLS1 Lab51-DLS1-TT-C-Cfg.txt<br />
DLS2 Lab51-DLS2-TT-C-Cfg.txt<br />
R1 Lab51-R1-TT-C-Cfg.txt<br />
R2 Lab51-R2-TT-C-Cfg.txt<br />
All contents are Copyright © 1992–2010 <strong>Cisco</strong> Systems, Inc. All rights reserved. This document is <strong>Cisco</strong> Public Information. Page 11 of 39
<strong>CCNP</strong>v6 <strong>TSHOOT</strong><br />
R3 Lab51-R3-TT-C-Cfg.txt<br />
SRV1 N/A Static IP: 10.1.50.1<br />
Default gateway: 10.1.50.254<br />
PC-B N/A DHCP (release and renew after loading device<br />
configurations)<br />
PC-C N/A DHCP (release and renew after loading device<br />
configurations)<br />
Step 3: Configure SRV1 and start the syslog and TFTP servers, as described in Task 1.<br />
Step 4: Release and renew the DHCP leases on PC-B and PC-C, as described in Task 1.<br />
Step 5: Outline the troubleshooting approach and validation steps.<br />
Use this space to identify your troubleshooting approach and the key steps to verify that the problem is resolved.<br />
Troubleshooting approaches to select from include: follow-the-path, spot-the-differences, bottom-up, top-down,<br />
divide-and-conquer, shoot-from-the-hip, and move-the-problem.<br />
Note: In addition to a specific approach, you can use the generic troubleshooting process described at the<br />
beginning of Section 2 of this lab.<br />
_______________________________________________________________________________<br />
_______________________________________________________________________________<br />
_______________________________________________________________________________<br />
_______________________________________________________________________________<br />
_______________________________________________________________________________<br />
_______________________________________________________________________________<br />
Step 6: Record the troubleshooting process and configuration changes.<br />
Note: Section 2 of this lab includes sample troubleshooting flows, useful commands, and examples of output.<br />
Use this log to document your actions and results during the troubleshooting process. List the commands you<br />
used to gather information. As you progress, record what you think the problem might be and which actions you<br />
will take to correct the problem.<br />
Device Actions and Results<br />
All contents are Copyright © 1992–2010 <strong>Cisco</strong> Systems, Inc. All rights reserved. This document is <strong>Cisco</strong> Public Information. Page 12 of 39
<strong>CCNP</strong>v6 <strong>TSHOOT</strong><br />
Device Actions and Results<br />
Step 7: Document trouble ticket debrief notes.<br />
Use this space to make notes of the key learning points that you picked up during the discussion of this trouble<br />
ticket with your instructor. The notes can include problems encountered, solutions applied, useful commands<br />
employed, alternate solutions and methods, and procedure and communication improvements.<br />
_______________________________________________________________________________<br />
_______________________________________________________________________________<br />
_______________________________________________________________________________<br />
_______________________________________________________________________________<br />
_______________________________________________________________________________<br />
_______________________________________________________________________________<br />
_______________________________________________________________________________<br />
All contents are Copyright © 1992–2010 <strong>Cisco</strong> Systems, Inc. All rights reserved. This document is <strong>Cisco</strong> Public Information. Page 13 of 39
<strong>CCNP</strong>v6 <strong>TSHOOT</strong><br />
Task 4: Trouble Ticket Lab 5-2 TT-D<br />
Step 1: Review trouble ticket Lab 5-2 TT-D.<br />
A recent security audit suggested that it would be best practice to secure the OSPF implementation by using MD5<br />
authentication between the routers. Because this could complicate the implementation, it was decided that it was<br />
too late to include this now for all areas. However, to test the concept, it was decided to enable the authentication<br />
for area 0 for two devices. If the test is successful, the authentication will be added to other areas during the<br />
second phase of the implementation. If the test is not successful, a separate project will be initiated to implement<br />
the authentication.<br />
One of your colleagues has enabled MD5 authentication for area 0 on VLAN 200, which is the link between the<br />
core switches DLS1 and DLS2 in area 0. Unfortunately, the neighbor relationship between DLS1 and DLS2 on<br />
VLAN 200 is not established.<br />
Your task is to diagnose this problem and, if possible, resolve it. After correcting the OSPF neighbor relationship,<br />
verify that OSPF authentication between DLS1 and DLS2 is functioning correctly. You may disable the password<br />
encryption service during authentication testing.<br />
Step 2: Load the device trouble ticket configuration files for TT-D.<br />
Using the procedure described in Lab 3-1, verify that the lab configuration files are present in flash. Load the<br />
proper configuration files as indicated in the Device Configuration File table.<br />
Note: See Task 1, Step 2 for device access methods, usernames, and passwords after the configuration files<br />
have been loaded.<br />
Device Configuration File Table<br />
Device Name File to Load Notes<br />
ALS1 Lab51-ALS1-TT-D-Cfg.txt<br />
DLS1 Lab51-DLS1-TT-D-Cfg.txt<br />
DLS2 Lab51-DLS2-TT-D-Cfg.txt<br />
R1 Lab51-R1-TT-C-Cfg.txt<br />
R2 Lab51-R2-TT-C-Cfg.txt<br />
R3 Lab51-R3-TT-C-Cfg.txt<br />
SRV1 N/A Static IP: 10.1.50.1<br />
Default gateway: 10.1.50.254<br />
PC-B N/A DHCP<br />
PC-C N/A DHCP<br />
Step 3: Configure SRV1 and start the syslog and TFTP servers, as described in Task 1.<br />
Step 4: Release and renew the DHCP leases on PC-B and PC-C, as described in Task 1.<br />
All contents are Copyright © 1992–2010 <strong>Cisco</strong> Systems, Inc. All rights reserved. This document is <strong>Cisco</strong> Public Information. Page 14 of 39
<strong>CCNP</strong>v6 <strong>TSHOOT</strong><br />
Step 5: Outline the troubleshooting approach and validation steps.<br />
Use this space to identify your troubleshooting approach and the key steps to verify that the problem is resolved.<br />
Troubleshooting approaches to select from include: follow-the-path, spot-the-differences, bottom-up, top-down,<br />
divide-and-conquer, shoot-from-the-hip, and move-the-problem.<br />
Note: In addition to a specific approach, you can use the generic troubleshooting process described at the<br />
beginning of Section 2 of this lab.<br />
_______________________________________________________________________________<br />
_______________________________________________________________________________<br />
_______________________________________________________________________________<br />
_______________________________________________________________________________<br />
_______________________________________________________________________________<br />
_______________________________________________________________________________<br />
Step 6: Record the troubleshooting process and configuration changes.<br />
Note: Section 2 of this lab includes sample troubleshooting flows, useful commands, and examples of output.<br />
Use this log to document your actions and results during the troubleshooting process. List the commands you<br />
used to gather information. As you progress, record what you think the problem might be and which actions you<br />
will take to correct the problems.<br />
Device Actions and Results<br />
All contents are Copyright © 1992–2010 <strong>Cisco</strong> Systems, Inc. All rights reserved. This document is <strong>Cisco</strong> Public Information. Page 15 of 39
<strong>CCNP</strong>v6 <strong>TSHOOT</strong><br />
Step 7: Document trouble ticket debrief notes.<br />
Use this space to make notes of the key learning points that you picked up during the discussion of this trouble<br />
ticket with your instructor. The notes can include problems encountered, solutions applied, useful commands<br />
employed, alternate solutions and methods, and procedure and communication improvements.<br />
_______________________________________________________________________________<br />
_______________________________________________________________________________<br />
_______________________________________________________________________________<br />
_______________________________________________________________________________<br />
_______________________________________________________________________________<br />
_______________________________________________________________________________<br />
_______________________________________________________________________________<br />
All contents are Copyright © 1992–2010 <strong>Cisco</strong> Systems, Inc. All rights reserved. This document is <strong>Cisco</strong> Public Information. Page 16 of 39
<strong>CCNP</strong>v6 <strong>TSHOOT</strong><br />
Section 2—Troubleshooting Reference Information<br />
General Troubleshooting Process<br />
As a general guideline, you can use the general troubleshooting process described in the course:<br />
1. Define the problem (symptoms).<br />
2. Gather information.<br />
3. Analyze the information.<br />
4. Propose a hypothesis (possible cause).<br />
5. Test the hypothesis.<br />
6. Eliminate or accept the hypothesis.<br />
7. Solve the problem.<br />
8. Document the problem.<br />
Commands Summary<br />
The table lists useful commands. Sample output is shown on the following pages.<br />
Command Key Information Displayed<br />
show ip route ip-addr<br />
show ip ospf interface type/#<br />
show ip ospf interface brief<br />
show ip ospf neighbor<br />
show ip ospf database router routerid<br />
show ip ospf database external<br />
subnet<br />
show ip ospf database summary subnet<br />
show ip ospf database asbr-summary<br />
router-id<br />
show system mtu<br />
Displays the routing table information for a particular<br />
destination address.<br />
Displays interfaces that are participating in the OSPF<br />
routing process. An interface does not need to be<br />
operational to be listed in the command output.<br />
Displays the OSPF neighbor table to verify that all<br />
expected neighbor relationships are operational.<br />
Verifies whether the directly connected routers<br />
properly advertise the destination network. Use this<br />
command to display the router (type-1) for the<br />
connected routers.<br />
Verifies the availability of a specific type-5 external<br />
link-state advertisement (LSA) in the OSPF<br />
database. The subnet option is the subnet IP<br />
address of the prefix in which you are interested.<br />
Verifies the availability of a specific target network in<br />
a different area. The subnet option is the subnet IP<br />
address of the prefix in which you are interested.<br />
Verifies if a type-4 summary autonomous system<br />
(AS) boundary LSA exists for the Autonomous<br />
System Boundary Router (ASBR) with the specified<br />
router ID.<br />
Displays the switch or router Maximum Transmission<br />
All contents are Copyright © 1992–2010 <strong>Cisco</strong> Systems, Inc. All rights reserved. This document is <strong>Cisco</strong> Public Information. Page 17 of 39
<strong>CCNP</strong>v6 <strong>TSHOOT</strong><br />
debug ip ospf packet<br />
debug ip ospf adj<br />
debug ip ospf events<br />
Lab 5-2: Sample Troubleshooting Flows<br />
Troubleshooting the OSPF Routing Protocol<br />
Unit (MTU), normally 1500 bytes. Mismatches in<br />
MTU can cause neighbor relationships to fail.<br />
Displays the headers of OSPF packets as they are<br />
received by the router. Transmitted packets are not<br />
displayed. Packets are only shown for interfaces that<br />
are enabled for OSPF.<br />
Displays all the different stages of the OSPF<br />
adjacency building process. It also reveals<br />
mismatches in the basic parameters contained in the<br />
OSPF packet header, such as area ID mismatches,<br />
the source being on the wrong subnet, or<br />
authentication mismatches. It does not reveal other<br />
mismatches in hello parameters, such as hello<br />
timers, subnet masks, or flags.<br />
Displays the same information that is displayed by<br />
the debug ip ospf adj command. In addition, it<br />
displays the transmission and reception of hello<br />
packets and reports mismatches in the hello<br />
parameters.<br />
The figure illustrates an example of a method that you could follow to diagnose and resolve problems related to<br />
the OSPF.<br />
Sample OSPF Troubleshooting Flow<br />
Layer 3<br />
problem<br />
caused by<br />
routing<br />
protocol<br />
failure<br />
Verify routing table<br />
and FIB<br />
Verify<br />
neighbor<br />
availability<br />
Verify route<br />
availability<br />
Verify route<br />
selection<br />
© 2009 <strong>Cisco</strong> Systems, Inc. All rights reserved. <strong>TSHOOT</strong> v1.0—67<br />
All contents are Copyright © 1992–2010 <strong>Cisco</strong> Systems, Inc. All rights reserved. This document is <strong>Cisco</strong> Public Information. Page 18 of 39
<strong>CCNP</strong>v6 <strong>TSHOOT</strong><br />
The usual trigger to start investigating routing protocol operation is when you are troubleshooting IP connectivity<br />
to a particular destination and you find that that the route to the destination network is missing from the routing<br />
table of one of the routers, or that a different route than expected was selected to forward the packets to that<br />
destination.<br />
To install a route into the routing table, each router that uses a routing protocol goes through several stages:<br />
• Discovers neighbors and establishes a neighbor relationship.<br />
• Exchanges routing information with neighbors and stores the received information in protocol-specific<br />
data structures.<br />
• Selects the best route from the available routes and installs it in the routing table.<br />
Errors during any of these stages can cause missing routing information or wrong routing information installed in<br />
the routing table.<br />
The exact processes that take place, the data structures that are used, and the commands to gather information<br />
about these processes and data structures are protocol-specific, but the generic troubleshooting principles are<br />
similar for all routing protocols.<br />
The order of verification of the different process stages is not important as long as a structured approach is used.<br />
Sample OSPF Troubleshooting Flow<br />
Layer 3<br />
problem<br />
caused by<br />
routing<br />
protocol<br />
failure<br />
Verify OSPF<br />
interface table<br />
Verify<br />
neighbor<br />
availability<br />
Verify OSPF<br />
neighbor table<br />
Verify route<br />
availability<br />
Debug OSPF<br />
packet exchange<br />
Verify route<br />
selection<br />
© 2009 <strong>Cisco</strong> Systems, Inc. All rights reserved. <strong>TSHOOT</strong> v1.0—68<br />
OSPF establishes and maintains neighbor relationships by using hello packets. Neighbors from which a hello<br />
packet is received are entered in the neighbor table. Subsequently, OSPF goes through the process of<br />
establishing an adjacency by transitioning through several stages in which the link-state database of the router<br />
are synchronized with its neighbor. After the completion of the database synchronization, the neighbors are<br />
considered to be fully adjacent, and both link-state updates and user traffic can be passed between the<br />
neighbors. The neighbor remains registered in the neighbor table as long as hello packets are received regularly.<br />
A neighbor is removed from the neighbor table when its dead time expires or when the interface on which the<br />
neighbor is registered goes down. The default OSPF hello timer is 10 seconds for point-to-point interfaces, such<br />
as serial interfaces running PPP or High-Level Data Link Control (HDLC), point-to-point Frame Relay or ATM<br />
subinterfaces, and broadcast-type interfaces such as Ethernet. The default dead time for these interfaces is 40<br />
seconds. Each router advertises its hello and hold times in its hello packets, and the values must match for two<br />
routers to become neighbors.<br />
Verify OSPF Interfaces<br />
All contents are Copyright © 1992–2010 <strong>Cisco</strong> Systems, Inc. All rights reserved. This document is <strong>Cisco</strong> Public Information. Page 19 of 39
<strong>CCNP</strong>v6 <strong>TSHOOT</strong><br />
R1#show ip ospf interface brief<br />
Interface PID area IP Address/Mask Cost State Nbrs F/C<br />
Lo0 1 0 10.1.201.1/32 1 P2P 0/0<br />
Fa0/1 1 0 10.1.2.2/30 1 DR 1/1<br />
Se0/0/0 1 2 10.1.1.1/30 64 P2P 1/1<br />
Neighbors can only be discovered on an interface that has been enabled for OSPF and has not been configured<br />
as a passive interface. An interface can be enabled for OSPF in two ways. One way is if the IP address of the<br />
interface is covered by one of the network statements configured under the router ospf process, which<br />
assigns it to an area. Alternatively, an explicit ip ospf process-id area area-id command is configured<br />
on the interface, which assigns it to an area. To display a list of OSPF-enabled interfaces, use the show ip<br />
ospf interface brief command. This list includes interfaces that are down, which are marked as DOWN,<br />
and interfaces that have been configured as passive. However, passive interfaces are not easily recognizable in<br />
the output.<br />
To verify whether an interface is passive, use the show ip ospf interface interface-id command.<br />
Instead of a short list, this command displays comprehensive details of the OSPF parameters and the operational<br />
state for the specified interface. This command is also useful to verify timer values, such as the hello and dead<br />
timers, which could prevent a neighbor relationship from being established.<br />
R1#show ip ospf interface fastEthernet 0/1<br />
FastEthernet0/1 is up, line protocol is up<br />
Internet Address 10.1.2.2/30, area 0<br />
Process ID 1, Router ID 10.1.201.1, Network Type BROADCAST, Cost: 1<br />
Transmit Delay is 1 sec, State DR, Priority 1<br />
Designated Router (ID) 10.1.201.1, Interface address 10.1.2.2<br />
No backup designated router on this network<br />
Timer intervals configured, hello 10, dead 40, Wait 40, Retransmit 5<br />
oob-resync timeout 40<br />
No Hellos (Passive interface)<br />
Supports Link-local Signaling (LLS)<br />
<strong>Cisco</strong> NSF helper support enabled<br />
IETF NSF helper support enabled<br />
Index 1/2, flood queue length 0<br />
Next 0x0(0)/0x0(0)<br />
Last flood scan length is 0, maximum is 0<br />
Last flood scan time is 0 msec, maximum is 0 msec<br />
Neighbor Count is 0, Adjacent neighbor count is 0<br />
Suppress hello for 0 neighbor(s)<br />
What does this mean from a troubleshooting standpoint?<br />
If you find that an interface is not listed in the output of the show ip ospf interface brief command as<br />
expected, verify the network commands under the router ospf configuration.<br />
If you find that an interface is listed but no neighbors are registered on the interface, verify that the interface was<br />
not marked as passive by issuing the show ip ospf interface interface-id command for that interface.<br />
Verify the OSPF Neighbor Table<br />
R1#show ip ospf neighbor<br />
Neighbor ID Pri State dead Time Address Interface<br />
10.1.211.1 1 FULL/DR 00:00:31 10.1.2.1 FastEthernet0/1<br />
10.1.202.1 0 FULL/ - 00:00:38 10.1.1.2 Serial0/0/0<br />
DLS1>show ip ospf neighbor<br />
Neighbor ID Pri State dead Time Address Interface<br />
All contents are Copyright © 1992–2010 <strong>Cisco</strong> Systems, Inc. All rights reserved. This document is <strong>Cisco</strong> Public Information. Page 20 of 39
<strong>CCNP</strong>v6 <strong>TSHOOT</strong><br />
10.1.212.1 1 FULL/DR 00:00:35 10.1.200.253 Vlan200<br />
10.1.201.1 1 FULL/BDR 00:00:39 10.1.2.2 FastEthernet0/5<br />
To verify that all expected neighbor relationships are operational, you can display the OSPF neighbor table using<br />
the show ip ospf neighbor command.<br />
While two routers establish an adjacency and synchronize their link-state databases, they go through the<br />
following phases: Attempt (optional), Init, 2-Way, Exstart, Exchange, Loading, and Full. The expected state for a<br />
neighbor relationship is Full. The other states are transitory states, and a neighbor should not be stuck in any of<br />
those states for an extended period of time.<br />
The only exception to this rule is a broadcast or nonbroadcast network with more than three routers. On these<br />
types of networks, a designated router (DR) and backup designated router (BDR) are elected, and all routers<br />
establish a full adjacency with the DR and BDR. Any two routers that are both not a DR or BDR (marked<br />
“DROTHER” in the show commands) do not transition any further than the two-way state.<br />
In the example output, the device has two neighbors: neighbor 10.1.212.1, which is the DR, and neighbor<br />
10.1.201.1, which is the BDR.<br />
Debug OSPF Packet Exchange<br />
DLS1#debug ip ospf packet<br />
OSPF packet debugging is on<br />
DLS1#<br />
Nov 5 15:54:32.574: OSPF: rcv. v:2 t:1 l:48 rid:10.1.212.1<br />
aid:0.0.0.0 chk:8B98 aut:0 auk: from Vlan200<br />
Nov 5 15:54:38.917: OSPF: rcv. v:2 t:1 l:48 rid:10.1.201.1<br />
aid:0.0.0.0 chk:2394 aut:0 auk: from FastEthernet0/5<br />
R1#debug ip ospf packet<br />
Nov 5 15:57:21.503: OSPF: rcv. v:2 t:1 l:48 rid:10.1.211.1<br />
aid:0.0.0.0 chk:2394 aut:0 auk: from FastEthernet0/1<br />
Nov 5 15:57:22.443: OSPF: rcv. v:2 t:1 l:48 rid:10.1.202.1<br />
aid:0.0.0.2 chk:4497 aut:0 auk: from Serial0/0/0<br />
In this highlighted sample output for R1, router ID 10.1.202.1 is in area 2<br />
(aid:0.0.0.2) and the hello was received on interface Serial 0/0/0.<br />
When an OSPF neighbor relationship is not properly established, you can use several debug commands to<br />
display events related to the establishment of neighbor relationships. The most elementary command is debug<br />
ip ospf packet, which displays the headers of OSPF packets as they are received by the router.<br />
This command lists only received packets. Transmitted packets are not displayed. In addition, because interfaces<br />
that are not enabled for OSPF do not listen to the OSPF multicast addresses, packets are only shown for<br />
interfaces that are enabled for OSPF.<br />
The following fields are the most relevant in the header description of these packets:<br />
• Type (t): Lists the type of packet. Possible packet types are:<br />
— Type 1: Hello packets<br />
— Type 2: Database description packets<br />
— Type 3: Link-state request packets<br />
— Type 4: Link-state update packets<br />
— Type 5: Link-state acknowledgement packets<br />
• Router ID (rid): Lists the ID of the sending router. This is usually not the same as the source address<br />
of the packet.<br />
All contents are Copyright © 1992–2010 <strong>Cisco</strong> Systems, Inc. All rights reserved. This document is <strong>Cisco</strong> Public Information. Page 21 of 39
<strong>CCNP</strong>v6 <strong>TSHOOT</strong><br />
• Area ID (aid): The 32-bit area ID of the sending router is represented in dotted-decimal IP address<br />
format.<br />
• Authentication (aut): Lists the authentication type. Possible types are:<br />
— Type 0: No (null) authentication<br />
— Type 1: Cleartext authentication<br />
— Type 2: Message Digest 5 (MD5) authentication<br />
• Interface (from): Lists the interface on which the packet was received.<br />
Note: Only successfully received and accepted packets are listed in the output of the debug ip ospf packet<br />
command. If there is a mismatch between essential parameters in the header, such as the area ID, authentication<br />
type, or authentication data between this router and the neighbor, the packets from that neighbor are silently<br />
discarded and not listed in the output of the debug.<br />
The usefulness of this command for troubleshooting is limited because it does not display sent packets, packets<br />
received on an interface that is not enabled for OSPF, or packets that carry mismatched header information.<br />
However, because of the relatively limited amount of generated output, it can be used to confirm the reception of<br />
correct hellos from a neighbor.<br />
Debug OSPF Adjacencies<br />
In the following debug outputs, DLS1 interface Fa0/5 (link to R1) is shutdown and the OSPF adjacency<br />
terminates. When the DLS1 Fa0/5 interface is reactivated, an election occurs, DLS1 becomes the DR again and<br />
builds LSAs to send to R1. DLS1 and R1 establish a neighbor relationship and exchange OSPF database<br />
information.<br />
DLS1#debug ip ospf adj<br />
OSPF adjacency events debugging is on<br />
DLS1(config)#interface fa0/5<br />
DLS1(config-if)#shut<br />
Nov 5 16:04:10.619: OSPF: Interface FastEthernet0/5 going Down<br />
Nov 5 16:04:10.619: OSPF: 10.1.211.1 address 10.1.2.1 on FastEthernet0/5 is dea<br />
d, state DOWN<br />
Nov 5 16:04:10.619: OSPF: Neighbor change Event on interface FastEthernet0/5<br />
Nov 5 16:04:10.619: OSPF: DR/BDR election on FastEthernet0/5<br />
Nov 5 16:04:10.619: OSPF: Elect BDR 10.1.201.1<br />
Nov 5 16:04:10.619: OSPF: Elect DR 10.1.201.1<br />
Nov 5 16:04:10.619: OSPF: Elect BDR 10.1.201.1<br />
Nov 5 16:04:10.619: OSPF: Elect DR 10.1.201.1<br />
Nov 5 16:04:10.619<br />
DLS1(config-if)#: DR: 10.1.201.1 (Id) BDR: 10.1.201.1 (Id)<br />
Nov 5 16:04:10.619: OSPF: Flush network LSA immediately<br />
Nov 5 16:04:10.619: OSPF: Remember old DR 10.1.211.1 (id)<br />
Nov 5 16:04:10.619: OSPF: 10.1.201.1 address 10.1.2.2 on FastEthernet0/5 is dea<br />
d, state DOWN<br />
Nov 5 16:04:10.619: %OSPF-5-ADJCHG: Process 1, Nbr 10.1.201.1 on FastEthernet0/<br />
5 from FULL to DOWN, Neighbor Down: Interface down or detached<br />
Nov 5 16:04:10.619: OSPF: Neighbor change Event on interface FastEthernet0/5<br />
Nov 5 16:04:10.619: OSPF: DR/BDR election on FastEthernet0/5<br />
Nov 5 16:04:10.619: OSPF: Elect BDR 0.0.0.0<br />
Nov 5 16:04:10.619: OSPF: Elect DR 0.0.0.0<br />
Nov 5 16:04:10.619: DR: none BDR: none<br />
Nov 5 16:04:10.619: OSPF: Remember old DR 10.1.201.1 (id)<br />
Nov 5 16:04:10.619: OSPF: [change notify] will poll [cnt 11] interface status f<br />
or FastEthernet0/5<br />
All contents are Copyright © 1992–2010 <strong>Cisco</strong> Systems, Inc. All rights reserved. This document is <strong>Cisco</strong> Public Information. Page 22 of 39
<strong>CCNP</strong>v6 <strong>TSHOOT</strong><br />
Nov 5 16:04:11.122: OSPF: We are not DR to build Net Lsa for interface FastEthe<br />
rnet0/5<br />
Nov 5 16:04:11.122: OSPF: Build network LSA for FastEthernet0/5, router ID 10.1<br />
.211.1<br />
Nov 5 16:04:11.122: OSPF: Build router LSA for area 0, router ID 10.1.211.1, se<br />
q 0x80000012, process 1<br />
Nov 5 16:04:12.599: %LINK-5-CHANGED: Interface FastEthernet0/5, changed state t<br />
o administratively down<br />
Nov 5 16:04:13.606: %LINEPROTO-5-UPDOWN: Line protocol on Interface FastEtherne<br />
t0/5, changed state to down<br />
Nov 5 16:04:20.628: OSPF: will poll [count 10] interface status for FastEtherne<br />
t0/5<br />
Nov 5 16:04:30.636: OSPF: will poll [count 9] interface status for FastEthernet<br />
0/5<br />
Nov 5 16:04:40.821: OSPF: will poll [count 8] interface status for FastEthernet<br />
0/5<br />
Nov 5 16:04:50.830: OSPF: will poll [count 7] interface status for FastEthernet<br />
0/5<br />
Nov 5 16:05:00.838: OSPF: will poll [count 6] interface status for FastEthernet<br />
0/5<br />
Nov 5 16:05:10.839: OSPF: will poll [count 5] interface status for FastEthernet<br />
0/5<br />
Nov 5 16:05:20.847: OSPF: will poll [count 4] interface status for FastEthernet<br />
0/5<br />
Nov 5 16:05:30.856: OSPF: will poll [count 3] interface status for FastEthernet<br />
0/5<br />
Nov 5 16:05:40.865: OSPF: will poll [count 2] interface status for FastEthernet<br />
0/5<br />
Nov 5 16:05:50.865: OSPF: will poll [count 1] interface status for FastEthernet<br />
0/5<br />
DLS1(config)#interface fa0/5<br />
DLS1(config-if)#no shut<br />
Nov 5 16:05:59.800: %LINK-3-UPDOWN: Interface FastEthernet0/5, changed state to<br />
up<br />
Nov 5 16:05:59.800: OSPF: Interface FastEthernet0/5 going Up<br />
Nov 5 16:05:59.800: OSPF: [change notify] will poll [cnt 11] interface status f<br />
or FastEthernet0/5<br />
Nov 5 16:06:00.303: OSPF: Build router LSA for area 0, router ID 10.1.211.1, se<br />
q 0x80000013, process 1<br />
Nov 5 16:06:00.807: %LINEPROTO-5-UPDOWN: Line protocol on Interface FastEtherne<br />
t0/5, changed state to up<br />
Nov 5 16:06:09.800: OSPF: will poll [count 10] interface status for FastEtherne<br />
t0/5<br />
Nov 5 16:06:09.800: OSPF: 2 Way Communication to 10.1.201.1 on FastEthernet0/5,<br />
state 2WAY<br />
Nov 5 16:06:19.809: OSPF: will poll [count 9] interface status for FastEthernet<br />
0/5<br />
Nov 5 16:06:29.809: OSPF: will poll [count 8] interface status for FastEthernet<br />
0/5<br />
Nov 5 16:06:39.809: OSPF: end of Wait on interface FastEthernet0/5<br />
Nov 5 16:06:39.809: OSPF: DR/BDR election on FastEthernet0/5<br />
Nov 5 16:06:39.809: OSPF: Elect BDR 10.1.211.1<br />
Nov 5 16:06:39.809: OSPF: Elect DR 10.1.211.1<br />
Nov 5 16:06:39.809: OSPF: Elect BDR 10.1.201.1<br />
Nov 5 16:06:39.809: OSPF: Elect DR 10.1.211.1<br />
Nov 5 16:06:39.809: DR: 10.1.211.1 (Id) BDR: 10.1.201.1 (Id)<br />
All contents are Copyright © 1992–2010 <strong>Cisco</strong> Systems, Inc. All rights reserved. This document is <strong>Cisco</strong> Public Information. Page 23 of 39
<strong>CCNP</strong>v6 <strong>TSHOOT</strong><br />
Nov 5 16:06:39.809: OSPF: Send DBD to 10.1.201.1 on FastEthernet0/5 seq 0x192E<br />
opt 0x52 flag 0x7 len 32<br />
Nov 5 16:06:39.818: OSPF: will poll [count 7] interface status for FastEthernet<br />
0/5<br />
Nov 5 16:06:40.313: OSPF: No full nbrs to build Net Lsa for interface FastEther<br />
net0/5<br />
Nov 5 16:06:42.209: OSPF: Rcv DBD from 10.1.201.1 on FastEthernet0/5 seq 0x8AC<br />
opt 0x52 flag 0x7 len 32 mtu 1500 state EXSTART<br />
Nov 5 16:06:42.209: OSPF: First DBD and we are not SLAVE<br />
Nov 5 16:06:44.818: OSPF: Send DBD to 10.1.201.1 on FastEthernet0/5 seq 0x192E<br />
opt 0x52 flag 0x7 len 32<br />
Nov 5 16:06:44.818: OSPF: Retransmitting DBD to 10.1.201.1 on FastEthernet0/5 [<br />
1]<br />
Nov 5 16:06:44.818: OSPF: Rcv DBD from 10.1.201.1 on FastEthernet0/5 seq 0x192E<br />
opt 0x52 flag 0x2 len 432 mtu 1500 state EXSTART<br />
Nov 5 16:06:44.818: OSPF: NBR Negotiation Done. We are the MASTER<br />
Nov 5 16:06:44.818: OSPF: Send DBD to 10.1.201.1 on FastEthernet0/5 seq 0x192F<br />
opt 0x52 flag 0x3 len 412<br />
Nov 5 16:06:44.818: OSPF: Rcv DBD from 10.1.201.1 on FastEthernet0/5 seq 0x192F<br />
opt 0x52 flag 0x0 len 32 mtu 1500 state EXCHANGE<br />
Nov 5 16:06:44.818: OSPF: Send DBD to 10.1.201.1 on FastEthernet0/5 seq 0x1930<br />
opt 0x52 flag 0x1 len 32<br />
Nov 5 16:06:44.818: OSPF: Send LS REQ to 10.1.201.1 length 24 LSA count 2<br />
Nov 5 16:06:44.826: OSPF: Rcv LS REQ from 10.1.201.1 on FastEthernet0/5 length<br />
36 LSA count 1<br />
Nov 5 16:06:44.826: OSPF: Send UPD to 10.1.2.2 on FastEthernet0/5 length 64 LSA<br />
count 1<br />
Nov 5 16:06:44.826: OSPF: Rcv DBD from 10.1.201.1 on FastEthernet0/5 seq 0x1930<br />
opt 0x52 flag 0x0 len 32 mtu 1500 state EXCHANGE<br />
Nov 5 16:06:44.826: OSPF: Exchange Done with 10.1.201.1 on FastEthernet0/5<br />
Nov 5 16:06:44.826: OSPF: Rcv LS UPD from 10.1.201.1 on FastEthernet0/5 length<br />
108 LSA count 2<br />
Nov 5 16:06:44.826: OSPF: No full nbrs to build Net Lsa for interface FastEther<br />
net0/5<br />
Nov 5 16:06:44.826: OSPF: Build network LSA for FastEthernet0/5, router ID 10.1<br />
.211.1<br />
Nov 5 16:06:44.826: OSPF: Synchronized with 10.1.201.1 on FastEthernet0/5, stat<br />
e FULL<br />
Nov 5 16:06:44.826: %OSPF-5-ADJCHG: Process 1, Nbr 10.1.201.1 on FastEthernet0/<br />
5 from LOADING to FULL, Loading Done<br />
The debug ip ospf adj command is useful for troubleshooting OSPF neighbor-related events. It displays the<br />
different stages of the OSPF adjacency-building process as two neighbors transition from the init state to the full<br />
state. This command can be helpful in diagnosing problems in which a neighbor relationship is stuck in a<br />
particular stage of the adjacency-building process.<br />
This command also reveals mismatches in the basic parameters contained in the OSPF packet header, such as<br />
area ID mismatches, the source being on the wrong subnet, or authentication mismatches. It does not, however,<br />
reveal other mismatches in hello parameters, such as hello timers, subnet masks, or flags.<br />
Debug OSPF Events<br />
DLS2#debug ip ospf events<br />
*Nov 5 03:03:11.043: OSPF: Send hello to 224.0.0.5 area 0 on FastEthernet0/5 fr<br />
om 10.1.2.13<br />
DLS2#<br />
*Nov 5 03:03:13.551: OSPF: Send hello to 224.0.0.5 area 0 on Vlan200 from 10.1.<br />
200.253<br />
All contents are Copyright © 1992–2010 <strong>Cisco</strong> Systems, Inc. All rights reserved. This document is <strong>Cisco</strong> Public Information. Page 24 of 39
<strong>CCNP</strong>v6 <strong>TSHOOT</strong><br />
*Nov 5 03:03:13.845: OSPF: Rcv hello from 10.1.211.1 area 0 from Vlan200 10.1.2<br />
00.252<br />
*Nov 5 03:03:13.845: OSPF: End of hello processing<br />
DLS2#<br />
*Nov 5 03:03:1<strong>6.0</strong>51: OSPF: Send hello to 224.0.0.5 area 0 on FastEthernet0/5 fr<br />
om 10.1.2.13<br />
*Nov 5 03:03:16.286: OSPF: Rcv hello from 10.1.203.1 area 0 from FastEthernet0/<br />
5 10.1.2.14<br />
*Nov 5 03:03:16.286: OSPF: Mismatched hello parameters from 10.1.2.14<br />
*Nov 5 03:03:16.286: OSPF: dead R 40 C 15, hello R 10 C 5 Mask R 255.255.255.2<br />
52 C 255.255.255.252<br />
DLS2#<br />
DLS2#undebug all<br />
All possible debugging has been turned off<br />
DLS2#<br />
*Nov 5 03:03:28: %OSPF-5-ADJCHG: Process 1, Nbr 10.1.203.1 on FastEthernet0/5 f<br />
rom FULL to DOWN, Neighbor Down: dead timer expired<br />
A third debug command that can be useful in troubleshooting the establishment of OSPF neighbor relationships<br />
is debug ip ospf events. This command displays the same information that is displayed by the debug ip<br />
ospf adj command, but it also displays the transmission and reception of hello packets and reports mismatches<br />
in the hello parameters.<br />
Confirming the transmission of hello packets by using this command can be useful because the debug ip ospf<br />
packet or debug ip ospf adj commands do not display the transmission of hello packets.<br />
You can also use this command to display the reception of invalid hello packets. If there is a mismatch between<br />
the neighbors in the hello parameters that prevents the neighbor relationship from forming, this command displays<br />
the type of parameter mismatch and the value of the mismatched parameters. It displays mismatches for the<br />
following parameters:<br />
• Hello and dead timers<br />
• Area ID<br />
• Subnet and subnet mask<br />
• Authentication type and authentication data<br />
• Flags that signify the area type, such as stub or not-so-stubby area (NSSA)<br />
Because this command displays more events, it is often better to first enable the debug ip ospf adj<br />
command and only use the debug ip ospf event command if you did not get the information you need.<br />
All contents are Copyright © 1992–2010 <strong>Cisco</strong> Systems, Inc. All rights reserved. This document is <strong>Cisco</strong> Public Information. Page 25 of 39
<strong>CCNP</strong>v6 <strong>TSHOOT</strong><br />
Sample OSPF Troubleshooting Flow<br />
Layer 3<br />
problem<br />
caused by<br />
routing<br />
protocol<br />
failure<br />
Verify<br />
neighbor<br />
availability<br />
Verify route<br />
availability<br />
Verify OSPF linkstate<br />
database<br />
Verify route<br />
selection<br />
© 2009 <strong>Cisco</strong> Systems, Inc. All rights reserved. <strong>TSHOOT</strong> v1.0—75<br />
After you have verified that neighbor relationships have been established as expected, verify that the network<br />
topology information for the destination network that you are troubleshooting has been received correctly and<br />
entered into the OSPF link-state database.<br />
The presence or absence of specific topology information in the OSPF link-state database can help isolate the<br />
source of the problem.<br />
Verify the OSPF Link-State Database for Intra-Area Routes<br />
DLS2#show ip ospf database router 10.1.212.1<br />
OSPF Router with ID (10.1.212.1) (Process ID 1)<br />
Router Link States (area 0)<br />
LS age: 60<br />
Options: (No TOS-capability, DC)<br />
LS Type: Router Links<br />
Link State ID: 10.1.212.1<br />
Advertising Router: 10.1.212.1<br />
LS Seq Number: 80000012<br />
Checksum: 0x592C<br />
Length: 60<br />
area Border Router<br />
Number of Links: 3<br />
Link connected to: a Stub Network<br />
(Link ID) Network/subnet number: 10.1.212.1<br />
(Link Data) Network Mask: 255.255.255.255<br />
Number of TOS metrics: 0<br />
TOS 0 Metrics: 1<br />
Link connected to: a Transit Network<br />
(Link ID) Designated Router address: 10.1.2.13<br />
(Link Data) Router Interface address: 10.1.2.13<br />
All contents are Copyright © 1992–2010 <strong>Cisco</strong> Systems, Inc. All rights reserved. This document is <strong>Cisco</strong> Public Information. Page 26 of 39
<strong>CCNP</strong>v6 <strong>TSHOOT</strong><br />
Number of TOS metrics: 0<br />
TOS 0 Metrics: 1<br />
To decide which information to look for in the link-state database, you first need to discern in which type of route<br />
you are interested. If the destination network that you are troubleshooting is in the same area as the router from<br />
which you are troubleshooting, you know that the path to this destination network was derived from the type-1 and<br />
type-2 LSAs in the database of that area. To begin with, you can verify whether the directly connected routers<br />
properly advertise the destination network. To do this, display the router (type-1) for the connected routers by<br />
issuing the show ip ospf database router router-id command for these routers. To troubleshoot<br />
OSPF effectively, it is necessary to know the router IDs of all routers in your network, because these are used to<br />
identify a router in many of the OSPF show commands.<br />
As part of the type-1 router LSA for a specific router, all subnets corresponding to a point-to-point link, loopback<br />
interface, or nontransit broadcast network (Ethernet) are listed as stub networks. If the target network is missing in<br />
this list, this indicates that the interface on the advertising router has not been enabled for OSPF.<br />
In the example above subnet 10.1.212.1 is advertised by router 10.1.212.1 in area 0.<br />
For transit networks, such as an Ethernet LAN with multiple routers attached, a link to the DR for the segment is<br />
listed. This points to the type-2 network LSA that contains the full topology information for the segment.<br />
In the example above, this router is connected to a transit network with router 10.1.2.13 as the DR. Note that this<br />
IP address is the interface IP address of the DR, not the router ID.<br />
DLS1#show ip ospf database network 10.1.2.13<br />
OSPF Router with ID (10.1.211.1) (Process ID 1)<br />
Net Link States (area 0)<br />
Routing Bit Set on this LSA<br />
LS age: 695<br />
Options: (No TOS-capability, DC)<br />
LS Type: Network Links<br />
Link State ID: 10.1.2.13 (address of Designated Router)<br />
Advertising Router: 10.1.212.1<br />
LS Seq Number: 80000004<br />
Checksum: 0xDBAA<br />
Length: 32<br />
Network Mask: /30<br />
Attached Router: 10.1.212.1<br />
Attached Router: 10.1.203.1<br />
To display full information about a transit LAN, issue the show ip ospf database network designatedrouter<br />
command, using the IP address of the DR that was listed in the type-1 router LSA for one of the routers<br />
connected to the transit LAN. In the type-2 LSA, the DR advertises the subnet mask and connected routers for the<br />
segment. The connected routers are listed by their router ID values.<br />
In the example above, a subnet mask of /30 is advertised for the transit LAN, and two connected routers are<br />
listed.<br />
Verify the OSPF Link-State Database for Inter-Area Routes<br />
DLS1>show ip ospf database summary 10.1.203.1<br />
OSPF Router with ID (10.1.211.1) (Process ID 1)<br />
Summary Net Link States (area 0)<br />
LS age: 577<br />
Options: (No TOS-capability, DC, Upward)<br />
All contents are Copyright © 1992–2010 <strong>Cisco</strong> Systems, Inc. All rights reserved. This document is <strong>Cisco</strong> Public Information. Page 27 of 39
<strong>CCNP</strong>v6 <strong>TSHOOT</strong><br />
LS Type: Summary Links(Network)<br />
Link State ID: 10.1.203.1 (summary Network Number)<br />
Advertising Router: 10.1.203.1<br />
LS Seq Number: 8000000B<br />
Checksum: 0x2A58<br />
Length: 28<br />
Network Mask: /32<br />
TOS: 0 Metric: 1<br />
If the destination network that you are troubleshooting is in a different area than the area of the router from which<br />
you are troubleshooting, the router will not learn about this network through type-1 and type-2 LSAs because<br />
these are only used for intra-area routes. OSPF inter-area routes are calculated based on type-3 LSAs that are<br />
generated by the Area Border Routers (ABRs) for the area.<br />
To verify the availability of a specific target network in a different area, you can use the show ip ospf<br />
database summary subnet command, where subnet is the subnet IP address of the prefix in which you are<br />
interested.<br />
The type-3 summary LSA contains the subnet, mask, and cost of the targeted subnet and also lists the router ID<br />
of the ABR. If multiple ABRs are advertising the same network, all entries are listed.<br />
In the example above, subnet 10.1.203.1/32 is advertised with a cost of 1 by ABR 10.1.203.1. The cost advertised<br />
by the ABR is the cost from the advertising ABR to the target network. When executing the Shortest Path First<br />
(SPF) algorithm, the router calculates its own cost to reach the ABR within the area and adds that to the cost<br />
advertised by the ABR.<br />
If you do not find an entry for the target network, the next step is to connect to the ABR that you expected to be<br />
advertising the route and verify if the route is available there.<br />
Verify the OSPF Link-State Database for External Routes<br />
DLS1#show ip ospf database external 10.1.1.0<br />
OSPF Router with ID (10.1.211.1) (Process ID 1)<br />
Type-5 AS External Link States<br />
Routing Bit Set on this LSA<br />
LS age: 1196<br />
Options: (No TOS-capability, DC)<br />
LS Type: AS External Link<br />
Link State ID: 10.1.1.0 (External Network Number )<br />
Advertising Router: 10.1.201.1<br />
LS Seq Number: 80000006<br />
Checksum: 0x6804<br />
Length: 36<br />
Network Mask: /30<br />
Metric Type: 2 (Larger than any link state path)<br />
TOS: 0<br />
Metric: 100<br />
Forward Address: 0.0.0.0<br />
External Route Tag: 0<br />
If the destination network that you are troubleshooting did not originate in the OSPF network but was redistributed<br />
from a different source, the OSPF router learns about this network through type-5 external routes that are injected<br />
into the OSPF database by an Autonomous System Boundary Router (ASBR).<br />
To verify the availability of a specific type-5 external LSA in the OSPF database, issue the show ip ospf<br />
database external subnet command, where subnet is the subnet IP address of the prefix in which you are<br />
interested.<br />
All contents are Copyright © 1992–2010 <strong>Cisco</strong> Systems, Inc. All rights reserved. This document is <strong>Cisco</strong> Public Information. Page 28 of 39
<strong>CCNP</strong>v6 <strong>TSHOOT</strong><br />
The type-5 summary LSA contains the subnet, mask, metric type, and cost of the targeted subnet. In addition, it<br />
lists the router ID of the advertising ASBR. If multiple ASBRs are advertising the same network, all entries are<br />
listed.<br />
In the example above, subnet 10.1.1.0/30 is advertised with a cost of 100 as a metric-type 2 external route by<br />
ASBR 10.1.201.1.<br />
If you do not find an entry for the target network, the next step is to connect to the ASBR that you expected to be<br />
advertising the route and verify if the route is available. If the route is available but not advertised by the ASBR,<br />
troubleshoot the route redistribution process on that router.<br />
DLS1#show ip ospf database router 10.1.201.1<br />
OSPF Router with ID (10.1.211.1) (Process ID 1)<br />
Router Link States (area 0)<br />
Routing Bit Set on this LSA<br />
LS age: 391<br />
Options: (No TOS-capability, DC)<br />
LS Type: Router Links<br />
Link State ID: 10.1.201.1<br />
Advertising Router: 10.1.201.1<br />
LS Seq Number: 8000000E<br />
Checksum: 0x1163<br />
Length: 48<br />
AS Boundary Router<br />
Number of Links: 2<br />
<br />
Instead of connecting to the ASBR, the OSPF database can also be used to verify if any form of redistribution has<br />
been configured on the router that is supposed to be an ASBR. If that router is in the same area as the router<br />
from which you are troubleshooting, you can inspect the type-1 router LSA for the ASBR and verify that it<br />
advertises itself as an ASBR.<br />
In the example above, the router 10.1.201.1 announces its ASBR status in its type-1 LSA. If the router does not<br />
advertise its ASBR status in its type-1 LSA, this indicates that redistribution has not been configured correctly on<br />
that router.<br />
DLS1#show ip ospf database asbr-summary 10.1.201.1<br />
OSPF Router with ID (10.1.211.1) (Process ID 1)<br />
Summary ASB Link States (area 1)<br />
LS age: 723<br />
Options: (No TOS-capability, DC, Upward)<br />
LS Type: Summary Links(AS Boundary Router)<br />
Link State ID: 10.1.201.1 (AS Boundary Router address)<br />
Advertising Router: 10.1.211.1<br />
LS Seq Number: 8000000D<br />
Checksum: 0xF583<br />
Length: 28<br />
Network Mask: /0<br />
TOS: 0 Metric: 1<br />
If the ASBR is not in the same area as the router from which you are troubleshooting, you do not have its type-1<br />
LSA in the database of the router. As a result, you cannot verify its ASBR status by displaying the type-1 LSA.<br />
However, if an ASBR is available in a different area, the ABRs for the area generate a type-4 summary AS<br />
All contents are Copyright © 1992–2010 <strong>Cisco</strong> Systems, Inc. All rights reserved. This document is <strong>Cisco</strong> Public Information. Page 29 of 39
<strong>CCNP</strong>v6 <strong>TSHOOT</strong><br />
Boundary (ASB) entry to announce the availability of the ASBR. The presence or absence of a type-4 entry can<br />
also yield a clue about the operation of the redistribution.<br />
You can use the show ip ospf database asbr-summary router-id command to verify if a type-4<br />
summary ASB LSA exists for the ASBR with the specified router ID.<br />
In the example above, ABR 10.1.211.1 announces the availability of ASBR 10.1.201.1.<br />
DLS1#show ip ospf border-routers<br />
OSPF Process 1 internal Routing Table<br />
Codes: i - Intra-area route, I - Inter-area route<br />
i 10.1.212.1 [1] via 10.1.200.253, Vlan200, ABR, area 0, SPF 5<br />
i 10.1.201.1 [1] via 10.1.2.2, FastEthernet0/5, ASBR, area 0, SPF 5<br />
i 10.1.203.1 [2] via 10.1.200.253, Vlan200, ABR, area 0, SPF 5<br />
During the execution of the SPF algorithm, a router combines the information from the various LSAs that contain<br />
information about ABR and ASBR status and calculates the shortest paths to each ABR and ASBR. You can view<br />
the result of this calculation with the show ip ospf border-routers command.<br />
In the example above, area 0 has two ABRs: 10.1.212.1 and 10.1.203.1. The cost to reach ABR 10.1.212.1 is 1,<br />
as can be seen from the number in the square brackets. The cost to reach ABR 10.1.203.1 is 2. The cost to reach<br />
ASBR 10.1.201.1 is 1. This cost is important to know because it is added to the cost advertised by these routers<br />
in their type-3 LSAs to obtain the total cost to the destination network.<br />
Sample OSPF Troubleshooting Flow<br />
Layer 3<br />
problem<br />
caused by<br />
routing<br />
protocol<br />
failure<br />
Verify<br />
neighbor<br />
availability<br />
Verify route<br />
availability<br />
Verify route<br />
selection<br />
Compare routing<br />
table against linkstate<br />
database<br />
© 2009 <strong>Cisco</strong> Systems, Inc. All rights reserved. <strong>TSHOOT</strong> v1.0—83<br />
If all appropriate entries are available in the OSPF link-state database, these should result in correct routes in the<br />
IP routing table after calculation of the SPF algorithm. Unfortunately, the results of the SPF algorithm for each<br />
individual route cannot be directly verified.<br />
Keep in mind that OSPF competes with other routing sources to install routes in the routing table. Therefore, an<br />
OSPF route might not be installed in the routing table because a route with a better administrative distance from a<br />
different source is available.<br />
All contents are Copyright © 1992–2010 <strong>Cisco</strong> Systems, Inc. All rights reserved. This document is <strong>Cisco</strong> Public Information. Page 30 of 39
<strong>CCNP</strong>v6 <strong>TSHOOT</strong><br />
Verify the MTU between OSPF Neighbors<br />
Maximum Transmission Unit (MTU) mismatch between two OSPF neighbors is common when connecting<br />
together two multilayer switches of a different type (for example 3550 and 3560) or when interconnecting a<br />
multilayer switch with a router. Multilayer switches often have the system MTU set to 1504 bytes while routers<br />
typically use an MTU of 1500 bytes. An MTU mismatch usually causes two OSPF neighbors to remain stuck in<br />
EXSTART/EXCHANGE state, failing to create full adjacency.<br />
Changes to the system MTU are made using the system mtu mtu-size command. The routing MTU can be<br />
changed using the system mtu routing mtu-size command. System MTU on a <strong>Cisco</strong> Catalyst 3560 switch<br />
can range from 1500-1998 bytes.<br />
Note: Changes to MTU size will not take effect until the next reload is done.<br />
MTU settings can be verified using the show interfaces or the show system mtu commands:<br />
DLS2#show interfaces fastEthernet 0/5<br />
FastEthernet0/5 is up, line protocol is up (connected)<br />
Hardware is Fast Ethernet, address is 0017.5a53.a3c2 (bia 0017.5a53.a3c2)<br />
Description: FE to R3<br />
Internet address is 10.1.2.13/30<br />
MTU 1500 bytes, BW 100000 Kbit, DLY 100 usec,<br />
reliability 255/255, txload 1/255, rxload 1/255<br />
DLS2#show system mtu<br />
System MTU size is 1500 bytes<br />
System Jumbo MTU size is 1500 bytes<br />
Routing MTU size is 1500 bytes<br />
OSPF Neighbor status can be verified using the show ip ospf neighbor command. In the example shown<br />
below, the system and system routing MTU for Layer 3 switch DLS2 has been changed to 1504 bytes. The MTU<br />
of the neighbors, DLS1 (10.1.211.1) and R3 (10.1.203.1) is set to the default of 1500 bytes.<br />
DLS2#show ip ospf neighbor<br />
Neighbor ID Pri State Dead Time Address Interface<br />
10.1.211.1 1 EXSTART/BDR 00:00:38 10.1.200.252 Vlan200<br />
10.1.203.1 1 EXSTART/BDR 00:00:37 10.1.2.14 FastEthernet0/5<br />
Console messages:<br />
DLS2#<br />
%OSPF-5-ADJCHG: Process 1, Nbr 10.1.203.1 on FastEthernet0/5 from DOWN to<br />
DOWN, Neighbor Down: Ignore timer expired<br />
DLS2#<br />
%OSPF-5-ADJCHG: Process 1, Nbr 10.1.211.1 on Vlan200 from EXSTART to DOWN,<br />
Neighbor Down: Too many retransmissions<br />
Troubleshooting Route Redistribution<br />
The figure illustrates an example of a method that you can use to diagnose and resolve problems related to route<br />
redistribution.<br />
All contents are Copyright © 1992–2010 <strong>Cisco</strong> Systems, Inc. All rights reserved. This document is <strong>Cisco</strong> Public Information. Page 31 of 39
<strong>CCNP</strong>v6 <strong>TSHOOT</strong><br />
Sample Route Redistribution<br />
Troubleshooting Flow<br />
Layer 3<br />
problem<br />
caused by<br />
missing<br />
routes<br />
Layer 3<br />
problem<br />
caused by<br />
suboptimal<br />
or incorrect<br />
routes<br />
Verify route<br />
selection and<br />
installation<br />
Verify route<br />
selection and<br />
installation<br />
Verify route<br />
redistribution<br />
Locate<br />
source of<br />
incorrect<br />
information<br />
Verify route<br />
propagation<br />
Filter or<br />
manipulate<br />
redistributed<br />
routes<br />
© 2009 <strong>Cisco</strong> Systems, Inc. All rights reserved. <strong>TSHOOT</strong> v1.0—84<br />
When do you start troubleshooting route redistribution?<br />
There are two major reasons to start troubleshooting the route redistribution. The first reason is when you are<br />
experiencing IP connectivity problems in an environment in which information from a specific routing domain is<br />
redistributed into a different routing domain and the connectivity problem is caused by a route from the source<br />
routing domain that is not available on one or more of the routers participating in the destination routing domain.<br />
In this scenario, the cause of the problem is that the exchange of routing information between the source routing<br />
domain and the destination routing domain is not working correctly.<br />
Note: In this section, the terms source and destination are used to indicate the source and destination of the<br />
routing information, not the source and destination of a traffic flow.<br />
The second reason to start troubleshooting route redistribution is if you are experiencing IP connectivity problems<br />
caused by the use of incorrect routing information by some of the routers in a network that use route<br />
redistribution. This behavior could be caused by routing information feedback or improper route selection.<br />
Sample troubleshooting flows for each of these scenarios are provided in this section.<br />
All contents are Copyright © 1992–2010 <strong>Cisco</strong> Systems, Inc. All rights reserved. This document is <strong>Cisco</strong> Public Information. Page 32 of 39
<strong>CCNP</strong>v6 <strong>TSHOOT</strong><br />
Sample Route Redistribution<br />
Troubleshooting Flow<br />
Layer 3<br />
problem<br />
caused by<br />
missing<br />
routes<br />
Verify routing table<br />
Verify route<br />
selection and<br />
installation<br />
Verify route<br />
redistribution<br />
Verify route<br />
propagation<br />
© 2009 <strong>Cisco</strong> Systems, Inc. All rights reserved. <strong>TSHOOT</strong> v1.0—85<br />
The first scenario in which you start troubleshooting route redistribution is when redistribution is configured and<br />
you are troubleshooting connectivity problems to a network in the source routing domain from a router in the<br />
destination routing domain. This type of problem is usually encountered during a generic IP connectivity<br />
troubleshooting process when a route is discovered missing from the routing table on one of the routers in the<br />
destination routing domain while the route is present in the routing tables of the routers in the source routing<br />
domain.<br />
Troubleshooting redistribution consists of troubleshooting four generic areas:<br />
• Source routing protocol<br />
• Route selection and installation<br />
• Redistribution<br />
• Destination protocol<br />
In this scenario, the reason to start troubleshooting the redistribution is when the route is available in the source<br />
routing domain but not in the destination routing domain. Therefore, the first step has already been taken at this<br />
point. If the route is not available everywhere in the source routing domain to begin with, there is no reason to<br />
start troubleshooting redistribution, but you should initiate a troubleshooting process for the source routing<br />
protocol first.<br />
Therefore, we will start at the second step: troubleshooting route selection and installation.<br />
All contents are Copyright © 1992–2010 <strong>Cisco</strong> Systems, Inc. All rights reserved. This document is <strong>Cisco</strong> Public Information. Page 33 of 39
<strong>CCNP</strong>v6 <strong>TSHOOT</strong><br />
Sample Route Redistribution<br />
Troubleshooting Flow<br />
Layer 3<br />
problem<br />
caused by<br />
missing<br />
routes<br />
Verify route<br />
selection and<br />
installation<br />
Verify routing table<br />
Verify route<br />
redistribution<br />
Verify route<br />
propagation<br />
Verify destination<br />
protocol data<br />
structures<br />
© 2009 <strong>Cisco</strong> Systems, Inc. All rights reserved. <strong>TSHOOT</strong> v1.0—86<br />
There are not many tools that are specifically targeted at troubleshooting the redistribution process. The<br />
redistribution process takes routes from the routing table after they have been installed by the source routing<br />
protocol and then injects them into the destination protocol’s data structures. Therefore, the main tools that are<br />
available to track this flow of information are the commands that allow you to examine the routing table and the<br />
destination protocol data structures.<br />
After you have verified that the routes are injected into the destination protocol’s data structures, you have<br />
finished troubleshooting the actual redistribution process. If the routes are not properly propagated by the<br />
destination protocol, initiate a troubleshooting process for the destination protocol.<br />
The show ip route 10.1.202.1 255.255.255.255 command on R1 indicates that the route is known via<br />
EIGRP 1 and is redistributing via OSPF, but it is not being advertised by OSPF.<br />
R1#show ip route 10.1.202.1 255.255.255.255<br />
Routing entry for 10.1.202.1/32<br />
Known via "eigrp 1", distance 90, metric 2297856, type internal<br />
Redistributing via eigrp 1, ospf 1<br />
Last update from 10.1.1.2 on Serial0/0/0, 07:02:16 ago<br />
Routing Descriptor Blocks:<br />
* 10.1.1.2, from 10.1.1.2, 07:02:16 ago, via Serial0/0/0<br />
Route metric is 2297856, traffic share count is 1<br />
Total delay is 25000 microseconds, minimum bandwidth is 1544 Kbit<br />
Reliability 255/255, minimum MTU 1500 bytes<br />
Loading 1/255, Hops 1<br />
The show ip route 10.1.203.1 255.255.255.255 command on R1 indicates that the route is known via<br />
EIGRP 1 and is redistributing via EIGRP. It is also being advertised by EIGRP 1.<br />
R1#show ip route 10.1.203.1 255.255.255.255<br />
Routing entry for 10.1.203.1/32<br />
Known via "ospf 1", distance 110, metric 4, type inter area<br />
Redistributing via eigrp 1<br />
Advertised by eigrp 1 metric 1544 2000 255 1 1500<br />
Last update from 10.1.2.1 on FastEthernet0/1, 07:13:32 ago<br />
Routing Descriptor Blocks:<br />
All contents are Copyright © 1992–2010 <strong>Cisco</strong> Systems, Inc. All rights reserved. This document is <strong>Cisco</strong> Public Information. Page 34 of 39
<strong>CCNP</strong>v6 <strong>TSHOOT</strong><br />
* 10.1.2.1, from 10.1.203.1, 07:13:32 ago, via FastEthernet0/1<br />
Route metric is 4, traffic share count is 1<br />
The best tool available in troubleshooting redistribution problems is the show ip route network mask<br />
command. Routes that are being redistributed and advertised to other routers by the destination protocol are<br />
marked with a line starting with “Advertised by” and then lists the destination protocol and any parameters<br />
configured on the redistribution statement, such as configured metrics and metric type.<br />
What makes this command useful is that it takes into account any route maps or distribute lists that are applied to<br />
the redistribution.<br />
Sample Route Redistribution<br />
Troubleshooting Flow<br />
Layer 3<br />
problem<br />
caused by<br />
suboptimal<br />
or incorrect<br />
routes<br />
Traceroute and<br />
verification of<br />
routing table.<br />
Verify route<br />
selection and<br />
installation<br />
Locate<br />
source of<br />
incorrect<br />
information<br />
Filter or<br />
manipulate<br />
redistributed<br />
routes<br />
© 2009 <strong>Cisco</strong> Systems, Inc. All rights reserved. <strong>TSHOOT</strong> v1.0—88<br />
The second common scenario that might lead you to start troubleshooting route redistribution is when you<br />
discover that traffic is using unexpected suboptimal routes to reach certain destinations or that traffic enters a<br />
routing loop. This is often discovered while troubleshooting IP connectivity to a certain destination and using the<br />
show ip route and traceroute commands to track the flow of traffic. When you are redistributing routing<br />
information between routing protocols, you have to be aware that improper route selection or routing feedback<br />
can cause suboptimal paths to be used or traffic to enter a routing loop. Whenever you spot unexpected routing<br />
behavior in a network that uses redistribution, consider routing feedback or improper route selection as a possible<br />
cause.<br />
A typical symptom of a redistribution problem is when the expected route is available on the router that you are<br />
troubleshooting, but it is not selected as the best route in the routing table. A route from a different protocol or a<br />
route of the same protocol but originated from a different source is selected as the best route and installed in the<br />
routing table.<br />
All contents are Copyright © 1992–2010 <strong>Cisco</strong> Systems, Inc. All rights reserved. This document is <strong>Cisco</strong> Public Information. Page 35 of 39
<strong>CCNP</strong>v6 <strong>TSHOOT</strong><br />
Sample Route Redistribution<br />
Troubleshooting Flow<br />
Layer 3<br />
problem<br />
caused by<br />
suboptimal<br />
or incorrect<br />
routes<br />
Verify route<br />
selection and<br />
installation<br />
Locate<br />
source of<br />
incorrect<br />
information<br />
Investigate routing<br />
table and routing<br />
protocol data<br />
structures<br />
Filter or<br />
manipulate<br />
redistributed<br />
routes<br />
Change<br />
administrative<br />
distance or<br />
implement route<br />
filtering<br />
© 2009 <strong>Cisco</strong> Systems, Inc. All rights reserved. <strong>TSHOOT</strong> v1.0—89<br />
The first question to ask at this point is if the route is only improperly selected. In other words, you expected this<br />
route to be present but did not want it to be selected as the best route. If this is the case, you can manipulate the<br />
route selection process by changing the administrative distance. This can be done for all routes learned via a<br />
particular routing protocol or selectively using an access list.<br />
If the route was not only improperly selected but should not have been present at all in the routing protocol data<br />
structures in this router, you must track the source of the route and use route-filtering techniques at the source to<br />
stop it from being advertised.<br />
Verify the Routing Table<br />
R1#show ip route<br />
Codes: C - connected, S - static, R - RIP, M - mobile, B - BGP<br />
D - EIGRP, EX - EIGRP external, O - OSPF, IA - OSPF inter area<br />
N1 - OSPF NSSA external type 1, N2 - OSPF NSSA external type 2<br />
E1 - OSPF external type 1, E2 - OSPF external type 2<br />
i - IS-IS, su - IS-IS summary, L1 - IS-IS level-1, L2 - IS-IS level-2<br />
ia - IS-IS inter area, * - candidate default, U - per-user static route<br />
o - ODR, P - periodic downloaded static route<br />
Gateway of last resort is not set<br />
10.0.0.0/8 is variably subnetted, 15 subnets, 3 masks<br />
O IA 10.1.10.0/24 [110/2] via 10.1.2.1, 07:43:07, FastEthernet0/1<br />
O 10.1.2.12/30 [110/3] via 10.1.2.1, 07:42:57, FastEthernet0/1<br />
C 10.1.1.2/32 is directly connected, Serial0/0/0<br />
C 10.1.2.0/30 is directly connected, FastEthernet0/1<br />
C 10.1.1.0/30 is directly connected, Serial0/0/0<br />
O IA 10.1.30.0/24 [110/2] via 10.1.2.1, 07:43:07, FastEthernet0/1<br />
O IA 10.1.20.0/24 [110/2] via 10.1.2.1, 07:43:07, FastEthernet0/1<br />
O IA 10.1.50.0/24 [110/2] via 10.1.2.1, 07:43:07, FastEthernet0/1<br />
O IA 10.1.100.0/24 [110/2] via 10.1.2.1, 07:43:07, FastEthernet0/1<br />
D 10.1.202.1/32 [90/2297856] via 10.1.1.2, 07:43:48, Serial0/0/0<br />
O IA 10.1.203.1/32 [110/4] via 10.1.2.1, 07:42:57, FastEthernet0/1<br />
C 10.1.201.1/32 is directly connected, Loopback0<br />
All contents are Copyright © 1992–2010 <strong>Cisco</strong> Systems, Inc. All rights reserved. This document is <strong>Cisco</strong> Public Information. Page 36 of 39
<strong>CCNP</strong>v6 <strong>TSHOOT</strong><br />
O 10.1.200.0/24 [110/2] via 10.1.2.1, 07:43:00, FastEthernet0/1<br />
O 10.1.211.1/32 [110/2] via 10.1.2.1, 07:43:10, FastEthernet0/1<br />
O 10.1.212.1/32 [110/3] via 10.1.2.1, 07:43:00, FastEthernet0/1<br />
R1#show ip route 10.1.50.0 255.255.255.0<br />
Routing entry for 10.1.50.0/24<br />
Known via "ospf 1", distance 110, metric 2, type inter area<br />
Redistributing via eigrp 1<br />
Advertised by eigrp 1 metric 1544 2000 255 1 1500<br />
Last update from 10.1.2.1 on FastEthernet0/1, 07:42:07 ago<br />
Routing Descriptor Blocks:<br />
* 10.1.2.1, from 10.1.211.1, 07:42:07 ago, via FastEthernet0/1<br />
Route metric is 2, traffic share count is 1<br />
The source of a route in the routing table is marked by the “from” field that follows the next-hop IP address. For<br />
distance vector protocols, the source and next-hop addresses are typically the same. For a link-state protocol,<br />
such as OSPF, this is the router that originated the LSA on which the route is based. By tracking the routing<br />
source from router to router, you can determine the point where the incorrect routing information is injected into<br />
the routing protocol’s data structures, and you can apply filtering to stop it from being propagated.<br />
All contents are Copyright © 1992–2010 <strong>Cisco</strong> Systems, Inc. All rights reserved. This document is <strong>Cisco</strong> Public Information. Page 37 of 39
<strong>CCNP</strong>v6 <strong>TSHOOT</strong><br />
Reflection Questions<br />
1. Which lab trouble tickets did you have the most difficulty with?<br />
__________________________________________________________________________________________<br />
__________________________________________________________________________________________<br />
__________________________________________________________________________________________<br />
2. For any of the trouble tickets, would you change anything about the process that you used now that you see<br />
the resolution of the problem?<br />
__________________________________________________________________________________________<br />
__________________________________________________________________________________________<br />
__________________________________________________________________________________________<br />
3. Which commands did you find most useful in diagnosing OSPF and redistribution issues? Add these to your<br />
toolbox for future use. Which commands did you find least useful?<br />
__________________________________________________________________________________________<br />
__________________________________________________________________________________________<br />
__________________________________________________________________________________________<br />
4. What is required for routes to be redistributed from OSPF to EIGRP? From EIGRP to OSPF?<br />
__________________________________________________________________________________________<br />
__________________________________________________________________________________________<br />
__________________________________________________________________________________________<br />
All contents are Copyright © 1992–2010 <strong>Cisco</strong> Systems, Inc. All rights reserved. This document is <strong>Cisco</strong> Public Information. Page 38 of 39
<strong>CCNP</strong>v6 <strong>TSHOOT</strong><br />
References<br />
If you need more information on the commands and their options, see the following references:<br />
• IP Routing Protocol Command Reference<br />
http://www.cisco.com/cisco/web/support/index.html<br />
• Open Shortest Path First Troubleshooting Tech Notes<br />
http://www.cisco.com/en/US/tech/tk365/tsd_technology_support_troubleshooting_technotes_list.ht<br />
ml#anchor8<br />
Router Interface Summary Table<br />
Router Model Ethernet Interface<br />
#1<br />
1700 Fast Ethernet 0<br />
(FA0)<br />
1800 Fast Ethernet 0/0<br />
(FA0/0)<br />
2600 Fast Ethernet 0/0<br />
(FA0/0)<br />
2800 Fast Ethernet 0/0<br />
(FA0/0)<br />
Router Interface Summary<br />
Ethernet Interface<br />
#2<br />
Fast Ethernet 1<br />
(FA1)<br />
Fast Ethernet 0/1<br />
(FA0/1)<br />
Fast Ethernet 0/1<br />
(FA0/1)<br />
Fast Ethernet 0/1<br />
(FA0/1)<br />
Serial Interface<br />
#1<br />
Serial Interface<br />
#2<br />
Serial 0 (S0) Serial 1 (S1)<br />
Serial 0/0/0<br />
(S0/0/0)<br />
Serial 0/0/1<br />
(S0/0/1)<br />
Serial 0/0 (S0/0) Serial 0/1 (S0/1)<br />
Serial 0/0/0<br />
(S0/0/0)<br />
Serial 0/0/1<br />
(S0/0/1)<br />
Note: To find out how the router is configured, look at the interfaces to identify the type of router<br />
and how many interfaces the router has. Rather than try to list all the combinations of<br />
configurations for each router class, this table includes identifiers for the possible combinations of<br />
Ethernet and serial interfaces in the device. The table does not include any other type of interface,<br />
even though a specific router might contain one. An example of this is an ISDN BRI interface. The<br />
string in parenthesis is the legal abbreviation that can be used in <strong>Cisco</strong> IOS commands to<br />
represent the interface.<br />
All contents are Copyright © 1992–2010 <strong>Cisco</strong> Systems, Inc. All rights reserved. This document is <strong>Cisco</strong> Public Information. Page 39 of 39
<strong>CCNP</strong>v6 <strong>TSHOOT</strong><br />
Chapter 5 Lab 5-3, BGP<br />
Physical Topology (Baseline)<br />
All contents are Copyright © 1992–2010 <strong>Cisco</strong> Systems, Inc. All rights reserved. This document is <strong>Cisco</strong> Public Information. Page 1 of 27
<strong>CCNP</strong>v6 <strong>TSHOOT</strong><br />
Logical Topology (Baseline)<br />
Objectives<br />
Background<br />
• Load the trouble ticket device configuration files for each trouble ticket.<br />
• Diagnose and resolve problems related to the BGP exterior routing protocol.<br />
• Document troubleshooting progress, configuration changes, and problem resolution.<br />
Border Gateway Protocol (BGP) is the most widely used exterior routing protocol on the Internet. It is the de<br />
facto standard for route (prefix) exchange between the autonomous systems (AS) of Internet service<br />
providers (ISPs). BGP can also be used between a customer network and one or more ISPs. In this lab, you<br />
will troubleshoot various problems related to BGP. For each task or trouble ticket, the trouble scenario and<br />
problem symptom are described. While troubleshooting, you will discover the cause of the problem, correct it,<br />
and then document the process and results.<br />
Implementing BGP<br />
Your company has decided to implement several new Internet-based services. The current web services that<br />
the company offers are hosted at an external data center. It has been decided to build an in-house data<br />
center from which the new services will be hosted. The servers that are currently externally hosted will also be<br />
moved to the new data center.<br />
Your company currently has a single ISP for Internet access. You have obtained a registered AS number<br />
(65501) and address block 172.30.1.0/27, which will be used for the new services. After consulting with the<br />
All contents are Copyright © 1992–2010 <strong>Cisco</strong> Systems, Inc. All rights reserved. This document is <strong>Cisco</strong> Public Information. Page 2 of 27
<strong>CCNP</strong>v6 <strong>TSHOOT</strong><br />
ISP, it has been decided to use BGP between the network edge router R1 and the ISP (R2). Upon successful<br />
completion of the BGP implementation, your company is considering adding another ISP for redundancy, but<br />
not as part of the current project.<br />
Your support team has been working closely together with the engineering team to prepare the<br />
implementation. You have received confirmation from the ISP that they have prepared their router for the<br />
BGP implementation.<br />
Router R1 will advertise the 172.30.1.0/27 IP address block to the ISP (R2). No other prefixes are allowed to<br />
be advertised. This ensures that only the assigned network address block will be received by the ISP. ISPs<br />
typically place filters on their edge routers to prevent customers from accidently announcing routes that do not<br />
belong to them.<br />
The ISP router will send a default route to router R1 via BGP. The default route will be redistributed into<br />
Enhanced Interior Gateway Routing Protocol (EIGRP) by router R1. No other routes will be redistributed.<br />
It is Friday evening, and the engineering team has just configured router R1 for BGP. To facilitate testing, a<br />
new hosted services VLAN and the corresponding subnet 172.30.1.0/27 will be created. All other devices,<br />
which have IP addresses in the 10.1.0.0/16 range, are using Network Address Translation (NAT), and their<br />
Internet access should not be affected by the BGP configuration.<br />
You are on standby to assist in troubleshooting and testing the solution.<br />
Implementation Plan<br />
The implementation plan is in two phases.<br />
Phase 1<br />
During Phase 1, the link between edge router R1 and the existing ISP will be upgraded to a T1 leased line<br />
and converted to BGP. The remainder of the network will continue to use EIGRP. The 10.1.1.0/30 addressing<br />
on the R1-to-R2 serial WAN link will be changed to a public address (209.165.200.224/30) provided by the<br />
ISP. NAT will be used to translate the 10.1.0.0/16 internal private addresses to public address<br />
209.165.200.225 using Port Address Translation (PAT). The loopback 0 address on R1 is also changed to<br />
192.168.1.1.<br />
An external BGP peering will be established between router R1 and the ISP (R2). The ISP will advertise a<br />
default route to R1 via BGP. On router R1, redistribution of the default route will be configured between BGP<br />
and EIGRP to ensure connectivity between headquarters and the ISP.<br />
Phase 2<br />
During Phase 2, the hosted services VLAN 130 named HSVCS and the corresponding subnet 172.30.1.0/27<br />
will be created on switch DLS1. A test server for the hosted services subnet will be installed, simulated by<br />
switch virtual interface (SVI) VLAN 130 172.30.1.1/27 on DLS1. A static route will be provided from R1 to<br />
DLS1 VLAN 130. Some services will be migrated to the new IP address block before moving them to the<br />
newly built datacenter.<br />
BGP Network Design<br />
The BGP design is outlined in the following figure. BGP AS 65501 is the company’s newly acquired AS<br />
number. The ISP AS is 65502.<br />
All contents are Copyright © 1992–2010 <strong>Cisco</strong> Systems, Inc. All rights reserved. This document is <strong>Cisco</strong> Public Information. Page 3 of 27
<strong>CCNP</strong>v6 <strong>TSHOOT</strong><br />
Test Plan<br />
In Phase 1, edge router R1 must become a BGP peer with the ISP, and the internal office clients must be<br />
able to access the Internet through the ISP. In Phase 2, the Internet clients must be able to access the hosted<br />
services network.<br />
Note: Trouble ticket A is related to the verification and acceptance of BGP Phase 1. Trouble tickets B and C<br />
are related to the second phase of BGP conversion. Any interfaces that have been shut down on routers R2<br />
and R3 should remain shut down for the duration of this lab exercise.<br />
Physical and Logical Topology Diagrams<br />
The physical and logical topologies for the existing EIGRP-based network are provided in this lab to assist the<br />
troubleshooting effort.<br />
All contents are Copyright © 1992–2010 <strong>Cisco</strong> Systems, Inc. All rights reserved. This document is <strong>Cisco</strong> Public Information. Page 4 of 27
<strong>CCNP</strong>v6 <strong>TSHOOT</strong><br />
Lab Structure<br />
This lab is divided into two main sections.<br />
Section 1—Trouble Tickets and Troubleshooting Logs<br />
This section includes multiple tasks. Each task is associated with a trouble ticket (TT) and introduces one or<br />
more errors on one or more devices. If time is a consideration, each task or trouble ticket can be performed<br />
independently.<br />
Section 2—Troubleshooting Reference Information<br />
This section provides general BGP troubleshooting information that can be applied to any trouble ticket in this<br />
lab. Sample troubleshooting flows are provided, along with examples of useful commands and output. If time<br />
permits, it is recommended that you read Section 2 prior to starting on the trouble tickets.<br />
Note: This lab uses <strong>Cisco</strong> 1841 routers with <strong>Cisco</strong> IOS Release 12.4(24)T1 and the advanced IP image<br />
c1841-advipservicesk9-mz.124-24.T1.bin. The switches are <strong>Cisco</strong> WS-C2960-24TT-L with the <strong>Cisco</strong> IOS<br />
image c2960-lanbasek9-mz.122-46.SE.bin and Catalyst 3560-24PS with the <strong>Cisco</strong> IOS image c3560advipservicesk9-mz.122-46.SE.bin.<br />
Other routers (such as 2801 and 2811), switches (such as 2950 or 3550),<br />
and <strong>Cisco</strong> IOS Software versions can be used if they have comparable capabilities and features. Depending<br />
on the router or switch model and <strong>Cisco</strong> IOS Software version, the commands available and output produced<br />
might vary from what is shown in this lab.<br />
Required Resources<br />
• 3 routers (<strong>Cisco</strong> 1841 with <strong>Cisco</strong> IOS Release 12.4(24)T1 Advanced IP Service or comparable)<br />
• 1 switch (<strong>Cisco</strong> 2960 with the <strong>Cisco</strong> IOS Release 12.2(46)SE C2960-LANBASEK9-M image or<br />
comparable)<br />
• 2 switches (<strong>Cisco</strong> 3560 with the <strong>Cisco</strong> IOS Release 12.2(46)SE C3560-LANBASEK9-M image or<br />
comparable)<br />
• SRV1 (Windows PC with a static IP address) with TFTP and syslog servers, plus an SSH client<br />
(PuTTY or comparable) and WireShark software<br />
• PC-B (Windows PC—DHCP client) with PuTTY and WireShark software<br />
• PC-C (Windows PC—DHCP client) with PuTTY and WireShark software<br />
• Serial and Ethernet cables<br />
All contents are Copyright © 1992–2010 <strong>Cisco</strong> Systems, Inc. All rights reserved. This document is <strong>Cisco</strong> Public Information. Page 5 of 27
<strong>CCNP</strong>v6 <strong>TSHOOT</strong><br />
Section 1—Trouble Tickets and Troubleshooting Logs<br />
Task 1: Trouble Ticket Lab 5-3 TT-A<br />
Step 1: Review trouble ticket Lab 5-3 TT-A.<br />
After your colleague finished configuring BGP on edge router R1, you tested connectivity from PC-B in VLAN<br />
10 to the ISP router to verify the configuration and peering between R1 and R2. This test failed. When you<br />
asked your colleague, he said he did not actually test the configuration from a client PC on the internal<br />
network. He suspected there was a problem with the ISP and contacted them to find out if there was an issue<br />
at their end. They stated that everything was correctly configured on router R2.<br />
Your task is to diagnose the problem and verify that BGP is properly configured to enable BGP peering<br />
between router R1 and the ISP.<br />
Step 2: Load the device trouble ticket configuration files for TT-A.<br />
Using the procedure described in Lab 3-1, verify that the lab configuration files are present in flash and load<br />
the proper configuration files as indicated in the Device Configuration File table.<br />
Note: The following device access methods are in effect after loading the configuration files:<br />
• Console access requires no username or password.<br />
• Telnet and SSH require username admin and password adminpa55.<br />
• The enable password is ciscoenpa55.<br />
Device Configuration File Table<br />
Device Name File to Load Notes<br />
ALS1 Lab53-ALS1-TT-A-Cfg.txt<br />
DLS1 Lab53-DLS1-TT-A-Cfg.txt<br />
DLS2 Lab53-DLS2-TT-A-Cfg.txt<br />
R1 Lab53-R1-TT-A-Cfg.txt<br />
R2 Lab53-R2-TT-A-Cfg.txt<br />
R3 Lab53-R3-TT-A-Cfg.txt<br />
SRV1 N/A Static IP: 10.1.50.1<br />
Default gateway: 10.1.50.254<br />
PC-B N/A DHCP<br />
PC-C N/A DHCP<br />
Step 3: Configure SRV1 and start the syslog and TFTP servers.<br />
Step 4: Release and renew the DHCP lease on PC-B.<br />
a. Ensure that PC-B is configured as a DHCP client in the OFFICE VLAN.<br />
b. After loading all TT-A device configuration files, issue the ipconfig /release and ipconfig /renew<br />
commands on PC-B.<br />
All contents are Copyright © 1992–2010 <strong>Cisco</strong> Systems, Inc. All rights reserved. This document is <strong>Cisco</strong> Public Information. Page 6 of 27
<strong>CCNP</strong>v6 <strong>TSHOOT</strong><br />
Step 5: Outline the troubleshooting approach and validation steps.<br />
Use this space to identify your troubleshooting approach and the key steps to verify that the problem is<br />
resolved. Troubleshooting approaches to select from include the follow-the-path, spot-the-differences, bottomup,<br />
top-down, divide-and-conquer, shoot-from-the-hip, and move-the-problem methods.<br />
Note: In addition to a specific approach, you can use the generic troubleshooting process described at the<br />
beginning of Section 2 of this lab.<br />
_______________________________________________________________________________<br />
_______________________________________________________________________________<br />
_______________________________________________________________________________<br />
_______________________________________________________________________________<br />
_______________________________________________________________________________<br />
_______________________________________________________________________________<br />
Step 6: Record the troubleshooting process and configuration changes.<br />
Note: Section 2 of this lab includes sample troubleshooting flows, useful commands, and examples of output.<br />
Use this log to document your actions and results during the troubleshooting process. List the commands you<br />
used to gather information. As you progress, record what you think the problem might be and which actions<br />
you will take to correct the problem.<br />
Device Actions and Results<br />
All contents are Copyright © 1992–2010 <strong>Cisco</strong> Systems, Inc. All rights reserved. This document is <strong>Cisco</strong> Public Information. Page 7 of 27
<strong>CCNP</strong>v6 <strong>TSHOOT</strong><br />
Step 7: Document trouble ticket debrief notes.<br />
Use this space to make notes of the key learning points that you picked up during the discussion of this<br />
trouble ticket with your instructor. The notes can include problems encountered, solutions applied, useful<br />
commands employed, alternate solutions and methods, and procedure and communication improvements.<br />
_______________________________________________________________________________<br />
_______________________________________________________________________________<br />
_______________________________________________________________________________<br />
_______________________________________________________________________________<br />
_______________________________________________________________________________<br />
_______________________________________________________________________________<br />
_______________________________________________________________________________<br />
Task 2: Trouble Ticket Lab 5-3 TT-B<br />
Step 1: Review trouble ticket Lab 5-3 TT-B.<br />
The next step after the peering has been established is to test the new hosted services subnet, which has<br />
been created using VLAN 130. This subnet uses the 172.30.1.0/27 IP address block that was assigned to<br />
your company by the ISP. The subnet has been configured, and a test server has been installed (simulated<br />
by DLS1 SVI VLAN 130 - 172.30.1.1). Internet clients must be able to access the subnet from ISP router R2<br />
(simulated by Lo0 192.168.2.1). Other hosts in the EIGRP 10.1.0.0/16 domain do not require access to the<br />
hosted services subnet.<br />
Your task is to verify VLAN configuration and routing functionality. Also, verify that traffic from the Internet can<br />
be sent to the hosted network test server in VLAN 130 via R1 and that the return traffic can be received via<br />
ISP router R2.<br />
Step 2: Load the device trouble ticket configuration files for TT-B.<br />
Using the procedure described in Lab 3-1, verify that the lab configuration files are present in flash. Load the<br />
configuration files as indicated in the Device Configuration File table.<br />
Note: See Task 1, Step 2 for device access methods, usernames, and passwords after the configuration files<br />
have been loaded.<br />
Device Configuration File Table<br />
Device Name File to Load Notes<br />
ALS1 Lab53-ALS1-TT-B-Cfg.txt<br />
DLS1 Lab53-DLS1-TT-B-Cfg.txt<br />
DLS2 Lab53-DLS2-TT-B-Cfg.txt<br />
R1 Lab53-R1-TT-B-Cfg.txt<br />
R2 Lab53-R2-TT-B-Cfg.txt<br />
R3 Lab53-R3-TT-B-Cfg.txt<br />
SRV1 N/A Static IP: 10.1.50.1<br />
Default gateway: 10.1.50.254<br />
PC-B N/A DHCP<br />
PC-C N/A DHCP<br />
All contents are Copyright © 1992–2010 <strong>Cisco</strong> Systems, Inc. All rights reserved. This document is <strong>Cisco</strong> Public Information. Page 8 of 27
<strong>CCNP</strong>v6 <strong>TSHOOT</strong><br />
Step 3: Configure SRV1 and start the syslog and TFTP servers.<br />
Step 4: Release and renew the DHCP leases on PC-B and PC-C, as described in Task 1.<br />
Step 5: Outline the troubleshooting approach and validation steps.<br />
Use this space to identify your troubleshooting approach and the key steps to verify that the problem is<br />
resolved. Troubleshooting approaches to select from include the follow-the-path, spot-the-differences, bottomup,<br />
top-down, divide-and-conquer, shoot-from-the-hip, and move-the-problem methods.<br />
Note: In addition to a specific approach, you can use the generic troubleshooting process described at the<br />
beginning of Section 2 of this lab.<br />
_______________________________________________________________________________<br />
_______________________________________________________________________________<br />
_______________________________________________________________________________<br />
_______________________________________________________________________________<br />
_______________________________________________________________________________<br />
Step 6: Record the troubleshooting process and configuration changes.<br />
Note: Section 2 of this lab includes sample troubleshooting flows, useful commands, and examples of output.<br />
Use this log to document your actions and results during the troubleshooting process. List the commands you<br />
used to gather information. As you progress, record what you think the problem might be and which actions<br />
you will take to correct the problem.<br />
Device Actions and Results<br />
All contents are Copyright © 1992–2010 <strong>Cisco</strong> Systems, Inc. All rights reserved. This document is <strong>Cisco</strong> Public Information. Page 9 of 27
<strong>CCNP</strong>v6 <strong>TSHOOT</strong><br />
Step 7: Document trouble ticket debrief notes.<br />
Use this space to make notes of the key learning points that you picked up during the discussion of this<br />
trouble ticket with your instructor. The notes can include problems encountered, solutions applied, useful<br />
commands employed, alternate solutions and methods, and procedure and communication improvements.<br />
_______________________________________________________________________________<br />
_______________________________________________________________________________<br />
_______________________________________________________________________________<br />
_______________________________________________________________________________<br />
_______________________________________________________________________________<br />
_______________________________________________________________________________<br />
_______________________________________________________________________________<br />
Task 3: Trouble Ticket Lab 5-3 TT-C<br />
Step 1: Review trouble ticket Lab 5-3 TT-C.<br />
Your ISP uses prefix lists to ensure that customers do not announce routes that have not been officially<br />
assigned to them. This is critical for an ISP because if two customers were to accidently announce the same<br />
route as their own, it would create problems for both customers and the ISP. After you corrected the static<br />
route and BGP route injection issues on R1, one of your colleagues was working with the hosted services test<br />
network and made some changes. Now he can no longer ping from the hosted network test server (DLS1<br />
VLAN 130) to the ISP. The ISP is also not receiving the advertisement for the hosted services subnet. Your<br />
task is to diagnose this problem and resolve it.<br />
Step 2: Load the device trouble ticket configuration files for TT-C.<br />
Using the procedure described in Lab 3-1, verify that the lab configuration files are present in flash. Load the<br />
proper configuration files as indicated in the Device Configuration File table.<br />
Note: See Task 1, Step 2 for device access methods, usernames, and passwords after the configuration files<br />
have been loaded.<br />
All contents are Copyright © 1992–2010 <strong>Cisco</strong> Systems, Inc. All rights reserved. This document is <strong>Cisco</strong> Public Information. Page 10 of 27
<strong>CCNP</strong>v6 <strong>TSHOOT</strong><br />
Device Configuration File Table<br />
Device Name File to Load Notes<br />
ALS1 Lab53-ALS1-TT-C-Cfg.txt<br />
DLS1 Lab53-DLS1-TT-C-Cfg.txt<br />
DLS2 Lab53-DLS2-TT-C-Cfg.txt<br />
R1 Lab53-R1-TT-C-Cfg.txt<br />
R2 Lab53-R2-TT-C-Cfg.txt<br />
R3 Lab53-R3-TT-C-Cfg.txt<br />
SRV1 N/A Static IP: 10.1.50.1<br />
Default gateway: 10.1.50.254<br />
PC-B N/A DHCP<br />
PC-C N/A DHCP<br />
Step 3: Configure SRV1 and start the syslog and TFTP servers, as described in Task 1.<br />
Step 4: Release and renew the DHCP leases on PC-B and PC-C, as described in Task 1.<br />
Step 5: Outline the troubleshooting approach and validation steps.<br />
Use this space to identify your troubleshooting approach and the key steps to verify that the problem is<br />
resolved. Troubleshooting approaches to select from include the follow-the-path, spot-the-differences, bottomup,<br />
top-down, divide-and-conquer, shoot-from-the-hip, and move-the-problem methods.<br />
Note: In addition to a specific approach, you can use the generic troubleshooting process described at the<br />
beginning of Section 2 of this lab.<br />
_______________________________________________________________________________<br />
_______________________________________________________________________________<br />
_______________________________________________________________________________<br />
_______________________________________________________________________________<br />
_______________________________________________________________________________<br />
_______________________________________________________________________________<br />
Step 6: Record the troubleshooting process and configuration changes.<br />
Note: Section 2 of this lab includes sample troubleshooting flows, useful commands, and examples of output.<br />
Use this log to document your actions and results during the troubleshooting process. List the commands you<br />
used to gather information. As you progress, record what you think the problem might be and which actions<br />
you will take to correct the problem.<br />
Device Actions and Results<br />
All contents are Copyright © 1992–2010 <strong>Cisco</strong> Systems, Inc. All rights reserved. This document is <strong>Cisco</strong> Public Information. Page 11 of 27
<strong>CCNP</strong>v6 <strong>TSHOOT</strong><br />
Device Actions and Results<br />
Step 7: Document trouble ticket debrief notes.<br />
Use this space to make notes of the key learning points that you picked up during the discussion of this<br />
trouble ticket with your instructor. The notes can include problems encountered, solutions applied, useful<br />
commands employed, alternate solutions and methods, and procedure and communication improvements.<br />
_______________________________________________________________________________<br />
_______________________________________________________________________________<br />
_______________________________________________________________________________<br />
_______________________________________________________________________________<br />
_______________________________________________________________________________<br />
_______________________________________________________________________________<br />
_______________________________________________________________________________<br />
All contents are Copyright © 1992–2010 <strong>Cisco</strong> Systems, Inc. All rights reserved. This document is <strong>Cisco</strong> Public Information. Page 12 of 27
<strong>CCNP</strong>v6 <strong>TSHOOT</strong><br />
Section 2—Troubleshooting Reference Information<br />
General Troubleshooting Process<br />
As a general guideline, you can use the following general troubleshooting process described in the course.<br />
1. Define the problem (symptoms).<br />
2. Gather information.<br />
3. Analyze the information.<br />
4. Propose a hypothesis (possible cause).<br />
5. Test the hypothesis.<br />
6. Eliminate or accept the hypothesis.<br />
7. Solve the problem.<br />
8. Document the problem.<br />
Command Summary<br />
The table lists useful commands. Sample output is shown on the following pages.<br />
Command Key Information Displayed<br />
show ip route<br />
or<br />
show ip route ip-addr<br />
show ip bgp<br />
show ip bgp summary<br />
show ip bgp neighbors<br />
or<br />
show ip bgp neighbor ip-address<br />
show ip bgp network mask<br />
debug ip tcp transactions<br />
Displays the entire routing table or information for a<br />
particular destination address.<br />
Displays local and learned network entries in the<br />
BGP table with next hop, metric, local preference,<br />
weight, and AS path.<br />
Displays a summary of the BGP neighbor table. This<br />
command lists important BGP parameters, such as<br />
the AS number and router ID, statistics about the<br />
memory consumption of the various BGP data<br />
structures, and a brief overview of the configured<br />
neighbors and their state.<br />
Displays parameters and extensive statistics about<br />
the peering session for all neighbors or for a<br />
particular neighbor address.<br />
Displays the contents of the BGP table for a specific<br />
prefix. The information is organized in the following<br />
manner: The entry for each available path in the<br />
table starts with the AS path attribute of the path,<br />
using the word “Local” to represent the empty AS<br />
path string.<br />
Displays TCP connection activity between peers.<br />
Can be used to investigate whether the TCP session<br />
is refused, established, and subsequently torn down<br />
again, or no response is received at all from the<br />
neighbor.<br />
debug ip bgp Displays the successive state transitions during the<br />
All contents are Copyright © 1992–2010 <strong>Cisco</strong> Systems, Inc. All rights reserved. This document is <strong>Cisco</strong> Public Information. Page 13 of 27
<strong>CCNP</strong>v6 <strong>TSHOOT</strong><br />
establishment of the BGP peering. If one of the peers<br />
decides to close the session because of a parameter<br />
problem, such as a mismatched AS number or an<br />
invalid router ID, the debug also displays information<br />
about the cause.<br />
clear ip bgp * Clears the contents of the BGP table.<br />
show ip bgp network mask longer<br />
prefixes<br />
show ip bgp neighbor ip-address<br />
routes<br />
show ip bgp neighbor ip-address<br />
advertised-routes<br />
show ip bgp regexp regularexpression<br />
Lab 5-3: Sample Troubleshooting Flows<br />
Displays more specific prefixes present in the BGP<br />
table (including the prefix itself) that are contained in<br />
the prefix specified by the network and mask<br />
options.<br />
Displays all routes in the BGP table that were<br />
received from the neighbor specified by the ipaddress<br />
option.<br />
Displays all routes in the BGP table that will be<br />
advertised to the neighbor specified by the ipaddress<br />
option.<br />
Displays all routes from the BGP table that have an<br />
AS path string that is matched by the specified<br />
regular expression.<br />
The figure illustrates an example of a method that you could follow to diagnose and resolve problems related to<br />
BGP.<br />
Sample BGP Troubleshooting Flow<br />
Layer 3<br />
problem<br />
caused by<br />
routing<br />
protocol<br />
failure<br />
Verify routing table<br />
and FIB<br />
Verify<br />
neighbor<br />
availability<br />
Verify route<br />
availability<br />
Verify route<br />
selection<br />
© 2009 <strong>Cisco</strong> Systems, Inc. All rights reserved. <strong>TSHOOT</strong> v1.0—93<br />
All contents are Copyright © 1992–2010 <strong>Cisco</strong> Systems, Inc. All rights reserved. This document is <strong>Cisco</strong> Public Information. Page 14 of 27
<strong>CCNP</strong>v6 <strong>TSHOOT</strong><br />
The typical trigger to start investigating BGP operation is when you are using BGP as an exterior gateway<br />
protocol to connect to other autonomous systems and you are troubleshooting IP connectivity to a destination in a<br />
different AS. Some reasons to start investigating BGP are if a route to the destination network is missing from the<br />
routing table of one of the routers, a different route than expected was selected to forward the packets to that<br />
destination, or return traffic from the other AS is not making it back to the source.<br />
Troubleshooting problems with missing return traffic usually requires coordination with those responsible for the<br />
routing in the destination AS and possibly even intermediate autonomous systems. The only thing you can verify<br />
from within your own AS is if your routing information is correctly passed to the neighbor AS. Propagation of your<br />
routes beyond your direct peers cannot be verified without access to routers in other autonomous systems.<br />
Therefore, this flow focuses mainly on troubleshooting traffic to a destination network in a different AS. However,<br />
commands that are helpful in troubleshooting route advertisement to a different AS are also highlighted, if<br />
appropriate.<br />
To install a route into the routing table, each router that uses BGP goes through several stages:<br />
1. Establish neighbor relationships with its configured neighbors.<br />
2. Exchange routing information with neighbors and store the received information in the BGP table.<br />
3. Select the best route from the available routes and install it in the routing table.<br />
Errors during any of these stages can cause routing information to be missed or incorrect routing information to<br />
be installed in the routing table.<br />
The order in which the different stages are verified is not important, as long as a structured approach is used.<br />
Sample BGP Troubleshooting Flow<br />
Layer 3<br />
problem<br />
caused by<br />
routing<br />
protocol<br />
failure<br />
Verify BGP<br />
neighbor table<br />
Verify<br />
neighbor<br />
availability<br />
Verify IP and TCP<br />
connectivity<br />
Verify route<br />
availability<br />
Debug BGP<br />
neighbor<br />
establishment<br />
Verify route<br />
selection<br />
© 2009 <strong>Cisco</strong> Systems, Inc. All rights reserved. <strong>TSHOOT</strong> v1.0—94<br />
BGP does not discover neighbors. Neighbor relationships are established based on an explicit configuration on<br />
both routers that participate in the peering session.<br />
BGP uses TCP as a transport protocol. Establishing a peering relationship always starts with the establishment of<br />
a TCP session on port 179 between the configured neighbor IP addresses. By default, both neighbors attempt to<br />
initiate the TCP session to the configured IP address of the neighbor. When a router receives an incoming<br />
session request, it compares the source IP address of the session to its list of configured neighbors. It only<br />
accepts the session if the source IP address matches one of the IP addresses of its configured neighbors.<br />
Therefore, it is important that a router always sources the BGP packets that it sends to a specific neighbor from<br />
All contents are Copyright © 1992–2010 <strong>Cisco</strong> Systems, Inc. All rights reserved. This document is <strong>Cisco</strong> Public Information. Page 15 of 27
<strong>CCNP</strong>v6 <strong>TSHOOT</strong><br />
the IP address that has been configured as the neighbor IP address on the peer router. For neighbors that are<br />
directly connected on an interface, the correct source address is automatically used. For neighbors that are not<br />
directly connected, the appropriate source IP address for the session to a neighbor might need to be selected with<br />
the neighbor ip-address update-source interface-id command.<br />
Verify the BGP Neighbor Table<br />
R1#show ip bgp<br />
BGP table version is 2, local router ID is 192.168.1.1<br />
Status codes: s suppressed, d damped, h history, * valid, > best, i - internal,<br />
r RIB-failure, S Stale<br />
Origin codes: i - IGP, e - EGP, ? - incomplete<br />
Network Next Hop Metric LocPrf Weight Path<br />
*> 0.0.0.0 192.168.2.1 0 0 65502 i<br />
R1#show ip bgp summary<br />
BGP router identifier 192.168.1.1, local AS number 65501<br />
BGP table version is 3, main routing table version 3<br />
2 network entries using 264 bytes of memory<br />
2 path entries using 104 bytes of memory<br />
3/2 BGP path/bestpath attribute entries using 504 bytes of memory<br />
1 BGP AS-PATH entries using 24 bytes of memory<br />
0 BGP route-map cache entries using 0 bytes of memory<br />
0 BGP filter-list cache entries using 0 bytes of memory<br />
Bitfield cache entries: current 1 (at peak 1) using 32 bytes of memory<br />
BGP using 928 total bytes of memory<br />
BGP activity 2/0 prefixes, 2/0 paths, scan interval 60 secs<br />
Neighbor V AS MsgRcvd MsgSent TblVer InQ OutQ Up/Down State/PfxRcd<br />
192.168.2.1 4 65502 36 36 3 0 0 00:33:01 1<br />
To verify that all expected neighbor relationships are operational, you can display a summary of the BGP<br />
neighbor table using the show ip bgp summary command. This command lists important BGP parameters,<br />
such as the AS number and router ID, statistics about the memory consumption of the various BGP data<br />
structures, and a brief overview of the configured neighbors and their state.<br />
For each neighbor, the configured IP address and AS of the neighbor are listed. The Up/Down column lists the<br />
time that has elapsed since the last state change. For a neighbor that is currently up, it lists the time elapsed<br />
since the session was established. For a neighbor that is down, it lists the time elapsed since the session was<br />
lost.<br />
The most important column to verify the operational state of the neighbor is State/PfxRcd. This column can<br />
display the following values:<br />
• Idle – Indicates that there is no session with the peer, and the router is not currently attempting to<br />
establish a session with the peer. The router is ready to accept incoming sessions.<br />
• Idle (Admin) – Indicates that the session has been administratively shut down with the neighbor<br />
ip-address shutdown command.<br />
• Active – The router is actively trying to open a TCP session with the neighbor. If it does not succeed<br />
in establishing the session, the router toggles between the Idle and Active states<br />
• Open Sent – An Open message has been sent to the neighboring router containing the router ID, AS<br />
number, BGP version, hold timer, and capabilities.<br />
• Open Confirm – An Open message from the neighbor has been received, the parameters in the<br />
message have been processed and accepted, and a hello message has been sent to acknowledge<br />
the acceptance of the neighbor’s Open message.<br />
All contents are Copyright © 1992–2010 <strong>Cisco</strong> Systems, Inc. All rights reserved. This document is <strong>Cisco</strong> Public Information. Page 16 of 27
<strong>CCNP</strong>v6 <strong>TSHOOT</strong><br />
• Number of received prefixes – After an acknowledgment from the neighbor confirming the reception<br />
of this router’s Open message, the state of the session moves to the Established state. At this point,<br />
the State/PfxRcd column does not list the state. It shows the number of prefixes that have been<br />
received from that neighbor and installed in the BGP table. The desired result is to see a number<br />
listed in this column, because that indicates that the session with the peer has been successfully<br />
established.<br />
The Open Sent and Open Confirm states are transitory states. When the state for a neighbor toggles between<br />
Active and Idle, this indicates that the router is not successful in establishing a session with the neighbor.<br />
You can use the show ip bgp neighbor ip-address command to display additional parameters and<br />
extensive statistics about the peering session. For more information about these parameters and statistics, see<br />
the BGP command references on www.cisco.com.<br />
Verify IP and TCP Connectivity<br />
R1#debug ip tcp transactions<br />
TCP special event debugging is on<br />
R1#conf t<br />
Enter configuration commands, one per line. End with CNTL/Z.<br />
R1(config)#no router bgp 65501<br />
R1(config)#<br />
*Nov 16 17:21:35.102: %BGP-5-ADJCHANGE: neighbor 192.168.2.1 Down BGP protocol i<br />
nitialization<br />
R1(config)#<br />
*Nov 16 17:21:35.102: TCP0: state was ESTAB -> FINWAIT1 [179 -> 192.168.2.1(1188<br />
9)]<br />
*Nov 16 17:21:35.102: TCP0: sending FIN<br />
*Nov 16 17:21:35.126: Released port 179 in Transport Port Agent for TCP IP type<br />
0 delay 240000<br />
*Nov 16 17:21:35.126: TCP0: state was LISTEN -> CLOSED [179 -> 192.168.2.1(0)]<br />
*Nov 16 17:21:35.126: TCB 0x66EE8F34 destroyed<br />
*Nov 16 17:21:35.138: TCP0: state was FINWAIT1 -> FINWAIT2 [179 -> 192.168.2.1(1<br />
1889)]<br />
*Nov 16 17:21:35.138: TCP0: FIN processed<br />
*Nov 16 17:21:35.138: TCP0: state was FINWAIT2 -> TIMEWAIT [179 -> 192.168.2.1(1<br />
1889)]<br />
R1(config)#<br />
*Nov 16 17:21:50.286: Reserved port 0 in Transport Port Agent for TCP IP type 0<br />
*Nov 16 17:21:50.286: TCP: sending RST, seq 0, ack 2752306274<br />
*Nov 16 17:21:50.286: TCP: sent RST to 192.168.2.1:41738 from 192.168.1.1:179<br />
*Nov 16 17:21:50.290: Released port 0 in Transport Port Agent for TCP IP type 0<br />
delay 240000<br />
*Nov 16 17:21:50.290: TCP0: state was LISTEN -> CLOSED [0 -> UNKNOWN(0)]<br />
*Nov 16 17:21:50.290: TCB 0x66F17E40 destroyed<br />
R1(config)#<br />
*Nov 16 17:21:55.006: Reserved port 0 in Transport Port Agent for TCP IP type 0<br />
*Nov 16 17:21:55.006: TCP: sending RST, seq 0, ack 3974493125<br />
*Nov 16 17:21:55.006: TCP: sent RST to 192.168.2.1:47416 from 192.168.1.1:179<br />
*Nov 16 17:21:55.006: Released port 0 in Transport Port Agent for TCP IP type 0<br />
delay 240000<br />
R1(config)#router bgp 65501<br />
R1(config-router)#no synchronization<br />
R1(config-router)#bgp log-neighbor-changes<br />
R1(config-router)#neighbor 192.168.2.1 remote-as 65502<br />
R1(config-router)#neighbor 192.168.2.1 ebgp-multihop 2<br />
All contents are Copyright © 1992–2010 <strong>Cisco</strong> Systems, Inc. All rights reserved. This document is <strong>Cisco</strong> Public Information. Page 17 of 27
<strong>CCNP</strong>v6 <strong>TSHOOT</strong><br />
R1(config-router)#neighbor 192.168.2.1 update-source Loopback0<br />
*Nov 16 17:28:46.549: TCB65950C34 created<br />
*Nov 16 17:28:46.549: TCB65950C34 setting property TCP_PMTU (38) 66A7C214<br />
*Nov 16 17:28:46.549: TCB65950C34 setting property TCP_TOS (11) 66A7C220<br />
*Nov 16 17:28:46.549: TCB65950C34 setting property TCP_VRFTABLEID (20) 66F233F8<br />
*Nov 16 17:28:46.549: TCB65950C34 setting property TCP_IN_TTL (29) 66A7C200<br />
*Nov 16 17:28:46.553: TCB65950C34 setting property TCP_OUT_TTL (30) 66A7C200<br />
*Nov 16 17:28:46.553: TCB65950C34 setting property TCP_OUT_TTL (30) 66F2359A<br />
*Nov 16 17:28:46.553: TCB65950C34 bound to UNKNOWN.179<br />
*Nov 16 17:28:46.553: TCB65950C34 setting property TCP_ACCESS_CHECK (5) 60B47108<br />
*Nov 16 17:28:46.553: TCB65950C34 setting property TCP_MD5KEY (4) 0<br />
*Nov 16 17:28:46.553: Reserved port 179 in Transport Port Agent for TCP IP type<br />
0<br />
*Nov 16 17:28:46.553: TCB65950C34 listening with queue 1<br />
*Nov 16 17:28:46.585: TCB65950C34 setting property TCP_IN_TTL (29) 66A7C278<br />
*Nov 16 17:28:46.585: TCB65950C34 setting property TCP_OUT_TTL (30) 66A7C278<br />
*Nov 16 17:28:46.585: TCB65950C34 setting property TCP_OUT_TTL (30) 66F2359A<br />
R1(config-router)#<br />
*Nov 16 17:28:50.581: TCB67096718 created<br />
*Nov 16 17:28:50.581: TCB67096718 setting property TCP_VRFTABLEID (20) 66F233F8<br />
*Nov 16 17:28:50.581: TCB67096718 setting property TCP_MD5KEY (4) 0<br />
*Nov 16 17:28:50.581: TCB67096718 setting property TCP_ACK_RATE (32) 66F1B4D4<br />
*Nov 16 17:28:50.581: TCB67096718 setting property TCP_TOS (11) 66F1B4C0<br />
*Nov 16 17:28:50.581: TCB67096718 setting property TCP_PMTU (38) 66F1B48C<br />
*Nov 16 17:28:50.581: TCB67096718 setting property TCP_IN_TTL (29) 66F1B478<br />
*Nov 16 17:28:50.581: TCB67096718 setting property TCP_OUT_TTL (30) 66F1B478<br />
*Nov 16 17:28:50.581: TCB67096718 setting property TCP_OUT_TTL (30) 66F2359A<br />
*Nov 16 17:28:50.581: TCP: Random local port generated 30517, network 1<br />
*Nov 16 17:28:50.581: TCB67096718 bound to 192.168.1.1.30517<br />
*Nov 16 17:28:50.581: TCB67096718 setting property TCP_RTRANSTMO (31) 66F1B4D8<br />
*Nov 16 17:28:50.581: Reserved port 30517 in Transport Port Agent for TCP IP typ<br />
e 1<br />
*Nov 16 17:28:50.581: TCP: sending SYN, seq 3632881552, ack 0<br />
*Nov 16 17:28:50.581: TCP0: Connection to 192.168.2.1:179, advertising MSS 536<br />
*Nov 16 17:28:50.585: TCP0: state was CLOSED -> SYNSENT [30517 -> 192.168.2.1(17<br />
9)]<br />
*Nov 16 17:28:50.593: TCP0: state was SYNSENT -> ESTAB [30517 -> 192.168.2.1(179<br />
)]<br />
*Nov 16 17:28:50.593: TCP: tcb 67096718 connection to 192.168.2.1:179, peer MSS<br />
536, MSS is 536<br />
*Nov 16 17:28:50.593: TCB67096718 connected to 192.168.2.1.179<br />
*Nov 16 17:28:50.593: TCB67096718 setting property TCP_NO_DELAY (0) 66F1B4D8<br />
*Nov 16 17:28:50.593: TCB67096718 setting property TCP_RTRANSTMO (31) 66F1B4D8<br />
*Nov 16 17:28:50.621: %BGP-5-ADJCHANGE: neighbor 192.168.2.1 Up<br />
R1(config-router)#<br />
*Nov 16 17:28:50.821: TCP0: ACK timeout timer expired<br />
R1(config-router)#do u all<br />
All possible debugging has been turned off<br />
If a session to one of the neighbors is not established correctly, you can take several steps to diagnose the issue.<br />
The first step is to test IP connectivity to the IP address of the neighbor by using the ping command. Make sure<br />
that you specify the same source interface that is used as the source interface for the BGP session. If the ping<br />
fails, initiate a troubleshooting process to first restore IP connectivity to the neighbor.<br />
If the ping is successful, the next step is to determine whether the TCP session with the neighbor is established<br />
and successively torn down again, or if the TCP session is never established.<br />
All contents are Copyright © 1992–2010 <strong>Cisco</strong> Systems, Inc. All rights reserved. This document is <strong>Cisco</strong> Public Information. Page 18 of 27
<strong>CCNP</strong>v6 <strong>TSHOOT</strong><br />
You can use the debug ip tcp transactions command to investigate whether the TCP session is refused<br />
(indicated by the reception of a TCP RST), established and subsequently torn down again (indicated by the<br />
normal TCP initiation and termination handshakes), or no response is received at all from the neighbor.<br />
In the example output above, you can see that the TCP session to IP address 192.168.2.1 and TCP port 179 is<br />
refused by the peer, as indicated by the reception of the TCP RST from the peer. Clues like these can help<br />
eliminate possible problem causes. For instance, in this particular example, the output rules out an access list as<br />
the cause of the problem, because a TCP RST has been successfully received from the neighbor in response to<br />
the transmitted TCP SYN. In general, the fact that the peer refuses the session indicates that it does not<br />
recognize the session as coming from one of its configured neighbors. Possible causes are a missing neighbor<br />
statement or a mismatch between the configured IP address on the neighbor and the source IP address used by<br />
this router. Note that the source IP address and TCP port of the session are also displayed in the output of the<br />
debug as “bound to 192.168.1.1.30517.” You must work together with the party that manages the peer router to<br />
determine the exact cause of the problem.<br />
Debug BGP Neighbor Establishment<br />
R1#debug ip bgp<br />
BGP debugging is on for address family: IPv4 Unicast<br />
R1#conf t<br />
Enter configuration commands, one per line. End with CNTL/Z.<br />
R1(config)#interface s0/0/0<br />
R1(config-if)#shutdown<br />
R1(config-if)#<br />
*Nov 16 17:38:51.181: %LINK-5-CHANGED: Interface Serial0/0/0, changed state to a<br />
dministratively down<br />
*Nov 16 17:38:52.181: %LINEPROTO-5-UPDOWN: Line protocol on Interface Serial0/0/<br />
0, changed state to down<br />
R1(config-if)#do clear ip bgp 192.168.2.1<br />
R1(config-if)#<br />
*Nov 16 17:40:21.093: BGPNSF state: 192.168.2.1 went from nsf_not_active to nsf_<br />
not_active<br />
*Nov 16 17:40:21.093: BGP: 192.168.2.1 went from Established to Idle<br />
*Nov 16 17:40:21.093: %BGP-5-ADJCHANGE: neighbor 192.168.2.1 Down User reset<br />
R1(config-if)#<br />
*Nov 16 17:40:21.093: BGP: 192.168.2.1 closing<br />
R1(config-if)#<br />
*Nov 16 17:40:22.973: BGP: 192.168.2.1 went from Idle to Active<br />
*Nov 16 17:40:22.973: BGP: 192.168.2.1 active open failed - route to peer is inv<br />
alid, open active delayed 26762ms (35000ms max, 60% jitter)<br />
R1(config-if)#interface s0/0/0<br />
R1(config-if)#no shutdown<br />
R1(config-if)#<br />
*Nov 16 17:40:51.041: %LINK-3-UPDOWN: Interface Serial0/0/0, changed state to up<br />
R1(config-if)#<br />
*Nov 16 17:40:52.045: %LINEPROTO-5-UPDOWN: Line protocol on Interface Serial0/0/<br />
0, changed state to up<br />
R1(config-if)#<br />
*Nov 16 17:41:11.365: BGP: 192.168.2.1 open active, local address 192.168.1.1<br />
*Nov 16 17:41:11.373: BGP: 192.168.2.1 read request no-op<br />
*Nov 16 17:41:11.377: BGP: 192.168.2.1 went from Active to OpenSent<br />
*Nov 16 17:41:11.377: BGP: 192.168.2.1 sending OPEN, version 4, my as: 65501, ho<br />
ldtime 180 seconds<br />
*Nov 16 17:41:11.377: BGP: 192.168.2.1 send message type 1, length (incl. header<br />
All contents are Copyright © 1992–2010 <strong>Cisco</strong> Systems, Inc. All rights reserved. This document is <strong>Cisco</strong> Public Information. Page 19 of 27
<strong>CCNP</strong>v6 <strong>TSHOOT</strong><br />
) 53<br />
*Nov 16 17:41:11.397: BGP: 192.168.2.1 rcv message type 1, length (excl. header)<br />
34<br />
*Nov 16 17:41:11.397: BGP: 192.168.2.1 rcv OPEN, version 4, holdtime 180 seconds<br />
*Nov 16 17:41:11.397: BGP: 192.168.2.1 rcv OPEN w/ OPTION parameter len: 24<br />
*Nov 16 17:41:11.397: BGP: 192.168.2.1 rcvd OPEN w/ optional parameter type 2 (C<br />
apability) len 6<br />
*Nov 16 17:41:11.397: BGP: 192.168.2.1 OPEN has CAPABILITY code: 1, length 4<br />
*Nov 16 17:41:11.397: BGP: 192.168.2.1 OPEN has MP_EXT CAP for afi/safi: 1/1<br />
*Nov 16 17:41:11.397: BGP: 192.168.2.1 rcvd OPEN w/ optional parameter type 2 (C<br />
apability) len 2<br />
*Nov 16 17:41:11.397: BGP: 192.168.2.1 OPEN has CAPABILITY code: 128, length 0<br />
*Nov 16 17:41:11.397: BGP: 192.168.2.1 OPEN has ROUTE-REFRESH capability(old) fo<br />
r all address-families<br />
*Nov 16 17:41:11.397: BGP: 192.168.2.1 rcvd OPEN w/ optional parameter type 2 (C<br />
apability) len 2<br />
*Nov 16 17:41:11.397: BGP: 192.168.2.1 OPEN has CAPABILITY code: 2, length 0<br />
*Nov 16 17:41:11.397: BGP: 192.168.2.1 OPEN has ROUTE-REFRESH capability(new) fo<br />
r all address-families<br />
*Nov 16 17:41:11.397: BGP: 192.168.2.1 rcvd OPEN w/ optional parameter type 2 (C<br />
apability) len 6<br />
*Nov 16 17:41:11.397: BGP: 192.168.2.1 OPEN has CAPABILITY code: 65, length 4<br />
*Nov 16 17:41:11.397: BGP: 192.168.2.1 OPEN has 4-byte ASN CAP for: 65502<br />
BGP: 192.168.2.1 rcvd OPEN w/ remote AS 65502, 4-byte remote AS 65502<br />
*Nov 16 17:41:11.401: BGP: 192.168.2.1 went from OpenSent to OpenConfirm<br />
*Nov 16 17:41:11.405: BGP: 192.168.2.1 went from OpenConfirm to Established<br />
*Nov 16 17:41:11.405: %BGP-5-ADJCHANGE: neighbor 192.168.2.1 Up<br />
R1(config-if)#<br />
*Nov 16 17:41:11.433: BGP_Router: unhandled major event code 128, minor 0<br />
R1(config-if)#do u all<br />
All possible debugging has been turned off<br />
If the TCP session is successfully established but consecutively torn down again, the likely cause is that one of<br />
the BGP peers is rejecting one of the parameters in the received Open message from the peer. The debug ip<br />
bgp command displays the successive state transitions during the establishment of the BGP peering. If one of the<br />
peers decides to close the session because of a parameter problem, such as a mismatched AS number or invalid<br />
router ID, the debug output displays information about the exact cause.<br />
All contents are Copyright © 1992–2010 <strong>Cisco</strong> Systems, Inc. All rights reserved. This document is <strong>Cisco</strong> Public Information. Page 20 of 27
<strong>CCNP</strong>v6 <strong>TSHOOT</strong><br />
Sample BGP Troubleshooting Flow<br />
Layer 3<br />
problem<br />
caused by<br />
routing<br />
protocol<br />
failure<br />
Verify<br />
neighbor<br />
availability<br />
Verify BGP table<br />
Verify route<br />
availability<br />
Verify route<br />
selection<br />
Debug BGP route<br />
exchange<br />
© 2009 <strong>Cisco</strong> Systems, Inc. All rights reserved. <strong>TSHOOT</strong> v1.0—98<br />
After you have verified that neighbor relationships have been established as expected, verify that the route for the<br />
destination network that you are troubleshooting has been received correctly from all appropriate neighbors. BGP<br />
stores all routes that it receives from its neighbors in the BGP table and then selects the best route for each prefix<br />
to be installed in the routing table and advertised to other neighbors.<br />
By investigating all available paths to the destination network in the BGP table, you can see if all the paths you<br />
expected to find are available. If multiple paths to the same prefix are listed, you can see which one was selected.<br />
In addition, you can see all the associated BGP attributes for the route, which can be useful to verify the path<br />
selection process and the results of the possible attribute manipulation by route maps that are used.<br />
If routes are missing from the BGP table, you might need to debug the BGP route exchange process to see if they<br />
were not received or not entered into the BGP table.<br />
Debug BGP Neighbor Establishment<br />
R1#show ip bgp 0.0.0.0 0.0.0.0<br />
BGP routing table entry for 0.0.0.0/0, version 4<br />
Paths: (1 available, best #1, table Default-IP-Routing-Table)<br />
Not advertised to any peer<br />
65502<br />
192.168.2.1 from 192.168.2.1 (192.168.2.1)<br />
Origin IGP, metric 0, localpref 100, valid, external, best<br />
In the output above, the prefix is 0.0.0.0/0, the AS path is 65502, and the next hop is 192.168.2.1.<br />
R1#show ip bgp 172.30.1.0 255.255.255.224<br />
BGP routing table entry for 172.30.1.0/27, version 5<br />
Paths: (1 available, best #1, table Default-IP-Routing-Table)<br />
Flag: 0x820<br />
Advertised to update-groups:<br />
1<br />
Local<br />
10.1.2.1 from 0.0.0.0 (192.168.1.1)<br />
Origin IGP, metric 0, localpref 100, weight 32768, valid, sourced, local,<br />
All contents are Copyright © 1992–2010 <strong>Cisco</strong> Systems, Inc. All rights reserved. This document is <strong>Cisco</strong> Public Information. Page 21 of 27
<strong>CCNP</strong>v6 <strong>TSHOOT</strong><br />
R2>sh ip bgp 172.30.1.0/27<br />
BGP routing table entry for 172.30.1.0/27, version 5<br />
Paths: (1 available, best #1, table Default-IP-Routing-Table)<br />
Flag: 0x820<br />
Not advertised to any peer<br />
65501<br />
192.168.1.1 from 192.168.1.1 (192.168.1.1)<br />
Origin IGP, metric 0, localpref 100, valid, external, best<br />
The BGP table contains all routes that were received from all neighbors and were not denied by an incoming<br />
access list, prefix list, or route map. In the output for R2 above, the prefix is 172.30.1.0/27, the AS path is 65501<br />
to the network, and the next hop is 192.168.1.1.<br />
When you issue the show ip bgp network mask command to display the content of the BGP table for a<br />
specific prefix, the information is organized in the following manner. The entry for each available path in the table<br />
starts with the AS path attribute of the path (using the word “Local” to represent the empty AS path string). On the<br />
following lines, the other BGP attributes of the route, such as the next hop, origin code, and local preference, are<br />
listed. In addition, other information associated with the route is displayed. For example, the route is marked as<br />
internal if it was received from a BGP neighbor in the same AS. It is marked as external if it was received from a<br />
neighbor in a different AS. The path that was selected as the best path by the BGP path selection algorithm is<br />
marked as “best.”<br />
Note: The following section uses some sample output not produced from the equipment in this lab to demonstrate<br />
how to interpret the output of this command. This output is interspersed with comments that explain the important<br />
fields and their interpretation.<br />
IRO1#show ip bgp 172.34.224.0 255.255.224.0<br />
BGP routing table entry for 172.34.224.0/19, version 98<br />
Paths: (2 available, best #1, table Default-IP-Routing-Table)<br />
Two paths are available to reach prefix 172.34.224.0/19. The first path listed has been selected as the best path.<br />
Advertised to update-groups:<br />
2<br />
The best path is advertised to all neighbors in update group 2. Use the show ip bgp update-group<br />
command to view the neighbors that are members of a specific update group.<br />
65525 65486<br />
The first path has 65525 65486 as its AS path attribute, which indicates that the route has originated in AS 65486<br />
and then passed to AS 65525, which subsequently passed it to this AS.<br />
192.168.224.254 from 192.168.224.254 (192.168.100.1)<br />
The BGP next hop for this route is 192.168.224.254. The route was received from neighbor 192.168.224.254. The<br />
router ID of that neighbor is 192.168.100.1.<br />
Origin IGP, localpref 100, valid, external, best<br />
The origin attribute for this route is IGP, and the local preference attribute has a value of 100. This route is a valid<br />
route received from an external BGP peer, and it has been selected as the best path.<br />
64566 65486<br />
The second path has 64566 65486 as its AS path attribute, which indicates that the route has originated in AS<br />
65486 and then passed to AS 64566, which subsequently passed it to this AS.<br />
All contents are Copyright © 1992–2010 <strong>Cisco</strong> Systems, Inc. All rights reserved. This document is <strong>Cisco</strong> Public Information. Page 22 of 27
<strong>CCNP</strong>v6 <strong>TSHOOT</strong><br />
172.24.244.86 (metric 30720) from 10.1.220.4 (10.1.220.4)<br />
The BGP next hop for this route is 172.24.244.86, and the IGP metric to reach this next-hop IP address is 30720<br />
(which is the EIGRP metric listed in the routing table to reach 172.24.244.86). The route was received from<br />
neighbor 10.1.220.4, and the router ID of that neighbor is also 10.1.220.4.<br />
Origin IGP, metric 0, localpref 100, valid, internal<br />
The origin attribute for this route is IGP, the multi-exit discriminator (MED) attribute has a value of 0, and the local<br />
preference attribute has a value of 100. The route is a valid route received from an internal BGP peer.<br />
For troubleshooting purposes, the AS path, next hop, and best path indicator are the most important fields in the<br />
output of this command. For a full description of all possible fields, see the BGP command references on<br />
www.cisco.com.<br />
Instead of viewing a specific entry in the BGP table, it can also be useful to select a set of routes from the BGP<br />
table based on certain criteria. The <strong>Cisco</strong> IOS BGP command toolkit includes the following options to select<br />
specific routes from the BGP table:<br />
• show ip bgp network mask longer-prefixes – Lists more specific prefixes present in the<br />
BGP table (including the prefix itself) that are contained in the network and mask options.<br />
• show ip bgp neighbor ip-address routes – Lists all routes in the BGP table that were<br />
received from the neighbor specified by the ip-address option.<br />
• show ip bgp neighbor ip-address advertised-routes – Lists all routes in the BGP table<br />
that will be advertised to the neighbor specified by the ip-address option.<br />
• show ip bgp regexp regular-expression – Selects all routes from the BGP table that have<br />
an AS path string that is matched by the specified regular expression.<br />
For more information about how to match specific AS paths using regular expressions, see the “Understanding<br />
Regular Expressions” section in the <strong>Cisco</strong> IOS Configuration Fundamentals Configuration Guide at<br />
http://www.cisco.com/en/US/docs/ios/fundamentals/configuration/guide/cf_clibasics_ps6350_TSD_Products_Configuration_Guide_Chapter.html#wp1002051<br />
Debug BGP Route Exchange<br />
R1#debug ip bgp update<br />
BGP updates debugging is on for address family: IPv4 Unicast<br />
R1#clear ip bgp *<br />
R1#<br />
*Nov 16 18:14:11.508: %BGP-5-ADJCHANGE: neighbor 192.168.2.1 Down User reset<br />
R1#<br />
*Nov 16 18:14:13.844: %BGP-5-ADJCHANGE: neighbor 192.168.2.1 Up<br />
R1#<br />
*Nov 16 18:14:13.860: BGP(0): 192.168.2.1 rcvd UPDATE w/ attr: nexthop 192.168.2<br />
.1, origin i, metric 0, merged path 65502, AS_PATH<br />
*Nov 16 18:14:13.860: BGP(0): 192.168.2.1 rcvd 0.0.0.0/0<br />
*Nov 16 18:14:14.832: BGP(0): Revise route installing 1 of 1 routes for 0.0.0.0/<br />
0 -> 192.168.2.1(main) to main IP table<br />
R1#<br />
*Nov 16 18:14:47.264: BGP(0): nettable_walker 172.30.1.0/27 route sourced locall<br />
y<br />
*Nov 16 18:14:47.268: BGP(0): 192.168.2.1 send UPDATE (format) 172.30.1.0/27, ne<br />
xt 192.168.1.1, metric 0<br />
If you find expected route entries to be missing from the BGP table, or you doubt whether the router is sending<br />
specific routes to a neighbor, consider using the debug ip bgp updates command to display the processing<br />
All contents are Copyright © 1992–2010 <strong>Cisco</strong> Systems, Inc. All rights reserved. This document is <strong>Cisco</strong> Public Information. Page 23 of 27
<strong>CCNP</strong>v6 <strong>TSHOOT</strong><br />
of BGP updates by the router. However, this command can generate a large number of messages, especially if<br />
your BGP table carries many routes. Consequently, it has a high risk of disrupting the router’s operation. In<br />
production networks, you should take extreme care when using this command, and you should use command<br />
options to limit the output to the prefixes and neighbor that you are troubleshooting.<br />
Note: The following section uses sample output not produced from the equipment in this lab to demonstrate how<br />
to limit the output of the debug ip bgp updates command by specifying a neighbor and using an access list<br />
to select only certain prefixes.<br />
The commands are interspersed with comments that explain the procedure and output.<br />
IRO1#configure terminal<br />
Enter configuration commands, one per line. End with CNTL/Z.<br />
IRO1(config)#access-list 37 permit 172.17.7<strong>6.0</strong> 0.0.3.255<br />
IRO1(config)#^Z<br />
IRO1#<br />
An access list with number 37 is created. When used to filter BGP routes, this access list matches any prefix in<br />
the 172.17.7<strong>6.0</strong>–172.17.79.0 IP range.<br />
IRO1#debug ip bgp 192.168.224.254 updates 37<br />
BGP updates debugging is on for access list 37 for neighbor<br />
192.168.224.254 for address family: IPv4 Unicast<br />
The debug is enabled for neighbor 192.168.224.254 and access list 37. Only update messages transmitted to or<br />
received from neighbor 192.168.224.254 that are permitted by access list 37 will be displayed.<br />
IRO1#clear ip bgp 192.168.224.254 soft<br />
A “soft” clear of BGP neighbor 192.168.224.254 is issued. As opposed to a “hard” clear, a soft clear does not tear<br />
down and restart the session completely. It just forces the routes between this router and the neighbor to be<br />
retransmitted.<br />
IRO1#<br />
Apr 29 06:36:57.549 PDT: BGP(0): 192.168.224.254 send UPDATE (format)<br />
172.17.7<strong>6.0</strong>/22, next 192.168.224.241, metric 0, path Local<br />
An update about prefix 172.17.7<strong>6.0</strong>/22 is transmitted to neighbor 192.168.224.254. Note that both the neighbor<br />
and the prefix match the imposed restrictions.<br />
Apr 29 06:36:57.553 PDT: BGP(0): 192.168.224.254 rcv UPDATE w/ attr:<br />
nexthop 192.168.224.254, origin i, originator 0.0.0.0, path 65525 64568,<br />
community , extended community<br />
Apr 29 06:36:57.553 PDT: BGP(0): 192.168.224.254 rcv UPDATE about<br />
172.17.7<strong>6.0</strong>/22 -- DENIED due to: AS-PATH contains our own AS;<br />
An update about prefix 172.17.7<strong>6.0</strong>/22 is received but denied, because the AS path attribute contains this router’s<br />
autonomous system (AS 64568).<br />
Many more updates were sent between this router and its neighbor, but only updates that match the imposed<br />
restrictions were displayed, limiting the impact of the command.<br />
All contents are Copyright © 1992–2010 <strong>Cisco</strong> Systems, Inc. All rights reserved. This document is <strong>Cisco</strong> Public Information. Page 24 of 27
<strong>CCNP</strong>v6 <strong>TSHOOT</strong><br />
Sample BGP Troubleshooting Flow<br />
Layer 3<br />
problem<br />
caused by<br />
routing<br />
protocol<br />
failure<br />
Verify<br />
neighbor<br />
availability<br />
Verify route<br />
availability<br />
Verify route<br />
selection<br />
Compare routing<br />
table and BGP<br />
table<br />
© 2009 <strong>Cisco</strong> Systems, Inc. All rights reserved. <strong>TSHOOT</strong> v1.0—101<br />
If you find that a route is available in the BGP table but not in the routing table, there are two possible<br />
explanations. Either BGP has not been able to select any of the paths as the best path, or it has selected a best<br />
path, but a competing route from a different source with a better administrative distance is present and has been<br />
installed in the routing table.<br />
If none of the paths has been selected as the best path, this will be clearly visible in the BGP table, and clues<br />
about the cause of the best path selection failure can be gathered from the BGP table. For example, if none of the<br />
paths has a next hop that can be resolved in the IP routing table, “Inaccessible” is displayed instead of the IGP<br />
metric to reach the next hop. If the BGP synchronization rule is causing a route not to be installed in the routing<br />
table, “not synchronized” is displayed behind the route.<br />
If a best path has been selected for the prefix but not installed in the routing table due to the presence of a<br />
competing route with a better administrative presence, the route is marked as a “RIB-failure” in the BGP table. To<br />
list all BGP routes that have not been installed in the routing table due to a RIB failure, use the show ip bgp<br />
rib-failure command.<br />
All contents are Copyright © 1992–2010 <strong>Cisco</strong> Systems, Inc. All rights reserved. This document is <strong>Cisco</strong> Public Information. Page 25 of 27
<strong>CCNP</strong>v6 <strong>TSHOOT</strong><br />
Reflection Questions<br />
1. Which lab trouble tickets did you have the most difficulty with?<br />
__________________________________________________________________________________________<br />
__________________________________________________________________________________________<br />
__________________________________________________________________________________________<br />
2. Would you change anything about the process that you used for any of the trouble tickets now that you see the<br />
resolution of the problem?<br />
__________________________________________________________________________________________<br />
__________________________________________________________________________________________<br />
__________________________________________________________________________________________<br />
3. Which commands did you find most useful in diagnosing BGP issues? Add these to your toolbox for future use.<br />
Which commands did you find least useful?<br />
__________________________________________________________________________________________<br />
__________________________________________________________________________________________<br />
__________________________________________________________________________________________<br />
All contents are Copyright © 1992–2010 <strong>Cisco</strong> Systems, Inc. All rights reserved. This document is <strong>Cisco</strong> Public Information. Page 26 of 27
<strong>CCNP</strong>v6 <strong>TSHOOT</strong><br />
References<br />
If you need more information on the commands and their options, see the following references:<br />
• IP Routing Protocol Command Reference<br />
http://www.cisco.com/en/US/docs/ios/iproute/command/reference/irp_book.html<br />
• Border Gateway Protocol Troubleshooting Tech Notes<br />
http://www.cisco.com/en/US/tech/tk365/tsd_technology_support_troubleshooting_technotes_list.html<br />
#anchor1<br />
Router Interface Summary Table<br />
Router Model Ethernet Interface<br />
#1<br />
1700 Fast Ethernet 0<br />
(FA0)<br />
1800 Fast Ethernet 0/0<br />
(FA0/0)<br />
2600 Fast Ethernet 0/0<br />
(FA0/0)<br />
2800 Fast Ethernet 0/0<br />
(FA0/0)<br />
Router Interface Summary<br />
Ethernet Interface<br />
#2<br />
Fast Ethernet 1<br />
(FA1)<br />
Fast Ethernet 0/1<br />
(FA0/1)<br />
Fast Ethernet 0/1<br />
(FA0/1)<br />
Fast Ethernet 0/1<br />
(FA0/1)<br />
Serial Interface<br />
#1<br />
Serial Interface<br />
#2<br />
Serial 0 (S0) Serial 1 (S1)<br />
Serial 0/0/0<br />
(S0/0/0)<br />
Serial 0/0/1<br />
(S0/0/1)<br />
Serial 0/0 (S0/0) Serial 0/1 (S0/1)<br />
Serial 0/0/0<br />
(S0/0/0)<br />
Serial 0/0/1<br />
(S0/0/1)<br />
Note: To find out how the router is configured, look at the interfaces to identify the type of router<br />
and how many interfaces the router has. Rather than try to list all the combinations of<br />
configurations for each router class, this table includes identifiers for the possible combinations of<br />
Ethernet and serial interfaces in the device. The table does not include any other type of interface,<br />
even though a specific router might contain one. An example of this is an ISDN BRI interface. The<br />
string in parenthesis is the legal abbreviation that can be used in <strong>Cisco</strong> IOS commands to<br />
represent the interface.<br />
All contents are Copyright © 1992–2010 <strong>Cisco</strong> Systems, Inc. All rights reserved. This document is <strong>Cisco</strong> Public Information. Page 27 of 27
<strong>CCNP</strong>v6 <strong>TSHOOT</strong><br />
Chapter 6 Lab 6-1, IP Addressing—NAT and DHCP<br />
Physical Topology (Baseline)<br />
All contents are Copyright © 1992–2010 <strong>Cisco</strong> Systems, Inc. All rights reserved. This document is <strong>Cisco</strong> Public Information. Page 1 of 20
<strong>CCNP</strong>v6 <strong>TSHOOT</strong><br />
Logical Topology (Baseline)<br />
Objectives<br />
• Load the device configuration files for each trouble ticket.<br />
• Diagnose and resolve problems related to IP addressing and NAT.<br />
• Diagnose and resolve problems related to IP addressing and DHCP.<br />
• Document the troubleshooting progress, configuration changes, and problem resolution.<br />
Background<br />
Network Address Translation (NAT) is routinely employed in small and large networks. NAT preserves the<br />
public IPv4 address space and can provide a measure of security by using private addresses internally.<br />
Network layer connectivity issues associated with NAT can include address pool definition, pool depletion,<br />
address configuration, interface boundaries, and the type of NAT employed: static, dynamic, or Port Address<br />
Translation (PAT).<br />
DHCP is the most common method of assigning IP addressing information to end-user clients. Network layer<br />
connectivity issues associated with DHCP include address pool definition, pool depletion, address and default<br />
gateway configuration, and server accessibility. In this lab, you will troubleshoot various problems related to<br />
NAT and DHCP.<br />
All contents are Copyright © 1992–2010 <strong>Cisco</strong> Systems, Inc. All rights reserved. This document is <strong>Cisco</strong> Public Information. Page 2 of 20
<strong>CCNP</strong>v6 <strong>TSHOOT</strong><br />
For each task or trouble ticket, the trouble scenario and problem symptom are described. While<br />
troubleshooting, you will discover the cause of the problem, correct it, and then document the process and<br />
results.<br />
NAT and DHCP Configuration<br />
Your company has decided not to implement a hosted services data center because of cost considerations.<br />
Because you will not be advertising a hosted services network, it was decided to discontinue the use of<br />
Border Gateway Protocol (BGP) in favor of a simple default static configuration.<br />
Phase 1 (TT-A and TT-B): Dynamic NAT will be used for internal users accessing the Internet. Static NAT<br />
will give teleworkers access to some of the key internal servers. Your Internet service provider (ISP) has<br />
assigned a block of public addresses using prefix 198.133.219.0/27. These addresses will be used for<br />
dynamic NAT with the internal 10.1.0.0/16 network, as well as static NAT to specific servers. Server SRV1 will<br />
act as a test server that provides access to an internal web-based application for remote workers. Router R1<br />
will have a default route to the ISP (R2) and will redistribute that route into Enhanced Interior Gateway<br />
Routing Protocol (EIGRP). The ISP will use a static route to the NAT public address pool on R1.<br />
Phase 2 (TT-C): A second DHCP server will be added in TT-C to support the branch office router R3 LAN.<br />
Switch DLS2 will be configured to provide DHCP addresses to the R3 LAN clients. The following diagram<br />
provides information on the NAT (Phase 1) and DHCP (Phase 2) implementation.<br />
All contents are Copyright © 1992–2010 <strong>Cisco</strong> Systems, Inc. All rights reserved. This document is <strong>Cisco</strong> Public Information. Page 3 of 20
<strong>CCNP</strong>v6 <strong>TSHOOT</strong><br />
Physical and Logical Topology Diagrams<br />
The baseline physical and logical topologies for the existing EIGRP-based network are provided in this lab to<br />
assist the troubleshooting effort.<br />
Lab Structure<br />
This lab is divided into two main sections.<br />
Section 1—Trouble Tickets and Troubleshooting Logs<br />
This section includes multiple tasks. Each task is associated with a trouble ticket (TT) and introduces one or<br />
more errors on one or more devices. If time is a consideration, each task or trouble ticket can be performed<br />
independently.<br />
Section 2—Troubleshooting Reference Information<br />
This section provides general troubleshooting information that can be applied to any of the trouble tickets in<br />
this lab. Examples of useful commands and output are provided. If time permits, it is recommended that you<br />
read through Section 2 prior to starting on the trouble tickets.<br />
Note: This lab uses <strong>Cisco</strong> 1841 routers with <strong>Cisco</strong> IOS Release 12.4(24)T1 and the advanced IP image<br />
c1841-advipservicesk9-mz.124-24.T1.bin. The switches are <strong>Cisco</strong> WS-C2960-24TT-L with the <strong>Cisco</strong> IOS<br />
image c2960-lanbasek9-mz.122-46.SE.bin and Catalyst 3560-24PS with the <strong>Cisco</strong> IOS image c3560advipservicesk9-mz.122-46.SE.bin.<br />
Other routers (such as 2801 and 2811), switches (such as 2950 or 3550),<br />
and <strong>Cisco</strong> IOS Software versions can be used if they have comparable capabilities and features. Depending<br />
on the router or switch model and <strong>Cisco</strong> IOS Software version, the commands available and output produced<br />
might vary from what is shown in this lab.<br />
Any changes made to configurations or topology (other than errors introduced) are noted in the lab and<br />
trouble tickets so that you are aware of them prior to beginning the troubleshooting process.<br />
Required Resources<br />
• 3 routers (<strong>Cisco</strong> 1841 with <strong>Cisco</strong> IOS Release 12.4(24)T1 Advanced IP Service or comparable)<br />
• 1 switch (<strong>Cisco</strong> 2960 with the <strong>Cisco</strong> IOS Release 12.2(46)SE C2960-LANBASEK9-M image or<br />
comparable)<br />
• 2 switches (<strong>Cisco</strong> 3560 with the <strong>Cisco</strong> IOS Release 12.2(46)SE C3560-advipservicesk9-mz image or<br />
comparable)<br />
• SRV1 (Windows PC with static IP address) with TFTP and syslog servers, plus an SSH client (PuTTY<br />
or comparable) and WireShark software<br />
• PC-B (Windows PC DHCP client) with PuTTY and WireShark software<br />
• PC-C (Windows PC DHCP client) with PuTTY and WireShark software<br />
• Serial and Ethernet cables<br />
All contents are Copyright © 1992–2010 <strong>Cisco</strong> Systems, Inc. All rights reserved. This document is <strong>Cisco</strong> Public Information. Page 4 of 20
<strong>CCNP</strong>v6 <strong>TSHOOT</strong><br />
Section 1—Trouble Tickets and Troubleshooting Logs<br />
Task 1: Trouble Ticket Lab 6-1 TT-A<br />
Step 1: Review trouble ticket Lab 6-1 TT-A.<br />
Your colleague has configured NAT on the edge router (R1), and the external users (simulated by R2 Lo0)<br />
can access the test server on the internal private network. However, host PC-B on the internal network cannot<br />
access the Internet. Your task is to diagnose the problem and verify that NAT is properly configured. In<br />
addition to external users accessing SRV1, internal users must also be able to access the Internet.<br />
Step 2: Load the device trouble ticket configuration files for TT-A.<br />
Using the procedure described in Lab 3-1, verify that the lab configuration files are present in flash. Load the<br />
proper configuration files as indicated in the Device Configuration File table.<br />
Note: The following device access methods are in effect after loading the configuration files:<br />
• Console access requires no username or password.<br />
• Telnet and SSH require username admin and password adminpa55.<br />
• The enable password is ciscoenpa55.<br />
Device Configuration File Table<br />
Device Name File to Load Notes<br />
ALS1 Lab61-ALS1-TT-A-Cfg.txt<br />
DLS1 Lab61-DLS1-TT-A-Cfg.txt<br />
DLS2 Lab61-DLS2-TT-A-Cfg.txt<br />
R1 Lab61-R1-TT-A-Cfg.txt<br />
R2 Lab61-R2-TT-A-Cfg.txt<br />
R3 Lab61-R3-TT-A-Cfg.txt<br />
SRV1 N/A Static IP: 10.1.50.1<br />
Default gateway: 10.1.50.254<br />
PC-B N/A DHCP<br />
PC-C N/A DHCP<br />
Step 3: Configure SRV1 and start the syslog and TFTP servers.<br />
Step 4: Release and renew the DHCP leases.<br />
a. Ensure that PC-B and PC-C are configured as a DHCP clients.<br />
b. After loading all TT-A device configuration files, issue the ipconfig /release and ipconfig<br />
/renew commands on both PCs.<br />
Note: This trouble ticket assumes that PC-C is in its standard location (connected to Fa0/18 on DLS2).<br />
All contents are Copyright © 1992–2010 <strong>Cisco</strong> Systems, Inc. All rights reserved. This document is <strong>Cisco</strong> Public Information. Page 5 of 20
<strong>CCNP</strong>v6 <strong>TSHOOT</strong><br />
Step 5: Outline the troubleshooting approach and validation steps.<br />
Use this space to identify your troubleshooting approach and the key steps to verify the problem is resolved.<br />
Troubleshooting approaches to select from include the follow-the-path, spot-the-differences, bottom-up, topdown,<br />
divide-and-conquer, shoot-from-the-hip, and move-the-problem methods.<br />
Note: In addition to a specific approach, you can use the generic troubleshooting process described at the<br />
beginning of Section 2 of this lab.<br />
_______________________________________________________________________________<br />
_______________________________________________________________________________<br />
_______________________________________________________________________________<br />
_______________________________________________________________________________<br />
_______________________________________________________________________________<br />
_______________________________________________________________________________<br />
Step 6: Record the troubleshooting process and configuration changes.<br />
Note: Section 2 of this lab includes useful commands and examples of output.<br />
Use this log to document your actions and results during the troubleshooting process. List the commands you<br />
used to gather information. As you progress, record what you think the problem might be and the actions you<br />
take to correct the problem.<br />
Device Actions and Results<br />
All contents are Copyright © 1992–2010 <strong>Cisco</strong> Systems, Inc. All rights reserved. This document is <strong>Cisco</strong> Public Information. Page 6 of 20
<strong>CCNP</strong>v6 <strong>TSHOOT</strong><br />
Step 7: Document trouble ticket debrief notes.<br />
Use this space to make notes of the key learning points that you picked up during the discussion of this<br />
trouble ticket with your instructor. The notes can include problems encountered, solutions applied, useful<br />
commands employed, alternate solutions, methods, and processes, and procedure and communication<br />
improvements.<br />
_______________________________________________________________________________<br />
_______________________________________________________________________________<br />
_______________________________________________________________________________<br />
_______________________________________________________________________________<br />
_______________________________________________________________________________<br />
_______________________________________________________________________________<br />
_______________________________________________________________________________<br />
Task 2: Trouble Ticket Lab 6-1 TT-B<br />
Step 1: Review trouble ticket Lab 6-1 TT-B.<br />
The NAT configuration has been corrected, and dynamic NAT is now functioning between internal hosts and<br />
the ISP. However, some users have called the help desk stating that Internet access is inconsistent.<br />
Sometimes it works, and other times it does not. Your task is to diagnose the problem and correct it. At a<br />
minimum, propose a possible solution to the problem so that internal users can consistently access the<br />
Internet.<br />
Step 2: Load the device trouble ticket configuration files for TT-B.<br />
Using the procedure described in Lab 3-1, verify that the lab configuration files are present in flash. Load the<br />
proper configuration files as indicated in the Device Configuration File table.<br />
Note: See Task 1, Step 2 for device access methods, usernames, and passwords after the configuration files<br />
have been loaded.<br />
Device Configuration File Table<br />
Device Name File to Load Notes<br />
ALS1 Lab61-ALS1-TT-B-Cfg.txt<br />
DLS1 Lab61-DLS1-TT-B-Cfg.txt<br />
DLS2 Lab61-DLS2-TT-B-Cfg.txt<br />
R1 Lab61-R1-TT-B-Cfg.txt<br />
R2 Lab61-R2-TT-B-Cfg.txt<br />
R3 Lab61-R3-TT-B-Cfg.txt<br />
SRV1 N/A Static IP: 10.1.50.1<br />
Default gateway: 10.1.50.254<br />
PC-B N/A DHCP<br />
PC-C N/A DHCP<br />
All contents are Copyright © 1992–2010 <strong>Cisco</strong> Systems, Inc. All rights reserved. This document is <strong>Cisco</strong> Public Information. Page 7 of 20
<strong>CCNP</strong>v6 <strong>TSHOOT</strong><br />
Step 3: Configure SRV1 and start the syslog and TFTP servers.<br />
Step 4: Release and renew the DHCP leases.<br />
a. Ensure that PC-B and PC-C are configured as a DHCP clients.<br />
b. After loading all TT-A device configuration files, issue the ipconfig /release and ipconfig<br />
/renew commands on both PCs.<br />
Note: This trouble ticket assumes that PC-C is in its standard location (connected to Fa0/18 on DLS2).<br />
Step 5: Outline the troubleshooting approach and validation steps.<br />
Use this space to identify your troubleshooting approach and the key steps to verify that the problem is<br />
resolved. Troubleshooting approaches to select from include the follow-the-path, spot-the-differences, bottomup,<br />
top-down, divide-and-conquer, shoot-from-the-hip, and move-the-problem methods.<br />
Note: In addition to a specific approach, you can use the generic troubleshooting process described at the<br />
beginning of Section 2 of this lab.<br />
_______________________________________________________________________________<br />
_______________________________________________________________________________<br />
_______________________________________________________________________________<br />
_______________________________________________________________________________<br />
_______________________________________________________________________________<br />
_______________________________________________________________________________<br />
Step 6: Record the troubleshooting process and configuration changes.<br />
Note: Section 2 of this lab includes sample troubleshooting flows, useful commands, and examples of output.<br />
Use this log to document your actions and results during the troubleshooting process. List the commands you<br />
used to gather information. As you progress, record what you think the problem might be and the actions you<br />
take to correct the problem.<br />
Device Actions and Results<br />
All contents are Copyright © 1992–2010 <strong>Cisco</strong> Systems, Inc. All rights reserved. This document is <strong>Cisco</strong> Public Information. Page 8 of 20
<strong>CCNP</strong>v6 <strong>TSHOOT</strong><br />
Device Actions and Results<br />
Step 7: Document trouble ticket debrief notes.<br />
Use this space to make notes of the key learning points that you picked up during the discussion of this<br />
trouble ticket with your instructor. The notes can include problems encountered, solutions applied, useful<br />
commands employed, alternate solutions, methods, and processes, and procedure and communication<br />
improvements.<br />
_______________________________________________________________________________<br />
_______________________________________________________________________________<br />
_______________________________________________________________________________<br />
_______________________________________________________________________________<br />
_______________________________________________________________________________<br />
_______________________________________________________________________________<br />
_______________________________________________________________________________<br />
Task 3: Trouble Ticket Lab 6-1 TT-C<br />
Step 1: Review trouble ticket Lab 6-1 TT-C.<br />
The company is expanding and opening a new branch office LAN that will be connected to router R3. It has<br />
been decided that switch DLS2 will provide DHCP services to this remote office. The branch office is<br />
represented by test host PC-C, which will be configured as a DHCP client. Your colleague says he has<br />
configured DHCP on DLS2 with a corresponding subnet and DHCP pool. However, test client PC-C has not<br />
been able to access server SRV1. The first address in the pool should be excluded because it is reserved for<br />
the R3 default gateway Fa0/0.<br />
Your task is to verify VLAN configuration and DHCP services and that PC-C can access internal server SRV1.<br />
Step 2: Load the device trouble ticket configuration files for TT-C.<br />
Using the procedure described in Lab 3-1, verify that the lab configuration files are present in flash. Load the<br />
proper configuration files as indicated in the Device Configuration File table.<br />
Note: See Task 1, Step 2 for device access methods, usernames, and passwords after the configuration files<br />
have been loaded.<br />
All contents are Copyright © 1992–2010 <strong>Cisco</strong> Systems, Inc. All rights reserved. This document is <strong>Cisco</strong> Public Information. Page 9 of 20
<strong>CCNP</strong>v6 <strong>TSHOOT</strong><br />
Device Configuration File Table<br />
Device Name File to Load Notes<br />
ALS1 Lab61-ALS1-TT-C-Cfg.txt<br />
DLS1 Lab61-DLS1-TT-C-Cfg.txt<br />
DLS2 Lab61-DLS2-TT-C-Cfg.txt<br />
R1 Lab61-R1-TT-C-Cfg.txt<br />
R2 Lab61-R2-TT-C-Cfg.txt<br />
R3 Lab61-R3-TT-C-Cfg.txt<br />
SRV1 N/A Static IP: 10.1.50.1<br />
Default gateway: 10.1.50.254<br />
PC-B N/A DHCP (release and renew after loading the device<br />
configurations)<br />
PC-C N/A DHCP (release and renew after loading the device<br />
configurations)<br />
Step 3: Configure SRV1 and start the syslog and TFTP servers.<br />
Step 4: Release and renew the DHCP lease on PC-C.<br />
a. Ensure that PC-C is configured as a DHCP client.<br />
b. Connect PC-C to R3.<br />
c. After loading all TT-C device configuration files, issue the ipconfig /release and ipconfig<br />
/renew commands on PC-C.<br />
Step 5: Outline the troubleshooting approach and validation steps.<br />
Use this space to identify your troubleshooting approach and the key steps to take to verify that the problem is<br />
resolved. Troubleshooting approaches to select from include the follow-the-path, spot-the-differences, bottomup,<br />
top-down, divide-and-conquer, shoot-from-the-hip, and move-the-problem methods.<br />
Note: In addition to a specific approach, you can use the generic troubleshooting process described at the<br />
beginning of Section 2 of this lab.<br />
_______________________________________________________________________________<br />
_______________________________________________________________________________<br />
_______________________________________________________________________________<br />
_______________________________________________________________________________<br />
_______________________________________________________________________________<br />
All contents are Copyright © 1992–2010 <strong>Cisco</strong> Systems, Inc. All rights reserved. This document is <strong>Cisco</strong> Public Information. Page 10 of 20
<strong>CCNP</strong>v6 <strong>TSHOOT</strong><br />
Step 6: Record the troubleshooting process and configuration changes.<br />
Note: Section 2 of this lab includes sample troubleshooting flows, useful commands, and examples of output.<br />
Use this log to document your actions and results during the troubleshooting process. List the commands that<br />
you used to gather information. As you progress, record what you think the problem might be and the actions<br />
you take to correct the problem.<br />
Device Actions and Results<br />
All contents are Copyright © 1992–2010 <strong>Cisco</strong> Systems, Inc. All rights reserved. This document is <strong>Cisco</strong> Public Information. Page 11 of 20
<strong>CCNP</strong>v6 <strong>TSHOOT</strong><br />
Step 7: Document trouble ticket debrief notes.<br />
Use this space to make notes of the key learning points that you picked up during the discussion of this<br />
trouble ticket with your instructor. The notes include problems encountered, solutions applied, useful<br />
commands employed, alternate solutions and methods, and procedure and communication improvements.<br />
_______________________________________________________________________________<br />
_______________________________________________________________________________<br />
_______________________________________________________________________________<br />
_______________________________________________________________________________<br />
_______________________________________________________________________________<br />
_______________________________________________________________________________<br />
_______________________________________________________________________________<br />
All contents are Copyright © 1992–2010 <strong>Cisco</strong> Systems, Inc. All rights reserved. This document is <strong>Cisco</strong> Public Information. Page 12 of 20
<strong>CCNP</strong>v6 <strong>TSHOOT</strong><br />
Section 2 Troubleshooting Reference Information<br />
NAT command examples include verification of NAT boundaries, the type of NAT configured, NAT statistics, NAT<br />
translations, and debugging NAT translations.<br />
DHCP examples include verification of the DHCP server configuration, address pools, DHCP server statistics,<br />
client configuration, and debugging DHCP activity.<br />
General Troubleshooting Process<br />
As a general guideline, you can use the following general troubleshooting process described in the course.<br />
1. Define the problem (symptoms).<br />
2. Gather information.<br />
3. Analyze the information.<br />
4. Propose a hypothesis (possible cause).<br />
5. Test the hypothesis.<br />
6. Eliminate or accept the hypothesis.<br />
7. Solve the problem.<br />
8. Document the problem.<br />
Command Summary<br />
The table lists useful commands for this lab. The sample output is shown on following pages.<br />
show ip nat statistics<br />
show ip nat translations<br />
debug ip icmp<br />
debug ip nat<br />
clear ip nat translations *<br />
clear ip nat statistics *<br />
Command Key Information Displayed<br />
show ip dhcp server statistics<br />
show ip dhcp pool<br />
show ip dhcp conflicts<br />
Displays the NAT pool configuration information, boundaries<br />
(inside and outside interfaces), translation pool size, and<br />
usage statistics.<br />
Displays all current translations (static and dynamic),<br />
including the initiating protocol as well as inside global, inside<br />
local, outside local, and outside global addresses.<br />
Displays real-time information related to ping (echo request<br />
and echo reply) and other protocols that make use of ICMP.<br />
Displays real-time information related to NAT translation<br />
activity (static and dynamic).<br />
Clears all dynamic translations.<br />
Clears NAT counters.<br />
Displays DHCP pool activity from hosts requesting IP<br />
addressing.<br />
Displays DHCP pool information, including the address<br />
range, number of excluded addresses, and lease activity.<br />
Displays conflicts resulting from assigning addresses that are<br />
already assigned to a device interface in the same subnet or<br />
network.<br />
show ip dhcp binding Displays the IP address, hardware (MAC) address, and lease<br />
All contents are Copyright © 1992–2010 <strong>Cisco</strong> Systems, Inc. All rights reserved. This document is <strong>Cisco</strong> Public Information. Page 13 of 20
<strong>CCNP</strong>v6 <strong>TSHOOT</strong><br />
debug dhcp detail<br />
debug ip dhcp server events<br />
clear ip dhcp server statistics<br />
clear ip dhcp conflict *<br />
show ip sockets<br />
Sample Troubleshooting Output<br />
NAT-related Commands<br />
expiration for a DHCP address assignment.<br />
Displays real-time information on a <strong>Cisco</strong> IOS DHCP client<br />
(router or switch).<br />
Displays real-time information for DHCP server process<br />
messages.<br />
Clears DHCP server statistics.<br />
Clears conflicted addresses.<br />
The following commands and output are samples from the devices in this lab.<br />
Displays the current connections for this server, including<br />
which services are running.<br />
R1#show ip nat translations<br />
Pro Inside global Inside local Outside local Outside global<br />
icmp 198.133.219.7:512 10.1.10.1:512 192.168.2.1:512 192.168.2.1:512<br />
--- 198.133.219.7 10.1.10.1 --- ---<br />
--- 198.133.219.1 10.1.50.1 --- ---<br />
udp 198.133.219.6:123 10.1.100.1:123 192.168.2.1:123 192.168.2.1:123<br />
tcp 198.133.219.6:38711 10.1.100.1:38711 192.168.2.1:23 192.168.2.1:23<br />
--- 198.133.219.6 10.1.100.1 --- ---<br />
udp 198.133.219.4:123 10.1.100.252:123 192.168.2.1:123 192.168.2.1:123<br />
--- 198.133.219.4 10.1.100.252 --- ---<br />
tcp 198.133.219.3:1121 10.1.10.1:1121 192.168.2.1:80 192.168.2.1:80<br />
--- 198.133.219.3 10.1.10.1 --- ---<br />
udp 198.133.219.5:123 10.1.100.253:123 192.168.2.1:123 192.168.2.1:123<br />
--- 198.133.219.5 10.1.100.253 --- ---<br />
In the above example, the connections resulted from pings (ICMP port 512), NTP (UDP port 123), Telnet (TCP<br />
port 23), and HTTP (TCP port 80).<br />
R1#show ip nat statistics<br />
Total active translations: 7 (1 static, 6 dynamic; 2 extended)<br />
Peak translations: 9, occurred 00:45:03 ago<br />
Outside interfaces:<br />
Serial0/0/0<br />
Inside interfaces:<br />
FastEthernet0/1<br />
Hits: 2442 Misses: 0<br />
CEF Translated packets: 2439, CEF Punted packets: 11<br />
Expired translations: 15<br />
Dynamic mappings:<br />
-- Inside Source<br />
[Id: 8] access-list 1 pool public-addrs refcount 6<br />
pool public-addrs: netmask 255.255.255.248<br />
start 198.133.219.3 end 198.133.219.6<br />
type generic, total addresses 4, allocated 4 (100%), misses 8<br />
Appl doors: 0<br />
Normal doors: 0<br />
Queued Packets: 0<br />
All contents are Copyright © 1992–2010 <strong>Cisco</strong> Systems, Inc. All rights reserved. This document is <strong>Cisco</strong> Public Information. Page 14 of 20
<strong>CCNP</strong>v6 <strong>TSHOOT</strong><br />
The above output shows NAT pool configuration information, boundaries (inside and outside interfaces),<br />
translation pool size, and usage statistics.<br />
R1#debug ip nat<br />
IP NAT debugging is on<br />
R1#terminal monitor<br />
R1#<br />
Nov 18 16:52:09.304: NAT*: s=10.1.10.1->198.133.219.6, d=192.168.2.1 [108]<br />
Nov 18 16:52:09.316: NAT*: s=192.168.2.1, d=198.133.219.6->10.1.10.1 [108]<br />
Nov 18 16:52:10.300: NAT*: s=10.1.10.1->198.133.219.6, d=192.168.2.1 [109]<br />
Nov 18 16:52:10.308: NAT*: s=192.168.2.1, d=198.133.219.6->10.1.10.1 [109]<br />
Nov 18 16:52:11.300: NAT*: s=10.1.10.1->198.133.219.6, d=192.168.2.1 [110]<br />
Nov 18 16:52:11.308: NAT*: s=192.168.2.1, d=198.133.219.6->10.1.10.1 [110]<br />
Nov 18 16:52:12.300: NAT*: s=10.1.10.1->198.133.219.6, d=192.168.2.1 [111]<br />
Nov 18 16:52:12.312: NAT*: s=192.168.2.1, d=198.133.219.6->10.1.10.1 [111]<br />
Nov 18 16:52:59.356: NAT*: s=10.1.100.252->198.133.219.4, d=192.168.2.1 [0]<br />
Nov 18 16:52:59.368: NAT*: s=192.168.2.1, d=198.133.219.4->10.1.100.252 [0]<br />
Nov 18 16:53:12.772: NAT: expiring 198.133.219.6 (10.1.10.1) icmp 512 (512)<br />
Nov 18 16:53:47.140: NAT*: s=10.1.100.1->198.133.219.5, d=192.168.2.1 [0]<br />
Nov 18 16:53:47.152: NAT*: s=192.168.2.1, d=198.133.219.5->10.1.100.1 [0]<br />
Nov 18 16:53:53.992: NAT*: s=10.1.100.253->198.133.219.3, d=192.168.2.1 [0]<br />
Nov 18 16:53:54.004: NAT*: s=192.168.2.1, d=198.133.219.3->10.1.100.253 [0]<br />
This first output example of NAT debug shows dynamic NAT translation of test pings from internal host PC-B to<br />
simulated ISP R2, Lo0. Note that translations are aged out (expired) if the source host does not refresh the<br />
address assignment. The terminal monitor command was issued on R1 so that the debug output could be<br />
viewed from a Telnet connection.<br />
R1#debug ip nat<br />
IP NAT debugging is on<br />
R1#<br />
Nov 18 19:31:36.112: NAT: translation failed (A), dropping packet s=10.1.10.1 d=<br />
192.168.2.1<br />
Nov 18 19:31:37.108: NAT: translation failed (A), dropping packet s=10.1.10.1 d=<br />
192.168.2.1<br />
R1#<br />
Nov 18 19:31:38.112: NAT: translation failed (A), dropping packet s=10.1.10.1 d=<br />
192.168.2.1<br />
R1#<br />
Nov 18 19:31:39.112: NAT: translation failed (A), dropping packet s=10.1.10.1 d=<br />
192.168.2.1<br />
The above output example shows error messages reported on the NAT router because of pool depletion and the<br />
inability to assign a public source address to the packet being routed.<br />
R1#debug ip icmp<br />
ICMP packet debugging is on<br />
Nov 18 19:50:50.879: ICMP: dst (192.168.2.1) host unreachable sent to 10.1.10.1<br />
Nov 18 19:50:51.875: ICMP: dst (192.168.2.1) host unreachable sent to 10.1.10.1<br />
R1#<br />
Nov 18 19:50:52.879: ICMP: dst (192.168.2.1) host unreachable sent to 10.1.10.1<br />
R1#<br />
Nov 18 19:50:53.879: ICMP: dst (192.168.2.1) host unreachable sent to 10.1.10.1<br />
The debug ip icmp output shows R1 responding to host PC-B with an error during a ping to the ISP because<br />
of the lack of NAT translation.<br />
All contents are Copyright © 1992–2010 <strong>Cisco</strong> Systems, Inc. All rights reserved. This document is <strong>Cisco</strong> Public Information. Page 15 of 20
<strong>CCNP</strong>v6 <strong>TSHOOT</strong><br />
R2#debug ip icmp<br />
Nov 18 18:29:31.381: ICMP: echo reply sent, src 192.168.2.1, dst 10.1.10.1<br />
Nov 18 18:29:36.737: ICMP: echo reply sent, src 192.168.2.1, dst 10.1.10.1<br />
Nov 18 18:29:41.745: ICMP: echo reply sent, src 192.168.2.1, dst 10.1.10.1<br />
Nov 18 18:29:46.753: ICMP: echo reply sent, src 192.168.2.1, dst 10.1.10.1<br />
The above output shows R2 sending replies to PC-B at the internal private address because of the lack of NAT<br />
translation.<br />
DHCP-Related Commands<br />
DLS2#show ip dhcp server statistics<br />
Memory usage 15668<br />
Address pools 1<br />
Database agents 0<br />
Automatic bindings 1<br />
Manual bindings 0<br />
Expired bindings 0<br />
Malformed messages 0<br />
Secure arp entries 0<br />
Renew messages 2<br />
Message Received<br />
BOOTREQUEST 0<br />
DHCPDISCOVER 4<br />
DHCPREQUEST 4<br />
DHCPDECLINE 0<br />
DHCPRELEASE 1<br />
DHCPINFORM 0<br />
Message Sent<br />
BOOTREPLY 0<br />
DHCPOFFER 2<br />
DHCPACK 4<br />
DHCPNAK 0<br />
The above output displays DHCP pool activity from hosts requesting IP addressing.<br />
DLS2#show ip dhcp pool<br />
Pool BRO3 :<br />
Utilization mark (high/low) : 100 / 0<br />
Subnet size (first/next) : 0 / 0<br />
Total addresses : 254<br />
Leased addresses : 1<br />
Excluded addresses : 3<br />
Pending event : none<br />
1 subnet is currently in the pool :<br />
Current index IP address range Leased/Excluded/Total<br />
10.1.80.1 10.1.80.1 - 10.1.80.254 1 / 3 / 254<br />
The above output displays DHCP pool information, including the address range, number of excluded addresses,<br />
and lease activity.<br />
DLS2#show ip dhcp conflict<br />
IP address Detection method Detection time VRF<br />
10.1.80.1 Gratuitous ARP Nov 20 2009 06:09 PM<br />
All contents are Copyright © 1992–2010 <strong>Cisco</strong> Systems, Inc. All rights reserved. This document is <strong>Cisco</strong> Public Information. Page 16 of 20
<strong>CCNP</strong>v6 <strong>TSHOOT</strong><br />
The above output displays an address conflict resulting from the attempted assignment of the 10.1.80.1 address.<br />
The server sends a ping for an address before it attempts to assign that address from the pool. Also, after the<br />
client is assigned an IP address by the DHCP server, it sends a Gratuitous ARP or test ARP for that address. If<br />
the address is already assigned to a device interface, the device to which it is assigned responds, and the DHCP<br />
server marks it as a conflicted address. Conflicted addresses can be cleared with the clear ip dhcp<br />
conflict * command.<br />
DLS2#show ip dhcp binding<br />
Bindings from all pools not associated with VRF:<br />
IP address Client-ID/ Lease expiration Type<br />
Hardware address/<br />
User name<br />
10.1.80.2 0100.0bdb.04a5.cd Nov 21 2009 02:50 PM Automatic<br />
The above output displays the IP address, hardware (MAC) address, and lease expiration for a DHCP address<br />
assignment.<br />
DLS2#debug ip dhcp server events<br />
DHCP server event debugging is on.<br />
DLS2#<br />
Nov 20 15:20:31.653: DHCPD: Sending notification of TERMINATION:<br />
Nov 20 15:20:31.653: DHCPD: address 10.1.80.2 mask 255.255.255.0<br />
Nov 20 15:20:31.653: DHCPD: reason flags: RELEASE<br />
Nov 20 15:20:31.653: DHCPD: htype 1 chaddr 000b.db04.a5cd<br />
Nov 20 15:20:31.653: DHCPD: lease time remaining (secs) = 86356<br />
Nov 20 15:20:31.653: DHCPD: interface = FastEthernet0/5<br />
Nov 20 15:20:31.653: DHCPD: returned 10.1.80.2 to address pool BRO3.<br />
DLS2#<br />
Nov 20 15:20:46.226: DHCPD: Sending notification of DISCOVER:<br />
Nov 20 15:20:46.226: DHCPD: htype 1 chaddr 000b.db04.a5cd<br />
Nov 20 15:20:46.226: DHCPD: giaddr = 10.1.80.1<br />
Nov 20 15:20:46.226: DHCPD: interface = FastEthernet0/5<br />
Nov 20 15:20:46.226: DHCPD: class id 4d53465420352e30<br />
Nov 20 15:20:48.239: DHCPD: client requests 10.1.80.2.<br />
Nov 20 15:20:48.239: DHCPD: Adding binding to radix tree (10.1.80.2)<br />
Nov 20 15:20:48.239: DHCPD: Adding binding to hash tree<br />
Nov 20 15:20:48.239: DHCPD: assigned IP address 10.1.80.2 to client<br />
0100.0bdb.04a5.cd. (471 0)<br />
Nov 20 15:20:48.239: DHCPD: Sending notification of ASSIGNMENT:<br />
Nov 20 15:20:48.239: DHCPD: address 10.1.80.2 mask 255.255.255.0<br />
Nov 20 15:20:48.239: DHCPD: htype 1 chaddr 000b.db04.a5cd<br />
Nov 20 15:20:48.239: DHCPD: lease time remaining (secs) = 86400<br />
Nov 20 15:20:48.239: DHCPD: interface = FastEthernet0/5<br />
Nov 20 15:21:49.307: DHCPD: checking for expired leases.<br />
The above output shows the process that the DHCP server goes through when a client issues the ipconfig<br />
/release and ipconfig /renew commands.<br />
R3#debug ip udp<br />
UDP packet debugging is on<br />
R3#conf t<br />
Enter configuration commands, one per line. End with CNTL/Z.<br />
All contents are Copyright © 1992–2010 <strong>Cisco</strong> Systems, Inc. All rights reserved. This document is <strong>Cisco</strong> Public Information. Page 17 of 20
<strong>CCNP</strong>v6 <strong>TSHOOT</strong><br />
R3(config)#int f0/0<br />
R3(config-if)#no ip helper-address 10.1.2.13<br />
R3(config-if)#<br />
*Nov 20 15:53:29.606: UDP: rcvd src=0.0.0.0(68), dst=255.255.255.255(67), length<br />
=308<br />
*Nov 20 15:53:32.606: UDP: rcvd src=0.0.0.0(68), dst=255.255.255.255(67), length<br />
=308<br />
*Nov 20 15:53:41.610: UDP: rcvd src=0.0.0.0(68), dst=255.255.255.255(67), length<br />
=308<br />
*Nov 20 15:53:57.614: UDP: rcvd src=0.0.0.0(68), dst=255.255.255.255(67), length<br />
=308<br />
R3#<br />
The above output shows the DHCP relay agent (R3) messages when a helper address is not configured. The<br />
UDP packets received are from the DHCP client (the source address is 0.0.0.0 port 68) searching for a DHCP<br />
server (the destination broadcast address is 255.255.255.255 port 67). There are no sent messages to the client<br />
because the broadcast is not forwarded to the DHCP server.<br />
R3(config)#int f0/0<br />
R3(config-if)#ip helper-address 10.1.2.13<br />
R3(config-if)#<br />
*Nov 20 15:54:19.547: Reserved port 67 in Transport Port Agent for UDP IP type 1<br />
*Nov 20 15:54:34.035: UDP: rcvd src=0.0.0.0(68), dst=255.255.255.255(67), length<br />
=308<br />
*Nov 20 15:54:34.035: UDP: sent src=10.1.80.1(67), dst=10.1.2.13(67), length=308<br />
*Nov 20 15:54:3<strong>6.0</strong>43: UDP: rcvd src=10.1.2.13(67), dst=10.1.80.1(67), length=308<br />
*Nov 20 15:54:3<strong>6.0</strong>47: UDP: sent src=0.0.0.0(67), dst=255.255.255.255(68), length<br />
=308<br />
*Nov 20 15:54:3<strong>6.0</strong>47: UDP: rcvd src=0.0.0.0(68), dst=255.255.255.255(67), length<br />
=324<br />
*Nov 20 15:54:3<strong>6.0</strong>47: UDP: sent src=10.1.80.1(67), dst=10.1.2.13(67), length=324<br />
*Nov 20 15:54:3<strong>6.0</strong>51: UDP: rcvd src=10.1.2.13(67), dst=10.1.80.1(67), length=308<br />
*Nov 20 15:54:3<strong>6.0</strong>51: UDP: sent src=0.0.0.0(67), dst=255.255.255.255(68), length<br />
=308<br />
The above output shows the DHCP relay agent (R3) messages when a helper address is configured. The DHCP<br />
exchange between the server and the client are captured.<br />
DLS2#show ip sockets<br />
Proto Remote Port Local Port In Out Stat TTY OutputIF<br />
17 --listen-- 10.1.200.253 1985 0 0 1001 0<br />
17 10.1.50.1 162 10.1.100.253 62682 0 0 0 0<br />
17 --listen-- 10.1.200.253 1975 0 0 11 0<br />
17 10.1.80.1 67 10.1.200.253 67 0 0 2211 0<br />
17 0.0.0.0 0 10.1.200.253 2228 0 0 211 0<br />
17 --listen-- 10.1.200.253 161 0 0 1 0<br />
17 --listen-- 10.1.200.253 162 0 0 11 0<br />
17 --listen-- 10.1.200.253 55485 0 0 1 0<br />
17 --listen-- --any-- 161 0 0 20001 0<br />
17 --listen-- --any-- 162 0 0 20011 0<br />
17 --listen-- --any-- 61812 0 0 20001 0<br />
17 --listen-- 10.1.200.253 123 0 0 1 0<br />
17 10.1.50.1 514 10.1.100.253 58346 0 0 400201 0<br />
The above output displays the current connections for this server. The remote connection with R3 Fa0/0<br />
(10.1.80.1) shows that the DHCP server is running on DLS2 and listening for requests on port 67 (DHCP server).<br />
All contents are Copyright © 1992–2010 <strong>Cisco</strong> Systems, Inc. All rights reserved. This document is <strong>Cisco</strong> Public Information. Page 18 of 20
<strong>CCNP</strong>v6 <strong>TSHOOT</strong><br />
Reflection Questions<br />
1. Which lab trouble tickets did you have the most difficulty with?<br />
__________________________________________________________________________________________<br />
__________________________________________________________________________________________<br />
__________________________________________________________________________________________<br />
2. Would you change anything about the process that you used for any of the trouble tickets now that you see the<br />
resolution of the problem?<br />
__________________________________________________________________________________________<br />
__________________________________________________________________________________________<br />
__________________________________________________________________________________________<br />
3. Which commands did you find most useful in diagnosing NAT and DHCP issues? Add these to your toolbox for<br />
future use. Which commands did you find least useful?<br />
__________________________________________________________________________________________<br />
__________________________________________________________________________________________<br />
__________________________________________________________________________________________<br />
All contents are Copyright © 1992–2010 <strong>Cisco</strong> Systems, Inc. All rights reserved. This document is <strong>Cisco</strong> Public Information. Page 19 of 20
<strong>CCNP</strong>v6 <strong>TSHOOT</strong><br />
Chapter 7 Lab 7-1, Router Performance<br />
Lab Topology<br />
Note: The topology for this lab moves access switch ALS1 to R3 and disconnects it from switches DLS1 and<br />
DLS2. This allows a load to be placed on R3 using ALS1 and DLS2. PC-B is moved to switch ALS1 port Fa0/11.<br />
Performance testing is done using <strong>Cisco</strong> IOS commands on R3 and pings from PC-B. Even though ALS1 is no<br />
longer attached to DSL1 and DLS2, VLAN 10 still exists. The interfaces for port channel 1 on DLS1 and port<br />
channel 2 on DLS2 are temporarily shutdown.<br />
Objectives<br />
• Load the trouble ticket device configuration files for each trouble ticket.<br />
• Diagnose and resolve problems related to router performance, such as excessive CPU and memory<br />
utilization.<br />
• Document troubleshooting progress, configuration changes, and problem resolution.<br />
All contents are Copyright © 1992–2010 <strong>Cisco</strong> Systems, Inc. All rights reserved. This document is <strong>Cisco</strong> Public Information. Page 1 of 32
<strong>CCNP</strong>v6 <strong>TSHOOT</strong><br />
Background<br />
A number of factors can affect router performance. In addition to heavy traffic loads, these can include<br />
suboptimal configurations for interfaces, WAN links, access lists, and routing protocols. In this activity, you<br />
troubleshoot various problems related to router performance and use <strong>Cisco</strong> IOS utilities to help diagnose the<br />
issues. For each task or trouble ticket, the trouble scenario and problem symptom is described. While<br />
troubleshooting, you will discover the cause of the problem, correct it, and then document the process and<br />
results.<br />
Note: The focus of this lab is on the tools available to diagnose performance issues. The problems induced<br />
are intended to create symptoms in a lab environment and are not necessarily real-world examples. In<br />
addition to the information provided in Section 2, command examples and assistance are provided inline with<br />
the trouble tickets.<br />
Lab Structure<br />
This lab is divided into two main sections.<br />
Section 1—Trouble Tickets and Troubleshooting Logs<br />
This section includes multiple tasks. Each task is associated with a trouble ticket (TT) and introduces one or<br />
more errors on one or more devices. If time is a consideration, each task or trouble ticket can be performed<br />
independently.<br />
Section 2—Troubleshooting Reference Information<br />
This section provides a generic troubleshooting process and examples of useful commands and output. If<br />
time permits, it is recommended you read through Section 2 prior to starting on the trouble tickets.<br />
Note: This lab uses <strong>Cisco</strong> 1841 routers with <strong>Cisco</strong> IOS Release 12.4(24)T1 and the advanced IP image<br />
c1841-advipservicesk9-mz.124-24.T1.bin. The switches are <strong>Cisco</strong> WS-C2960-24TT-L with the <strong>Cisco</strong> IOS<br />
image c2960-lanbasek9-mz.122-46.SE.bin and Catalyst 3560-24PS with the <strong>Cisco</strong> IOS image c3560advipservicesk9-mz.122-46.SE.bin.<br />
Other routers (such as 2801 and 2811), switches (such as 2950 or 3550),<br />
and <strong>Cisco</strong> IOS Software versions can be used if they have comparable capabilities and features. Depending<br />
on the router or switch model and <strong>Cisco</strong> IOS Software version, the commands available and output produced<br />
might vary from what is shown in this lab.<br />
Required Resources<br />
• 3 routers (<strong>Cisco</strong> 1841 with the <strong>Cisco</strong> IOS Release 12.4(24)T1 Advanced IP Service or comparable)<br />
• 1 switch (<strong>Cisco</strong> 2960 with the <strong>Cisco</strong> IOS Release 12.2(46)SE C2960-LANBASEK9-M image or<br />
comparable)<br />
• 2 switches (<strong>Cisco</strong> 3560 with the <strong>Cisco</strong> IOS Release 12.2(46)SE C3560- advipservicesk9-mz image or<br />
comparable)<br />
• SRV1 (Windows PC with static IP address) with TFTP and syslog servers plus an SSH client (PuTTY<br />
or comparable) and WireShark software<br />
• PC-B (Windows PC DHCP client) with PuTTY and WireShark software<br />
• PC-C (Windows PC DHCP client) with PuTTY and WireShark software<br />
• Serial and Ethernet cables<br />
All contents are Copyright © 1992–2010 <strong>Cisco</strong> Systems, Inc. All rights reserved. This document is <strong>Cisco</strong> Public Information. Page 2 of 32
<strong>CCNP</strong>v6 <strong>TSHOOT</strong><br />
Section 1—Trouble Tickets and Troubleshooting Logs<br />
Task 1: Trouble Ticket Lab 7-1 TT-A<br />
In this lab, the <strong>Cisco</strong> IOS command ttcp is used to simulate a heavy traffic load between switches ALS1 and<br />
DLS2. The TTCP utility is a hidden, unsupported <strong>Cisco</strong> IOS command. This lab provides step-by-step<br />
assistance for using <strong>Cisco</strong> IOS performance diagnostic commands and the TTCP utility.<br />
Note: Appendix A contains additional information on how to set up a PC as a client end device for TTCP.<br />
A recommended approach to this lab is to follow a troubleshooting process that includes the following highlevel<br />
tasks:<br />
• Generate test traffic using the ping or ttcp command, as described in this task.<br />
• Use ping to measure the performance between the headquarters and branch office. For example,<br />
ping from client PC-B to server SRV1.<br />
• Examine the key performance indicators, such as interfaces, CPU, and memory on the routers, and<br />
look for symptoms associated with performance problems.<br />
• Examine the routers for features and configurations that deviate from the baseline configurations and<br />
attempt to find the root cause of the problems.<br />
• Address the issues causing the performance problems and test to verify that the performance has<br />
improved.<br />
Step 1: Review trouble ticket Lab 7-1 TT-A.<br />
It is Monday morning and as soon as you enter your office at headquarters, you receive a call from your<br />
colleague from the branch office (R3 LAN). She tells you that client (PC-B) applications report errors while<br />
connecting to the corporate server (SRV1) for large file transfers (simulated by TTCP). Your colleague<br />
suspects that there is performance degradation on the R3 router and has run some tests to verify this. She<br />
also has the baseline performance tests to compare with.<br />
Another colleague who works the night shift has full access to the branch office devices. You suspect he<br />
might have made some configuration changes.<br />
Your task is to diagnose the branch office problems and correct them.<br />
Step 2: Load the device trouble ticket configuration files for TT-A.<br />
Using the procedure described in Lab 3-1, verify that the lab configuration files are present in flash. Load the<br />
proper configuration files as indicated in the Device Configuration File Table.<br />
Note: The following device access methods are in effect after loading the configuration files:<br />
• Console access requires no username or password.<br />
• Telnet and SSH require username admin and password adminpa55.<br />
• The enable password is ciscoenpa55.<br />
All contents are Copyright © 1992–2010 <strong>Cisco</strong> Systems, Inc. All rights reserved. This document is <strong>Cisco</strong> Public Information. Page 3 of 32
<strong>CCNP</strong>v6 <strong>TSHOOT</strong><br />
Device Configuration File Table<br />
Device Name File to Load Notes<br />
ALS1 Lab71-ALS1-TT-A-Cfg.txt<br />
DLS1 Lab71-DLS1-TT-A-Cfg.txt<br />
DLS2 Lab71-DLS2-TT-A-Cfg.txt<br />
R1 Lab71-R1-TT-A-Cfg.txt<br />
R2 Lab71-R2-TT-A-Cfg.txt<br />
R3 Lab71-R3-TT-A-Cfg.txt<br />
SRV1 N/A Static IP: 10.1.50.1/24<br />
Default gateway: 10.1.50.254<br />
PC-B N/A Static IP: 10.1.80.254/24<br />
Default gateway: 10.1.80.1<br />
PC-C N/A DHCP<br />
Step 3: Configure PC-B.<br />
Configure PC-B with static IP address 10.1.80.254/24 and default gateway 10.1.80.1.<br />
Step 4: Test R3 performance without the TTCP load generator.<br />
Use <strong>Cisco</strong> IOS commands and pings to record the router performance figures simulating a condition where no<br />
large file transfers are currently being transmitted from PC-B to SRV1. These results can be compared to the<br />
baseline output (selected baseline information is shown) and the output obtained when using the TTCP utility.<br />
Note: Sample output is provided. Depending on your timing and the devices in use, the output and results<br />
may vary.<br />
a. Ping from PC-B to SRV1 (10.1.50.1) and record the results here. Include minimum, maximum, and<br />
average round-trip times.<br />
________________________________________________________________________________<br />
________________________________________________________________________________<br />
C:\>ping 10.1.50.1<br />
Pinging 10.1.50.1 with 32 bytes of data:<br />
Reply from 10.1.50.1: bytes=32 time=3ms TTL=64<br />
Reply from 10.1.50.1: bytes=32 time=1ms TTL=64<br />
Reply from 10.1.50.1: bytes=32 time=1ms TTL=64<br />
Reply from 10.1.50.1: bytes=32 time=1ms TTL=64<br />
Ping statistics for 10.1.50.1:<br />
Packets: Sent = 4, Received = 4, Lost = 0 (0% loss),<br />
Approximate round trip times in milli-seconds:<br />
Minimum = 1ms, Maximum = 3ms, Average = 1ms<br />
All contents are Copyright © 1992–2010 <strong>Cisco</strong> Systems, Inc. All rights reserved. This document is <strong>Cisco</strong> Public Information. Page 4 of 32
<strong>CCNP</strong>v6 <strong>TSHOOT</strong><br />
b. Issue the show interfaces fa0/0 command and note the transmit and receive loads (txload and<br />
rxload).<br />
________________________________________________________________________________<br />
________________________________________________________________________________<br />
R3#show interfaces fa0/0<br />
FastEthernet0/0 is up, line protocol is up<br />
Hardware is Gt96k FE, address is 001b.530d.6028 (bia 001b.530d.6028)<br />
Internet address is 10.1.80.1/24<br />
MTU 1500 bytes, BW 100000 Kbit/sec, DLY 100 usec,<br />
reliability 255/255, txload 1/255, rxload 1/255<br />
c. Issue the show interfaces fa0/0 stats command. Record the switching path and the packets<br />
in and out for processor and route cache.<br />
________________________________________________________________________________<br />
________________________________________________________________________________<br />
R3#show interfaces fa0/0 stats<br />
FastEthernet0/0<br />
Switching path Pkts In Chars In Pkts Out Chars Out<br />
Processor 50 16309 176 18457<br />
Route cache 1 159 0 0<br />
Total 51 16468 176 18457<br />
Total 116557 66924378 115034 6384079<br />
d. Issue the show interfaces fa0/0 summary command for Fa0/0 and note the transmit (tx) and<br />
receive (rx) rates in bits per second and packets per second. With no load, there might be very little<br />
activity.<br />
________________________________________________________________________________<br />
________________________________________________________________________________<br />
R3#show interfaces fa0/0 summary<br />
*: interface is up<br />
IHQ: pkts in input hold queue IQD: pkts dropped from input queue<br />
OHQ: pkts in output hold queue OQD: pkts dropped from output queue<br />
RXBS: rx rate (bits/sec) RXPS: rx rate (pkts/sec)<br />
TXBS: tx rate (bits/sec) TXPS: tx rate (pkts/sec)<br />
TRTL: throttle count<br />
Interface IHQ IQD OHQ OQD RXBS RXPS TXBS TXPS TRTL<br />
------------------------------------------------------------------------<br />
* FastEthernet0/0 0 0 0 0 0 1 0 0 0<br />
e. Issue the show processes cpu sorted command on R3 and note the CPU utilization for five<br />
seconds, one minute, and five minutes. Also note that the processes running are sorted by highest<br />
CPU utilization.<br />
________________________________________________________________________________<br />
________________________________________________________________________________<br />
All contents are Copyright © 1992–2010 <strong>Cisco</strong> Systems, Inc. All rights reserved. This document is <strong>Cisco</strong> Public Information. Page 5 of 32
<strong>CCNP</strong>v6 <strong>TSHOOT</strong><br />
R3#show processes cpu sorted<br />
CPU utilization for five seconds: 0%/0%; one minute: 0%; five minutes: 0%<br />
PID Runtime(ms) Invoked uSecs 5Sec 1Min 5Min TTY Process<br />
153 4 1366369 0 0.15% 0.12% 0.10% 0 HQF Shaper Backg<br />
2 0 7658 0 0.07% 0.02% 0.02% 0 Load Meter<br />
5 4 3 1333 0.00% 0.00% 0.00% 0 Pool Manager<br />
<br />
f. Generate some traffic by pinging from switch ALS1 to SRV1. From privileged EXEC mode on ALS1,<br />
issue the ping 10.1.50.1 repeat 1000 size 1000 command. What are the minimum,<br />
maximum, and average round-trip times?<br />
________________________________________________________________________________<br />
________________________________________________________________________________<br />
Success rate is 100 percent (1000/1000), round-trip min/avg/max = 1/4/9 ms<br />
g. Quickly issue the show processes cpu sorted command on R3 again and note the CPU<br />
utilization for five seconds, one minute, and five minutes.<br />
________________________________________________________________________________<br />
________________________________________________________________________________<br />
R3#show processes cpu sorted<br />
CPU utilization for five seconds: 17%/5%; one minute: 3%; five minutes: 1%<br />
PID Runtime(ms) Invoked uSecs 5Sec 1Min 5Min TTY Process<br />
91 2308 4797 481 11.19% 2.10% 0.52% 0 IP Input<br />
3 13308 2477 5372 0.87% 0.18% 0.05% 0 Exec<br />
124 12 265 45 0.15% 0.03% 0.00% 0 TCP Timer<br />
153 20 93423 0 0.15% 0.12% 0.10% 0 HQF Shaper Backg<br />
265 1280 11572 110 0.07% 0.01% 0.00% 0 IP-EIGRP: HELLO<br />
<br />
h. Issue the show processes cpu history command on R3 to see CPU utilization history in graph<br />
format. Note the CPU utilization for the last 60 seconds, last 60 minutes, and last 72 hours.<br />
________________________________________________________________________________<br />
________________________________________________________________________________<br />
R3#show processes cpu history<br />
R3 06:04:05 PM Monday Nov 30 2009 UTC<br />
100<br />
90<br />
80<br />
70<br />
1 11111 11111<br />
All contents are Copyright © 1992–2010 <strong>Cisco</strong> Systems, Inc. All rights reserved. This document is <strong>Cisco</strong> Public Information. Page 6 of 32
<strong>CCNP</strong>v6 <strong>TSHOOT</strong><br />
60<br />
50<br />
40<br />
30<br />
20<br />
10<br />
0....5....1....1....2....2....3....3....4....4....5....5....6<br />
0 5 0 5 0 5 0 5 0 5 0<br />
CPU% per second (last 60 seconds)<br />
5 1 1 1 9<br />
511911111111119119413111111111111112111111211111111111829111<br />
100 *<br />
90 *<br />
80 *<br />
70 *<br />
60 * *<br />
50 * *<br />
40 * *<br />
30 * *<br />
20 * * * * #<br />
10 * * * * * #<br />
0....5....1....1....2....2....3....3....4....4....5....5....6<br />
0 5 0 5 0 5 0 5 0 5 0<br />
CPU% per minute (last 60 minutes)<br />
* = maximum CPU% # = average CPU%<br />
9<br />
9<br />
100 *<br />
90 *<br />
80 *<br />
70 *<br />
60 *<br />
50 *<br />
40 *<br />
30 *<br />
20 *<br />
10 *<br />
0....5....1....1....2....2....3....3....4....4....5....5....6....6....7..<br />
0 5 0 5 0 5 0 5 0 5 0 5 0<br />
CPU% per hour (last 72 hours)<br />
* = maximum CPU% # = average CPU%<br />
Step 5: Generate loads on R3 using the TTCP utility.<br />
For this trouble ticket, you can use the <strong>Cisco</strong> IOS command ttcp to simulate a heavy traffic load instead of<br />
performing large file transfers between the client (PC-B) and server SRV1 for testing. The TTCP utility consists of<br />
a client side and server side. Because this lab revolves around router performance, you can use the switches as<br />
test points.<br />
Note: The ttcp command is a hidden, unsupported, privileged mode command, and it is not available for all<br />
<strong>Cisco</strong> IOS Software releases. For instance, some platforms require the <strong>Cisco</strong> IOS Enterprise feature set to<br />
perform this activity. For more information about TTCP, see the URL references provided at the end of the lab<br />
and in Appendix A.<br />
To initiate a TTCP connection and generate test traffic from switch ALS1 at the branch office to switch DLS2 at<br />
headquarters, use the following procedure.<br />
All contents are Copyright © 1992–2010 <strong>Cisco</strong> Systems, Inc. All rights reserved. This document is <strong>Cisco</strong> Public Information. Page 7 of 32
<strong>CCNP</strong>v6 <strong>TSHOOT</strong><br />
a. On DLS2, the device that will perform the receiving (server) side of the connection, issue the ttcp<br />
command. You are prompted for information about this connection. You can accept the default values<br />
or enter new values. You can also use the command line to enter all the parameters as one<br />
command. The command generated is shown after the last entry prompt.<br />
As TTCP waits for the transmitting (client) side to make a connection, the console screen freezes.<br />
DLS2#ttcp<br />
transmit or receive [receive]:<br />
receive packets asynchronously [n]:<br />
perform tcp half close [n]:<br />
receive buflen [32768]:<br />
bufalign [16384]:<br />
bufoffset [0]:<br />
port [5001]:<br />
sinkmode [y]:<br />
rcvwndsize [32768]:<br />
ack frequency [0]:<br />
delayed ACK [y]:<br />
show tcp information at end [n]:<br />
ttcp-r: buflen=32768, align=16384/0, port=5001<br />
rcvwndsize=32768, delayedack=yes tcp<br />
b. On ALS1, the device that will perform the client side of the connection, you must specify that this side<br />
is the transmitting side because the default is to run in receive mode. You must also specify the IP<br />
address of the receiving side (DLS2) to initiate the connection.<br />
ALS1#ttcp<br />
transmit or receive [receive]: transmit<br />
Target IP address: 10.1.100.253<br />
calculate checksum during buffer write [y]:<br />
perform tcp half close [n]:<br />
send buflen [32768]:<br />
send nbuf [2048]:<br />
bufalign [16384]:<br />
bufoffset [0]:<br />
port [5001]:<br />
sinkmode [y]:<br />
buffering on writes [y]:<br />
show tcp information at end [n]:<br />
ttcp-t: buflen=32768, nbuf=2048, align=16384/0, port=5001 tcp -><br />
10.1.100.253<br />
ttcp-t: connect<br />
ttcp-t: 67108864 bytes in 106812 ms (106.812 real seconds) (~613 kB/s) +++<br />
ttcp-t: 2048 I/O calls<br />
ttcp-t: 0 sleeps (0 ms total) (0 ms average)<br />
The DLS2 (receive) side of the connection shows the following information when the transfer<br />
completes:<br />
ttcp-r: accept from 10.1.80.251<br />
ttcp-r: 67108864 bytes in 106837 ms (106.837 real seconds) (~613 kB/s) +++<br />
ttcp-r: 43182 I/O calls<br />
ttcp-r: 0 sleeps (0 ms total) (0 ms average)<br />
All contents are Copyright © 1992–2010 <strong>Cisco</strong> Systems, Inc. All rights reserved. This document is <strong>Cisco</strong> Public Information. Page 8 of 32
<strong>CCNP</strong>v6 <strong>TSHOOT</strong><br />
Referring to the above results, the TTCP utility transmitted over 67 million bytes in approximately 106<br />
seconds or about 613 Kilobytes per second (kB/s). As a comparison, the baseline configuration without the<br />
errors in this trouble ticket took approximately 70 seconds to transmit the same amount of data but at a rate of<br />
about 898 kB/s. Different devices and network links produce different results.<br />
Note: You cannot issue any commands on the console of either device until the transfer finishes. The<br />
transmission can be interrupted at any point in time from the transmitting side using the key combination Ctrl-<br />
Shift-6.<br />
Caution: This utility can overload a router with test traffic. It is not recommended to use it on production<br />
devices. Read the TTCP documentation before using the TTCP utility.<br />
Step 6: Test R3 with load applied.<br />
Note: For this lab, TTCP utility creates a load that lasts 60–120 seconds. The actual length of time<br />
depends on the capabilities of the devices and links being used.<br />
On R3, use <strong>Cisco</strong> IOS commands and pings to record the router performance figures simulating a<br />
condition where large file transfers are being transmitted. These results can be compared to the baseline<br />
output (selected baseline information is shown) and the output obtained when using the TTCP utility.<br />
Try to issue the following <strong>Cisco</strong> IOS commands on R3 while TTCP is generating traffic between ALS1 and<br />
DSL2. If it stops, restart the transmit-receive process between switches ALS1 and DLS2. You can also<br />
increase the length of time traffic runs by increasing the send buflen parameter, which defaults to<br />
32768 (for example, you can increase it 65536 or higher).<br />
a. While TTCP is running, ping from PC-B to SRV1 and record the minimum, maximum, and average<br />
round-trip results.<br />
____________________________________________________________________________________<br />
____________________________________________________________________________________<br />
The times should be 10 times or more higher than without the TTCP load on R3.<br />
C:\>ping 10.1.50.1<br />
Pinging 10.1.50.1 with 32 bytes of data:<br />
Reply from 10.1.50.1: bytes=32 time=39ms TTL=64<br />
Reply from 10.1.50.1: bytes=32 time=38ms TTL=64<br />
Reply from 10.1.50.1: bytes=32 time=38ms TTL=64<br />
Reply from 10.1.50.1: bytes=32 time=38ms TTL=64<br />
Ping statistics for 10.1.50.1:<br />
Packets: Sent = 4, Received = 4, Lost = 0 (0% loss),<br />
Approximate round trip times in milli-seconds:<br />
Minimum = 38ms, Maximum = 39ms, Average = 38ms<br />
b. On Fa0/0, change the period over which the loads are computed to 30 seconds.<br />
interface fa0/0<br />
load-interval 30<br />
c. Issue the show interfaces fa0/0 command and note the values for txload and rxload.<br />
___________________________________________________________________________<br />
R3#show interfaces fa0/0<br />
FastEthernet0/0 is up, line protocol is up<br />
Hardware is Gt96k FE, address is 001b.530d.6028 (bia 001b.530d.6028)<br />
Internet address is 10.1.80.1/24<br />
MTU 1500 bytes, BW 100000 Kbit/sec, DLY 100 usec,<br />
All contents are Copyright © 1992–2010 <strong>Cisco</strong> Systems, Inc. All rights reserved. This document is <strong>Cisco</strong> Public Information. Page 9 of 32
<strong>CCNP</strong>v6 <strong>TSHOOT</strong><br />
reliability 255/255, txload 0/255, rxload 4/255<br />
d. Issue the show interfaces fa0/0 stats command and record the switching path and the<br />
packets in and out for processor and route cache.<br />
________________________________________________________________________________<br />
________________________________________________________________________________<br />
R3#show interfaces f0/0 stats<br />
FastEthernet0/0<br />
Switching path Pkts In Chars In Pkts Out Chars Out<br />
Processor 134289 77529720 129782 10884700<br />
Route cache 1 159 0 0<br />
Total 134290 77529879 129782 10884700<br />
e. Issue the show interfaces summary command for Fa0/0 and record the transmit (tx) and receive<br />
(rx) rates in bits per second and packets per second. How do they compare to the rates when TTCP<br />
is not running?<br />
________________________________________________________________________________<br />
________________________________________________________________________________<br />
R3#show interfaces f0/0 summary<br />
*: interface is up<br />
IHQ: pkts in input hold queue IQD: pkts dropped from input queue<br />
OHQ: pkts in output hold queue OQD: pkts dropped from output queue<br />
RXBS: rx rate (bits/sec) RXPS: rx rate (pkts/sec)<br />
TXBS: tx rate (bits/sec) TXPS: tx rate (pkts/sec)<br />
TRTL: throttle count<br />
Interface IHQ IQD OHQ OQD RXBS RXPS TXBS TXPS TRTL<br />
------------------------------------------------------------------------<br />
* FastEthernet0/0 0 0 0 0 969000 204 94000 201 0<br />
f. While TTCP is transferring data, issue the show processes cpu sorted command on R3 and<br />
note the CPU utilization for five seconds, one minute, and five minutes. How do they compare with<br />
utilization when TTCP is not running?<br />
________________________________________________________________________________<br />
R3#show processes cpu sorted<br />
CPU utilization for five seconds: 99%/29%; one minute: 77%; five minutes: 26%<br />
PID Runtime(ms) Invoked uSecs 5Sec 1Min 5Min TTY Process<br />
91 201824 20441 9873 69.50% 54.19% 18.26% 0 IP Input<br />
<br />
g. After the TTCP transfer process ends, issue the show processes cpu history command on R3<br />
to see the CPU utilization history in graph format. Note the CPU utilization for the last 60 seconds, 60<br />
minutes, and 72 hours. What is the maximum utilization shown?<br />
________________________________________________________________________________<br />
All contents are Copyright © 1992–2010 <strong>Cisco</strong> Systems, Inc. All rights reserved. This document is <strong>Cisco</strong> Public Information. Page 10 of 32
<strong>CCNP</strong>v6 <strong>TSHOOT</strong><br />
R3#show processes cpu history<br />
R3 07:54:09 PM Monday Nov 30 2009 UTC<br />
999988888<br />
99999999922222 11111<br />
100 ****<br />
90 *********<br />
80 *********<br />
70 *********<br />
60 *********<br />
50 *********<br />
40 *********<br />
30 *********<br />
20 *********<br />
10 *********<br />
0....5....1....1....2....2....3....3....4....4....5....5....6<br />
0 5 0 5 0 5 0 5 0 5 0<br />
CPU% per second (last 60 seconds)<br />
992 3<br />
111111119981111121111111211111111112111111211111113111111111<br />
100 *#<br />
90 *#<br />
80 ##<br />
70 ##<br />
60 ##<br />
50 ##<br />
40 ##<br />
30 ##* *<br />
20 ##* *<br />
10 ##* *<br />
0....5....1....1....2....2....3....3....4....4....5....5....6<br />
0 5 0 5 0 5 0 5 0 5 0<br />
CPU% per minute (last 60 minutes)<br />
* = maximum CPU% # = average CPU%<br />
99<br />
99<br />
100 **<br />
90 **<br />
80 **<br />
70 **<br />
60 **<br />
50 **<br />
40 **<br />
30 **<br />
20 **<br />
10 **<br />
0....5....1....1....2....2....3....3....4....4....5....5....6....6....7..<br />
0 5 0 5 0 5 0 5 0 5 0 5 0<br />
CPU% per hour (last 72 hours)<br />
* = maximum CPU% # = average CPU%<br />
All contents are Copyright © 1992–2010 <strong>Cisco</strong> Systems, Inc. All rights reserved. This document is <strong>Cisco</strong> Public Information. Page 11 of 32
<strong>CCNP</strong>v6 <strong>TSHOOT</strong><br />
h. Issue the show memory statistics command and note the free memory and the amount used. Is<br />
there an issue with memory usage with this router?<br />
________________________________________________________________________________<br />
______________________________________________________________________________<br />
R3#show memory statistics<br />
Head Total(b) Used(b) Free(b) Lowest(b) Largest(b)<br />
Processor 64E822C0 101178688 24016328 77162360 75584536 75588172<br />
I/O EAF00000 17825792 5421744 12404048 12363136 1238780<br />
Step 7: Outline the troubleshooting approach and validation steps.<br />
The following approach is recommended as a troubleshooting process:<br />
1. Generate test traffic using the ping and ttcp commands, as described in this task.<br />
2. Use ping to measure the performance between the headquarters and branch office. For example,<br />
ping from client PC-B to server SRV1.<br />
3. Examine the key performance indicators, such as the interfaces, CPU and memory on the routers,<br />
and watch for symptoms associated with performance problems.<br />
4. Examine the routers for features and configurations that deviate from the baseline configurations and<br />
attempt to find the root cause of the problems.<br />
5. Address the issues causing the performance problems and test to verify that the performance has<br />
improved.<br />
Step 8: Record the troubleshooting process and configuration changes.<br />
Document your actions and results during the troubleshooting process. List the commands you used to gather<br />
information. As you progress, record what you think the problem might be and which actions you will take to<br />
correct the problem.<br />
Device Actions and Results<br />
All contents are Copyright © 1992–2010 <strong>Cisco</strong> Systems, Inc. All rights reserved. This document is <strong>Cisco</strong> Public Information. Page 12 of 32
<strong>CCNP</strong>v6 <strong>TSHOOT</strong><br />
Device Actions and Results<br />
Step 9: Document trouble ticket debrief notes.<br />
Use this space to make notes of the key learning points that you picked up during the discussion of this<br />
trouble ticket with your instructor. This can include problems encountered, solutions applied, useful<br />
commands, alternate solutions, methods, and processes, and procedure and communication improvements.<br />
_______________________________________________________________________________<br />
_______________________________________________________________________________<br />
_______________________________________________________________________________<br />
_______________________________________________________________________________<br />
_______________________________________________________________________________<br />
_______________________________________________________________________________<br />
_______________________________________________________________________________<br />
Task 2: Trouble Ticket Lab 7-1 TT-B<br />
Step 1: Review trouble ticket Lab 7-1 TT-B.<br />
After the Internet service provider (ISP) reconfigured Border Gateway Protocol (BGP) on router R2, you<br />
received complaints from branch office users on the R3 LAN about it being slow or having no connection at all<br />
to the partner servers outside the corporate network residing in the IP address block 172.20.0.0/16 (simulated<br />
by R2 Lo1).<br />
You have access to the R1 and R2 routers. Your task is to diagnose the problem and verify that BGP is<br />
properly configured to minimize the impact on internal routing performance for devices such as R3, DLS1,<br />
and DLS2.<br />
Step 2: Load the device trouble ticket configuration files for TT-B.<br />
Using the procedure described in Lab 3-1, verify that the lab configuration files are present in flash. Load the<br />
proper configuration files as indicated in the Device Configuration File table.<br />
Note: See Task 1, Step 2 for device access methods, usernames, and passwords after the configuration files<br />
have been loaded.<br />
All contents are Copyright © 1992–2010 <strong>Cisco</strong> Systems, Inc. All rights reserved. This document is <strong>Cisco</strong> Public Information. Page 13 of 32
<strong>CCNP</strong>v6 <strong>TSHOOT</strong><br />
Device Configuration File Table<br />
Device Name File to Load Notes<br />
ALS1 Lab71-ALS1-TT-B-Cfg.txt<br />
DLS1 Lab71-DLS1-TT-B-Cfg.txt<br />
DLS2 Lab71-DLS2-TT-B-Cfg.txt<br />
R1 Lab71-R1-TT-B-Cfg.txt<br />
R2 Lab71-R2-TT-B-Cfg.txt<br />
R3 Lab71-R3-TT-B-Cfg.txt<br />
SRV1 N/A Static IP: 10.1.50.1<br />
Default gateway: 10.1.50.254<br />
PC-B N/A Static IP: 10.1.80.254/24<br />
Default gateway: 10.1.80.1<br />
PC-C N/A DHCP<br />
Step 3: Test R3 performance without the TTCP load generator.<br />
Use <strong>Cisco</strong> IOS commands and pings to record the router performance figures simulating a condition in which<br />
no large file transfers are currently being transmitted. These results can be compared to the baseline output<br />
(selected baseline information is shown) and the output obtained when using the TTCP utility.<br />
a. Ping from PC-B to R2 Lo1 (simulated remote server) and record the minimum, maximum, and<br />
average round-trip times.<br />
____________________________________________________________________________<br />
C:\>ping 172.20.0.1<br />
Pinging 172.20.0.1 with 32 bytes of data:<br />
Reply from 172.20.0.1 : bytes=32 time=11ms TTL=64<br />
Reply from 172.20.0.1 : bytes=32 time=10ms TTL=64<br />
Reply from 172.20.0.1 : bytes=32 time=10ms TTL=64<br />
Reply from 172.20.0.1 : bytes=32 time=10ms TTL=64<br />
Ping statistics for 172.20.0.1 :<br />
Packets: Sent = 4, Received = 4, Lost = 0 (0% loss),<br />
Approximate round trip times in milli-seconds:<br />
Minimum = 10ms, Maximum = 11ms, Average = 10ms<br />
b. Issue the show interfaces fa0/0 command and note the txload and rxload information.<br />
______________________________________________________________________________<br />
R3#show interfaces fa0/0<br />
FastEthernet0/0 is up, line protocol is up<br />
Hardware is Gt96k FE, address is 001b.530d.6028 (bia 001b.530d.6028)<br />
Internet address is 10.1.80.1/24<br />
MTU 1500 bytes, BW 100000 Kbit/sec, DLY 100 usec,<br />
reliability 255/255, txload 1/255, rxload 1/255<br />
<br />
All contents are Copyright © 1992–2010 <strong>Cisco</strong> Systems, Inc. All rights reserved. This document is <strong>Cisco</strong> Public Information. Page 14 of 32
<strong>CCNP</strong>v6 <strong>TSHOOT</strong><br />
c. Issue the show interfaces fa0/0 stats command and record the switching path and the<br />
packets in and out for the processor and route cache.<br />
______________________________________________________________________________<br />
R3#show interfaces fa0/0 stats<br />
FastEthernet0/0<br />
Switching path Pkts In Chars In Pkts Out Chars Out<br />
Processor 831 356623 4075 408723<br />
Route cache 381399 221941950 375270 20282949<br />
Total 382230 222298573 379345 20691672<br />
d. Issue the show processes cpu sorted command on R3 and note the CPU utilization for five<br />
seconds, one minute, and five minutes.<br />
______________________________________________________________________________<br />
R3#show processes cpu sorted<br />
CPU utilization for five seconds: 0%/0%; one minute: 0%; five minutes: 0%<br />
e. Generate some traffic by pinging from switch ALS1 to R2 Lo1. From privileged EXEC mode on ALS1,<br />
issue the ping 172.20.0.1 repeat 100 size 1000 command. What are the round-trip<br />
minimum, average, and maximum times?<br />
________________________________________________________________________________(<br />
Success rate is 100% (100/100), round-trip min/avg/max = 125/129/135 ms<br />
f. While the ping is running, issue the show processes cpu sorted command on R3 again and<br />
note the CPU utilization for five seconds, one minute, and five minutes. Was there an increase?<br />
_______<br />
R3#show processes cpu sorted<br />
CPU utilization for five seconds: 11%/11%; one minute: 6%; five minutes: 2%<br />
<br />
g. Issue the show processes cpu history command on R3 to see the CPU history in graph<br />
format. Note the CPU utilization for the last 60 seconds, 60 minutes, and 72 hours. Does the CPU<br />
appear to be heavily loaded? ____________<br />
R3#show processes cpu history<br />
R3 04:08:25 PM Tuesday Dec 1 2009 UTC<br />
100<br />
90<br />
80<br />
70<br />
60<br />
50<br />
40<br />
11111 11111<br />
All contents are Copyright © 1992–2010 <strong>Cisco</strong> Systems, Inc. All rights reserved. This document is <strong>Cisco</strong> Public Information. Page 15 of 32
<strong>CCNP</strong>v6 <strong>TSHOOT</strong><br />
30<br />
20<br />
10<br />
0....5....1....1....2....2....3....3....4....4....5....5....6<br />
0 5 0 5 0 5 0 5 0 5 0<br />
CPU% per second (last 60 seconds)<br />
5<br />
211121111111111111111111211111111111111111111111311151111111<br />
100<br />
90<br />
80<br />
70<br />
60 *<br />
50 *<br />
40 *<br />
30 *<br />
20 *<br />
10 *<br />
0....5....1....1....2....2....3....3....4....4....5....5....6<br />
0 5 0 5 0 5 0 5 0 5 0<br />
CPU% per minute (last 60 minutes)<br />
* = maximum CPU% # = average CPU%<br />
344351<br />
251910<br />
100<br />
90<br />
80<br />
70<br />
60<br />
50 * *<br />
40 ****<br />
30 *****<br />
20 *****<br />
10 ******<br />
0....5....1....1....2....2....3....3....4....4....5....5....6....6....7..<br />
0 5 0 5 0 5 0 5 0 5 0 5 0<br />
CPU% per hour (last 72 hours)<br />
* = maximum CPU% # = average CPU%<br />
h. Issue the show processes memory sorted command on R3. Note the processes running and<br />
the holding amount of memory. The holding amount is the memory the process is currently using. The<br />
entries go from highest holding memory to lowest.<br />
R3#show processes memory sorted<br />
Processor Pool Total: 101178688 Used: 24024572 Free: 77154116<br />
I/O Pool Total: 17825792 Used: 5421728 Free: 12404064<br />
PID TTY Allocated Freed Holding Getbufs Retbufs Process<br />
0 0 64042304 36231984 23552016 0 0 *Init*<br />
55 0 659620 1328 640292 0 0 USB Startup<br />
1 0 474960 0 482164 0 0 Chunk Manager<br />
All contents are Copyright © 1992–2010 <strong>Cisco</strong> Systems, Inc. All rights reserved. This document is <strong>Cisco</strong> Public Information. Page 16 of 32
<strong>CCNP</strong>v6 <strong>TSHOOT</strong><br />
219 0 469096 18304 436816 0 0 VLAN Manager<br />
25 0 260308 0 270512 99792 0 EEM ED Syslog<br />
170 0 218420 504 215916 0 0 Crypto HW<br />
Proc<br />
221 0 196192 0 203396 0 0 EEM Server<br />
183 0 114340 532 123012 0 0 Crypto WUI<br />
167 0 76476 252 83428 0 0 HTTP Process<br />
i. Issue the show memory statistics command on R3. Note the amount of used and free memory<br />
for the processor for later comparison. By comparing the amount of memory used to the baseline<br />
(shown below), you can determine how much is used when the trouble ticket issues are introduced.<br />
You can also compare this to the memory when running the TTCP utility. The baseline memory<br />
amounts and after the TT was loaded are provided here for comparison.<br />
Note: As can be seen below, the trouble ticket issues cause an increase of nearly 70 KB of memory<br />
over the baseline. This is not enough to cause serious memory depletion issues with the router but<br />
serves to illustrate the type of problem that can occur in a lab environment. Actual results might be<br />
very different in a production environment.<br />
Baseline<br />
R3#show memory statistics<br />
Head Total(b) Used(b) Free(b) Lowest(b) Largest(b)<br />
Processor 64E822C0 101178688 24016328 77162360 75584536 75588172<br />
I/O EAF00000 17825792 5421744 12404048 12363136 1238780<br />
After TT Issues Are Introduced<br />
R3#show memory statistics<br />
Head Total(b) Used(b) Free(b) Lowest(b) Largest(b)<br />
Processor 64E822C0 101178688 24085092 77093596 75584536 75579176<br />
I/O EAF00000 17825792 5421744 12404048 12363136 1238780<br />
Step 4: Generate loads on R3 using the TTCP utility.<br />
To initiate a TTCP connection and generate test traffic from switch ALS1 at the branch office to switch DLS2<br />
at headquarters, use the following procedure.<br />
a. On switch DLS2 (receiver), enter the command sequence.<br />
DLS2#ttcp<br />
transmit or receive [receive]:<br />
receive packets asynchronously [n]:<br />
perform tcp half close [n]:<br />
receive buflen [32768]:<br />
bufalign [16384]:<br />
bufoffset [0]:<br />
port [5001]:<br />
sinkmode [y]:<br />
rcvwndsize [32768]:<br />
All contents are Copyright © 1992–2010 <strong>Cisco</strong> Systems, Inc. All rights reserved. This document is <strong>Cisco</strong> Public Information. Page 17 of 32
<strong>CCNP</strong>v6 <strong>TSHOOT</strong><br />
ack frequency [0]:<br />
delayed ACK [y]:<br />
show tcp information at end [n]:<br />
ttcp-r: buflen=32768, align=16384/0, port=5001<br />
rcvwndsize=32768, delayedack=yes tcp<br />
b. On switch ALS1 (transmitter), enter the command sequence:<br />
ALS1#ttcp<br />
transmit or receive [receive]: transmit<br />
Target IP address: 10.1.100.253<br />
calculate checksum during buffer write [y]:<br />
perform tcp half close [n]:<br />
send buflen [32768]:<br />
send nbuf [2048]:<br />
bufalign [16384]:<br />
bufoffset [0]:<br />
port [5001]:<br />
sinkmode [y]:<br />
buffering on writes [y]:<br />
show tcp information at end [n]:<br />
ttcp-t: buflen=32768, nbuf=2048, align=16384/0, port=5001 tcp -><br />
10.1.100.253<br />
ttcp-t: connect<br />
ttcp-t: 67108864 bytes in 68434 ms (68.434 real seconds) (~957 kB/s)<br />
+++<br />
ttcp-t: 2048 I/O calls<br />
ttcp-t: 0 sleeps (0 ms total) (0 ms average)<br />
c. Record the time required to complete the TTCP data transfer.<br />
________________________________________________________________________________<br />
Note: Referring to the above results, the TTCP utility transmitted over 67 million bytes in<br />
approximately 68 seconds. This is comparable to the baseline performance, which indicates that this<br />
router is not significantly loaded. Different devices and network links will produce different results.<br />
Step 5: Test R3 with load applied.<br />
Note: In this lab, the TCP utility creates a load that lasts for about 60–120 seconds. The actual length of time<br />
depends on the capabilities of the devices and links in use.<br />
Use <strong>Cisco</strong> IOS commands and pings to record the router performance figures simulating a condition in which<br />
large file transfers are currently being transmitted. These results can be compared to the baseline output<br />
(selected baseline information is shown) and the output obtained when using the TTCP utility.<br />
a. Ping from PC-B to R2 Lo1 and record the results.<br />
____________________________________________________________________________<br />
Include the minimum, maximum, and average round-trip times. The times should be about the same as<br />
without the TTCP load on R3.<br />
C:\>ping 172.20.0.1<br />
Pinging 172.20.0.1 with 32 bytes of data:<br />
Reply from 172.20.0.1 : bytes=32 time=12ms TTL=64<br />
Reply from 172.20.0.1 : bytes=32 time=11ms TTL=64<br />
All contents are Copyright © 1992–2010 <strong>Cisco</strong> Systems, Inc. All rights reserved. This document is <strong>Cisco</strong> Public Information. Page 18 of 32
<strong>CCNP</strong>v6 <strong>TSHOOT</strong><br />
Reply from 172.20.0.1 : bytes=32 time=11ms TTL=64<br />
Reply from 172.20.0.1 : bytes=32 time=11ms TTL=64<br />
Ping statistics for 172.20.0.1 :<br />
Packets: Sent = 4, Received = 4, Lost = 0 (0% loss),<br />
Approximate round trip times in milli-seconds:<br />
Minimum = 11ms, Maximum = 12ms, Average = 11ms<br />
b. While TTCP is transferring data, issue the show processes cpu sorted command on R3 and<br />
note the CPU utilization for five seconds, one minute, and five minutes<br />
____________________________________________________________________________<br />
R3#show processes cpu sorted<br />
CPU utilization for five seconds: 10%/9%; one minute: 2%; five minutes: 1%<br />
PID Runtime(ms) Invoked uSecs 5Sec 1Min 5Min TTY Process<br />
<br />
Based on the output above, you can see that R3 is not CPU bound.<br />
c. Issue the show processes cpu history command on R3 to see the CPU history in graph<br />
format. Note the CPU utilization for the last 60 minutes and 72 hours.<br />
R3#show processes cpu history<br />
R3 05:46:25 PM Tuesday Dec 1 2009 UTC<br />
<br />
4 11<br />
111111111111111111111111111111911111111110111111111111111111<br />
100<br />
90<br />
80<br />
70<br />
60<br />
50 *<br />
40 *<br />
30 *<br />
20 *<br />
10 * *#<br />
0....5....1....1....2....2....3....3....4....4....5....5....6<br />
0 5 0 5 0 5 0 5 0 5 0<br />
CPU% per minute (last 60 minutes)<br />
* = maximum CPU% # = average CPU%<br />
35344351<br />
15251910<br />
100<br />
90<br />
80<br />
70<br />
60 *<br />
50 * * *<br />
40 * ****<br />
30 *******<br />
All contents are Copyright © 1992–2010 <strong>Cisco</strong> Systems, Inc. All rights reserved. This document is <strong>Cisco</strong> Public Information. Page 19 of 32
<strong>CCNP</strong>v6 <strong>TSHOOT</strong><br />
20 *******<br />
10 ********<br />
0....5....1....1....2....2....3....3....4....4....5....5....6....6....7..<br />
0 5 0 5 0 5 0 5 0 5 0 5 0<br />
CPU% per hour (last 72 hours)<br />
* = maximum CPU% # = average CPU%<br />
As with the output for the show processes cpu sorted command, you can see that R3 is not CPU<br />
bound.<br />
d. Issue the show memory statistics command on R3. Note the amount of used and free memory<br />
for the processor. By comparing the amount of memory used to the baseline and the TT issues, you<br />
can determine how much is used when running the TTCP utility. The memory amounts for the<br />
baseline after the TT was loaded and while TTCP was running are shown here for comparison.<br />
Note: The trouble ticket issues cause an increase of nearly 70 KB of memory over the baseline. This<br />
is not enough to cause real memory depletion issues with the router but serves to illustrate the type of<br />
problem that can occur in a production environment. Running the TTCP load utility caused an<br />
increase of about 7 KB over the TT issues.<br />
Baseline<br />
R3#show memory statistics<br />
Head Total(b) Used(b) Free(b) Lowest(b) Largest(b)<br />
Processor 64E822C0 101178688 24016328 77162360 75584536 75588172<br />
I/O EAF00000 17825792 5421744 12404048 12363136 1238780<br />
After TT Issues Are Introduced<br />
R3#show memory statistics<br />
Head Total(b) Used(b) Free(b) Lowest(b) Largest(b)<br />
Processor 64E822C0 101178688 24085092 77093596 75584536 75579176<br />
I/O EAF00000 17825792 5421744 12404048 12363136 1238780<br />
While Running TTCP<br />
R3#show memory statistics<br />
Head Total(b) Used(b) Free(b) Lowest(b) Largest(b)<br />
Processor 64E822C0 101178688 24092388 77086300 75584536 75579176<br />
I/O EAF00000 17825792 5424292 12401500 12363136 1238780<br />
Step 6: Outline the troubleshooting approach and validation steps.<br />
The following approach is recommended as a troubleshooting process:<br />
1. Generate test traffic using the ping and ttcp commands, as described in this task.<br />
2. Use ping to measure the performance between the headquarters and Internet or network servers.<br />
For example, ping from client PC-B to server SRV1, R1 or R2.<br />
3. Examine the key performance indicators, such as the interfaces, CPU, and memory, on the routers<br />
and watch for symptoms associated with performance problems.<br />
All contents are Copyright © 1992–2010 <strong>Cisco</strong> Systems, Inc. All rights reserved. This document is <strong>Cisco</strong> Public Information. Page 20 of 32
<strong>CCNP</strong>v6 <strong>TSHOOT</strong><br />
4. Examine the routers for features and configurations that deviate from the baseline configurations and<br />
attempt to find the root cause of the problems.<br />
5. Address the issues causing the performance problems and test to verify that performance has<br />
improved.<br />
Step 7: Record the troubleshooting process and configuration changes.<br />
Use this log to document your actions and results during the troubleshooting process. List the commands you<br />
used to gather information. As you progress, record what you think the problem might be and which actions<br />
you will take to correct the problem.<br />
Device Actions and Results<br />
All contents are Copyright © 1992–2010 <strong>Cisco</strong> Systems, Inc. All rights reserved. This document is <strong>Cisco</strong> Public Information. Page 21 of 32
<strong>CCNP</strong>v6 <strong>TSHOOT</strong><br />
Step 8: Document trouble ticket debrief notes.<br />
Use this space to make notes of the key learning points that you picked up during the discussion of this<br />
trouble ticket with your instructor. This can include problems encountered, solutions applied, useful<br />
commands employed, alternate solutions, methods, and processes, and procedure and communication<br />
improvements.<br />
_______________________________________________________________________________<br />
_______________________________________________________________________________<br />
_______________________________________________________________________________<br />
_______________________________________________________________________________<br />
_______________________________________________________________________________<br />
_______________________________________________________________________________<br />
_______________________________________________________________________________<br />
All contents are Copyright © 1992–2010 <strong>Cisco</strong> Systems, Inc. All rights reserved. This document is <strong>Cisco</strong> Public Information. Page 22 of 32
<strong>CCNP</strong>v6 <strong>TSHOOT</strong><br />
Section 2—Troubleshooting Reference Information<br />
General Troubleshooting Process<br />
As a general guideline, you can use the following general troubleshooting process described in the course.<br />
1. Define the problem (symptoms).<br />
2. Gather information.<br />
3. Analyze the information.<br />
4. Propose a hypothesis (possible cause).<br />
5. Test the hypothesis.<br />
6. Eliminate or accept the hypothesis.<br />
7. Solve the problem.<br />
8. Document the problem.<br />
Command Summary<br />
The table lists useful commands for this lab. The sample output is shown on following pages.<br />
Command Key Information Displayed<br />
show interfaces type/#<br />
show interfaces type/# summary<br />
show interfaces type/# stats<br />
show ip interface type/#<br />
clear counters type/#<br />
show processes cpu sorted<br />
show processes cpu history<br />
show processes memory sorted<br />
show memory statistics<br />
show ip cef<br />
Displays the interface IP address, subnet mask, MAC<br />
address, and load statistics.<br />
Displays a summary of input and output queues and packet<br />
transmit and receive rates.<br />
Displays the switching path and the number of characters or<br />
packets in and out for the processor and route cache (<strong>Cisco</strong><br />
Express Forwarding).<br />
Displays primarily IP-related information for the interface,<br />
such as the helper address, multicast groups, and route<br />
cache processing status.<br />
Clears the interface counters on an interface.<br />
Displays short-term CPU utilization (five seconds, one<br />
minute, and five minutes). It also lists the currently running<br />
processes, sorted by the most CPU utilization to the least.<br />
Displays long-term CPU utilization in a graph format for the<br />
last 60 seconds, 60 minutes, and 72 hours. Useful for<br />
analyzing CPU load over time.<br />
Displays memory CPU utilization (used and free) for the<br />
processor and I/O memory pools. The entries are sorted by<br />
the highest amount of holding memory used.<br />
Displays a summary of memory utilization (total, used, and<br />
free) for the processor and I/O memory pools. The lowest is<br />
the smallest amount of free memory since the last boot. The<br />
largest is the size of the largest available free block.<br />
Displays all known prefix entries in the <strong>Cisco</strong> Express<br />
Forwarding Forwarding Information Base (FIB). The prefix,<br />
next-hop IP address, and the exit interface are shown. If<br />
All contents are Copyright © 1992–2010 <strong>Cisco</strong> Systems, Inc. All rights reserved. This document is <strong>Cisco</strong> Public Information. Page 23 of 32
<strong>CCNP</strong>v6 <strong>TSHOOT</strong><br />
Display Interface Load, Statistics, and Forwarding Information<br />
<strong>Cisco</strong> Express Forwarding is not enabled, the output states<br />
this.<br />
R3#show interfaces fastethernet 0/0<br />
FastEthernet0/0 is up, line protocol is up<br />
Hardware is Gt96k FE, address is 001b.530d.6028 (bia 001b.530d.6028)<br />
Internet address is 10.1.80.1/24<br />
MTU 1500 bytes, BW 100000 Kbit/sec, DLY 100 usec,<br />
reliability 255/255, txload 1/255, rxload 2/255<br />
Encapsulation ARPA, loopback not set<br />
Keepalive set (10 sec)<br />
Full-duplex, 100Mb/s, 100BaseTX/FX<br />
ARP type: ARPA, ARP Timeout 04:00:00<br />
Last input 00:00:00, output 00:00:00, output hang never<br />
Last clearing of "show interface" counters never<br />
Input queue: 0/75/0/0 (size/max/drops/flushes); Total output drops: 0<br />
Queueing strategy: fifo<br />
Output queue: 0/40 (size/max)<br />
5 minute input rate 913000 bits/sec, 179 packets/sec<br />
5 minute output rate 62000 bits/sec, 175 packets/sec<br />
381659 packets input, 222009886 bytes<br />
Received 257 broadcasts, 0 runts, 0 giants, 0 throttles<br />
0 input errors, 0 CRC, 0 frame, 0 overrun, 0 ignored<br />
0 watchdog<br />
0 input packets with dribble condition detected<br />
377267 packets output, 20429223 bytes, 0 underruns<br />
0 output errors, 0 collisions, 3 interface resets<br />
0 unknown protocol drops<br />
0 babbles, 0 late collision, 0 deferred<br />
0 lost carrier, 0 no carrier<br />
0 output buffer failures, 0 output buffers swapped out<br />
The output of the show interfaces fastethernet 0/0 command above shows the IP address and mask,<br />
hardware (MAC) address, as well as the reliability, transmit (txload), receive (rxload), and details on packet input<br />
and output rates. The summary option shown below provides a quick view of input and output queues and bit per<br />
packet transmit and receive rates. As can be seen, there are no packets in the input and output queues.<br />
R3#show interfaces fa0/0 summary<br />
*: interface is up<br />
IHQ: pkts in input hold queue IQD: pkts dropped from input queue<br />
OHQ: pkts in output hold queue OQD: pkts dropped from output queue<br />
RXBS: rx rate (bits/sec) RXPS: rx rate (pkts/sec)<br />
TXBS: tx rate (bits/sec) TXPS: tx rate (pkts/sec)<br />
TRTL: throttle count<br />
Interface IHQ IQD OHQ OQD RXBS RXPS TXBS TXPS TRTL<br />
------------------------------------------------------------------------<br />
* FastEthernet0/0 0 0 0 0 969000 204 94000 201 0<br />
R3#show interfaces fa0/0 stats<br />
FastEthernet0/0<br />
All contents are Copyright © 1992–2010 <strong>Cisco</strong> Systems, Inc. All rights reserved. This document is <strong>Cisco</strong> Public Information. Page 24 of 32
<strong>CCNP</strong>v6 <strong>TSHOOT</strong><br />
Switching path Pkts In Chars In Pkts Out Chars Out<br />
Processor 831 356623 4075 408723<br />
Route cache 381399 221941950 375270 20282949<br />
Total 382230 222298573 379345 20691672<br />
The stats option shown above displays the switching path and the number of characters and packets in and out<br />
for processor and route cache (<strong>Cisco</strong> Express Forwarding). As can be seen, only a few packets have been<br />
process-switched and a very large number have been switched via the route cache (with <strong>Cisco</strong> Express<br />
Forwarding enabled).<br />
R3#show ip interface fastethernet 0/0<br />
FastEthernet0/0 is up, line protocol is up<br />
Internet address is 10.1.80.1/24<br />
Broadcast address is 255.255.255.255<br />
Address determined by non-volatile memory<br />
MTU is 1500 bytes<br />
Helper address is 10.1.2.13<br />
Directed broadcast forwarding is disabled<br />
Multicast reserved groups joined: 224.0.0.10<br />
Outgoing access list is not set<br />
Inbound access list is not set<br />
Proxy ARP is enabled<br />
Local Proxy ARP is disabled<br />
Security level is default<br />
Split horizon is enabled<br />
ICMP redirects are always sent<br />
ICMP unreachables are always sent<br />
ICMP mask replies are never sent<br />
IP fast switching is enabled<br />
IP fast switching on the same interface is disabled<br />
IP Flow switching is disabled<br />
IP CEF switching is enabled<br />
IP CEF switching turbo vector<br />
IP multicast fast switching is enabled<br />
IP multicast distributed fast switching is disabled<br />
IP route-cache flags are Fast, CEF<br />
Router Discovery is disabled<br />
IP output packet accounting is disabled<br />
IP access violation accounting is disabled<br />
TCP/IP header compression is disabled<br />
RTP/IP header compression is disabled<br />
Policy routing is disabled<br />
Network address translation is disabled<br />
BGP Policy Mapping is disabled<br />
Input features: Ingress-NetFlow, MCI Check<br />
Output features: Post-Ingress-NetFlow<br />
WCCP Redirect outbound is disabled<br />
WCCP Redirect inbound is disabled<br />
WCCP Redirect exclude is disabled<br />
The output from the show ip interface fastethernet 0/0 command above shows primarily IP-related<br />
information for the interface. Note the helper address pointing to the switch DLS2 DHCP server IP address. This<br />
router interface has joined multicast group 224.0.0.10 for communication between EIGRP routers. Also note that<br />
<strong>Cisco</strong> Express Forwarding is enabled.<br />
R1#show ip cef<br />
All contents are Copyright © 1992–2010 <strong>Cisco</strong> Systems, Inc. All rights reserved. This document is <strong>Cisco</strong> Public Information. Page 25 of 32
<strong>CCNP</strong>v6 <strong>TSHOOT</strong><br />
Prefix Next Hop Interface<br />
0.0.0.0/0 209.165.200.226 Serial0/0/0<br />
0.0.0.0/8 drop<br />
0.0.0.0/32 receive<br />
10.1.2.0/30 attached FastEthernet0/1<br />
10.1.2.0/32 receive FastEthernet0/1<br />
10.1.2.1/32 attached FastEthernet0/1<br />
10.1.2.2/32 receive FastEthernet0/1<br />
10.1.2.3/32 receive FastEthernet0/1<br />
10.1.2.12/30 10.1.2.1 FastEthernet0/1<br />
10.1.10.0/24 10.1.2.1 FastEthernet0/1<br />
10.1.20.0/24 10.1.2.1 FastEthernet0/1<br />
10.1.30.0/24 10.1.2.1 FastEthernet0/1<br />
10.1.50.0/24 10.1.2.1 FastEthernet0/1<br />
10.1.80.0/24 10.1.2.1 FastEthernet0/1<br />
10.1.100.0/24 10.1.2.1 FastEthernet0/1<br />
10.1.200.0/24 10.1.2.1 FastEthernet0/1<br />
10.1.203.1/32 10.1.2.1 FastEthernet0/1<br />
127.0.0.0/8 drop<br />
172.20.0.0/21 209.165.200.226 Serial0/0/0<br />
192.168.1.0/24 attached Loopback0<br />
192.168.1.0/32 receive Loopback0<br />
Prefix Next Hop Interface<br />
192.168.1.1/32 receive Loopback0<br />
192.168.1.255/32 receive Loopback0<br />
192.168.2.1/32 209.165.200.226 Serial0/0/0<br />
209.165.200.224/30 attached Serial0/0/0<br />
209.165.200.224/32 receive Serial0/0/0<br />
209.165.200.225/32 receive Serial0/0/0<br />
209.165.200.226/32 attached Serial0/0/0<br />
209.165.200.227/32 receive Serial0/0/0<br />
224.0.0.0/4 drop<br />
224.0.0.0/24 receive<br />
240.0.0.0/4 drop<br />
255.255.255.255/32 receive<br />
The output from the show ip cef command above shows all the known prefix entries in the <strong>Cisco</strong> Express<br />
Forwarding FIB. The prefix, next-hop IP address, and the exit interface are shown. If <strong>Cisco</strong> Express Forwarding is<br />
not enabled, the output states this.<br />
Display CPU Load and Process Statistics<br />
R3#show processes cpu sorted<br />
CPU utilization for five seconds: 17%/5%; one minute: 3%; five minutes: 1%<br />
PID Runtime(ms) Invoked uSecs 5Sec 1Min 5Min TTY Process<br />
91 2308 4797 481 11.19% 2.10% 0.52% 0 IP Input<br />
3 13308 2477 5372 0.87% 0.18% 0.05% 0 Exec<br />
124 12 265 45 0.15% 0.03% 0.00% 0 TCP Timer<br />
153 20 93423 0 0.15% 0.12% 0.10% 0 HQF Shaper Backg<br />
265 1280 11572 110 0.07% 0.01% 0.00% 0 IP-EIGRP: HELLO<br />
<br />
All contents are Copyright © 1992–2010 <strong>Cisco</strong> Systems, Inc. All rights reserved. This document is <strong>Cisco</strong> Public Information. Page 26 of 32
<strong>CCNP</strong>v6 <strong>TSHOOT</strong><br />
The output from the show processes cpu sorted command above shows short-term CPU utilization for the<br />
last five seconds, one minute, and five minutes. It also lists the currently running processes, sorted by the most<br />
CPU utilization to the least. This router CPU is not heavily loaded at this time (not CPU bound).<br />
R3#show processes cpu history<br />
R3 07:54:09 PM Monday Nov 30 2009 UTC<br />
999988888<br />
99999999922222 11111<br />
100 ****<br />
90 *********<br />
80 *********<br />
70 *********<br />
60 *********<br />
50 *********<br />
40 *********<br />
30 *********<br />
20 *********<br />
10 *********<br />
0....5....1....1....2....2....3....3....4....4....5....5....6<br />
0 5 0 5 0 5 0 5 0 5 0<br />
CPU% per second (last 60 seconds)<br />
992 3<br />
111111119981111121111111211111111112111111211111113111111111<br />
100 *#<br />
90 *#<br />
80 ##<br />
70 ##<br />
60 ##<br />
50 ##<br />
40 ##<br />
30 ##* *<br />
20 ##* *<br />
10 ##* *<br />
0....5....1....1....2....2....3....3....4....4....5....5....6<br />
0 5 0 5 0 5 0 5 0 5 0<br />
CPU% per minute (last 60 minutes)<br />
* = maximum CPU% # = average CPU%<br />
99<br />
99<br />
100 **<br />
90 **<br />
80 **<br />
70 **<br />
60 **<br />
50 **<br />
40 **<br />
30 **<br />
20 **<br />
10 **<br />
0....5....1....1....2....2....3....3....4....4....5....5....6....6....7..<br />
All contents are Copyright © 1992–2010 <strong>Cisco</strong> Systems, Inc. All rights reserved. This document is <strong>Cisco</strong> Public Information. Page 27 of 32
<strong>CCNP</strong>v6 <strong>TSHOOT</strong><br />
0 5 0 5 0 5 0 5 0 5 0 5 0<br />
CPU% per hour (last 72 hours)<br />
* = maximum CPU% # = average CPU%<br />
The output from the show processes cpu history command above shows long-term CPU utilization in a<br />
graph format for the last 60 seconds, 60 minutes, and 72 hours. This router CPU has been recently heavily<br />
loaded and is CPU bound at 99% utilization. Percent CPU utilization can hit 90% occasionally, but consistently<br />
high utilization over time can point to processing problems, such as access lists and large file transfers.<br />
Display Memory Usage and Process Statistics<br />
R3#show processes memory sorted<br />
Processor Pool Total: 101226944 Used: 24015448 Free: 77211496<br />
I/O Pool Total: 17825792 Used: 5446544 Free: 12379248<br />
PID TTY Allocated Freed Holding Getbufs Retbufs Process<br />
0 0 62860036 36235836 23615956 0 0 *Init*<br />
55 0 659528 1328 640200 0 0 USB Startup<br />
1 0 466000 0 473204 0 0 Chunk Manager<br />
219 0 469124 18304 436776 0 0 VLAN Manager<br />
0 0 0 0 420380 0 0 *MallocLite*<br />
25 0 260308 0 270512 99792 0 EEM ED Syslog<br />
170 0 218420 504 215916 0 0 Crypto HW Proc<br />
221 0 196192 0 203396 0 0 EEM Server<br />
183 0 114384 528 123060 0 0 Crypto WUI<br />
167 0 76544 252 83496 0 0 HTTP Process<br />
40 0 66536 153420 73340 0 0 IF-MGR control p<br />
3 0 7352228 7237092 66908 0 0 Exec<br />
<br />
The output from the show processes memory sorted command above shows memory utilization (used and<br />
free) for the processor and I/O memory pools. The holding amount is the amount of memory that the process is<br />
currently using. The entries are sorted by the highest amount of holding memory first.<br />
R3#show processes memory sorted | include EIGRP<br />
265 0 1676448 7910464 24464 0 0 IP-EIGRP: PDM<br />
264 0 0 0 18200 0 0 IP-EIGRP Router<br />
266 0 19720032 13337320 7116 0 0 IP-EIGRP: HELLO<br />
The list of processes output from this command can be lengthy. Use the pipe (|), as shown above, to filter the<br />
output and focus on specific processes. Search strings are case-sensitive.<br />
All contents are Copyright © 1992–2010 <strong>Cisco</strong> Systems, Inc. All rights reserved. This document is <strong>Cisco</strong> Public Information. Page 28 of 32
<strong>CCNP</strong>v6 <strong>TSHOOT</strong><br />
R3#show memory statistics<br />
Head Total(b) Used(b) Free(b) Lowest(b) Largest(b)<br />
Processor 64E76640 101226944 23964420 77262524 76880040 76910312<br />
I/O EAF00000 17825792 5421732 12404060 12376432 1240031<br />
The output from the show memory statistics command above shows a summary of memory utilization<br />
(total, used, and free) for the processor and I/O memory pools. The lowest column is the smallest amount of free<br />
memory since the last boot. The largest column shows the size of the largest available free block.<br />
All contents are Copyright © 1992–2010 <strong>Cisco</strong> Systems, Inc. All rights reserved. This document is <strong>Cisco</strong> Public Information. Page 29 of 32
<strong>CCNP</strong>v6 <strong>TSHOOT</strong><br />
Reflection Questions<br />
1. Which lab trouble tickets did you have the most difficulty with?<br />
__________________________________________________________________________________________<br />
__________________________________________________________________________________________<br />
__________________________________________________________________________________________<br />
2. Would you change anything about the process that you used for any of the trouble tickets now that you see the<br />
resolution of the problem?<br />
__________________________________________________________________________________________<br />
__________________________________________________________________________________________<br />
__________________________________________________________________________________________<br />
3. Which commands did you find most useful in diagnosing router performance issues? Add these to your toolbox<br />
for future use. Which commands did you find least useful?<br />
__________________________________________________________________________________________<br />
__________________________________________________________________________________________<br />
__________________________________________________________________________________________<br />
All contents are Copyright © 1992–2010 <strong>Cisco</strong> Systems, Inc. All rights reserved. This document is <strong>Cisco</strong> Public Information. Page 30 of 32
<strong>CCNP</strong>v6 <strong>TSHOOT</strong><br />
References<br />
If you need more information on the commands and their options, see the following references:<br />
• IP Routing Protocol Command Reference<br />
http://www.cisco.com/cisco/web/support/index.html<br />
• <strong>Cisco</strong> IOS IP Switching Reference<br />
http://www.cisco.com/en/US/docs/ios/ipswitch/command/reference/isw_book.html<br />
• TTCP information (also see Appendix A)<br />
http://www.cisco.com/en/US/tech/tk801/tk36/technologies_tech_note09186a0080094694.shtml<br />
Router Interface Summary Table<br />
Router Model Ethernet Interface<br />
#1<br />
1700 Fast Ethernet 0<br />
(FA0)<br />
1800 Fast Ethernet 0/0<br />
(FA0/0)<br />
2600 Fast Ethernet 0/0<br />
(FA0/0)<br />
2800 Fast Ethernet 0/0<br />
(FA0/0)<br />
Router Interface Summary<br />
Ethernet Interface<br />
#2<br />
Fast Ethernet 1<br />
(FA1)<br />
Fast Ethernet 0/1<br />
(FA0/1)<br />
Fast Ethernet 0/1<br />
(FA0/1)<br />
Fast Ethernet 0/1<br />
(FA0/1)<br />
Serial Interface<br />
#1<br />
Serial Interface<br />
#2<br />
Serial 0 (S0) Serial 1 (S1)<br />
Serial 0/0/0<br />
(S0/0/0)<br />
Serial 0/0/1<br />
(S0/0/1)<br />
Serial 0/0 (S0/0) Serial 0/1 (S0/1)<br />
Serial 0/0/0<br />
(S0/0/0)<br />
Serial 0/0/1<br />
(S0/0/1)<br />
Note: To find out how the router is configured, look at the interfaces to identify the type of router<br />
and how many interfaces the router has. Rather than try to list all the combinations of<br />
configurations for each router class, this table includes identifiers for the possible combinations of<br />
Ethernet and serial interfaces in the device. The table does not include any other type of interface,<br />
even though a specific router might contain one. An example of this is an ISDN BRI interface. The<br />
string in parenthesis is the legal abbreviation that can be used in <strong>Cisco</strong> IOS commands to<br />
represent the interface.<br />
All contents are Copyright © 1992–2010 <strong>Cisco</strong> Systems, Inc. All rights reserved. This document is <strong>Cisco</strong> Public Information. Page 31 of 32
<strong>CCNP</strong>v6 <strong>TSHOOT</strong><br />
Appendix A—Using a Windows PC as a TTCP End Device<br />
a. Download the TTCP for Windows ttcpw program from the link provided at<br />
http://www.cisco.com/en/US/tech/tk801/tk36/technologies_tech_note09186a0080094694.shtml.<br />
b. Expand the ZIP file in a folder to access the .exe and readme files.<br />
c. Start the ttcpw program on the PC (in a DOS window), running as a receiver. Refer to the Readme<br />
file provided with the windows TTCP software for the appropriate syntax. An example is provided<br />
here.<br />
C:\<strong>Cisco</strong>\TTCP>ttcpw -r -s ttcp-r: buflen=8192, nbuf=2048, align=16364/0,<br />
port=5001 tcp ttcp-r: socket<br />
d. Start the ttcp program on DLS2 running as a transmitter and specify the target IP address of the PC.<br />
DLS2#ttcp<br />
transmit or receive [receive]: transmit<br />
Target IP address: 10.1.80.254<br />
calculate checksum during buffer write [y]:<br />
perform tcp half close [n]:<br />
send buflen [32768]:<br />
send nbuf [2048]:<br />
bufalign [16384]:<br />
bufoffset [0]:<br />
port [5001]:<br />
sinkmode [y]:<br />
buffering on writes [y]:<br />
show tcp information at end [n]:<br />
e. When the transfer completes, you should see the results on the transmitter and receiver. The<br />
following output is from DLS2, the transmitter.<br />
ttcp-t: buflen=32768, nbuf=2048, align=16384/0, port=5001 tcp -><br />
10.1.80.254<br />
ttcp-t: connect<br />
ttcp-t: 67108864 bytes in 47622 ms (47.622 real seconds) (~1375 kB/s) +++<br />
ttcp-t: 2048 I/O calls<br />
ttcp-t: 0 sleeps (0 ms total) (0 ms average)<br />
All contents are Copyright © 1992–2010 <strong>Cisco</strong> Systems, Inc. All rights reserved. This document is <strong>Cisco</strong> Public Information. Page 32 of 32
<strong>CCNP</strong>v6 <strong>TSHOOT</strong><br />
Chapter 9 Lab 9-1, Management Plane Security<br />
Lab Topology<br />
Objectives<br />
• Load the device configuration files for each trouble ticket.<br />
• Diagnose and resolve problems related to router and Layer 3 switch management plane security.<br />
• Document the troubleshooting progress, configuration changes, and problem resolution.<br />
All contents are Copyright © 1992–2010 <strong>Cisco</strong> Systems, Inc. All rights reserved. This document is <strong>Cisco</strong> Public Information. Page 1 of 22
<strong>CCNP</strong>v6 <strong>TSHOOT</strong><br />
Background<br />
Routers and Layer 3 switches are typically segmented into three planes of operation, each with a clearly<br />
identified objective. The data plane (also called the forwarding plane) forwards user data packets. The control<br />
plane routes data correctly, and the management plane manages the network devices.<br />
The management plane deals with the traffic used to access, manage, and monitor all the network elements.<br />
It supports all required provisioning, maintenance, and monitoring functions for the network. Like the other IP<br />
traffic planes, management plane traffic is handled in-band with all other IP traffic. Most service providers and<br />
many large enterprises also build separate, out-of-band (OOB) management networks to provide alternate<br />
reachability when the primary in-band IP path is not reachable.<br />
Processes and protocols that are associated with this plane include Telnet, AAA, SSH, FTP, TFTP, SNMP,<br />
syslog, TACACS+, RADIUS, DNS, NetFlow, ROMMON, and other management protocols.<br />
This lab focuses on management plane security issues related to SSH, AAA, and RADIUS for management<br />
access to routers and Layer 3 switches.<br />
For each task or trouble ticket, the trouble scenario and problem symptom are described. While<br />
troubleshooting, you will discover the cause of the problem, correct it, and then document the process and<br />
results.<br />
Lab Structure<br />
This lab is divided into two main sections.<br />
Section 1—Trouble Tickets and Troubleshooting Logs<br />
This section includes two tasks. Each task is associated with a trouble ticket (TT) and introduces one or more<br />
errors on one or more devices. If time is a consideration, each task or trouble ticket can be performed<br />
independently.<br />
Section 2—Troubleshooting Reference Information<br />
This section provides general troubleshooting information that can be applied to any of the trouble tickets in<br />
this lab. Examples of useful commands and output are provided. If time permits, it is recommended that you<br />
read through Section 2 prior to starting on the trouble tickets.<br />
Note: This lab uses <strong>Cisco</strong> 1841 routers with <strong>Cisco</strong> IOS Release 12.4(24)T1 and the advanced IP image<br />
c1841-advipservicesk9-mz.124-24.T1.bin. The switches are <strong>Cisco</strong> WS-C2960-24TT-L with the <strong>Cisco</strong> IOS<br />
image c2960-lanbasek9-mz.122-46.SE.bin and Catalyst 3560-24PS with the <strong>Cisco</strong> IOS image c3560advipservicesk9-mz.122-46.SE.bin.<br />
Other routers (such as 2801 and 2811), switches (such as 2950 or 3550),<br />
and <strong>Cisco</strong> IOS Software versions can be used if they have comparable capabilities and features. Depending<br />
on the router or switch model and <strong>Cisco</strong> IOS Software version, the commands available and output produced<br />
might vary from what is shown in this lab.<br />
Any changes made to configurations or topology (other than errors introduced) are noted in the lab and<br />
trouble tickets so that you are aware of them prior to beginning the troubleshooting process.<br />
Required Resources<br />
• 3 routers (<strong>Cisco</strong> 1841 with <strong>Cisco</strong> IOS Release 12.4(24)T1 Advanced IP Service or comparable)<br />
• 1 switch (<strong>Cisco</strong> 2960 with the <strong>Cisco</strong> IOS Release 12.2(46)SE C2960-LANBASEK9-M image or<br />
comparable)<br />
• 2 switches (<strong>Cisco</strong> 3560 with the <strong>Cisco</strong> IOS Release 12.2(46)SE C3560-advipservicesk9-mz image or<br />
comparable)<br />
• SRV1 (Windows PC with static IP address) with TFTP and syslog servers plus an SSH client (PuTTY<br />
or comparable) and WireShark software<br />
• PC-B (Windows PC DHCP client) with PuTTY and WireShark software<br />
• PC-C (Windows PC DHCP client) with PuTTY and WireShark software<br />
• Serial and Ethernet cables<br />
All contents are Copyright © 1992–2010 <strong>Cisco</strong> Systems, Inc. All rights reserved. This document is <strong>Cisco</strong> Public Information. Page 2 of 22
<strong>CCNP</strong>v6 <strong>TSHOOT</strong><br />
Section 1—Trouble Tickets and Troubleshooting Logs<br />
Task 1: Trouble Ticket Lab 9-1 TT-A<br />
Step 1: Review trouble ticket Lab 9-1 TT-A.<br />
As a security measure, your company has decided to implement centralized server-based AAA authentication<br />
for key network devices, such as routers and switches. The implementation plan specifies that RADIUS<br />
server software is to be installed on SRV1 (see Appendix A for the installation procedure). As a pilot, Layer 3<br />
core switch DLS1 is to be configured with AAA to access the RADIUS server for login authentication. The<br />
implementation plan specifies RADIUS as the primary method of authentication, with local authentication as<br />
the backup method.<br />
Your colleague has configured the RADIUS server on SRV1 and AAA login authentication on DLS1 but is<br />
having trouble accessing DLS1 when attempting to log in via Telnet from PC-B. On the RADIUS server, he<br />
has created a test username raduser with a password of RadUserpass.<br />
He has asked for your help in diagnosing and solving the problem.<br />
Note: The freeware server WinRadius is used for this trouble ticket.<br />
Step 2: Load the device trouble ticket configuration files for TT-A.<br />
Using the procedure described in Lab 3-1, verify that the lab configuration files are present in flash. Load the<br />
proper configuration files as indicated in the Device Configuration File table.<br />
Note: The following device access methods are in effect after installing RADIUS on SRV1 and loading the<br />
configuration files:<br />
• Console access requires no username or password.<br />
• Telnet and SSH require username admin and password adminpa55 (except for DLS1, which uses<br />
RADIUS).<br />
• The enable password is ciscoenpa55.<br />
Device Configuration File Table<br />
Device Name File to Load Notes<br />
ALS1 Lab91-ALS1-TT-A-Cfg.txt<br />
DLS1 Lab91-DLS1-TT-A-Cfg.txt<br />
DLS2 Lab91-DLS2-TT-A-Cfg.txt<br />
R1 Lab91-R1-TT-A-Cfg.txt<br />
R2 Lab91-R2-TT-A-Cfg.txt<br />
R3 Lab91-R3-TT-A-Cfg.txt<br />
SRV1 N/A Static IP: 10.1.50.1/24<br />
Default gateway: 10.1.50.254<br />
PC-B N/A DHCP<br />
PC-C N/A Static IP: 10.1.80.100/24<br />
Default gateway: 10.1.80.1<br />
All contents are Copyright © 1992–2010 <strong>Cisco</strong> Systems, Inc. All rights reserved. This document is <strong>Cisco</strong> Public Information. Page 3 of 22
<strong>CCNP</strong>v6 <strong>TSHOOT</strong><br />
Step 3: Configure SRV1 and start the RADIUS server.<br />
a. Configure SRV1 with the static IP address 10.1.50.1/24 and default gateway 10.1.50.254.<br />
b. Start the WinRadius server application on SRV1. If the WinRadius server is not installed, contact your<br />
instructor.<br />
c. From the menu, select Operation > Add User and create a new user named raduser with a<br />
password of RadUserpass. Click OK.<br />
Note: Passwords are case-sensitive.<br />
d. To clear the log on the WinRadius server, select Log > Clear from the main menu.<br />
Note: If you exit the WinRadius server application and restart it, you must recreate the user raduser. A<br />
maximum of five users can be created using the free version of the software.<br />
Step 4: Release and renew the DHCP lease on PC-B.<br />
a. Ensure that PC-B is configured as a DHCP client in the OFFICE VLAN.<br />
b. After loading all TT-A device configuration files, issue the ipconfig /release and ipconfig<br />
/renew commands on PC-B.<br />
Step 5: Outline the troubleshooting approach and validation steps.<br />
Use this space to identify your troubleshooting approach and the key steps to verify that the problem is<br />
resolved. Troubleshooting approaches to select from include the follow-the-path, spot-the-differences, bottomup,<br />
top-down, divide-and-conquer, shoot-from-the-hip, and move-the-problem methods.<br />
Note: In addition to a specific approach, you can use the generic troubleshooting process described at the<br />
beginning of Section 2 of this lab.<br />
_______________________________________________________________________________<br />
_______________________________________________________________________________<br />
_______________________________________________________________________________<br />
_______________________________________________________________________________<br />
_______________________________________________________________________________<br />
_______________________________________________________________________________<br />
Step 6: Record the troubleshooting process and configuration changes.<br />
Note: Section 2 of this lab includes useful commands and examples of output.<br />
Use this log to document your actions and results during the troubleshooting process. List the commands you<br />
used to gather information. As you progress, record what you think the problem might be and the actions you<br />
take to correct the problem.<br />
All contents are Copyright © 1992–2010 <strong>Cisco</strong> Systems, Inc. All rights reserved. This document is <strong>Cisco</strong> Public Information. Page 4 of 22
<strong>CCNP</strong>v6 <strong>TSHOOT</strong><br />
Device Actions and Results<br />
Step 7: Document trouble ticket debrief notes.<br />
Use this space to make notes of the key learning points that you picked up during the discussion of this<br />
trouble ticket with your instructor. The notes can include problems encountered, solutions applied, useful<br />
commands employed, alternate solutions, methods, and processes, and procedure and communication<br />
improvements.<br />
_______________________________________________________________________________<br />
_______________________________________________________________________________<br />
_______________________________________________________________________________<br />
_______________________________________________________________________________<br />
_______________________________________________________________________________<br />
_______________________________________________________________________________<br />
_______________________________________________________________________________<br />
All contents are Copyright © 1992–2010 <strong>Cisco</strong> Systems, Inc. All rights reserved. This document is <strong>Cisco</strong> Public Information. Page 5 of 22
<strong>CCNP</strong>v6 <strong>TSHOOT</strong><br />
Task 2: Trouble Ticket Lab 9-1 TT-B<br />
Step 1: Review trouble ticket Lab 9-1 TT-B.<br />
As a further security measure, your company has decided to implement SSH and only allow vty access to key<br />
networking devices from specific management workstations. As a pilot, router R3 will be configured to allow<br />
SSH access from only PC-C (on the R3 LAN) and prevent remote access from any host other than PC-C. For<br />
testing purposes, host PC-C will be used as a management workstation and will be assigned a static address<br />
of 10.1.80.100. Login from PC-C to R3 must be authenticated by the RADIUS server running on SRV1. No<br />
other hosts in the network should be able to access R3 via SSH.<br />
A colleague of yours configured an ACL and SSH access on R3, but due to sporadic hardware issues with<br />
R3, she decided to replace R3 with a comparable router. She says that she backed up the configuration from<br />
the old router to a USB flash drive and loaded it into the new router. Now she is unable to connect to R3 using<br />
SSH from PC-C.<br />
On the RADIUS server, she created a test user named raduser with a password of RadUserpass. The<br />
implementation plan specifies RADIUS as the primary method of authentication with local authentication as<br />
the backup method.<br />
She has asked for your help in diagnosing and solving the problem.<br />
Step 2: Load the device trouble ticket configuration files for TT-B.<br />
Using the procedure described in Lab 3-1, verify that the lab configuration files are present in flash. Load the<br />
proper configuration files as indicated in the Device Configuration File table.<br />
Note: The following device access methods are in effect after installing RADIUS on SRV1 and loading the<br />
configuration files:<br />
• Console access requires no username or password.<br />
• Telnet and SSH require username admin and password adminpa55 (except for R3).<br />
• The enable password is ciscoenpa55.<br />
Device Configuration File Table<br />
Device Name File to Load Notes<br />
ALS1 Lab91-ALS1-TT-B-Cfg.txt<br />
DLS1 Lab91-DLS1-TT-B-Cfg.txt<br />
DLS2 Lab91-DLS2-TT-B-Cfg.txt<br />
R1 Lab91-R1-TT-B-Cfg.txt<br />
R2 Lab91-R2-TT-B-Cfg.txt<br />
R3 Lab91-R3-TT-B-Cfg.txt<br />
SRV1 N/A Static IP: 10.1.50.1/24<br />
Default gateway: 10.1.50.254<br />
PC-B N/A DHCP<br />
PC-C N/A Static IP: 10.1.80.100/24<br />
Default gateway: 10.1.80.1<br />
All contents are Copyright © 1992–2010 <strong>Cisco</strong> Systems, Inc. All rights reserved. This document is <strong>Cisco</strong> Public Information. Page 6 of 22
<strong>CCNP</strong>v6 <strong>TSHOOT</strong><br />
Step 3: Configure SRV1 and start the RADIUS server.<br />
a. Configure SRV1 with static IP address 10.1.50.1/24 and default gateway 10.1.50.254.<br />
b. Start the WinRadius server application on SRV1. If the WinRadius server is not installed, contact your<br />
instructor.<br />
c. Select Operation > Add User from the menu and create a new user named raduser with a password<br />
of RadUserpass. Click OK.<br />
Note: Passwords are case-sensitive.<br />
d. To clear the log on the WinRadius server, select Log > Clear from the main menu.<br />
Note: If you exit the WinRadius server application and restart it, you must recreate the user raduser. A<br />
maximum of five users can be created using the free version of the software.<br />
Step 4: Configure a static IP address on PC-C.<br />
a. Configure PC-C with static IP address 10.1.80.100, subnet mask 255.255.255.0, and default gateway<br />
10.1.80.1.<br />
b. Verify that PC-C has PuTTY (or comparable) SSH client software installed. If it does not, contact your<br />
instructor.<br />
Step 5: Outline the troubleshooting approach and validation steps.<br />
Use this space to identify your troubleshooting approach and the key steps to verify that the problem is<br />
resolved. Troubleshooting approaches to select from include the follow-the-path, spot-the-differences, bottomup,<br />
top-down, divide-and-conquer, shoot-from-the-hip, and move-the-problem methods.<br />
Note: In addition to a specific approach, you can use the generic troubleshooting process described at the<br />
beginning of Section 2 of this lab.<br />
_______________________________________________________________________________<br />
_______________________________________________________________________________<br />
_______________________________________________________________________________<br />
_______________________________________________________________________________<br />
_______________________________________________________________________________<br />
_______________________________________________________________________________<br />
Step 6: Record the troubleshooting process and configuration changes.<br />
Note: Section 2 of this lab includes useful commands and examples of output.<br />
Use this log to document your actions and results during the troubleshooting process. List the commands you<br />
used to gather information. As you progress, record what you think the problem might be and the actions you<br />
take to correct the problem.<br />
Device Actions and Results<br />
All contents are Copyright © 1992–2010 <strong>Cisco</strong> Systems, Inc. All rights reserved. This document is <strong>Cisco</strong> Public Information. Page 7 of 22
<strong>CCNP</strong>v6 <strong>TSHOOT</strong><br />
Device Actions and Results<br />
Step 7: Document trouble ticket debrief notes.<br />
Use this space to make notes of the key learning points that you picked up during the discussion of this<br />
trouble ticket with your instructor. The notes can include problems encountered, solutions applied, useful<br />
commands employed, alternate solutions, methods, and processes, and procedure and communication<br />
improvements.<br />
_______________________________________________________________________________<br />
_______________________________________________________________________________<br />
_______________________________________________________________________________<br />
_______________________________________________________________________________<br />
_______________________________________________________________________________<br />
_______________________________________________________________________________<br />
_______________________________________________________________________________<br />
All contents are Copyright © 1992–2010 <strong>Cisco</strong> Systems, Inc. All rights reserved. This document is <strong>Cisco</strong> Public Information. Page 8 of 22
<strong>CCNP</strong>v6 <strong>TSHOOT</strong><br />
Section 2—Troubleshooting Reference Information<br />
General Troubleshooting Process<br />
As a general guideline, you can use the following general troubleshooting process described in the course.<br />
1. Define the problem (symptoms).<br />
2. Gather information.<br />
3. Analyze the information.<br />
4. Propose a hypothesis (possible cause).<br />
5. Test the hypothesis.<br />
6. Eliminate or accept the hypothesis.<br />
7. Solve the problem.<br />
8. Document the problem.<br />
Command Summary<br />
The table lists useful commands for this lab. The sample output is shown on following pages.<br />
Command Key Information Displayed<br />
show line vty 0<br />
show users<br />
show radius server-group all<br />
show radius statistics<br />
debug radius authentication<br />
show aaa servers<br />
show aaa method-lists all<br />
debug aaa authentication<br />
debug aaa authorization<br />
Displays the physical serial interface characteristics of a<br />
vty line as well as the transport input and output allowed<br />
(for example: Telnet or SSH).<br />
Displays device lines in use (for example: con, vty 0, vty<br />
1), the username logged in, and the IP address of the<br />
connected host.<br />
Displays the RADIUS servers defined in the group<br />
specified (default group is radius). The server IP address<br />
and port numbers are listed.<br />
Displays the RADIUS message statistics for<br />
authentication and accounting communication between<br />
the network device and the RADIUS server. Output<br />
includes packets with and without responses, response<br />
delay, and timeouts. Source port numbers are also listed.<br />
Displays real-time interaction and message exchange<br />
between the network device, the calling station, and the<br />
RADIUS server. Authentication success or failure is<br />
indicated.<br />
Displays AAA server host information, including type<br />
(RADIUS or TACACS), IP address, port numbers in use,<br />
and AAA requests, successes, and failures.<br />
Displays the names of AAA method lists currently<br />
defined, the type of validation in use, and the sequence<br />
of application (for example: server group, local, or none).<br />
Displays the method list defined and being used for AAA<br />
authentication (for example: TELNET_LINES).<br />
Displays the method list defined and being used for AAA<br />
authorization.<br />
All contents are Copyright © 1992–2010 <strong>Cisco</strong> Systems, Inc. All rights reserved. This document is <strong>Cisco</strong> Public Information. Page 9 of 22
<strong>CCNP</strong>v6 <strong>TSHOOT</strong><br />
debug aaa accounting<br />
show ip ssh<br />
show ssh<br />
sh access-lists<br />
show ip interface fa0/0<br />
Sample Troubleshooting Output<br />
VTY Line-related Commands<br />
Displays the method list defined and being used for AAA<br />
accounting.<br />
Displays SSH status (enabled or disabled), version<br />
number, timeout, retries, and key size in use (for<br />
example: 1024 bits).<br />
Displays active SSH connections with username,<br />
version, mode, encryption, HMAC, and state of the<br />
connection.<br />
Displays currently configured ACLs with type (for<br />
example: standard, extended) and name if one is<br />
assigned. ACL statements are listed with the number of<br />
matches for each one.<br />
Displays IP-related interface information, including any<br />
inbound or outbound access lists configured.<br />
The following commands and outputs are samples from the devices in this lab.<br />
DLS1#show line vty 0<br />
Tty Typ Tx/Rx A Modem Roty AccO AccI Uses Noise Overruns Int<br />
1 VTY - - - - - 4 0 0/0 -<br />
Line 1, Location: "", Type: ""<br />
Length: 24 lines, Width: 80 columns<br />
Baud rate (TX/RX) is 9600/9600<br />
Status: Ready, No Exit Banner<br />
Capabilities: none<br />
Modem state: Ready<br />
Special Chars: Escape Hold Stop Start Disconnect Activation<br />
^^x none - - none<br />
Timeouts: Idle EXEC Idle Session Modem Answer Session Dispatch<br />
01:00:00 never none not set<br />
Idle Session Disconnect Warning<br />
never<br />
Login-sequence User Response<br />
00:00:30<br />
Autoselect Initial Wait<br />
not set<br />
Modem type is unknown.<br />
Session limit is not set.<br />
Time since activation: never<br />
Editing is enabled.<br />
History is enabled, history size is 20.<br />
DNS resolution in show commands is enabled<br />
Full user help is disabled<br />
Allowed input transports are ssh.<br />
Allowed output transports are telnet ssh.<br />
Preferred transport is telnet.<br />
No output characters are padded<br />
No special data dispatching characters<br />
All contents are Copyright © 1992–2010 <strong>Cisco</strong> Systems, Inc. All rights reserved. This document is <strong>Cisco</strong> Public Information. Page 10 of 22
<strong>CCNP</strong>v6 <strong>TSHOOT</strong><br />
In the above example, DLS1 allows only SSH as an input transport protocol on vty lines, but it allows both SSH<br />
and Telnet on output.<br />
R3#show users<br />
Line User Host(s) Idle Location<br />
* 0 con 0 idle 00:00:00<br />
194 vty 0 raduser idle 00:22:52 10.1.80.100<br />
195 vty 1 admin idle 00:00:22 10.1.50.1<br />
In the above example, two users are logged in to R3 using the vty lines (could be Telnet or SSH), one from host<br />
10.1.80.100 and one from host 10.1.50.1.<br />
RADIUS-related Commands<br />
DLS1#show radius server-group all<br />
Sever group radius<br />
Sharecount = 1 sg_unconfigured = FALSE<br />
Type = standard Memlocks = 1<br />
Server(10.1.50.1:1645,1646) Transactions:<br />
Authen: Not Available Author:Not Available Acct:Not Available<br />
In the above example, DLS1 is configured to access a RADIUS server at IP address 10.1.50.1, using ports 1645<br />
and 1646. No transaction have taken place.<br />
DLS1#show radius statistics<br />
Auth. Acct. Both<br />
Maximum inQ length: NA NA 1<br />
Maximum waitQ length: NA NA 1<br />
Maximum doneQ length: NA NA 1<br />
Total responses seen: 0 0 0<br />
Packets with responses: 0 0 0<br />
Packets without responses: 4 0 4<br />
Average response delay(ms): 0 0 0<br />
Maximum response delay(ms): 0 0 0<br />
Number of Radius timeouts: 16 0 16<br />
Duplicate ID detects: 0 0 0<br />
Buffer Allocation Failures: 0 0 0<br />
Maximum Buffer Size (bytes): 82 0 82<br />
Source Port Range: (2 ports only)<br />
1645 - 1646<br />
Last used Source Port/Identifier:<br />
1645/4<br />
1646/0<br />
In the above example, DLS1 has attempted to contact the server 16 times (four attempted logins with four retries<br />
each), and all attempts have timed out due to lack of accessibility of the server.<br />
DLS1#debug radius authentication<br />
Radius protocol debugging is on<br />
Radius protocol brief debugging is off<br />
Radius protocol verbose debugging is off<br />
Radius packet hex dump debugging is off<br />
Radius packet protocol debugging is on<br />
Radius packet retransmission debugging is off<br />
Radius server fail-over debugging is off<br />
Radius elog debugging is off<br />
All contents are Copyright © 1992–2010 <strong>Cisco</strong> Systems, Inc. All rights reserved. This document is <strong>Cisco</strong> Public Information. Page 11 of 22
<strong>CCNP</strong>v6 <strong>TSHOOT</strong><br />
Login attempt with incorrect RADIUS ports specified on DLS1:<br />
DLS1#<br />
Dec 4 16:06:50.142: RADIUS/ENCODE(00000005): ask "Username: "<br />
DLS1#<br />
Dec 4 16:06:59.430: RADIUS/ENCODE(00000005): ask "Password: "<br />
DLS1#<br />
Dec 4 16:07:05.487: RADIUS/ENCODE(00000005):Orig. component type = EXEC<br />
Dec 4 16:07:05.487: RADIUS: AAA Unsupported Attr: interface [170] 4<br />
Dec 4 16:07:05.487: RADIUS: 74 74 [ tt]<br />
Dec 4 16:07:05.487: RADIUS/ENCODE(00000005): dropping service type, "radius-server<br />
attribute 6 on-for-login-auth" is off<br />
Dec 4 16:07:05.487: RADIUS(00000005): Config NAS IP: 0.0.0.0<br />
Dec 4 16:07:05.487: RADIUS/ENCODE(00000005): acct_session_id: 5<br />
Dec 4 16:07:05.487: RADIUS(00000005): sending<br />
Dec 4 16:07:05.487: RADIUS/ENCODE: Best Local IP-Address 10.1.50.252 for Radius<br />
-Server 10.1.50.1<br />
Dec 4 16:07:05.487: RADIUS(00000005): Send Access-Request to 10.1.50.1:1645 id<br />
1645/5, len 82<br />
Dec 4 16:07:05.487: RADIUS: authenticator B5 DF D2 00 81 8A C0 08 - 5E 68 DA A<br />
9 59 01 7A 00<br />
Dec 4 16:07:05.487: RADIUS: User-Name [1] 9 "raduser"<br />
Dec 4 16:07:05.487: RADIUS: User-Password [2] 18 *<br />
Dec 4 16:07:05.487: RADIUS: NAS-Port [5] 6 1<br />
DLS1#<br />
Dec 4 16:07:05.487: RADIUS: NAS-Port-Id [87] 6 "tty1"<br />
Dec 4 16:07:05.487: RADIUS: NAS-Port-Type [61] 6 Virtual<br />
[5]<br />
Dec 4 16:07:05.487: RADIUS: Calling-Station-Id [31] 11 "10.1.10.1"<br />
Dec 4 16:07:05.487: RADIUS: NAS-IP-Address [4] 6 10.1.50.252<br />
DLS1#<br />
Dec 4 16:07:10.370: RADIUS: Retransmit to (10.1.50.1:1645,1646) for id 1645/5<br />
DLS1#<br />
Dec 4 16:07:15.269: RADIUS: Retransmit to (10.1.50.1:1645,1646) for id 1645/5<br />
DLS1#<br />
Dec 4 16:07:20.403: RADIUS: Retransmit to (10.1.50.1:1645,1646) for id 1645/5<br />
DLS1#<br />
Dec 4 16:07:25.370: %RADIUS-4-RADIUS_DEAD: RADIUS server 10.1.50.1:1645,1646 is<br />
not responding.<br />
Dec 4 16:07:25.370: %RADIUS-4-RADIUS_ALIVE: RADIUS server 10.1.50.1:1645,1646 h<br />
as returned.<br />
DLS1#<br />
Dec 4 16:07:25.370: RADIUS: No response from (10.1.50.1:1645,1646) for id 1645/<br />
5<br />
Dec 4 16:07:25.370: RADIUS/DECODE: parse response no app start; FAIL<br />
Dec 4 16:07:25.370: RADIUS/DECODE: parse response; FAIL<br />
DLS1#<br />
Dec 4 16:07:27.375: RADIUS/ENCODE(00000005): ask "Username: "<br />
The above example shows the exchange between the RADIUS client and server when the client is using port<br />
numbers that do not match the server. Note the retransmits and the server dead messages.<br />
Successful login from PC-B (using valid username raduser on the RADIUS server):<br />
All contents are Copyright © 1992–2010 <strong>Cisco</strong> Systems, Inc. All rights reserved. This document is <strong>Cisco</strong> Public Information. Page 12 of 22
<strong>CCNP</strong>v6 <strong>TSHOOT</strong><br />
DLS1(config)#<br />
Dec 6 17:04:47.577: RADIUS/ENCODE(0000000F): ask "Username: "<br />
DLS1(config)#<br />
Dec 6 17:04:55.715: RADIUS/ENCODE(0000000F): ask "Password: "<br />
DLS1(config)#<br />
Dec 6 17:05:05.439: RADIUS/ENCODE(0000000F):Orig. component type = EXEC<br />
Dec 6 17:05:05.439: RADIUS: AAA Unsupported Attr: interface [170] 4<br />
Dec 6 17:05:05.439: RADIUS: 74 74 [ tt]<br />
Dec 6 17:05:05.439: RADIUS/ENCODE(0000000F): dropping service type, "radius-ser<br />
ver attribute 6 on-for-login-auth" is off<br />
Dec 6 17:05:05.439: RADIUS(0000000F): Config NAS IP: 0.0.0.0<br />
Dec 6 17:05:05.439: RADIUS/ENCODE(0000000F): acct_session_id: 15<br />
Dec 6 17:05:05.439: RADIUS(0000000F): se<br />
DLS1(config)#nding<br />
Dec 6 17:05:05.439: RADIUS/ENCODE: Best Local IP-Address 10.1.50.252 for Radius<br />
-Server 10.1.50.1<br />
Dec 6 17:05:05.439: RADIUS(0000000F): Send Access-Request to 10.1.50.1:1812 id<br />
1645/12, len 82<br />
Dec 6 17:05:05.439: RADIUS: authenticator 7E D1 DF 37 75 69 EC 91 - 42 FC 2E 7<br />
8 D7 9B 5B 3B<br />
Dec 6 17:05:05.439: RADIUS: User-Name [1] 9 "raduser"<br />
Dec 6 17:05:05.439: RADIUS: User-Password [2] 18 *<br />
Dec 6 17:05:05.439: RADIUS: NAS-Port [5] 6 1<br />
DLS1(config)#<br />
Dec 6 17:05:05.439: RADIUS: NAS-Port-Id [87] 6 "tty1"<br />
Dec 6 17:05:05.439: RADIUS: NAS-Port-Type [61] 6 Virtual<br />
[5]<br />
Dec 6 17:05:05.439: RADIUS: Calling-Station-Id [31] 11 "10.1.10.1"<br />
Dec 6 17:05:05.439: RADIUS: NAS-IP-Address [4] 6 10.1.50.252<br />
Dec 6 17:05:05.447: RADIUS: Received from id 1645/12 10.1.50.1:1812, Access-Acc<br />
ept, len 26<br />
Dec 6 17:05:05.447: RADIUS: authenticator 75 81 E4 CD 45 1D F6 14 - 5D 1F AD F<br />
4 D4 83 D<br />
DLS1(config)#5 FE<br />
Dec 6 17:05:05.447: RADIUS: Session-Timeout [27] 6 9999999<br />
Dec 6 17:05:05.447: RADIUS(0000000F): Received from id 1645/12<br />
The above example shows the exchange between the RADIUS client and server when the client is using the<br />
same port numbers as the server and a legitimate user attempts to login. Note the Access-Accept message.<br />
Unsuccessful login from PC-B (using invalid username baduser):<br />
DLS1(config)#<br />
Dec 6 17:10:00.346: RADIUS/ENCODE(00000010): ask "Username: "<br />
DLS1(config)#<br />
Dec 6 17:10:06.722: RADIUS/ENCODE(00000010): ask "Password: "<br />
DLS1(config)#<br />
Dec 6 17:10:16.580: RADIUS/ENCODE(00000010):Orig. component type = EXEC<br />
Dec 6 17:10:16.580: RADIUS: AAA Unsupported Attr: interface [170] 4<br />
Dec 6 17:10:16.580: RADIUS: 74 74 [ tt]<br />
Dec 6 17:10:16.580: RADIUS/ENCODE(00000010): dropping service type, "radius-ser<br />
ver attribute 6 on-for-login-auth" is off<br />
All contents are Copyright © 1992–2010 <strong>Cisco</strong> Systems, Inc. All rights reserved. This document is <strong>Cisco</strong> Public Information. Page 13 of 22
<strong>CCNP</strong>v6 <strong>TSHOOT</strong><br />
Dec 6 17:10:16.580: RADIUS(00000010): Config NAS IP: 0.0.0.0<br />
Dec 6 17:10:16.580: RADIUS/ENCODE(00000010): acct_session_id: 16<br />
Dec 6 17:10:16.580: RADIUS(00000010): se<br />
DLS1(config)#nding<br />
Dec 6 17:10:16.580: RADIUS/ENCODE: Best Local IP-Address 10.1.50.252 for Radius<br />
-Server 10.1.50.1<br />
Dec 6 17:10:16.580: RADIUS(00000010): Send Access-Request to 10.1.50.1:1812 id<br />
1645/13, len 82<br />
Dec 6 17:10:16.580: RADIUS: authenticator 17 3A 1D 34 81 4C F1 6F - 89 62 05 1<br />
3 14 8F 33 4B<br />
Dec 6 17:10:16.580: RADIUS: User-Name [1] 9 "baduser"<br />
Dec 6 17:10:16.580: RADIUS: User-Password [2] 18 *<br />
Dec 6 17:10:16.580: RADIUS: NAS-Port [5] 6 1<br />
Dec 6 17:10:16.580: RADIUS: NAS-Port-Id [87] 6 "tty1"<br />
Dec 6 17:10:16.580: RADIUS: NAS-Port-Type [61] 6 Virtual<br />
[5]<br />
Dec 6 17:10:16.580: RADIUS: Calling-Station-Id [31] 11 "10.1.10.1"<br />
Dec 6 17:10:16.580: RADIUS: NAS-IP-Address [4] 6 10.1.50.252<br />
Dec 6 17:10:16.588: RADIUS: Received from id 1645/13 10.1.50.1:1812, Access-Rej<br />
ect, len 20<br />
Dec 6 17:10:16.588: RADIUS: authenticator 81 34 66 76 58 03 AF 9B - CF D5 93 F<br />
2 C6 13 6<br />
DLS1(config)#7 7D<br />
Dec 6 17:10:16.588: RADIUS(00000010): Received from id 1645/13<br />
Dec 6 17:10:18.593: RADIUS/ENCODE(00000010): ask "Username: "<br />
The above example shows the exchange between the RADIUS client and server when the client is using the<br />
same port numbers as the server and a bad login is attempted (nonexistent username and bad password). Note<br />
the Access-Reject message. Switch DLS1 then prompts immediately to allow entry of a correct username and<br />
password combination.<br />
AAA-related Commands<br />
Incorrect RADIUS port numbers:<br />
DLS1#show aaa servers<br />
RADIUS: id 2, priority 1, host 10.1.50.1, auth-port 1645, acct-port 1646<br />
State: current UP, duration 13752s, previous duration 0s<br />
Dead: total time 0s, count 0<br />
Quarantined: No<br />
Authen: request 8, timeouts 8<br />
Response: unexpected 0, server error 0, incorrect 0, time 0ms<br />
Transaction: success 0, failure 2<br />
<br />
The above example shows that the AAA server is RADIUS and lists the IP address and ports defined on the<br />
client. Note the eight requests and eight timeouts, resulting in two failed authentication attempts.<br />
Correct RADIUS port numbers:<br />
R3#show aaa servers<br />
RADIUS: id 1, priority 1, host 10.1.50.1, auth-port 1812, acct-port 1813<br />
State: current UP, duration 23188s, previous duration 0s<br />
All contents are Copyright © 1992–2010 <strong>Cisco</strong> Systems, Inc. All rights reserved. This document is <strong>Cisco</strong> Public Information. Page 14 of 22
<strong>CCNP</strong>v6 <strong>TSHOOT</strong><br />
Dead: total time 0s, count 0<br />
Quarantined: No<br />
Authen: request 0, timeouts 0, failover 0, retransmission 0<br />
Response: accept 0, reject 0, challenge 0<br />
Response: unexpected 0, server error 0, incorrect 0, time 0ms<br />
Transaction: success 2, failure 0<br />
Throttled: transaction 0, timeout 0, failure 0<br />
Author: request 0, timeouts 0, failover 0, retransmission 0<br />
Response: accept 0, reject 0, challenge 0<br />
Response: unexpected 0, server error 0, incorrect 0, time 0ms<br />
Transaction: success 0, failure 0<br />
Throttled: transaction 0, timeout 0, failure 0<br />
Account: request 0, timeouts 0, failover 0, retransmission 0<br />
Request: start 0, interim 0, stop 0<br />
Response: start 0, interim 0, stop 0<br />
Response: unexpected 0, server error 0, incorrect 0, time 0ms<br />
Transaction: success 0, failure 0<br />
Throttled: transaction 0, timeout 0, failure 0<br />
The above example shows that the AAA server is RADIUS and lists the IP address and ports defined on the<br />
client. Note the two successful authentication transactions.<br />
R3#show aaa method-lists all<br />
authen queue=AAA_ML_AUTHEN_LOGIN<br />
name=default valid=TRUE id=0 :state=ALIVE : LOCAL<br />
name=CONSOLE valid=TRUE id=2B000001 :state=ALIVE : NONE<br />
name=VTY_LINES valid=TRUE id=87000002 :state=ALIVE : SERVER_GROUP radius LOCAL<br />
authen queue=AAA_ML_AUTHEN_ENABLE<br />
authen queue=AAA_ML_AUTHEN_PPP<br />
authen queue=AAA_ML_AUTHEN_SGBP<br />
authen queue=AAA_ML_AUTHEN_ARAP<br />
authen queue=AAA_ML_AUTHEN_DOT1X<br />
authen queue=AAA_ML_AUTHEN_EAPOUDP<br />
authen queue=AAA_ML_AUTHEN_8021X<br />
permanent lists<br />
name=Permanent Enable None valid=TRUE id=0 :state=ALIVE : ENABLE NONE<br />
name=Permanent Enable valid=TRUE id=0 :state=ALIVE : ENABLE<br />
name=Permanent None valid=TRUE id=0 :state=ALIVE : NONE<br />
name=Permanent Local valid=TRUE id=0 :state=ALIVE : LOCAL<br />
author queue=AAA_ML_AUTHOR_SHELL<br />
name=VTY_LINES valid=TRUE id=61000003 :state=ALIVE : SERVER_GROUP radius LOCAL<br />
<br />
The above example shows the names of the AAA method lists currently defined, the type of validation in use, and<br />
the sequence of application (for example: server group, local, or none).<br />
DLS1#debug aaa authentication<br />
AAA Authentication debugging is on<br />
DLS1#<br />
Dec 7 15:48:21.869: AAA/BIND(0000000C): Bind i/f<br />
Dec 7 15:48:21.869: AAA/AUTHEN/LOGIN (0000000C): Pick method list 'TELNET_LINES<br />
'<br />
The above example shows the method list defined and being used for AAA authentication (TELNET_LINES).<br />
All contents are Copyright © 1992–2010 <strong>Cisco</strong> Systems, Inc. All rights reserved. This document is <strong>Cisco</strong> Public Information. Page 15 of 22
<strong>CCNP</strong>v6 <strong>TSHOOT</strong><br />
DLS1#debug aaa authorization<br />
AAA Authorization debugging is on<br />
DLS1#<br />
Dec 7 16:06:34.836: AAA/AUTHOR (0xD): Pick method list 'default' - FAIL<br />
Dec 7 16:06:34.844: AAA/AUTHOR/EXEC(0000000D): Authorization FAILED<br />
The above example shows the method list defined and being used for AAA authorization (default). Note that the<br />
authorization attempt failed.<br />
SSH-related Commands<br />
R3#show ip ssh<br />
SSH Enabled - version 1.99<br />
Authentication timeout: 120 secs; Authentication retries: 3<br />
Minimum expected Diffie Hellman key size : 1024 bits<br />
R3#show ip ssh<br />
SSH Disabled - version 1.99<br />
%Please create RSA keys (of at least 768 bits size) to enable SSH v2.<br />
Authentication timeout: 120 secs; Authentication retries: 3<br />
Minimum expected Diffie Hellman key size : 1024 bits<br />
The first example above shows the output when the RSA keys have been created and SSH is enabled. The<br />
second example shows the output when there are no RSA keys and SSH is disabled.<br />
R3#show ssh<br />
Connection Version Mode Encryption Hmac State Username<br />
0 2.0 IN aes256-cbc hmac-sha1 Session started raduser<br />
0 2.0 OUT aes256-cbc hmac-sha1 Session started raduser<br />
1 2.0 IN aes256-cbc hmac-sha1 Session started admin<br />
1 2.0 OUT aes256-cbc hmac-sha1 Session started admin<br />
%No SSHv1 server connections running.<br />
The above example shows active SSH connections with the username, version, mode, encryption, HMAC, and<br />
state of the connection.<br />
ACL-related Commands<br />
R3#show access-lists<br />
Standard IP access list 1<br />
10 permit 10.1.80.100 (77 matches)<br />
The above example shows the currently configured ACLs with the type, number (if one is assigned), statements,<br />
and the number of matches for each one.<br />
R3#show ip interface fa0/0<br />
FastEthernet0/0 is up, line protocol is up<br />
Internet address is 10.1.80.1/24<br />
Broadcast address is 255.255.255.255<br />
Address determined by non-volatile memory<br />
MTU is 1500 bytes<br />
Helper address is not set<br />
Directed broadcast forwarding is disabled<br />
Multicast reserved groups joined: 224.0.0.10<br />
Outgoing access list is not set<br />
All contents are Copyright © 1992–2010 <strong>Cisco</strong> Systems, Inc. All rights reserved. This document is <strong>Cisco</strong> Public Information. Page 16 of 22
<strong>CCNP</strong>v6 <strong>TSHOOT</strong><br />
Inbound access list is 1<br />
Proxy ARP is enabled<br />
Local Proxy ARP is disabled<br />
Security level is default<br />
Split horizon is enabled<br />
ICMP redirects are always sent<br />
ICMP unreachables are always sent<br />
ICMP mask replies are never sent<br />
IP fast switching is enabled<br />
IP fast switching on the same interface is disabled<br />
IP Flow switching is disabled<br />
IP CEF switching is enabled<br />
IP CEF switching turbo vector<br />
<br />
The above example shows IP-related interface information, including any inbound or outbound access lists<br />
configured<br />
Reflection Questions<br />
1. Which lab trouble tickets did you have the most difficulty with?<br />
__________________________________________________________________________________________<br />
__________________________________________________________________________________________<br />
__________________________________________________________________________________________<br />
2. Would you change anything about the process that you used for any of the trouble tickets now that you see the<br />
resolution of the problem?<br />
__________________________________________________________________________________________<br />
__________________________________________________________________________________________<br />
__________________________________________________________________________________________<br />
3. Which commands did you find most useful in diagnosing management plane security issues? Add these to your<br />
toolbox for future use. Which commands did you find least useful?<br />
__________________________________________________________________________________________<br />
__________________________________________________________________________________________<br />
__________________________________________________________________________________________<br />
All contents are Copyright © 1992–2010 <strong>Cisco</strong> Systems, Inc. All rights reserved. This document is <strong>Cisco</strong> Public Information. Page 17 of 22
<strong>CCNP</strong>v6 <strong>TSHOOT</strong><br />
References<br />
If you need more information on the commands and their options, see the following references:<br />
• IP Routing Protocol<br />
http://www.cisco.com/cisco/web/support/index.html<br />
• <strong>Cisco</strong> IOS IP Switching<br />
http://www.cisco.com/en/US/docs/ios/ipswitch/command/reference/isw_book.html<br />
• Configuring SSH on Routers and Switches Running <strong>Cisco</strong> IOS Software<br />
http://www.cisco.com/en/US/tech/tk583/tk617/technologies_tech_note09186a00800949e2.shtml<br />
• SSH FAQ<br />
http://www.cisco.com/en/US/tech/tk583/tk617/technologies_q_and_a_item09186a0080267e0f.shtml<br />
Router Interface Summary Table<br />
Router Model Ethernet Interface<br />
#1<br />
1700 Fast Ethernet 0<br />
(FA0)<br />
1800 Fast Ethernet 0/0<br />
(FA0/0)<br />
2600 Fast Ethernet 0/0<br />
(FA0/0)<br />
2800 Fast Ethernet 0/0<br />
(FA0/0)<br />
Router Interface Summary<br />
Ethernet Interface<br />
#2<br />
Fast Ethernet 1<br />
(FA1)<br />
Fast Ethernet 0/1<br />
(FA0/1)<br />
Fast Ethernet 0/1<br />
(FA0/1)<br />
Fast Ethernet 0/1<br />
(FA0/1)<br />
Serial Interface<br />
#1<br />
Serial Interface<br />
#2<br />
Serial 0 (S0) Serial 1 (S1)<br />
Serial 0/0/0<br />
(S0/0/0)<br />
Serial 0/0/1<br />
(S0/0/1)<br />
Serial 0/0 (S0/0) Serial 0/1 (S0/1)<br />
Serial 0/0/0<br />
(S0/0/0)<br />
Serial 0/0/1<br />
(S0/0/1)<br />
Note: To find out how the router is configured, look at the interfaces to identify the type of router<br />
and how many interfaces the router has. Rather than try to list all the combinations of<br />
configurations for each router class, this table includes identifiers for the possible combinations of<br />
Ethernet and serial interfaces in the device. The table does not include any other type of interface,<br />
even though a specific router might contain one. An example of this is an ISDN BRI interface. The<br />
string in parenthesis is the legal abbreviation that can be used in <strong>Cisco</strong> IOS commands to<br />
represent the interface.<br />
All contents are Copyright © 1992–2010 <strong>Cisco</strong> Systems, Inc. All rights reserved. This document is <strong>Cisco</strong> Public Information. Page 18 of 22
<strong>CCNP</strong>v6 <strong>TSHOOT</strong><br />
Appendix A—WinRadius Server Installation<br />
Note: A WinRadius (or comparable) server should be installed on server SRV1 for this lab. If it is not, you can<br />
use the following procedure to download and install it. Check with your instructor if you have questions<br />
regarding the RADIUS server installation.<br />
Step 1: Download the WinRadius software.<br />
A number of RADIUS servers are available, both freeware and for sale. This lab uses WinRadius, a freeware<br />
standards-based RADIUS server that runs on Windows XP and most other Windows operating systems.<br />
Note: The free version of the software can support only five usernames.<br />
Step 2: Install the WinRadius software.<br />
a. Create a folder named WinRadius on your desktop or other location in which to store the files.<br />
b. Search the web for winradius and download the latest version from a trusted website.<br />
c. Save the downloaded zip file in the folder created in Step 2a, and extract the zipped files to the same<br />
folder. There is no installation setup. The extracted WinRadius.exe file is executable.<br />
d. You can create a shortcut on your desktop for WinRadius.exe.<br />
Step 3: Configure the WinRadius server database.<br />
a. Start the WinRadius.exe application. WinRadius uses a local database in which it stores user<br />
information. When the application is started for the first time, the following messages are displayed:<br />
Please go to “Settings/Database and create the ODBC for your RADIUS<br />
database.<br />
Launch ODBC failed.<br />
b. From the main menu, select Settings > Database.<br />
c. Click the Configure ODBC automatically button and then click OK. You should see a message that<br />
the ODBC was created successfully. Exit WinRadius and restart the application for the changes to<br />
take effect.<br />
All contents are Copyright © 1992–2010 <strong>Cisco</strong> Systems, Inc. All rights reserved. This document is <strong>Cisco</strong> Public Information. Page 19 of 22
<strong>CCNP</strong>v6 <strong>TSHOOT</strong><br />
d. When WinRadius starts again, you should see messages similar to the following:<br />
All contents are Copyright © 1992–2010 <strong>Cisco</strong> Systems, Inc. All rights reserved. This document is <strong>Cisco</strong> Public Information. Page 20 of 22
<strong>CCNP</strong>v6 <strong>TSHOOT</strong><br />
Step 4: Configure users and passwords on the WinRadius server.<br />
Note: The free version of WinRadius can support only five usernames at a time. The usernames are lost<br />
if you exit the application and restart it. Any usernames created in previous sessions must be recreated.<br />
The first message in the previous screen shows that zero users were loaded. No users had been created<br />
prior to this, but this message is displayed each time WinRadius is started, regardless of whether users<br />
were created or not.<br />
a. From the main menu, select Operation > Add User.<br />
b. Enter the username raduser with a password of RadUserpass.<br />
Note: The lab specifies the username raduser in lowercase. The example here creates user RadUser.<br />
c. Click OK. You should see a message on the log screen that the user was added successfully.<br />
Step 5: Clear the log display.<br />
From the main menu, select Log > Clear.<br />
Step 6: Test the new user added using the WinRadius test utility.<br />
a. A WinRadius testing utility is included in the downloaded zip file. Navigate to the folder where you<br />
unzipped the WinRadius.zip file and locate the file named RadiusTest.exe.<br />
b. Start the RadiusTest application, and enter the IP address of the RADIUS server. For this lab, the<br />
RADIUS server is SRV1, and the IP address is 10.1.50.1. The IP address of the RADIUS server in<br />
the example shown here is 192.168.1.3.<br />
c. Enter username raduser and password RadUserpass. Do not change the default RADIUS port<br />
number of 1813 nor the RADIUS password of WinRadius.<br />
Note: Be sure to use the IP address of SRV1 in this lab (10.1.50.1) when testing.<br />
All contents are Copyright © 1992–2010 <strong>Cisco</strong> Systems, Inc. All rights reserved. This document is <strong>Cisco</strong> Public Information. Page 21 of 22
<strong>CCNP</strong>v6 <strong>TSHOOT</strong><br />
d. Click Send and you should see a Send Access_Request message indicating that the server at<br />
10.1.50.1, port number 1813, received 44 hexadecimal characters. On the WinRadius log display,<br />
you should also see a message indicating that user raduser was authenticated successfully.<br />
e. Close the RadiusTest application.<br />
All contents are Copyright © 1992–2010 <strong>Cisco</strong> Systems, Inc. All rights reserved. This document is <strong>Cisco</strong> Public Information. Page 22 of 22
<strong>CCNP</strong>v6 <strong>TSHOOT</strong><br />
Chapter 9 Lab 9-2, Control Plane Security<br />
Lab Topology<br />
Objectives<br />
• Load the device configuration files for each trouble ticket.<br />
• Diagnose and resolve problems related to router and switch control plane security.<br />
• Document the troubleshooting progress, configuration changes, and problem resolution.<br />
All contents are Copyright © 1992–2010 <strong>Cisco</strong> Systems, Inc. All rights reserved. This document is <strong>Cisco</strong> Public Information. Page 1 of 17
<strong>CCNP</strong>v6 <strong>TSHOOT</strong><br />
Background<br />
Routers and Layer 3 switches are typically segmented into three planes of operation, each with a clearly<br />
identified objective. The data plane (also called the forwarding plane) forwards user data packets. The control<br />
plane routes data correctly, and the management plane manages the network devices.<br />
The control plane is typically associated with packets generated by the network elements themselves. End<br />
users typically do not interact with the control plane. Examples of Layer 3 control plane protocols and related<br />
security functions include neighbor authentication for routing protocols and HSRP. Examples of securityrelated<br />
Layer 2 control plane protocols include root guard, BPDU guard, DHCP snooping, Dynamic ARP<br />
Inspection, IP source guard, and the use of special VLANs for trunks and unused ports.<br />
This lab focuses on control plane security issues related to DHCP snooping and EIGRP authentication for<br />
routers and Layer 3 switches.<br />
For each task or trouble ticket, the trouble scenario and problem symptom is described. While<br />
troubleshooting, you will discover the cause of the problem, correct it, and then document the process and<br />
results.<br />
Lab Structure<br />
This lab is divided into two main sections.<br />
Section 1—Trouble Tickets and Troubleshooting Logs<br />
This section includes two tasks. Each task is associated with a trouble ticket (TT) and introduces one or more<br />
errors on one or more devices. If time is a consideration, each task or trouble ticket can be performed<br />
independently.<br />
Section 2—Troubleshooting Reference Information<br />
This section provides general troubleshooting information that can be applied to any of the trouble tickets in<br />
this lab. Examples of useful commands and output are provided. If time permits, it is recommended that you<br />
read through Section 2 prior to starting on the trouble tickets.<br />
Note: This lab uses <strong>Cisco</strong> 1841 routers with <strong>Cisco</strong> IOS Release 12.4(24)T1 and the advanced IP image<br />
c1841-advipservicesk9-mz.124-24.T1.bin. The switches are <strong>Cisco</strong> WS-C2960-24TT-L with the <strong>Cisco</strong> IOS<br />
image c2960-lanbasek9-mz.122-46.SE.bin and Catalyst 3560-24PS with the <strong>Cisco</strong> IOS image c3560advipservicesk9-mz.122-46.SE.bin.<br />
Other routers (such as 2801 and 2811), switches (such as 2950 or 3550),<br />
and <strong>Cisco</strong> IOS Software versions can be used if they have comparable capabilities and features. Depending<br />
on the router or switch model and <strong>Cisco</strong> IOS Software version, the commands available and output produced<br />
might vary from what is shown in this lab.<br />
Any changes made to configurations or topology (other than errors introduced) are noted in the lab and<br />
trouble tickets so that you are aware of them prior to beginning the troubleshooting process.<br />
Required Resources<br />
• 3 routers (<strong>Cisco</strong> 1841 with <strong>Cisco</strong> IOS Release 12.4(24)T1 Advanced IP Service or comparable)<br />
• 1 switch (<strong>Cisco</strong> 2960 with the <strong>Cisco</strong> IOS Release 12.2(46)SE C2960-LANBASEK9-M image or<br />
comparable)<br />
• 2 switches (<strong>Cisco</strong> 3560 with the <strong>Cisco</strong> IOS Release 12.2(46)SE C3560-advipservicesk9-mz image or<br />
comparable)<br />
• SRV1 (Windows PC with static IP address) with TFTP and syslog servers plus an SSH client (PuTTY<br />
or comparable) and WireShark software<br />
• PC-B (Windows PC DHCP client) with PuTTY and WireShark software<br />
• PC-C (Windows PC DHCP client) with PuTTY and WireShark software<br />
• Serial and Ethernet cables<br />
All contents are Copyright © 1992–2010 <strong>Cisco</strong> Systems, Inc. All rights reserved. This document is <strong>Cisco</strong> Public Information. Page 2 of 17
<strong>CCNP</strong>v6 <strong>TSHOOT</strong><br />
Section 1—Trouble Tickets and Troubleshooting Logs<br />
Task 1: Trouble Ticket Lab 9-2 TT-A<br />
Step 1: Review trouble ticket Lab 9-2 TT-A.<br />
As a security measure, your company has decided to implement DHCP snooping on access switches to<br />
prevent DHCP spoofing by unauthorized DHCP servers. For the pilot, the implementation plan specifies that<br />
the user VLAN 10 (OFFICE VLAN) on ASL1 be configured for DHCP snooping, and DHCP client PC-B be<br />
used as a test station. The test plan requires that the redundant switch topology failover allows VLAN 10<br />
users to obtain an IP address from the DHCP server (DLS1) if one of the trunk links from ALS1 to DLS1 or<br />
DLS2 goes down.<br />
Your colleague has configured DHCP snooping on ASL1, but now PC-B cannot access SRV1 or the Internet.<br />
He has asked for your help in diagnosing and solving the problem.<br />
Step 2: Load the device trouble ticket configuration files for TT-A.<br />
Using the procedure described in Lab 3-1, verify that the lab configuration files are present in flash. Load the<br />
proper configuration files as indicated in the Device Configuration File table.<br />
Note: The following device access methods are in effect after loading the configuration files:<br />
• Console access requires no username or password.<br />
• Telnet and SSH require username admin and password adminpa55.<br />
• The enable password is ciscoenpa55.<br />
Device Configuration File Table<br />
Device Name File to Load Notes<br />
ALS1 Lab92-ALS1-TT-A-Cfg.txt<br />
DLS1 Lab92-DLS1-TT-A-Cfg.txt<br />
DLS2 Lab92-DLS2-TT-A-Cfg.txt<br />
R1 Lab92-R1-TT-A-Cfg.txt<br />
R2 Lab92-R2-TT-A-Cfg.txt<br />
R3 Lab92-R3-TT-A-Cfg.txt<br />
SRV1 N/A Static IP: 10.1.50.1<br />
Default gateway: 10.1.50.254<br />
PC-B N/A DHCP<br />
PC-C N/A Static IP: 10.1.80.100<br />
Default gateway: 10.1.80.1<br />
Step 3: Configure SRV1.<br />
a. Configure SRV1 with static IP address 10.1.50.1/24 and default gateway 10.1.50.254.<br />
Step 4: Release and renew the DHCP lease on PC-B.<br />
a. Ensure that PC-B is configured as a DHCP client in the OFFICE VLAN.<br />
b. After loading all TT-A device configuration files, issue the ipconfig /release and ipconfig<br />
/renew commands on PC-B.<br />
All contents are Copyright © 1992–2010 <strong>Cisco</strong> Systems, Inc. All rights reserved. This document is <strong>Cisco</strong> Public Information. Page 3 of 17
<strong>CCNP</strong>v6 <strong>TSHOOT</strong><br />
Step 5: Outline the troubleshooting approach and validation steps.<br />
Use this space to identify your troubleshooting approach and the key steps to verify that the problem is<br />
resolved. Troubleshooting approaches to select from include the follow-the-path, spot-the-differences, bottomup,<br />
top-down, divide-and-conquer, shoot-from-the-hip, and move-the-problem methods.<br />
Note: In addition to a specific approach, you can use the generic troubleshooting process described at the<br />
beginning of Section 2 of this lab.<br />
_______________________________________________________________________________<br />
_______________________________________________________________________________<br />
_______________________________________________________________________________<br />
_______________________________________________________________________________<br />
_______________________________________________________________________________<br />
_______________________________________________________________________________<br />
Step 6: Record the troubleshooting process and configuration changes.<br />
Note: Section 2 of this lab includes useful commands and examples of output.<br />
Use this log to document your actions and results during the troubleshooting process. List the commands you<br />
used to gather information. As you progress, record what you think the problem might be and the actions you<br />
take to correct the problem.<br />
Device Actions and Results<br />
All contents are Copyright © 1992–2010 <strong>Cisco</strong> Systems, Inc. All rights reserved. This document is <strong>Cisco</strong> Public Information. Page 4 of 17
<strong>CCNP</strong>v6 <strong>TSHOOT</strong><br />
Step 7: Document trouble ticket debrief notes.<br />
Use this space to make notes of the key learning points that you picked up during the discussion of this<br />
trouble ticket with your instructor. The notes can include problems encountered, solutions applied, useful<br />
commands employed, alternate solutions, methods, and processes, and procedure and communication<br />
improvements.<br />
_______________________________________________________________________________<br />
_______________________________________________________________________________<br />
_______________________________________________________________________________<br />
_______________________________________________________________________________<br />
_______________________________________________________________________________<br />
_______________________________________________________________________________<br />
_______________________________________________________________________________<br />
Task 2: Trouble Ticket Lab 9-2 TT-B<br />
Step 1: Review trouble ticket Lab 9-2 TT-B.<br />
As another control plane security measure, your company has decided to implement MD5 authentication<br />
between EIGRP routers and Layer 3 switches. As a pilot, a colleague of yours configured MD5 authentication<br />
on Layer 3 switch DLS2 and router R3. Now branch office users on the R3 LAN (PC-C) cannot access SRV1<br />
or the Internet. He has asked for your help in diagnosing and solving the problem.<br />
Step 2: Load the device trouble ticket configuration files for TT-B.<br />
Using the procedure described in Lab 3-1, verify that the lab configuration files are present in flash. Load the<br />
proper configuration files as indicated in the Device Configuration File table.<br />
Note: The following device access methods are in effect after loading the configuration files:<br />
• Console access requires no username or password.<br />
• Telnet and SSH require username admin and password adminpa55.<br />
• The enable password is ciscoenpa55.<br />
Device Configuration File Table<br />
Device Name File to Load Notes<br />
ALS1 Lab92-ALS1-TT-B-Cfg.txt<br />
DLS1 Lab92-DLS1-TT-B-Cfg.txt<br />
DLS2 Lab92-DLS2-TT-B-Cfg.txt<br />
R1 Lab92-R1-TT-B-Cfg.txt<br />
R2 Lab92-R2-TT-B-Cfg.txt<br />
R3 Lab92-R3-TT-B-Cfg.txt<br />
SRV1 N/A Static IP: 10.1.50.1<br />
Default gateway: 10.1.50.254<br />
PC-B N/A DHCP<br />
PC-C N/A Static IP: 10.1.80.100<br />
Default gateway: 10.1.80.1<br />
All contents are Copyright © 1992–2010 <strong>Cisco</strong> Systems, Inc. All rights reserved. This document is <strong>Cisco</strong> Public Information. Page 5 of 17
<strong>CCNP</strong>v6 <strong>TSHOOT</strong><br />
Step 3: Configure SRV1.<br />
Configure SRV1 with static IP address 10.1.50.1/24 and default gateway 10.1.50.254.<br />
Step 4: Configure a static IP address on PC-C.<br />
Configure PC-C with static IP address 10.1.80.100, subnet mask 255.255.255.0, and default gateway<br />
10.1.80.1.<br />
Step 5: Outline the troubleshooting approach and validation steps.<br />
Use this space to identify your troubleshooting approach and the key steps to verify that the problem is<br />
resolved. Troubleshooting approaches to select from include the follow-the-path, spot-the-differences, bottomup,<br />
top-down, divide-and-conquer, shoot-from-the-hip, and move-the-problem methods.<br />
Note: In addition to a specific approach, you can use the generic troubleshooting process described at the<br />
beginning of Section 2 of this lab.<br />
_______________________________________________________________________________<br />
_______________________________________________________________________________<br />
_______________________________________________________________________________<br />
_______________________________________________________________________________<br />
_______________________________________________________________________________<br />
_______________________________________________________________________________<br />
Step 6: Record the troubleshooting process and configuration changes.<br />
Note: Section 2 of this lab includes useful commands and examples of output.<br />
Use this log to document your actions and results during the troubleshooting process. List the commands you<br />
used to gather information. As you progress, record what you think the problem might be and the actions you<br />
take to correct the problem.<br />
Device Actions and Results<br />
All contents are Copyright © 1992–2010 <strong>Cisco</strong> Systems, Inc. All rights reserved. This document is <strong>Cisco</strong> Public Information. Page 6 of 17
<strong>CCNP</strong>v6 <strong>TSHOOT</strong><br />
Device Actions and Results<br />
Step 7: Document trouble ticket debrief notes.<br />
Use this space to make notes of the key learning points that you picked up during the discussion of this<br />
trouble ticket with your instructor. The notes can include problems encountered, solutions applied, useful<br />
commands employed, alternate solutions, methods, and processes, and procedure and communication<br />
improvements.<br />
_______________________________________________________________________________<br />
_______________________________________________________________________________<br />
_______________________________________________________________________________<br />
_______________________________________________________________________________<br />
_______________________________________________________________________________<br />
_______________________________________________________________________________<br />
_______________________________________________________________________________<br />
All contents are Copyright © 1992–2010 <strong>Cisco</strong> Systems, Inc. All rights reserved. This document is <strong>Cisco</strong> Public Information. Page 7 of 17
<strong>CCNP</strong>v6 <strong>TSHOOT</strong><br />
Section 2 Troubleshooting Reference Information<br />
General Troubleshooting Process<br />
As a general guideline, you can use the following general troubleshooting process described in the course.<br />
1. Define the problem (symptoms).<br />
2. Gather information.<br />
3. Analyze the information.<br />
4. Propose a hypothesis (possible cause).<br />
5. Test the hypothesis.<br />
6. Eliminate or accept the hypothesis.<br />
7. Solve the problem.<br />
8. Document the problem.<br />
Command Summary<br />
The table lists useful commands for this lab. The sample output is shown on following pages.<br />
Command Key Information Displayed<br />
show ip dhcp snooping<br />
debug ip dhcp snooping packet<br />
debug ip dhcp server packet<br />
show ip eigrp neighbors<br />
sh ip eigrp interfaces<br />
show ip eigrp interfaces detail<br />
debug eigrp packets<br />
Displays snooping status (enabled or not) and, if<br />
enabled, on which VLANs. Also shows which interfaces<br />
are trusted.<br />
Displays real-time information on DHCP snooping activity<br />
and the client/server exchange.<br />
Displays real-time information on DHCP on the<br />
client/server exchange from the server perspective.<br />
Displays the IP address of EIGRP neighbors and the<br />
interface on which they were learned.<br />
Displays all interfaces participating in EIGRP for each AS<br />
and the number of peers associated with each interface.<br />
Displays all interfaces participating in EIGRP for each AS<br />
along with the number of peers, hello interval, and the<br />
type of authentication (if configured).<br />
Displays real-time information on types of EIGRP<br />
packets exchange, which include authentication<br />
information.<br />
All contents are Copyright © 1992–2010 <strong>Cisco</strong> Systems, Inc. All rights reserved. This document is <strong>Cisco</strong> Public Information. Page 8 of 17
<strong>CCNP</strong>v6 <strong>TSHOOT</strong><br />
Sample Troubleshooting Output<br />
DHCP Snooping-related Commands<br />
The following commands and outputs are provided as samples from the devices in this lab.<br />
ALS1#show ip dhcp snooping<br />
Switch DHCP snooping is enabled<br />
DHCP snooping is configured on following VLANs:<br />
10<br />
DHCP snooping is operational on following VLANs:<br />
10<br />
DHCP snooping is configured on the following L3 Interfaces:<br />
Insertion of option 82 is enabled<br />
circuit-id format: vlan-mod-port<br />
remote-id format: MAC<br />
Option 82 on untrusted port is not allowed<br />
Verification of hwaddr field is enabled<br />
Verification of giaddr field is enabled<br />
DHCP snooping trust/rate is configured on the following Interfaces:<br />
Interface Trusted Rate limit (pps)<br />
------------------------ ------- ----------------<br />
FastEthernet0/1 yes unlimited<br />
FastEthernet0/2 yes unlimited<br />
FastEthernet0/3 yes unlimited<br />
FastEthernet0/4 yes unlimited<br />
Port-channel1 yes unlimited<br />
Port-channel2 yes unlimited<br />
In the above example, DHCP snooping is operational on ALS1 VLAN 10, and Fa0/1 through Fa0/4 (port channels<br />
Po1 and Po2) are trusted.<br />
DLS1#show ip dhcp snooping<br />
Switch DHCP snooping is disabled<br />
DHCP snooping is configured on following VLANs:<br />
none<br />
DHCP snooping is operational on following VLANs:<br />
none<br />
DHCP snooping is configured on the following L3 Interfaces:<br />
Insertion of option 82 is enabled<br />
circuit-id format: vlan-mod-port<br />
remote-id format: MAC<br />
Option 82 on untrusted port is not allowed<br />
Verification of hwaddr field is enabled<br />
Verification of giaddr field is enabled<br />
DHCP snooping trust/rate is configured on the following Interfaces:<br />
Interface Trusted Rate limit (pps)<br />
------------------------ ------- ----------------<br />
In the above example, Option 82 on untrusted port is not allowed, and no interfaces are trusted.<br />
All contents are Copyright © 1992–2010 <strong>Cisco</strong> Systems, Inc. All rights reserved. This document is <strong>Cisco</strong> Public Information. Page 9 of 17
<strong>CCNP</strong>v6 <strong>TSHOOT</strong><br />
ALS1#debug ip dhcp snooping packet<br />
DHCP Snooping Packet debugging is on<br />
ALS1#<br />
*Mar 1 09:04:48.215: DHCPSNOOP(hlfm_set_if_input): Setting if_input to Fa0/18 f<br />
or pak. Was not set<br />
*Mar 1 09:04:48.215: DHCPSNOOP(hlfm_set_if_input): Clearing if_input for pak.<br />
Was Fa0/18<br />
*Mar 1 09:04:48.215: DHCPSNOOP(hlfm_set_if_input): Setting if_input to Fa0/18 f<br />
or pak. Was not set<br />
*Mar 1 09:04:48.215: DHCP_SNOOPING: received new DHCP packet from input interfa<br />
ce (FastEthernet0/18)<br />
*Mar 1 09:04:48.215: DHCP_SNOOPING: process new DHCP packet, message type: DHCP<br />
DISCOVER, input interface: Fa0/18, MAC da: ffff.ffff.ffff, MAC sa: 000b.db04.a5cd,<br />
IP da: 255.255.255.255<br />
, IP sa: 0.0.0.0, DHCP ciaddr: 0.0.0.0, DHCP yiaddr: 0.0.0.0, DHCP siaddr: 0.0.0<br />
.0, DHCP giaddr: 0.0.0.0, DHCP chaddr: 000b.db04.a5cd<br />
*Mar 1 09:04:48.215: DHCP_SNOOPING: add relay information option.<br />
*Mar 1 09:04:48.215: DHCP_SNOOPING_SW: Encoding opt82 CID in vlan-mod-port form<br />
at<br />
*Mar 1 09:04:48.215: DHCP_SNOOPING_SW: Encoding opt82 RID in MAC address format<br />
*Mar 1 09:04:48.215: DHCP_SNOOPING: binary dump of relay info option, length: 20<br />
data:<br />
0x52 0x12 0x1 0x6 0x0 0x4 0x0 0xA 0x1 0x12 0x2 0x8 0x0 0x6 0x0 0x1B 0xC 0x6D 0x8<br />
F 0x0<br />
*Mar 1 09:04:48.215: DHCP_SNOOPING_SW: bridge packet get invalid mat entry: FFF<br />
F.FFFF.FFFF, packet is flooded to ingress VLAN: (10)<br />
ALS1#<br />
In the above example, a DHCP DISCOVER message with option 82 and GIADDR of 0.0.0.0 was sent to DLS1<br />
but, because DLS1 does not trust this relay information a reply was not received from the DLS1 DHCP server.<br />
ALS1#debug ip dhcp snooping packet<br />
DHCP Snooping Packet debugging is on<br />
ALS1#<br />
*Mar 1 09:10:36.904: DHCPSNOOP(hlfm_set_if_input): Setting if_input to Fa0/18 f<br />
or pak. Was not set<br />
*Mar 1 09:10:36.904: DHCPSNOOP(hlfm_set_if_input): Clearing if_input for pak.<br />
Was Fa0/18<br />
*Mar 1 09:10:36.904: DHCPSNOOP(hlfm_set_if_input): Setting if_input to Fa0/18 f<br />
or pak. Was not set<br />
*Mar 1 09:10:36.904: DHCP_SNOOPING: received new DHCP packet from input interfa<br />
ce (FastEthernet0/18)<br />
*Mar 1 09:10:36.904: DHCP_SNOOPING: process new DHCP packet, message type: DHCP<br />
DISCOVER, input interface: Fa0/18, MAC da: ffff.ffff.ffff, MAC sa: 000b.db04.a5cd,<br />
IP da: 255.255.255.255<br />
, IP sa: 0.0.0.0, DHCP ciaddr: 0.0.0.0, DHCP yiaddr: 0.0.0.0, DHCP siaddr: 0.0.0<br />
.0, DHCP giaddr: 0.0.0.0, DHCP chaddr: 000b.db04.a5cd<br />
*Mar 1 09:10:36.904: DHCP_SNOOPING: add relay information option.<br />
*Mar 1 09:10:36.904: DHCP_SNOOPING_SW: Encoding opt82 CID in vlan-mod-port form<br />
at<br />
*Mar 1 09:10:36.904: DHCP_SNOOPING_SW: Encoding opt82 RID in MAC address format<br />
*Mar 1 09:10:36.904: DHCP_SNOOPING: binary dump of relay info option, length: 20<br />
data:<br />
0x52 0x12 0x1 0x6 0x0 0x4 0x0 0xA 0x1 0x12 0x2 0x8 0x0 0x6 0x0 0x1B 0xC 0x6D 0x8<br />
All contents are Copyright © 1992–2010 <strong>Cisco</strong> Systems, Inc. All rights reserved. This document is <strong>Cisco</strong> Public Information. Page 10 of 17
<strong>CCNP</strong>v6 <strong>TSHOOT</strong><br />
F 0x0<br />
*Mar 1 09:10:36.904: DHCP_SNOOPING_SW: bridge packet get invalid mat entry: FFF<br />
F.FFFF.FFFF, packet is flooded to ingress VLAN: (10)<br />
*Mar 1 09:10:36.912: DHCPSNOOP(hlfm_set_if_input): Setting if_input to Po1 for<br />
pak. Was not set<br />
*Mar 1 09:10:36.912: DHCPSNOOP(hlfm_set_if_input): Clearing if_input for pak.<br />
Was Po1<br />
*Mar 1 09:10:36.912: DHCPSNOOP(hlfm_set_if_input): Setting if_input to Po1 for<br />
pak. Was not set<br />
*Mar 1 09:10:36.912: DHCP_SNOOPING: received new DHCP packet from input interfa<br />
ce (Port-channel1)<br />
*Mar 1 09:10:36.912: DHCP_SNOOPING: process new DHCP packet, message type: DHCP<br />
OFFER, input interface: Po1, MAC da: ffff.ffff.ffff, MAC sa: 0017.5a5b.b443, IP<br />
da: 255.255.255.255, IP sa: 10.1.10.252, DHCP ciaddr: 0.0.0.0, DHCP yiaddr: 10.1<br />
.10.1, DHCP siaddr: 0.0.0.0, DHCP giaddr: 0.0.0.0, DHCP chaddr: 000b.db04.a5cd<br />
*Mar 1 09:10:36.912: DHCP_SNOOPING: binary dump of option 82, length:<br />
ALS1#20 data:<br />
0x52 0x12 0x1 0x6 0x0 0x4 0x0 0xA 0x1 0x12 0x2 0x8 0x0 0x6 0x0 0x1B 0xC 0x6D 0x8<br />
F 0x0<br />
*Mar 1 09:10:36.912: DHCP_SNOOPING: binary dump of extracted circuit id, length<br />
: 8 data:<br />
0x1 0x6 0x0 0x4 0x0 0xA 0x1 0x12<br />
*Mar 1 09:10:36.912: DHCP_SNOOPING: binary dump of extracted remote id, length:<br />
10 data:<br />
0x2 0x8 0x0 0x6 0x0 0x1B 0xC 0x6D 0x8F 0x0<br />
*Mar 1 09:10:36.912: DHCP_SNOOPING_SW: opt82 data indicates local packet<br />
*Mar 1 09:10:36.912: DHCP_SNOOPING: remove relay information option.<br />
*Mar<br />
ALS1# 1 09:10:36.912: DHCP_SNOOPING: direct forward dhcp reply to output port: F<br />
astEthernet0/18.<br />
*Mar 1 09:10:36.912: DHCPSNOOP(hlfm_set_if_input): Setting if_input to Fa0/18 f<br />
or pak. Was not set<br />
*Mar 1 09:10:36.912: DHCPSNOOP(hlfm_set_if_input): Clearing if_input for pak.<br />
Was Fa0/18<br />
*Mar 1 09:10:36.912: DHCPSNOOP(hlfm_set_if_input): Setting if_input to Fa0/18 f<br />
or pak. Was not set<br />
*Mar 1 09:10:36.912: DHCP_SNOOPING: received new DHCP packet from input interfa<br />
ce (FastEthernet0/18)<br />
*Mar 1 09:10:36.91<br />
ALS1#2: DHCP_SNOOPING: process new DHCP packet, message type: DHCPREQUEST, input<br />
interface: Fa0/18, MAC da: ffff.ffff.ffff, MAC sa: 000b.db04.a5cd, IP da: 255.2<br />
55.255.255, IP sa: 0.0.0.0, DHCP ciaddr: 0.0.0.0, DHCP yiaddr: 0.0.0.0, DHCP sia<br />
ddr: 0.0.0.0, DHCP giaddr: 0.0.0.0, DHCP chaddr: 000b.db04.a5cd<br />
*Mar 1 09:10:36.912: DHCP_SNOOPING: add relay information option.<br />
*Mar 1 09:10:36.912: DHCP_SNOOPING_SW: Encoding opt82 CID in vlan-mod-port form<br />
at<br />
*Mar 1 09:10:36.912: DHCP_SNOOPING_SW: Encoding opt82 RID<br />
ALS1#in MAC address format<br />
*Mar 1 09:10:36.912: DHCP_SNOOPING: binary dump of relay info option, length: 2<br />
0 data:<br />
0x52 0x12 0x1 0x6 0x0 0x4 0x0 0xA 0x1 0x12 0x2 0x8 0x0 0x6 0x0 0x1B 0xC 0x6D 0x8<br />
F 0x0<br />
*Mar 1 09:10:36.921: DHCP_SNOOPING_SW: bridge packet get invalid mat entry: FFF<br />
F.FFFF.FFFF, packet is flooded to ingress VLAN: (10)<br />
*Mar 1 09:10:36.921: DHCPSNOOP(hlfm_set_if_input): Setting if_input to Po1 for<br />
pak. Was not set<br />
*Mar 1 09:10:36.921: DHCPSNOOP(hlfm_set_if_input): Clearing if_input for pak.<br />
ALS1# Was Po1<br />
All contents are Copyright © 1992–2010 <strong>Cisco</strong> Systems, Inc. All rights reserved. This document is <strong>Cisco</strong> Public Information. Page 11 of 17
<strong>CCNP</strong>v6 <strong>TSHOOT</strong><br />
*Mar 1 09:10:36.921: DHCPSNOOP(hlfm_set_if_input): Setting if_input to Po1 for<br />
pak. Was not set<br />
*Mar 1 09:10:36.921: DHCP_SNOOPING: received new DHCP packet from input interfa<br />
ce (Port-channel1)<br />
*Mar 1 09:10:36.921: DHCP_SNOOPING: process new DHCP packet, message type: DHCP<br />
ACK, input interface: Po1, MAC da: ffff.ffff.ffff, MAC sa: 0017.5a5b.b443, IP da<br />
: 255.255.255.255, IP sa: 10.1.10.252, DHCP ciaddr: 0.0.0.0, DHCP yiaddr: 10.1.1<br />
0.1, DHCP siaddr: 0.0.0.0, DHCP giaddr: 0.0.0.0, DHCP chaddr:<br />
ALS1# 000b.db04.a5cd<br />
*Mar 1 09:10:36.921: DHCP_SNOOPING: binary dump of option 82, length: 20 data:<br />
0x52 0x12 0x1 0x6 0x0 0x4 0x0 0xA 0x1 0x12 0x2 0x8 0x0 0x6 0x0 0x1B 0xC 0x6D 0x8<br />
F 0x0<br />
*Mar 1 09:10:36.921: DHCP_SNOOPING: binary dump of extracted circuit id, length<br />
: 8 data:<br />
0x1 0x6 0x0 0x4 0x0 0xA 0x1 0x12<br />
*Mar 1 09:10:36.921: DHCP_SNOOPING: binary dump of extracted remote id, length:<br />
10 data:<br />
0x2 0x8 0x0 0x6 0x0 0x1B 0xC 0x6D 0x8F 0x0<br />
*Mar 1 09:10:36.921: DHCP_SNOOPING_SW: opt82 data indicates lo<br />
ALS1#cal packet<br />
*Mar 1 09:10:36.921: DHCP_SNOOPING_SW: opt82 data indicates local packet<br />
*Mar 1 09:10:36.921: DHCP_SNOOPING: remove relay information option.<br />
*Mar 1 09:10:36.921: DHCP_SNOOPING: direct forward dhcp reply to output port: F<br />
astEthernet0/18.<br />
ALS1#u all<br />
All possible debugging has been turned off<br />
ALS1#<br />
In the above example, the ip dhcp relay information trust-all command was issued on DLS1. The<br />
DHCP DISCOVER message received on ALS1 interface Fa0/18 (from PC-B) and was forwarded to DLS1 to<br />
complete the DHCP exchange between PC-B and DLS1.<br />
DLS1#debug ip dhcp server packet<br />
DHCP server packet debugging is on.<br />
Dec 11 14:14:25.024: DHCPD: Reload workspace interface Vlan10 tableid 0.<br />
Dec 11 14:14:25.024: DHCPD: tableid for 10.1.10.252 on Vlan10 is 0<br />
Dec 11 14:14:25.024: DHCPD: client's VPN is .<br />
Dec 11 14:14:25.024: DHCPD: inconsistent relay information.<br />
Dec 11 14:14:25.024: DHCPD: relay information option exists, but giaddr is zero<br />
In the above example, with dhcp relay information from ALS1 and a GIADDR of 0.0.0.0, the relay information is<br />
inconsistent and DLS1 rejects the DHCP DISCOVER message from PC-B.<br />
DLS1#debug ip dhcp server packet<br />
DHCP server packet debugging is on.<br />
Dec 11 14:28:13.118: DHCPD: Reload workspace interface Vlan10 tableid 0.<br />
Dec 11 14:28:13.118: DHCPD: tableid for 10.1.10.252 on Vlan10 is 0<br />
Dec 11 14:28:13.118: DHCPD: client's VPN is .<br />
Dec 11 14:28:13.118: DHCPD: DHCPRELEASE message received from client 0100.0bdb.0<br />
4a5.cd (10.1.10.1).<br />
Dec 11 14:28:15.542: DHCPD: Reload workspace interface Vlan10 tableid 0.<br />
Dec 11 14:28:15.542: DHCPD: tableid for 10.1.10.252 on Vlan10 is 0<br />
Dec 11 14:28:15.542: DHCPD: client's VPN is .<br />
Dec 11 14:28:15.542: DHCPD: using received relay info.<br />
Dec 11 14:28:15.542: DHCPD: DHCPDISCOVER received from client 0100.0bdb.04a5.cd<br />
on interface Vlan10.<br />
All contents are Copyright © 1992–2010 <strong>Cisco</strong> Systems, Inc. All rights reserved. This document is <strong>Cisco</strong> Public Information. Page 12 of 17
<strong>CCNP</strong>v6 <strong>TSHOOT</strong><br />
Dec 11 14:28:15.542: DHCPD: using received relay info.<br />
Dec 11 14:28:17.556: DHCPD: Sending DHCPOFFER to client 0100.0bdb.04a5.cd (10.1.<br />
10.1).<br />
Dec 11 14:28:17.556: DHCPD: Check for IPe on Vlan10<br />
Dec 11 14:28:17.556: DHCPD: creating ARP entry (10.1.10.1, 000b.db04.a5cd).<br />
Dec 11 14:28:17.556: DHCPD: unicasting BOOTREPLY to client 000b.db04.a5cd (10.1.<br />
10.1).<br />
Dec 11 14:28:17.556: DHCPD: Reload workspace interface Vlan10 tableid 0.<br />
Dec 11 14:28:17.556: DHCPD: tableid for 10.1.10.252 on Vlan10 is 0<br />
Dec 11 14:28:17.556: DHCPD: client's VPN is .<br />
Dec 11 14:28:17.556: DHCPD: DHCPREQUEST received from client 0100.0bdb.04a5.cd.<br />
Dec 11 14:28:17.556: DHCPD: Sending DHCPACK to client 0100.0bdb.04a5.cd (10.1.10<br />
.1).<br />
Dec 11 14:28:17.556: DHCPD: Check for IPe on Vlan10<br />
Dec 11 14:28:17.556: DHCPD: creating ARP entry (10.1.10.1, 000b.db04.a5cd).<br />
Dec 11 14:28:17.556: DHCPD: unicasting BOOTREPLY to client 000b.db04.a5cd (10.1.<br />
10.1).<br />
In the above example, with the ip dhcp relay information trust-all command issued on DLS1, the<br />
entire DHCP conversation between PC-B and the DLS1 server takes place, and PC-B is provided with an IP<br />
address.<br />
EIGRP Authentication-related Commands<br />
DLS2#show ip eigrp neighbors<br />
EIGRP-IPv4:(1) neighbors for process 1<br />
H Address Interface Hold Uptime SRTT RTO Q Seq<br />
(sec) (ms) Cnt Num<br />
1 10.1.2.14 Fa0/5 13 00:20:59 1 200 0 29<br />
0 10.1.200.252 Vl200 14 05:31:25 2 200 0 45<br />
In the above example, DLS2 has two EIGRP neighbors, R3 (10.1.2.14) via Fa0/5 and DLS1 (10.1.200.252) via<br />
VLAN 200.<br />
DLS2#show ip eigrp interfaces<br />
EIGRP-IPv4:(1) interfaces for process 1<br />
Xmit Queue Mean Pacing Time Multicast Pending<br />
Interface Peers Un/Reliable SRTT Un/Reliable Flow Timer Routes<br />
Vl200 1 0/0 2 0/1 50 0<br />
Fa0/5 1 0/0 1 0/1 50 0<br />
In the above example, DLS2 has two interfaces participating in the EIGRP process, VLAN 200 and Fa0/5. Both<br />
interfaces have a peer attached.<br />
DLS2#show ip eigrp interfaces detail<br />
EIGRP-IPv4:(1) interfaces for process 1<br />
Xmit Queue Mean Pacing Time Multicast Pending<br />
Interface Peers Un/Reliable SRTT Un/Reliable Flow Timer Routes<br />
Vl200 1 0/0 1 0/1 50 0<br />
Hello interval is 5 sec<br />
Next xmit serial <br />
Un/reliable mcasts: 0/18 Un/reliable ucasts: 22/9<br />
Mcast exceptions: 1 CR packets: 1 ACKs suppressed: 1<br />
All contents are Copyright © 1992–2010 <strong>Cisco</strong> Systems, Inc. All rights reserved. This document is <strong>Cisco</strong> Public Information. Page 13 of 17
<strong>CCNP</strong>v6 <strong>TSHOOT</strong><br />
Retransmissions sent: 1 Out-of-sequence rcvd: 0<br />
Topology-ids on interface - 0<br />
Authentication mode is not set<br />
Fa0/5 0 0/0 0 0/1 50 0<br />
Hello interval is 5 sec<br />
Next xmit serial <br />
Un/reliable mcasts: 0/18 Un/reliable ucasts: 9/25<br />
Mcast exceptions: 2 CR packets: 2 ACKs suppressed: 3<br />
Retransmissions sent: 6 Out-of-sequence rcvd: 1<br />
Topology-ids on interface - 0<br />
Authentication mode is md5, key-chain is "EIGRPCHAIN"<br />
In the above example, no authentication is configured on DLS2 interface VLAN 200. MD5 authentication is<br />
configured on interface Fa0/5 using key chain EIGRPCHAIN.<br />
DLS2#debug eigrp packets<br />
EIGRP Packets debugging is on<br />
(UPDATE, REQUEST, QUERY, REPLY, HELLO, IPXSAP, PROBE, ACK, STUB, SIAQUERY,<br />
SIAREPLY)<br />
DLS2#<br />
Dec 14 18:21:51.626: EIGRP: Sending HELLO on FastEthernet0/5<br />
Dec 15 18:21:51.626: AS 1, Flags 0x0, Seq 0/0 interfaceQ 0/0 iidbQ un/rely 0/0<br />
Dec 15 18:21:51.895: EIGRP: FastEthernet0/5: ignored packet from 10.1.2.14, opcode<br />
= 5 (missing authentication)<br />
Dec 15 18:21:52.255: EIGRP: Sending HELLO on Vlan200<br />
Dec 15 18:21:52.255: AS 1, Flags 0x0, Seq 0/0 interfaceQ 0/0 iidbQ un/rely 0/0<br />
Dec 15 18:21:54.495: EIGRP: Received HELLO on Vlan200 nbr 10.1.200.252<br />
Dec 15 18:21:54.495: AS 1, Flags 0x0, Seq 0/0 interfaceQ 0/0 iidbQ un/rely 0/0<br />
peerQ un/rely 0/0<br />
DLS2#debug eigrp packets<br />
EIGRP Packets debugging is on<br />
(UPDATE, REQUEST, QUERY, REPLY, HELLO, IPXSAP, PROBE, ACK, STUB, SIAQUERY,<br />
SIAREPLY)<br />
Dec 15 18:28:38.442: EIGRP: Sending UPDATE on FastEthernet0/5 tid 0<br />
Dec 15 18:28:38.442: AS 1, Flags 0x2, Seq 21/0 interfaceQ 2/0 iidbQ un/rely 0/<br />
0 serno 1-10<br />
Dec 15 18:28:38.442: EIGRP: received packet with MD5 authentication, key id = 1<br />
Dec 15 18:28:38.442: EIGRP: Received HELLO on FastEthernet0/5 nbr 10.1.2.14<br />
In the first debug example above, authentication is configured on DLS2 Fa0/5. However, it is not configured on R3<br />
Fa0/1, and DLS2 ignores packets from R3. No authentication is required on VLAN 200, so DLS2 is able to send<br />
and receive hello messages with DLS1.<br />
In the second debug example above, authentication is now configured on R3 Fa0/1, and DLS2 accepts hello<br />
packets from R3.<br />
R3#show ip route<br />
Codes: C - connected, S - static, R - RIP, M - mobile, B - BGP<br />
D - EIGRP, EX - EIGRP external, O - OSPF, IA - OSPF inter area<br />
N1 - OSPF NSSA external type 1, N2 - OSPF NSSA external type 2<br />
E1 - OSPF external type 1, E2 - OSPF external type 2<br />
i - IS-IS, su - IS-IS summary, L1 - IS-IS level-1, L2 - IS-IS level-2<br />
All contents are Copyright © 1992–2010 <strong>Cisco</strong> Systems, Inc. All rights reserved. This document is <strong>Cisco</strong> Public Information. Page 14 of 17
<strong>CCNP</strong>v6 <strong>TSHOOT</strong><br />
route<br />
ia - IS-IS inter area, * - candidate default, U - per-user static<br />
o - ODR, P - periodic downloaded static route<br />
Gateway of last resort is 10.1.2.13 to network 0.0.0.0<br />
10.0.0.0/8 is variably subnetted, 9 subnets, 3 masks<br />
D 10.1.10.0/24 [90/28416] via 10.1.2.13, 00:01:43, FastEthernet0/1<br />
C 10.1.2.12/30 is directly connected, FastEthernet0/1<br />
D 10.1.2.0/30 [90/30976] via 10.1.2.13, 00:01:43, FastEthernet0/1<br />
D 10.1.30.0/24 [90/28416] via 10.1.2.13, 00:01:43, FastEthernet0/1<br />
D 10.1.20.0/24 [90/28416] via 10.1.2.13, 00:01:43, FastEthernet0/1<br />
D 10.1.50.0/24 [90/28416] via 10.1.2.13, 00:01:43, FastEthernet0/1<br />
D 10.1.100.0/24 [90/28416] via 10.1.2.13, 00:01:43, FastEthernet0/1<br />
C 10.1.203.1/32 is directly connected, Loopback0<br />
D 10.1.200.0/24 [90/28416] via 10.1.2.13, 00:01:43, FastEthernet0/1<br />
D 192.168.1.0/24 [90/158976] via 10.1.2.13, 00:01:43, FastEthernet0/1<br />
D*EX 0.0.0.0/0 [170/2175232] via 10.1.2.13, 00:01:43, FastEthernet0/1<br />
In the above example, all expected routes are present in the R3 routing table. This does not prove that<br />
authentication is occurring. However, it does indicate that either authentication is configured correctly for both<br />
adjacent interfaces, or it is not configured at all for both adjacent interfaces.<br />
All contents are Copyright © 1992–2010 <strong>Cisco</strong> Systems, Inc. All rights reserved. This document is <strong>Cisco</strong> Public Information. Page 15 of 17
<strong>CCNP</strong>v6 <strong>TSHOOT</strong><br />
Reflection Questions<br />
1. Which lab trouble tickets did you have the most difficulty with?<br />
__________________________________________________________________________________________<br />
__________________________________________________________________________________________<br />
__________________________________________________________________________________________<br />
2. Would you change anything about the process that you used for any of the trouble tickets now that you see the<br />
resolution of the problem?<br />
__________________________________________________________________________________________<br />
__________________________________________________________________________________________<br />
__________________________________________________________________________________________<br />
3. Which commands did you find most useful in diagnosing management plane security issues? Add these to your<br />
toolbox for future use. Which commands did you find least useful?<br />
__________________________________________________________________________________________<br />
__________________________________________________________________________________________<br />
__________________________________________________________________________________________<br />
All contents are Copyright © 1992–2010 <strong>Cisco</strong> Systems, Inc. All rights reserved. This document is <strong>Cisco</strong> Public Information. Page 16 of 17
<strong>CCNP</strong>v6 <strong>TSHOOT</strong><br />
References<br />
If you need more information on the commands and their options, see the following references<br />
• IP Routing Protocol<br />
http://www.cisco.com/cisco/web/support/index.html<br />
• <strong>Cisco</strong> IOS IP Switching<br />
http://www.cisco.com/en/US/docs/ios/ipswitch/command/reference/isw_book.html<br />
• Configuring DHCP Features on a <strong>Cisco</strong> 2960 Switch<br />
http://www.cisco.com/en/US/docs/switches/lan/catalyst2960/software/release/12.2_37_se/configuration/guide/<br />
swdhcp82.html<br />
• Configuring EIGRP Message Authentication<br />
http://www.cisco.com/en/US/tech/tk365/technologies_configuration_example09186a00807f5a63.shtml<br />
Router Interface Summary Table<br />
Router Model Ethernet Interface<br />
#1<br />
1700 Fast Ethernet 0<br />
(FA0)<br />
1800 Fast Ethernet 0/0<br />
(FA0/0)<br />
2600 Fast Ethernet 0/0<br />
(FA0/0)<br />
2800 Fast Ethernet 0/0<br />
(FA0/0)<br />
Router Interface Summary<br />
Ethernet Interface<br />
#2<br />
Fast Ethernet 1<br />
(FA1)<br />
Fast Ethernet 0/1<br />
(FA0/1)<br />
Fast Ethernet 0/1<br />
(FA0/1)<br />
Fast Ethernet 0/1<br />
(FA0/1)<br />
Serial Interface<br />
#1<br />
Serial Interface<br />
#2<br />
Serial 0 (S0) Serial 1 (S1)<br />
Serial 0/0/0<br />
(S0/0/0)<br />
Serial 0/0/1<br />
(S0/0/1)<br />
Serial 0/0 (S0/0) Serial 0/1 (S0/1)<br />
Serial 0/0/0<br />
(S0/0/0)<br />
Serial 0/0/1<br />
(S0/0/1)<br />
Note: To find out how the router is configured, look at the interfaces to identify the type of router<br />
and how many interfaces the router has. Rather than try to list all the combinations of<br />
configurations for each router class, this table includes identifiers for the possible combinations of<br />
Ethernet and serial interfaces in the device. The table does not include any other type of interface,<br />
even though a specific router might contain one. An example of this is an ISDN BRI interface. The<br />
string in parenthesis is the legal abbreviation that can be used in <strong>Cisco</strong> IOS commands to<br />
represent the interface.<br />
All contents are Copyright © 1992–2010 <strong>Cisco</strong> Systems, Inc. All rights reserved. This document is <strong>Cisco</strong> Public Information. Page 17 of 17
<strong>CCNP</strong>v6 <strong>TSHOOT</strong><br />
Chapter 9 Lab 9-3, Data Plane Security<br />
Lab Topology<br />
Objectives<br />
• Load the device configuration files for each trouble ticket.<br />
• Diagnose and resolve problems related to router and switch data plane security.<br />
• Document the troubleshooting progress, configuration changes, and problem resolution.<br />
All contents are Copyright © 1992–2010 <strong>Cisco</strong> Systems, Inc. All rights reserved. This document is <strong>Cisco</strong> Public Information. Page 1 of 16
<strong>CCNP</strong>v6 <strong>TSHOOT</strong><br />
Background<br />
Routers and Layer 3 switches are typically segmented into three planes of operation, each with a clearly<br />
identified objective. The data plane (also called the forwarding plane) forwards user data packets. The control<br />
plane routes data correctly. The management plane provides administrative access to network devices.<br />
The data plane encompasses all “customer” application traffic. Customer traffic refers to traffic generated by<br />
hosts, clients, servers, and applications that are intended to use the network for the purpose of transport only.<br />
Data plane traffic should never have destination IP addresses that belong to any networking devices (routers<br />
or switches). Instead, data plane traffic should be sourced from and destined to other devices, such as PCs<br />
and servers, that are supported by the network. The primary job of the router or Layer 3 switch is to forward<br />
these packets downstream as quickly as possible. Routers and switches can inspect and filter traffic as part of<br />
the implementation of a security policy.<br />
Examples of security features implemented on the data plane include ACLs, NAT, firewalls, IPS, switch port<br />
security, VLAN ACLs (VACLs), IP Source Guard, private VLANs, Storm Control, and VPNs.<br />
This lab focuses on data plane security issues related to <strong>Cisco</strong> IOS stateful firewalls and VLAN ACLs for<br />
routers and Layer 3 switches.<br />
For each task or trouble ticket, the trouble scenario and problem symptom are described. While<br />
troubleshooting, you will discover the cause of the problem, correct it, and then document the process and<br />
results.<br />
Lab Structure<br />
This lab is divided into two main sections.<br />
Section 1—Trouble Tickets and Troubleshooting Logs<br />
This section includes two tasks. Each task is associated with a trouble ticket (TT) and introduces one or more<br />
errors on one or more devices. If time is a consideration, each task or trouble ticket can be performed<br />
independently.<br />
Section 2—Troubleshooting Reference Information<br />
This section provides general troubleshooting information that can be applied to any of the trouble tickets in<br />
this lab. Examples of useful commands and output are provided. If time permits, it is recommended that you<br />
read through Section 2 prior to starting on the trouble tickets.<br />
Note: This lab uses <strong>Cisco</strong> 1841 routers with <strong>Cisco</strong> IOS Release 12.4(24)T1 and the advanced IP image<br />
c1841-advipservicesk9-mz.124-24.T1.bin. The switches are <strong>Cisco</strong> WS-C2960-24TT-L with the <strong>Cisco</strong> IOS<br />
image c2960-lanbasek9-mz.122-46.SE.bin and Catalyst 3560-24PS with the <strong>Cisco</strong> IOS image c3560advipservicesk9-mz.122-46.SE.bin.<br />
Other routers (such as 2801 and 2811), switches (such as 2950 or 3550),<br />
and <strong>Cisco</strong> IOS Software versions can be used if they have comparable capabilities and features. Depending<br />
on the router or switch model and <strong>Cisco</strong> IOS Software version, the commands available and output produced<br />
might vary from what is shown in this lab.<br />
Any changes made to configurations or topology (other than errors introduced) are noted in the lab and<br />
trouble tickets so that you are aware of them prior to beginning the troubleshooting process.<br />
Required Resources<br />
• 3 routers (<strong>Cisco</strong> 1841 with <strong>Cisco</strong> IOS Release 12.4(24)T1 Advanced IP Service or comparable)<br />
• 1 switch (<strong>Cisco</strong> 2960 with the <strong>Cisco</strong> IOS Release 12.2(46)SE C2960-LANBASEK9-M image or<br />
comparable)<br />
• 2 switches (<strong>Cisco</strong> 3560 with the <strong>Cisco</strong> IOS Release 12.2(46)SE C3560-LANBASEK9-M image or<br />
comparable)<br />
• SRV1 (Windows PC with static IP address) with TFTP and syslog servers plus an SSH client (PuTTY<br />
or comparable) and WireShark software<br />
• PC-B (Windows PC DHCP client) with PuTTY and WireShark software<br />
All contents are Copyright © 1992–2010 <strong>Cisco</strong> Systems, Inc. All rights reserved. This document is <strong>Cisco</strong> Public Information. Page 2 of 16
<strong>CCNP</strong>v6 <strong>TSHOOT</strong><br />
• PC-C (Windows PC DHCP client) with PuTTY and WireShark software<br />
• Serial and Ethernet cables<br />
All contents are Copyright © 1992–2010 <strong>Cisco</strong> Systems, Inc. All rights reserved. This document is <strong>Cisco</strong> Public Information. Page 3 of 16
<strong>CCNP</strong>v6 <strong>TSHOOT</strong><br />
Section 1—Trouble Tickets and Troubleshooting Logs<br />
Task 1: Trouble Ticket Lab 9-3 TT-A<br />
Step 1: Review trouble ticket Lab 9-3 TT-A.<br />
As a security measure, your company has decided to implement stateful packet inspection using a <strong>Cisco</strong> IOS<br />
firewall on edge router R1. The firewall will allow traffic from external hosts only if it is a response to a<br />
legitimate request from an internal host. The only exception is that Internet access to the internal SRV1 webbased<br />
application will be allowed. Internal users should be able to access the Internet (simulated by Lo1 on<br />
R2) using various protocols, such as ICMP, FTP, Telnet, DNS, and HTTP. The firewall implementation must<br />
work in conjunction with the dynamic NAT currently being employed on R1. In addition, internal network<br />
devices must be able to obtain the correct time from the ISP (R2).<br />
You colleague has configured the firewall and the necessary access lists on R1. However, users on the office<br />
VLAN cannot access Internet websites, and remote users on the Internet cannot access the web-based<br />
application on SRV1. Your colleague has asked for your help in diagnosing and solving the problem.<br />
Step 2: Load the device trouble ticket configuration files for TT-A.<br />
Using the procedure described in Lab 3-1, verify that the lab configuration files are present in flash. Load the<br />
proper configuration files as indicated in the Device Configuration File table.<br />
Note: The following device access methods are in effect after loading the configuration files:<br />
• Console access requires no username or password.<br />
• Telnet and SSH require username admin and password adminpa55.<br />
• The enable password is ciscoenpa55.<br />
Device Configuration File Table<br />
Device Name File to Load Notes<br />
ALS1 Lab93-ALS1-TT-A-Cfg.txt<br />
DLS1 Lab93-DLS1-TT-A-Cfg.txt<br />
DLS2 Lab93-DLS2-TT-A-Cfg.txt<br />
R1 Lab93-R1-TT-A-Cfg.txt<br />
R2 Lab93-R2-TT-A-Cfg.txt<br />
R3 Lab93-R3-TT-A-Cfg.txt<br />
SRV1 N/A Static IP: 10.1.50.1<br />
Default gateway: 10.1.50.254<br />
PC-B N/A DHCP<br />
PC-C N/A DHCP<br />
Step 3: Configure SRV1.<br />
Configure SRV1 with static IP address 10.1.50.1/24 and default gateway 10.1.50.254.<br />
Step 4: Release and renew the DHCP lease on PC-B.<br />
a. Ensure that PC-B is configured as a DHCP client in the OFFICE VLAN.<br />
b. After loading all TT-A device configuration files, issue the ipconfig /release and ipconfig<br />
/renew commands on PC-B.<br />
All contents are Copyright © 1992–2010 <strong>Cisco</strong> Systems, Inc. All rights reserved. This document is <strong>Cisco</strong> Public Information. Page 4 of 16
<strong>CCNP</strong>v6 <strong>TSHOOT</strong><br />
Step 5: Outline the troubleshooting approach and validation steps.<br />
Use this space to identify your troubleshooting approach and the key steps to verify that the problem is<br />
resolved. Troubleshooting approaches to select from include the follow-the-path, spot-the-differences, bottomup,<br />
top-down, divide-and-conquer, shoot-from-the-hip, and move-the-problem methods.<br />
Note: In addition to a specific approach, you can use the generic troubleshooting process described at the<br />
beginning of Section 2 of this lab.<br />
_______________________________________________________________________________<br />
_______________________________________________________________________________<br />
_______________________________________________________________________________<br />
_______________________________________________________________________________<br />
_______________________________________________________________________________<br />
_______________________________________________________________________________<br />
Step 6: Record the troubleshooting process and configuration changes.<br />
Note: Section 2 of this lab includes useful commands and examples of output.<br />
Use this log to document your actions and results during the troubleshooting process. List the commands you<br />
used to gather information. As you progress, record what you think the problem might be and the actions you<br />
take to correct the problem.<br />
Device Actions and Results<br />
All contents are Copyright © 1992–2010 <strong>Cisco</strong> Systems, Inc. All rights reserved. This document is <strong>Cisco</strong> Public Information. Page 5 of 16
<strong>CCNP</strong>v6 <strong>TSHOOT</strong><br />
Device Actions and Results<br />
Step 7: Document trouble ticket debrief notes.<br />
Use this space to make notes of the key learning points that you picked up during the discussion of this<br />
trouble ticket with the instructor. The notes can include problems encountered, solutions applied, useful<br />
commands employed, alternate solutions, methods, and processes, and procedure and communication<br />
improvements.<br />
_______________________________________________________________________________<br />
_______________________________________________________________________________<br />
_______________________________________________________________________________<br />
_______________________________________________________________________________<br />
_______________________________________________________________________________<br />
_______________________________________________________________________________<br />
_______________________________________________________________________________<br />
Task 2: Trouble Ticket Lab 9-3 TT-B<br />
Step 1: Review trouble ticket Lab 9-3 TT-B.<br />
In a continuing effort to improve network data plane security, your company has decided to limit access for<br />
users on the guest VLAN 30 subnet (10.1.30.0/24). Guest VLAN users should not have access to any Office<br />
VLAN 10 or Server VLAN 50 resources. In addition, it will be necessary to prevent guests from pinging<br />
internal network switches. Although they will not have access to internal resources, guest users must be able<br />
to access the Internet from VLAN 30. Guest user PCs are DHCP clients (simulated by PC-C) that connect to<br />
the network from Layer 3 core switch DLS2 and obtain their IP addresses from DLS1.<br />
Your colleague has configured a VLAN access control list (VACL) on DLS2 to limit guest access. After the<br />
VACL implementation, guests are prevented from accessing Office VLAN and Server VLAN resources, as<br />
expected. However, guest users are unable to access the Internet (simulated by R2 Lo1). Your colleague has<br />
asked for your help in diagnosing and solving the problem.<br />
Step 2: Load the device trouble ticket configuration files for TT-B.<br />
Using the procedure described in Lab 3-1, verify that the lab configuration files are present in flash. Load the<br />
proper configuration files as indicated in the Device Configuration File table.<br />
Note: The following device access methods are in effect after loading the configuration files:<br />
• Console access requires no username or password.<br />
• Telnet and SSH require username admin and password adminpa55.<br />
• The enable password is ciscoenpa55.<br />
All contents are Copyright © 1992–2010 <strong>Cisco</strong> Systems, Inc. All rights reserved. This document is <strong>Cisco</strong> Public Information. Page 6 of 16
<strong>CCNP</strong>v6 <strong>TSHOOT</strong><br />
Device Configuration File Table<br />
Device Name File to Load Notes<br />
ALS1 Lab93-ALS1-TT-B-Cfg.txt<br />
DLS1 Lab93-DLS1-TT-B-Cfg.txt<br />
DLS2 Lab93-DLS2-TT-B-Cfg.txt<br />
R1 Lab93-R1-TT-B-Cfg.txt<br />
R2 Lab93-R2-TT-B-Cfg.txt<br />
R3 Lab93-R3-TT-B-Cfg.txt<br />
SRV1 N/A Static IP: 10.1.50.1<br />
Default gateway: 10.1.50.254<br />
PC-B N/A DHCP<br />
PC-C N/A DHCP<br />
Step 3: Configure SRV1.<br />
Configure SRV1 with static IP address 10.1.50.1/24 and default gateway 10.1.50.254.<br />
Step 4: Release and renew the DHCP lease on PC-C.<br />
After loading all TT-B device configuration files, issue the ipconfig /release and ipconfig<br />
/renew commands on PC-C.<br />
Step 5: Outline the troubleshooting approach and validation steps.<br />
Use this space to identify your troubleshooting approach and the key steps to verify that the problem is<br />
resolved. Troubleshooting approaches to select from include the follow-the-path, spot-the-differences, bottomup,<br />
top-down, divide-and-conquer, shoot-from-the-hip, and move-the-problem methods.<br />
Note: In addition to a specific approach, you can use the generic troubleshooting process described at the<br />
beginning of Section 2 of this lab.<br />
_______________________________________________________________________________<br />
_______________________________________________________________________________<br />
_______________________________________________________________________________<br />
_______________________________________________________________________________<br />
_______________________________________________________________________________<br />
_______________________________________________________________________________<br />
Step 6: Record the troubleshooting process and configuration changes.<br />
Note: Section 2 of this lab includes useful commands and examples of output.<br />
Use this log to document your actions and results during the troubleshooting process. List the commands you<br />
used to gather information. As you progress, record what you think the problem might be and the actions you<br />
take to correct the problem.<br />
All contents are Copyright © 1992–2010 <strong>Cisco</strong> Systems, Inc. All rights reserved. This document is <strong>Cisco</strong> Public Information. Page 7 of 16
<strong>CCNP</strong>v6 <strong>TSHOOT</strong><br />
Device Actions and Results<br />
Step 7: Document trouble ticket debrief notes.<br />
Use this space to make notes of the key learning points that you picked up during the discussion of this<br />
trouble ticket with the instructor. The notes can include problems encountered, solutions applied, useful<br />
commands employed, alternate solutions, methods, and processes, and procedure and communication<br />
improvements.<br />
_______________________________________________________________________________<br />
_______________________________________________________________________________<br />
_______________________________________________________________________________<br />
_______________________________________________________________________________<br />
_______________________________________________________________________________<br />
_______________________________________________________________________________<br />
_______________________________________________________________________________<br />
All contents are Copyright © 1992–2010 <strong>Cisco</strong> Systems, Inc. All rights reserved. This document is <strong>Cisco</strong> Public Information. Page 8 of 16
<strong>CCNP</strong>v6 <strong>TSHOOT</strong><br />
Section 2 Troubleshooting Reference Information<br />
General Troubleshooting Process<br />
As a general guideline, you can use the following general troubleshooting process described in the course.<br />
1. Define the problem (symptoms).<br />
2. Gather information.<br />
3. Analyze the information.<br />
4. Propose a hypothesis (possible cause).<br />
5. Test the hypothesis.<br />
6. Eliminate or accept the hypothesis.<br />
7. Solve the problem.<br />
8. Document the problem.<br />
Command Summary<br />
The table lists useful commands for this lab. The sample output is shown on following pages.<br />
Command Key Information Displayed<br />
show ip inspect sessions<br />
show ip inspect config<br />
show ip inspect interfaces<br />
show access-lists ACL#/name<br />
show vlan access-map<br />
show vlan filter<br />
show clock<br />
show ntp associations<br />
show ntp status<br />
Displays established sessions with the source IP address and<br />
port number, protocol name, and destination IP address and<br />
port number.<br />
Displays inspection rule configuration information, including<br />
rule name, session parameters, and protocols being<br />
inspected.<br />
Displays interfaces configured for inspection and<br />
inbound/outbound inspection rules, if set, and<br />
inbound/outbound access lists, if applied. Also displays<br />
protocols being inspected.<br />
Displays all ACLs configured on a device, including the ACL<br />
number and name, the type of ACL (standard or extended),<br />
the statements in each ACL, and the number of matches<br />
accumulated for each statement.<br />
Displays the name of any configured VLAN access maps,<br />
including the match clauses in each. An implied deny all<br />
match clause is in effect at the end of the access map.<br />
Displays the name of any configured VLAN access maps and<br />
the VLANs for which they are filtering traffic.<br />
Displays the time and date kept by the device internal clock.<br />
Displays the configured NTP server IP address, reference<br />
clock in use, stratum level, and sync status.<br />
Displays the clock synchronization status, stratum level, and<br />
reference clock IP address. Also shows the number of<br />
seconds since the last update was received from the<br />
reference clock.<br />
All contents are Copyright © 1992–2010 <strong>Cisco</strong> Systems, Inc. All rights reserved. This document is <strong>Cisco</strong> Public Information. Page 9 of 16
<strong>CCNP</strong>v6 <strong>TSHOOT</strong><br />
Sample Troubleshooting Output<br />
The following commands and outputs are provided as samples from the devices in this lab.<br />
<strong>Cisco</strong> IOS Stateful Firewall-related Commands<br />
R1#show ip inspect sessions<br />
Established Sessions<br />
Session 657D5B98 (10.1.10.1:8)=>(172.20.0.1:0) icmp SIS_OPEN<br />
Session 657D5608 (10.1.10.1:1041)=>(172.20.0.1:23) telnet SIS_OPEN<br />
In the example above, PC-B (10.1.10.1) has established two sessions to R2 Lo1 through the firewall, one for ping<br />
(ICMP) and one for Telnet.<br />
R1#show ip inspect config<br />
Session audit trail is disabled<br />
Session alert is enabled<br />
one-minute (sampling period) thresholds are [unlimited : unlimited] connections<br />
max-incomplete sessions thresholds are [unlimited : unlimited]<br />
max-incomplete tcp connections per host is unlimited. Block-time 0 minute.<br />
tcp synwait-time is 30 sec -- tcp finwait-time is 5 sec<br />
tcp idle-time is 3600 sec -- udp idle-time is 30 sec<br />
tcp reassembly queue length 16; timeout 5 sec; memory-limit 1024 kilo bytes<br />
dns-timeout is 5 sec<br />
Inspection Rule Configuration<br />
Inspection name FW-inspect<br />
ftp alert is on audit-trail is off timeout 3600<br />
http alert is on audit-trail is off timeout 3600<br />
smtp max-data 20000000 alert is on audit-trail is off timeout 3600<br />
tftp alert is on audit-trail is off timeout 30<br />
dns alert is on audit-trail is off timeout 30<br />
icmp alert is on audit-trail is off timeout 10<br />
telnet alert is on audit-trail is off timeout 3600<br />
http alert is on audit-trail is off timeout 3600<br />
ntp alert is on audit-trail is off timeout 30<br />
In the example above, a stateful firewall rule named FW-inspect has been configured that inspects FTP, HTTP,<br />
SMTP, TFTP, DNS, ICMP, HTTP, NTP, and Telnet traffic.<br />
R1#show ip inspect interfaces<br />
Interface Configuration<br />
Interface Serial0/0/0<br />
Inbound inspection rule is not set<br />
Outgoing inspection rule is FW-inspect<br />
ftp alert is on audit-trail is off timeout 3600<br />
http alert is on audit-trail is off timeout 3600<br />
smtp max-data 20000000 alert is on audit-trail is off timeout 3600<br />
tftp alert is on audit-trail is off timeout 30<br />
dns alert is on audit-trail is off timeout 30<br />
icmp alert is on audit-trail is off timeout 10<br />
telnet alert is on audit-trail is off timeout 3600<br />
Inbound access list is FW-ACL<br />
Outgoing access list is not set<br />
In the example above, an outgoing inspection rule named FW-inspect has been configured on S0/0/0, and an<br />
access list FW-ACL is applied inbound on S0/0/0.<br />
All contents are Copyright © 1992–2010 <strong>Cisco</strong> Systems, Inc. All rights reserved. This document is <strong>Cisco</strong> Public Information. Page 10 of 16
<strong>CCNP</strong>v6 <strong>TSHOOT</strong><br />
The example below shows the use of the <strong>Cisco</strong> IOS help function to display a partial listing of the protocols that<br />
can be inspected.<br />
R1(config)#ip inspect name FW-inspect ?<br />
802-11-iapp IEEE 802.11 WLANs WG IAPP<br />
ace-svr ACE Server/Propagation<br />
appfw Application Firewall<br />
appleqtc Apple QuickTime<br />
bgp Border Gateway Protocol<br />
biff Bliff mail notification<br />
bittorrent bittorrent<br />
bootpc Bootstrap Protocol Client<br />
bootps Bootstrap Protocol Server<br />
cddbp CD Database Protocol<br />
cifs CIFS<br />
cisco-fna <strong>Cisco</strong> FNATIVE<br />
cisco-net-mgmt cisco-net-mgmt<br />
cisco-svcs cisco license/perf/GDP/X.25/ident svcs<br />
cisco-sys <strong>Cisco</strong> SYSMAINT<br />
cisco-tdp <strong>Cisco</strong> TDP<br />
cisco-tna <strong>Cisco</strong> TNATIVE<br />
citrix Citrix IMA/ADMIN/RTMP<br />
citriximaclient Citrix IMA Client<br />
clp <strong>Cisco</strong> Line Protocol<br />
creativepartnr Creative Partnr<br />
creativeserver Creative Server<br />
cuseeme CUSeeMe Protocol<br />
daytime Daytime (RFC 867)<br />
dbase dBASE Unix<br />
dbcontrol_agent Oracle dbControl Agent po<br />
ddns-v3 Dynamic DNS Version 3<br />
dhcp-failover DHCP Failover<br />
directconnect Direct Connect Version 2.0<br />
discard Discard port<br />
dns Domain Name Server<br />
dnsix DNSIX Securit Attribute Token Map<br />
echo Echo port<br />
edonkey eDonkey<br />
entrust-svc-hdlr Entrust KM/Admin Service Handler<br />
entrust-svcs Entrust sps/aaas/aams<br />
esmtp Extended SMTP<br />
exec Remote Process Execution<br />
fasttrack FastTrack Traffic - KaZaA, Morpheus, Gro<br />
fcip-port FCIP<br />
finger Finger<br />
fragment IP fragment inspection<br />
ftp File Transfer Protocol<br />
ftps FTP over TLS/SSL<br />
gdoi GDOI<br />
giop Oracle GIOP/SSL<br />
gnutella Gnutella Version2 Traffic - BearShare, S<br />
gopher Gopher<br />
gtpv0 GPRS Tunneling Protocol Version 0<br />
gtpv1 GPRS Tunneling Protocol Version 1<br />
h323 H.323 Protocol (e.g, MS NetMeeting, Intel Video Phone)<br />
h323-annexe H.323 Protocol AnnexE (e.g, MS NetMeetin<br />
h323-nxg H.323 Protocol AnnexG<br />
hp-alarm-mgr HP Performance data alarm manager<br />
All contents are Copyright © 1992–2010 <strong>Cisco</strong> Systems, Inc. All rights reserved. This document is <strong>Cisco</strong> Public Information. Page 11 of 16
<strong>CCNP</strong>v6 <strong>TSHOOT</strong><br />
hp-collector HP Performance data collector<br />
hp-managed-node HP Performance data managed node<br />
hsrp Hot Standby Router Protocol<br />
http HTTP Protocol<br />
https Secure Hypertext Transfer Protocol<br />
ica ica (Citrix)<br />
icabrowser icabrowser (Citrix)<br />
icmp ICMP Protocol<br />
<br />
ACL-related Commands<br />
R1#show access-lists<br />
Standard IP access list 1<br />
10 permit 10.1.0.0, wildcard bits 0.0.255.255 (18 matches)<br />
Extended IP access list FW-ACL<br />
10 deny ip any any (29 matches)<br />
In the above example, two ACLs are configured on R1: a standard numbered ACL that identities internal NAT<br />
hosts, and an extended named ACL that blocks all traffic for a given direction (inbound or outbound). Statements<br />
in both are accumulating matches.<br />
R1#show access-lists FW-ACL<br />
Extended IP access list FW-ACL<br />
10 permit icmp any host 198.133.219.1 (13 matches)<br />
20 permit tcp any host 198.133.219.1 eq www<br />
30 permit udp host 192.168.2.1 host 192.168.1.1 eq ntp<br />
40 deny ip any any log (299 matches)<br />
In the above example, a specific named ACL is displayed. Note the log option on the deny ip any any<br />
statement. The use of this option produces logged message output on the console and syslog server, similar to<br />
that shown below. In this example, an NTP packet (port 123) from R2 to R1 is being denied.<br />
Dec 19 20:23:29.691: %SEC-6-IPACCESSLOGP: list FW-ACL denied udp 192.168.2.1(123) -<br />
> 192.168.1.1(123), 1 packet<br />
VACL-related Commands<br />
DLS2#show vlan access-map<br />
Vlan access-map "BLOCK-GUEST" 10<br />
Match clauses:<br />
ip address: GUEST-ACCESS-CTRL<br />
Action:<br />
drop<br />
Vlan access-map "BLOCK-GUEST" 20<br />
Match clauses:<br />
Action:<br />
Forward<br />
In the above example, access map BLOCK-GUEST has been configured with two match clauses. The first drops<br />
all traffic that matches the IP addresses specified in named ACL GUEST-ACCESS-CTRL. The second forwards<br />
all traffic that does not match the IP addresses specified in named ACL GUEST-ACCESS-CTRL. An implied<br />
deny all match clause is in effect at the end of the access map.<br />
All contents are Copyright © 1992–2010 <strong>Cisco</strong> Systems, Inc. All rights reserved. This document is <strong>Cisco</strong> Public Information. Page 12 of 16
<strong>CCNP</strong>v6 <strong>TSHOOT</strong><br />
DLS2#show vlan filter<br />
VLAN Map BLOCK-GUEST is filtering VLANs:<br />
30<br />
In the above example, access map BLOCK-GUEST has been applied to VLAN 30 and is filtering traffic.<br />
NAT-related Commands<br />
R1#show ip nat translations<br />
Pro Inside global Inside local Outside local Outside global<br />
icmp 198.133.219.20:512 10.1.10.1:512 172.20.0.1:512 172.20.0.1:512<br />
tcp 198.133.219.20:1043 10.1.10.1:1043 172.20.0.1:23 172.20.0.1:23<br />
tcp 198.133.219.20:1046 10.1.10.1:1046 172.20.0.1:80 172.20.0.1:80<br />
--- 198.133.219.1 10.1.50.1 --- ---<br />
udp 198.133.219.17:123 10.1.100.1:123 192.168.2.1:123 192.168.2.1:123<br />
udp 198.133.219.18:123 10.1.100.252:123 192.168.2.1:123 192.168.2.1:123<br />
udp 198.133.219.16:123 10.1.100.253:123 192.168.2.1:123 192.168.2.1:123<br />
In the above example, PC-B (inside local 10.1.10.1) has initiated a ping (ICMP port 512), a Telnet session (TCP<br />
port 23), and a browser (HTTP) session (TCP port 80) to the external R2 Lo1 IP address 172.20.0.1. In addition,<br />
several internal devices have initiated NTP requests (UDP port 123) to NTP server R2 (192.168.2.1). Server<br />
SRV1 with IP address 10.1.50.1 has a NAT static mapping to public address 198.133.219.1.<br />
NTP-related Commands<br />
R2#show clock<br />
*19:19:48.350 UTC Wed Dec 21 2009<br />
R1#show ntp associations<br />
address ref clock st when poll reach delay offset disp<br />
~192.168.2.1 .INIT. 16 2258 256 0 0.000 0.000 15937.<br />
* sys.peer, # selected, + candidate, - outlyer, x falseticker, ~ configured<br />
R1#show ntp associations<br />
address ref clock st when poll reach delay offset disp<br />
*~192.168.2.1 127.127.1.1 3 3 64 377 0.000 -0.393 3.038<br />
* sys.peer, # selected, + candidate, - outlyer, x falseticker, ~ configured<br />
In the first example above, R1 is configured to contact the NTP server R2 at 192.168.2.1, but the reference clock<br />
is in the INIT state, and R1 has not peered with R2. In the second example, R1 has peered with the NTP server<br />
R2 at 192.168.2.1, and the reference clock is now R1’s internal clock (127.127.1.1).<br />
R1#show ntp status<br />
Clock is unsynchronized, stratum 16, no reference clock<br />
nominal freq is 250.0000 Hz, actual freq is 250.0002 Hz, precision is 2**24<br />
reference time is CED4F227.B352D730 (18:08:39.700 UTC Thu Dec 17 2009)<br />
clock offset is 0.0000 msec, root delay is 0.00 msec<br />
root dispersion is 0.02 msec, peer dispersion is 0.00 msec<br />
loopfilter state is 'CTRL' (Normal Controlled Loop), drift is -0.000000961 s/s<br />
system poll interval is 64, last update was 2278 sec ago.<br />
All contents are Copyright © 1992–2010 <strong>Cisco</strong> Systems, Inc. All rights reserved. This document is <strong>Cisco</strong> Public Information. Page 13 of 16
<strong>CCNP</strong>v6 <strong>TSHOOT</strong><br />
R1#show ntp status<br />
Clock is synchronized, stratum 4, reference is 192.168.2.1<br />
nominal freq is 250.0000 Hz, actual freq is 250.0002 Hz, precision is 2**24<br />
reference time is CED63F93.9C972B04 (17:51:15.611 UTC Fri Dec 18 2009)<br />
clock offset is -0.0003 msec, root delay is 0.01 msec<br />
root dispersion is 0.00 msec, peer dispersion is 0.00 msec<br />
loopfilter state is 'CTRL' (Normal Controlled Loop), drift is -0.000000977 s/s<br />
system poll interval is 64, last update was 20 sec ago.<br />
In the first example above, the R1 clock is unsynchronized, and there is no reference clock. The stratum level<br />
defaults to 16 (the highest) when no NTP server is reachable. The last update occurred before the firewall was<br />
applied and blocked NTP. In the second example, the R1 clock is synchronized, and the reference clock is R2<br />
192.168.2.1. The stratum level is now 4. The last update occurred very recently after the firewall was adjusted to<br />
allow NTP.<br />
All contents are Copyright © 1992–2010 <strong>Cisco</strong> Systems, Inc. All rights reserved. This document is <strong>Cisco</strong> Public Information. Page 14 of 16
<strong>CCNP</strong>v6 <strong>TSHOOT</strong><br />
Reflection Questions<br />
1. Which lab trouble tickets did you have the most difficulty with?<br />
__________________________________________________________________________________________<br />
__________________________________________________________________________________________<br />
__________________________________________________________________________________________<br />
2. Would you change anything about the process that you used for any of the trouble tickets now that you see the<br />
resolution of the problem?<br />
__________________________________________________________________________________________<br />
__________________________________________________________________________________________<br />
__________________________________________________________________________________________<br />
3. Which commands did you find most useful in diagnosing data plane security issues? Add these to your toolbox<br />
for future use. Which commands did you find least useful?<br />
__________________________________________________________________________________________<br />
__________________________________________________________________________________________<br />
__________________________________________________________________________________________<br />
All contents are Copyright © 1992–2010 <strong>Cisco</strong> Systems, Inc. All rights reserved. This document is <strong>Cisco</strong> Public Information. Page 15 of 16
<strong>CCNP</strong>v6 <strong>TSHOOT</strong><br />
References<br />
If you need more information on the commands and their options, see the following references:<br />
• IP Routing Protocol<br />
http://www.cisco.com/cisco/web/support/index.html<br />
• <strong>Cisco</strong> IOS IP Switching<br />
http://www.cisco.com/en/US/docs/ios/ipswitch/command/reference/isw_book.html<br />
• Configuring <strong>Cisco</strong> IOS Firewall with NAT<br />
http://www.cisco.com/en/US/products/sw/secursw/ps1018/products_configuration_example09186a00800944<br />
5f.shtml<br />
• Configuring VLAN ACLs (VACLs)<br />
http://www.cisco.com/en/US/docs/routers/7600/ios/12.2SXF/configuration/guide/vacl.html#wp1039754<br />
Router Interface Summary Table<br />
Router Model Ethernet Interface<br />
#1<br />
1700 Fast Ethernet 0<br />
(FA0)<br />
1800 Fast Ethernet 0/0<br />
(FA0/0)<br />
2600 Fast Ethernet 0/0<br />
(FA0/0)<br />
2800 Fast Ethernet 0/0<br />
(FA0/0)<br />
Router Interface Summary<br />
Ethernet Interface<br />
#2<br />
Fast Ethernet 1<br />
(FA1)<br />
Fast Ethernet 0/1<br />
(FA0/1)<br />
Fast Ethernet 0/1<br />
(FA0/1)<br />
Fast Ethernet 0/1<br />
(FA0/1)<br />
Serial Interface<br />
#1<br />
Serial Interface<br />
#2<br />
Serial 0 (S0) Serial 1 (S1)<br />
Serial 0/0/0<br />
(S0/0/0)<br />
Serial 0/0/1<br />
(S0/0/1)<br />
Serial 0/0 (S0/0) Serial 0/1 (S0/1)<br />
Serial 0/0/0<br />
(S0/0/0)<br />
Serial 0/0/1<br />
(S0/0/1)<br />
Note: To find out how the router is configured, look at the interfaces to identify the type of router<br />
and how many interfaces the router has. There is no way to effectively list all the combinations of<br />
configurations for each router class. This table includes identifiers for the possible combinations of<br />
Ethernet and Serial interfaces in the device. The table does not include any other type of interface,<br />
even though a specific router may contain one. An example of this might be an ISDN BRI interface.<br />
The string in parenthesis is the legal abbreviation that can be used in <strong>Cisco</strong> IOS commands to<br />
represent the interface.<br />
All contents are Copyright © 1992–2010 <strong>Cisco</strong> Systems, Inc. All rights reserved. This document is <strong>Cisco</strong> Public Information. Page 16 of 16
<strong>CCNP</strong>v6 <strong>TSHOOT</strong><br />
Chapter 10 Lab 10-1, Troubleshooting Complex Environments<br />
Lab Topology<br />
Objectives<br />
• Load the device configuration files for each trouble ticket.<br />
• Diagnose and resolve problems related to features, protocols, or technology that could be encountered in<br />
a complex, integrated enterprise network.<br />
• Document the troubleshooting progress, configuration changes, and problem resolution.<br />
All contents are Copyright © 1992–2010 <strong>Cisco</strong> Systems, Inc. All rights reserved. This document is <strong>Cisco</strong> Public Information. Page 1 of 17
<strong>CCNP</strong>v6 <strong>TSHOOT</strong><br />
Background<br />
This lab covers a range of problems and requires that you make use of the troubleshooting skills acquired<br />
throughout this course to resolve the routing and switching problems introduced. These trouble tickets are<br />
based on scenarios from previous labs. This lab focuses on routing and switching connectivity issues related<br />
to EtherChannel, STP, OSPF, EIGRP, and ACLs.<br />
For each task or trouble ticket, the trouble scenario and problem symptom are described. While<br />
troubleshooting, you will discover the cause of the problem, correct it, and then document the process and<br />
results.<br />
Trouble Tickets and Troubleshooting Logs<br />
This lab includes four tasks. Each task is associated with a trouble ticket (TT) and introduces one or more<br />
errors on one or more devices. If time is a consideration, each task or trouble ticket can be performed<br />
independently.<br />
Troubleshooting Reference Information<br />
A generic troubleshooting flow is provided for analysis. Suggested commands are provided for each trouble<br />
ticket. Refer to previous labs for specific troubleshooting flows, examples of additional commands and<br />
command output.<br />
Note: This lab uses <strong>Cisco</strong> 1841 routers with <strong>Cisco</strong> IOS Release 12.4(24)T1 and the advanced IP image<br />
c1841-advipservicesk9-mz.124-24.T1.bin. The switches are <strong>Cisco</strong> WS-C2960-24TT-L with the <strong>Cisco</strong> IOS<br />
image c2960-lanbasek9-mz.122-46.SE.bin and Catalyst 3560-24PS with the <strong>Cisco</strong> IOS image c3560advipservicesk9-mz.122-46.SE.bin.<br />
Other routers (such as 2801 and 2811), switches (such as 2950 or 3550),<br />
and <strong>Cisco</strong> IOS Software versions can be used if they have comparable capabilities and features. Depending<br />
on the router or switch model and <strong>Cisco</strong> IOS Software version, the commands available and output produced<br />
might vary from what is shown in this lab.<br />
Required Resources<br />
• 3 routers (<strong>Cisco</strong> 1841 with <strong>Cisco</strong> IOS Release 12.4(24)T1 Advanced IP Service or comparable)<br />
• 1 switch (<strong>Cisco</strong> 2960 with the <strong>Cisco</strong> IOS Release 12.2(46)SE C2960-LANBASEK9-M image or<br />
comparable)<br />
• 2 switches (<strong>Cisco</strong> 3560 with the <strong>Cisco</strong> IOS Release 12.2(46)SE C3560-advipservicesk9-mz image or<br />
comparable)<br />
• SRV1 (Windows PC with static IP address) with TFTP and syslog servers plus an SSH client (PuTTY<br />
or comparable) and WireShark software<br />
• PC-B (Windows PC DHCP client) with PuTTY and WireShark software<br />
• PC-C (Windows PC DHCP client) with PuTTY and WireShark software<br />
• Serial and Ethernet cables<br />
All contents are Copyright © 1992–2010 <strong>Cisco</strong> Systems, Inc. All rights reserved. This document is <strong>Cisco</strong> Public Information. Page 2 of 17
<strong>CCNP</strong>v6 <strong>TSHOOT</strong><br />
Section 1—Trouble Tickets and Troubleshooting Logs<br />
Task 1: Trouble Ticket Lab 10-1 TT-A<br />
Step 1: Review trouble ticket Lab 10-1 TT-A.<br />
One of your colleagues mentioned that he had established a Telnet connection to switch ALS1 from PC-B<br />
and tested connectivity to server SRV1 via ping but was not successful. All switches in the network have a<br />
management address assigned, so he should be able to ping any device in the network. He asked for your<br />
help in determining the cause and resolving the issue.<br />
Step 2: Load the device trouble ticket configuration files for TT-A.<br />
Using the procedure described in Lab 3-1, verify that the lab configuration files are present in flash. Load the<br />
proper configuration files as indicated in the Device Configuration File table.<br />
Note: The following device access methods are in effect after loading the configuration files:<br />
• Console access requires no username or password.<br />
• Telnet and SSH require username admin and password adminpa55.<br />
• The enable password is ciscoenpa55.<br />
Device Configuration File Table<br />
Device Name File to Load Notes<br />
ALS1 Lab101-ALS1-TT-A-Cfg.txt<br />
DLS1 Lab101-DLS1-TT-A-Cfg.txt<br />
DLS2 Lab101-DLS2-TT-A-Cfg.txt<br />
R1 Lab101-R1-TT-A-Cfg.txt<br />
R2 Lab101-R2-TT-A-Cfg.txt<br />
R3 Lab101-R3-TT-A-Cfg.txt<br />
SRV1 N/A Static IP: 10.1.50.1<br />
Default gateway: 10.1.50.254<br />
PC-B N/A DHCP<br />
PC-C N/A DHCP<br />
Step 3: Configure SRV1 and start the syslog and TFTP servers.<br />
a. Configure SRV1 with the static IP address 10.1.50.1/24 and default gateway 10.1.50.254.<br />
b. Start the syslog server on SRV1 to monitor console messages from multiple devices.<br />
c. Start the TFTP server on SRV1 to record device configuration changes.<br />
Step 4: Release and renew the DHCP lease on PC-B and PC-C.<br />
a. Ensure that PC-B is configured as a DHCP client in the OFFICE VLAN.<br />
b. Ensure that PC-C is configured as a DHCP client in the R3 branch office LAN.<br />
c. After loading all TT-A device configuration files, issue the ipconfig /release and ipconfig<br />
/renew commands on PC-B and PC-C.<br />
All contents are Copyright © 1992–2010 <strong>Cisco</strong> Systems, Inc. All rights reserved. This document is <strong>Cisco</strong> Public Information. Page 3 of 17
<strong>CCNP</strong>v6 <strong>TSHOOT</strong><br />
Step 5: Outline the troubleshooting approach and validation steps.<br />
Use this space to identify your troubleshooting approach and the key steps to verify that the problem is<br />
resolved. Troubleshooting approaches to select from include the follow-the-path, spot-the-differences, bottomup,<br />
top-down, divide-and-conquer, shoot-from-the-hip, and move-the-problem methods.<br />
Note: In addition to a specific approach, you can use the generic troubleshooting process described at the<br />
beginning of Section 2 of this lab.<br />
_______________________________________________________________________________<br />
_______________________________________________________________________________<br />
_______________________________________________________________________________<br />
_______________________________________________________________________________<br />
_______________________________________________________________________________<br />
_______________________________________________________________________________<br />
Step 6: Record the troubleshooting process and configuration changes.<br />
Use this log to document your actions and results during the troubleshooting process. List the commands you<br />
used to gather information. As you progress, record what you think the problem might be and the actions you<br />
take to correct the problem.<br />
Note: Refer to the table of commands following this log, which might be helpful in troubleshooting this<br />
problem. You can also refer to Lab 4-1 for sample troubleshooting flows and additional commands.<br />
Device Actions and Results<br />
All contents are Copyright © 1992–2010 <strong>Cisco</strong> Systems, Inc. All rights reserved. This document is <strong>Cisco</strong> Public Information. Page 4 of 17
<strong>CCNP</strong>v6 <strong>TSHOOT</strong><br />
Command Key Information Displayed<br />
show interfaces status<br />
show cdp neighbors [detail]<br />
show spanning-tree vlan vlan#<br />
show spanning-tree summary<br />
show vlan brief<br />
show vlan id vlan#<br />
show interfaces trunk<br />
show interfaces type/#<br />
switchport<br />
show etherchannel summary<br />
Step 7: Document trouble ticket debrief notes.<br />
Displays link status, speed, duplex, trunk or VLAN<br />
membership, and interface descriptions.<br />
Displays detailed information about a neighbor (or neighbors)<br />
including network address, enabled protocols, hold time, and<br />
software version.<br />
Displays all essential parameters that affect the topology, such<br />
as root port, designated ports, port state, and port type, as well<br />
as the spanning-tree mode implemented.<br />
Displays the spanning-tree mode and the VLANs for which this<br />
switch is the root bridge. VLANs are listed along with the<br />
number of ports in various STP states.<br />
Displays an overview of all existing VLANs and the ports within<br />
them. Trunk ports are not listed.<br />
Displays whether the VLAN exists and which ports are<br />
assigned to it. Includes which trunk ports that the VLAN is<br />
allowed on.<br />
Displays all trunk ports, the operational status, trunk<br />
encapsulation, and native VLAN, as well as the list of allowed<br />
VLANs, active VLANs, and the VLANs in Spanning Tree<br />
Forwarding state for the trunk.<br />
Checks all VLAN-related parameters for a specific interface<br />
(access ports and trunk ports).<br />
Displays port channels, member ports, and flags indicating<br />
status.<br />
Use this space to make notes of the key learning points that you picked up during the discussion of this<br />
trouble ticket with the instructor. The notes can include problems encountered, solutions applied, useful<br />
commands employed, alternate solutions, methods, and processes, and procedure and communication<br />
improvements.<br />
_______________________________________________________________________________<br />
_______________________________________________________________________________<br />
_______________________________________________________________________________<br />
_______________________________________________________________________________<br />
_______________________________________________________________________________<br />
_______________________________________________________________________________<br />
_______________________________________________________________________________<br />
All contents are Copyright © 1992–2010 <strong>Cisco</strong> Systems, Inc. All rights reserved. This document is <strong>Cisco</strong> Public Information. Page 5 of 17
<strong>CCNP</strong>v6 <strong>TSHOOT</strong><br />
Task 2: Trouble Ticket Lab 10-1 TT-B<br />
Step 1: Review trouble ticket Lab 10-1 TT-B.<br />
Many users on the network are experiencing problems when accessing the Internet. An office user who uses<br />
client PC-B reports that he cannot browse to a website at IP address 172.30.3.1 (simulated by R2 Lo3).<br />
Your task is to restore connectivity from client PC-B to the Internet and ensure that the user can connect to<br />
172.30.3.1 using ping or a web browser.<br />
Step 2: Load the device trouble ticket configuration files for TT-B.<br />
Using the procedure described in Lab 3-1, verify that the lab configuration files are present in flash. Load the<br />
proper configuration files as indicated in the Device Configuration File table.<br />
Note: The following device access methods are in effect after loading the configuration files:<br />
• Console access requires no username or password.<br />
• Telnet and SSH require username admin and password adminpa55.<br />
• The enable password is ciscoenpa55.<br />
Device Configuration File Table<br />
Device Name File to Load Notes<br />
ALS1 Lab101-ALS1-TT-B-Cfg.txt<br />
DLS1 Lab101-DLS1-TT-B-Cfg.txt<br />
DLS2 Lab101-DLS2-TT-B-Cfg.txt<br />
R1 Lab101-R1-TT-B-Cfg.txt<br />
R2 Lab101-R2-TT-B-Cfg.txt<br />
R3 Lab101-R3-TT-B-Cfg.txt<br />
SRV1 N/A Static IP: 10.1.50.1<br />
Default gateway: 10.1.50.254<br />
PC-B N/A DHCP<br />
PC-C N/A DHCP<br />
Step 3: Configure SRV1 and start the syslog and TFTP servers.<br />
a. Configure SRV1 with the static IP address 10.1.50.1/24 and default gateway 10.1.50.254.<br />
b. Start the syslog server on SRV1 to monitor console messages from multiple devices.<br />
c. Start the TFTP server on SRV1 to record device configuration changes.<br />
Step 4: Release and renew the DHCP lease on PC-B and PC-C.<br />
a. Ensure that PC-B is configured as a DHCP client in the OFFICE VLAN.<br />
b. Ensure that PC-C is configured as a DHCP client in the R3 branch office LAN.<br />
c. After loading all TT-B device configuration files, issue the ipconfig /release and ipconfig<br />
/renew commands on PC-B and PC-C.<br />
All contents are Copyright © 1992–2010 <strong>Cisco</strong> Systems, Inc. All rights reserved. This document is <strong>Cisco</strong> Public Information. Page 6 of 17
<strong>CCNP</strong>v6 <strong>TSHOOT</strong><br />
Step 5: Outline the troubleshooting approach and validation steps.<br />
Use this space to identify your troubleshooting approach and the key steps to verify that the problem is<br />
resolved. Troubleshooting approaches to select from include the follow-the-path, spot-the-differences, bottomup,<br />
top-down, divide-and-conquer, shoot-from-the-hip, and move-the-problem methods.<br />
Note: In addition to a specific approach, you can use the generic troubleshooting process described at the<br />
beginning of Section 2 of this lab.<br />
_______________________________________________________________________________<br />
_______________________________________________________________________________<br />
_______________________________________________________________________________<br />
_______________________________________________________________________________<br />
_______________________________________________________________________________<br />
_______________________________________________________________________________<br />
Step 6: Record the troubleshooting process and configuration changes.<br />
Use this log to document your actions and results during the troubleshooting process. List the commands you<br />
used to gather information. As you progress, record what you think the problem might be and the actions you<br />
take to correct the problem.<br />
Note: In addition to the commands listed for TT-A, the table of commands following this log might be helpful<br />
in troubleshooting this problem. You can also refer to Labs 5-2 and 5-3 for sample troubleshooting flows and<br />
additional commands.<br />
Device Actions and Results<br />
All contents are Copyright © 1992–2010 <strong>Cisco</strong> Systems, Inc. All rights reserved. This document is <strong>Cisco</strong> Public Information. Page 7 of 17
<strong>CCNP</strong>v6 <strong>TSHOOT</strong><br />
Command Key Information Displayed<br />
show ip route<br />
or<br />
show ip route ip-addr<br />
show ip ospf interface brief<br />
show ip ospf neighbor<br />
show ip bgp<br />
show ip bgp summary<br />
show ip bgp neighbors<br />
show ip ospf database<br />
Step 7: Document trouble ticket debrief notes.<br />
Displays the entire routing table or information for a<br />
particular destination address.<br />
Displays interfaces that are participating in the OSPF<br />
routing process. An interface does not need to be<br />
operational to be listed in the command output.<br />
Displays the OSPF neighbor table to verify that all<br />
expected neighbor relationships are operational.<br />
Displays local and learned network entries in the BGP<br />
table with next hop, metric, local preference, weight, and<br />
AS path.<br />
Displays a summary of the BGP neighbor table. Lists<br />
important BGP parameters, such as the AS number and<br />
router ID, statistics about the memory consumption of the<br />
various BGP data structures, and a brief overview of the<br />
configured neighbors and their state.<br />
Displays parameters and extensive statistics about the<br />
peering session for all BGP neighbors.<br />
Verifies the link types and link IDs for all areas in which<br />
this device participates.<br />
Use this space to make notes of the key learning points that you picked up during the discussion of this<br />
trouble ticket with the instructor. The notes can include problems encountered, solutions applied, useful<br />
commands employed, alternate solutions, methods, and processes, and procedure and communication<br />
improvements.<br />
_______________________________________________________________________________<br />
_______________________________________________________________________________<br />
_______________________________________________________________________________<br />
_______________________________________________________________________________<br />
_______________________________________________________________________________<br />
_______________________________________________________________________________<br />
_______________________________________________________________________________<br />
All contents are Copyright © 1992–2010 <strong>Cisco</strong> Systems, Inc. All rights reserved. This document is <strong>Cisco</strong> Public Information. Page 8 of 17
<strong>CCNP</strong>v6 <strong>TSHOOT</strong><br />
Task 3: Trouble Ticket Lab 10-1 TT-C<br />
Step 1: Review trouble ticket Lab 10-1 TT-C.<br />
The user of PC-C on the branch office network called the help desk and reported that she is unable to access<br />
SRV1 or the Internet. Your task is to restore connectivity from client PC-C to SRV1 and the Internet and<br />
ensure that the user can connect to 172.30.3.1 using ping or a web browser. The branch office administrator<br />
did some preliminary testing and reported that he cannot ping or use Telnet to DLS2 or any other network<br />
devices from R3. The capability to ping other devices from remote router R3 is a connectivity requirement for<br />
the network.<br />
Step 2: Load the device trouble ticket configuration files for TT-C.<br />
Using the procedure described in Lab 3-1, verify that the lab configuration files are present in flash. Load the<br />
proper configuration files as indicated in the Device Configuration File table.<br />
Note: The following device access methods are in effect after loading the configuration files:<br />
• Console access requires no username or password.<br />
• Telnet and SSH require username admin and password adminpa55.<br />
• The enable password is ciscoenpa55.<br />
Device Configuration File Table<br />
Device Name File to Load Notes<br />
ALS1 Lab101-ALS1-TT-C-Cfg.txt<br />
DLS1 Lab101-DLS1-TT-C-Cfg.txt<br />
DLS2 Lab101-DLS2-TT-C-Cfg.txt<br />
R1 Lab101-R1-TT-C-Cfg.txt<br />
R2 Lab101-R2-TT-C-Cfg.txt<br />
R3 Lab101-R3-TT-C-Cfg.txt<br />
SRV1 N/A Static IP: 10.1.50.1<br />
Default gateway: 10.1.50.254<br />
PC-B N/A DHCP<br />
PC-C N/A DHCP<br />
Step 3: Configure SRV1 and start the syslog and TFTP servers.<br />
a. Configure SRV1 with the static IP address 10.1.50.1/24 and default gateway 10.1.50.254.<br />
b. Start the syslog server on SRV1 to monitor console messages from multiple devices.<br />
c. Start the TFTP server on SRV1 to record device configuration changes.<br />
Step 4: Release and renew the DHCP lease on PC-B and PC-C.<br />
a. Ensure that PC-B is configured as a DHCP client in the OFFICE VLAN.<br />
b. Ensure that PC-C is configured as a DHCP client in the R3 branch office LAN.<br />
c. After loading all TT-C device configuration files, issue the ipconfig /release and ipconfig<br />
/renew commands on PC-B and PC-C.<br />
All contents are Copyright © 1992–2010 <strong>Cisco</strong> Systems, Inc. All rights reserved. This document is <strong>Cisco</strong> Public Information. Page 9 of 17
<strong>CCNP</strong>v6 <strong>TSHOOT</strong><br />
Step 5: Outline the troubleshooting approach and validation steps.<br />
Use this space to identify your troubleshooting approach and the key steps to verify that the problem is<br />
resolved. Troubleshooting approaches to select from include follow-the-path, spot-the-differences, bottom-up,<br />
top-down, divide-and-conquer, shoot-from-the-hip, and move-the-problem methods.<br />
Note: In addition to a specific approach, you can use the generic troubleshooting process described at the<br />
beginning of Section 2 of this lab.<br />
_______________________________________________________________________________<br />
_______________________________________________________________________________<br />
_______________________________________________________________________________<br />
_______________________________________________________________________________<br />
_______________________________________________________________________________<br />
_______________________________________________________________________________<br />
Step 6: Record the troubleshooting process and configuration changes.<br />
Use this log to document your actions and results during the troubleshooting process. List the commands that<br />
you used to gather information. As you progress, record what you think the problem might be and the actions<br />
you take to correct the problem.<br />
Note: In addition to the commands listed for TT-A and TT-B, the table of commands following this log might<br />
help you troubleshoot this problem. You can also refer to Lab 5-1 and the Chapter 9 labs for sample<br />
troubleshooting flows and additional commands.<br />
Device Actions and Results<br />
All contents are Copyright © 1992–2010 <strong>Cisco</strong> Systems, Inc. All rights reserved. This document is <strong>Cisco</strong> Public Information. Page 10 of 17
<strong>CCNP</strong>v6 <strong>TSHOOT</strong><br />
Command Key Information Displayed<br />
show ip cef ip-addr detail<br />
show standby brief<br />
show ip eigrp interfaces<br />
show ip eigrp neighbors<br />
show access-lists ACL#/name<br />
show ntp status<br />
Step 7: Document trouble ticket debrief notes.<br />
Displays the next hop and interface used for a particular<br />
destination address from the CEF table.<br />
Verifies active and standby roles and IP addresses for all<br />
VLANs on an HSRP router.<br />
Displays interfaces that are participating in the EIGRP routing<br />
process. An interface does not need to be operational to be<br />
listed in the output.<br />
Displays the EIGRP neighbor table to verify that all expected<br />
neighbor relationships are operational.<br />
Displays all ACLs configured on a device, including the ACL<br />
number and name, the type (standard or extended), the<br />
statements, and the number of matches accumulated for each<br />
statement.<br />
Displays the clock synchronization status, stratum level, and<br />
reference clock IP address. Also shows the number of seconds<br />
since the last update was received from the reference clock.<br />
Use this space to make notes of the key learning points that you picked up during the discussion of this<br />
trouble ticket with the instructor. The notes can include problems encountered, solutions applied, useful<br />
commands employed, alternate solutions, methods, and processes, and procedure and communication<br />
improvements.<br />
_______________________________________________________________________________<br />
_______________________________________________________________________________<br />
_______________________________________________________________________________<br />
_______________________________________________________________________________<br />
_______________________________________________________________________________<br />
_______________________________________________________________________________<br />
_______________________________________________________________________________<br />
All contents are Copyright © 1992–2010 <strong>Cisco</strong> Systems, Inc. All rights reserved. This document is <strong>Cisco</strong> Public Information. Page 11 of 17
<strong>CCNP</strong>v6 <strong>TSHOOT</strong><br />
Task 4: Trouble Ticket Lab 10-1 TT-D<br />
Step 1: Review trouble ticket Lab 10-1 TT-D.<br />
The user of PC-C on the branch office network called the help desk again and reported that she is unable to<br />
access SRV1 or the Internet and she is pretty upset. You must restore access to these resources for this<br />
user.<br />
Step 2: Load the device trouble ticket configuration files for TT-D.<br />
Using the procedure described in Lab 3-1, verify that the lab configuration files are present in flash. Load the<br />
proper configuration files as indicated in the Device Configuration File table.<br />
Note: The following device access methods are in effect after loading the configuration files:<br />
• Console access requires no username or password.<br />
• Telnet and SSH require username admin and password adminpa55.<br />
• The enable password is ciscoenpa55.<br />
Step 3: Restart router R3 after the TT-D file is loaded.<br />
After loading the TT-D file into the running config for router R3 and then copying it to the startup config, use<br />
the reload command to restart the router.<br />
Device Configuration File Table<br />
Device Name File to Load Notes<br />
ALS1 Lab101-ALS1-TT-D-Cfg.txt<br />
DLS1 Lab101-DLS1-TT-D-Cfg.txt<br />
DLS2 Lab101-DLS2-TT-D-Cfg.txt<br />
R1 Lab101-R1-TT-D-Cfg.txt<br />
R2 Lab101-R2-TT-D-Cfg.txt<br />
R3 Lab101-R3-TT-D-Cfg.txt<br />
SRV1 N/A Static IP: 10.1.50.1<br />
Default gateway: 10.1.50.254<br />
PC-B N/A DHCP<br />
PC-C N/A DHCP<br />
Step 4: Configure SRV1 and start the syslog and TFTP servers.<br />
a. Configure SRV1 with the static IP address 10.1.50.1/24 and default gateway 10.1.50.254.<br />
b. Start the syslog server on SRV1 to monitor console messages from multiple devices.<br />
c. Start the TFTP server on SRV1 to record device configuration changes.<br />
Step 5: Release and renew the DHCP lease on PC-B and PC-C.<br />
a. Ensure that PC-B is configured as a DHCP client in the OFFICE VLAN.<br />
b. Ensure that PC-C is configured as a DHCP client in the R3 branch office LAN.<br />
c. After loading all TT-D device configuration files, issue the ipconfig /release and ipconfig<br />
/renew commands on PC-B and PC-C.<br />
All contents are Copyright © 1992–2010 <strong>Cisco</strong> Systems, Inc. All rights reserved. This document is <strong>Cisco</strong> Public Information. Page 12 of 17
<strong>CCNP</strong>v6 <strong>TSHOOT</strong><br />
Step 6: Outline the troubleshooting approach and validation steps.<br />
Use this space to identify your troubleshooting approach and the key steps to verify that the problem is<br />
resolved. Troubleshooting approaches to select from include the follow-the-path, spot-the-differences, bottomup,<br />
top-down, divide-and-conquer, shoot-from-the-hip, and move-the-problem methods.<br />
Note: In addition to a specific approach, you can use the generic troubleshooting process described at the<br />
beginning of Section 2 of this lab.<br />
_______________________________________________________________________________<br />
_______________________________________________________________________________<br />
_______________________________________________________________________________<br />
_______________________________________________________________________________<br />
_______________________________________________________________________________<br />
_______________________________________________________________________________<br />
Step 7: Record the troubleshooting process and configuration changes.<br />
Use this log to document your actions and results during the troubleshooting process. List the commands that<br />
you used to gather information. As you progress, record what you think the problem might be and the actions<br />
you take to correct the problem.<br />
Note: The table of commands following this log might help you troubleshoot this problem.<br />
Device Actions and Results<br />
All contents are Copyright © 1992–2010 <strong>Cisco</strong> Systems, Inc. All rights reserved. This document is <strong>Cisco</strong> Public Information. Page 13 of 17
<strong>CCNP</strong>v6 <strong>TSHOOT</strong><br />
Command Key Information Displayed<br />
show version Displays the device hardware and software status.<br />
dir flash: Displays the files and directories in flash memory.<br />
Step 7: Document trouble ticket debrief notes.<br />
Use this space to make notes of the key learning points that you picked up during the discussion of this<br />
trouble ticket with the instructor. The notes can include problems encountered, solutions applied, useful<br />
commands employed, alternate solutions, methods, and processes, and procedure and communication<br />
improvements.<br />
_______________________________________________________________________________<br />
_______________________________________________________________________________<br />
_______________________________________________________________________________<br />
_______________________________________________________________________________<br />
_______________________________________________________________________________<br />
_______________________________________________________________________________<br />
_______________________________________________________________________________<br />
All contents are Copyright © 1992–2010 <strong>Cisco</strong> Systems, Inc. All rights reserved. This document is <strong>Cisco</strong> Public Information. Page 14 of 17
<strong>CCNP</strong>v6 <strong>TSHOOT</strong><br />
Section 2 Troubleshooting Reference Information<br />
This lab covers all the technologies that were practiced in the previous labs. Therefore, no specific additional<br />
troubleshooting flows are provided for this lab. Refer to the Sample Troubleshooting Flows sections in previous<br />
labs for examples of procedures for specific technologies.<br />
General Troubleshooting Process<br />
As a general guideline, you can use the following general troubleshooting process described in the course.<br />
1. Define the problem (symptoms).<br />
2. Gather information.<br />
3. Analyze the information.<br />
4. Propose a hypothesis (possible cause).<br />
5. Test the hypothesis.<br />
6. Eliminate or accept the hypothesis.<br />
7. Solve the problem.<br />
8. Document the problem.<br />
All contents are Copyright © 1992–2010 <strong>Cisco</strong> Systems, Inc. All rights reserved. This document is <strong>Cisco</strong> Public Information. Page 15 of 17
<strong>CCNP</strong>v6 <strong>TSHOOT</strong><br />
Reflection Questions<br />
1. Which lab trouble tickets did you have the most difficulty with?<br />
__________________________________________________________________________________________<br />
__________________________________________________________________________________________<br />
__________________________________________________________________________________________<br />
2. Would you change anything about the process that you used for any of the trouble tickets now that you see the<br />
resolution of the problem?<br />
__________________________________________________________________________________________<br />
__________________________________________________________________________________________<br />
__________________________________________________________________________________________<br />
3. Which commands did you find most useful in diagnosing issues?<br />
__________________________________________________________________________________________<br />
__________________________________________________________________________________________<br />
__________________________________________________________________________________________<br />
All contents are Copyright © 1992–2010 <strong>Cisco</strong> Systems, Inc. All rights reserved. This document is <strong>Cisco</strong> Public Information. Page 16 of 17
<strong>CCNP</strong>v6 <strong>TSHOOT</strong><br />
Router Interface Summary Table<br />
Router Model Ethernet Interface<br />
#1<br />
1700 Fast Ethernet 0<br />
(FA0)<br />
1800 Fast Ethernet 0/0<br />
(FA0/0)<br />
2600 Fast Ethernet 0/0<br />
(FA0/0)<br />
2800 Fast Ethernet 0/0<br />
(FA0/0)<br />
Router Interface Summary<br />
Ethernet Interface<br />
#2<br />
Fast Ethernet 1<br />
(FA1)<br />
Fast Ethernet 0/1<br />
(FA0/1)<br />
Fast Ethernet 0/1<br />
(FA0/1)<br />
Fast Ethernet 0/1<br />
(FA0/1)<br />
Serial Interface<br />
#1<br />
Serial Interface<br />
#2<br />
Serial 0 (S0) Serial 1 (S1)<br />
Serial 0/0/0<br />
(S0/0/0)<br />
Serial 0/0/1<br />
(S0/0/1)<br />
Serial 0/0 (S0/0) Serial 0/1 (S0/1)<br />
Serial 0/0/0<br />
(S0/0/0)<br />
Serial 0/0/1<br />
(S0/0/1)<br />
Note: To find out how the router is configured, look at the interfaces to identify the type of router<br />
and how many interfaces the router has. There is no way to effectively list all the combinations of<br />
configurations for each router class. This table includes identifiers for the possible combinations of<br />
Ethernet and Serial interfaces in the device. The table does not include any other type of interface,<br />
even though a specific router may contain one. An example of this might be an ISDN BRI interface.<br />
The string in parenthesis is the legal abbreviation that can be used in <strong>Cisco</strong> IOS commands to<br />
represent the interface.<br />
All contents are Copyright © 1992–2010 <strong>Cisco</strong> Systems, Inc. All rights reserved. This document is <strong>Cisco</strong> Public Information. Page 17 of 17