OPERATOR'S MANUAL R4 AIS Class A Transponder ... - Polaris-as.dk
OPERATOR'S MANUAL R4 AIS Class A Transponder ... - Polaris-as.dk
OPERATOR'S MANUAL R4 AIS Class A Transponder ... - Polaris-as.dk

Create successful ePaper yourself
Turn your PDF publications into a flip-book with our unique Google optimized e-Paper software.
Saab <strong>Transponder</strong>Tech<br />
OPERATOR’S <strong>MANUAL</strong><br />
<strong>R4</strong> <strong>AIS</strong> <strong>Cl<strong>as</strong>s</strong> A<br />
<strong>Transponder</strong> System
Copyright<br />
The entire contents of this manual and its appendices, including any future updates and<br />
modifications, shall remain the property of Saab <strong>Transponder</strong>Tech AB at all times. The<br />
contents must not, whether in its original form or modified, be wholly or partly copied or<br />
reproduced, nor used for any other purpose than the subject of this manual.<br />
Disclaimer<br />
While re<strong>as</strong>onable care h<strong>as</strong> been exercised in the preparation of this manual, Saab<br />
<strong>Transponder</strong>Tech AB shall incur no liability whatsoever b<strong>as</strong>ed on the contents or lack of<br />
contents in the manual.<br />
Software<br />
This manual reflects the capabilities of <strong>R4</strong> Display software version 5.0.x and <strong>R4</strong> <strong>AIS</strong><br />
<strong>Transponder</strong> software 5.0.x.<br />
Operators Manual Part Number and Revision<br />
Part number 7000 108-131, revision H.<br />
This manual replaces earlier manuals from part number 7000 108-131 revision P9D onwards.<br />
Safety Instructions<br />
Note the following comp<strong>as</strong>s safe distances:<br />
Equipment Standard magnetic<br />
comp<strong>as</strong>s<br />
<strong>R4</strong> Display 0.6 m 0.3 m<br />
<strong>R4</strong> <strong>Transponder</strong> 0.2 m 0.1 m<br />
How To Contact Us<br />
For Information on New Products and Dealers:<br />
Ple<strong>as</strong>e visit our home page www.transpondertech.se<br />
Steering magnetic<br />
comp<strong>as</strong>s<br />
For Installation, Service and Technical Support:<br />
Ple<strong>as</strong>e contact your <strong>R4</strong> <strong>AIS</strong> <strong>Cl<strong>as</strong>s</strong> A <strong>Transponder</strong> System dealer.
Table of Contents<br />
Product Description ................................................. 5<br />
System Overview 5<br />
Main Features 6<br />
Getting Started ........................................................ 7<br />
Front Panel Keys 7<br />
How to Operate the <strong>R4</strong> Display 8<br />
Views and Function Keys 8<br />
Change Settings 8<br />
Alarm and Alert Pop-ups 9<br />
Turning On and Off the <strong>R4</strong> Display 9<br />
System Modes 10<br />
Status Bar 12<br />
Status Icons 12<br />
View Remote Ship Information 13<br />
View Plot of Targets 14<br />
Enter and Read Voyage Related Information 15<br />
F<strong>as</strong>t Setting of Navigational Status 15<br />
Handling Safety Related Messages (SRM) and Text Messages 16<br />
Read Received Messages 16<br />
Send SRMs 17<br />
Send Text Messages 17<br />
Alarm and Status Lists 18<br />
Visual Settings 19<br />
Reference .............................................................. 21<br />
Status LEDs 21<br />
<strong>R4</strong> <strong>Transponder</strong> LEDs 21<br />
Icon Description 22<br />
Message Symbols 22<br />
<strong>AIS</strong> Status Symbols 22<br />
Navigational Status Symbols (Own Vessel Icons) 22<br />
Miscellaneous Symbols 22<br />
Target Symbols (Target List and Plot) 22<br />
Adjusting Settings 23<br />
Alarm and Alert Pop-ups 24<br />
Changing System Mode 25<br />
Navigate Mode 27<br />
Overview 27<br />
3<br />
Table of Contents
4<br />
Target List 28<br />
Extended Info 29<br />
Plot 30<br />
Own Ship Data 32<br />
Plan Voyage Mode 33<br />
Overview 33<br />
<strong>AIS</strong> Voyage 34<br />
Alarms & Msgs Mode 35<br />
Overview 35<br />
Alarm List 37<br />
Status List 38<br />
<strong>AIS</strong> Messages 38<br />
Received Messages 39<br />
Sent Messages 40<br />
Send SRM 40<br />
Send Text Message 42<br />
Long Range Messages 43<br />
Config Mode 45<br />
Overview 45<br />
Time Config 47<br />
Display Config 48<br />
Visual Config 48<br />
Sound Config 49<br />
<strong>AIS</strong> Config 49<br />
Ship Static 50<br />
GNSS Antenn<strong>as</strong> 51<br />
VHF Radio Config 52<br />
<strong>AIS</strong> Display 53<br />
Tran. P<strong>as</strong>sword 53<br />
Long Range 54<br />
Regional Are<strong>as</strong> 55<br />
Alarm Config 57<br />
Units Config 57<br />
Port Rate Config 59<br />
System Info 61<br />
Restore Sys. Conf. 63<br />
Appendix ................................................................ 65<br />
Alarm Messages 65<br />
<strong>AIS</strong> Alarms Description 65<br />
Indication Messages 67<br />
Long Range Definitions 67<br />
Glossary ................................................................. 69<br />
Index ...................................................................... 71
Product Description<br />
System Overview<br />
System Overview<br />
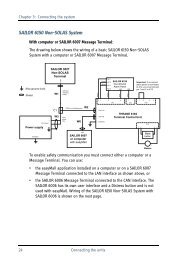
The <strong>R4</strong> <strong>AIS</strong> <strong>Cl<strong>as</strong>s</strong> A <strong>Transponder</strong> System consists of an <strong>R4</strong> <strong>AIS</strong> <strong>Transponder</strong> and an <strong>R4</strong><br />
Display. The <strong>R4</strong> <strong>Transponder</strong> consists of a radio transceiver unit, a GPS receiver and a<br />
controller unit. The transceiver consist of one transmitter and three independent VHF receivers,<br />
two tunable TDMA receivers and one DSC receiver. The transmitter alternates its<br />
transmissions between the two operating TDMA channels and can also be used to reply a<br />
DSC interrogation (ITU-R M.825-3, Annex 1). The controller unit creates and schedules<br />
data packets (containing dynamic, static and voyage related data) for transmission b<strong>as</strong>ed<br />
on the IMO performance standard for <strong>AIS</strong>.<br />
The <strong>R4</strong> <strong>Transponder</strong> shall be connected to the ship’s sensors <strong>as</strong> required by the installation<br />
guidelines published by IALA. The <strong>R4</strong> <strong>Transponder</strong> can interface external navigation<br />
and presentation systems that support required IEC 61162-1 sentences <strong>as</strong> set out in the<br />
Installation Manual. The <strong>R4</strong> <strong>Transponder</strong> is prepared for connection to Long Range systems<br />
like Inmarsat C.<br />
The <strong>R4</strong> Display provides a graphical user-friendly interface to the system. Via the display<br />
it is possible to plot the location of other ships, aids to navigation and search and rescue<br />
vessels. Information about other vessel can be listed sorted by range and optionally filtered<br />
showing only vessels within a specific sector. The display can also be used to send<br />
and receive messages, perform configuration <strong>as</strong> well <strong>as</strong> supervise the systems status.<br />
5<br />
Product Description
Main Features<br />
Main Features<br />
• High resolution, sunlight readable, 6'' graphic day and night display.<br />
• User interface design centered around modes of operation corresponding to typical<br />
operator activities such <strong>as</strong> voyage planning and ship navigation.<br />
• Broadc<strong>as</strong>t of Dynamic, Static and Voyage related information.<br />
• Standardized interface for connection to ship sensors e.g. GNSS, Gyro, Rate of Turn<br />
Indicator, ECDIS/ECS and ARPA.<br />
• Plot capable of presenting up to 200 targets in vicinity of own ship and situation display<br />
with capability to view vessels in the most interesting bearing and range.<br />
• Messaging views for generation and display of safety related messages and text messages.<br />
• Mandatory pilot plug integrated in the display.<br />
• VHF transceiver with one transmitter, three receivers.<br />
• Channel management capability for are<strong>as</strong> without access to the worldwide allocated<br />
<strong>AIS</strong> frequencies.<br />
• Possibility to generate Long Range <strong>AIS</strong> reply over satcom equipment for example<br />
Inmarsat C.<br />
• 1W mode in accordance with requirements for tanker operations in port.<br />
• Reception and processing of <strong>AIS</strong> messages 18,19 and 24A/B <strong>as</strong> transmitted by <strong>AIS</strong><br />
<strong>Cl<strong>as</strong>s</strong> B ‘CS’ <strong>Transponder</strong>s<br />
• Upgradeable without hardware modifications due to fully integrated DSP solution.<br />
6
Getting Started<br />
Front Panel Keys<br />
Front Panel Keys<br />
POWER Used for turning the <strong>R4</strong> Display on and off. To turn the power off press and hold<br />
the key for 3 seconds.<br />
MOB Not used in a <strong>R4</strong> <strong>AIS</strong> <strong>Cl<strong>as</strong>s</strong> A <strong>Transponder</strong> System.<br />
DISPLAY Provides controls for f<strong>as</strong>t configuration of backlight, contr<strong>as</strong>t, LED illumination<br />
and button illumination. Two separate configurations are available, for day and night<br />
operation.<br />
STATUS Used for f<strong>as</strong>t change of the ship’s navigational status.<br />
MODE Used for changing mode of operation, which can be set to any of Navigate, Plan<br />
Voyage, Alarms & Msgs and Config.<br />
ALPHANUMERIC KEYS These keys are used for entering text and numbers. To write a<br />
number in a numeric field press the key once. To write a character in a text field press once<br />
for the first character <strong>as</strong>sociated with the key, twice for the second character and so on.<br />
PAGE Toggles page of function keys shown in views having more than 5 function keys,<br />
<strong>as</strong> indicated by a small arrow in the bottom right corner of the display.<br />
ENTER Used to start editing a field and for confirming data entry.<br />
ESC Returns display to previous page, or restores a data field's previous value.<br />
∧ ∨ (Up and down on ARROW KEYPAD) Moves the field and list highlight up and down,<br />
and the cursor position when editing a field.<br />
< > (Left and right on ARROW KEYPAD) Jumps between pages in lists, moves the field<br />
highlight left and right and moves the cursor position when editing a field.<br />
The ARROW KEYPAD also have four diagonal directions for changing targets in the plot.<br />
FUNCTION KEYS These keys have different functions depending on current view. The<br />
function is displayed above each key on the screen.<br />
7<br />
Getting Started
How to Operate the <strong>R4</strong> Display<br />
How to Operate the <strong>R4</strong> Display<br />
Views and Function Keys<br />
The user interface is built upon a number of views, organized in four different modes. The<br />
different views are reached with the function keys below the screen and the ESC and<br />
PAGE keys on the right side of the front panel. The mode is changed by pressing the<br />
MODE key followed by the function key corresponding to the desired mode.<br />
Use the function keys to step into a specific view, and ESC to get back one level. Pressing<br />
PAGE will toggle function keys shown in views having several pages of function keys.<br />
An example view is shown below. In the following sections of the manual the views of<br />
the <strong>R4</strong> <strong>AIS</strong> <strong>Cl<strong>as</strong>s</strong> A <strong>Transponder</strong> System are described.<br />
The function keys are view-specific and the function of each key is specified with a label<br />
on the screen. Note that unlabelled keys are not active in that specific view. Also, in some<br />
views the function keys might serve <strong>as</strong> switches, e.g. toggling a parameter.<br />
The status bar of the system is present in all views at the top of the screen, and further<br />
described in section “Status Bar” on page 12.<br />
Change Settings<br />
Several of the views in the <strong>R4</strong> <strong>AIS</strong> <strong>Cl<strong>as</strong>s</strong> A <strong>Transponder</strong> System contain parameters that<br />
can be edited. To edit a parameter, select it by using the ∧ ∨ < > keys and press ENTER.<br />
Then enter data in one of four ways:<br />
8<br />
Function key label<br />
performing an<br />
operation<br />
System status<br />
bar<br />
Function key label<br />
leading to a sub<br />
view<br />
• Numbers: Press the ALPHANUMERIC KEY that corresponds to each digit. To<br />
delete a digit, press function key Backspace.<br />
• Text: Press the ALPHANUMERIC KEY that corresponds to each character.<br />
Press the key once for the first character, twice for the second character and so<br />
on. Press the key marked with a dot twice to, where allowed, bring up a menu<br />
for entering special characters. To delete a character, press function key<br />
Backspace. To change between upper and lower c<strong>as</strong>e letters, press function<br />
key Capslock (if present).
How to Operate the <strong>R4</strong> Display<br />
• List of predefined values: Use the ∧ ∨ keys to select between the predefined<br />
values.<br />
• Bar graph data: Use the < > keys to increment or decrement the parameter.<br />
Press ENTER when done. If desired, use the ∧ ∨ < > keys to select a new parameter to be<br />
edited, else press function key Apply and Exit.<br />
Use the ESC key to undo changes and to return to the previous view.<br />
Alarm and Alert Pop-ups<br />
The <strong>R4</strong> Display features alarm and alert pop-ups that can appear any time during operation.<br />
To acknowledge an alarm or alert message, press ENTER. Example of an alarm message<br />
is shown below.<br />
For more information on alarms and alerts see the Reference, section “Alarm and Alert<br />
Pop-ups” on page 24. For alarm definitions see Appendix, section “Alarm Messages” on<br />
page 65.<br />
Turning On and Off the <strong>R4</strong> Display<br />
To turn on the <strong>R4</strong> Display, press the POWER key. The LEDs on the display will blink<br />
momentarily, indicating that the <strong>R4</strong> Display is starting up. Any alarm active when the display<br />
is started will be indicated by Alarm pop-ups, <strong>as</strong> described above. Press ENTER to<br />
acknowledge any present alarm, and the corresponding pop-up will be removed.<br />
The <strong>R4</strong> Display will power up in the Navigate mode, showing the Target List view. The<br />
different modes and the b<strong>as</strong>ic operation of the <strong>R4</strong> <strong>AIS</strong> <strong>Cl<strong>as</strong>s</strong> A <strong>Transponder</strong> System are<br />
described in the following sections.<br />
To power off the <strong>R4</strong> Display, press and hold the POWER key for 3 seconds, until the<br />
screen goes black.<br />
9<br />
Getting Started
System Modes<br />
System Modes<br />
The user interface of the <strong>R4</strong> Display h<strong>as</strong> four different system modes, which each correspond<br />
to different types of user activities.<br />
The four modes are Navigate, Plan Voyage, Alarms & Msgs and Config. Current mode is<br />
changed by pressing the MODE key, which will bring up the function key labels illustrated<br />
below. Press the corresponding function key to enter the desired mode.<br />
Function keys<br />
for selecting<br />
system mode<br />
The different modes are described below, with illustrations of typical mode views.<br />
Navigate Mode<br />
The Navigate mode is used under normal ship operation. It supports viewing <strong>AIS</strong> targets,<br />
plotting <strong>AIS</strong> targets, viewing extended information for a specific target, sending an <strong>AIS</strong><br />
message (security related message or text message) to a specific target and viewing the<br />
own ship information being transmitted to remote targets. This mode is described in detail<br />
on page 27 and onwards in the Reference chapter.<br />
Plan Voyage Mode<br />
The Plan Voyage mode is used to enter voyage information when starting a new journey.<br />
This mode is described in detail on page 33 and onwards in the Reference chapter.<br />
10
Alarms & Msgs Mode<br />
System Modes<br />
The Alarms & Msgs mode provides functions for monitoring of current system status and<br />
message handling. This mode is described in detail on page 35 and onwards in the Reference<br />
chapter.<br />
Config Mode<br />
The Config mode comprises functions used to setup and configure the <strong>R4</strong> <strong>AIS</strong> <strong>Cl<strong>as</strong>s</strong> A<br />
<strong>Transponder</strong> System. This mode is described in detail on page 45 and onwards in the Reference<br />
chapter.<br />
Functions Accessible Regardless of Mode<br />
Functions <strong>as</strong>sociated with the MODE, DISPLAY, STATUS and POWER keys are accessible<br />
regardless of mode. These keys provide functionality for switching system mode,<br />
changing display settings, changing navigational status and for turning the display on and<br />
off.<br />
11<br />
Getting Started
Status Bar<br />
Status Bar<br />
The top of the screen of the <strong>R4</strong> Display always displays a summary of the system’s status.<br />
See illustration below.<br />
If a valid navigation position is available, it is displayed to the left. The status icons are<br />
displayed in the middle, and to the right current time is shown. Time is either UTC or local<br />
(LOC).<br />
Status Icons<br />
The status icons that can be displayed are:<br />
Unread <strong>AIS</strong> message (safety related message or text message)<br />
Unread Long Range message (auto reply)<br />
Unread Long Range message (manual reply)<br />
Active alarms<br />
1W mode (Available only if Ship Type = Tanker and Navigational Status = Moored)<br />
<strong>AIS</strong> status, being one of:<br />
<strong>AIS</strong> functionality available<br />
No communication with the <strong>R4</strong> <strong>AIS</strong> <strong>Transponder</strong><br />
Navigational status, being one of:<br />
Navigational status is undefined<br />
At anchor or moored<br />
Under way using engine<br />
Navigational status is one of: Not under command, Restricted manoeuvrability, Constrained<br />
by her draught, Aground, Engaged in fishing, Under way sailing, Reserved<br />
for future use.<br />
The icons are also described in section “Icon Description” on page 22 in the Reference<br />
chapter.<br />
12<br />
Current position Status icons<br />
Current time
View Remote Ship Information<br />
View Remote Ship Information<br />
The <strong>R4</strong> Display will power up in Target List view. This view, also referred to <strong>as</strong> the<br />
minimal display, is accessed by pressing function key Target List when in the top view<br />
of the Navigate mode. The mode is reached by pressing MODE followed by function key<br />
NAVIGATE. The view displays a list of all targets sorted by range from own ship (closest<br />
first). The list includes MMSI, ship’s name, range (RNG) and bearing (BRG). The total<br />
number of ships in the list will be shown in the upper right corner of the list and the index<br />
of the currently selected ship will be shown on the right side. By pressing the Show<br />
Sector / Show All Targets function keys the list will show either the targets within a<br />
bearing interval, or all targets. When showing targets within a particular bearing sector,<br />
the start bearing will be close to own ship direction (HDG or COG if available). Each sector<br />
covers 30° and moving through the sectors is done in 15° steps by using the function<br />
keys -15° ← and +15° →.<br />
For extended information about a target in the list, select the ship with the ∧ ∨ key and<br />
press function key Extended Info or ENTER.<br />
The Extended Information view includes static, dynamic and voyage related data for the<br />
selected target. The first page displays ship information for f<strong>as</strong>t navigational decisions.<br />
Press Show Next to change the information shown in the view’s lower part. For details,<br />
see section “Target List” on page 28 and section “Extended Info” on page 29.<br />
Press ESC to return to Target List view.<br />
13<br />
Getting Started
View Plot of Targets<br />
Function keys Send SRM and Send Text Message in the Target List view are used to<br />
send a safety related message (SRM) or a text message to the selected target. For more<br />
information about <strong>AIS</strong> messages, see Reference chapter section “<strong>AIS</strong> Messages” on<br />
page 38.<br />
View Plot of Targets<br />
The location of targets relative to your own ship are visualized in the Plot view. The view<br />
is accessed when in the top view of the Navigate mode by pressing function key Plot. Use<br />
the ARROW KEYPAD (∧ ∨ < >) to select any of the targets on the display. The arrow<br />
keys can also be used to select targets in diagonal direction. Brief information about the<br />
selected target is shown to the left. Use the Zoom in and Zoom out function keys to<br />
zoom in or out.<br />
For extended information about a target select it using the ∧ ∨ < > key and press function<br />
key Extended Info or ENTER.<br />
The own ship target is displayed <strong>as</strong> a filled (black) target icon. <strong>Cl<strong>as</strong>s</strong> B targets are indicated<br />
by a ‘B’ appended to the target icon (not shown in the figure above).<br />
Press function key Send SRM or Send Text Message in order to send a safety related<br />
message (SRM) or a text message to the selected target. For more information about <strong>AIS</strong><br />
messages, see Reference chapter, section “<strong>AIS</strong> Messages” on page 38.<br />
14
Enter and Read Voyage Related Information<br />
Enter and Read Voyage Related Information<br />
Voyage related information (for transmit via <strong>AIS</strong>) is displayed in the <strong>AIS</strong> Voyage view.<br />
The view is present in the Plan Voyage mode which is accessed by pressing the MODE<br />
key followed by function key PLAN VOYAGE. The view is then entered by pressing function<br />
key <strong>AIS</strong> Voyage. Voyage related data includes destination, estimated time of arrival<br />
(ETA) and number of people aboard.<br />
The parameters “Cargo” and “1 W mode” are available for special ship types only. For<br />
more information see Reference chapter, section “<strong>AIS</strong> Voyage” on page 34.<br />
F<strong>as</strong>t Setting of Navigational Status<br />
The ship’s navigational status can be quickly set in the Navigational Status view. This<br />
view is reached by pressing the STATUS key. The status is set by pressing the appropriate<br />
function key. Use the PAGE key to toggle between the different status messages alternatives.<br />
Note: When ship type is “Tanker” and navigational status “Moored” this view also contains<br />
a function key for toggling “1 W mode”.<br />
15<br />
Getting Started
Handling Safety Related Messages (SRM) and Text Messages<br />
Handling Safety Related Messages (SRM) and Text Messages<br />
Safety related messages (SRMs) and text messages can be sent to specific targets (addressed<br />
messages) or broadc<strong>as</strong>t to all targets. Handling of messages is supported by the<br />
<strong>AIS</strong> Messages view accessible in the Alarms & Msgs mode. This mode is reached by<br />
pressing MODE followed by function key ALARMS & MSGS. The view is then reached<br />
by pressing function key <strong>AIS</strong> Messages<br />
Read Received Messages<br />
Received messages can be accessed in the Received Messages view. To enter the view,<br />
press function key Received.<br />
Select a message with ∧ ∨, press function key Read to see the entire message. For more<br />
information, see Reference chapter, section “<strong>AIS</strong> Messages” on page 38.<br />
16
Send SRMs<br />
Handling Safety Related Messages (SRM) and Text Messages<br />
SRMs are composed and sent in the Send SRM view. To get to this view, press function<br />
key Send SRM.<br />
The message can either be composed manually, or taken from a predefined list. For more<br />
information about how to create and send a safety related message see Reference chapter,<br />
section “Send SRM” on page 40.<br />
Send Text Messages<br />
Text messages are composed and sent in the Send Text Message view. To get to this view,<br />
press function key Send Text Message<br />
Adressed text messages can not be received by <strong>Cl<strong>as</strong>s</strong> B targets. For more information see<br />
Reference chapter, section “Send Text Message” on page 42.<br />
17<br />
Getting Started
Alarm and Status Lists<br />
Alarm and Status Lists<br />
Current alarm status can be viewed under the Alarm List view, in the Alarms & Msgs<br />
mode. To enter the mode, press the MODE key followed by the ALARMS & MSGS function<br />
key. Then press function key Alarm List to enter the view. Active alarms are marked<br />
with an exclamation mark (!).<br />
On entrance, the view only shows status of enabled alarm. To show alarms that have been<br />
disabled, press the function key Show Disabled. For more information on alarm messages<br />
see Appendix, section “Alarm Messages” on page 65. The Alarms & Msgs mode<br />
and <strong>as</strong>sociated views are described on page 35 and onwards.<br />
Current status of indications and the latest events are listed in the Status List. To enter this<br />
view press function key Status List in the Alarms & Msgs mode. For a list of status messages<br />
see Appendix, section “Indication Messages” on page 67.<br />
18
Visual Settings<br />
Visual Settings<br />
The display backlight, contr<strong>as</strong>t, LED illumination, button illumination and day or night<br />
settings can be changed in the Visual Config view. Changes made in this view directly effect<br />
the corresponding visual setting.<br />
To enter this view, press the DISPLAY key. The following view is shown.<br />
To change between day and night settings, press Switch to Day or Switch to Night.<br />
The day and night settings are stored separately, so different settings can be specified for<br />
day and night operation. To change backlight, contr<strong>as</strong>t, LED illumination or button illumination,<br />
press the corresponding function key. Regardless if the Backlight, Contr<strong>as</strong>t,<br />
Led Illum. or Button Illum. function key is pressed, a view with a bar graph is shown<br />
<strong>as</strong> illustrated below.<br />
Use < > to decre<strong>as</strong>e or incre<strong>as</strong>e the value of the selected setting. The corresponding screen<br />
or illumination setting is directly affected <strong>as</strong> the bar is moved.<br />
To exit the Visual Config view, press DISPLAY or ESC.<br />
19<br />
Getting Started
Visual Settings<br />
This page is intentionally empty<br />
20
Reference<br />
Status LEDs<br />
Status LEDs<br />
The following section describe the status indicating light emitting diodes (LEDs) of the<br />
<strong>R4</strong> <strong>Transponder</strong>.<br />
<strong>R4</strong> <strong>Transponder</strong> LEDs<br />
The following LEDs, located on the front of the <strong>R4</strong> <strong>Transponder</strong>, indicates its current status<br />
and radio link activity.<br />
Green LED<br />
The green LED indicates that power is applied to the <strong>R4</strong> transponder.<br />
Yellow LED<br />
A fl<strong>as</strong>hing yellow LED indicates that the <strong>R4</strong> <strong>Transponder</strong> is receiving data.<br />
Red LED<br />
A fl<strong>as</strong>hing red LED indicates that the <strong>R4</strong> <strong>Transponder</strong> is transmitting on the radio link<br />
(transmission starts approximately 1 minute after power on).<br />
21<br />
Reference
Icon Description<br />
Icon Description<br />
Message Symbols<br />
22<br />
Unread SRM or text message<br />
Unread Long Range messages (auto reply)<br />
Unread Long Range messages (manual reply)<br />
<strong>AIS</strong> Status Symbols<br />
<strong>AIS</strong> functionality available<br />
No communication with the <strong>R4</strong> <strong>AIS</strong> <strong>Transponder</strong><br />
Navigational Status Symbols (Own Vessel Icons)<br />
Navigational status is undefined<br />
At anchor or moored<br />
Under way using engine<br />
Navigational status is one of: Not under command, Restricted manoeuvrability,<br />
Constrained by her draught, Aground, Engaged in fishing, Under way sailing, Reserved<br />
for future use.<br />
Miscellaneous Symbols<br />
Active Alarm(s)<br />
1W mode active<br />
Target Symbols (Target List and Plot)<br />
Own ship (plot view)<br />
Ship (cl<strong>as</strong>s A)<br />
Ship (cl<strong>as</strong>s B)<br />
B<strong>as</strong>e Station<br />
SAR<br />
Aids-to-Navigation
Adjusting Settings<br />
Adjusting Settings<br />
If desired, some presentation and navigation characteristics of the <strong>R4</strong> Display can be adjusted<br />
to the user’s preferences. The most central parameters that can be adjusted are<br />
briefly described below.<br />
Maximum number of targets in Target List and Plot<br />
The maximum number of targets that can be shown in the Target List and Plot views can<br />
be adjusted. See section “<strong>AIS</strong> Display” on page 53.<br />
Adjust enabled and disabled alarms<br />
Enable alarms for those alarm conditions that indications are desired for. Per default, several<br />
of the alarms are disabled. Alarms that are invalid in the specific system configuration<br />
can remain disabled. If not, such alarms will always be active. Adjusting alarms is described<br />
in section “Alarm Config” on page 57.<br />
Range, speed and depth units<br />
The units used for displaying range, speed and depth values can be configured. Configuration<br />
of units is described in section “Units Config” on page 57.<br />
23<br />
Reference
Alarm and Alert Pop-ups<br />
Alarm and Alert Pop-ups<br />
There are two types of pop-up windows, alarms and alerts. Pop-up windows can appear<br />
any time during system operation to notify the user of an event or alarm condition. To acknowledge<br />
an alarm or an alert and close the pop-up window, press ENTER. Active<br />
alarms are listed in the Alarm List view described on page 37. For explanation of different<br />
alarms, see Appendix, section “Alarm Messages” on page 65.<br />
It is possible to disable alarms that are invalid for the specific system configuration. If not<br />
disabled, such alarms will otherwise always be active.This is described in section “Alarm<br />
Config” on page 57.<br />
24
Changing System Mode<br />
Changing System Mode<br />
The <strong>R4</strong> Display h<strong>as</strong> four system modes: Navigate, Plan Voyage, Alarms & Msgs and Config.<br />
The system modes corresponds to the kind of operation the user is performing. An<br />
overview of the different modes is present in section “System Modes” on page 10. Each<br />
mode is also described in detail in the following sections of this chapter.<br />
Accessing Navigate mode views when in a different mode<br />
1. Press MODE key.<br />
2. Press function key NAVIGATE.<br />
3. Press the function key <strong>as</strong>sociated with the desired view.<br />
Accessing Plan Voyage mode views when in a different mode<br />
1. Press MODE key.<br />
2. Press function key PLAN.<br />
3. Press the function key <strong>as</strong>sociated with the desired view.<br />
Accessing Alarms & Msgs mode views when in a different mode<br />
1. Press MODE key.<br />
2. Press function key ALARMS & MSGS.<br />
3. Press the function key <strong>as</strong>sociated with the desired view.<br />
Accessing Config mode views when in a different mode<br />
1. Press MODE key.<br />
2. Press function key CONFIG.<br />
3. To show the second page of main views, press PAGE.<br />
4. Press the function key <strong>as</strong>sociated with the desired view.<br />
25<br />
Reference
Changing System Mode<br />
This page is intentionally empty<br />
26
Navigate Mode<br />
Navigate Mode - Overview<br />
The Navigate mode contains a set of views for performing t<strong>as</strong>ks for normal voyage operation.<br />
This includes: showing list and plot of <strong>AIS</strong> equipped vessels in range <strong>as</strong> well <strong>as</strong><br />
showing extended information for a specific vessel.<br />
The mode is entered by pressing the MODE key followed by function key NAVIGATE.<br />
Overview<br />
The top level function keys of the Navigate mode are illustrated below.<br />
• Target List lists brief information about the closest targets.<br />
• Plot views the closest targets and displays information for a marked target.<br />
• Own Ship Data shows the ships own data which is transmitted to other vessels.<br />
Below is a graphical overview of the different views present in Navigate mode.<br />
27<br />
Reference
Navigate Mode - Target List<br />
Target List<br />
The Target List view displays a list of targets sorted by range from own ship (closest first).<br />
The list includes MMSI, ship’s name, range (RNG) and bearing (BRG). The total number<br />
of ships in the list will be shown in the upper right corner of the list and the index of the<br />
currently selected ship will be shown on the right side. The maximum number of targets<br />
that can be shown in the list is controlled by the Max. Targets in List parameter, <strong>as</strong> set in<br />
the <strong>AIS</strong> Display view described on page 53.<br />
By pressing the Show Sector / Show All Targets function key the list will show either<br />
the targets within a bearing interval, or all targets. Starting sector is in own ship heading<br />
direction if heading is available, or else in own ship COG direction. Each bearing sector<br />
covers 30°.<br />
To get detailed information about a target, to send an SRM to a specific target or to send<br />
a text message to a specific target, enter subview Extended Info, Send SRM or Send Text<br />
Message.<br />
Get extended information about a selected target<br />
1. Select the target using ∧ ∨.<br />
2. Press function key Extended Info or ENTER.<br />
3. The Extended Info view is shown, described on page 29.<br />
Send an SRM to a selected target<br />
1. Select the target using ∧ ∨.<br />
2. Press function key Send SRM.<br />
3. To send SRMs, refer to “Send SRM” on page 40.<br />
Send a text message to a selected target<br />
1. Select the target using ∧ ∨.<br />
2. Press function key Send Text Message.<br />
3. To send text messages, refer to “Send Text Message” on page 42.<br />
Show only targets within a sector (when showing all targets)<br />
1. Press function key Show Sector.<br />
28
Show all targets (when showing only targets within sector)<br />
1. Press function key Show All.<br />
Navigate Mode - Target List<br />
Changing displayed sectors (when showing only targets within sector)<br />
1. Use the function keys -15° ← and +15° → to step through the sectors counterclockwise<br />
or clockwise. Starting sector is in own ship heading direction if heading<br />
is available, or else in own ship COG direction.<br />
Extended Info<br />
The Extended Info subview is used to show extended information for a specific target. The<br />
upper part of the view always show central information of the selected target including<br />
call sign, MMSI and bearing and range to target. The lower part of the view can be toggled<br />
showing three different sets of information. When first entered, the following view is<br />
shown.<br />
Pressing function key Show Next once displays the following fields.<br />
29<br />
Reference
Navigate Mode - Plot<br />
Pressing function key Show Next again shows the following fields.<br />
As long <strong>as</strong> all messages from the specific target not yet have been received, it is possible<br />
to perform a manual interrogation for the missing information with function key Query.<br />
This function key will only be available until all static and voyage related data have been<br />
received from the target.<br />
It is also possible to enable a manual request for number of persons on board from a specific<br />
target. In this c<strong>as</strong>e, a function key Persons On Board will be available and a datafield<br />
added on the second page of the Extended Info view. This function is enabled by<br />
the Persons On Board Query parameter in the <strong>AIS</strong> Display view <strong>as</strong> described on page 53.<br />
For a <strong>Cl<strong>as</strong>s</strong> B target the Extended Info subview will look somewhat different due to the<br />
smaller amount of data transmitted from <strong>Cl<strong>as</strong>s</strong> B transponders. The following parameters<br />
will not be available:<br />
- Nav Status<br />
- Destination<br />
- ETA<br />
- Draught<br />
- IMO number<br />
- Persons on Board<br />
A ‘display’ parameter will indicate whether the <strong>Cl<strong>as</strong>s</strong> B transponder is capable to process<br />
and display <strong>AIS</strong> safety related messages (SRM:s). Only two Extended Info pages are required<br />
to display all data for a <strong>Cl<strong>as</strong>s</strong> B target.<br />
Plot<br />
The Plot view displays the targets closest to your ship and brief information (MMSI,<br />
range, bearing, heading and SOG) about the currently selected target. To get detailed<br />
information about a target, to send an SRM to a specific target or send a text message to<br />
a selected target, enter subview Extended Info, Send SRM or Send Text Message.<br />
30
Navigate Mode - Plot<br />
The maximum amount of targets shown in the plot is controlled by the Max Targets in<br />
Plot parameter configured in the <strong>AIS</strong> Display view described on page 53.<br />
The own ship is displayed <strong>as</strong> a filled (black) target icon in the plot view. <strong>Cl<strong>as</strong>s</strong> B targets<br />
have a ‘B’ appended to the target symbol (not shown in the figure above).<br />
Show more details in the plot<br />
1. Press function key Zoom In.<br />
Show less details in the plot<br />
1. Press function key Zoom Out.<br />
Select a target<br />
1. Choose a target using ∧ ∨ < >. The diagonal directions of the arrow keypad can<br />
also be used.<br />
Get extended information about the selected target<br />
1. Press ENTER or function key Extended Info.<br />
2. The Extended Info view is shown, described in page 29.<br />
Send a SRM to the selected target<br />
1. Press function key Send SRM.<br />
2. This brings forth the Send SRM view, described in more detail on page 40.<br />
Send a text message to the selected target<br />
1. Press function key Send Text Message.<br />
2. This brings forth the Send Text Message view, described in more detail on<br />
page 42.<br />
31<br />
Reference
Navigate Mode - Own Ship Data<br />
Own Ship Data<br />
The Own Ship Data view shows your ships own data, which is transmitted to other vessels.<br />
The upper part of the view always displays the most central information being<br />
MMSI, call sign and position. The lower part of the view consists of three different pages<br />
which can be toggled by pressing the function key Show Next one or more times. See<br />
illustrations below.<br />
32
Plan Voyage Mode<br />
Plan Voyage Mode - Overview<br />
The Plan Voyage mode contains the <strong>AIS</strong> Voyage view used for planning the <strong>AIS</strong> part of a<br />
voyage. The view is used to enter information such <strong>as</strong> cargo, destination and ETA for the<br />
current voyage. To get to the Plan Voyage views, press MODE followed by function key<br />
PLAN VOYAGE.<br />
Overview<br />
The mode only contains one view, the <strong>AIS</strong> Voyage view.<br />
Below is a graphical overview of the Plan Voyage mode.<br />
The view is further described below.<br />
33<br />
Reference
Plan Voyage Mode - <strong>AIS</strong> Voyage<br />
<strong>AIS</strong> Voyage<br />
The <strong>AIS</strong> Voyage Settings view is used to view and edit voyage related data such <strong>as</strong> navigational<br />
status, estimated time of arrival (ETA), draught, number of people aboard, destination<br />
and cargo. These settings are used when transmitting information about the current<br />
voyage to remote ships. The Cargo parameter is only present when ship type is one of<br />
Wig, High-Speed Craft, P<strong>as</strong>senger Ship, Cargo Ship, Tanker or Ship Type Other. The ship<br />
type is set in the Ship Static Configuration view described on page 50.<br />
Change settings<br />
1. Select parameter to change using ∧ ∨ and press ENTER.<br />
2. Enter the desired value using the alphanumeric keypad or if it is a drop down<br />
list, select a value using ∧ ∨. Use function key Backspace to er<strong>as</strong>e data where<br />
applicable. Press ENTER when done.<br />
3. Repeat step 2 and 3 for each setting to change.<br />
4. Press function key Apply when done.<br />
Reg. app. flag is intended for use in regional applications only and should be set to zero<br />
(0) in other applications. Definitions of values 1 to 15 shall be provided by a competent<br />
regional authority if used.<br />
A special function called “1 W mode” is made available when ship type is defined <strong>as</strong> a<br />
tanker (in the Ship Static Configuration view described on page 50) and navigational status<br />
is “Moored”. This mode is automatically disabled whenever any of these conditions<br />
no longer applies and also at speeds exceeding 3 knots. While enabled, ‘1W mode’ operation<br />
can be manually controlled by a setting the <strong>AIS</strong> Voyage Settings view and also by a<br />
function key in the Navigational Status view. A ‘1 W’ icon is displayed in the Status Bar<br />
while this mode is active. For further information about the “1 W mode” see International<br />
Safety Guide for Oil Tankers & Terminals (ISGOTT).<br />
34
Alarms & Msgs Mode<br />
Alarms & Msgs Mode - Overview<br />
The Alarms & Msgs mode is used to view the status of the <strong>R4</strong> <strong>AIS</strong> <strong>Cl<strong>as</strong>s</strong> A <strong>Transponder</strong><br />
System. It contains views and functions for current and p<strong>as</strong>t alarms, current status of indications<br />
and events, safety related messages (SRMs), text messages and long range (LR)<br />
interrogations.<br />
To reach Alarms & Msgs mode, press MODE followed by function key ALARMS &<br />
MSGS.<br />
Overview<br />
The top level functions keys of the mode are illustrated below.<br />
• Alarm List indicates active alarms in the system. It also contains logs of p<strong>as</strong>t and<br />
present alarms.<br />
• Status List provide current status of indications and the latest events.<br />
• <strong>AIS</strong> Messages supports transmissions of safety related messages (SRMs) and<br />
text messages.<br />
• Long Range lists received long range (LR) interrogations and transmitted<br />
replies. It also supports manual replies to unacknowledged interrogations.<br />
35<br />
Reference
Alarms & Msgs Mode - Overview<br />
Below is a graphical overview of the different views present in Alarms & Msgs mode.<br />
36
Alarm List<br />
Alarms & Msgs Mode - Alarm List<br />
The Alarm List view lists current status of all alarms. Active alarms are presented in the<br />
top of the list and are marked with an exclamation mark (!). The view contains the Alarm<br />
Log subview which shows the log of all alarms that h<strong>as</strong> been activated in the system. In<br />
addition, it is possible to toggle between showing the enabled or the disabled alarms, by<br />
in each view pressing the function key Show Disabled. All alarms are described in section<br />
“Alarm Messages” on page 65 in the Appendix.<br />
The Alarm List view is illustrated below.<br />
View the log of all alarms<br />
1. Press function key Alarm Log.<br />
2. The following view is displayed. The view contains an entry for each time an<br />
alarm h<strong>as</strong> been active, and shows the time of activation and deactivation (if the<br />
alarm h<strong>as</strong> been deactivated).<br />
3. Press function key ESC to return to the main view.<br />
Clear the alarm log<br />
1. Press function key Alarm Log. The above view is displayed.<br />
2. Press function key Clear Log. The entire alarm history will be er<strong>as</strong>ed.<br />
37<br />
Reference
Alarms & Msgs Mode - Status List<br />
Status List<br />
The Status List view lists current status of indications and the latest events. The different<br />
status indications are listed in section “Indication Messages” on page 67 in the Appendix.<br />
<strong>AIS</strong> Messages<br />
The system supports transmission of safety related messages (SRMs) <strong>as</strong> well <strong>as</strong> text messages<br />
for undefined purposes over the <strong>AIS</strong> data link. Messages can be broadc<strong>as</strong>t to all targets<br />
within range or adressed to a particular <strong>AIS</strong> target. Maximum length of each message<br />
is 156 characters for an addressed SRM and 161 characters for a broadc<strong>as</strong>t SRM. For text<br />
messages, the maximum lengths are 151 and 156 characters respectively. An <strong>AIS</strong> Message<br />
Icon will be displayed in the status bar whenever a new SRM or text message h<strong>as</strong><br />
been received.<br />
Note that <strong>Cl<strong>as</strong>s</strong> B transponders are allowed to, but not required to, process SRMs and<br />
boadc<strong>as</strong>t text messages. Thus it can not be expected that a message sent to a <strong>Cl<strong>as</strong>s</strong> B target<br />
will be received. Adressed text messages are not processed by <strong>Cl<strong>as</strong>s</strong> B transponders<br />
When sending an adressed message, a warning will be displayed if no acknowledge is received<br />
from the adressee. For text messages, it may be configured whether a warning also<br />
shall be provided if the message not h<strong>as</strong> been interpreted by the receiving equipment. Refer<br />
to “<strong>AIS</strong> Display” on page 53.<br />
38
Alarms & Msgs Mode - <strong>AIS</strong> Messages<br />
The <strong>AIS</strong> Messages view contains the subviews Received Messages, Sent Messages, Send<br />
SRM and Send Text Message.<br />
Received Messages<br />
The Received Messages view allows the user to read, delete, reply or forward a received<br />
SRM or text message.<br />
Read a received SRM or text message<br />
1. Select message from the list using ∧ ∨.<br />
2. If necessary press function key Read to see the entire message.<br />
Reply to a received SRM or text message<br />
1. Select message from the list using ∧ ∨.<br />
2. Press function key Reply.<br />
3. Continue <strong>as</strong> described under “Send SRM” on page 40 or “Send Text Message”<br />
on page 42.<br />
Forward a received SRM or text message<br />
1. Select message from the list with ∧ ∨.<br />
2. Press function key Forward.<br />
3. Continue <strong>as</strong> described under “Send SRM” on page 40 or “Send Text Message”<br />
on page 42.<br />
39<br />
Reference
Alarms & Msgs Mode - <strong>AIS</strong> Messages<br />
Delete a received SRM or text message<br />
1. Select message from the list using ∧ ∨.<br />
2. Press function key Delete<br />
Delete all received SRMs and text messages<br />
1. Press function key Delete All Messages<br />
2. Acknowledge the displayed request for confirmation.<br />
Sent Messages<br />
Sent SRMs and text messages are stored and can be retrieved in the Sent Messages view.<br />
A sent message can also be used <strong>as</strong> source for a new message by selecting the desired message<br />
followed by the function key Forward. The selected sent messages text field is then<br />
copied into the new messages text field.<br />
Send an SRM or text message b<strong>as</strong>ed on a previously sent message<br />
1. Select message from the list using ∧ ∨.<br />
2. Press function key Forward.<br />
3. Continue <strong>as</strong> described under “Send SRM” on page 40. or “Send Text Message”<br />
on page 42.<br />
Delete a sent SRM or text message<br />
1. Select message from the list using ∧ ∨.<br />
2. Press function key Delete.<br />
Delete all sent SRMs and text messages<br />
1. Press function key Delete All Messages<br />
2. Acknowledge the displayed request for confirmation.<br />
Send SRM<br />
The Send SRM view allows the user to create and send an addressed or broadc<strong>as</strong>t SRM.<br />
The message text can be taken from a predefined list or entered manually. A manually<br />
entered text can be stored in the list of predefined SRM texts <strong>as</strong> a user predefined SRM.<br />
40
Alarms & Msgs Mode - <strong>AIS</strong> Messages<br />
A user predefined SRM can also be removed from the list. The factory predefined messages<br />
cannot be removed.<br />
Send a SRM with manually entered text<br />
1. Enter message text using the alphanumeric keypad and press ENTER. Use the<br />
Backspace function key to er<strong>as</strong>e characters.<br />
2. Select the Addressed/Broadc<strong>as</strong>t field and press ENTER.<br />
3. Use ∧ ∨ to choose Addressed if you want to send the SRM to a specific target,<br />
and Broadc<strong>as</strong>t if you want to send the SRM to all targets. Press ENTER when<br />
done.<br />
4. If Addressed is selected: Press > to select the To: field and then press ENTER.<br />
Type in the target address and press ENTER again. If you are sending a SRM<br />
from the Target List or Plot view, the target address is already filled in.<br />
5. Select the Channel field and press ENTER.<br />
6. Select between AUTO, A, B or A+B with ∧ ∨ and press ENTER.<br />
7. Send the SRM by pressing function key Send.<br />
Save <strong>as</strong> predefined SRM<br />
1. Enter message text and select addressed/broadc<strong>as</strong>t and channel, <strong>as</strong> described in<br />
the previous section.<br />
2. Press the function key Save <strong>as</strong> Predefined.<br />
41<br />
Reference
Alarms & Msgs Mode - <strong>AIS</strong> Messages<br />
Send a predefined SRM<br />
1. Press function key Choose Predefined. The below view is shown.<br />
42<br />
2. Choose SRM text with ∧ ∨.<br />
3. Press the function key Select or ENTER.<br />
4. The message field is now entered and the mesage can be sent <strong>as</strong> described for<br />
SRM with manually entered text above.<br />
Delete a user predefined SRM<br />
1. Press function key Choose Predefined.<br />
2. Choose the user predefined SRM using ∧ ∨.<br />
3. Press the function key Delete.<br />
Send Text Message<br />
The Send Text Message view allows the user to create and send an addressed or broadc<strong>as</strong>t<br />
text message.<br />
Send a text message with manually entered text<br />
1. Enter message text using the alphanumeric keypad and press ENTER. Use the<br />
Backspace function key to er<strong>as</strong>e characters.<br />
2. Select the Addressed/Broadc<strong>as</strong>t field and press ENTER.<br />
3. Use ∧ ∨ to choose Addressed if you want to send the message to a specific target,<br />
and Broadc<strong>as</strong>t if you want to send to all targets. Press ENTER when done.
Alarms & Msgs Mode - Long Range Messages<br />
4. If Addressed is selected: Press > to select the To: field and then press ENTER.<br />
Type in the target address and press ENTER again. If you are sending a message<br />
from the Target List or Plot view, the target address is already filled in.<br />
5. Select the Channel field and press ENTER.<br />
6. Select between AUTO, A, B or A+B with ∧ ∨ and press ENTER.<br />
7. Send the message by pressing function key Send.<br />
Long Range Messages<br />
Received long range (LR) interrogations and transmitted replies are displayed in the Long<br />
Range view. The user can delete LRs and manually send replies to LRs that have not been<br />
acknowledged. Below is a list of definitions for information that can be requested via long<br />
range.<br />
A = Ship’s name, call sign, and IMO number<br />
B = Date and time of message composition<br />
C = Position<br />
E = Course over ground (COG)<br />
F = Speed over ground (SOG)<br />
I = Destination and Estimated Time of Arrival (ETA)<br />
O = Draught<br />
P = Ship/Cargo<br />
U = Ship’s length, breadth, type<br />
W = Persons on board<br />
Note that the reply mode for the <strong>R4</strong> can be set up to automatically acknowledge, or to let<br />
the user manually acknowledge any LR interrogation. To change the LR reply mode, refer<br />
to the description of the Long Range Configuration view on page 54.<br />
Reply to a LR interrogation (only when current LR reply mode is set to manual)<br />
1. Select LR message using ∧ ∨.<br />
2. Press function key Send Reply.<br />
Refuse to reply to a LR interrogation (only when current LR reply mode is set to<br />
manual)<br />
1. Select LR message using ∧ ∨.<br />
2. Press function key Refuse Reply.<br />
43<br />
Reference
Alarms & Msgs Mode - Long Range Messages<br />
Delete a LR interrogation/message<br />
1. Select LR message using ∧ ∨.<br />
2. Press function key Delete.<br />
44
Config Mode<br />
Config Mode - Overview<br />
The Config mode is used to configure the <strong>R4</strong> <strong>AIS</strong> <strong>Cl<strong>as</strong>s</strong> A <strong>Transponder</strong> System. To get to<br />
the Config views, press MODE followed by function key CONFIG.<br />
Overview<br />
Use the PAGE key to toggle between the two pages of top level function keys.<br />
The main views of Config mode are introduced below.<br />
First Page<br />
Second Page<br />
• Time allows the user to define a local time offset from UTC and choose if times<br />
displayed shall be in local or UTC time frames.<br />
• Display Config allows the user to configure settings for the <strong>R4</strong> Display, both<br />
visual and sound settings.<br />
• <strong>AIS</strong> Config allows the user to configure <strong>AIS</strong> functionality.<br />
• Alarm Config allows the user to configure which alarms that should be used and<br />
if they should trigger the external alarm signal.<br />
• Units Config allows the user to configure the used units.<br />
• Port Rate Config allows the user to configure port communication rates.<br />
• System Info allows the user to view current system information including software<br />
and hardware versions <strong>as</strong> well <strong>as</strong> memory usage.<br />
• Restore Sys.Conf. allows the user to restore the whole or parts of the system.<br />
45<br />
Reference
Config Mode - Overview<br />
Below is a graphical overview of the different views present in the mode.<br />
The views are further described below.<br />
46
Time Config<br />
Config Mode - Time Config<br />
The Time Configuration view is used to define a local time offset from UTC and to select<br />
whether times displayed shall be in local or UTC timeframes. The Time Configuration<br />
view is illustrated below.<br />
Change local time offset<br />
1. Edit the +/- field if required by selecting it using < > and press ENTER. Use ∧ ∨<br />
to set the desired sign and press ENTER again.<br />
2. Edit the hours field if required by selecting it using < > and press ENTER. Use<br />
the numeric keyboard together with function key Backspace to enter the<br />
desired value. Press ENTER when done.<br />
3. Repeat the procedure to edit the minutes field if required.<br />
Select timeframe for display<br />
1. Press function key Use UTC to display all times in UTC. Press function key<br />
Use Local to display all times with the current local offset from UTC. This will<br />
be indicated by ‘LOC’displayed after the time values instead of ‘UTC’.<br />
Note: Times output on the serial interface will always be in UTC regardless of the time<br />
setting for display.<br />
47<br />
Reference
Config Mode - Display Config<br />
Display Config<br />
The Display Configuration view contains two subviews, the Visual Configuration and<br />
Sound Configuration views. The former is used to configure display illumination settings<br />
and the latter the sounds played at different events.<br />
Visual Config<br />
The Visual Configuration view allows the user to adjust display back light, contr<strong>as</strong>t, LED<br />
intensity and button illumination. Two separate settings are provided, for day and for<br />
night operation.<br />
Change display setting<br />
1. Select Day Settings or Night Settings with < >.<br />
2. Select the setting you want to change using ∧ ∨ and press ENTER.<br />
3. Modify the setting with < > and press ENTER. Repeat step 1 to 3 if necessary.<br />
4. Press function key Apply and Exit.<br />
Note: As described in section “Visual Settings” on page 19, it is also possible to change<br />
visual settings by pressing the DISPLAY key.<br />
48
Config Mode - <strong>AIS</strong> Config<br />
Sound Config<br />
The Sound Configuration view allows the user to <strong>as</strong>sociate an event with a specific sound.<br />
The settings can be restored to their default values.<br />
Change settings<br />
1. Select the setting you want to change using ∧ ∨ and press ENTER.<br />
2. Select the desired value in the drop-down list using ∧ ∨, and press ENTER.<br />
3. Press function key Apply and Exit.<br />
Restore a parameter to factory default setting<br />
1. Use ∧ ∨ to select the parameter to return to the factory default setting.<br />
2. Press function key Get Default.<br />
3. Press function key Apply and Exit to save the changes.<br />
<strong>AIS</strong> Config<br />
The <strong>AIS</strong> Configuration view contains subviews for configuration of <strong>AIS</strong> parameters. The<br />
view contains two pages of function keys, <strong>as</strong> illustrated below. To show the second page,<br />
press the PAGE key.<br />
First Page<br />
49<br />
Reference
Config Mode - <strong>AIS</strong> Config<br />
Ship Static<br />
The Ship Static Configuration view is used to configure the static information for the current<br />
ship, including MMSI, IMO number, ship name, callsign, height over keel and ship<br />
type.<br />
Change setting<br />
1. Select the parameter to edit using ∧ ∨ and press ENTER.<br />
2. If the parameter is selected using a drop-down box, use ∧ ∨ to select the desired<br />
option in the drop-down box.<br />
If the parameter is a numeric or text value, use the alphanumeric keypad to enter<br />
the desired value. Use the Backspace function key to er<strong>as</strong>e entered values.<br />
3. Press ENTER when the correct parameter value h<strong>as</strong> been entered.<br />
4. Press function key Apply and Exit.<br />
5. Enter the user p<strong>as</strong>sword using the alphanumeric keypad. Use Capslock to<br />
change between upper- and lowerc<strong>as</strong>e letters. Press ENTER when done.<br />
Restore a parameter to factory default setting<br />
1. Use ∧ ∨ to select the parameter to return to the factory default setting.<br />
2. Press function key Get Default.<br />
3. Press function key Apply and Exit to save the changes.<br />
4. Enter the user p<strong>as</strong>sword using the alphanumeric keypad. Use Capslock to<br />
change between upper- and lowerc<strong>as</strong>e letters. Press ENTER when done.<br />
Restore all parameters to factory default<br />
1. Press function key Restore Defaults.<br />
2. Press function key Apply and Exit to save the changes.<br />
3. Enter the user p<strong>as</strong>sword using the alphanumeric keypad. Use Capslock to<br />
change between upper- and lowerc<strong>as</strong>e letters. Press ENTER when done.<br />
50<br />
Second Page
Config Mode - <strong>AIS</strong> Config<br />
GNSS Antenn<strong>as</strong><br />
The GNSS antenn<strong>as</strong> position view allows the user to configure antenna positions.<br />
Change GNSS position<br />
1. Select the GNSS to change position for, by pressing either the function key<br />
Internal GNSS or External GNSS.<br />
2. Select the field to edit using ∧ ∨ and press ENTER.<br />
3. Use the alphanumeric keypad to enter the desired value. Use the Backspace<br />
function key to er<strong>as</strong>e digits.<br />
4. Press ENTER when the correct value h<strong>as</strong> been entered.<br />
5. Repeat step 2 - 4 to change more fields. Press function key Apply and Exit<br />
when done.<br />
6. Enter the user p<strong>as</strong>sword using the alphanumeric keypad. Use Capslock to<br />
change between upper- and lowerc<strong>as</strong>e letters. Press ENTER when done.<br />
Restore all antenn<strong>as</strong> to factory default settings<br />
1. Press function key Restore Defaults.<br />
2. Press function key Apply and Exit to save the changes.<br />
3. Enter the user p<strong>as</strong>sword using the alphanumeric keypad. Use Capslock to<br />
change between upper- and lowerc<strong>as</strong>e letters. Press ENTER when done.<br />
Note:<br />
Dimension<br />
Distance (m)<br />
0 - 511;<br />
A<br />
511 = 511 m or greater<br />
0 - 511;<br />
B<br />
511 = 511 m or greater<br />
0 - 63;<br />
C<br />
63 = 63 m or greater<br />
D<br />
0 - 63;<br />
63 = 63 m or greater<br />
The dimension A should be in the direction of the transmitted heading information (bow).<br />
Reference point of reported position not available, but dimensions of ship are available:<br />
A = C = 0 and B ≠ 0 and D ≠ 0.<br />
Neither reference point of reported position nor dimensions of ship available:<br />
A = B = C = D = 0 (= default)<br />
51<br />
Reference
Config Mode - <strong>AIS</strong> Config<br />
VHF Radio Config<br />
The VHF Radio Configuration view allows an administrator to configure the systems radio<br />
parameters.<br />
Change setting<br />
1. Select the parameter to edit using ∧ ∨ and press ENTER.<br />
2. If the parameter is selected using a drop-down box, use ∧ ∨ to select the desired<br />
option in the drop-down box.<br />
If the parameter is a numeric value, use the alphanumeric keypad to enter the<br />
desired value. Use the Backspace function key to er<strong>as</strong>e entered digits.<br />
3. Press ENTER when the correct parameter value h<strong>as</strong> been entered.<br />
4. Press function key Apply and Exit.<br />
5. Enter the administrator p<strong>as</strong>sword using the alphanumeric keypad. Use<br />
Capslock to change between upper- and lowerc<strong>as</strong>e letters. Press ENTER when<br />
done.<br />
Restore a parameter to factory default setting<br />
1. Use ∧ ∨ to select the parameter to return to the factory default setting.<br />
2. Press function key Get Default.<br />
3. Press function key Apply and Exit to save the changes.<br />
4. Enter the administrator p<strong>as</strong>sword using the alphanumeric keypad. Use<br />
Capslock to change between upper- and lowerc<strong>as</strong>e letters. Press ENTER when<br />
done.<br />
Restore all parameters to factory default<br />
1. Press function key Restore Defaults.<br />
2. Press function key Apply and Exit to save the changes.<br />
3. Enter the administrator p<strong>as</strong>sword using the alphanumeric keypad. Use<br />
Capslock to change between upper- and lowerc<strong>as</strong>e letters. Press ENTER when<br />
done.<br />
52
Config Mode - <strong>AIS</strong> Config<br />
<strong>AIS</strong> Display<br />
The <strong>AIS</strong> Presentation Configuration view allows the user to set a number of <strong>AIS</strong> display<br />
related parameters.<br />
The Max Targets In Plot and Max Targets In List parameters define the maximum number<br />
of targets displayed in the Plot and Target List views respectively.<br />
The Persons On Board Query parameter enables or disables functionality for manual interrogation<br />
of number of persons on board from the Extended Information view.<br />
The Require Text Message Ack parameter is related to transmission of adressed text messages.<br />
If this parameter is set to “Yes”, a warning will be displayed if the message not w<strong>as</strong><br />
received and interpreted by the addressee. If set to “No”, no warning will be displayed if<br />
the message w<strong>as</strong> received, regardless of whether it w<strong>as</strong> interpreted by the receiving equipment<br />
or not.<br />
Change setting<br />
1. Select the parameter to edit using ∧ ∨ and press ENTER.<br />
2. Use the alphanumeric keypad to enter the desired value. Use the Backspace<br />
function key to er<strong>as</strong>e entered digits. Press ENTER when done.<br />
3. Press function key Apply and Exit.<br />
Restore a setting to factory default setting<br />
1. Use ∧ ∨ to select the parameter to return to the factory default setting.<br />
2. Press function key Get Default.<br />
3. Press function key Apply and Exit to save the changes.<br />
Tran. P<strong>as</strong>sword<br />
WARNING! It is strongly recommended that p<strong>as</strong>swords are never changed.<br />
The <strong>Transponder</strong> P<strong>as</strong>sword view allows the operator to change the user and administrator<br />
transponder p<strong>as</strong>sword. The user p<strong>as</strong>sword is used to confirm changes made to the installation<br />
of the <strong>R4</strong> <strong>Transponder</strong>, while the administrator p<strong>as</strong>sword is used to confirm extra<br />
sensitive changes such <strong>as</strong> a complete system restore and changing VHF radio parameters.<br />
The administrator p<strong>as</strong>sword can also be used to set a new user p<strong>as</strong>sword.<br />
53<br />
Reference
Config Mode - <strong>AIS</strong> Config<br />
Change a transponder p<strong>as</strong>sword<br />
1. Select the p<strong>as</strong>sword to edit using ∧ ∨.<br />
2. Press ENTER and type the new p<strong>as</strong>sword (4-8 characters) using the alphanumeric<br />
keypad. Use function key Capslock to change between upper- and<br />
lowerc<strong>as</strong>e letters. Use function key Backspace to er<strong>as</strong>e characters.<br />
3. Press ENTER when done.<br />
4. Enter the p<strong>as</strong>sword again to confirm it. Press ENTER when done.<br />
5. Press function key Apply and Exit to store the new p<strong>as</strong>sword.<br />
6. If having only changed the user p<strong>as</strong>sword, a dialog will appear. Answer Yes to<br />
confirm the new p<strong>as</strong>sword using the administrator p<strong>as</strong>sword. Answer No to confirm<br />
it using the user p<strong>as</strong>sword.<br />
7. Enter the existing p<strong>as</strong>sword of the required type to confirm the change of<br />
p<strong>as</strong>sword. Press ENTER when done.<br />
Note: Store the new p<strong>as</strong>sword in a safe place. Do not forget it!<br />
Long Range<br />
The Long Range Configuration view allows the user to configure long range interrogation<br />
parameters.<br />
Manual Reply<br />
The parameter specifies if manual or automatic long range reply should be used. When<br />
on, each response to received long range interrogations need to be manually confirmed or<br />
conformed by an external application. When set to off, replies are automatically sent for<br />
allowed interrogations.<br />
Interrogations<br />
Each interrogation parameter specifies if responses should be sent to interrogation requests<br />
of that type. No response will be sent to interrogation types which are Disallowed,<br />
regardless if manual reply mode is turned off or on.<br />
54
Config Mode - <strong>AIS</strong> Config<br />
Change setting<br />
1. Use ∧ ∨ to select the parameter to modify and press ENTER.<br />
2. Select the desired value in the drop-down list using ∧ ∨, and press ENTER.<br />
3. Press function key Apply and Exit to save the changes.<br />
Restore a parameter to factory default<br />
1. Use ∧ ∨ to select the parameter to return to the factory default setting.<br />
2. Press function key Get Default.<br />
3. Press function key Apply and Exit to save the changes.<br />
Restore all parameters to factory defaults<br />
1. Press function key Restore.<br />
2. Answer yes to the confirmation dialog by pressing OK.<br />
Regional Are<strong>as</strong><br />
The Regional Are<strong>as</strong> view allows the user to list, add and edit regional are<strong>as</strong> definitions.<br />
55<br />
Reference
Config Mode - <strong>AIS</strong> Config<br />
Create a new Regional Area<br />
1. Press function key New Area. The below view is shown.<br />
56<br />
2. Press function key Edit Area to enter information for the new area.<br />
3. Use ∧ ∨ < > to select the parameter to be entered and press ENTER.<br />
4. Enter the value using the keypad, or if it is a drop down list, select a value using<br />
∧ ∨ and press ENTER. To check the Tx and Rx check boxes, press ENTER<br />
when having the correct check box selected.<br />
5. Repeat steps 3 and 4 for each parameter to enter.<br />
6. Press function key Apply when done.<br />
7. Press OK to confirm the entry of the area.<br />
8. Press ESC to return to the Regional Are<strong>as</strong> view.<br />
Edit a Regional Area<br />
1. Select the Regional Area to edit using ∧ ∨.<br />
2. Press function key Display Area.<br />
3. Press function key Edit Area. The below view is shown.<br />
4. Use ∧ ∨ < > to select the parameter to be edited and press ENTER.<br />
5. Enter the new value using the keypad, or if it is a drop down list, select a value<br />
using ∧ ∨ and press ENTER. To check the Tx and Rx check boxes, press<br />
ENTER when having the correct check box selected.<br />
6. Repeat steps 4 and 5 for each parameter to edit.<br />
7. Press function key Apply when done.<br />
8. Press OK to confirm the entry of the area.
9. Press ESC to return to the Regional Are<strong>as</strong> view.<br />
Alarm Config<br />
Config Mode - Alarm Config<br />
The Alarm Configuration view is used to configure the action the system should perform<br />
when a specific alarm is raised. The possible settings for each alarm is:<br />
• Disabled. The alarm will not be indicated when active.<br />
• Popup. An alarm pop-up will be displayed when the alarm becomes active. See<br />
section “Alarm and Alert Pop-ups” on page 24.<br />
• External. The <strong>AIS</strong> Alarm Relay will be activated when the alarm is active.<br />
• Popup & External. The alarm will result in both an alarm pop-up dialogue and<br />
the <strong>AIS</strong> Alarm Relay being activated.<br />
It is possible to disable alarms that are of no interest for the operator by setting them to<br />
Disabled.<br />
The view shows abbreviations for some alarms with long alarm names. The different<br />
alarms and their abbreviations (if any) are described in the Appendix on page 65.<br />
Change setting<br />
1. Use ∧ ∨ to select the parameter to modify and press ENTER.<br />
2. Select the desired value in the drop-down list using ∧ ∨, and press ENTER.<br />
3. Press function key Apply and Exit to save the changes.<br />
Restore factory default setting<br />
1. Use ∧ ∨ to select the parameter to return to the factory default setting.<br />
2. Press function key Get Default.<br />
3. Press function key Apply and Exit to save the changes.<br />
Units Config<br />
The Units Configuration view is used to configure the used units of me<strong>as</strong>urements in the<br />
system. The configurable types of units are described below.<br />
Range Unit<br />
The unit used when displaying range values. Can be set to one of Nautical Mile, Kilometers<br />
and Statute Mile.<br />
57<br />
Reference
Config Mode - Units Config<br />
Speed Unit<br />
The unit used when displaying speed values. Can be set to one of Knots, kilometers per<br />
hour (km/h) and miles per hour (mph).<br />
Change setting<br />
1. Use ∧ ∨ to select the parameter to modify and press ENTER.<br />
2. Select the desired value in the drop-down list using ∧ ∨, and press ENTER.<br />
3. Press function key Apply and Exit to save the changes.<br />
Restore factory default setting<br />
1. Use ∧ ∨ to select the parameter to return to the factory default setting.<br />
2. Press function key Get Default.<br />
3. Press function key Apply and Exit to save the changes.<br />
58
Port Rate Config<br />
Port Rate Config - Units Config<br />
The Port Rate Configuration view allows the user to configure the communication rate<br />
used for the serial ports in the <strong>R4</strong> <strong>AIS</strong> <strong>Cl<strong>as</strong>s</strong> A <strong>Transponder</strong> System. The view also makes<br />
it possible to view the data that is received on the different serial ports.<br />
The communication rate for the ports are locked if no response is received from the <strong>R4</strong><br />
<strong>Transponder</strong>.<br />
Change communication rate<br />
1. Select port to change communication rate (baud rate) for using ∧ ∨ and press<br />
ENTER.<br />
2. Use ∧ ∨ to select the desired communication rate in the drop-down box and<br />
press ENTER.<br />
3. Press function key Apply and Exit.<br />
Restore factory default setting<br />
1. Use ∧ ∨ to select the port to return to the factory default setting.<br />
2. Press function key Get Default.<br />
3. Press function key Apply and Exit to save the changes.<br />
Disable checksum verification for a specific input port<br />
1. Use ∧ ∨ to select the port to disable checksum verification for.<br />
2. Press function key Toggle Checksum.<br />
3. Press function key Apply and Exit to save the changes.<br />
4. Enter the user p<strong>as</strong>sword using the alphanumeric keypad. Use Capslock to<br />
change between upper- and lowerc<strong>as</strong>e letters. Press ENTER when done.<br />
59<br />
Reference
Port Rate Config - Units Config<br />
View received data<br />
1. Select serial port to view received data on using ∧ ∨.<br />
2. Press function key View Raw Data. The following view is displayed.<br />
60<br />
3. Use function key Freeze to stop the update of raw data on the screen. Use<br />
Resume function key to view more data.<br />
4. Press ESC when done.
System Info<br />
Port Rate Config - System Info<br />
The System Information view provides subviews for general system information. It contains<br />
subviews for: viewing software and hardware versions, displaying the results of the<br />
<strong>R4</strong> Display’s l<strong>as</strong>t performed built-in integrity tests, showing the <strong>R4</strong> <strong>Transponder</strong> nonfunctioning<br />
times and for viewing the current memory usage of the <strong>R4</strong> Display.<br />
View software and hardware versions<br />
1. Press the function key SW/HW Versions.<br />
2. The below view is displayed.<br />
The view shows the software versions of the different components present in the <strong>R4</strong> Display<br />
and <strong>R4</strong> <strong>Transponder</strong>, and the display’s hardware revision.<br />
View the result of the <strong>R4</strong> Display’s l<strong>as</strong>t performed built-in integrity tests<br />
1. Press function key Display BIIT Info.<br />
2. A view displaying the built in test result is shown, <strong>as</strong> illustrated below.<br />
61<br />
Reference
Port Rate Config - System Info<br />
Show <strong>R4</strong> <strong>Transponder</strong> non-functioning time<br />
1. Press function key Transp. NFTR.<br />
2. The <strong>Transponder</strong> NFTR view is shown, <strong>as</strong> illustrated below.<br />
62<br />
The view displays information about times where the <strong>R4</strong> <strong>Transponder</strong> h<strong>as</strong> been<br />
turned off or in silent mode for more than 15 minutes.<br />
View current memory usage of the <strong>R4</strong> Display<br />
1. Press function key Memory Usage.<br />
2. The Memory Usage view is shown, <strong>as</strong> illustrated below.<br />
The memory usage is displayed for individual parameters <strong>as</strong> shown in the view.
Restore Sys. Conf.<br />
Port Rate Config - Restore Sys. Conf.<br />
The Restore System Configuration view allows the user to restore the default settings for<br />
either the <strong>R4</strong> Display or the <strong>R4</strong> <strong>Transponder</strong>.<br />
Restore display configuration<br />
1. Press function key Restore Display.<br />
2. Answer Yes to the confirmation message if confident in restoring all configuration<br />
parameters of the <strong>R4</strong> Display.<br />
Restore transponder configuration<br />
1. Press function key Restore Transp.<br />
2. Use the alphanumeric keypad to enter the administrator p<strong>as</strong>sword. Use function<br />
key Capslock to change between upper and lowerc<strong>as</strong>e letters. Press ENTER<br />
when done.<br />
63<br />
Reference
Port Rate Config - Restore Sys. Conf.<br />
This page is intentionally empty<br />
64
Appendix<br />
Alarm Messages<br />
Alarm Messages<br />
The alarm messages that can occur in a <strong>R4</strong> <strong>AIS</strong> <strong>Cl<strong>as</strong>s</strong> A <strong>Transponder</strong> System are listed<br />
below.<br />
Table 1: <strong>AIS</strong> Alarm Messages<br />
ID Message Abbreviation<br />
(in Alarm Config)<br />
001 <strong>AIS</strong>: Tx malfunction<br />
002 <strong>AIS</strong>: Antenna VSWR exceeds limit Antenna VSWR<br />
003 <strong>AIS</strong>: Rx channel 1 malfunction Rx 1 Malfunction<br />
004 <strong>AIS</strong>: Rx channel 2 malfunction Rx 2 Malfunction<br />
005 <strong>AIS</strong>: Rx channel 70 malfunction Rx 70 Malfunction<br />
006 <strong>AIS</strong>: General failure<br />
008 <strong>AIS</strong>: <strong>R4</strong> <strong>Transponder</strong> Lost Connection to <strong>R4</strong> Display Transp. Lost Display<br />
025 <strong>AIS</strong>: External EPFS lost No external EPFS<br />
026 <strong>AIS</strong>: No sensor position in use No Sensor Position<br />
029 <strong>AIS</strong>: No valid SOG information No Valid SOG Info.<br />
030 <strong>AIS</strong>: No valid COG information No Valid COG Info.<br />
032 <strong>AIS</strong>: Heading lost/invalid<br />
035 <strong>AIS</strong>: No valid ROT information No Valid ROT Info.<br />
165 <strong>AIS</strong>: <strong>R4</strong> Display Lost Connection to <strong>R4</strong> <strong>Transponder</strong><br />
Display Lost Transp.<br />
<strong>AIS</strong> Alarms Description<br />
<strong>AIS</strong>: Tx Malfunction<br />
A Tx Malfunction alarm is generated if there is a malfunction in the radio transmitter<br />
hardware or if the antenna VSWR exceeds an allowed ratio. If the radio transmitter returns<br />
to normal operation or if VSWR returns to a value below the allowed threshold, the alarm<br />
is cleared.<br />
<strong>AIS</strong>: Antenna VSWR Exceeds limit<br />
The VSWR (Voltage Standing Wave Ratio) of the antenna is checked for every transmission<br />
and if it exceeds a given ratio then a VSWR alarm is generated. If the VSWR goes<br />
below the allowed threshold, the alarm is cleared.<br />
<strong>AIS</strong>: Rx Malfunctions<br />
The radio receivers are continuously monitored and if any part of the receivers hardware<br />
should malfunction, a Rx Malfunction alarm is generated for that receiver. If the radio<br />
receiver returns to normal operation, the alarm is cleared.<br />
65<br />
Appendix
Alarm Messages<br />
<strong>AIS</strong>: General Failure<br />
This alarm is generated if the <strong>R4</strong> <strong>AIS</strong> <strong>Transponder</strong> fails to initiate the radio. If this alarm<br />
occurs, contact your retailer.<br />
<strong>AIS</strong>: <strong>R4</strong> <strong>Transponder</strong> Lost Connection to <strong>R4</strong> Display<br />
This alarm is active if the communication between the <strong>R4</strong> <strong>AIS</strong> <strong>Transponder</strong> and the <strong>R4</strong><br />
Display does not work. The alarm indicates that the <strong>Transponder</strong> does not receive any data<br />
from the Display.<br />
<strong>AIS</strong>: <strong>R4</strong> Display Lost Connection to <strong>R4</strong> <strong>Transponder</strong><br />
This alarm is active if the communication between the <strong>R4</strong> <strong>AIS</strong> <strong>Transponder</strong> and the <strong>R4</strong><br />
Display does not work. The alarm indicates that the Display does not receive any data<br />
from the <strong>Transponder</strong>.<br />
<strong>AIS</strong>: External EPFS Lost<br />
This alarm is generated if the position from the external Electronic Position Fixing System<br />
is invalid (i.e. no external GNSS). Due to the fallback arrangement for the positioning sensor<br />
this alarm can be inactive up to 30 seconds (during which the internal GNSS is used)<br />
before the alarm is activated.<br />
<strong>AIS</strong>: No Sensor Position In Use<br />
This alarm is active if the <strong>R4</strong> <strong>AIS</strong> <strong>Transponder</strong> does not have a valid position (latitude/<br />
longitude) from any sensor.<br />
<strong>AIS</strong>: No Valid SOG Information/No Valid COG Information<br />
These alarms are active if the <strong>R4</strong> <strong>AIS</strong> <strong>Transponder</strong> does not have a valid SOG (Speed<br />
Over Ground) or a valid COG (Course Over Ground) from any sensor. The SOG and COG<br />
is b<strong>as</strong>ed on the speed log (if external GNSS is used and a valid heading is available) or the<br />
GNSS currently in use.<br />
<strong>AIS</strong>: Heading Lost/Invalid<br />
This alarm is generated if either the heading information is lost/invalid (from external<br />
sensors) or if the heading is undefined.<br />
<strong>AIS</strong>: No Valid ROT Information<br />
This alarm is active if ROT (Rate Of Turn) is undefined or if no valid ROT information<br />
is available from external sensor or internal calculations.<br />
66
Indication Messages<br />
The indication messages, with identity and type information, are listed below:<br />
ID Type Message text<br />
007 Status UTC clock lost<br />
021 Status External DGNSS in use<br />
022 Status External GNSS in use<br />
023 Status Internal DGNSS in use (beacon)<br />
024 Status Internal DGNSS in use (msg 17)<br />
025 Status Internal GNSS in use<br />
027 Status External SOG/COG in use<br />
028 Status Internal SOG/COG in use<br />
031 Status Heading valid<br />
033 Status Rate of Turn Indicator in use<br />
034 Status Other ROT source in use<br />
036 Event Channel management parameters changed<br />
053 Status SOG from external position source<br />
054 Status SOG from log sensor<br />
055 Status UTC clock OK<br />
056 Event Channel management zone memory changed<br />
061 Status Enter semaphore mode<br />
061 Event Leave semaphore mode<br />
063 Event NVM Checksum error<br />
064 Event RATDMA overflow<br />
066 Status Tanker Low VHF Power Mode<br />
Long Range Definitions<br />
A = Ship’s name, call sign, and IMO number<br />
B = Date and time of message composition<br />
C = Position<br />
E = Course over ground (COG)<br />
F = Speed over ground (SOG)<br />
I = Destination and Estimated Time of Arrival (ETA)<br />
O = Draught<br />
P = Ship/Cargo<br />
U = Ship’s length, breadth, type<br />
W = Persons on board<br />
Indication Messages<br />
67<br />
Appendix
Long Range Definitions<br />
This page is intentionally empty.<br />
68
Glossary<br />
<strong>AIS</strong>. . . . . . Automatic Identification System<br />
ARPA. . . . Automatic Radar Plotting Aid<br />
BRG . . . . . Bearing<br />
COG. . . . . Course Over Ground<br />
DGNSS . . Differential Global Navigational Satellite System<br />
DSC . . . . . Digital Selective Calling<br />
ECDIS . . . Electronic Chart Display and Information System<br />
EGNOS . . European Geostationary Navigation Overlay Service<br />
EPFS . . . . Electronic Position Fixing System<br />
ETA . . . . . Estimated Time of Arrival<br />
GNSS . . . . Global Navigational Satellite System<br />
GPS . . . . . Global Positioning System<br />
HDG. . . . . Heading<br />
HDOP. . . . Horizontal Dilution Of Precision<br />
IALA . . . . International Association of Lighthouse Authorities<br />
IEC. . . . . . International Electrotechnical Commission<br />
IMO . . . . . International Maritime Organization<br />
ITU. . . . . . International Telecommunications Union<br />
LR . . . . . . Long Range<br />
MKD . . . . Minimum Keyboard and Display<br />
MSAS. . . . MTSAT Satellite Augmentation System (Japan)<br />
NMEA . . . National Marine Electronics Association<br />
MMSI. . . . Maritime Mobile Service Identity<br />
NVM . . . . Non-Volatile Memory<br />
69<br />
Glossary
RAIM . . . Receiver Autonomous Integrity Monitoring<br />
RNG . . . . Range<br />
RATDMA Random Access Time Division Multiple Access<br />
ROT. . . . . Rate Of Turn<br />
Rx . . . . . . Receive<br />
SAR . . . . . Search And Rescue<br />
SBAS. . . . Satellite B<strong>as</strong>ed Augmentation System<br />
SNR . . . . . Signal to Noise Ratio<br />
SOG. . . . . Speed Over Ground<br />
SRM . . . . Safety Related Message<br />
TDMA . . . Time Division Multiple Access<br />
Tx . . . . . . Transmit<br />
UTC. . . . . Universal Time Coordinated<br />
VHF. . . . . Very High Frequency<br />
VSWR . . . Voltage Standing Wave Ratio. (A low value indicates a problem with the antenna<br />
or connections/cables to the antenna.)<br />
WAAS . . . Wide Area Augmentation System (United States)<br />
70
Index<br />
Numerics<br />
1W Mode 15, 34<br />
A<br />
Alarm 18, 65<br />
Alarm Configuration 57<br />
Alarm List 18, 37<br />
Alarm Messages 65<br />
Alarms And Messages mode 35<br />
Alerts 9, 24<br />
Alphanumeric Keys 7<br />
B<br />
Built-in integrity tests 61<br />
C<br />
Cargo 34<br />
Change Settings 8<br />
<strong>Cl<strong>as</strong>s</strong> B targets 6, 22, 30, 31, 38<br />
Config mode 45<br />
D<br />
Destination 34<br />
Display (Key) 7<br />
Display Configuration 48<br />
Draught 34<br />
E<br />
Enter (Key) 7<br />
Esc (Key) 7<br />
ETA 34<br />
Event Mark 24<br />
F<br />
Front Panel 7<br />
Function Keys 8<br />
G<br />
GNSS Antenn<strong>as</strong> 51<br />
I<br />
Icon Description 22<br />
L<br />
LEDs, <strong>R4</strong> Display 21<br />
Long Range Definitions 67<br />
71<br />
Index
M<br />
Main Features 6<br />
Memory usage 62<br />
Message Symbols 22<br />
MOB (Key) 7<br />
Mode (Key) 7<br />
N<br />
Navigate mode 27<br />
Navigation Configuration 47<br />
Navigational Status 15, 22<br />
P<br />
Page (Key) 7<br />
Persons on board 30, 34, 53<br />
Plot 30<br />
Port Rate Configuration 59<br />
Power (Key) 7<br />
R<br />
<strong>R4</strong> Display 8<br />
Range Unit 57<br />
Remote Ship Information 13<br />
S<br />
Safety Related Messages (SRM) 16, 38<br />
Sound Configuration 49<br />
Static Data 51<br />
Status (Key) 7<br />
Status bar 12<br />
SW/HW Versions 61<br />
Symbols 22<br />
System Information 61<br />
System Modes 10, 25<br />
System Overview 5<br />
T<br />
Text Messages 16, 38, 53<br />
U<br />
Units Configuration 57<br />
V<br />
Views 8<br />
Visual Configuration 19, 48<br />
Voyage 34<br />
Voyage Related Information 15<br />
72