
Create successful ePaper yourself
Turn your PDF publications into a flip-book with our unique Google optimized e-Paper software.
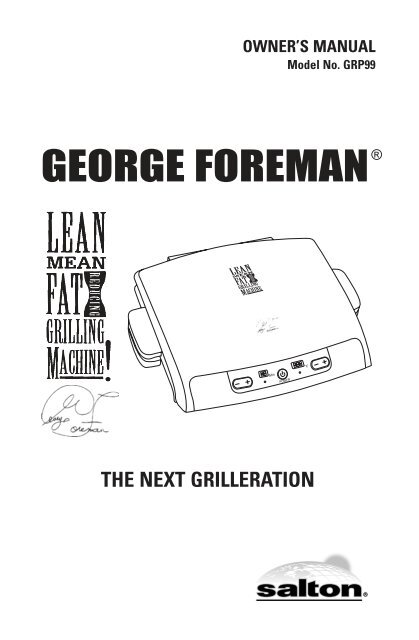
OWNER’S MANUAL<br />
Model No. GRP99<br />
<strong>GEORGE</strong> <strong>FOREMAN</strong><br />
THE NEXT GRILLERATION<br />
®
IMPORTANT SAFEGUARDS<br />
When using electrical appliances, basic safety precautions should<br />
always be followed, including the following:<br />
1. Read all instructions.<br />
2. Do not touch hot surfaces. Use handles or knobs. Use oven mitts or<br />
pot holders.<br />
3. To protect against electric shock, do not immerse cord, plug, or<br />
appliance in water or other liquid.<br />
4. Close supervision is necessary when any appliance is used by or<br />
near children.<br />
5. Unplug from outlet when not in use and before cleaning. Allow to<br />
cool before putting on or taking off parts, and before cleaning the<br />
appliance.<br />
6. Do not operate any appliance with a damaged cord or plug or after<br />
the appliance malfunctions, or has been damaged in any manner.<br />
Contact Consumer Service for examination, repair or adjustment.<br />
7. The use of accessory attachments not recommended by the appliance<br />
manufacturer may cause injuries.<br />
8. Do not use outdoors.<br />
9. Do not let cord hang over edge of table or counter, or touch hot surfaces.<br />
10. Do not place on or near a hot gas or electric burner, or in a heated<br />
oven.<br />
11. Extreme caution must be used when moving an appliance containing<br />
hot oil or other hot liquids. Allow liquid to cool before removing and<br />
emptying drip tray.<br />
12. To disconnect, press Power On/Off Button to OFF, grasp plug and<br />
remove from wall outlet.<br />
13. Do not use appliance for other than intended use.<br />
SAVE THESE INSTRUCTIONS<br />
THIS APPLIANCE IS FOR HOUSEHOLD USE ONLY<br />
2
ADDITIONAL IMPORTANT<br />
SAFEGUARDS<br />
CAUTION HOT SURFACES: This appliance generates heat and escaping<br />
steam during use. Proper precautions must be taken to prevent the<br />
risk of burns, fires or other injury to persons or damage to property.<br />
CAUTION: This appliance is hot during operation and retains heat for<br />
some time after turning off. Always use oven mitts when handling hot<br />
materials and allow metal parts to cool before cleaning. Do not place<br />
anything on top of the appliance while it is operating or while it is hot.<br />
1. All users of this appliance must read and understand this Owner's<br />
Manual before operating or cleaning this appliance.<br />
2. The cord to this appliance should be plugged into a 120V AC electrical<br />
outlet only.<br />
3. If this appliance begins to malfunction during use, immediately<br />
unplug cord from outlet. Do not use or attempt to repair the malfunctioning<br />
appliance.<br />
4. Do not leave this appliance unattended during use.<br />
5. When using this appliance, provide adequate air space above and on<br />
all sides for air circulation. Do not allow this appliance to touch curtains,<br />
wall coverings, clothing, dish towels or other flammable materials<br />
during use.<br />
6. This appliance generates steam — do not operate in open position.<br />
7. Using pot holder, hold the top cover (Lid) open while placing or<br />
removing food on the cooking surface to prevent accidental closing<br />
and injury.<br />
3
Polarized Plug<br />
This appliance has a polarized plug (one blade is wider than the other).<br />
To reduce the risk of electric shock, this plug is intended to fit into a<br />
polarized outlet only one way. If the plug does not fit fully in the outlet,<br />
reverse the plug. If it still does not fit, contact a qualified electrician. Do<br />
not attempt to modify the plug in any way.<br />
Short Cord Instructions<br />
A short power-supply cord is provided to reduce the risk resulting from<br />
becoming entangled in or tripping over a longer cord.<br />
Do not use an extension cord with this product.<br />
Electric Power<br />
If the electrical circuit is overloaded with other appliances, your appliance<br />
may not operate properly. It should be operated on a separate<br />
electrical circuit from other appliances.<br />
Plasticizer Warning<br />
CAUTION: To prevent Plasticizers from migrating from the finish of the<br />
countertop or tabletop or other furniture, place NON-PLASTIC coasters<br />
or placemats between the appliance and the finish of the countertop or<br />
tabletop.<br />
Failure to do so may cause the finish to darken, permanent blemishes<br />
may occur or stains can appear.<br />
4
3<br />
1<br />
4<br />
2<br />
7<br />
Getting To Know Your GRP99<br />
Grilling Machine<br />
RELEASE<br />
RELEASE<br />
1. Grilling Machine Body<br />
2. Grilling Plate Release Handles,<br />
Lower<br />
3. Grilling Plates<br />
Upper Grilling Plate (P/N 22543U)<br />
Lower Grilling Plate (P/N 22543L)<br />
4. Grilling Plate Release Handles,<br />
Upper<br />
5. Cord<br />
6. Drip Tray (P/N 22544)<br />
5<br />
12<br />
13<br />
11<br />
RELEASE<br />
RELEASE<br />
10 9<br />
Controls<br />
14<br />
7. Plastic Spatula (P/N 22545)<br />
8. Variable Temperature Control<br />
Button<br />
9. Temperature Display (LED)<br />
10. Power On/Off Button<br />
11. Timer Display (LED)<br />
12. Timer Control Button<br />
13. Timer Light<br />
14. Temperature Light<br />
4<br />
2<br />
8<br />
6<br />
5
How To Use George Foreman’s Lean Mean<br />
Fat Reducing Grilling Machine<br />
1. Before using the Grilling Machine for the first time, wipe the Grilling Plates with a<br />
damp cloth to remove all dust.and make sure both Grilling Plates are firmly<br />
attached to the appliance.<br />
2. To preheat: Close the Lid and plug the cord into a 120V AC outlet. Time and<br />
Temperature Displays will show dashes, indicating that the appliance is in the off<br />
mode. Press the Power On/Off Button to turn the unit on. The Timer and<br />
Temperature Light will illuminate. The Timer Display will show "5", indicating the<br />
start of the 5 minute (300°F) pre-heat countdown and the Temperature Display will<br />
show a flashing "300". Adjusting the Variable Temperature Control allows you to<br />
cook your food at a specific heat setting, 300˚ - 425˚F, in 25˚ increments. Adjust<br />
the temperature to your desired setting. Press the Temperature "+" Button to<br />
increase the temperature. To decrease the temperature press the Temperature "-"<br />
Button. See Suggested Cooking Chart for specific details. When the countdown<br />
is complete the unit will beep 4 times. Note: If temperature reaches displayed<br />
temperature before 5 minutes the temperature display will stop flashing and the<br />
unit will beep 4 times. Unless the time is reset, the unit will continue its 5 minute<br />
countdown and will beep 4 times once it reaches 5 minutes. The Timer Display<br />
will show "on" as a reminder that the power is still on and the Timer Light will go<br />
out. If the Temperature Display is still flashing the set temperature has not yet<br />
been reached. When the set temperature is reached the unit will beep 4 times<br />
and the display will stop flashing.<br />
3. Use a pot holder to carefully open the Lid.<br />
4. Slide the grease catching Drip Tray under the front of the unit.<br />
5. Carefully place the items to be cooked on the bottom grilling plate.<br />
6. Close the Lid and press the Timer "+" Button to raise the grilling time in 1 minute<br />
increments, up to a maximum of 20 minutes. To reduce time, press the Timer "-"<br />
Button. The Timer Display will show the set time.<br />
7. Allow the food to cook for the desired time. Do not leave appliance unattended<br />
during use! During grilling, the Timer Display will begin counting down. When the<br />
set time has elapsed the unit will beep 4 times. Reminder: The heat continues to<br />
be "on" until the appliance is turned off.<br />
Note: The Grilling Machine will automatically shut-off one hour after you have<br />
turned it on. To continue cooking, press the ON/OFF Button and reset the temperature<br />
and time.<br />
8. After the desired amount of time, the food should be done.<br />
9. Press the Power On/Off Button to turn the appliance off. The Time and<br />
Temperature Displays will show dashes. Disconnect the plug from the wall outlet.<br />
CAUTION: To avoid any sparks at the outlet while disconnecting plug, make sure the<br />
power is off (Timer and Temperature Displays show dashes) before disconnecting<br />
the plug from the outlet.<br />
10. Use a pot holder to carefully open the Lid.<br />
11. Remove the food using the Plastic Spatula provided. Be sure to always use either<br />
plastic or wooden utensils so as not to scratch the non-stick surface. Never use<br />
metal tongs, forks or knives as these can damage the coating on the grilling plates.<br />
12. When cool, the Drip Tray may be removed and emptied. Be sure the liquid has<br />
cooled before removing Drip Tray.<br />
6
Suggested Cooking Chart<br />
The following times are meant to be used as guidelines only. Times will vary due to the cut or thickness<br />
of the meat being cooked. To be sure that the food is truly done, use a cooking thermometer. If<br />
the food does need more time to cook, reset the timer and check periodically so you do not overcook.<br />
When cooking the following items, we recommend setting your Grilling Machine to 300˚F:<br />
Medium Rare 145˚F* Medium 160˚F* Well 170˚F*<br />
Salmon Filet, 1" thick, 4 oz each 7-8 min. 9-10 min.<br />
Salmon Steak, 1" thick, 10 oz each 8-9 min. 11-12 min.<br />
Sword Fish, 1" thick, 6 oz each 8-9 min. 10-11 min.<br />
Tuna Steak, 1" thick, 6 oz each 6-7 min. 8-9 min.<br />
White Fish, 1/2" thick, 6 oz each 2-3 min. 4-5 min.<br />
Turkey Burger, 3/4" thick, 4 oz each 8-10 min.<br />
Turkey Burger, 1" thick, 8 oz each 11-13 min.<br />
Frozen Turkey Burgers, 3/4" thick, 4 oz each 11-13 min.<br />
Frozen Turkey Burgers, 1" thick, 8 oz each 14-16 min.<br />
Sea Scallops, 1" thick, 1 oz each 3-4 min. 4-5 min.<br />
Shrimp, Split Shell, med. size, 1/2 lb. 2-3 min.<br />
When cooking the following items, we recommend setting your Grilling Machine to 350˚F:<br />
Center Cut Pork Chops, 1/2" thick, 6 oz each 8-9 min. 10-11 min.<br />
Pork Tenderloin, 1/2" thick, 2 oz each 3 min. 5-6 min.<br />
Hamburger, 3/4" thick, 4 oz each 7-8 min. 9-10 min.<br />
Hamburger, 1" thick, 8 oz each 9-10 min. 11-12 min.<br />
Frozen Hamburger, 3/4" thick, 4 oz each 9-10 min. 11-12 min.<br />
Frozen Hamburger, 1" thick, 8 oz each 15-16 min. 17-18 min.<br />
Chicken Breast (boneless/skinless)11 /2" thick, 6-8 oz each 9-10 min.<br />
Frozen Chicken Breast (boneless/skinless) 11 /2" thick, 6-8 oz each 12-13 min.<br />
Link Sausage 4-5 min. 5-6 min.<br />
Sliced Sausage (1/2" thick) 4-5 min. 5-6 min.<br />
Brats 5-6 min. 6-7 min.<br />
Hot Dogs 5-6 min.<br />
Ham Steak, 3/4" thick, 4 oz each 4-5 min. 5-6 min.<br />
When cooking the following items, we recommend setting your Grilling Machine to 400˚F:<br />
Fajita Beef ( 1 /2" thick slices) 1-2 min. 2-21 /2 min. 21 /2-3min.<br />
T-Bone Steak, 3/4" thick, 12 oz each 3-4 min. 4-5 min. 5-6 min.<br />
Frozen T-Bone, 3/4" thick, 16 oz each 8-9 min. 11-12 min. 13-14 min.<br />
NY/KC Strip Steak, 3/4" thick, 8 oz each 7-8 min. 8-9 min. 9-10 min.<br />
Frozen NY/KC Strip Steak, 3/4" thick, 8 oz each 7-8 min. 8-9 min. 9-10 min.<br />
Ribeye Steak, 3/4" thick, 12 oz each 5-6 min. 61 /2-71 /2 min. 8-9 min.<br />
Frozen Ribeye Steak, 3/4" thick, 10 oz each 9-101 /2 min. 10-111 /2 min. 11-121 /2 min.<br />
Onions and Peppers (brush with olive oil) 7-8 min. 9-10 min.<br />
PLEASE NOTE: The USDA recommends that meats such as beef and lamb, etc. should be cooked to<br />
an internal temperature of 145˚F. Pork should be cooked to an internal temperature of 160˚F and<br />
poultry products should be cooked to an internal temperature of 170˚F - 180˚F to be sure any harmful<br />
bacteria has been killed. When reheating meat/poultry products, they should also be cooked to an<br />
internal temperature of 165˚F.<br />
* Internal Food Temperatures<br />
7
User Maintenance Instructions<br />
CAUTION: To avoid accidental burns, allow your Grilling Machine to<br />
cool thoroughly before cleaning.<br />
1. Before cleaning, unplug the appliance from the wall outlet and allow<br />
to cool.<br />
CAUTION: To avoid any sparks at the outlet while disconnecting plug, make sure<br />
the power is off (Timer and Temperature Displays show dashes) before disconnecting<br />
the plug from the outlet.<br />
2. Inside cleaning: Place the Drip Tray under the front of the Grilling<br />
Machine. Using the specially designed Spatula, scrape off any<br />
excess fat and food particles. Wipe the plates with absorbent paper<br />
towel or a sponge. Run off will drip into the Drip Tray.<br />
3. Empty the Drip Tray and wash with warm soapy water. The Grilling<br />
Plates may be removed from the appliance by pulling out on the<br />
Grilling Plate Release Handles. Wash in warm, soapy water and dry<br />
thoroughly. Reinstall the Grilling Plates, making sure they are securely<br />
attached to the appliance. The removable Grilling Plates are also<br />
dishwasher safe.<br />
4. Stubborn build-up: Use a non-metallic scrubbing pad to clean the<br />
plates.<br />
5. Outside cleaning: Wipe with a warm, wet sponge and dry with a soft,<br />
dry cloth.<br />
6. Do not use steel wool, scouring pads, or abrasive cleaners on any<br />
part of the appliance.<br />
7. DO NOT IMMERSE THE BODY OF THE APPLIANCE IN WATER OR<br />
OTHER LIQUID.<br />
8. Any servicing requiring disassembly other than the above cleaning<br />
must be performed by a qualified electrician.<br />
9. Make sure to hold the top cover (Lid) by hand while cleaning to prevent<br />
accidental closing and injury.<br />
8
Question<br />
Frequently Asked Questions<br />
1. Can I cook frozen food on<br />
my George Foreman Grill?<br />
2. Can I cook kabobs on the<br />
George Foreman Grill?<br />
3. After cooking with garlic,<br />
how can I remove the smell<br />
of the garlic from the surface<br />
of my George Foreman<br />
Grill?<br />
4. How can I cook hot dogs<br />
on my George Foreman<br />
Grill?<br />
5. Can hash browns be prepared<br />
on my George<br />
Foreman Grill?<br />
6. Any other cooking suggestions?<br />
Response<br />
Yes, but of course the cooking time will be<br />
longer. And it is preferable that food be<br />
defrosted before placing on the George<br />
Foreman Grill. Please refer to the Suggested<br />
Cooking Chart in this manual for examples.<br />
Yes. In order to protect the non-stick surface<br />
use wooden skewers. We recommend that<br />
you soak the skewers first in water for about<br />
20 minutes. This will keep the skewers from<br />
burning.<br />
After cleaning your George Foreman Grill<br />
according to the "User Maintenance<br />
Instructions" make a paste of baking soda and<br />
water and spread on the surface of the Grill.<br />
Allow it to sit for a few minutes and then wipe<br />
away with a damp sponge or cloth.<br />
Preheat your Grill for 5-minutes. Place the hot<br />
dogs lengthwise on the Grill. Close the Lid and<br />
cook for 2-1/2 minutes or until desired browning<br />
is achieved.<br />
Yes, self-browning hash browns can be prepared<br />
by preheating the Grill for 5 minutes.<br />
Add hash browns onto the Grill surface, close<br />
the Lid, and cook for approximately half the<br />
time stated on the package for oven preparation.<br />
Fresh peppers can be grilled for 2-3 minutes<br />
for skinning purposes.<br />
Grilled cheese sandwiches can also be<br />
cooked on your George Foreman Grill.<br />
9
LIMITED ONE YEAR WARRANTY<br />
Warranty: This George Foreman ® product is warranted by Salton, Inc. to be free from defects in<br />
materials or workmanship for a period of (1) year from the original purchase date. This product<br />
warranty covers only the original consumer purchaser of the product.<br />
Warranty Coverage: This warranty is void if the product has been damaged by accident in shipment,<br />
unreasonable use, misuse, neglect, improper service, commercial use, repairs by unauthorized<br />
personnel, normal wear and tear, improper assembly, installation or maintenance abuse or<br />
other causes not arising out of defects in materials or workmanship. This warranty is effective only<br />
if the product is purchased and operated in the USA, and does not extend to any units which have<br />
been used in violation of written instructions furnished with the product or to units which have<br />
been altered or modified or to damage to products or parts thereof which have had the serial number<br />
removed, altered, defaced or rendered illegible.<br />
Implied Warranties: ANY IMPLIED WARRANTIES WHICH THE PURCHASER MAY HAVE ARE LIMIT-<br />
ED IN DURATION TO ONE (1) YEAR FROM THE DATE OF PURCHASE. Some states do not allow limitations<br />
on how long an implied warranty lasts, so the above limitation may not apply to you.<br />
Warranty Performance: During the above one-year warranty period, a product with a defect will be<br />
either repaired or replaced with a reconditioned comparable model (at our option) when the product<br />
is returned to the Repair Center, or the purchase price refunded. The repaired or replacement<br />
product will be in warranty for the balance of the one-year warranty period and an additional onemonth<br />
period. No charge will be made for such repair or replacement.<br />
Service and Repair: Should the appliance malfunction, you should first call toll-free 1 (800) 937-3883<br />
between the hours of 9:00 am and 5:00 pm Central Standard Time and ask for CONSUMER SERVICE<br />
stating that you are a consumer with a problem. Please refer to model number GRP99 when you<br />
call.<br />
In-Warranty Service (USA): For an appliance covered under the warranty period, no charge is<br />
made for service or postage. Call for return authorization (1 800 937-3883).<br />
Out-of Warranty Service: A flat rate charge by model is made for out-of-warranty service. Include<br />
$10.00 (U.S.) for return shipping and handling. We will notify you by mail of the amount of the<br />
charge for service and require you to pay in advance for the repair or replacement.<br />
For Products Purchased in the USA, but Used in Canada: You may return the product insured,<br />
packaged with sufficient protection, and postage and insurance prepaid to the USA address listed<br />
below. Please note that all customs duty / brokerage fees, if any, must be paid by you and we will<br />
require you to pay the cost of customs duty / brokerage fees to us in advance of our performing<br />
any service.<br />
Risk During Shipment: We cannot assume responsibility for loss or damage during incoming shipment.<br />
For your protection, carefully package the product for shipment and insure it with the carrier.<br />
Be sure to enclose the following items with your appliance: any accessories related to your problem,<br />
your full return address and daytime phone number, a note describing the problem you experienced,<br />
a copy of your sales receipt or other proof of purchase to determine warranty status. C.O.D.<br />
shipments cannot be accepted.<br />
To return the appliance, ship to: To contact us, please write to, call, or email:<br />
Attn: Repair Center Salton, Inc.<br />
Salton, Inc. P.O. Box 1526<br />
708 South Missouri Street Columbia, MO 65205-1526<br />
Macon, MO 63552 1 800 937-3883<br />
Email: Salton@Saltonusa.com<br />
Limitation of Remedies: No representative or person is authorized to assume for Salton, Inc. any<br />
other liability in connection with the sale of our products. There shall be no claims for defects or<br />
failure of performance or product failure under any theory of tort, contract or commercial law<br />
including, but not limited to negligence, gross negligence, strict liability, breach of warranty and<br />
breach of contract. Repair, replacement or refund shall be the sole remedy of the purchaser under<br />
this warranty, and in no event shall Salton be liable for any incidental or consequential damages,<br />
losses or expenses. Some states do not allow the exclusion or limitation of incidental or consequential<br />
damages, so the above limitation or exclusion may not apply to you.<br />
Legal Rights: This warranty gives you specific legal rights, and you may also have other rights<br />
which vary from state to state.<br />
George Foreman ® is a registered trademark of Salton, Inc.<br />
For more information on Salton products: Visit our website: www.eSalton.com<br />
“© 2004 Salton, Inc. P/N 61512<br />
All Rights Reserved” Printed in China